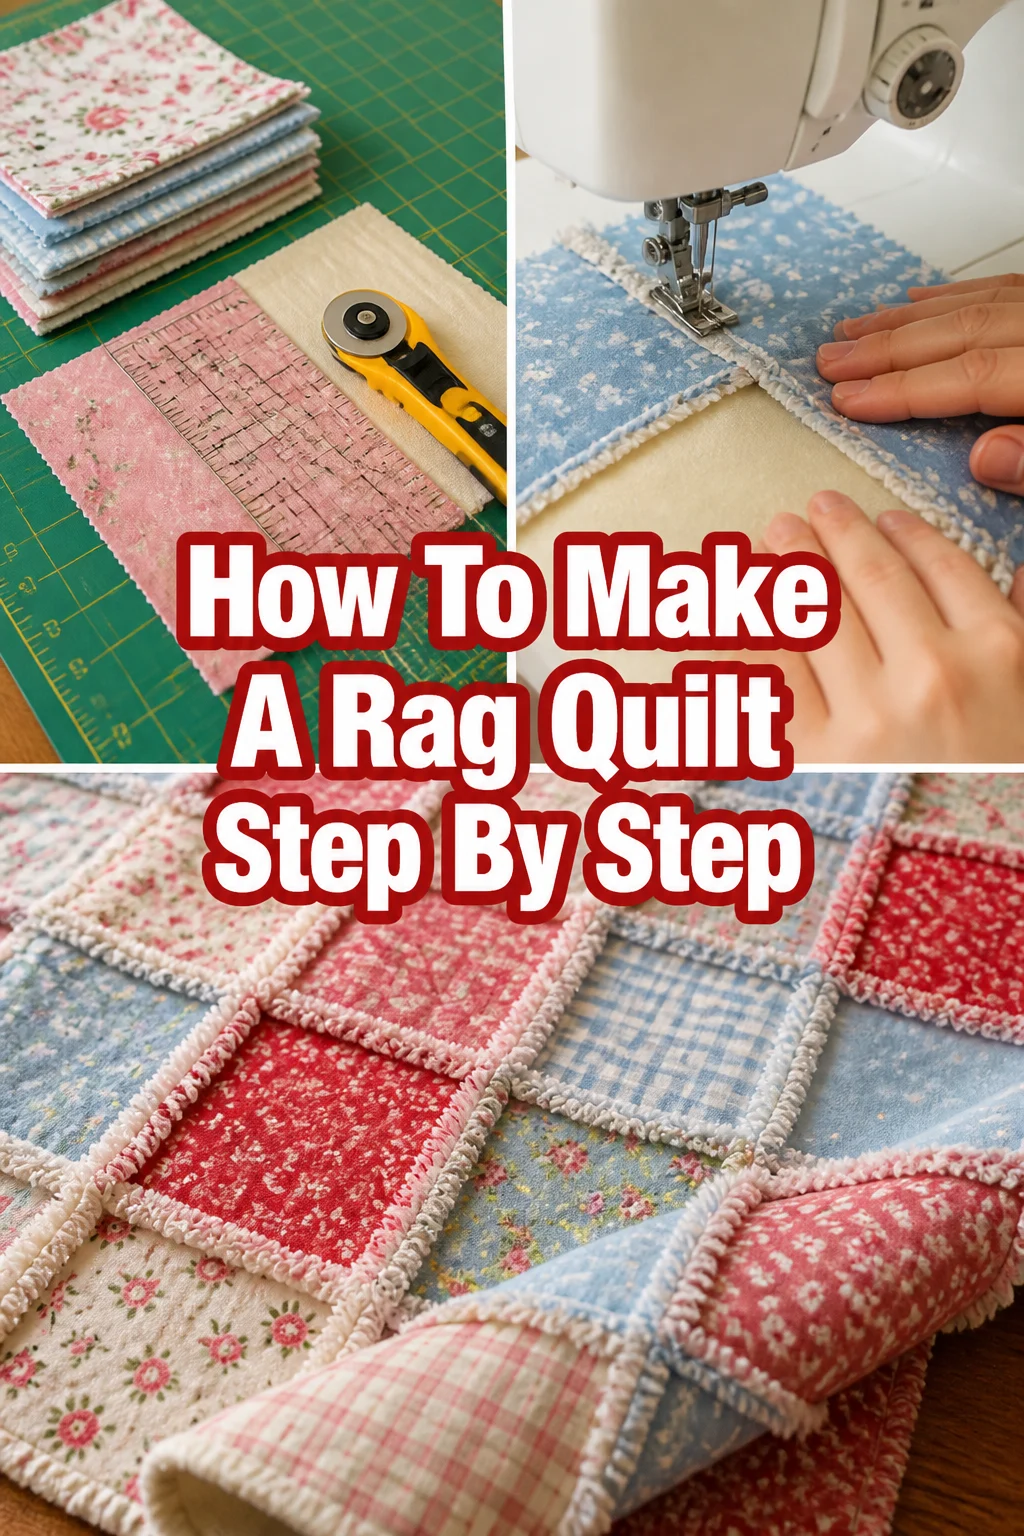
How To Make A Rag Quilt Step By Step

Beginner-friendly templates, step-by-step guides,
and weekly project ideas in your inbox.
There’s something incredibly comforting about a handmade quilt. A rag quilt, with its soft, frayed edges, offers a unique charm and is surprisingly simple to create. I’ve made several of these for gifts and they always become cherished items.
This guide will walk you through every step, ensuring your first rag quilt is a cozy success. You’ll gain the confidence to craft a beautiful, tactile masterpiece perfect for snuggling.

Quick Overview
Making a rag quilt is a rewarding project that results in a wonderfully textured, warm blanket. You’ll learn how to cut, layer, stitch, and finish your quilt to achieve those signature fluffy seams.
- Time needed: 10-20 hours (depending on quilt size and experience)
- Difficulty: Beginner
- What you’ll need: Fabric (flannel recommended), batting, thread, scissors/rotary cutter, ruler, cutting mat, sewing machine, fabric clips.
Step-by-Step Instructions
Step 1: Gather and Prepare Your Materials
The foundation of any great rag quilt is your fabric choice. Flannel is highly recommended because it frays beautifully, creating that signature “rag” look. You can mix and match prints and solids.
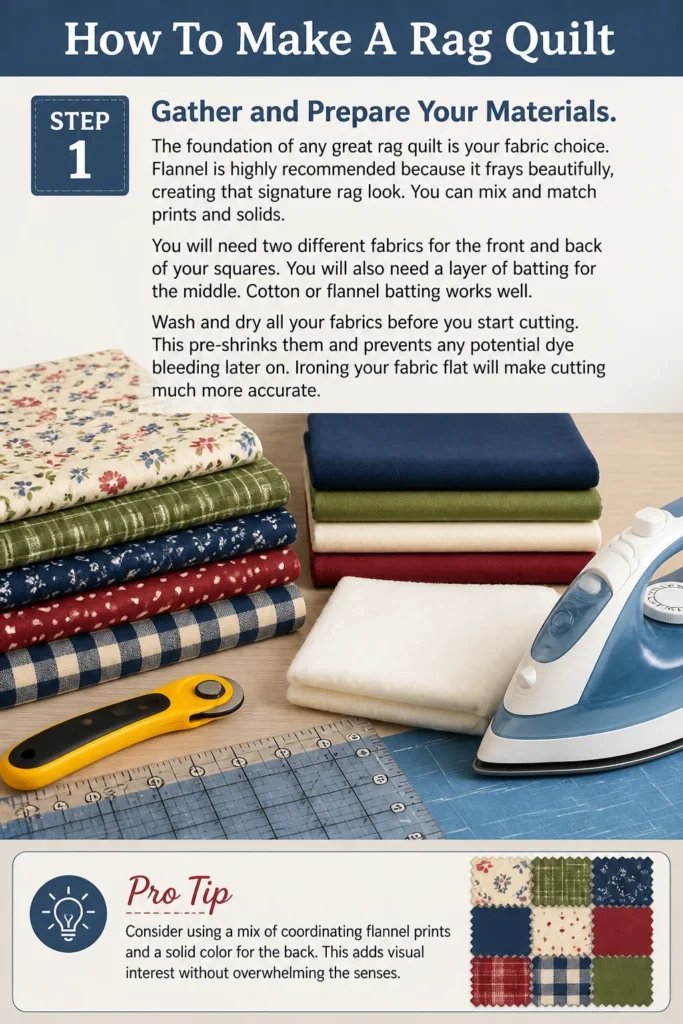
You will need two different fabrics for the front and back of your squares. You will also need a layer of batting for the middle. Cotton or flannel batting works well.
Wash and dry all your fabrics before you start cutting. This pre-shrinks them and prevents any potential dye bleeding later on. Ironing your fabric flat will make cutting much more accurate.
Pro Tip: Consider using a mix of coordinating flannel prints and a solid color for the back. This adds visual interest without overwhelming the senses.
Step 2: Cut Your Fabric Squares
Decide on the finished size of your quilt. A common square size for rag quilts is 8 inches by 8 inches. This size allows for comfortable handling and good seam allowances.
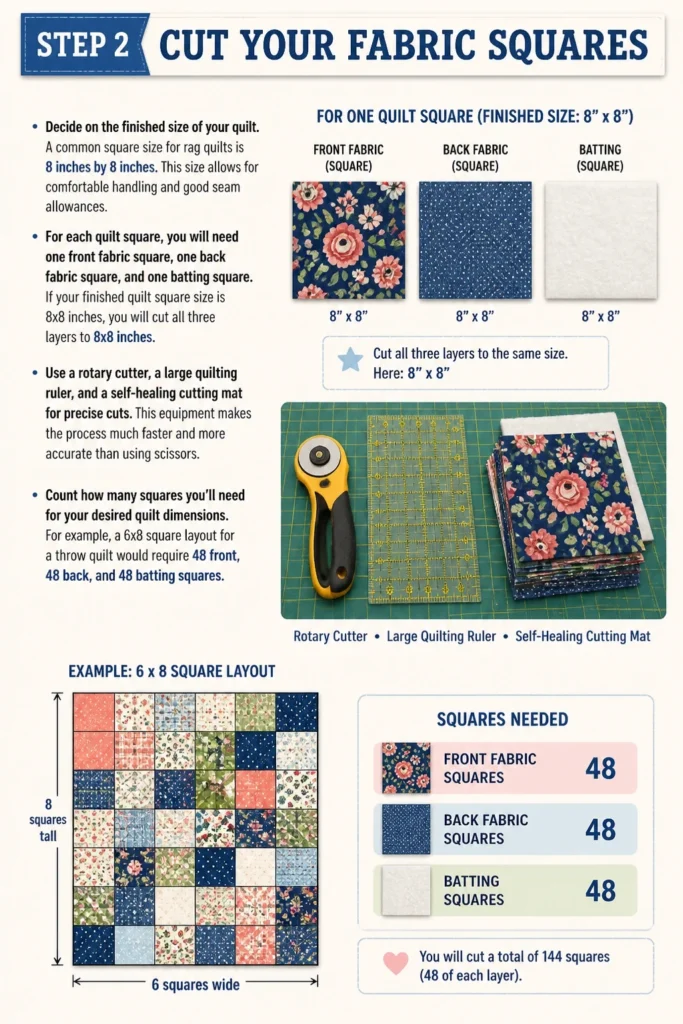
For each quilt square, you will need one front fabric square, one back fabric square, and one batting square. If your finished quilt square size is 8×8 inches, you will cut all three layers to 8×8 inches.
Use a rotary cutter, a large quilting ruler, and a self-healing cutting mat for precise cuts. This equipment makes the process much faster and more accurate than using scissors.
Count how many squares you’ll need for your desired quilt dimensions. For example, a 6×8 square layout for a throw quilt would require 48 front, 48 back, and 48 batting squares.
Step 3: Layer and Pin Your Squares
Now it’s time to assemble your individual quilt blocks. Take one back fabric square and lay it flat with the right side facing down. Place one batting square directly on top of the back fabric.
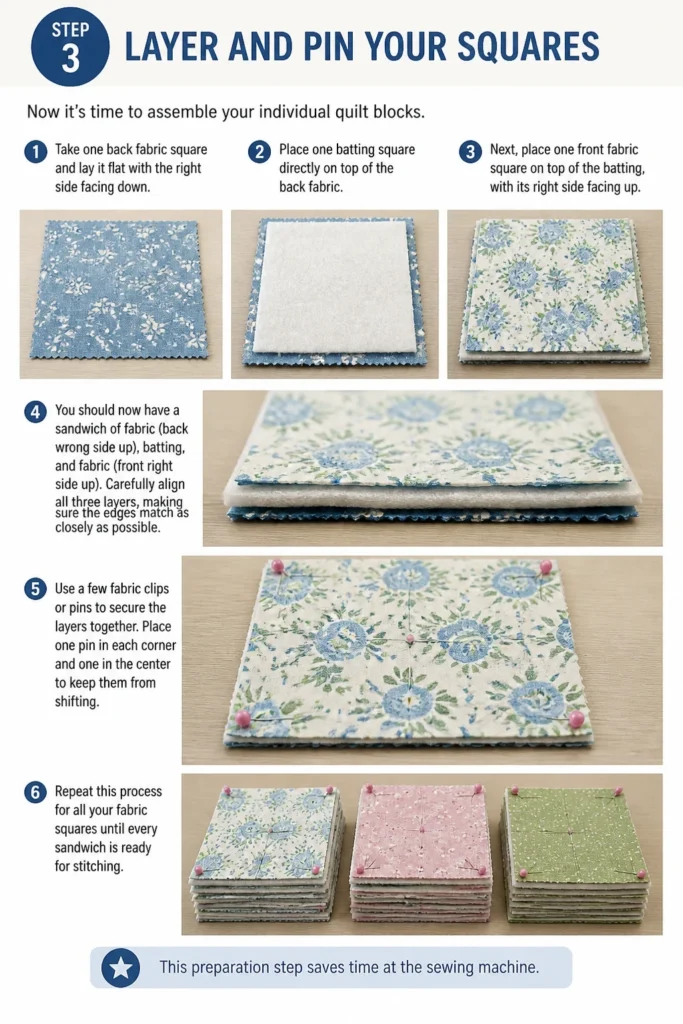
Next, place one front fabric square on top of the batting, with its right side facing up. You should now have a “sandwich” of fabric (back wrong side up), batting, and fabric (front right side up).
Carefully align all three layers, making sure the edges match as closely as possible. Use a few fabric clips or pins to secure the layers together. Place one pin in each corner and one in the center to keep them from shifting.
Repeat this process for all your fabric squares until every “sandwich” is ready for stitching. This preparation step saves time at the sewing machine.
Step 4: Stitch Your Quilt Blocks
With your sewing machine, stitch an “X” pattern across each layered square. Start from one corner and sew diagonally to the opposite corner. Then, sew from the other two corners diagonally across the square.
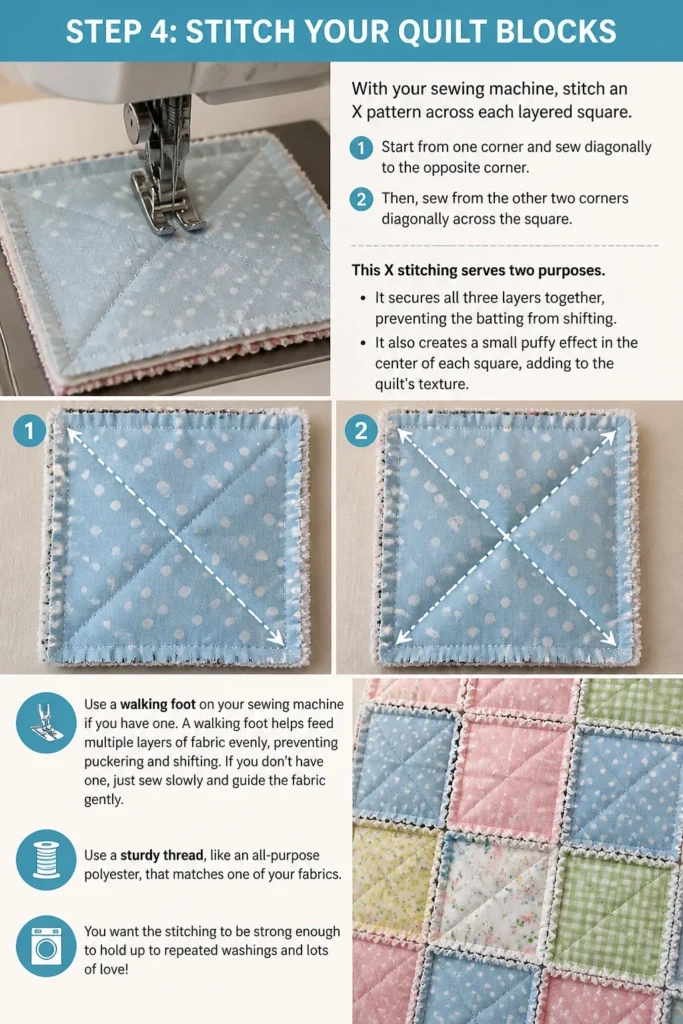
This “X” stitching serves two purposes. It secures all three layers together, preventing the batting from shifting. It also creates a small puffy effect in the center of each square, adding to the quilt’s texture.
Use a walking foot on your sewing machine if you have one. A walking foot helps feed multiple layers of fabric evenly, preventing puckering and shifting. If you don’t have one, just sew slowly and guide the fabric gently.
Use a sturdy thread, like an all-purpose polyester, that matches one of your fabrics. You want the stitching to be strong enough to hold up to repeated washing and fraying.
Step 5: Assemble Your Quilt Rows
Now you’ll start joining your individual blocks into rows. Take two finished squares and place them together with the back (wrong) sides facing each other. This is different from traditional quilting where right sides face.
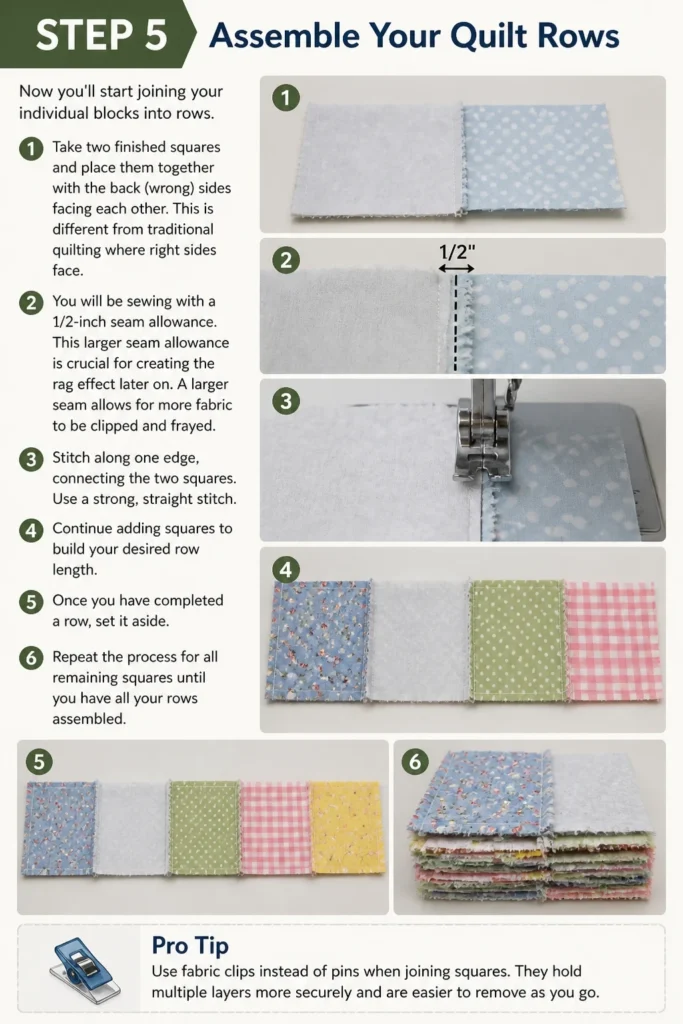
You will be sewing with a 1/2-inch seam allowance. This larger seam allowance is crucial for creating the “rag” effect later on. A larger seam allows for more fabric to be clipped and frayed.
Stitch along one edge, connecting the two squares. Use a strong, straight stitch. Continue adding squares to build your desired row length.
Once you have completed a row, set it aside. Repeat the process for all remaining squares until you have all your rows assembled.
Pro Tip: Use fabric clips instead of pins when joining squares. They hold multiple layers more securely and are easier to remove as you sew.
Step 6: Join Your Quilt Rows
With all your rows constructed, it’s time to connect them to form the full quilt top. Take two completed rows and place them together, again with the back (wrong) sides facing each other.
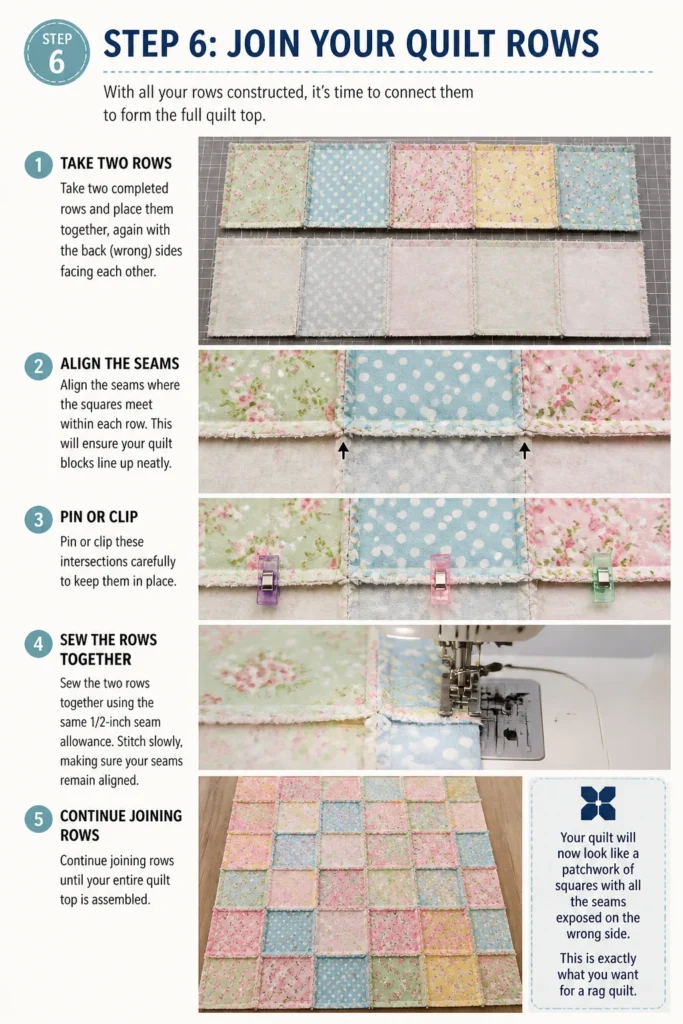
Align the seams where the squares meet within each row. This will ensure your quilt blocks line up neatly. Pin or clip these intersections carefully to keep them in place.
Sew the two rows together using the same 1/2-inch seam allowance. Stitch slowly, making sure your seams remain aligned. Continue joining rows until your entire quilt top is assembled.
Your quilt will now look like a patchwork of squares with all the seams exposed on the “wrong” side. This is exactly what you want for a rag quilt.
Step 7: Clip All the Seams
This is the most satisfying step and where the “rag” magic happens! Using a sharp pair of fabric scissors, carefully clip into all the exposed seam allowances.
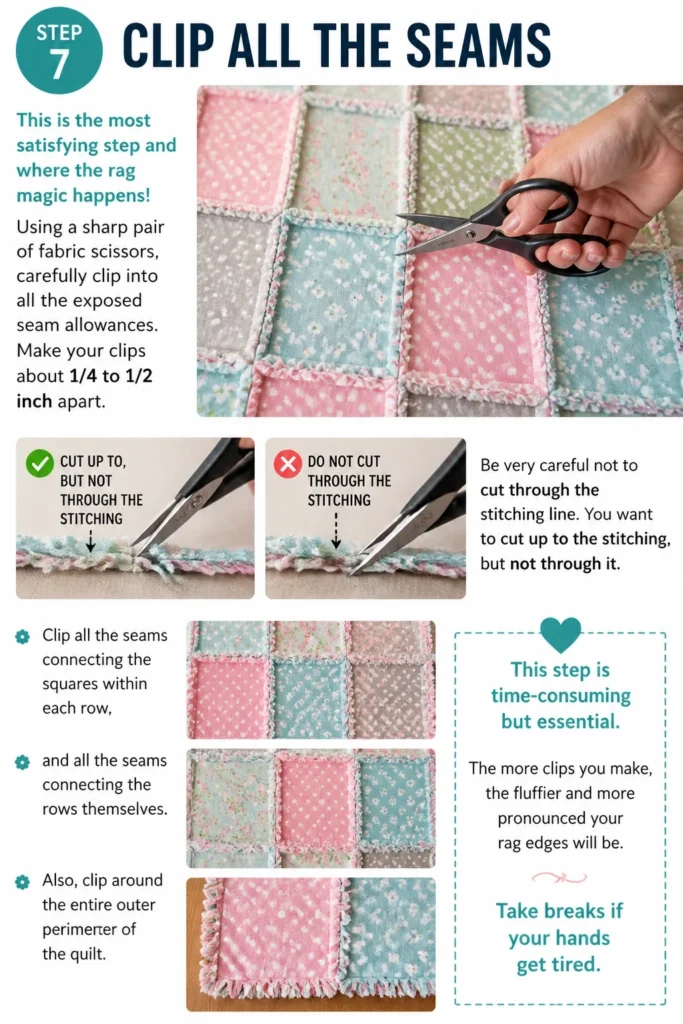
Make your clips about 1/4 to 1/2 inch apart. Be very careful not to cut through the stitching line. You want to cut up to the stitching, but not through it.
Clip all the seams connecting the squares within each row, and all the seams connecting the rows themselves. Also, clip around the entire outer perimeter of the quilt.
This step is time-consuming but essential. The more clips you make, the fluffier and more pronounced your rag edges will be. Take breaks if your hands get tired.
Step 8: Wash and Dry Your Quilt
Once all the seams are clipped, your quilt is ready for its transformation. Place the quilt into your washing machine. Add a small amount of laundry detergent.
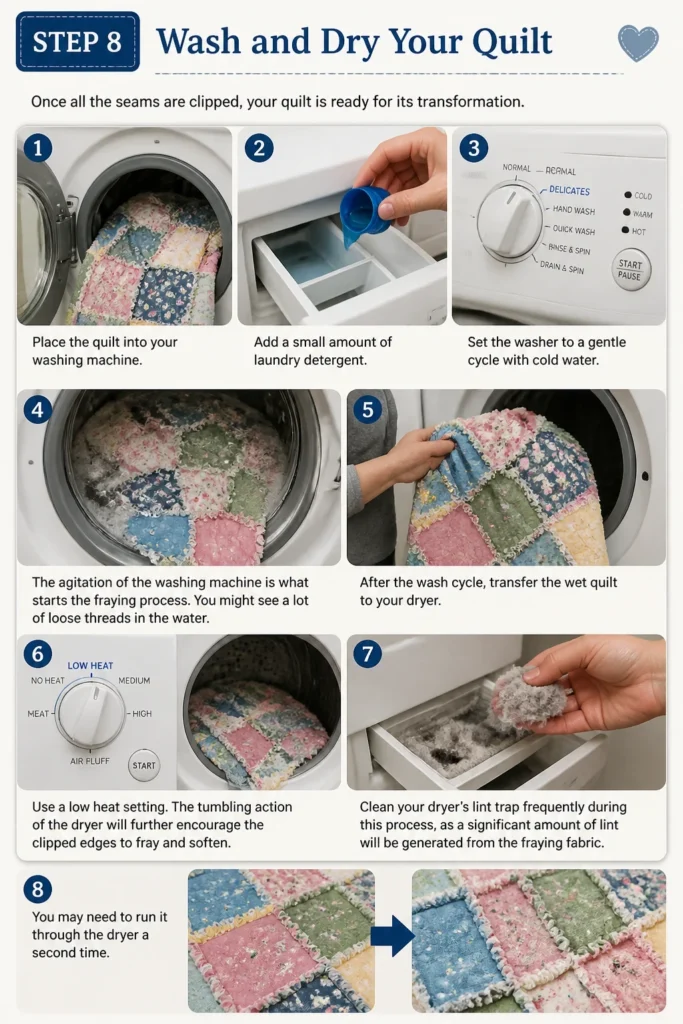
Set the washer to a gentle cycle with cold water. The agitation of the washing machine is what starts the fraying process. You might see a lot of loose threads in the water.
After the wash cycle, transfer the wet quilt to your dryer. Use a low heat setting. The tumbling action of the dryer will further encourage the clipped edges to fray and soften.
Clean your dryer’s lint trap frequently during this process, as a significant amount of lint will be generated from the fraying fabric. You may need to run it through the dryer a second time.
Step 9: Enjoy Your Rag Quilt
Once dry, shake out your quilt and admire the beautiful, soft, frayed edges. The flannel will have bloomed, creating a wonderfully textured and cozy blanket.
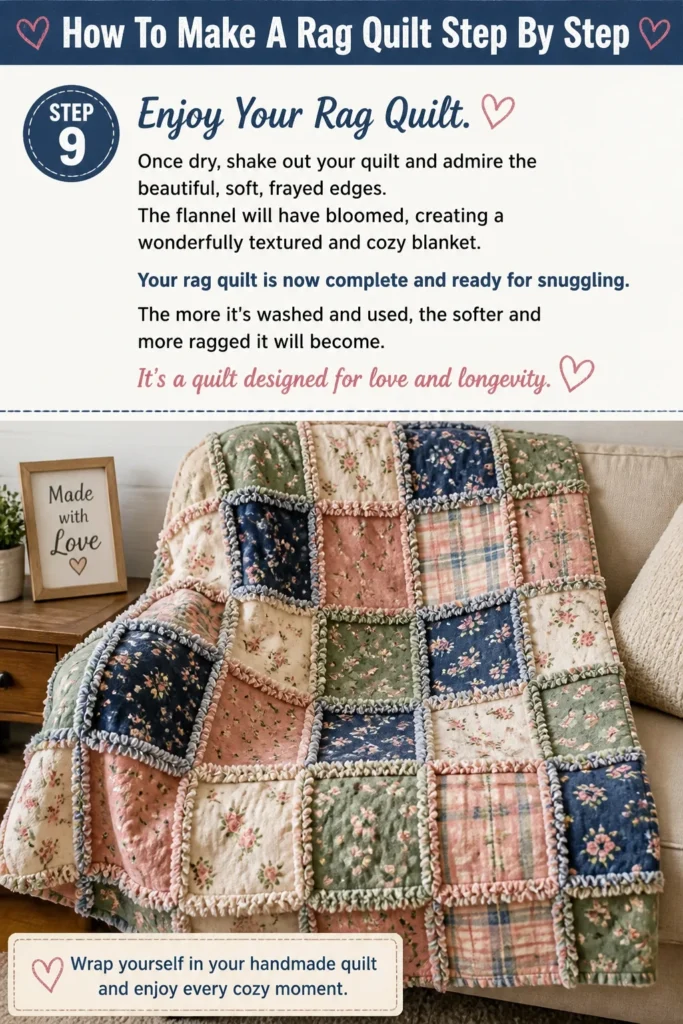
Your rag quilt is now complete and ready for snuggling. The more it’s washed and used, the softer and more “ragged” it will become. It’s a quilt designed for love and longevity.
Common Mistakes to Avoid
Not Pre-Washing Fabric
Skipping the pre-wash step can lead to problems down the line. Fabrics can shrink at different rates, causing your quilt to pucker unevenly after its first wash. Dyes can also bleed onto lighter fabrics if not pre-washed, ruining your finished project. Always wash and dry all your fabric before cutting.
Cutting Uneven Squares
Inconsistent square sizes will make it difficult to align your blocks and rows. This can result in crooked seams or a quilt that doesn’t lie flat. Invest in a good rotary cutter, ruler, and mat, and take your time to ensure all your cuts are precise and square.
Sewing with Too Small a Seam Allowance
A traditional quilting seam allowance is 1/4 inch, but for a rag quilt, you need a larger one, typically 1/2 inch. A smaller seam allowance won’t leave enough fabric to clip and fray effectively, resulting in sparse or barely noticeable “rags.” Stick to the 1/2-inch allowance for optimal fraying.
Cutting Through the Stitching Line
When clipping your seams, it’s easy to get carried away and snip a stitch. If you cut through the seam line, your quilt can start to fall apart, especially after washing. Always clip up to the stitching, but never through it. Use sharp, pointed scissors and go slowly.
Troubleshooting
My Seams Aren’t Fraying Enough
If your quilt’s edges aren’t as fluffy as you’d hoped, it’s likely due to insufficient clipping or the wrong fabric. Ensure you clipped all seams, including the perimeter, and that your clips were close enough together (about 1/4 to 1/2 inch apart). Also, flannel frays best; other cottons might not “rag” as much. Try re-washing and drying the quilt, or even adding a tennis ball to the dryer for extra agitation.
My Quilt is Puckering or Uneven
Puckering often occurs when fabric layers shift during sewing or if squares were cut inconsistently. Make sure to pin or clip your layers well before stitching the “X” on each block. When joining blocks and rows, align them carefully and use a walking foot if possible. If the issue is severe, you might need to unpick and re-sew problematic sections, paying close attention to alignment and even pressure.
My Sewing Machine is Struggling with Layers
Sewing through multiple layers of fabric and batting can be tough on a standard machine. First, check that you’re using a fresh, sharp needle, preferably a denim or quilting needle. These are stronger and less likely to break. Increase your stitch length slightly to reduce strain on the motor. Also, ensure your thread is good quality and not snagging. A walking foot is incredibly helpful for feeding thick layers smoothly.
Key Takeaways
- Pre-wash all your fabrics to prevent shrinking and dye bleeding.
- Cut all your squares precisely using a rotary cutter, ruler, and mat.
- Use a 1/2-inch seam allowance for all construction seams to allow for generous fraying.
- Clip all exposed seams thoroughly and carefully, avoiding the stitching line.
- The washing and drying process is crucial for activating the “rag” effect.
- Flannel is the ideal fabric choice for achieving the best frayed texture.
Frequently Asked Questions
What kind of fabric is best for a rag quilt?
Flannel is hands down the best fabric for rag quilts. Its loosely woven nature frays beautifully and creates a soft, plush texture after washing. You can also use other 100% cotton fabrics, but they might not fray as dramatically as flannel.
Can I use different sized squares in one rag quilt?
While you can technically use different sized squares, it makes the assembly process much more complicated. It’s highly recommended for beginners to stick to one consistent square size throughout the entire quilt. This simplifies cutting, layering, and joining.
Do I need to bind a rag quilt?
No, one of the wonderful things about rag quilts is that you don’t need traditional binding. The clipped and frayed seams around the outer perimeter of the quilt create a soft, finished edge, eliminating the need for a separate binding step.
How do I clean a rag quilt?
Rag quilts are very durable and easy to clean. Simply machine wash them on a gentle cycle with cold water and tumble dry on a low heat setting. You may need to clean your dryer’s lint trap more often, especially after the first few washes, due to the fraying.
Our Top Recommended Finds
- Rotary Cutter & Mat Set: Essential for quick, precise fabric cuts, saving immense time and effort.
- Quilting Ruler: A 6×24 inch clear acrylic ruler provides accuracy for all your square and strip cutting.
- Fabric Clips: These hold multiple layers of fabric more securely than pins, especially with bulkier projects like rag quilts.
Your Next Cozy Creation Awaits
Crafting a rag quilt is a journey of creativity and comfort. You now have all the tools and knowledge to embark on your own rag quilt adventure. Imagine the joy of snuggling under a blanket made by your own hands, or the warmth it could bring to a loved one.
Why not pick out some beautiful flannel fabrics this week? Start with a small throw or a baby quilt to build your confidence. You’ll be amazed at what you can create.
Beginner-friendly templates, step-by-step guides,
and weekly project ideas in your inbox.