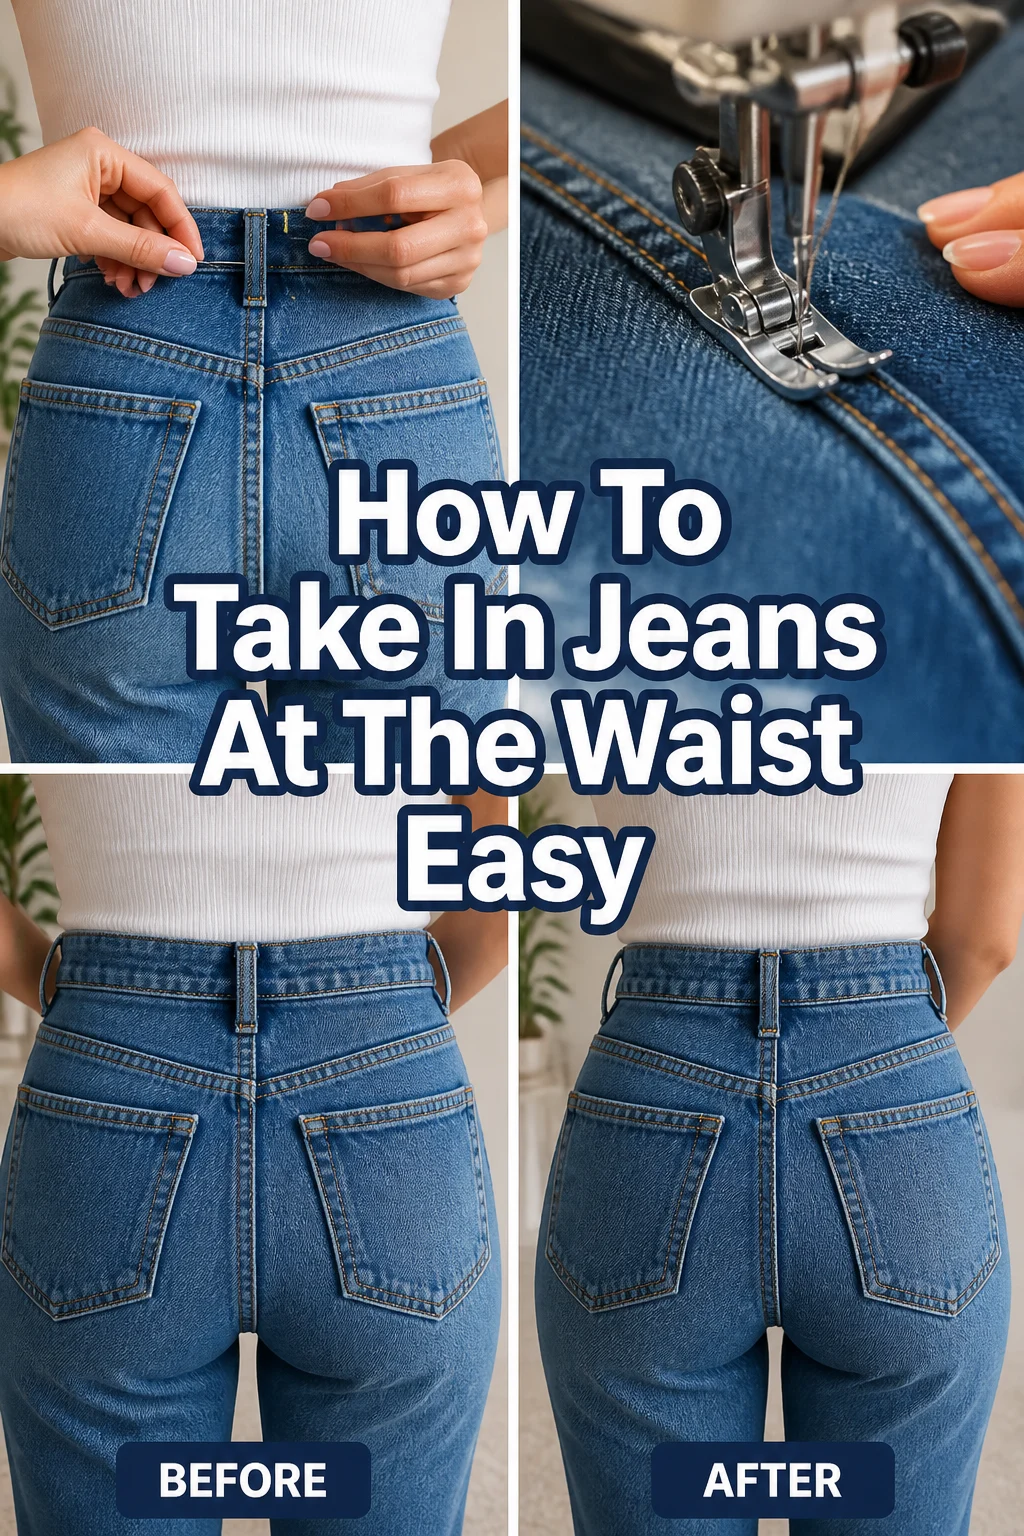
👖 How To Take In Jeans At The Waist Easy

Beginner-friendly templates, step-by-step guides,
and weekly project ideas in your inbox.
Finding jeans that fit perfectly at the waist can feel like a never-ending quest.
Often, the hips and thighs fit great, but the waistband gape awkwardly in the back.
I’ve personally struggled with this for years, and this simple alteration has been a game-changer for achieving a custom fit.

Quick Overview
This guide will walk you through transforming your ill-fitting jeans into a pair that hugs your waist just right. You’ll learn how to create a snug, comfortable fit without complex tailoring.
- Time needed: 45-90 minutes (depending on experience level)
- Difficulty: Beginner
- What you’ll need: Jeans, sewing machine (optional, hand-sewing works too), needle, thread, pins, fabric scissors, measuring tape, seam ripper, tailor’s chalk or fabric marker, iron.
Step-by-Step Instructions
Step 1: Gather Your Essential Tools
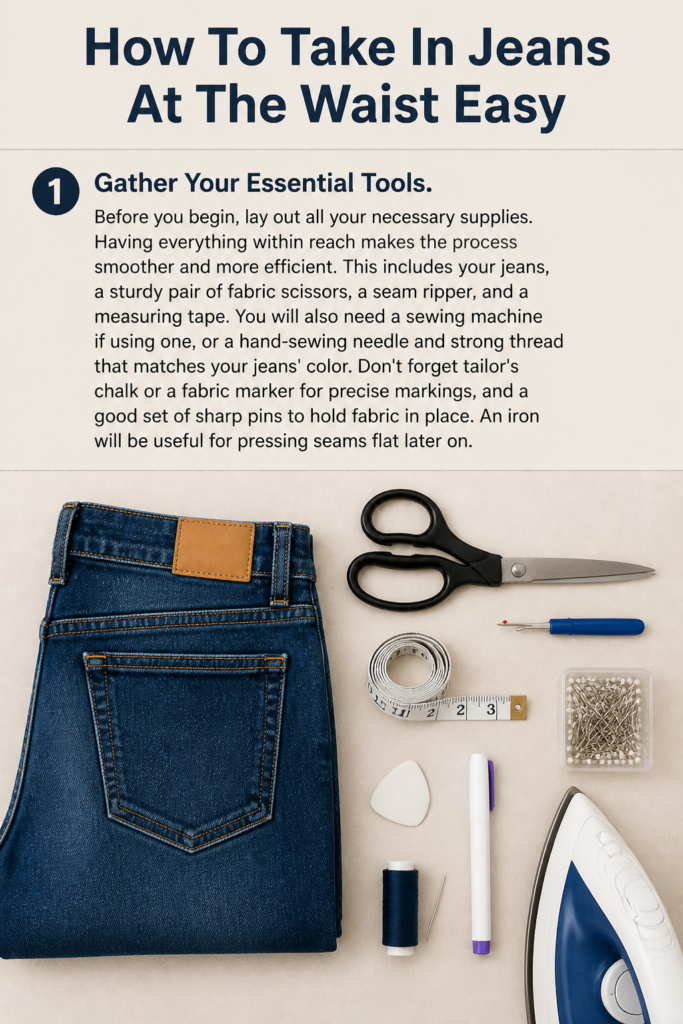
Before you begin, lay out all your necessary supplies. Having everything within reach makes the process smoother and more efficient.
This includes your jeans, a sturdy pair of fabric scissors, a seam ripper, and a measuring tape.
You will also need a sewing machine if using one, or a hand-sewing needle and strong thread that matches your jeans’ color.
Don’t forget tailor’s chalk or a fabric marker for precise markings, and a good set of sharp pins to hold fabric in place.
An iron will be useful for pressing seams flat later on.
Step 2: Try On and Pin for the Perfect Fit
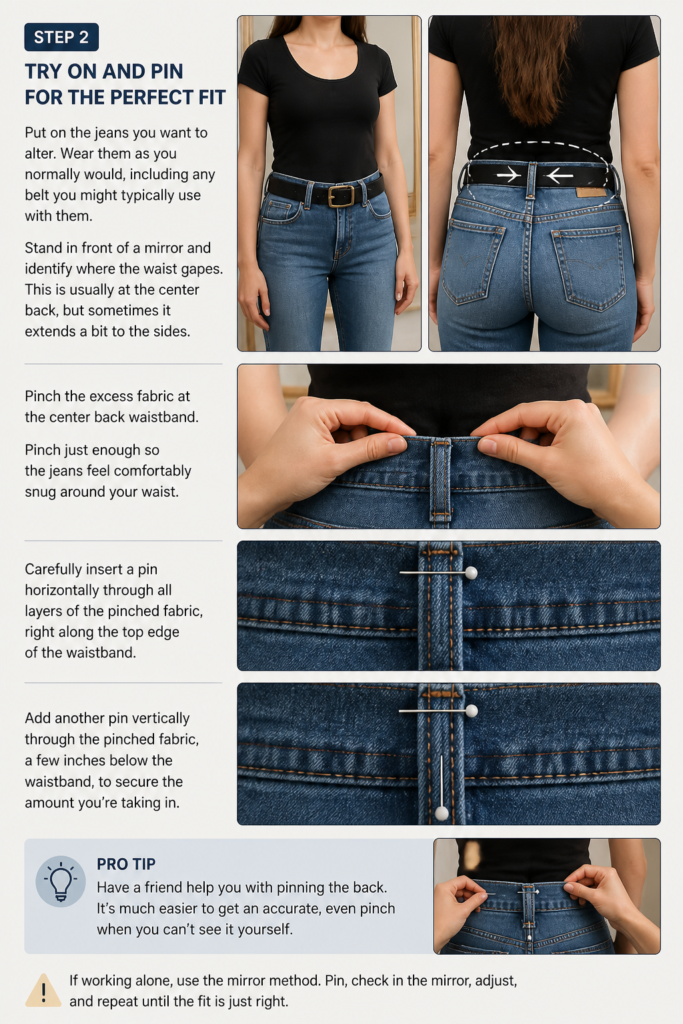
Put on the jeans you want to alter. Wear them as you normally would, including any belt you might typically use with them.
Stand in front of a mirror and identify where the waist gapes. This is usually at the center back, but sometimes it extends a bit to the sides.
Pinch the excess fabric at the center back waistband. Pinch just enough so the jeans feel comfortably snug around your waist.
Carefully insert a pin horizontally through all layers of the pinched fabric, right along the top edge of the waistband.
Add another pin vertically through the pinched fabric, a few inches below the waistband, to secure the amount you’re taking in.
Pro Tip: Have a friend help you with pinning the back. It’s much easier to get an accurate, even pinch when you can’t see it yourself. If working alone, use a second mirror to view your back.
Step 3: Mark Your New Seam Line
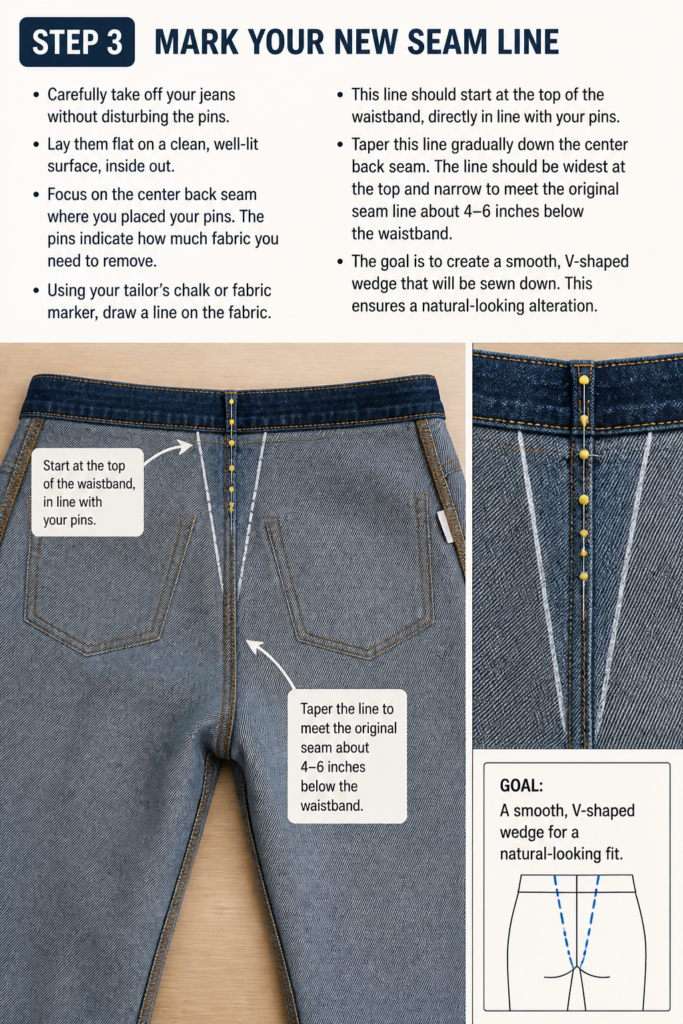
Carefully take off your jeans without disturbing the pins. Lay them flat on a clean, well-lit surface, inside out.
Focus on the center back seam where you placed your pins. The pins indicate how much fabric you need to remove.
Using your tailor’s chalk or fabric marker, draw a line on the fabric. This line should start at the top of the waistband, directly in line with your pins.
Taper this line gradually down the center back seam. The line should be widest at the top and narrow to meet the original seam line about 4-6 inches below the waistband.
The goal is to create a smooth, V-shaped wedge that will be sewn down. This ensures a natural-looking alteration.
Step 4: Prepare for Sewing by Seam Ripping
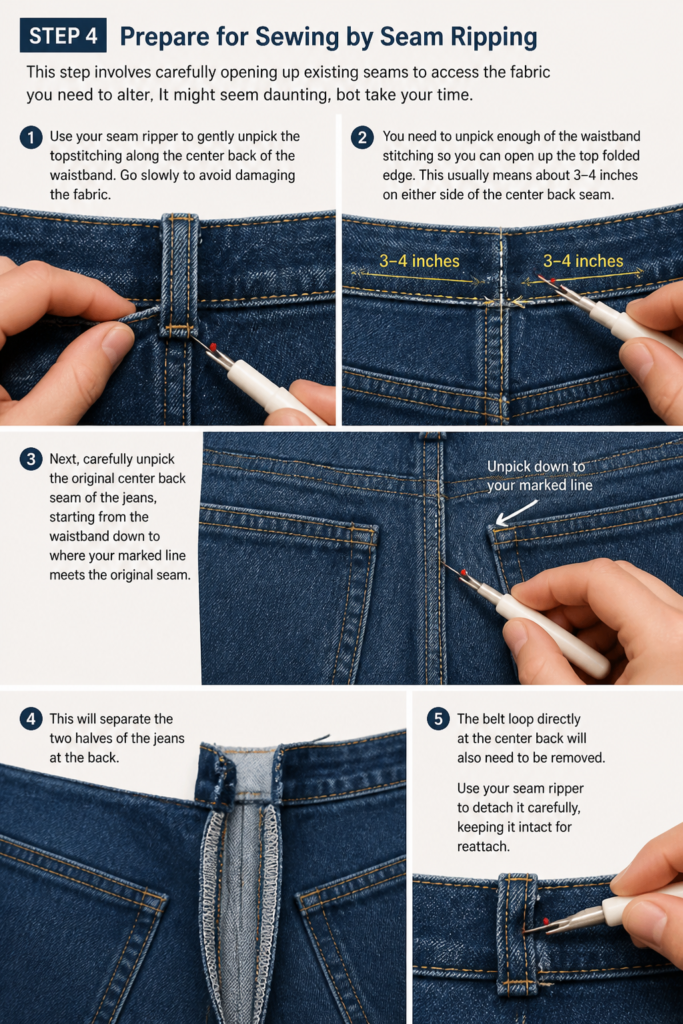
This step involves carefully opening up existing seams to access the fabric you need to alter. It might seem daunting, but take your time.
Use your seam ripper to gently unpick the topstitching along the center back of the waistband. Go slowly to avoid damaging the fabric.
You need to unpick enough of the waistband stitching so you can open up the top folded edge. This usually means about 3-4 inches on either side of the center back seam.
Next, carefully unpick the original center back seam of the jeans, starting from the waistband down to where your marked line meets the original seam. This will separate the two halves of the jeans at the back.
The belt loop directly at the center back will also need to be removed. Use your seam ripper to detach it carefully, keeping it intact for reattachment later.
Pro Tip: When using a seam ripper, always work away from your body. Insert the sharp point under a stitch and gently push it through. Don’t force it, as this can tear the fabric.
Step 5: Pin and Sew the New Seam
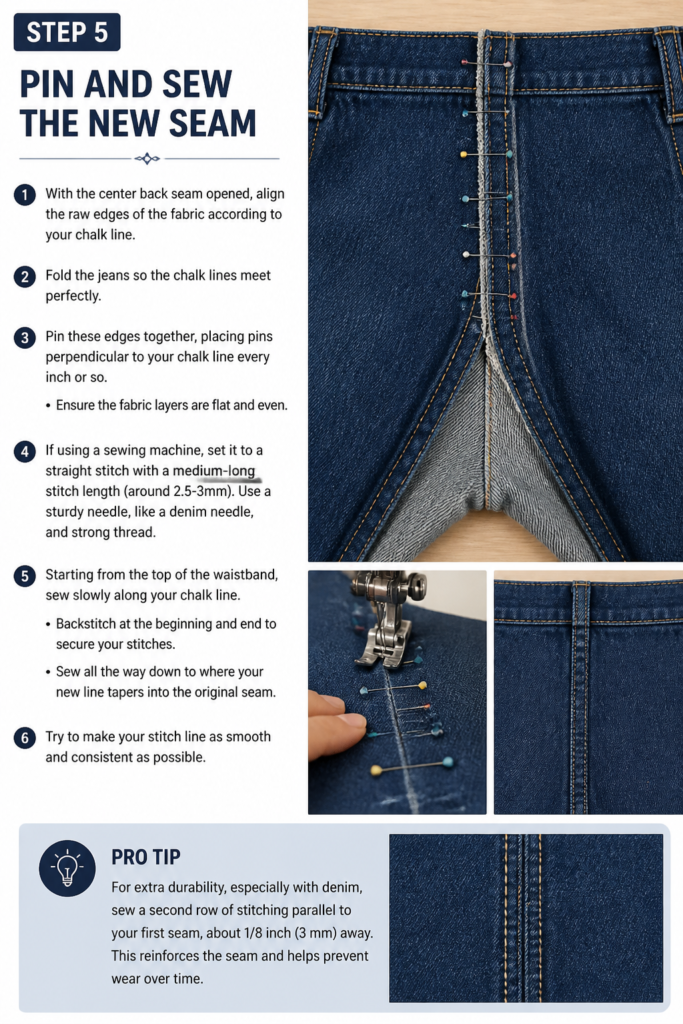
With the center back seam opened, align the raw edges of the fabric according to your chalk line. Fold the jeans so the chalk lines meet perfectly.
Pin these edges together, placing pins perpendicular to your chalk line every inch or so. Ensure the fabric layers are flat and even.
If using a sewing machine, set it to a straight stitch with a medium-long stitch length (around 2.5-3mm). Use a sturdy needle, like a denim needle, and strong thread.
Starting from the top of the waistband, sew slowly along your chalk line. Backstitch at the beginning and end to secure your stitches.
Sew all the way down to where your new line tapers into the original seam. Try to make your stitch line as smooth and consistent as possible.
Pro Tip: For extra durability, especially with denim, sew a second row of stitches parallel to your first, about 1/8 inch closer to the raw edge. This creates a stronger seam.
Step 6: Try On and Adjust
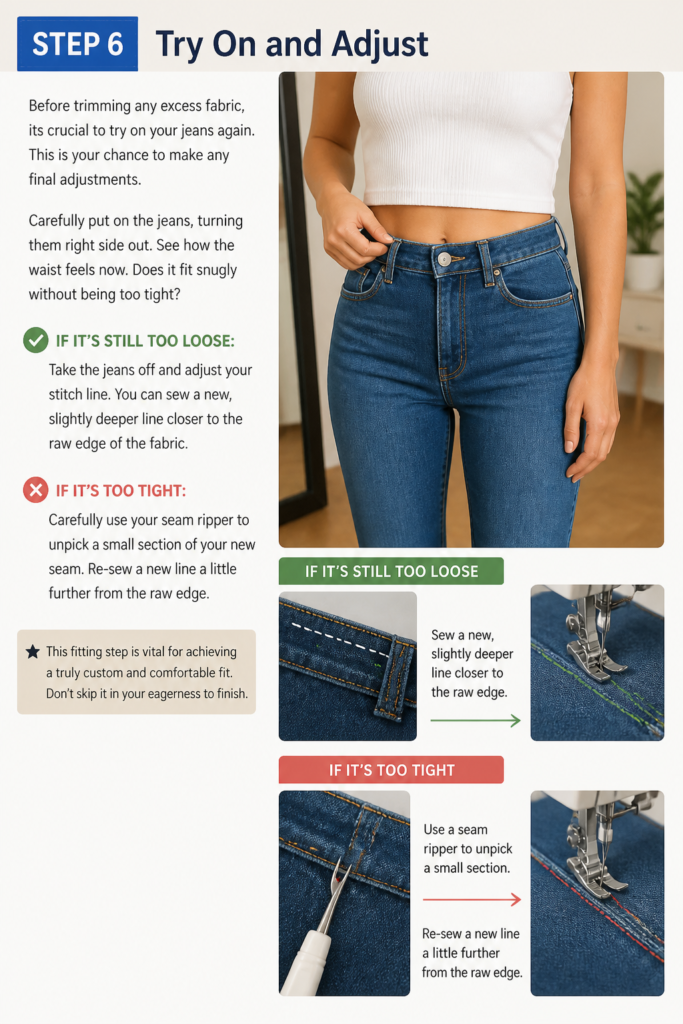
Before trimming any excess fabric, it’s crucial to try on your jeans again. This is your chance to make any final adjustments.
Carefully put on the jeans, turning them right side out. See how the waist feels now. Does it fit snugly without being too tight?
If it’s still too loose, take the jeans off and adjust your stitch line. You can sew a new, slightly deeper line closer to the raw edge of the fabric.
If it’s too tight, carefully use your seam ripper to unpick a small section of your new seam. Re-sew a new line a little further from the raw edge.
This fitting step is vital for achieving a truly custom and comfortable fit. Don’t skip it in your eagerness to finish.
Step 7: Trim and Finish the Seam
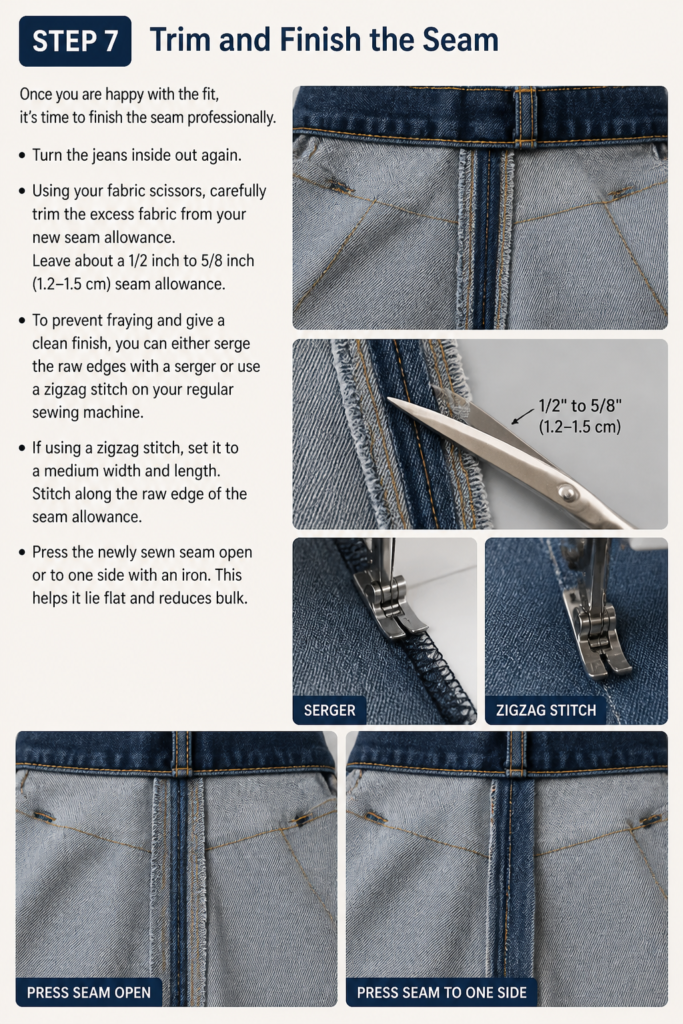
Once you are happy with the fit, it’s time to finish the seam professionally. Turn the jeans inside out again.
Using your fabric scissors, carefully trim the excess fabric from your new seam allowance. Leave about a 1/2 inch to 5/8 inch (1.2-1.5 cm) seam allowance.
To prevent fraying and give a clean finish, you can either serge the raw edges with a serger or use a zigzag stitch on your regular sewing machine.
If using a zigzag stitch, set it to a medium width and length. Stitch along the raw edge of the seam allowance.
Press the newly sewn seam open or to one side with an iron. This helps it lie flat and reduces bulk.
Step 8: Reattach the Waistband and Belt Loop
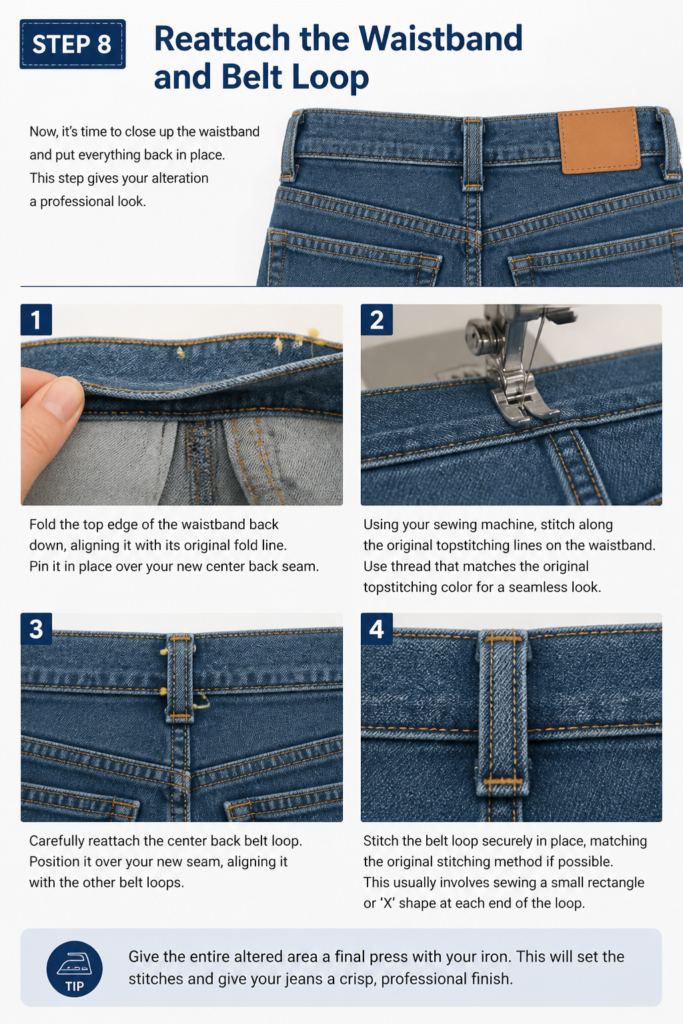
Now, it’s time to close up the waistband and put everything back in place. This step gives your alteration a professional look.
Fold the top edge of the waistband back down, aligning it with its original fold line. Pin it in place over your new center back seam.
Using your sewing machine, stitch along the original topstitching lines on the waistband. Use thread that matches the original topstitching color for a seamless look.
Carefully reattach the center back belt loop. Position it over your new seam, aligning it with the other belt loops.
Stitch the belt loop securely in place, matching the original stitching method if possible. This usually involves sewing a small rectangle or ‘X’ shape at each end of the loop.
Give the entire altered area a final press with your iron. This will set the stitches and make the alteration look crisp and professional.
Common Mistakes to Avoid
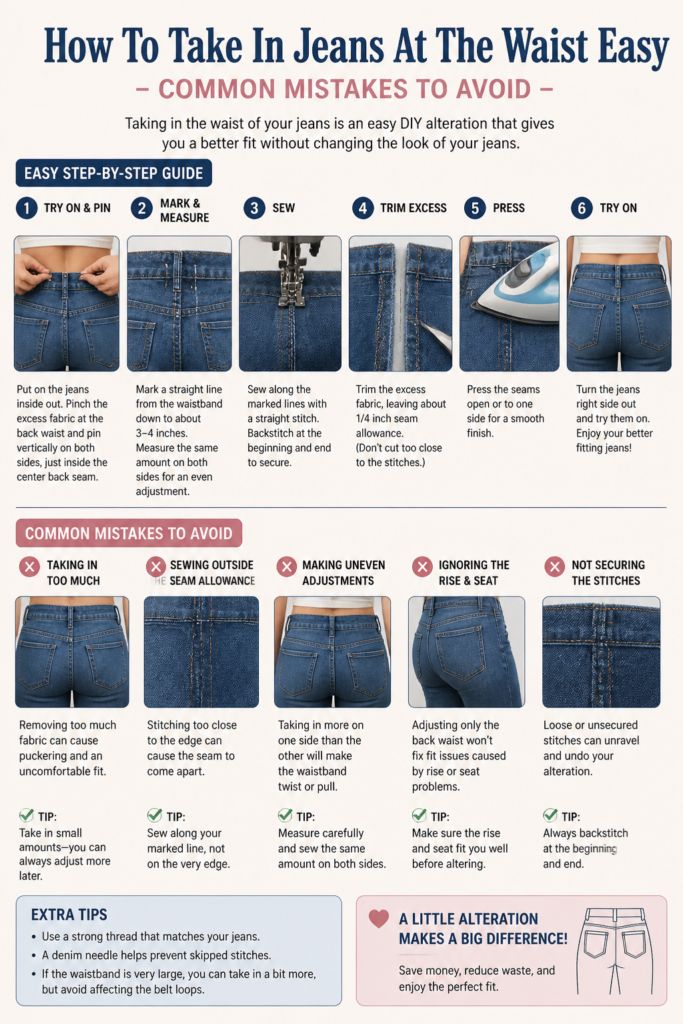
Not Tapering the Seam Properly
A common mistake is sewing a straight line down the back, rather than a gradual taper. This creates a harsh, unnatural point or pucker in the fabric below the waistband. Always ensure your new seam line smoothly merges with the original seam several inches down, creating a subtle V-shape.
Skipping the Test Fit
Some people get eager to finish and trim the excess fabric before trying on the jeans after the initial stitch. This is a critical error. Once you trim, there’s no going back if the fit isn’t quite right. Always try them on after sewing the new seam but before cutting any fabric.
Ignoring Seam Finishing
Leaving raw edges inside your jeans will lead to fraying over time, weakening the seam and making the alteration look unprofessional. Always finish your seam allowances with a serger or a zigzag stitch. This protects the fabric and makes your alteration last longer.
Using the Wrong Thread or Needle
Denim is a tough fabric, and using a standard needle or thin thread can lead to broken needles, skipped stitches, or weak seams. Always use a denim-specific needle (usually size 90/14 or 100/16) and strong, polyester all-purpose thread. For topstitching, use a slightly thicker topstitching thread if you want to match the original look.
Troubleshooting
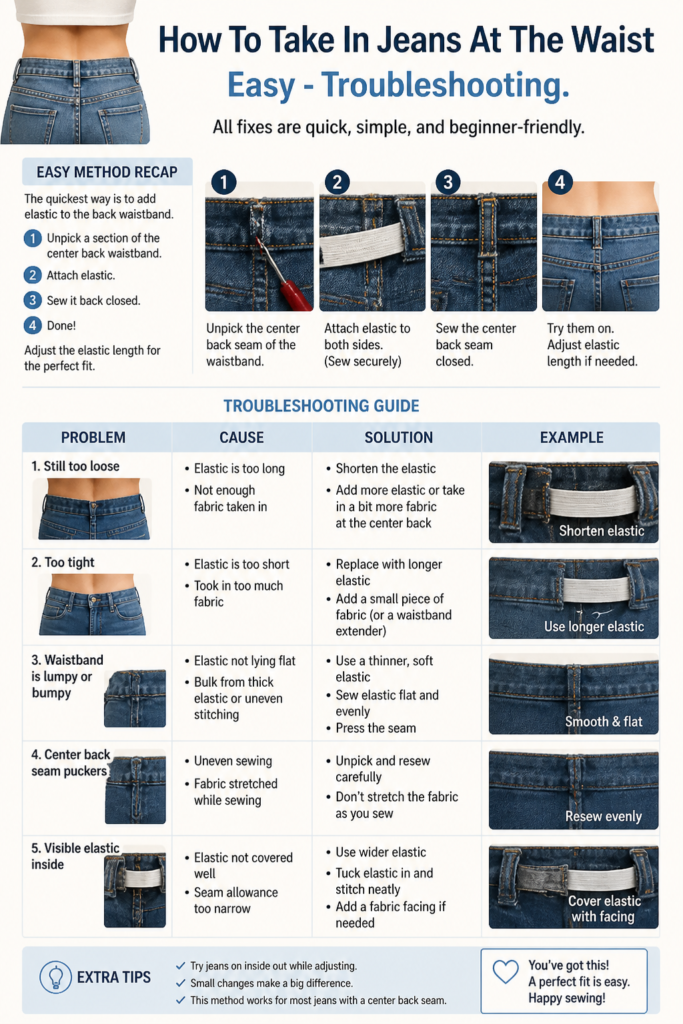
Waist Still Too Loose or Too Tight
If the waist isn’t perfect after your first attempt, don’t worry. This is a common adjustment. If it’s too loose, carefully unpick your new seam and sew a slightly deeper line. If it’s too tight, use your seam ripper to remove some stitches and sew a new line a bit further out from the raw edge. Always try on and adjust before trimming.
Fabric Bunching or Puckering
Bunching often happens if the fabric isn’t laid flat or pinned smoothly before sewing. It can also occur if your stitch length is too short for denim. Ensure your fabric is completely flat, use plenty of pins, and try a slightly longer stitch length. Ironing the seam before and after sewing can also help to prevent puckers.
Stitches Coming Undone
If your stitches are unraveling, it might be due to not backstitching at the beginning and end of your seam. Always backstitch a few stitches to lock the thread in place. Also, ensure you’re using strong, good-quality polyester thread and a sharp, appropriate needle for denim. Finishing the seam edges (zigzag or serge) also prevents stress on the main stitch line.
Key Takeaways
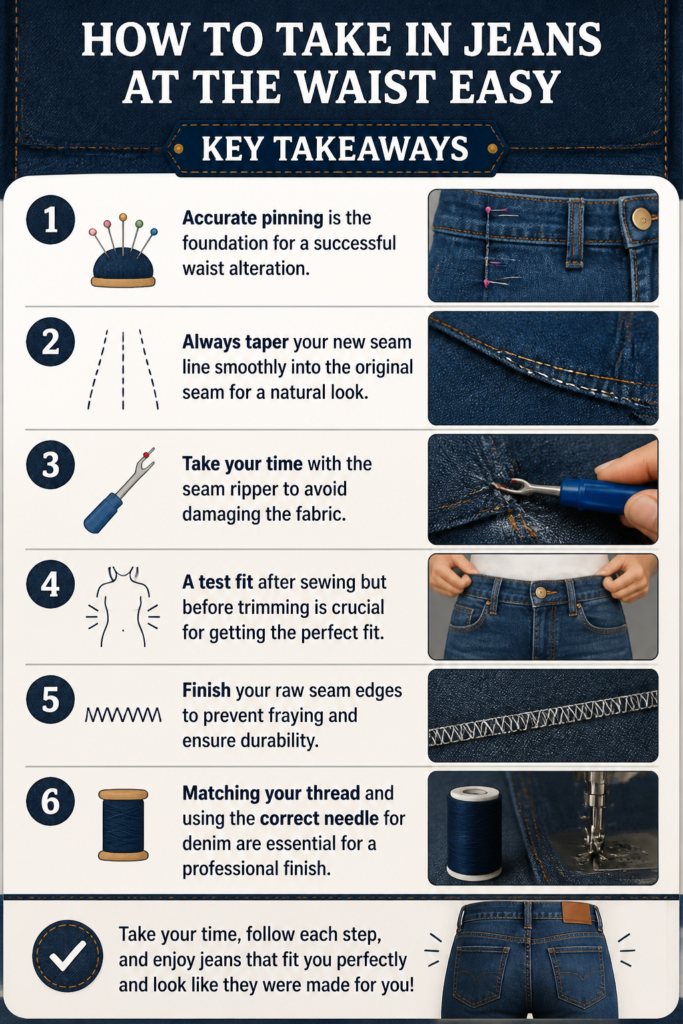
- Accurate pinning is the foundation for a successful waist alteration.
- Always taper your new seam line smoothly into the original seam for a natural look.
- Take your time with the seam ripper to avoid damaging the fabric.
- A test fit after sewing but before trimming is crucial for getting the perfect fit.
- Finish your raw seam edges to prevent fraying and ensure durability.
- Matching your thread and using the correct needle for denim are essential for a professional finish.
Frequently Asked Questions
Can I do this without a sewing machine?
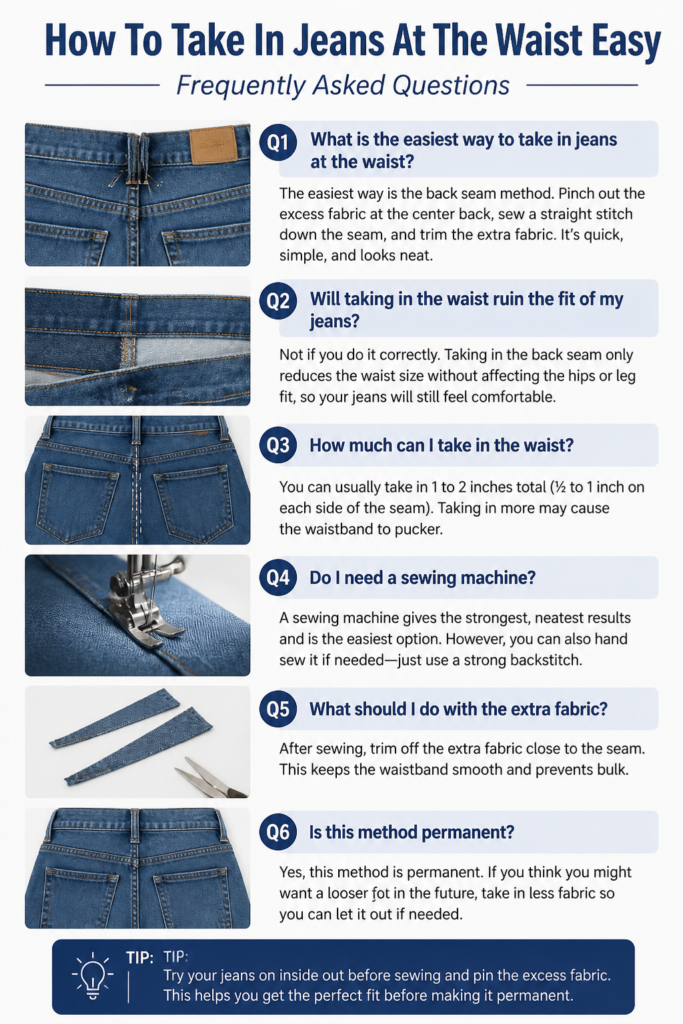
Yes, absolutely! While a sewing machine makes the process quicker, you can hand-sew this alteration. Use a strong needle (like a denim needle) and a sturdy thread, making small, even backstitches for durability. It will take more time, but the results can be just as good.
What if my jeans have a curved waistband?
Many modern jeans feature a contoured or curved waistband. The principle remains the same: pinch out the excess at the center back. When you sew, follow the existing curve of the waistband as much as possible, tapering your new seam line smoothly. You might need to unpick a bit more of the waistband to adjust for the curve.
Will this work for all types of denim?
This method works well for most denim types, especially rigid or mid-stretch denim. For very thin or super-stretchy denim, you might need to be extra careful with pinning and consider using a stretch needle on your machine. The fabric’s elasticity might also affect how much you need to take in.
How much can I realistically take in?
You can usually take in anywhere from 1 to 4 inches at the waist using this method. For more significant alterations (e.g., more than 4 inches), you might need a more advanced alteration that involves taking in the side seams as well, which is a more complex project.
Our Top Recommended Finds
- Quality Fabric Shears: Sharp shears make clean cuts, essential for professional-looking seams.
- Seam Ripper Set: Having a few different sizes or a comfortable ergonomic ripper saves time and prevents frustration.
- Assorted Denim Needles & Thread: A pack of denim needles (sizes 90/14, 100/16) and a spool of strong polyester thread are indispensable for working with jeans.
Embrace Your Perfect Fit Today
You now have the power to transform your jeans from “almost right” to “perfectly fitted.” This simple alteration not only enhances your wardrobe but also boosts your confidence.
Imagine no more awkward waist gaps or constantly pulling up your jeans. You’ve gained a valuable skill that opens up a world of possibilities for your clothing.
Don’t stop here. This basic alteration is a fantastic entry point into the world of garment customization. Consider exploring other simple fixes, like hemming or tapering.
Grab those jeans that have been sitting in your closet and give them a new lease on life. Your perfect fit is just a few stitches away.
Beginner-friendly templates, step-by-step guides,
and weekly project ideas in your inbox.