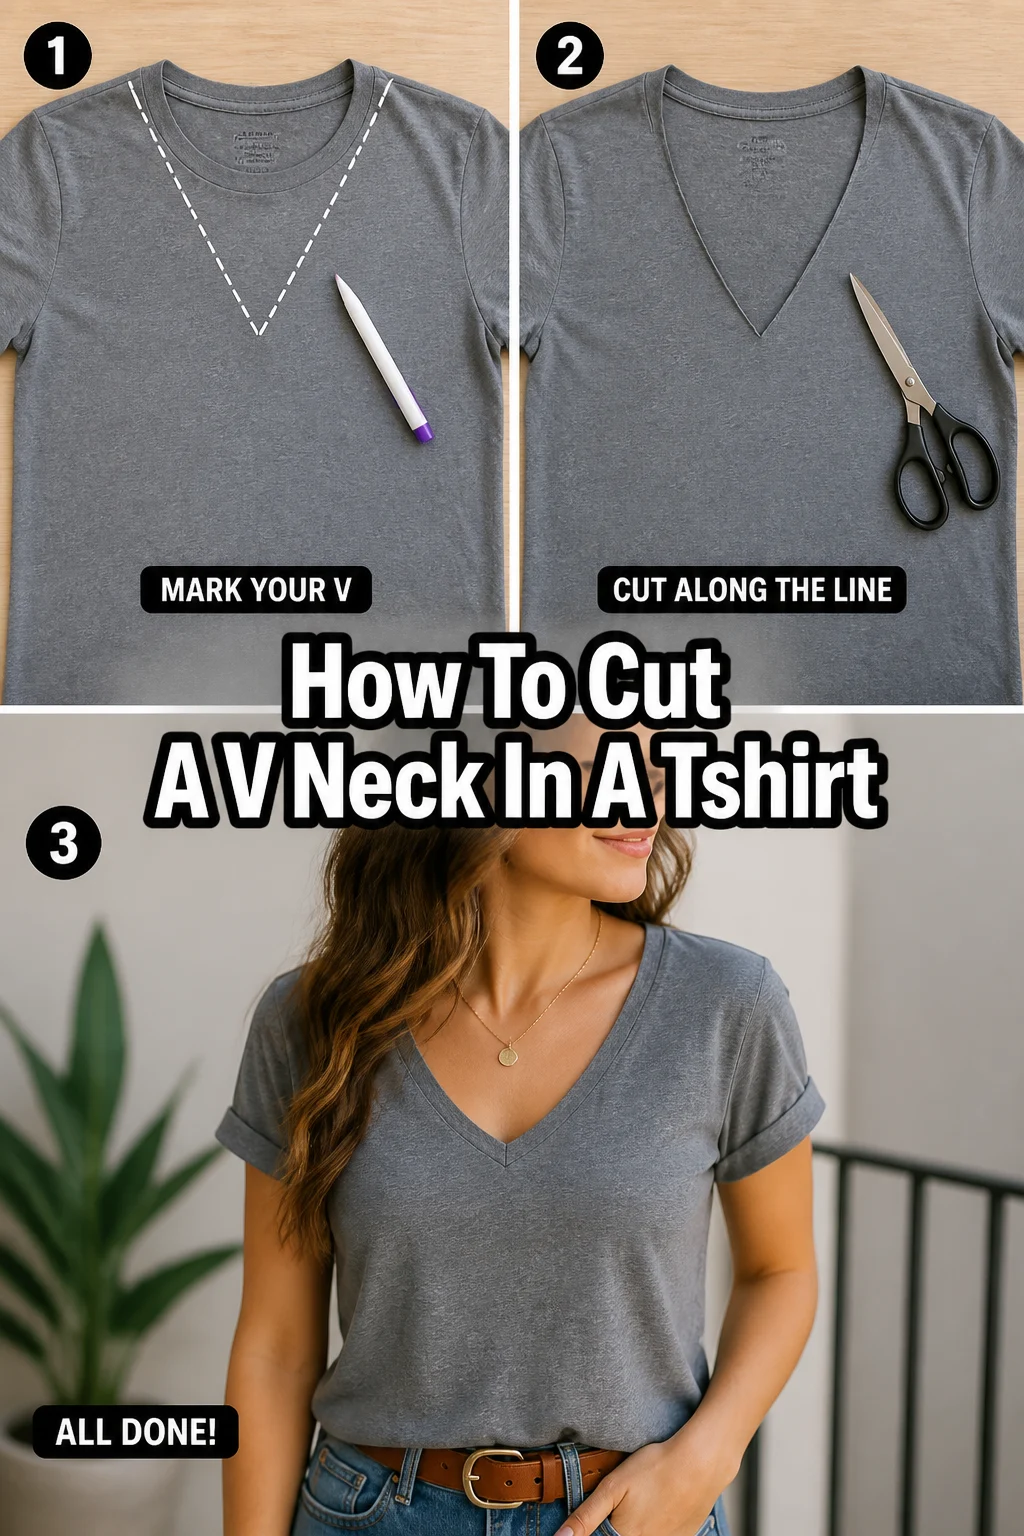
✂️ How To Cut A V Neck In A Tshirt

Beginner-friendly templates, step-by-step guides,
and weekly project ideas in your inbox.
Do you have a stack of crew neck t-shirts just waiting for a fresh look?
Transforming a simple tee into a stylish V-neck is surprisingly simple, and it can completely revitalize your wardrobe.
I’ve personally updated countless shirts this way, turning overlooked basics into everyday favorites with just a few careful snips.
Quick Overview
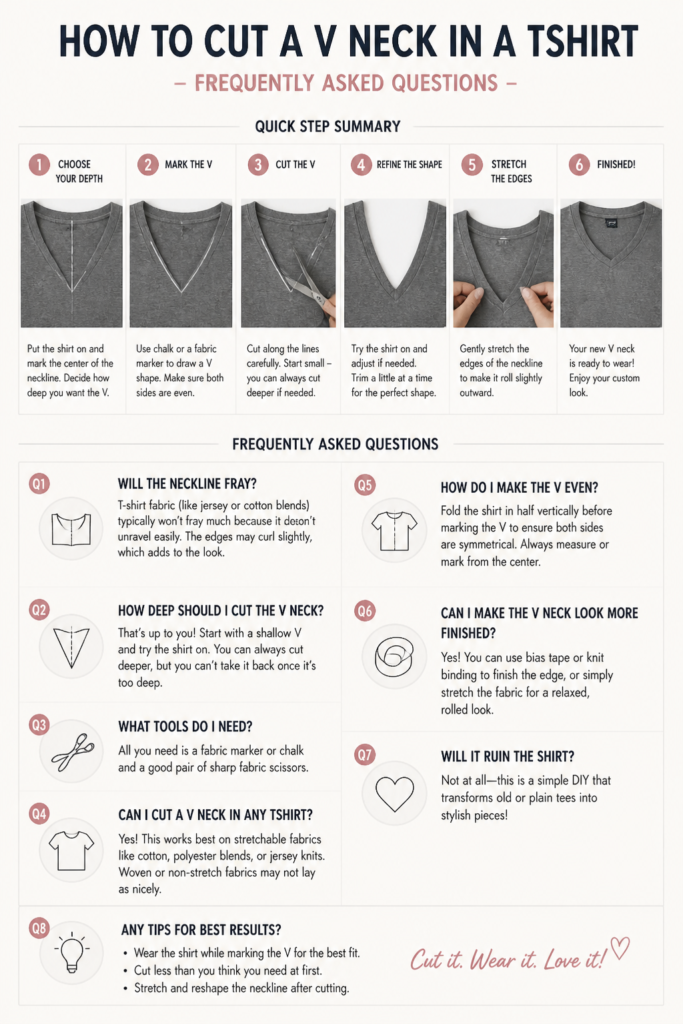
This guide will walk you through the entire process, from planning your cut to finishing the edges.
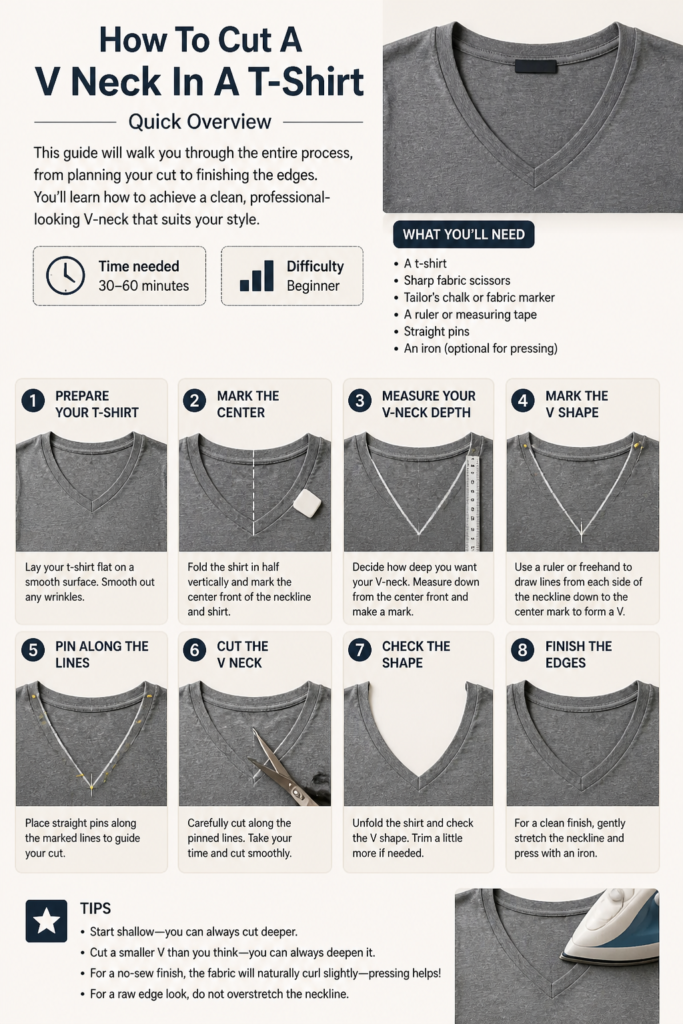
You’ll learn how to achieve a clean, professional-looking V-neck that suits your style.
- Time needed: 30-60 minutes
- Difficulty: Beginner
- What you’ll need: A t-shirt, sharp fabric scissors, tailor’s chalk or fabric marker, a ruler or measuring tape, straight pins, an iron (optional for pressing).
Step-by-Step Instructions
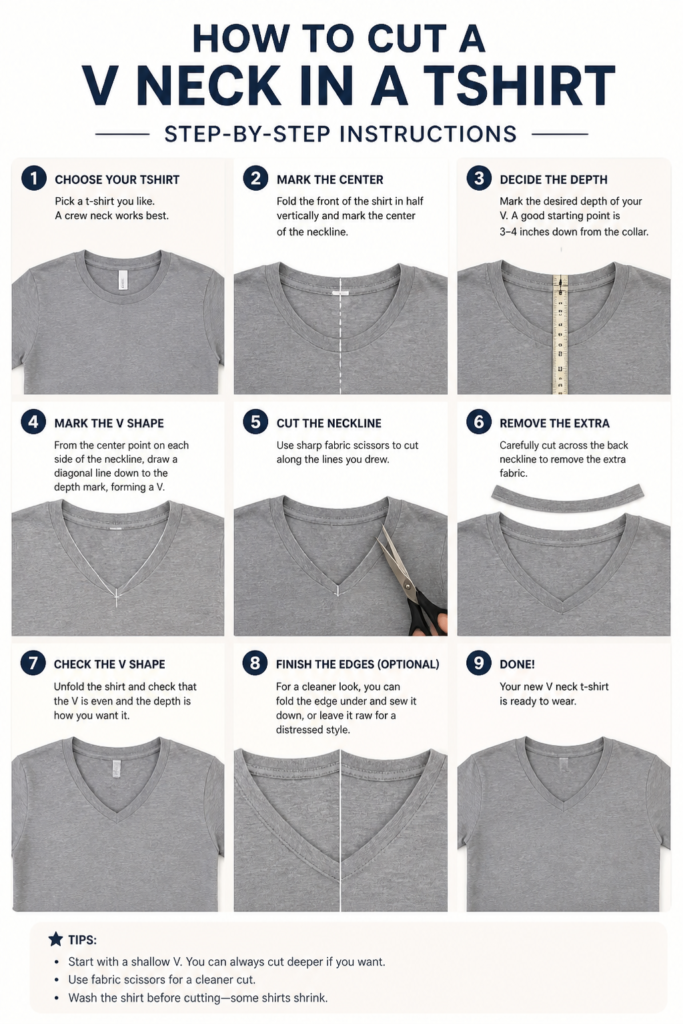
Step 1: Choose Your T-Shirt Wisely
Start by selecting the right t-shirt for your project. Opt for a tee made from a stable knit fabric, like cotton jersey, that doesn’t stretch excessively or fray easily.
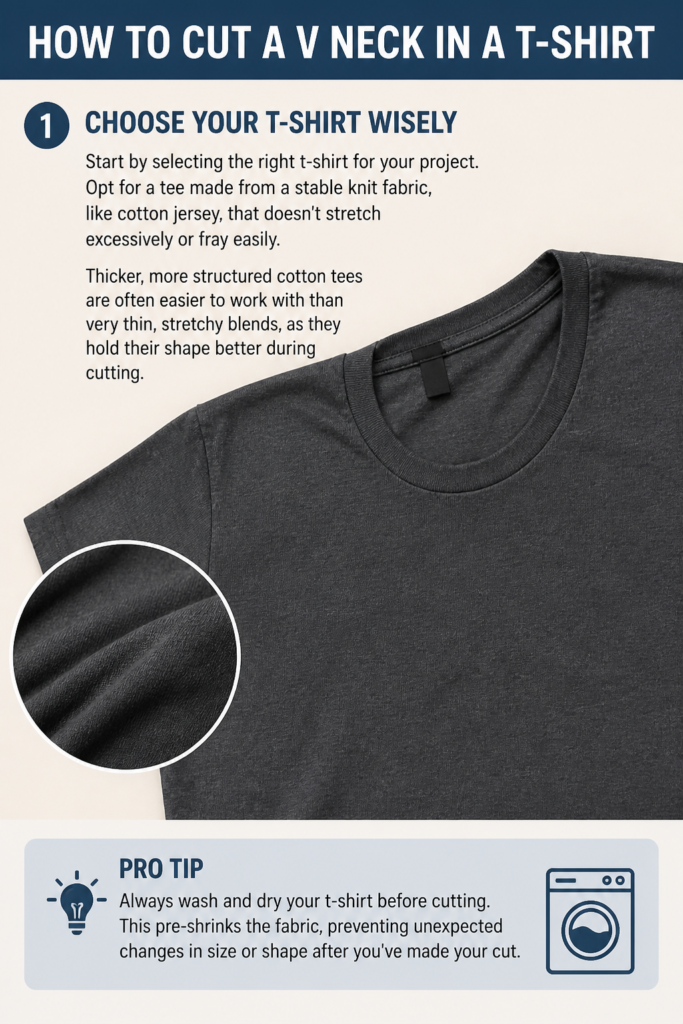
Thicker, more structured cotton tees are often easier to work with than very thin, stretchy blends, as they hold their shape better during cutting.
Pro Tip: Always wash and dry your t-shirt before cutting. This pre-shrinks the fabric, preventing unexpected changes in size or shape after you’ve made your cut.
Step 2: Prepare Your Workspace and Gather Tools
Clear a large, flat surface where you can lay your t-shirt completely flat without wrinkles. A cutting mat is ideal, but a clean table works just fine.
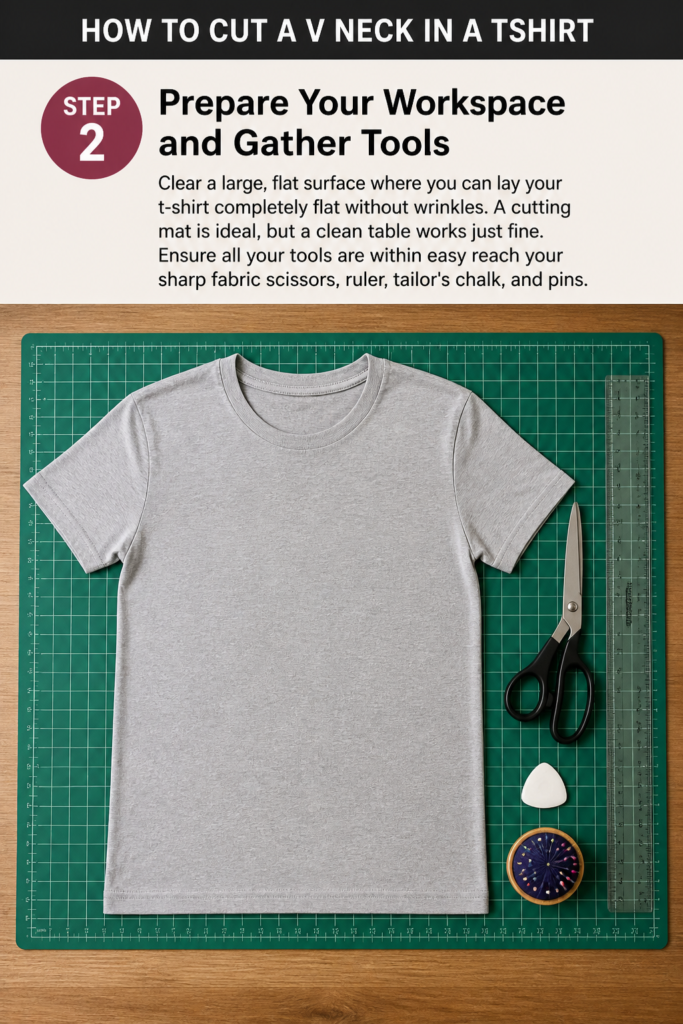
Ensure all your tools are within easy reach: your sharp fabric scissors, ruler, tailor’s chalk, and pins.
Step 3: Lay Out and Smooth Your T-Shirt
Carefully lay your t-shirt flat on your prepared surface. Smooth out any wrinkles or bumps, ensuring both the front and back layers are perfectly aligned.
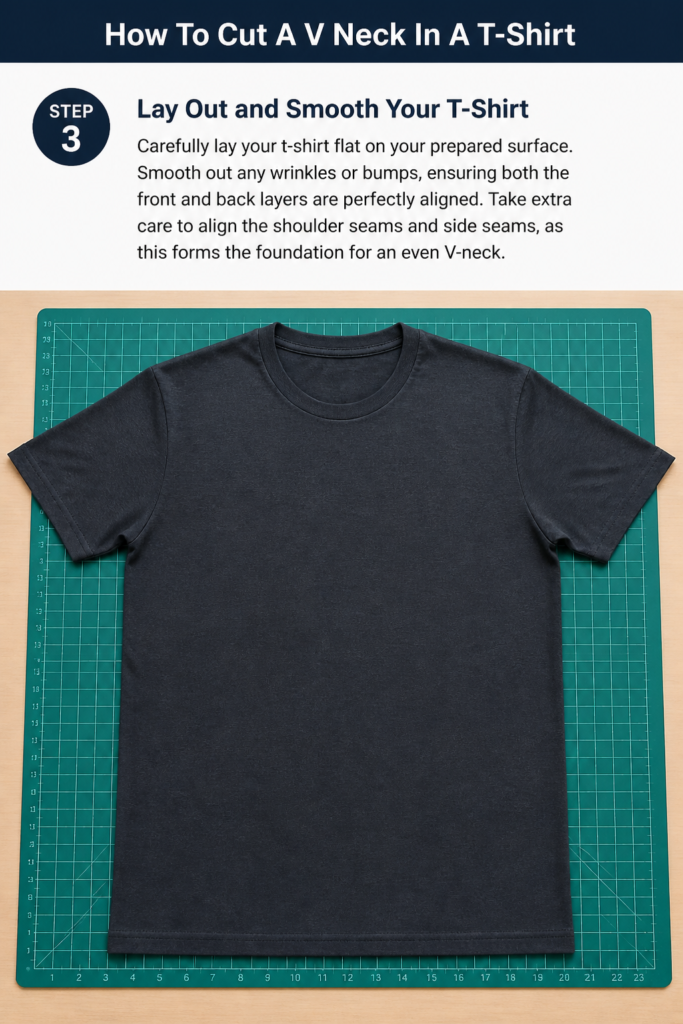
Take extra care to align the shoulder seams and side seams, as this forms the foundation for an even V-neck.
Step 4: Determine Your Desired V-Neck Depth
Decide how deep you want your V-neck to be. A good starting point is usually 3-5 inches below the existing crew neck seam for a modest V.
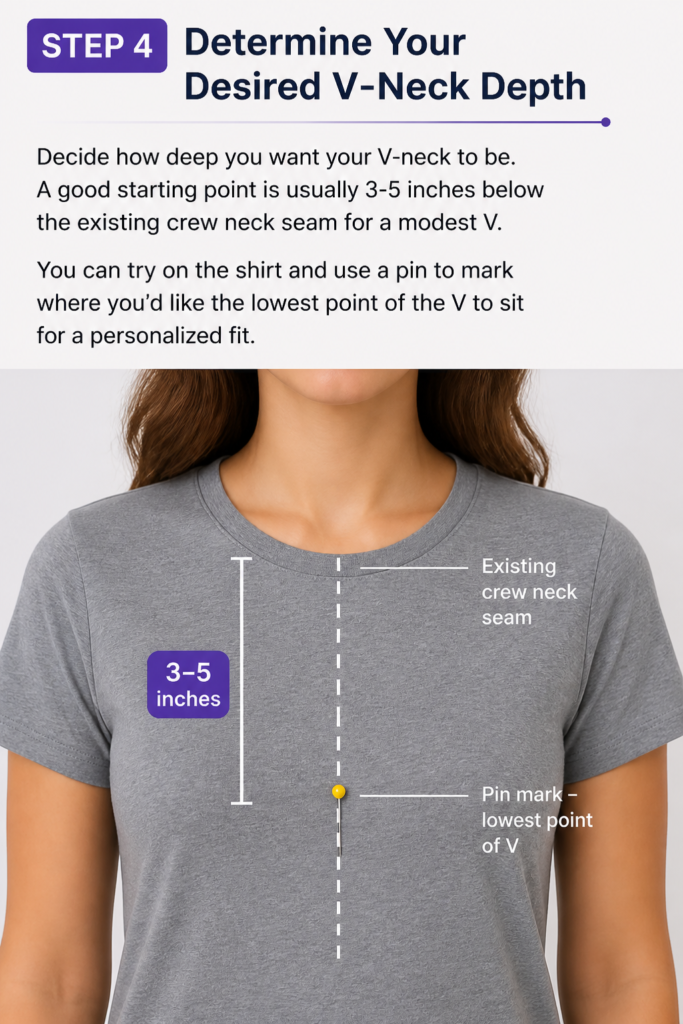
You can try on the shirt and use a pin to mark where you’d like the lowest point of the V to sit for a personalized fit.
Step 5: Mark Your Cutting Lines
Using your tailor’s chalk or fabric marker, make a small dot at the center front of your shirt, precisely at your desired V-neck depth.
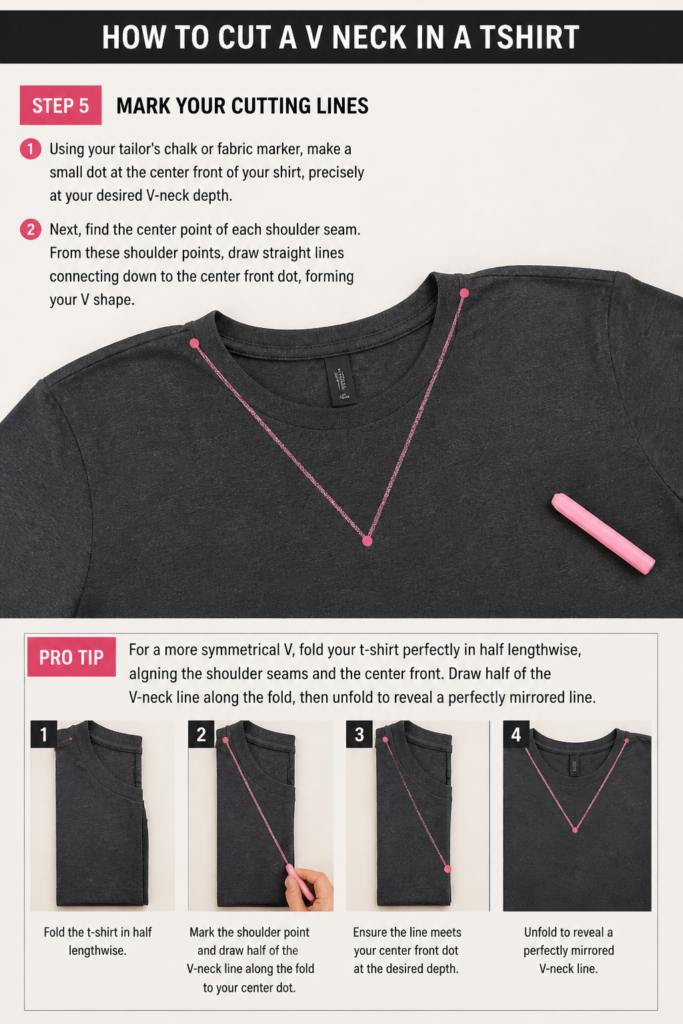
Next, find the center point of each shoulder seam. From these shoulder points, draw straight lines connecting down to the center front dot, forming your V shape.
Pro Tip: For a more symmetrical V, fold your t-shirt perfectly in half lengthwise, aligning the shoulder seams and the center front. Draw half of the V-neck line along the fold, then unfold to reveal a perfectly mirrored line.
Step 6: Pin Along the Marked Lines (Optional but Recommended)
If your fabric is particularly slippery or you want extra precision, place a few straight pins along the marked lines.
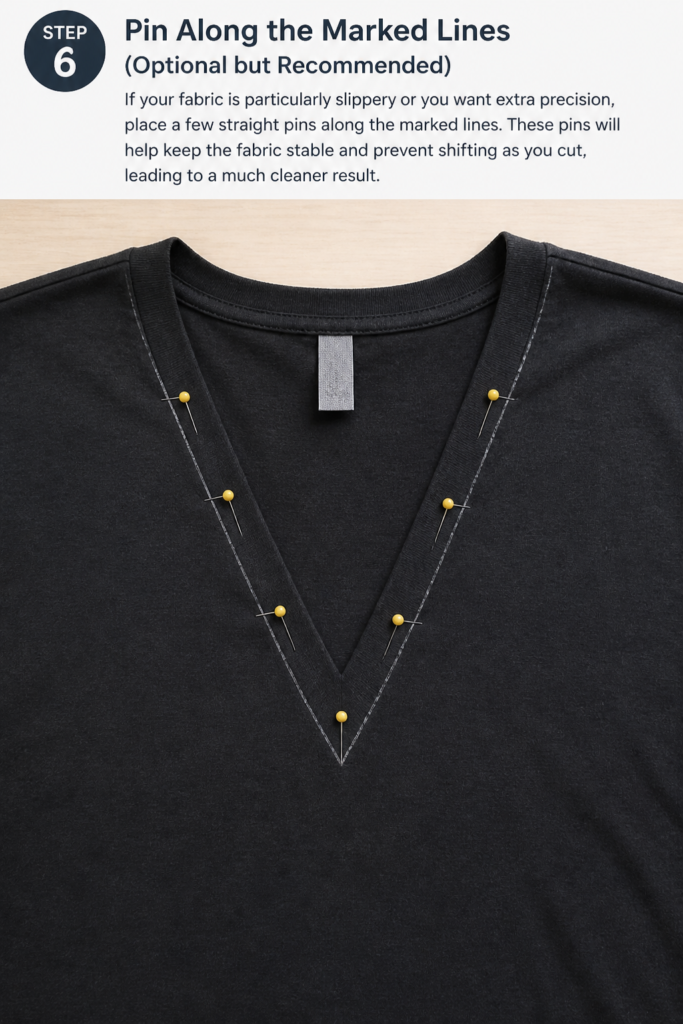
These pins will help keep the fabric stable and prevent shifting as you cut, leading to a much cleaner result.
Step 7: Carefully Cut the V-Neck
Using your sharp fabric scissors, slowly and steadily cut along your marked lines.
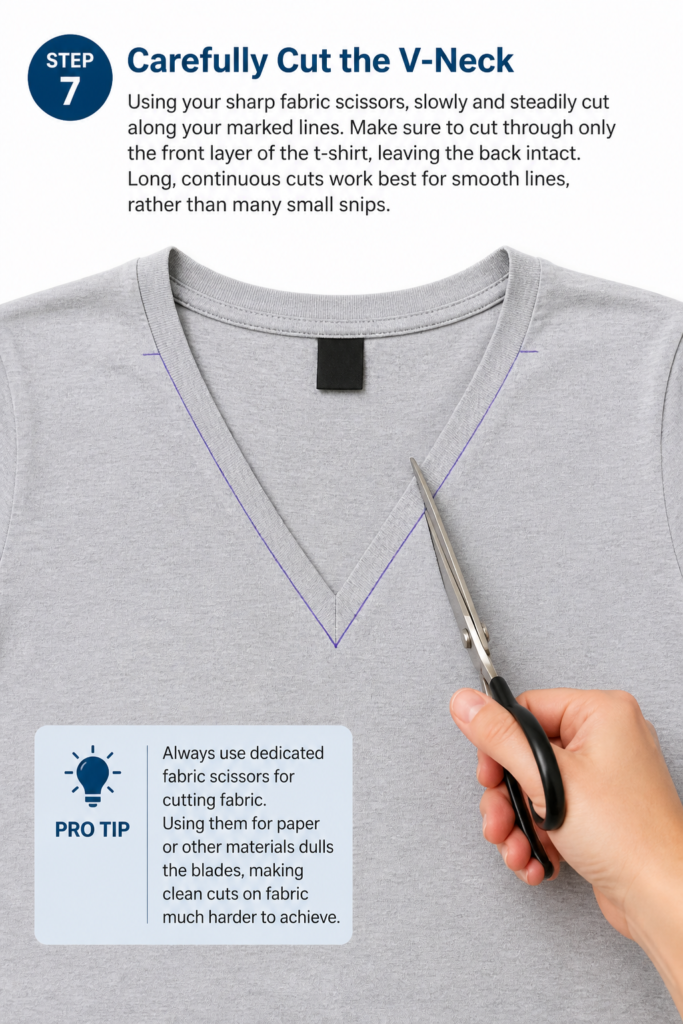
Make sure to cut through only the front layer of the t-shirt, leaving the back intact.
Long, continuous cuts work best for smooth lines, rather than many small snips.
Pro Tip: Always use dedicated fabric scissors for cutting fabric. Using them for paper or other materials dulls the blades, making clean cuts on fabric much harder to achieve.
Step 8: Reinforce the Cut Edge (Optional for Durability)
For a more finished and durable V-neck, you can reinforce the cut edge. For most t-shirt fabrics, the cut edge will naturally roll slightly, providing a casual finish.
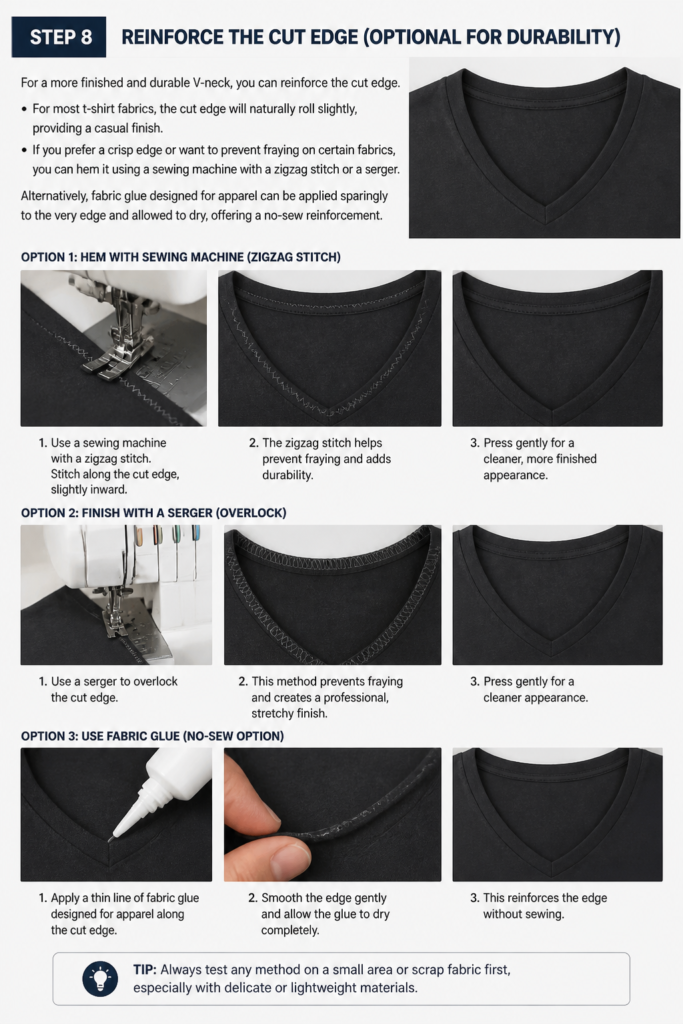
If you prefer a crisp edge or want to prevent fraying on certain fabrics, you can hem it using a sewing machine with a zigzag stitch or a serger.
Alternatively, fabric glue designed for apparel can be applied sparingly to the very edge and allowed to dry, offering a no-sew reinforcement.
Step 9: Try On and Adjust
Once you’ve made your cut, try on the t-shirt. Assess the depth and width of the V-neck.
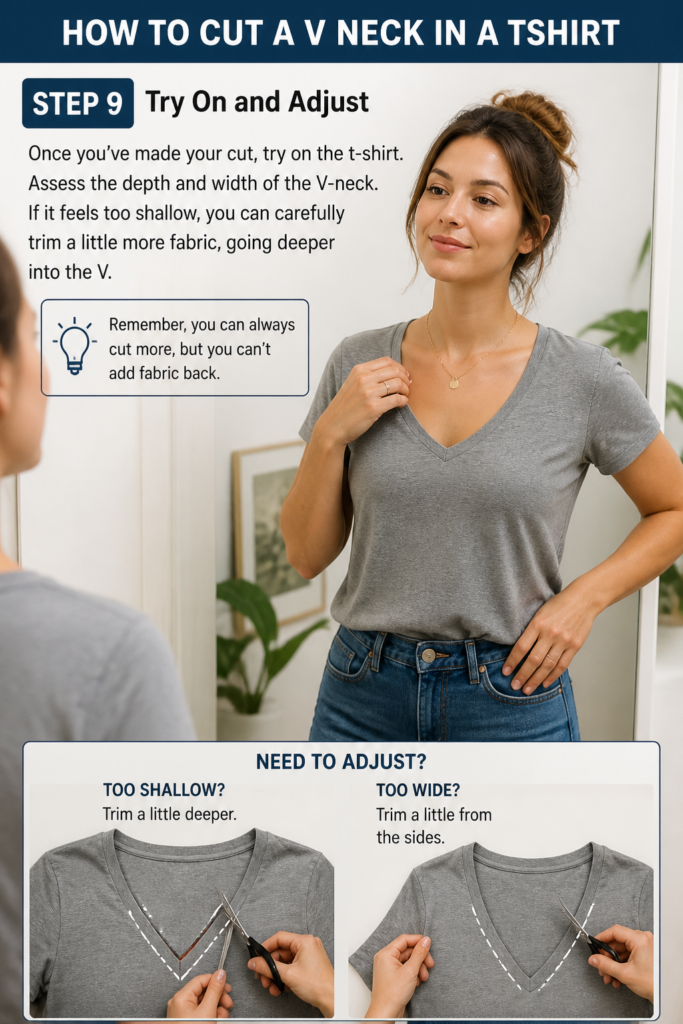
If it feels too shallow, you can carefully trim a little more fabric, going deeper into the V.
Remember, you can always cut more, but you can’t add fabric back.
Common Mistakes to Avoid
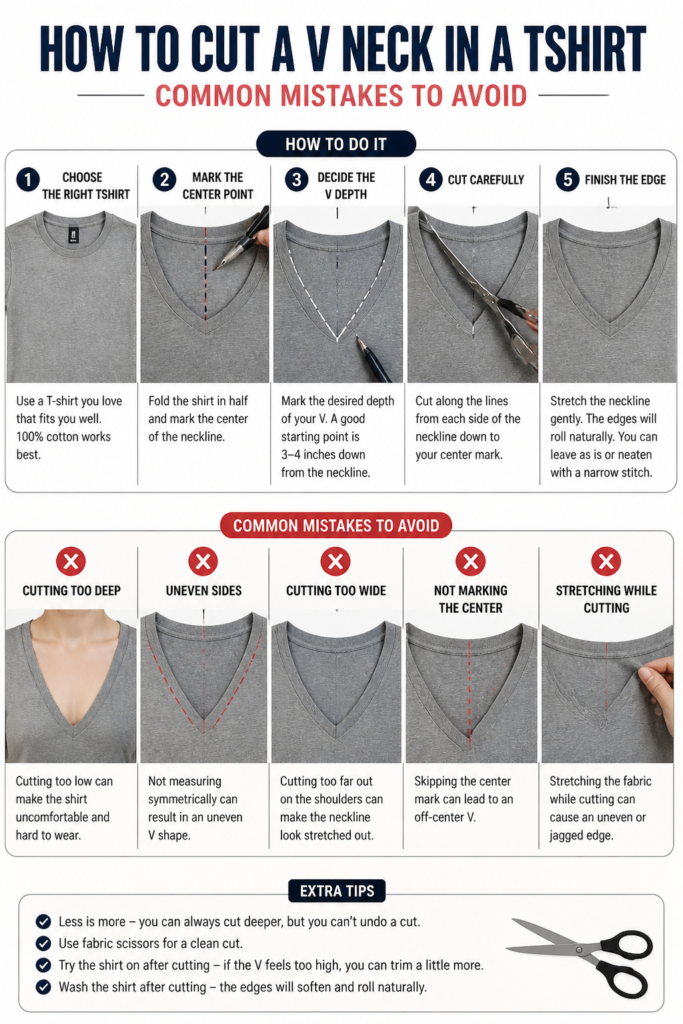
Cutting Too Deep Too Soon
One of the most common errors is making the initial cut too deep. It’s impossible to add fabric back once it’s removed, leading to a V-neck that might be wider or lower than desired.
Always start with a shallower V-neck than you think you want. You can always try the shirt on and gradually trim more fabric away until you achieve the perfect depth.
Using Dull Scissors
Using scissors that aren’t sharp enough can lead to jagged, uneven cuts and frayed edges. Dull blades will pull and chew the fabric rather than slicing cleanly through it.
Invest in a good pair of sharp fabric scissors and reserve them exclusively for fabric projects. This ensures clean, precise cuts every time.
Not Stabilizing the Fabric
Allowing the t-shirt fabric to shift or wrinkle while marking or cutting will result in an asymmetrical or crooked V-neck. Knit fabrics can be especially prone to stretching and moving.
Always lay your t-shirt perfectly flat, smooth out all wrinkles, and consider pinning the layers together or folding it precisely down the center to ensure symmetry before cutting.
Ignoring Fabric Stretch and Roll
Many t-shirt fabrics, especially cotton jerseys, will naturally roll at the cut edge. Expect this and decide if you like the look or if you need to finish the edge.
Don’t be surprised when the edges curl. If you want a flat, finished edge, plan to hem it with a sewing machine or use a fabric adhesive.
Troubleshooting
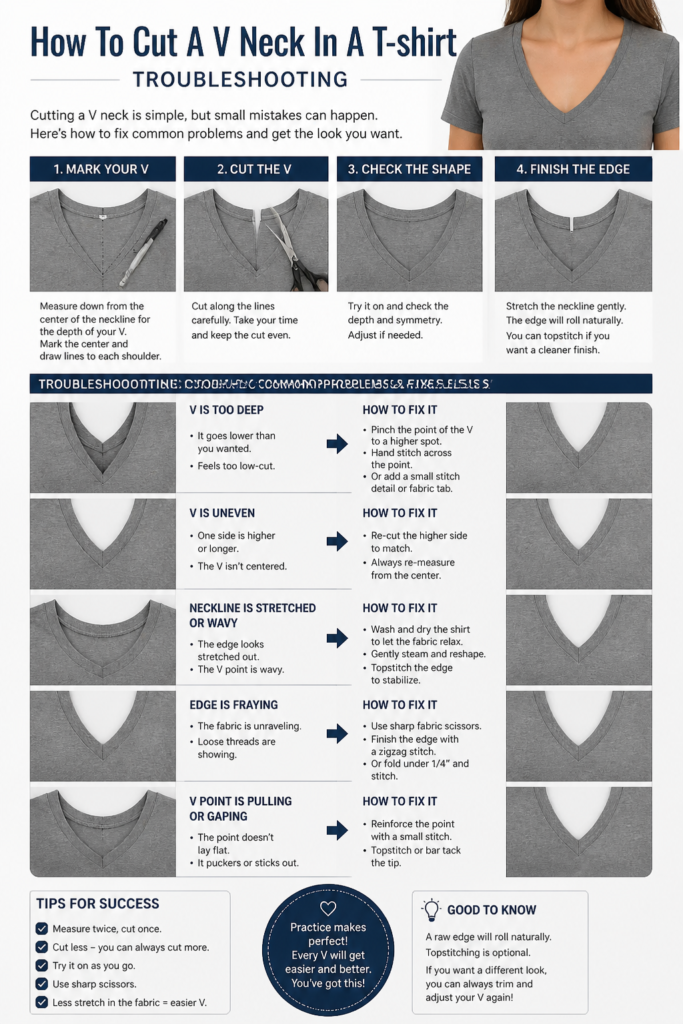
The V-Neck Looks Uneven
If your V-neck appears uneven after cutting, it’s likely due to the fabric shifting or inaccurate marking.
Lay the shirt flat again, carefully fold it in half along the center front, and align all seams. Trim any uneven parts very slowly, taking off tiny slivers of fabric at a time until both sides match.
The V-Neck is Too Wide or Too Deep
Unfortunately, once fabric is cut, it cannot be put back. If your V-neck is significantly wider or deeper than intended, your options are limited.
You can try wearing it as a more dramatic V-neck, or consider adding a decorative trim or lace to the edges to slightly cover the excess cut area. For a deep V, a camisole underneath works well.
The Edges Are Fraying
While many knit t-shirt fabrics don’t fray significantly, some blends might. If you notice excessive fraying, it means the fabric weave is unraveling.
To stop fraying, you’ll need to finish the edge. Use a sewing machine to sew a narrow hem with a zigzag stitch, or apply a small amount of fray-check liquid to the raw edge, allowing it to dry completely.
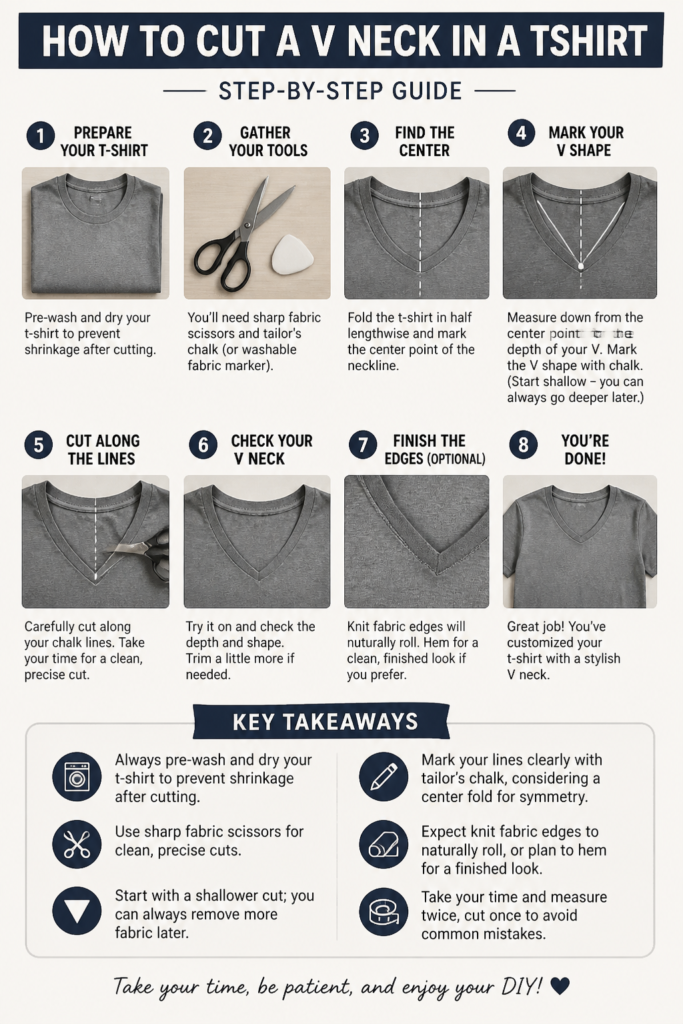
Key Takeaways
- Always pre-wash and dry your t-shirt to prevent shrinkage after cutting.
- Use sharp fabric scissors for clean, precise cuts.
- Start with a shallower cut; you can always remove more fabric later.
- Mark your lines clearly with tailor’s chalk, considering a center fold for symmetry.
- Expect knit fabric edges to naturally roll, or plan to hem for a finished look.
- Take your time and measure twice, cut once to avoid common mistakes.
Frequently Asked Questions
Can I cut a V-neck in any type of t-shirt fabric?
While most cotton jersey t-shirts are suitable, very thin, stretchy, or loosely woven fabrics can be challenging. They may stretch out of shape easily or fray excessively. Stick to stable knits for your first few attempts.
What if I accidentally cut the back of the shirt?
If you’ve cut through to the back, it’s a common mishap, especially when rushing. Depending on the severity, you might be able to sew the cut back together with a matching thread or turn it into a design feature, like a small cutout, if it’s symmetrical.
How can I prevent the V-neck from stretching out over time?
To minimize stretching, consider adding a narrow strip of fusible interfacing to the wrong side of the fabric along the cut V-neck line before hemming. Alternatively, sewing a narrow hem with a zigzag stitch or using a twin needle will provide stability.
Is it possible to make the V-neck wider instead of just deeper?
Yes, you can make the V-neck wider. When marking, instead of drawing lines from the existing shoulder seam, start your V-neck lines a little further in from the shoulder, towards the existing crew neck edge. This will create a broader V opening.
Our Top Recommended Finds
- Fiskars Fabric Scissors: Incredibly sharp and comfortable, these make cutting fabric a breeze and ensure clean edges.
- Dritz Tailor’s Chalk: Essential for marking precise lines that disappear easily after use, preventing permanent marks on your garment.
- Singer Fray Check Liquid Seam Sealant: A fantastic tool for preventing fraying on raw edges, especially if you opt for a no-sew finish.
Reimagine Your Wardrobe Today
Transforming a simple t-shirt into a custom V-neck is a rewarding project that adds a personal touch to your everyday wear.
It’s an accessible way to experiment with fashion and make your clothes truly reflect your style.
Grab an old tee, follow these steps, and discover the satisfaction of creating something new with your own hands.
Beginner-friendly templates, step-by-step guides,
and weekly project ideas in your inbox.