💎 How To Wire Wrap Stones For Beginners

Beginner-friendly templates, step-by-step guides,
and weekly project ideas in your inbox.
There’s a unique magic in turning a raw stone into a wearable piece of art.
I remember my first wire-wrapped pendant; it wasn’t perfect, but the feeling of creating something beautiful with my own hands was incredibly rewarding.
This guide shares that hands-on experience, providing clear steps to help you start your own wire-wrapping journey today.
Quick Overview
You’re about to learn how to transform ordinary stones into stunning jewelry pieces using simple wire-wrapping techniques.
This guide breaks down the process, making it accessible even if you’ve never worked with wire before.
- Time needed: 1-2 hours for your first piece
- Difficulty: Beginner
- What you’ll need: Wire, pliers, and a cabochon stone
Step-by-Step Instructions
Step 1: Gather Your Tools and Materials
Before you begin, ensure you have everything ready. This prevents interruptions and keeps your workflow smooth.
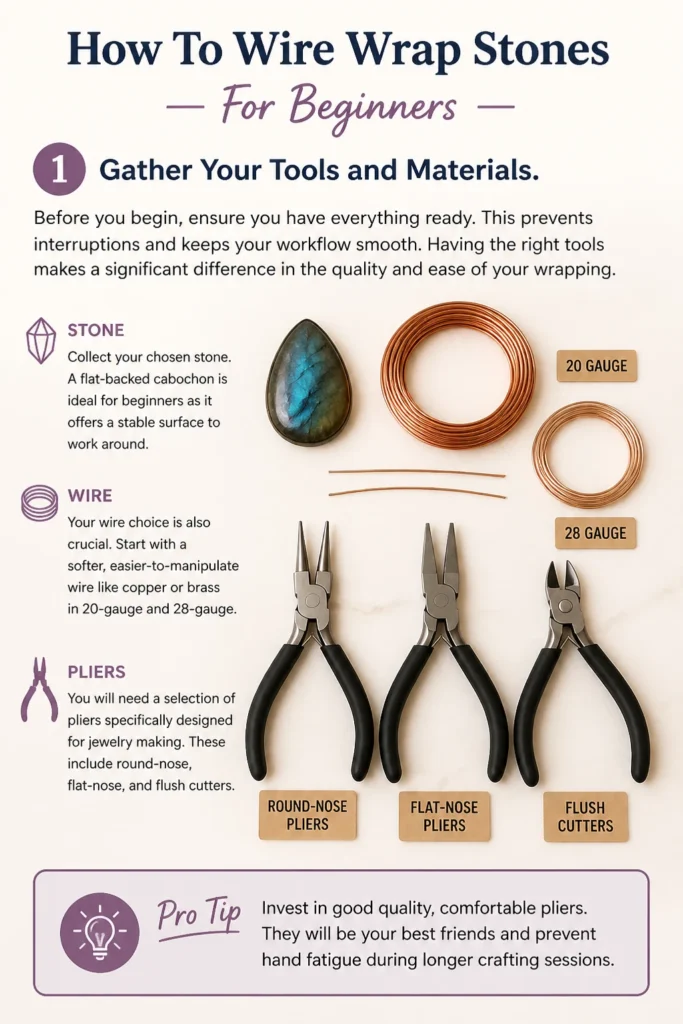
Having the right tools makes a significant difference in the quality and ease of your wrapping.
Collect your chosen stone, various wires, and your set of pliers.
You will need a selection of pliers specifically designed for jewelry making. These include round-nose, flat-nose, and flush cutters.
Your wire choice is also crucial. Start with a softer, easier-to-manipulate wire like copper or brass in 20-gauge and 28-gauge.
For stones, a flat-backed cabochon is ideal for beginners as it offers a stable surface to work around.
Pro Tip: Invest in good quality, comfortable pliers. They will be your best friends and prevent hand fatigue during longer crafting sessions.
Step 2: Prepare Your Frame Wires
The frame wires are the foundation that holds your stone securely. They provide the main structure for your design.
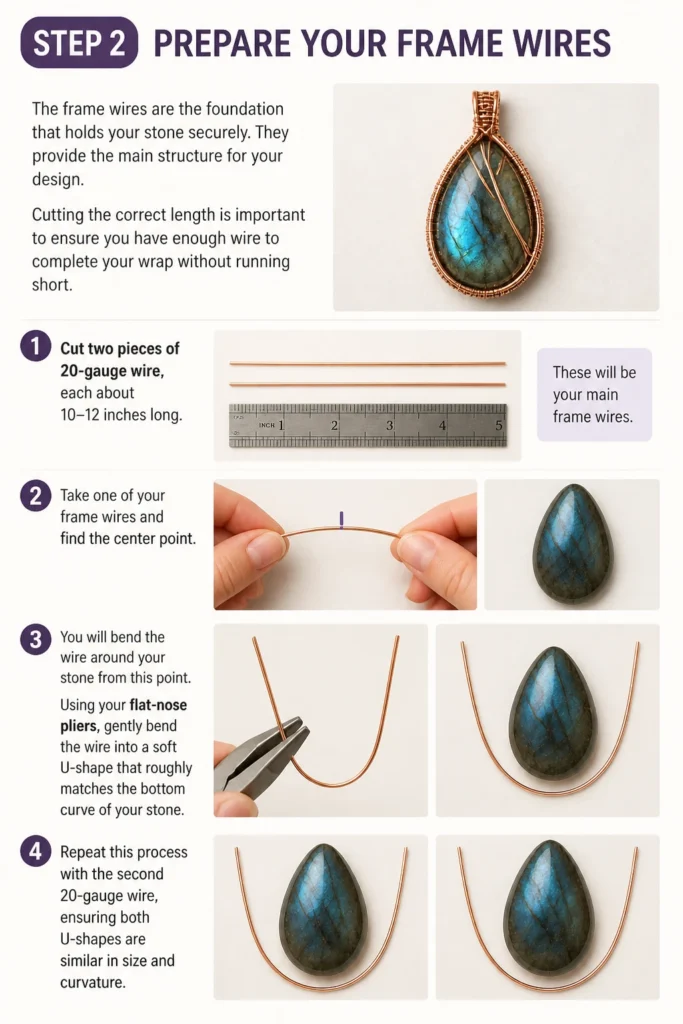
Cutting the correct length is important to ensure you have enough wire to complete your wrap without running short.
Cut two pieces of 20-gauge wire, each about 10-12 inches long. These will be your main frame wires.
Take one of your frame wires and find the center point. You will bend the wire around your stone from this point.
Using your flat-nose pliers, gently bend the wire into a soft U-shape that roughly matches the bottom curve of your stone.
Repeat this process with the second 20-gauge wire, ensuring both U-shapes are similar in size and curvature.
Step 3: Create the Stone’s Basket Base
This step involves securing the two frame wires together to form a stable base for your stone.
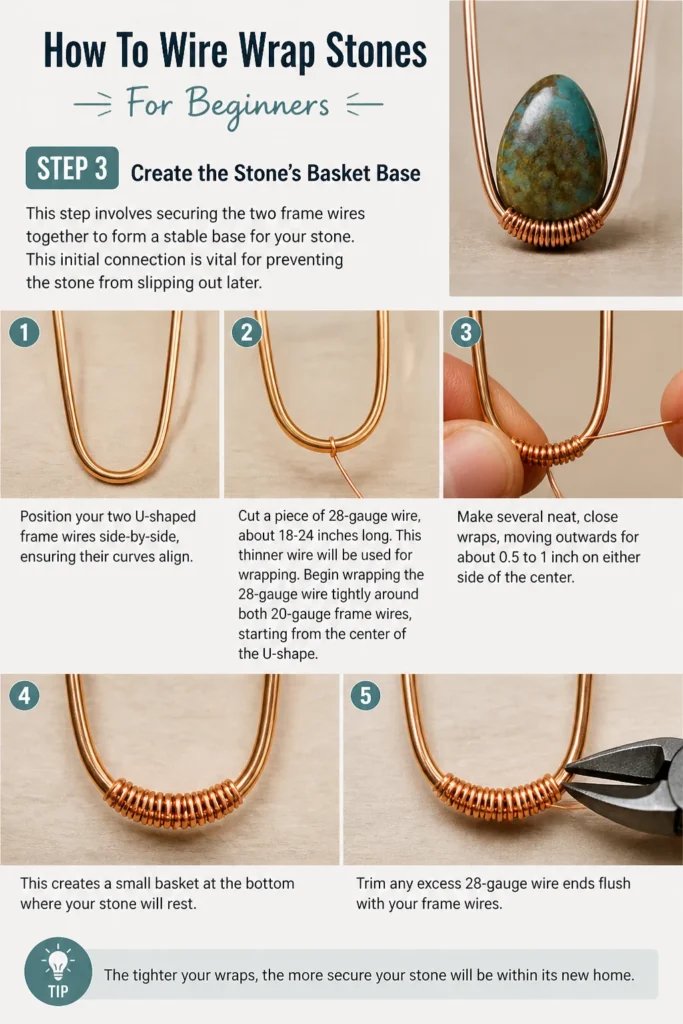
This initial connection is vital for preventing the stone from slipping out later.
Position your two U-shaped frame wires side-by-side, ensuring their curves align.
Now, cut a piece of 28-gauge wire, about 18-24 inches long. This thinner wire will be used for wrapping.
Begin wrapping the 28-gauge wire tightly around both 20-gauge frame wires, starting from the center of the U-shape.
Make several neat, close wraps, moving outwards for about 0.5 to 1 inch on either side of the center.
This creates a small “basket” at the bottom where your stone will rest. Trim any excess 28-gauge wire ends flush with your frame wires.
The tighter your wraps, the more secure your stone will be within its new home.
Step 4: Position Your Stone and Secure the Sides
With the base complete, it’s time to introduce your stone and begin encasing it.
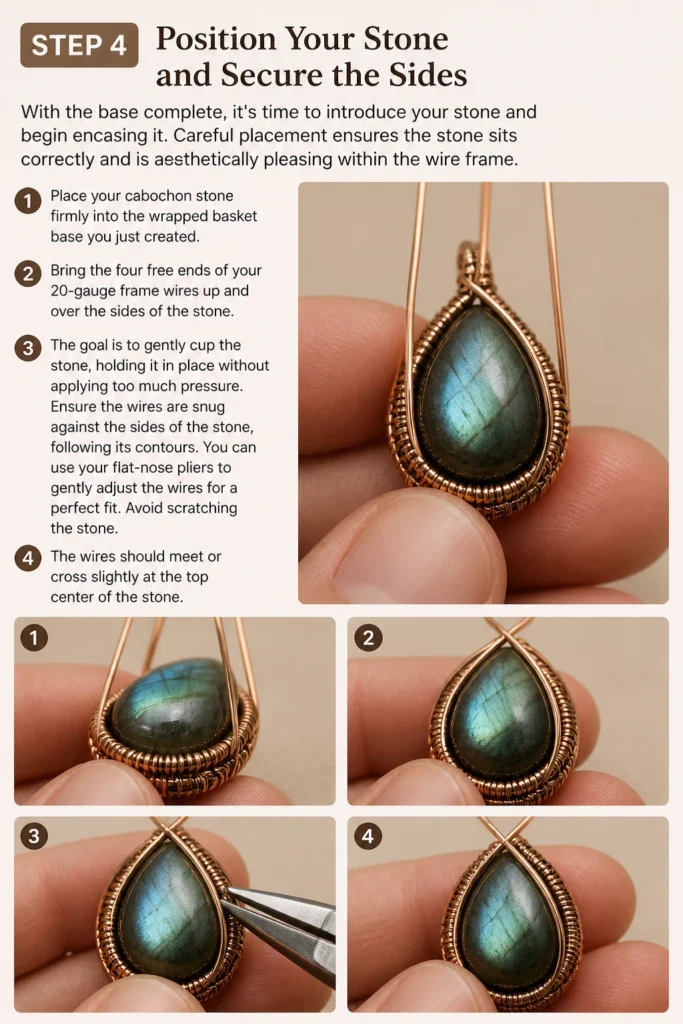
Careful placement ensures the stone sits correctly and is aesthetically pleasing within the wire frame.
Place your cabochon stone firmly into the wrapped basket base you just created.
Bring the four free ends of your 20-gauge frame wires up and over the sides of the stone.
The goal is to gently cup the stone, holding it in place without applying too much pressure.
Ensure the wires are snug against the sides of the stone, following its contours.
You can use your flat-nose pliers to gently adjust the wires for a perfect fit. Avoid scratching the stone.
The wires should meet or cross slightly at the top center of the stone.
Step 5: Begin the Back Weave and Top Closure
This stage focuses on creating the back structure and starting the top loop for hanging.
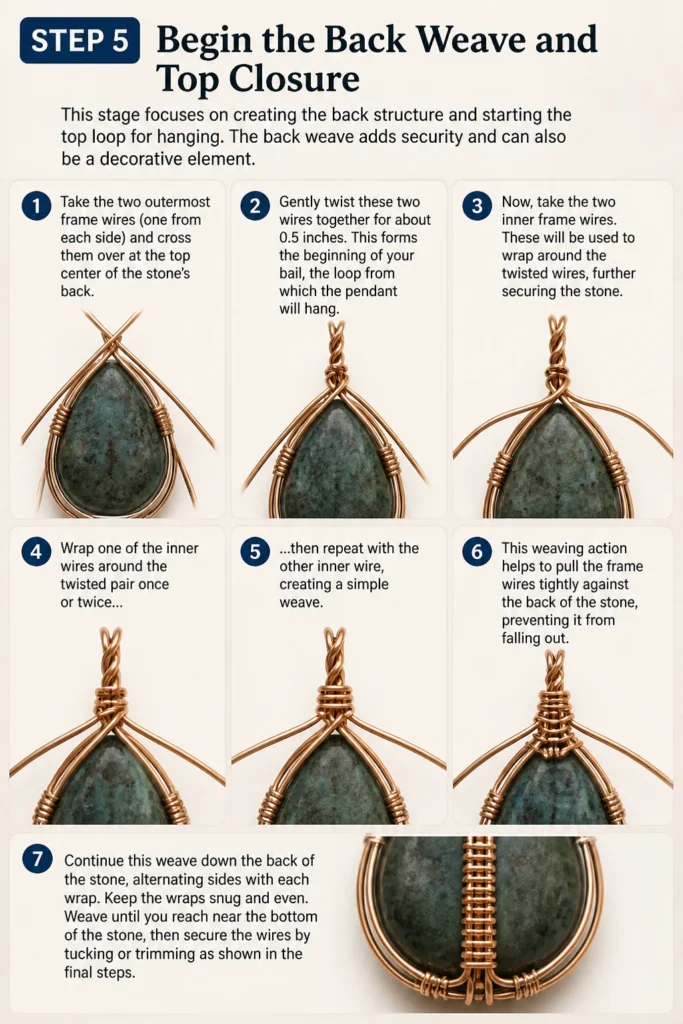
The back weave adds security and can also be a decorative element.
Take the two outermost frame wires (one from each side) and cross them over at the top center of the stone’s back.
Gently twist these two wires together for about 0.5 inches. This forms the beginning of your bail, the loop from which the pendant will hang.
Now, take the two inner frame wires. These will be used to wrap around the twisted wires, further securing the stone.
Wrap one of the inner wires around the twisted pair once or twice, then repeat with the other inner wire, creating a simple weave.
This weaving action helps to pull the frame wires tightly against the back of the stone, preventing it from falling out.
Continue this weaving for about 1-2 inches, or until the stone feels very secure within its wire cage.
Pro Tip: Keep your wraps tight and consistent. Loose wraps can lead to a wobbly stone or an uneven final appearance. Practice makes perfect.
Step 6: Form the Bail (Hanging Loop)
The bail is essential for wearing your pendant. It needs to be sturdy and well-formed.
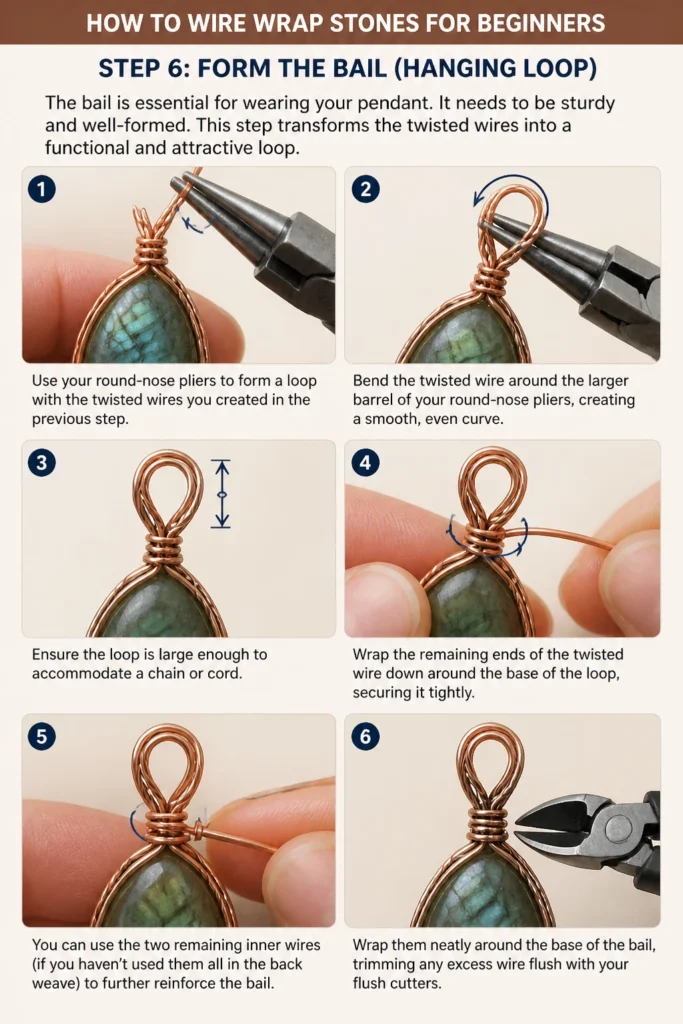
This step transforms the twisted wires into a functional and attractive loop.
Use your round-nose pliers to form a loop with the twisted wires you created in the previous step.
Bend the twisted wire around the larger barrel of your round-nose pliers, creating a smooth, even curve.
Ensure the loop is large enough to accommodate a chain or cord.
Wrap the remaining ends of the twisted wire down around the base of the loop, securing it tightly.
You can use the two remaining inner wires (if you haven’t used them all in the back weave) to further reinforce the bail.
Wrap them neatly around the base of the bail, trimming any excess wire flush with your flush cutters.
Step 7: Add Finishing Touches and Secure Loose Ends
This final step refines your pendant, making it comfortable to wear and visually appealing.
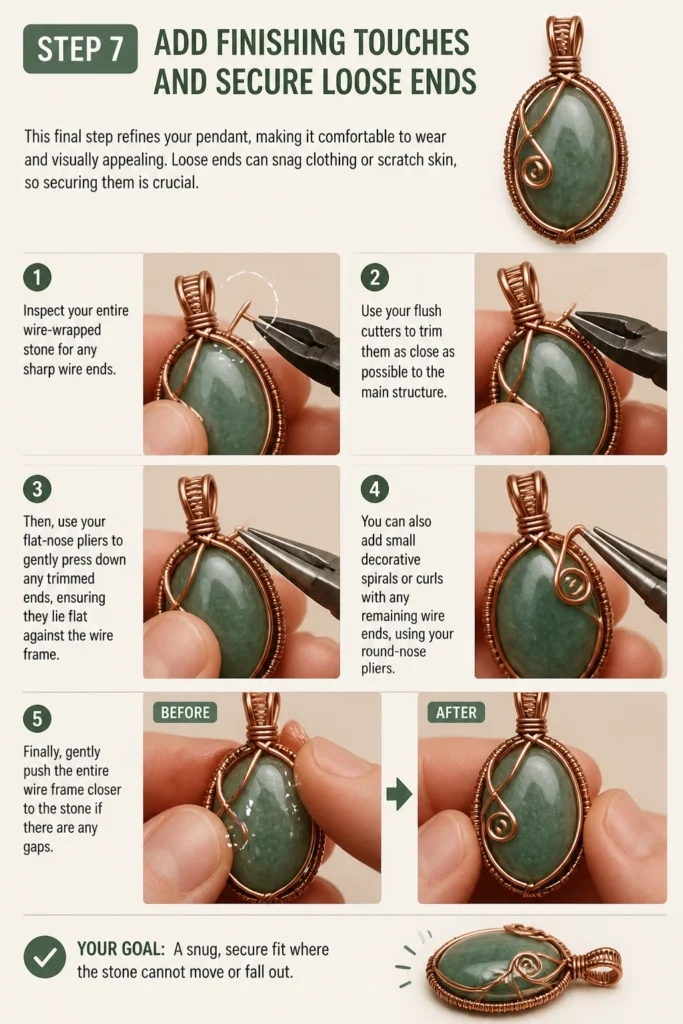
Loose ends can snag clothing or scratch skin, so securing them is crucial.
Inspect your entire wire-wrapped stone for any sharp wire ends. Use your flush cutters to trim them as close as possible to the main structure.
Then, use your flat-nose pliers to gently press down any trimmed ends, ensuring they lie flat against the wire frame.
You can also add small decorative spirals or curls with any remaining wire ends, using your round-nose pliers.
These small details can elevate the look of your piece and add a personal touch.
Finally, gently push the entire wire frame closer to the stone if there are any gaps.
Your goal is a snug, secure fit where the stone cannot move or fall out.
Common Mistakes to Avoid
Using the Wrong Pliers
Many beginners try to use household pliers, which are often serrated and can mar or scratch your wire. These marks are difficult to remove and detract from your finished piece.
Always use smooth-jawed jewelry pliers. Flat-nose, round-nose, and flush cutters are the essential trio for wire wrapping, designed to protect your wire and achieve clean bends.
Not Securing Ends Properly
Leaving sharp wire ends exposed is a common mistake that can lead to discomfort or injury when wearing the jewelry. It also creates a less professional finish.
After trimming, always use flat-nose pliers to press the wire ends flat against the main structure. Ensure no sharp points are sticking out to catch on clothing or skin.
Loose Wire Wraps
If your initial wraps are not tight, the stone can become loose and potentially fall out of its setting. Loose wraps also look messy and unprofessional.
Always pull your wrapping wire taut as you work. Consistent tension is key to creating a secure and aesthetically pleasing wire basket for your stone.
Overworking the Wire
Bending and unbending wire repeatedly can cause it to “work harden,” making it brittle and prone to breaking. This is especially true for softer metals like copper.
Plan your bends as much as possible and try to achieve them in one or two deliberate motions. If you make a mistake, gently correct it rather than forcing the wire.
Troubleshooting
Stone Feels Loose in the Setting
If your stone wiggles or feels insecure, the frame wires might not be tight enough around it, or your initial wraps were too loose.
Gently press the frame wires closer to the stone with your flat-nose pliers. You can also add more tight wraps of thinner wire around the frame wires at strategic points to snug the stone in place.
Wire Snaps While Working
Wire snapping often indicates that it has been bent too many times in the same spot, causing work hardening and fatigue, or that you’re using too much force.
Try to work gently and avoid excessive re-bending. If the wire snaps, you might need to cut a new piece and restart that section, or carefully integrate the break into your design if possible by securing the ends.
Bail (Loop) is Uneven or Too Small
An uneven or small bail can make it difficult to wear your pendant on a chain, or it might look awkward.
Use the larger barrel of your round-nose pliers to form the bail. If it’s uneven, gently reshape it with your pliers. For a larger bail, ensure you have enough wire length before forming the loop.
Key Takeaways
- Choosing the right tools, especially smooth-jawed pliers, is fundamental for clean wire wrapping.
- Start with softer metals like copper or brass and flat-backed cabochons for easier learning.
- Securely wrapping the base and back of the stone is critical for preventing it from falling out.
- Always trim and press down wire ends to ensure a safe and professional finish.
- Practice consistency in your wire tension and bends to achieve a neat and strong piece.
- Don’t be afraid to experiment with decorative elements like spirals once you master the basics.
Frequently Asked Questions
What type of wire is best for beginners?
For beginners, 20-gauge and 28-gauge copper, brass, or artistic wire are excellent choices. They are soft, easy to bend, and relatively inexpensive, allowing you to practice without significant cost.
Can I use any stone for wire wrapping?
While almost any stone can be wire-wrapped, beginners should start with flat-backed cabochons. These provide a stable surface and are easier to secure than irregularly shaped or faceted stones.
How do I prevent the wire from scratching my stone?
Work gently and deliberately. Avoid dragging pliers directly across the stone’s surface. Some crafters even place a small piece of painter’s tape on the stone’s face for added protection during the wrapping process.
What if my wire looks messy or uneven?
Evenness comes with practice. Focus on keeping your wraps tight and consistent. If a section looks messy, you can often unwrap it carefully and redo it, or incorporate small decorative elements to disguise imperfections.
Our Top Recommended Finds
- Jewelry Pliers Set: A basic set including round-nose, flat-nose, and flush cutters is indispensable for precise work.
- Assorted Copper Wire Pack: Get a variety of gauges (20, 24, 28) to experiment with different structural and decorative elements.
- Flat-Backed Cabochon Assortment: A small collection of various stones provides ample practice material and creative options.
Craft Your Vision: Your Journey Starts Now
You’ve taken the first step towards a rewarding new craft. Wire wrapping offers endless possibilities for creativity and personal expression.
Each stone you wrap tells a unique story, shaped by your hands and your imagination.
Now, gather your tools, choose your first stone, and begin crafting. The joy of creating something beautiful awaits.
Beginner-friendly templates, step-by-step guides,
and weekly project ideas in your inbox.



I love the wire wrapping instructions. However an disappointed that there are no picture examples or video so I can actually see what your words reflect. I will have to go somewhere else to actually see how this is done. A visual example would mean the world.