⚙️ How To Fix A Zipper That Splits

Beginner-friendly templates, step-by-step guides,
and weekly project ideas in your inbox.
Few things are as frustrating as a zipper that splits open, rendering your favorite jacket or bag unusable. I’ve been there, staring at a perfectly good item, wondering if it’s destined for the donation pile. But what if I told you most splitting zippers are easily fixable with a few simple tools and a little patience?
This guide comes from countless personal repairs, saving everything from cherished jeans to essential luggage. You absolutely can revive that faulty zipper and extend the life of your belongings.

Quick Overview
Repairing a splitting zipper is a common household task that can save you money and keep your favorite items functional. You’ll learn to diagnose the problem, adjust the slider, and get your zipper running smoothly again.
- Time needed: 10-30 minutes
- Difficulty: Beginner
- What you’ll need: Pliers (needle-nose or regular), graphite pencil or lubricant, possibly a small flathead screwdriver.
Step-by-Step Instructions
Step 1: Understand the Zipper’s Anatomy
Before diving into repairs, it helps to know the main parts of a zipper. You have the teeth (or coils), the fabric tape they’re attached to, and the slider that moves up and down. The slider is usually the culprit when a zipper splits.
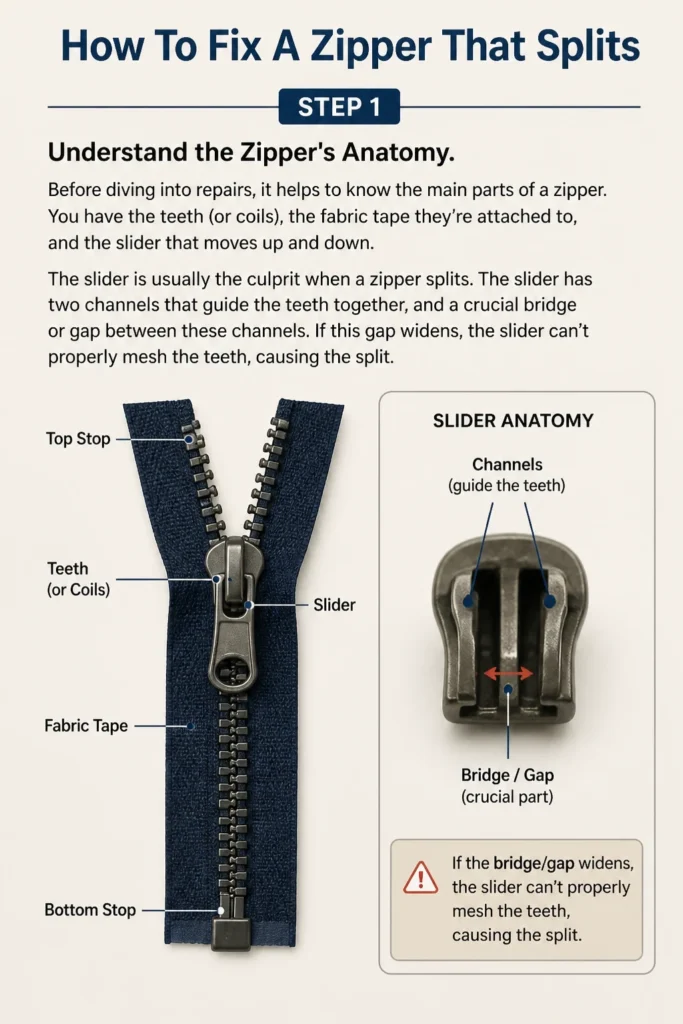
The slider has two channels that guide the teeth together, and a crucial “bridge” or gap between these channels. If this gap widens, the slider can’t properly mesh the teeth, causing the split.
Step 2: Clear the Zipper Path
Sometimes, a zipper splits because something is blocking its path. Fabric, threads, or even small debris can get caught in the slider, preventing the teeth from engaging.
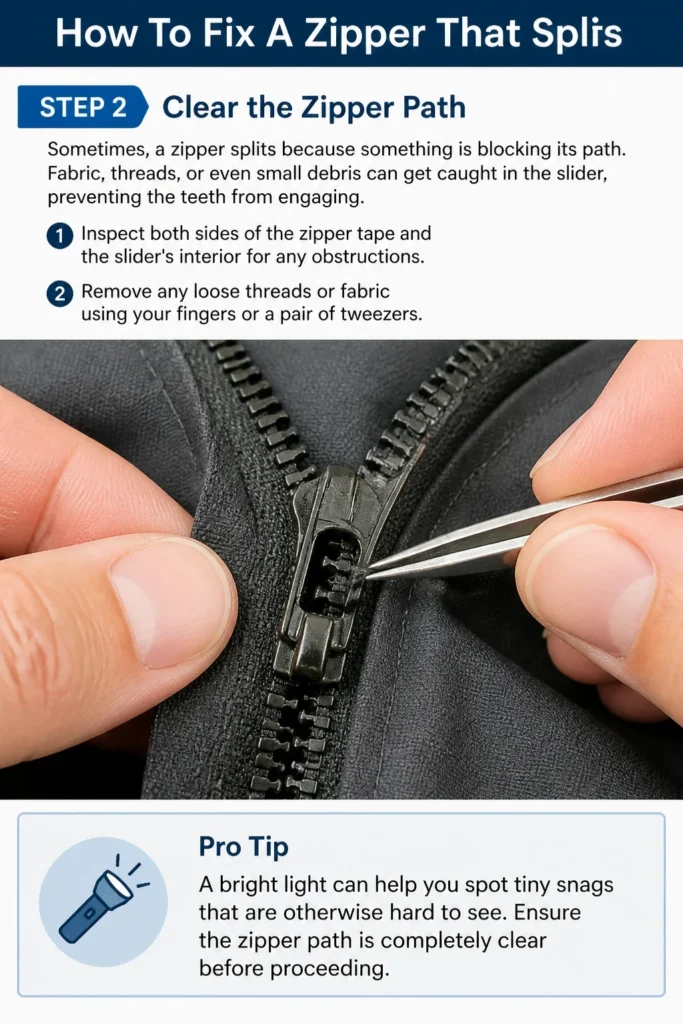
Inspect both sides of the zipper tape and the slider’s interior for any obstructions. Remove any loose threads or fabric using your fingers or a pair of tweezers.
Pro Tip: A bright light can help you spot tiny snags that are otherwise hard to see. Ensure the zipper path is completely clear before proceeding.
Step 3: Lubricate the Zipper
A dry, stiff zipper can sometimes struggle to engage properly, leading to splitting. Lubrication helps the slider move smoothly, reducing friction and stress on the teeth.
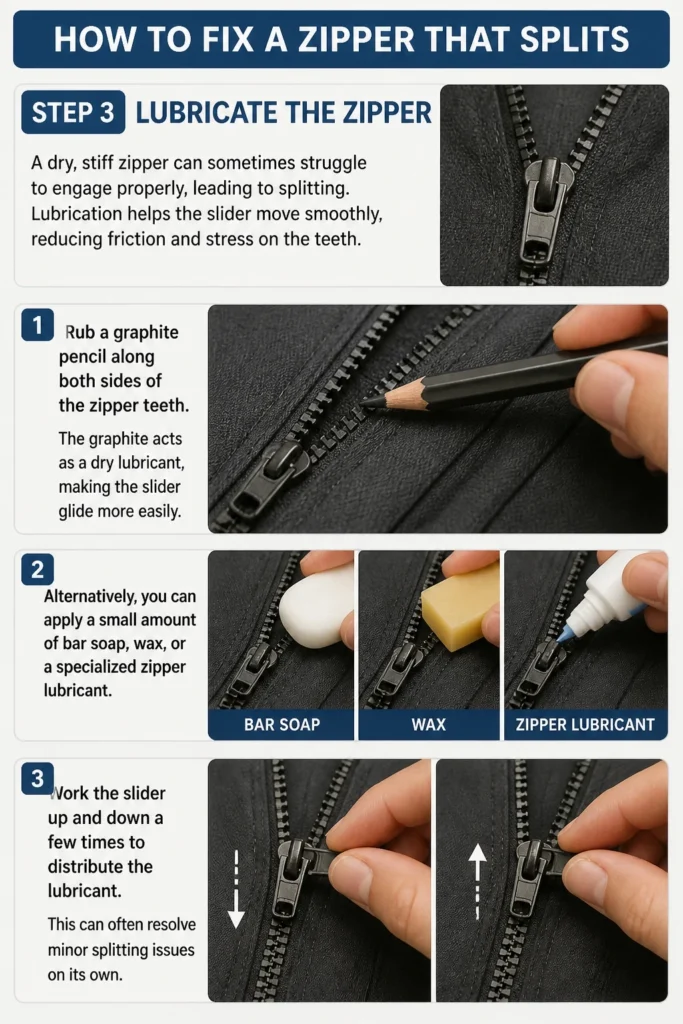
Rub a graphite pencil along both sides of the zipper teeth. The graphite acts as a dry lubricant, making the slider glide more easily. Alternatively, you can apply a small amount of bar soap, wax, or a specialized zipper lubricant.
Work the slider up and down a few times to distribute the lubricant. This can often resolve minor splitting issues on its own.
Step 4: Examine the Zipper Slider
The slider is the heart of your zipper’s problem. Carefully look at the slider itself. Does it appear bent or misshapen? Is there a noticeable gap between the top and bottom plates of the slider?
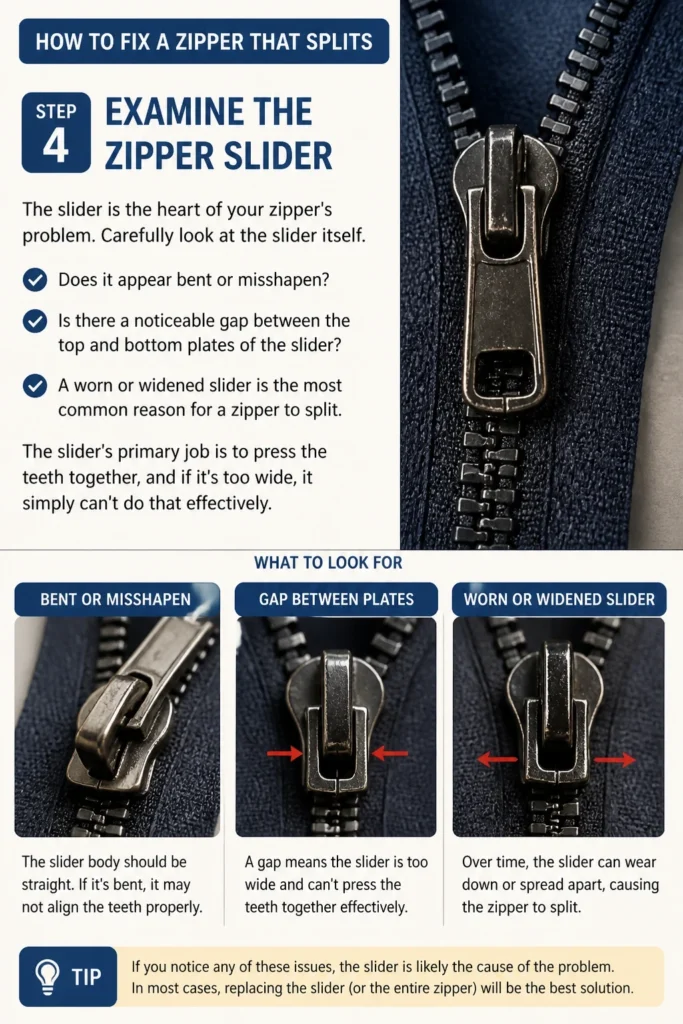
A worn or widened slider is the most common reason for a zipper to split. The slider’s primary job is to press the teeth together, and if it’s too wide, it simply can’t do that effectively.
Step 5: Tighten the Zipper Slider
This is often the most effective fix. You need to gently squeeze the slider to narrow the gap that guides the zipper teeth. This restores its ability to properly engage the teeth.
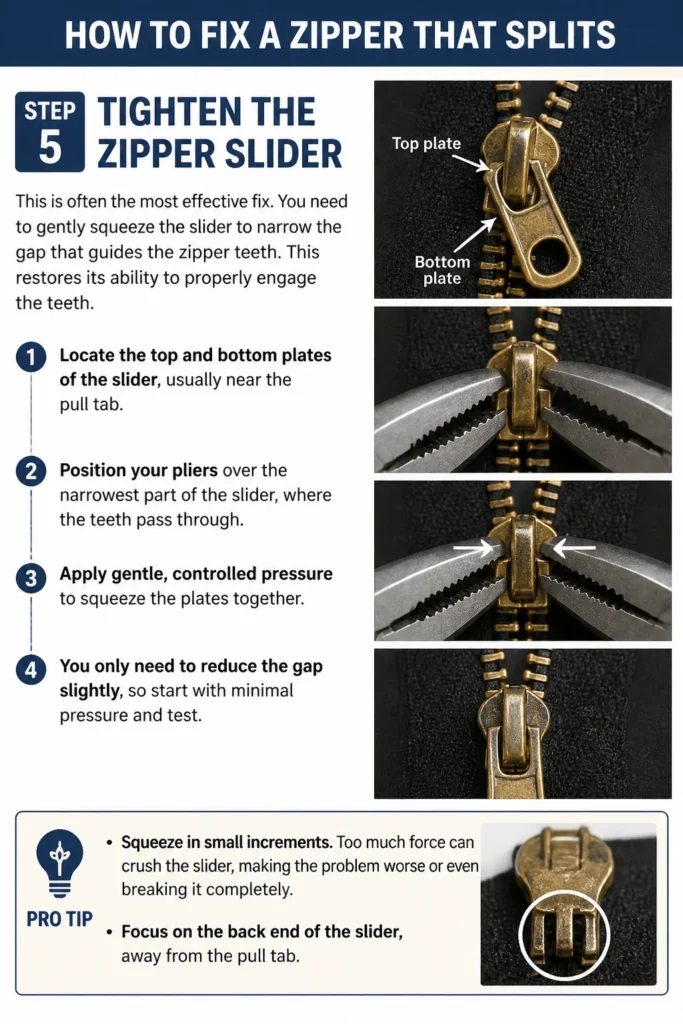
Locate the top and bottom plates of the slider, usually near the pull tab. Position your pliers over the narrowest part of the slider, where the teeth pass through.
Apply gentle, controlled pressure to squeeze the plates together. You only need to reduce the gap slightly, so start with minimal pressure and test.
Pro Tip: Squeeze in small increments. Too much force can crush the slider, making the problem worse or even breaking it completely. Focus on the back end of the slider, away from the pull tab.
Step 6: Test the Zipper
After each small adjustment, it’s crucial to test your work. Move the zipper slider up and down the track. Does it still split? Does it move more smoothly?
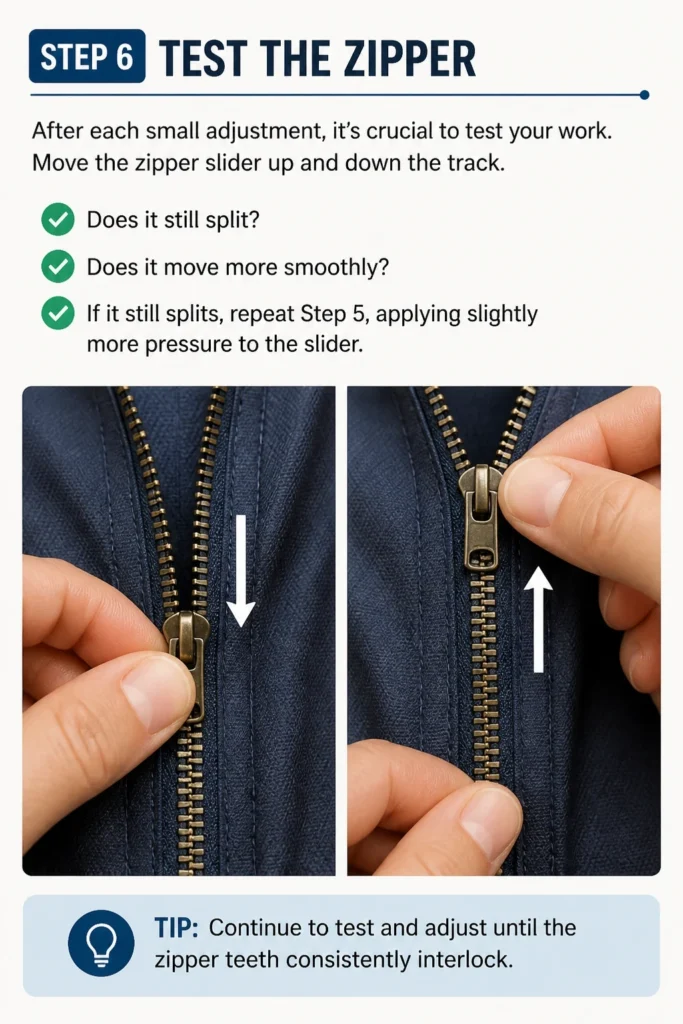
If it still splits, repeat Step 5, applying slightly more pressure to the slider. Continue to test and adjust until the zipper teeth consistently interlock.
Step 7: Address Uneven Gaps (If Applicable)
Sometimes, one side of the slider’s gap might be wider than the other. If you notice this, you’ll need to adjust more precisely.
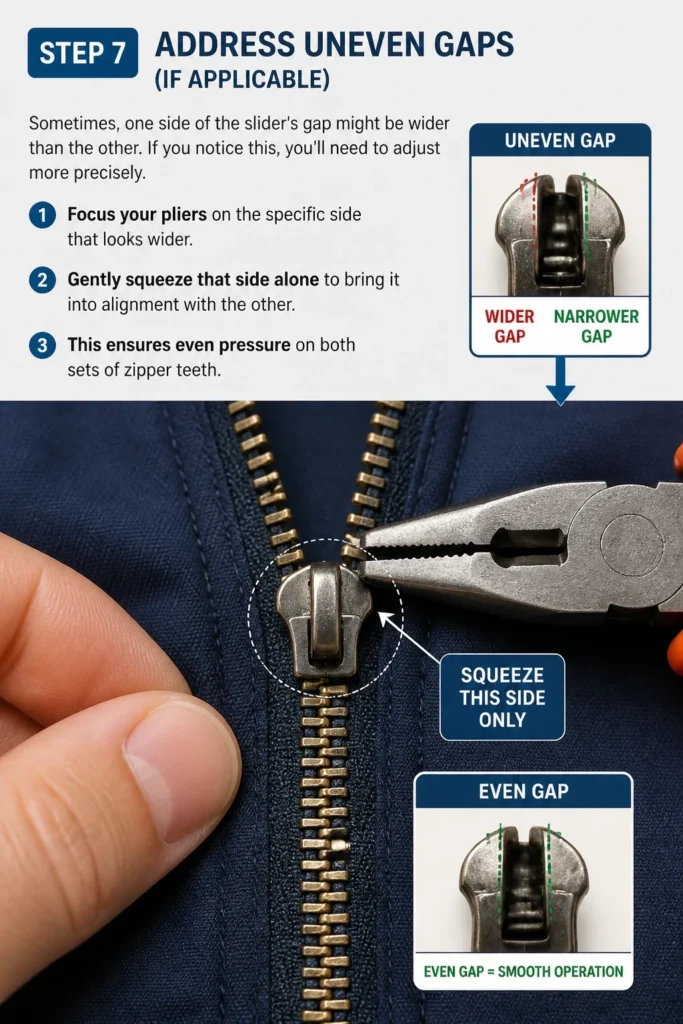
Focus your pliers on the specific side that looks wider. Gently squeeze that side alone to bring it into alignment with the other. This ensures even pressure on both sets of zipper teeth.
Step 8: Consider a Full Slider Replacement
If repeated tightening doesn’t work, or if the slider is visibly damaged, bent, or broken, it might be beyond repair. In this scenario, replacing the slider is the next step.
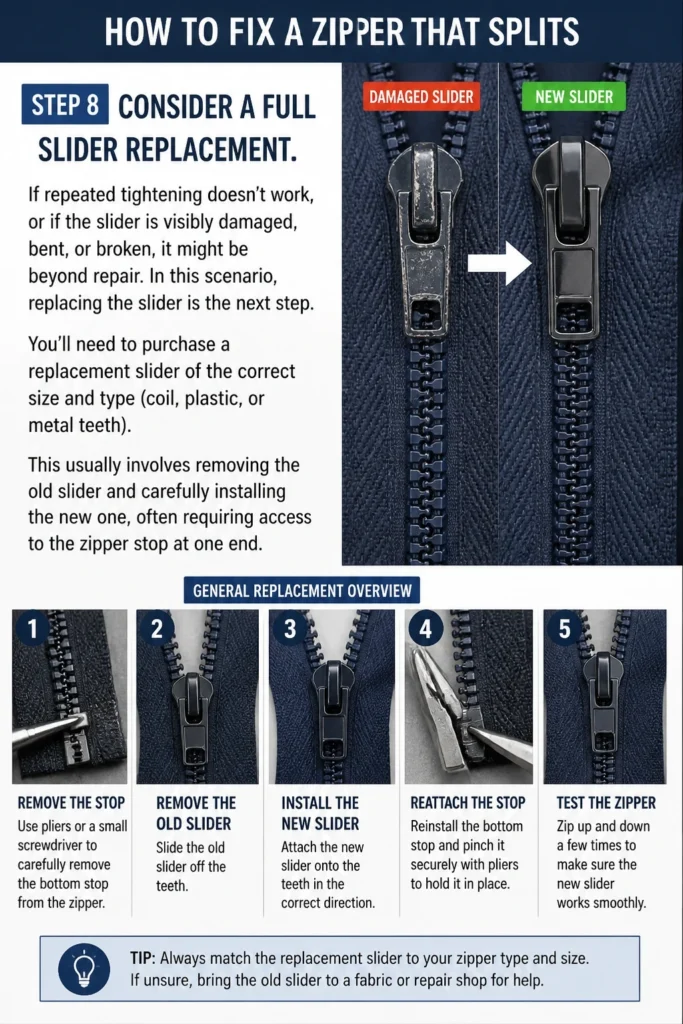
You’ll need to purchase a replacement slider of the correct size and type (coil, plastic, or metal teeth). This usually involves removing the old slider and carefully installing the new one, often requiring access to the zipper stop at one end.
Common Mistakes to Avoid
Applying Too Much Force
It’s tempting to squeeze the zipper slider with all your might when it’s not working. However, excessive force can easily crush the slider, making it unusable and potentially damaging the zipper teeth. Always use gentle, controlled pressure and make small adjustments.
Ignoring Zipper Type
Not all zippers are the same. Metal zippers, plastic zippers, and coil zippers each have slightly different constructions. While the principle of tightening the slider is similar, be aware that metal zippers can be more robust, while plastic or coil zippers might be more delicate and prone to breaking if mishandled.
Overlooking Obstructions
Many people immediately jump to tightening the slider without first checking for simple obstructions. A stray thread or a tiny piece of fabric caught in the slider can cause splitting. Always clear the zipper path thoroughly before attempting any mechanical adjustments.
Using the Wrong Tools
Using large, blunt pliers can make precise adjustments difficult and increase the risk of over-tightening or damaging the slider. Needle-nose pliers or jewelry pliers offer better control and precision, making the repair process much smoother and safer for your zipper.
Troubleshooting
Zipper Still Splits After Tightening
If the zipper continues to split even after you’ve tightened the slider, it could be a sign of a severely worn slider or damaged teeth. First, ensure you’ve lubricated the zipper thoroughly and cleared any hidden obstructions. If it still fails, the slider might be too worn to hold its shape, or some teeth might be bent or missing. In this case, a slider replacement is likely necessary.
Zipper Becomes Too Tight or Jams
If the zipper now feels extremely stiff, hard to move, or jams frequently, you’ve likely over-tightened the slider. The gap is now too narrow, creating too much friction for the teeth to pass through. Gently use a small flathead screwdriver to very slightly pry open the slider’s plates, just enough to ease the tension. Test after each tiny adjustment.
Zipper Teeth Are Damaged or Missing
If individual teeth are bent, broken, or completely missing, tightening the slider won’t fix the issue. A zipper needs a continuous, intact row of teeth to function correctly. For minor damage, you might be able to gently bend a metal tooth back into place with needle-nose pliers. However, significant damage or missing teeth usually means the entire zipper needs to be replaced, not just the slider.
Key Takeaways
- Most splitting zippers are fixable by adjusting the slider.
- Always start by clearing obstructions and lubricating the zipper.
- Use needle-nose pliers for precise, gentle adjustments to the slider.
- Squeeze the slider incrementally, testing after each small adjustment.
- Avoid excessive force, which can permanently damage the zipper.
- Consider a slider replacement if tightening doesn’t resolve the issue.
Frequently Asked Questions
Can all types of zippers be fixed this way?
Most standard coil, metal, and plastic zippers can be fixed using the slider tightening method. However, very fine invisible zippers or heavy-duty industrial zippers might require specialized tools or techniques. The principle remains the same, but the delicacy or robustness of the zipper material will dictate your approach.
What if the zipper pull tab breaks off?
If the pull tab breaks, the slider itself might still be functional. You can often attach a new pull tab, a paperclip, or a small keyring through the hole where the original tab was connected. If the entire slider is damaged, you’ll need to replace the slider.
How do I know what size replacement slider to buy?
Zipper sliders are sized according to the width of the zipper teeth when closed. Look for a number on the back of your existing slider (e.g., #3, #5, #10). If there’s no number, measure the width of the zipper teeth in millimeters while the zipper is closed. This measurement will help you find the correct replacement size.
Is it worth fixing an old zipper, or should I just replace the item?
Fixing a zipper is almost always worth it, especially for high-quality items or those with sentimental value. It’s a cost-effective and environmentally friendly solution. Learning to fix zippers also builds a valuable skill that can save you money on future repairs.
Our Top Recommended Finds
- Needle-Nose Pliers: Essential for precise gripping and gentle squeezing of the zipper slider. Look for a pair with a comfortable grip.
- Graphite Pencil Set: A simple, effective dry lubricant for almost any zipper type. Keep one handy in your repair kit.
- Zipper Repair Kit: A comprehensive kit often includes various slider sizes, top/bottom stops, and sometimes even specialized pliers, perfect for more complex repairs or replacements.
Empower Your Everyday Repairs
Don’t let a splitting zipper dictate the fate of your favorite items any longer. With this guide, you now have the practical knowledge to tackle this common problem head-on. Take a moment to gather your tools and apply these steps to that troublesome zipper today.
Embrace the satisfaction of a successful repair and the extended life of your belongings. You’ll not only save money but also reduce waste. What other small household repairs are waiting for your newfound confidence?
Beginner-friendly templates, step-by-step guides,
and weekly project ideas in your inbox.