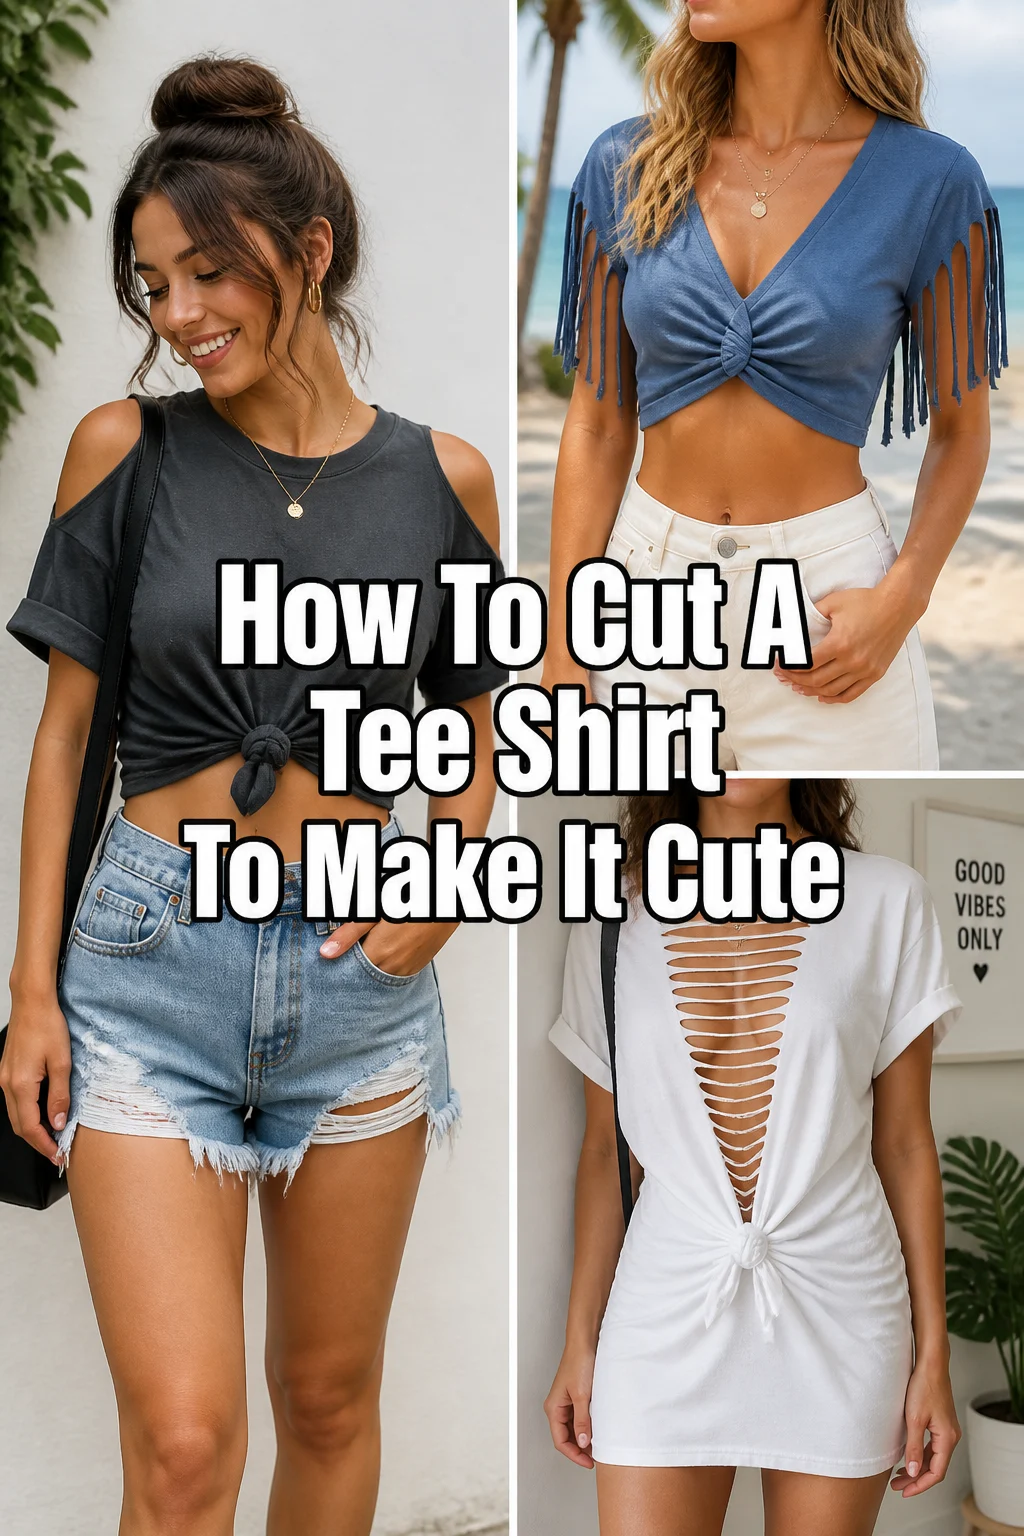
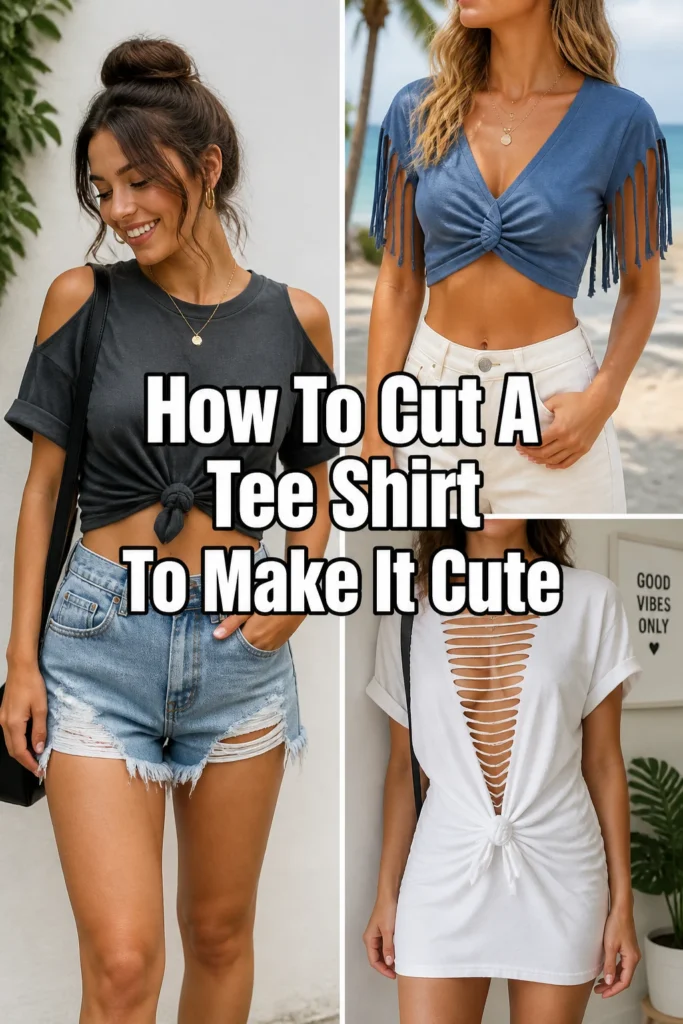
✂️ How To Cut A Tee Shirt To Make It Cute

Beginner-friendly templates, step-by-step guides,
and weekly project ideas in your inbox.
Ever gazed at a plain tee shirt and wished it had a little more personality?
Transforming a basic top into a cute, custom piece is simpler than you might think.
I remember my own early attempts, fumbling with dull scissors and unsure cuts, but with a little guidance, you can create something truly unique and stylish.
Quick Overview
This guide will walk you through various techniques to snip, style, and personalize your tee shirts.
You’ll learn how to create flattering necklines, stylish sleeves, and playful hems, turning an ordinary item into a wardrobe favorite.
- Time needed: 30-60 minutes (depending on design complexity)
- Difficulty: Beginner
- What you’ll need: A tee shirt, sharp fabric scissors, fabric chalk or marker, a ruler, and a flat surface.
Step-by-Step Instructions
Step 1: Choose Your Tee Shirt and Gather Supplies
Start with a tee shirt you’re ready to transform. Cotton or cotton-blend tees work best, as they are forgiving and won’t fray excessively.
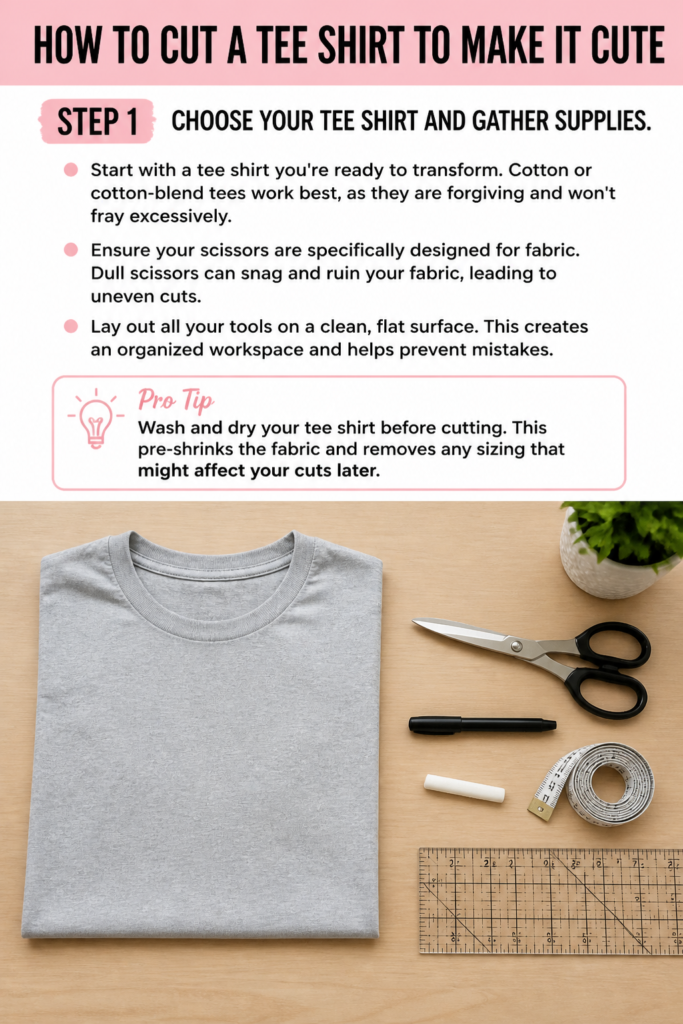
Ensure your scissors are specifically designed for fabric. Dull scissors can snag and ruin your fabric, leading to uneven cuts.
Lay out all your tools on a clean, flat surface. This creates an organized workspace and helps prevent mistakes.
Pro Tip: Wash and dry your tee shirt before cutting. This pre-shrinks the fabric and removes any sizing that might affect your cuts later.
Step 2: Plan Your Design and Mark Your Cuts
Decide on the style you want to achieve. Will you alter the neckline, sleeves, or hem? Perhaps all three?
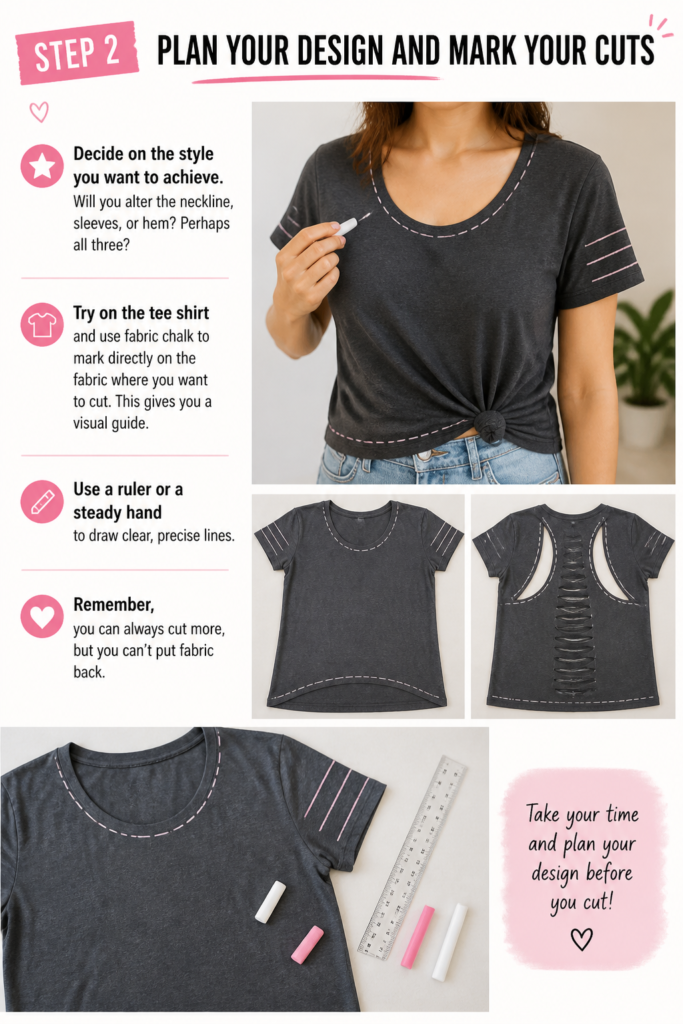
Try on the tee shirt and use fabric chalk to mark directly on the fabric where you want to cut. This gives you a visual guide.
Use a ruler or a steady hand to draw clear, precise lines. Remember, you can always cut more, but you can’t put fabric back.
Step 3: Master the Neckline Transformation
A simple change to the neckline can dramatically alter a tee’s look. Common options include off-the-shoulder, wider scoop, or V-neck.
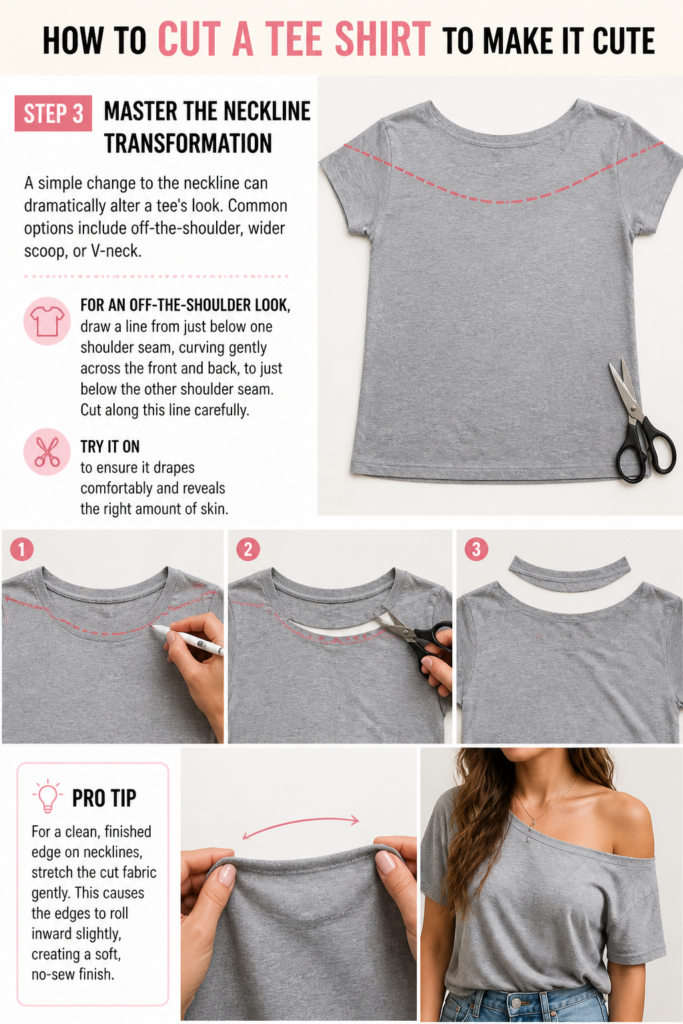
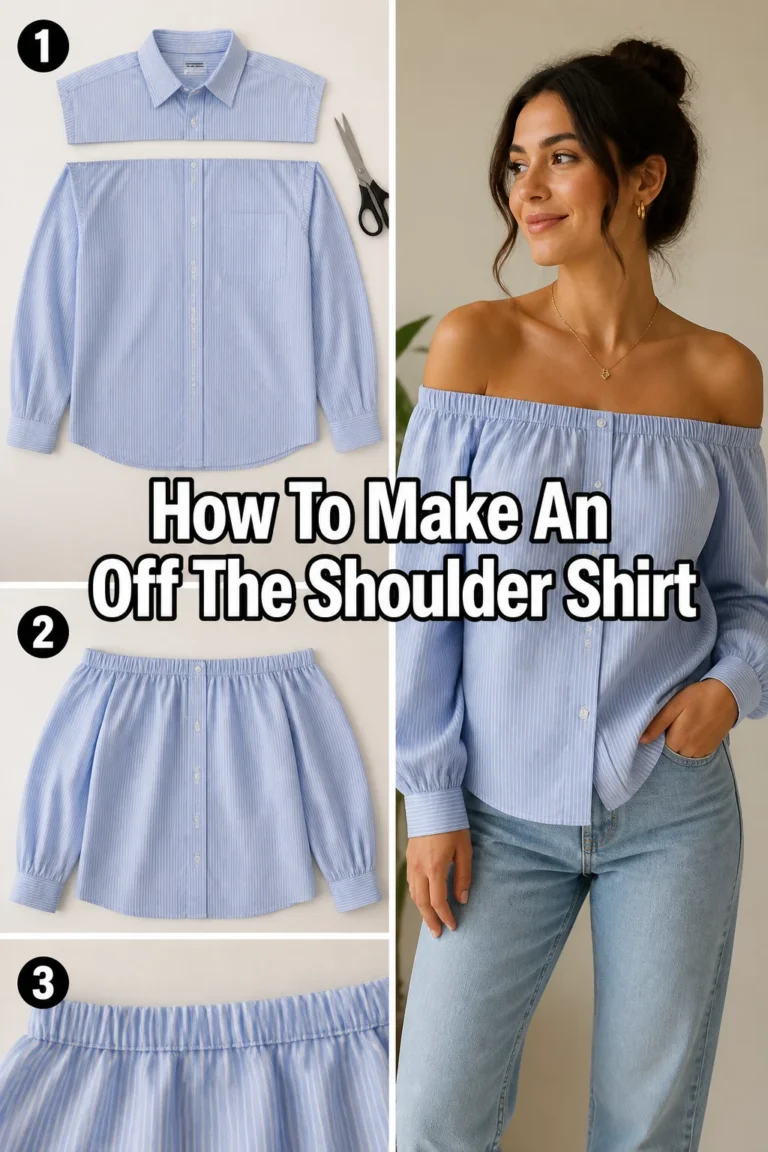
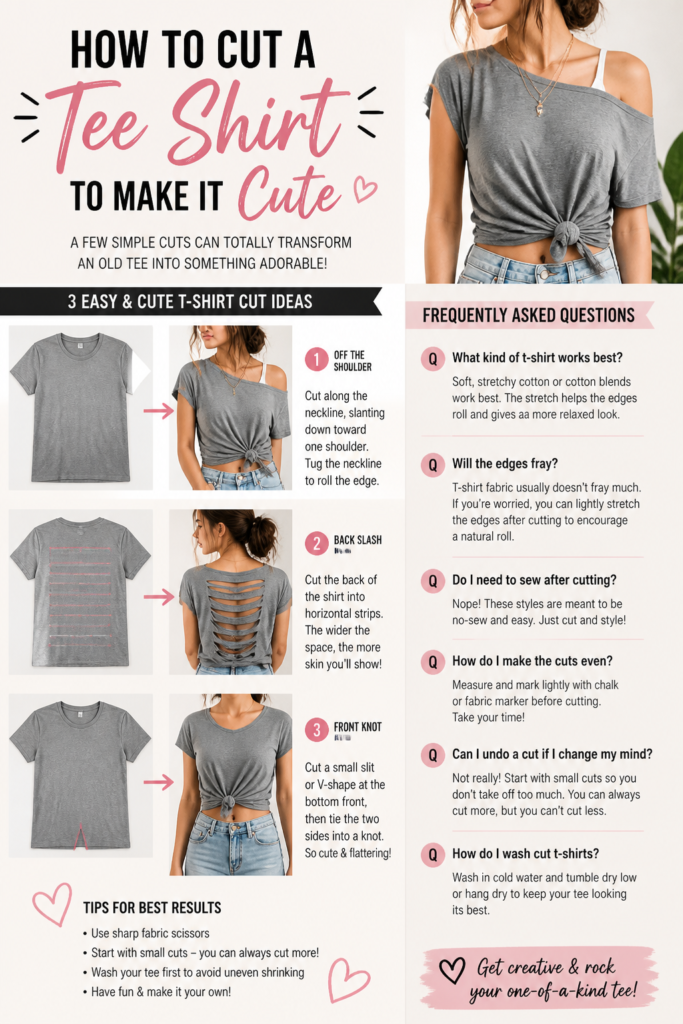
For an off-the-shoulder look, draw a line from just below one shoulder seam, curving gently across the front and back, to just below the other shoulder seam.
Cut along this line carefully. Try it on to ensure it drapes comfortably and reveals the right amount of skin.
Pro Tip: For a clean, finished edge on necklines, stretch the cut fabric gently. This causes the edges to roll inward slightly, creating a soft, no-sew finish.
Step 4: Style Your Sleeves
Sleeve alterations can range from a simple trim to a complete redesign. Consider rolled sleeves, cap sleeves, or even sleeveless cuts.
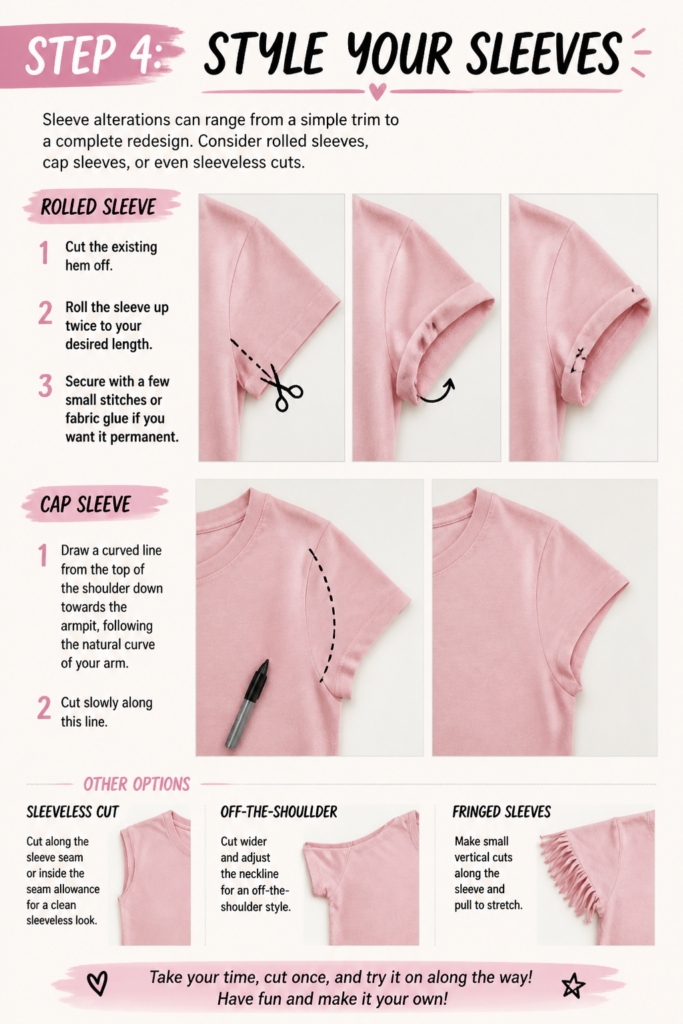
To create a rolled sleeve, cut the existing hem off. Then, roll the sleeve up twice to your desired length and secure with a few small stitches or fabric glue if you want it permanent.
For a cap sleeve, draw a curved line from the top of the shoulder down towards the armpit, following the natural curve of your arm. Cut slowly along this line.
Step 5: Revamp the Hemline
The bottom hem offers many creative possibilities. You can create a cropped look, a high-low hem, or even a fringed bottom.
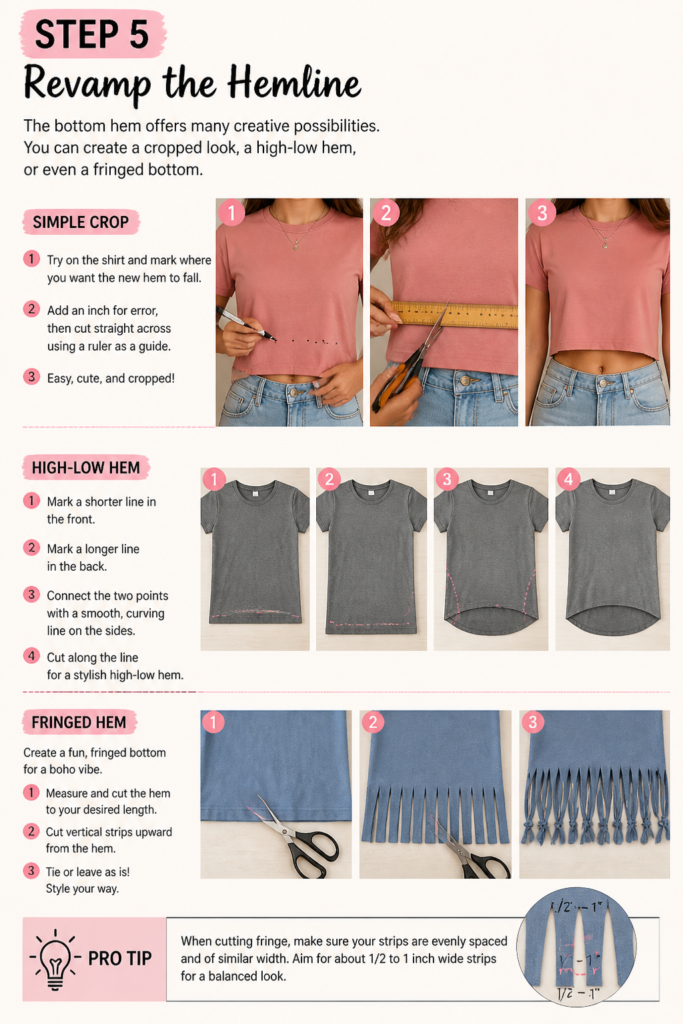
For a simple crop, try on the shirt and mark where you want the new hem to fall. Add an inch for error, then cut straight across using a ruler as a guide.
To make a high-low hem, mark a shorter line in the front and a longer line in the back. Connect these two points with a smooth, curving line on the sides before cutting.
Pro Tip: When cutting fringe, make sure your strips are evenly spaced and of similar width. Aim for about 1/2 to 1 inch wide strips for a balanced look.
Step 6: Add Fun Details Like Fringe or Ties
Fringe adds a playful, bohemian touch. Decide if you want fringe on the sleeves, hem, or both.
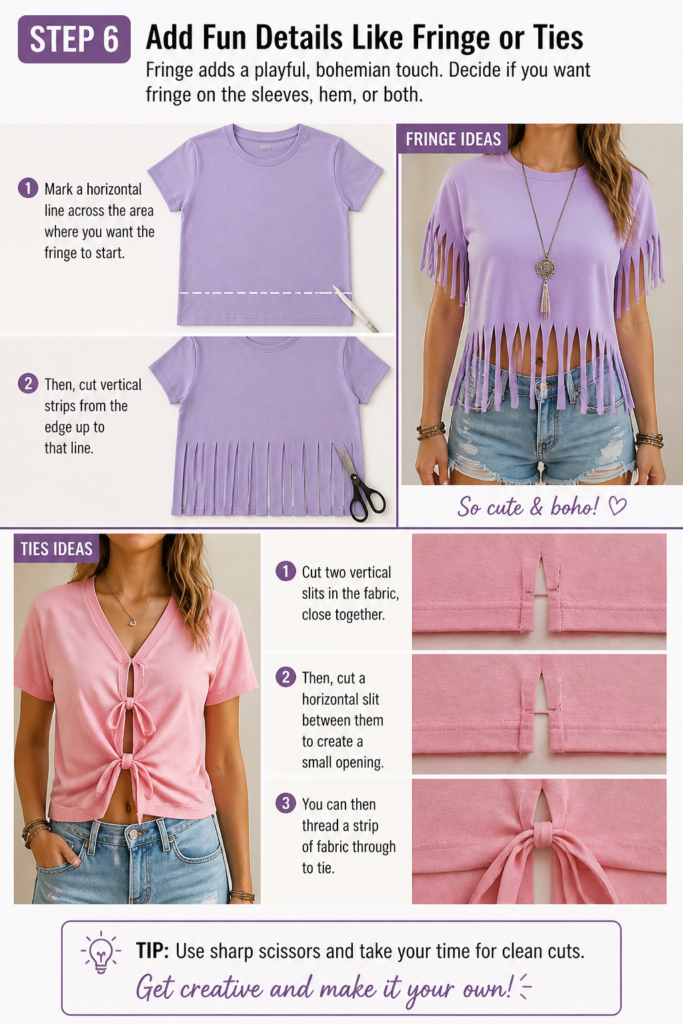
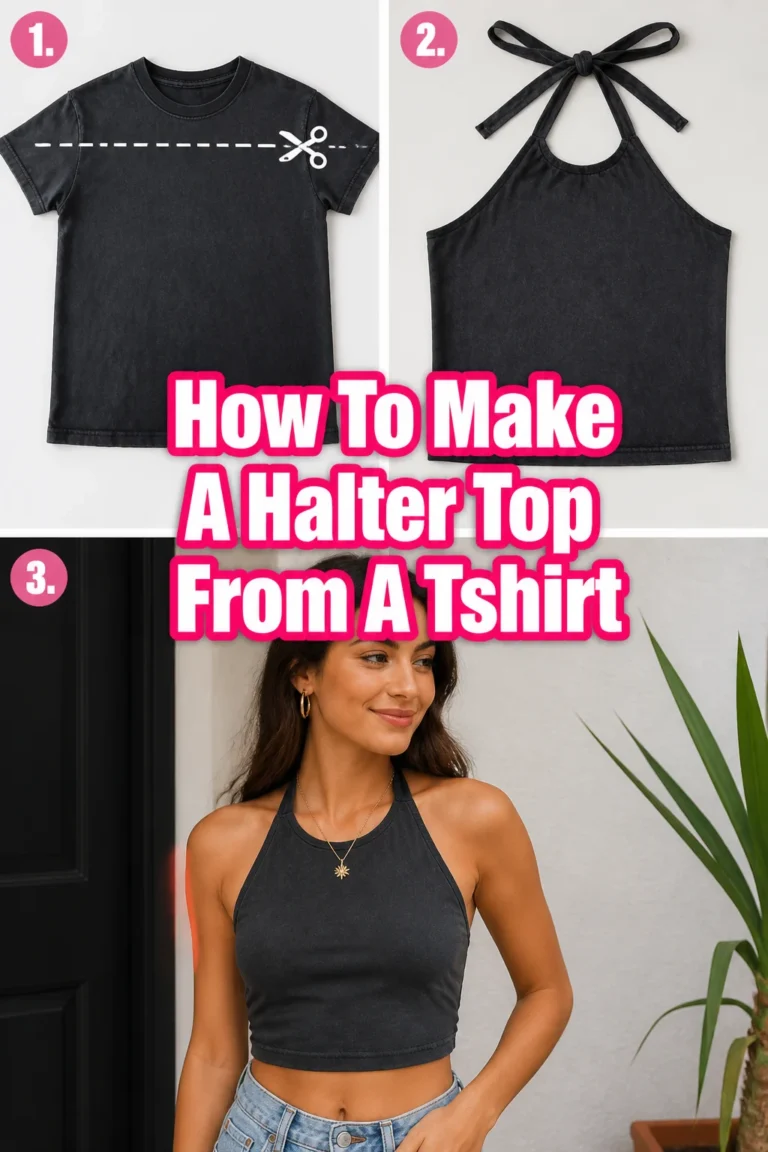
Mark a horizontal line across the area where you want the fringe to start. Then, cut vertical strips from the edge up to that line.
For ties, cut two vertical slits in the fabric, close together. Then, cut a horizontal slit between them to create a small opening. You can then thread a strip of fabric through to tie.
Step 7: Test and Adjust
After your initial cuts, try on the tee shirt. Walk around, lift your arms, and see how it feels and looks.
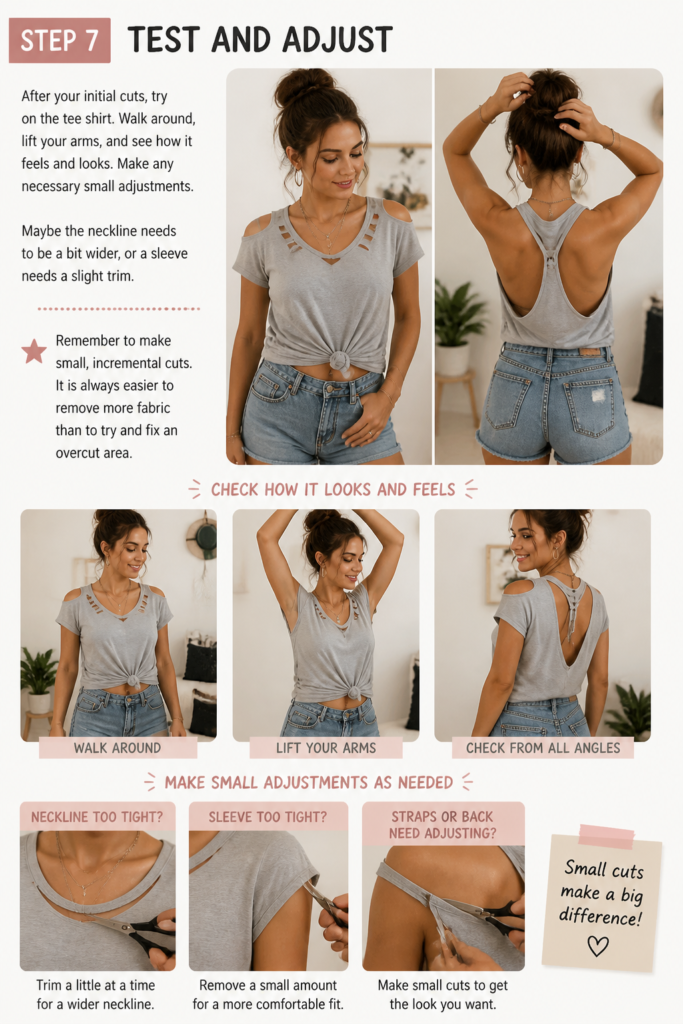
Make any necessary small adjustments. Maybe the neckline needs to be a bit wider, or a sleeve needs a slight trim.
Remember to make small, incremental cuts. It is always easier to remove more fabric than to try and fix an overcut area.
Common Mistakes to Avoid
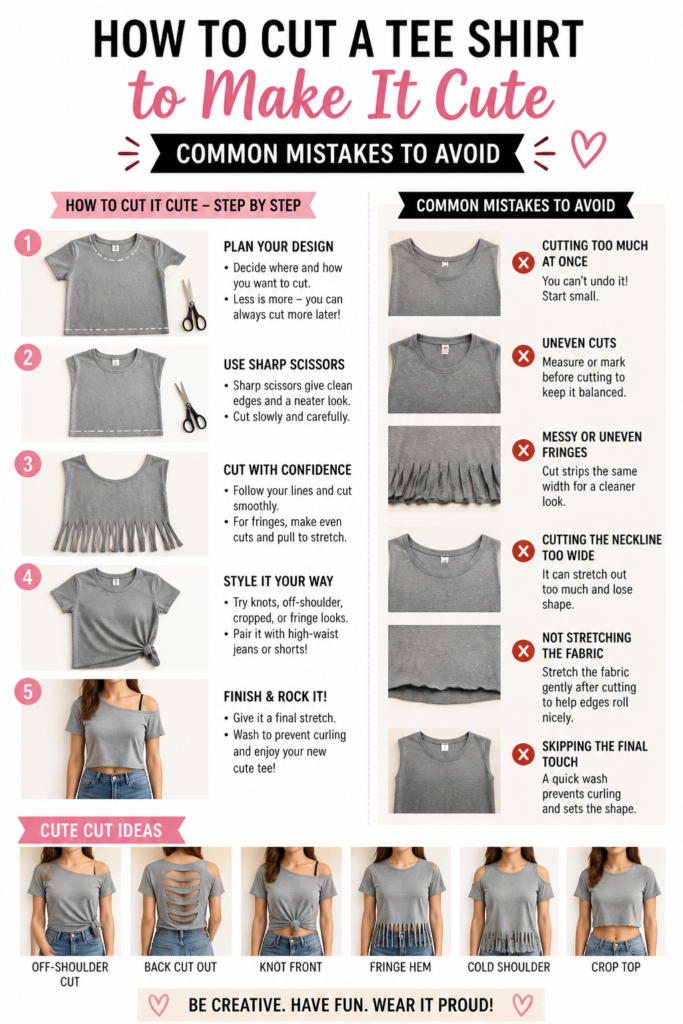
Cutting Without a Plan
Many people get excited and start snipping away without a clear vision. This often results in uneven cuts or a design that doesn’t quite work.
Always take the time to try on the shirt, mark your lines with fabric chalk, and visualize the final outcome. A little planning saves a lot of disappointment.
Using Dull Scissors
Trying to cut fabric with kitchen scissors or craft scissors that aren’t sharp enough is a recipe for disaster. Dull blades chew through fabric, leaving jagged, frayed edges.
Invest in a good pair of sharp fabric scissors. They make clean cuts, are easier to use, and give your finished project a much more professional look.
Overcutting on the First Try
It’s tempting to go bold with your cuts right away, but cutting too much fabric too quickly is a common error. Once the fabric is gone, it’s gone for good.
Always err on the side of caution. Start with smaller cuts and try on the shirt frequently. You can always trim more, ensuring you achieve the perfect fit and style.
Ignoring Fabric Stretch and Grain
Different fabrics stretch in different ways. Cutting against the fabric grain or without considering how the fabric will stretch can lead to distorted shapes or hems that sag.
Pay attention to the natural stretch of your tee. When cutting necklines or armholes, understand that horizontal cuts will stretch more easily than vertical ones. Use gentle stretching on cut edges to encourage a roll, rather than a fray.
Troubleshooting
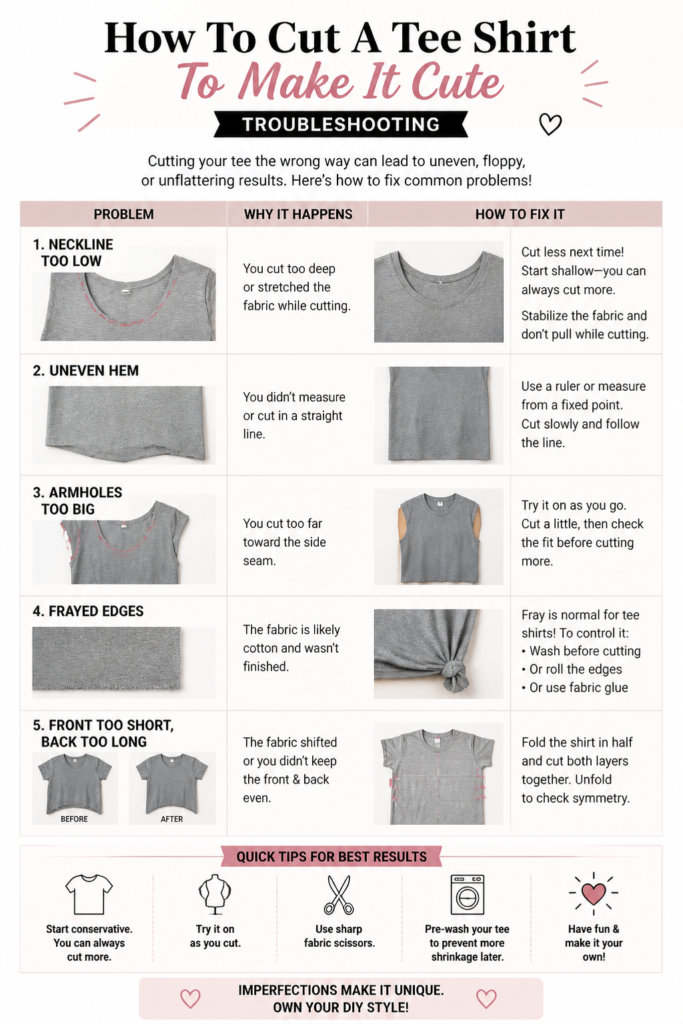
My Cut Edges Are Fraying
Some fabrics, especially those with looser weaves, are prone to fraying after cutting. This can make your tee look unfinished quickly.
To minimize fraying, stretch the cut edges gently but firmly. This often causes cotton knits to roll inwards, creating a neat, no-sew finish. For more persistent fraying, a small amount of fabric glue along the edge can seal it, or you could add a quick zigzag stitch with a sewing machine.
The Neckline Looks Uneven
An uneven neckline is a common issue, especially when cutting freehand. It can make the shirt feel unbalanced or uncomfortable.
Lay the shirt flat and fold it in half perfectly, aligning the shoulder seams. Re-draw your desired neckline on the folded shirt, ensuring symmetry. Trim slowly and carefully, checking the alignment frequently. Small adjustments can make a big difference.
I Accidentally Cut a Hole
A slip of the scissors can lead to an unwanted hole, which feels frustrating. Don’t despair, as many small holes can be incorporated into the design.
If the hole is small and near an edge, you might be able to incorporate it into a distressed look by making other small cuts or tears. For a hole in the main body, consider adding a patch, an appliqué, or even strategically cutting out a larger shape around it to make it part of a new design element.
Key Takeaways
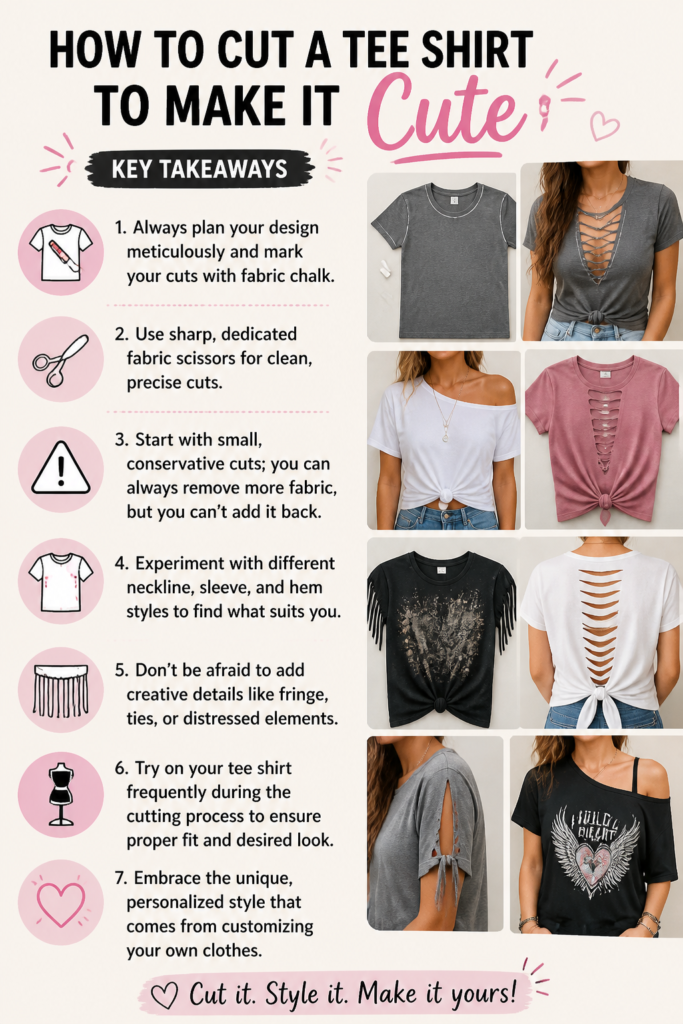
- Always plan your design meticulously and mark your cuts with fabric chalk.
- Use sharp, dedicated fabric scissors for clean, precise cuts.
- Start with small, conservative cuts; you can always remove more fabric, but you can’t add it back.
- Experiment with different neckline, sleeve, and hem styles to find what suits you.
- Don’t be afraid to add creative details like fringe, ties, or distressed elements.
- Try on your tee shirt frequently during the cutting process to ensure proper fit and desired look.
- Embrace the unique, personalized style that comes from customizing your own clothes.
Frequently Asked Questions
Can I cut any type of tee shirt fabric?
While most cotton and cotton-blend tees are ideal for cutting and styling, fabrics with a high synthetic content or very loose weaves might not hold up as well. Polyester can be more prone to showing raw edges, and loose knits might unravel. Always test a small, inconspicuous area first if you’re unsure.
How do I prevent my cuts from stretching out too much?
To prevent excessive stretching, avoid pulling the fabric taut while you cut. Make smooth, steady cuts. For necklines and armholes, gently stretching the finished edge encourages it to roll and settle, which can help maintain its shape rather than stretching further.
Can I fix a cut that went wrong?
Absolutely! Many “mistakes” can be turned into unique design features. An uneven hem can become a high-low hem. An accidental snip can be incorporated into a distressed look or a small cut-out detail. Embrace creativity and see if you can salvage or even improve your design.
How do I make a tee shirt off-the-shoulder without it falling down?
When cutting an off-the-shoulder neckline, ensure you don’t cut too wide. The key is to cut just enough so that it comfortably sits below your collarbone. You can also sew a small elastic band into the inside of the neckline hem to help it stay in place and provide a more secure fit.
Our Top Recommended Finds
- Sharp Fabric Scissors: A good pair of fabric shears makes all the difference for clean, effortless cuts.
- Fabric Chalk or Marker: Essential for precise marking that washes out easily, ensuring accurate designs.
- Self-Healing Cutting Mat: Protects your work surface and provides a stable base for accurate cutting.
Unleash Your Inner Fashion Designer
You now have the tools and techniques to transform any basic tee into a stylish, custom piece.
Don’t let a plain shirt sit in your closet when it could be a statement of your personal style.
Grab an old tee, some sharp scissors, and start experimenting today. The possibilities are endless, and your wardrobe will thank you for the fresh, unique additions!
Beginner-friendly templates, step-by-step guides,
and weekly project ideas in your inbox.