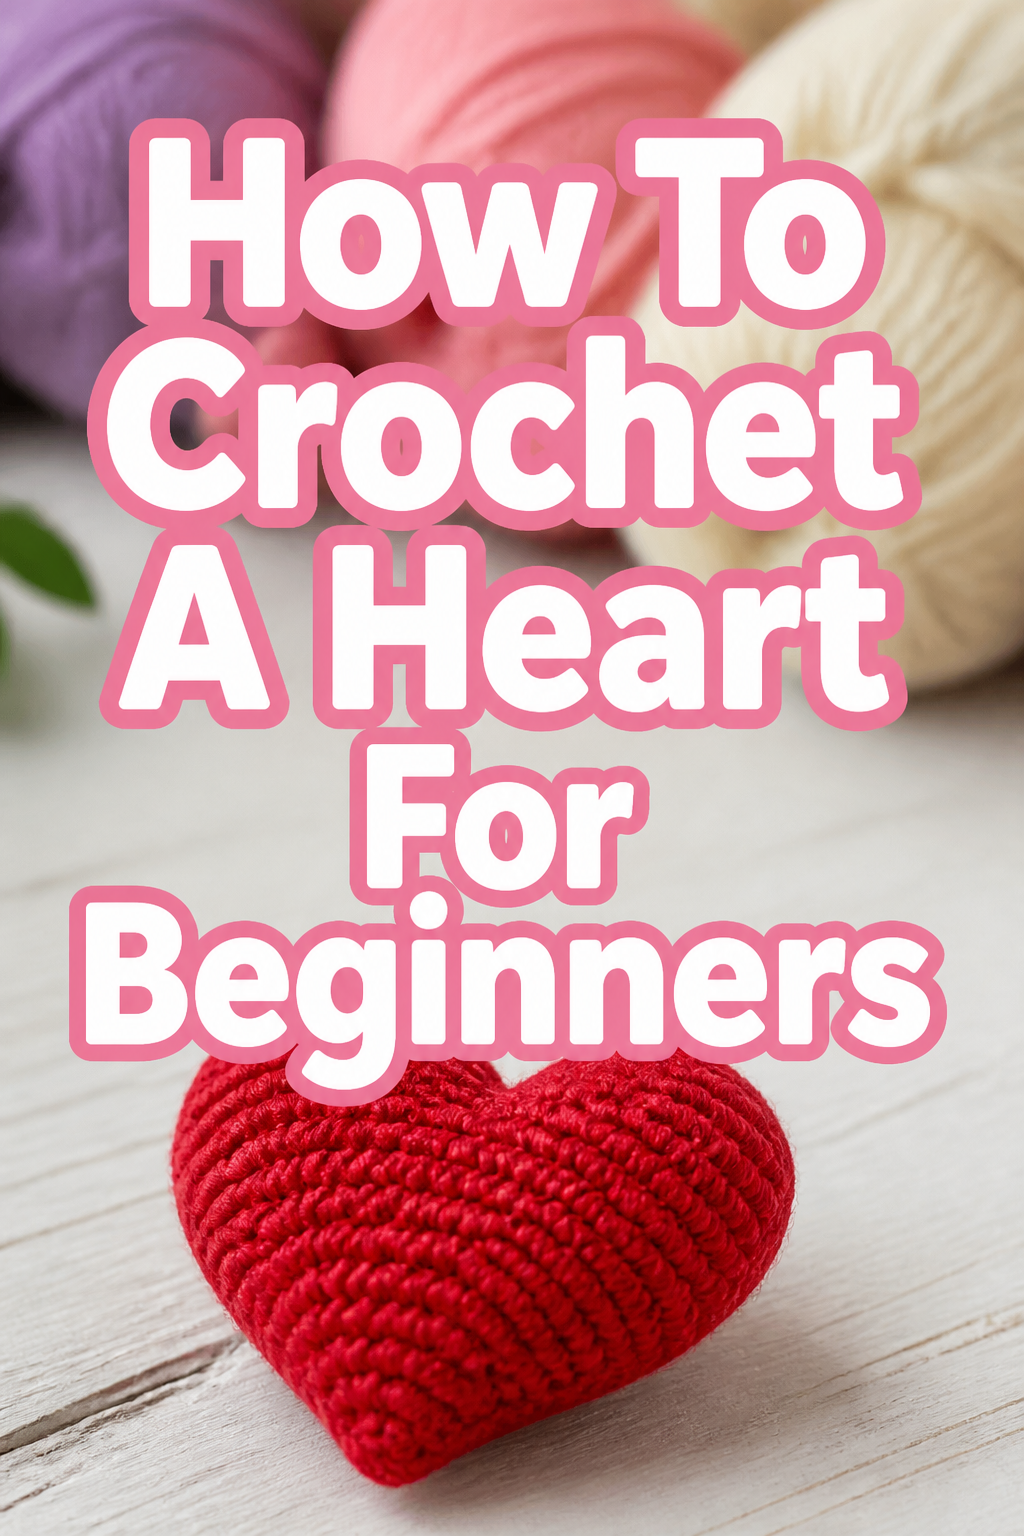
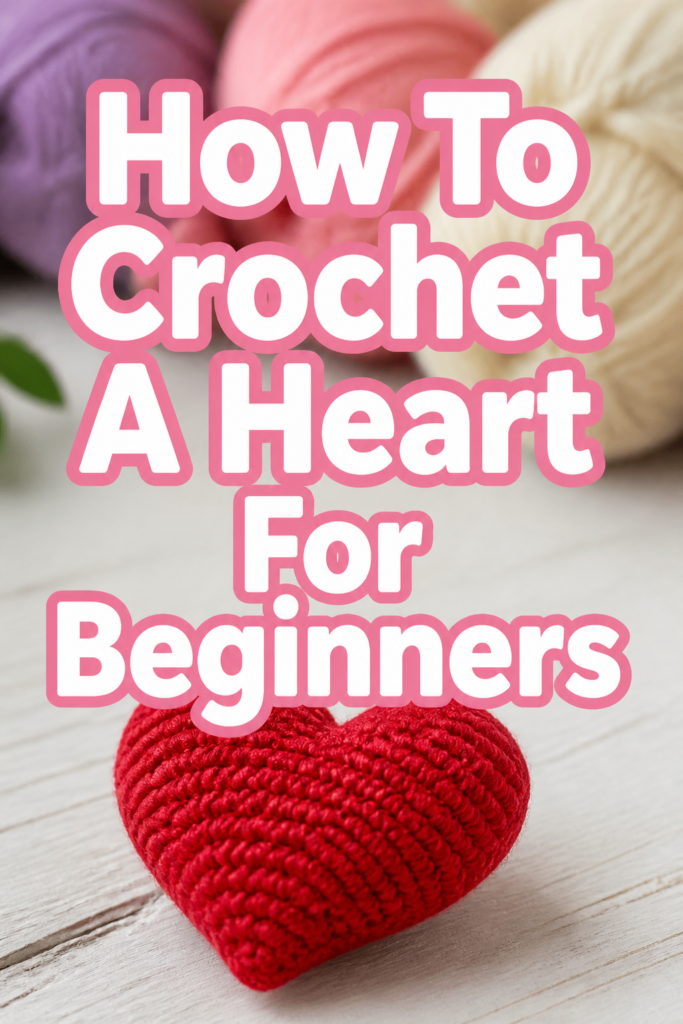
❤️ How To Crochet A Heart For Beginners

Beginner-friendly templates, step-by-step guides,
and weekly project ideas in your inbox.
There’s something uniquely satisfying about creating something beautiful with your own hands.
I still remember the first tiny crocheted heart I made, imperfect but brimming with charm, and the joy it brought.
This guide will walk you through each step, helping you craft your very own lovely heart, even if you’ve never held a crochet hook before.
Quick Overview
You’re about to embark on a delightful journey to create a charming, small crocheted heart. This project is perfect for gifting, decorating, or simply practicing your basic crochet stitches.
- Time needed: 30-60 minutes
- Difficulty: Beginner
- What you’ll need: Yarn, crochet hook, scissors, tapestry needle
Step-by-Step Instructions
Step 1: Gather Your Tools and Yarn
Before you begin, make sure you have everything ready. This prevents interruptions and helps maintain your flow.
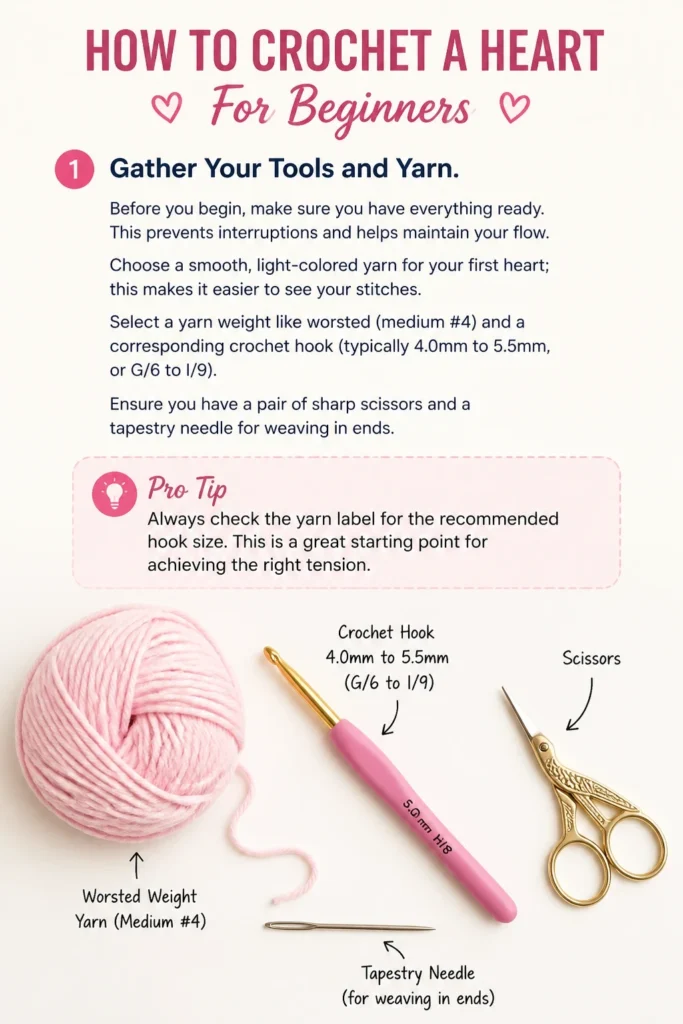
Choose a smooth, light-colored yarn for your first heart; this makes it easier to see your stitches.
- Select a yarn weight like worsted (medium #4) and a corresponding crochet hook (typically 4.0mm to 5.5mm, or G/6 to I/9).
- Ensure you have a pair of sharp scissors and a tapestry needle for weaving in ends.
Pro Tip: Always check the yarn label for the recommended hook size. This is a great starting point for achieving the right tension.
Step 2: Learn the Slip Knot
Every crochet project begins with a slip knot on your hook. This creates the initial loop from which your stitches will grow.
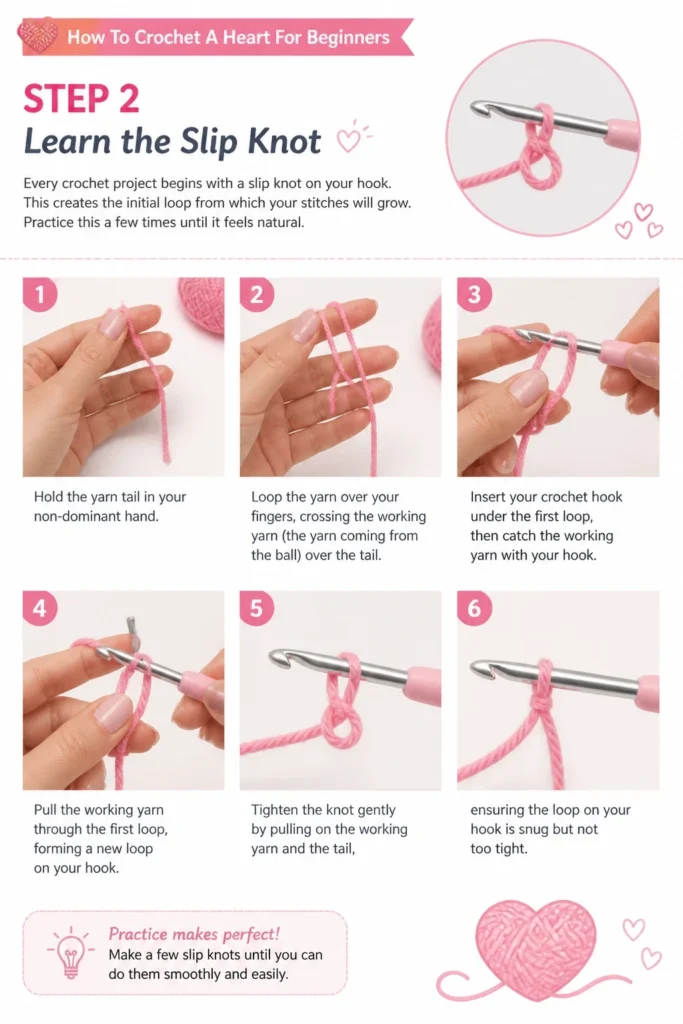
Practice this a few times until it feels natural.
- Hold the yarn tail in your non-dominant hand.
- Loop the yarn over your fingers, crossing the working yarn (the yarn coming from the ball) over the tail.
- Insert your crochet hook under the first loop, then catch the working yarn with your hook.
- Pull the working yarn through the first loop, forming a new loop on your hook.
- Tighten the knot gently by pulling on the working yarn and the tail, ensuring the loop on your hook is snug but not too tight.
Step 3: Master the Magic Ring (or Chain 4 Method)
The magic ring (also called a magic circle or adjustable ring) creates a tight, closed center for your heart. If this feels too tricky, you can use the chain 4 method instead.
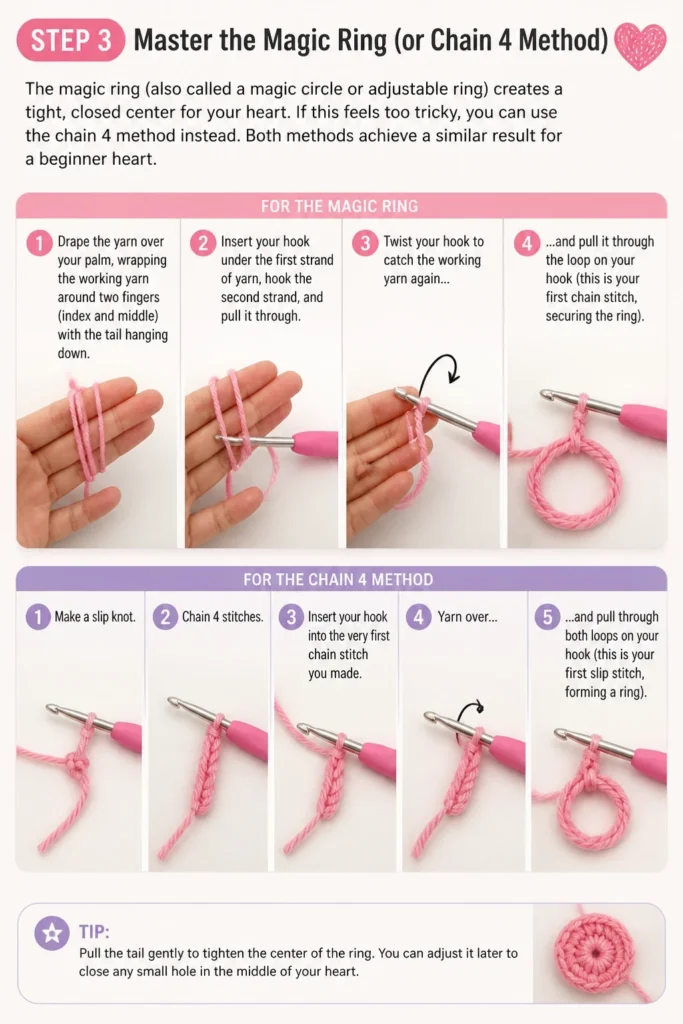
Both methods achieve a similar result for a beginner heart.
- For the Magic Ring:
- Drape the yarn over your palm, wrapping the working yarn around two fingers (index and middle) with the tail hanging down.
- Insert your hook under the first strand of yarn, hook the second strand, and pull it through.
- Twist your hook to catch the working yarn again and pull it through the loop on your hook (this is your first chain stitch, securing the ring).
- For the Chain 4 Method:
- Make a slip knot and chain 4 stitches.
- Insert your hook into the very first chain stitch you made.
- Yarn over and pull through both loops on your hook (this is a slip stitch, joining the chain into a ring).
Pro Tip: The magic ring gives a neater, tighter center, which is ideal for hearts. Don’t worry if it takes a few tries to get it right!
Step 4: Chain 2 (Starting Half Double Crochet)
Now that you have your ring (either magic or chain 4), you’ll start building the height of your heart.
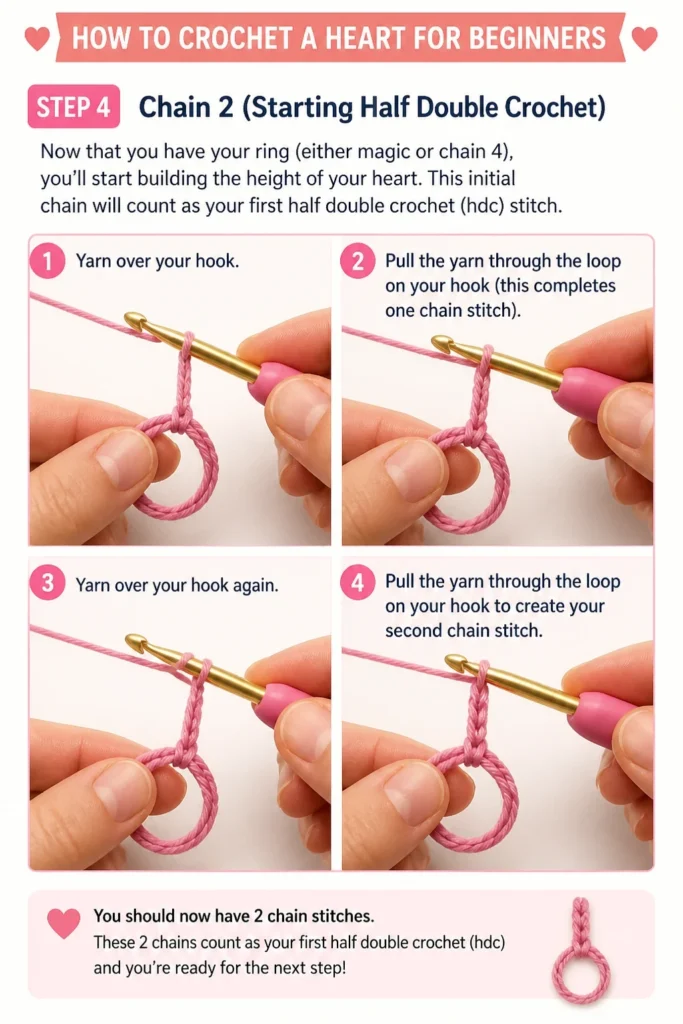
This initial chain will count as your first half double crochet (hdc) stitch.
- Yarn over your hook.
- Pull the yarn through the loop on your hook (this completes one chain stitch).
- Repeat this action one more time to create a total of two chain stitches.
Step 5: Crochet Your First Half Double Crochet Stitches
The half double crochet (hdc) is a fundamental stitch that adds nice height. You’ll make two more hdc stitches into your ring.
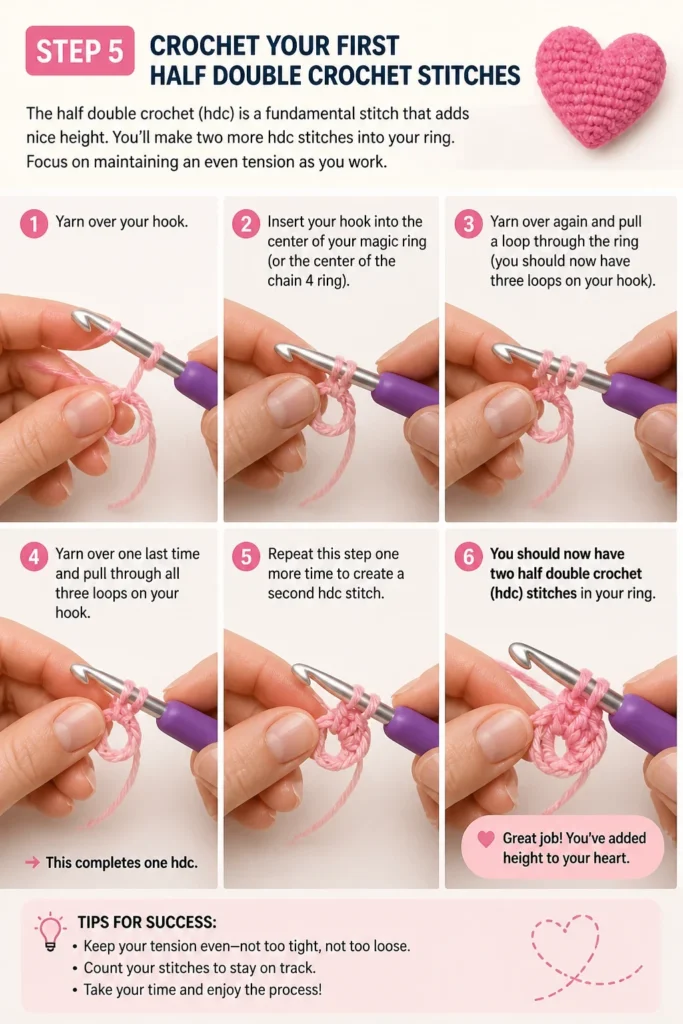
Focus on maintaining an even tension as you work.
- Yarn over your hook.
- Insert your hook into the center of your magic ring (or the center of the chain 4 ring).
- Yarn over again and pull a loop through the ring (you should now have three loops on your hook).
- Yarn over one last time and pull through all three loops on your hook. This completes one hdc.
- Repeat this step one more time to create a second hdc stitch.
Step 6: Introduce Double Crochet Stitches
The double crochet (dc) stitch is taller than the hdc and helps shape the curves of the heart.
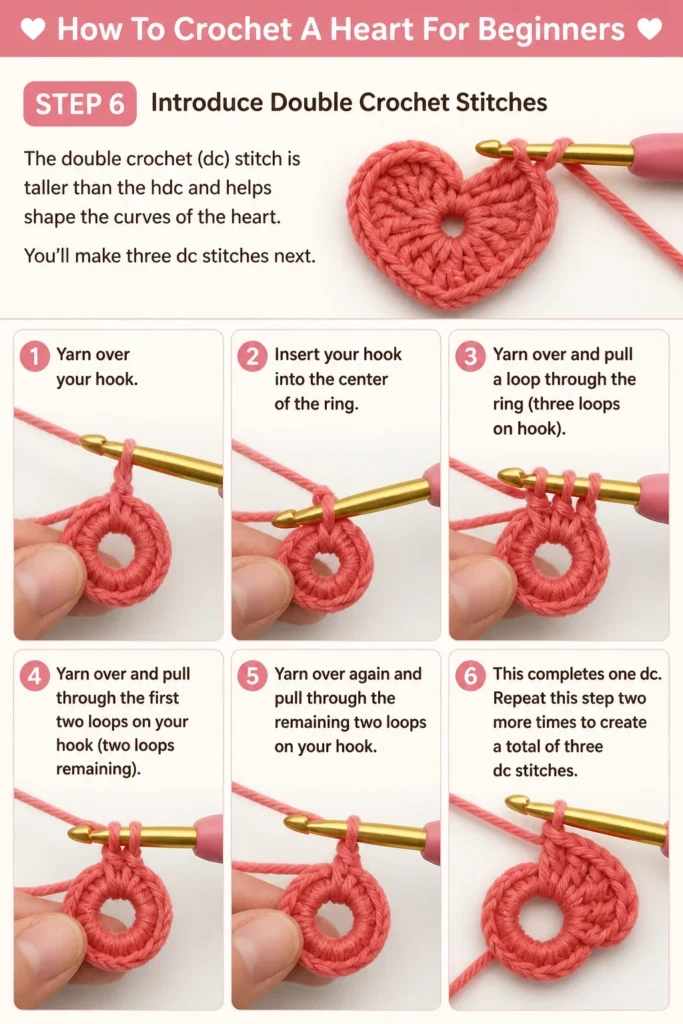
You’ll make three dc stitches next.
- Yarn over your hook.
- Insert your hook into the center of the ring.
- Yarn over and pull a loop through the ring (three loops on hook).
- Yarn over and pull through the first two loops on your hook (two loops remaining).
- Yarn over again and pull through the remaining two loops on your hook. This completes one dc.
- Repeat this step two more times to create a total of three dc stitches.
Step 7: Create the Heart’s Point with a Chain Stitch
To define the bottom point of your heart, you’ll make a single chain stitch.
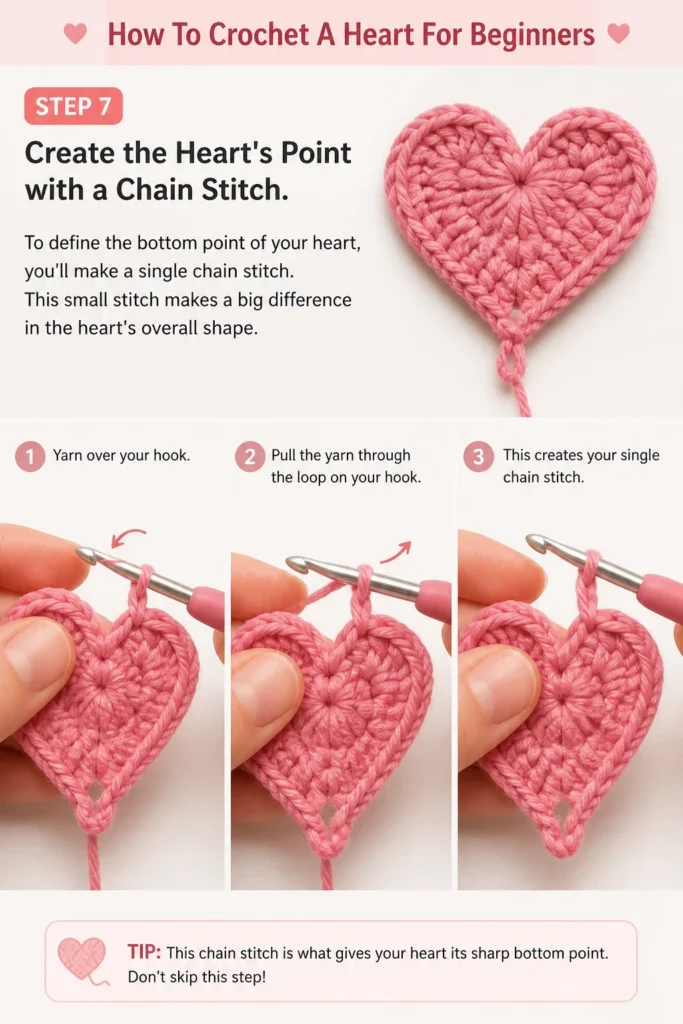
This small stitch makes a big difference in the heart’s overall shape.
- Yarn over your hook.
- Pull the yarn through the loop on your hook. This creates your single chain stitch.
Step 8: Complete the Other Side of the Heart
Now you’ll mirror the stitches you made earlier to form the second curve of your heart.
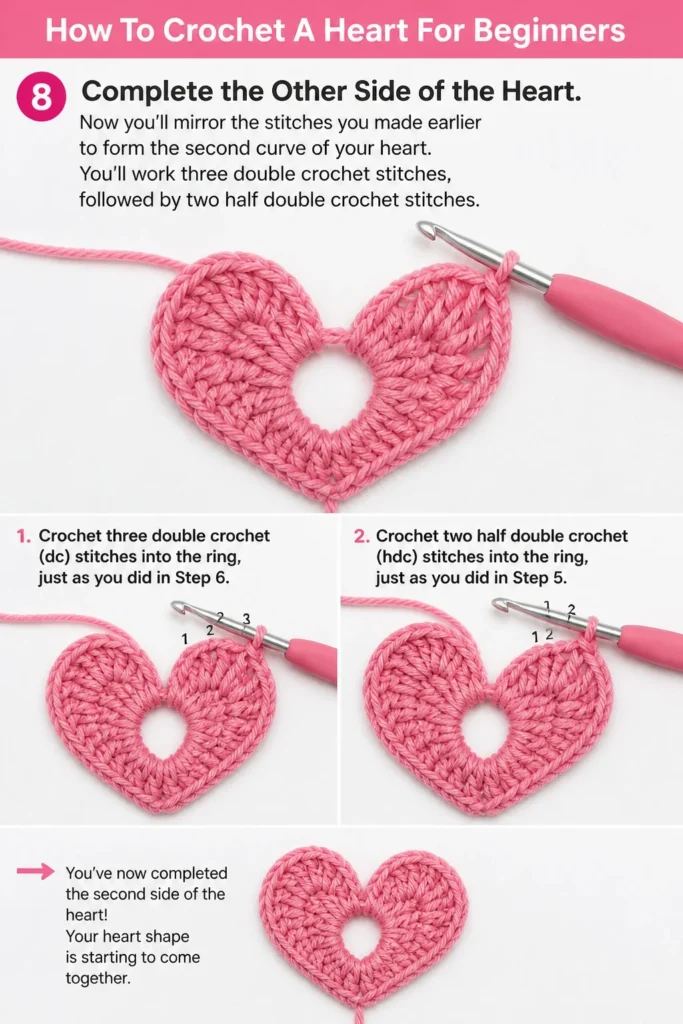
You’ll work three double crochet stitches, followed by two half double crochet stitches.
- Crochet three double crochet (dc) stitches into the ring, just as you did in Step 6.
- Crochet two half double crochet (hdc) stitches into the ring, just as you did in Step 5.
Step 9: Finish the Heart with a Chain and Slip Stitch
You’re almost there! To bring the heart together and create its final shape, you’ll make a final chain and then join it to the ring.
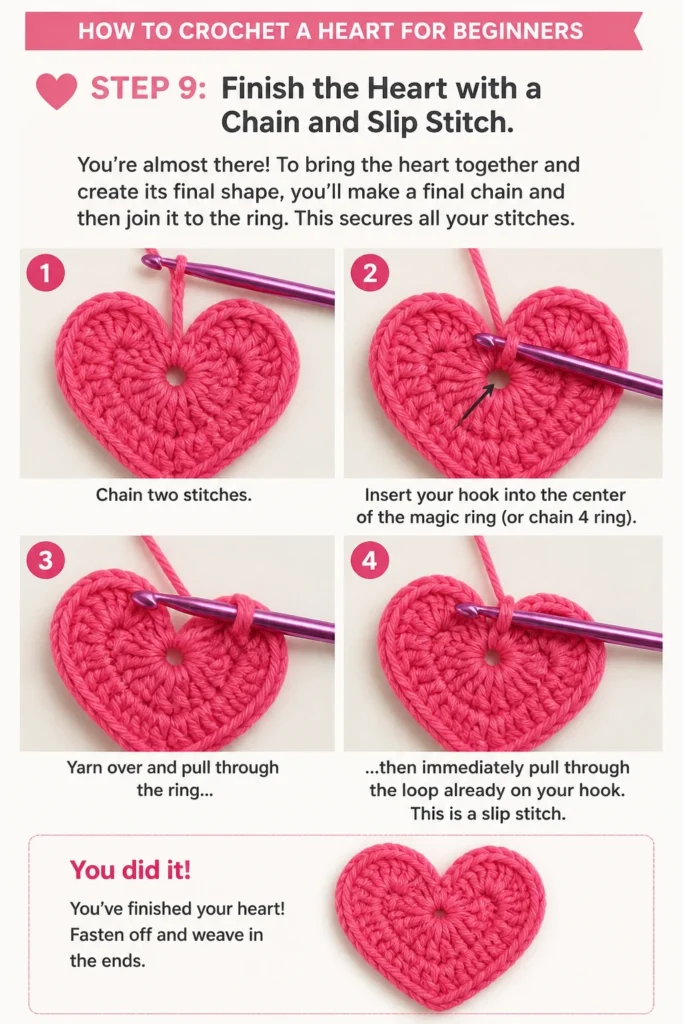
This secures all your stitches.
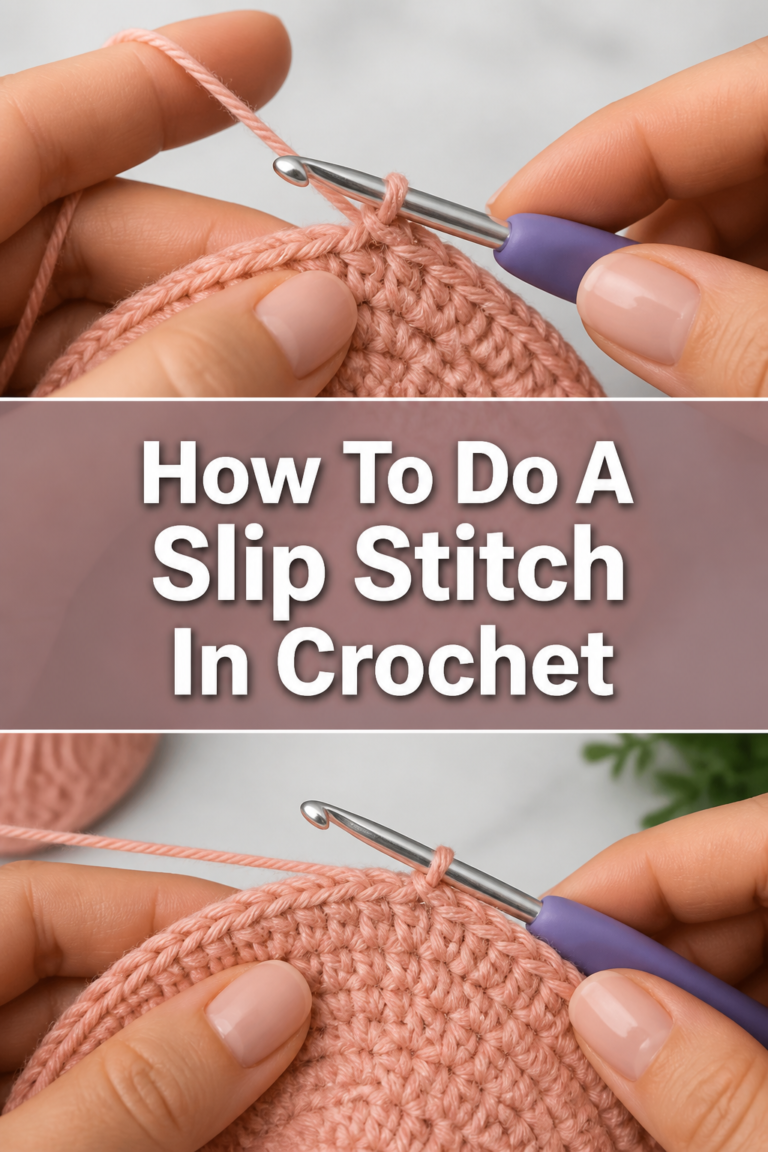
- Chain two stitches.
- Insert your hook into the center of the magic ring (or chain 4 ring).
- Yarn over and pull through the ring, then immediately pull through the loop already on your hook. This is a slip stitch.
Step 10: Fasten Off and Weave in Ends
Your heart is formed! Now you just need to secure your work and tidy up the loose ends.
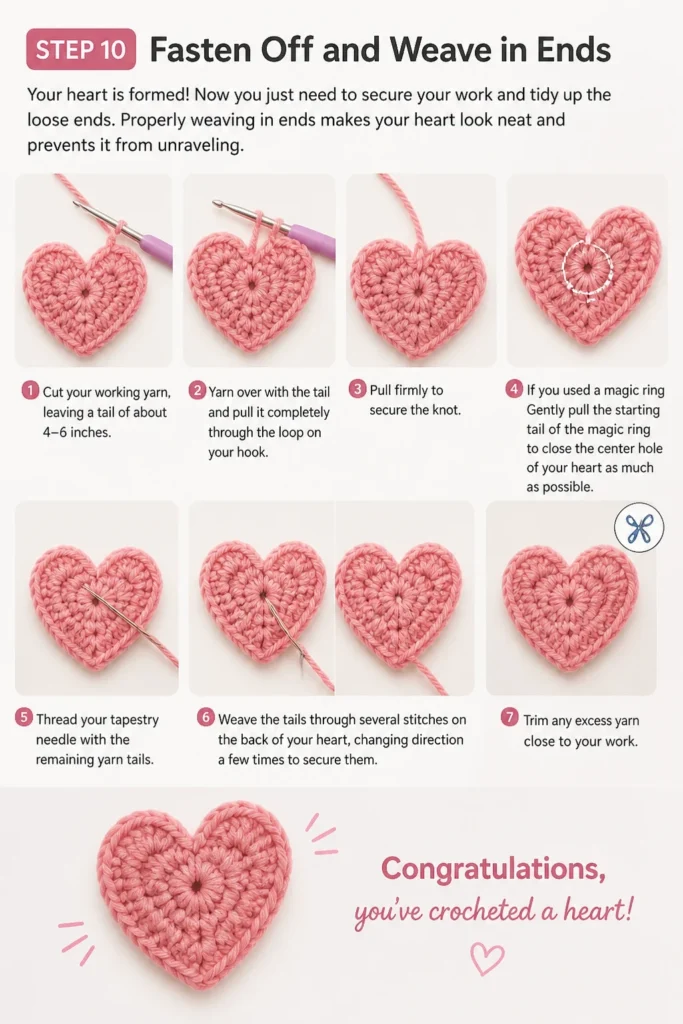
Properly weaving in ends makes your heart look neat and prevents it from unraveling.
- Cut your working yarn, leaving a tail of about 4-6 inches.
- Yarn over with the tail and pull it completely through the loop on your hook. Pull firmly to secure the knot.
- If you used a magic ring: Gently pull the starting tail of the magic ring to close the center hole of your heart as much as possible.
- Thread your tapestry needle with the remaining yarn tails.
- Weave the tails through several stitches on the back of your heart, changing direction a few times to secure them.
- Trim any excess yarn close to your work.
Congratulations, you’ve crocheted a heart!
Common Mistakes to Avoid
Inconsistent Tension
One of the most common issues for beginners is having stitches that are too tight or too loose. This can make your heart look lumpy or uneven. Practice helps immensely, but also pay attention to how you hold your yarn and hook. Try to keep your movements relaxed and consistent throughout the project.
Missing Stitches or Extra Stitches
It’s easy to accidentally skip a stitch or add an extra one, especially when working into a ring. This can distort the heart’s shape. Carefully count your stitches as you go, especially after each set of hdc and dc stitches. If your heart looks off, unraveling a few stitches and recounting is always a good idea.
Not Closing the Magic Ring Properly
If you used the magic ring, sometimes the center hole doesn’t close completely, leaving a gap. Make sure to pull the starting tail of the magic ring as tightly as possible after all your stitches are made. If it still doesn’t close, you might not have caught all the strands when forming the initial ring. A little tug and adjustment can often fix this.
Leaving Ends Too Short or Not Weaving Them In
Cutting your yarn tails too short makes them difficult to weave in, and if they’re not woven in securely, your heart could unravel over time. Always leave a tail of at least 4-6 inches. Weave them through several stitches, changing direction to lock them in place, rather than just tucking them into one spot.
Troubleshooting
My Heart Doesn’t Look Like a Heart
If your creation looks more like a blob than a heart, don’t worry! This is very common for first attempts. Double-check your stitch count for each section (2 hdc, 3 dc, ch 1, 3 dc, 2 hdc). Ensure your chain 1 for the point and the final chain 2 are distinct. Sometimes, simply adjusting the shape with your fingers after it’s finished can make a big difference. Remember, practice makes perfect, and every heart has its own unique charm.
My Stitches Are Unraveling
If your work is coming undone, you might not have fastened off correctly, or your slip knot at the beginning might not have been secure enough. Ensure you pull the final yarn tail completely through the last loop on your hook after cutting the yarn. When weaving in ends, make sure they are threaded through existing stitches in varying directions to create friction and prevent slippage.
Difficulty with the Magic Ring
The magic ring can be a bit tricky initially. If you’re struggling, try watching a video tutorial alongside this guide for a visual demonstration. Alternatively, use the chain 4 and slip stitch method described in Step 3. It creates a small hole in the center, but it’s much easier for beginners and still results in a lovely heart shape.
Key Takeaways
- Start with a slip knot and either a magic ring or a chain 4 joined with a slip stitch.
- The heart is formed by a sequence of chain, half double crochet, and double crochet stitches.
- Count your stitches carefully to maintain the heart’s symmetrical shape.
- Inconsistent tension is common; practice helps achieve even stitches.
- Always fasten off securely and weave in your yarn tails for a neat, durable finish.
- Don’t be afraid to unravel and restart; it’s part of the learning process.
Frequently Asked Questions
Can I use different types of yarn?
Absolutely! Once you’re comfortable with the basic pattern, you can experiment with different yarn weights and fibers. Thicker yarns will result in a larger heart, while thinner yarns will create a daintier one. Just remember to adjust your hook size according to the yarn’s recommendation to maintain good stitch definition.
How can I make my heart bigger or smaller?
To make a bigger heart, you can use a thicker yarn and a larger hook. You can also add more stitches to each section (e.g., 3 hdc, 4 dc, ch 2, 4 dc, 3 hdc) and potentially add a treble crochet for a more pronounced point. For a smaller heart, use thinner yarn and a smaller hook. You can also simplify the pattern further, perhaps using only single crochet stitches.
What can I do with my crocheted heart?
Crocheted hearts are incredibly versatile! You can use them as appliques for blankets, hats, or clothing. They make charming keychains, gift tags, or ornaments. String several together for a sweet garland, or simply use them as small tokens of affection for friends and family. The possibilities are endless!
Is there an easier way than the magic ring?
Yes, if the magic ring proves too challenging, you can always start your heart by chaining 4 stitches and then joining them with a slip stitch into the first chain to form a small ring. All subsequent stitches will be worked into the center of this ring. It leaves a tiny hole in the center, but it’s a perfectly acceptable and beginner-friendly alternative.
Our Top Recommended Finds
- Ergonomic Crochet Hook Set: A good set with comfortable grips can make a huge difference, especially during longer crochet sessions.
- Yarn Winder: This handy tool transforms unruly skeins into neat, pull-from-center cakes, preventing tangles and making your crafting smoother.
- Stitch Markers: Essential for beginners, these little clips help you keep track of your first and last stitches, preventing errors and frustration.
Embrace Your Crocheted Creations
You’ve just taken your first step into the wonderful world of crochet, and look what you’ve made – a beautiful heart! This little project is more than just yarn and stitches; it’s a testament to your patience and creativity.
Keep practicing, try new colors, and maybe even experiment with different sizes. The more you crochet, the more confident and skilled you’ll become.
Why not pick up your hook and yarn right now, and crochet another heart? You might be surprised at how quickly your skills grow.
Beginner-friendly templates, step-by-step guides,
and weekly project ideas in your inbox.