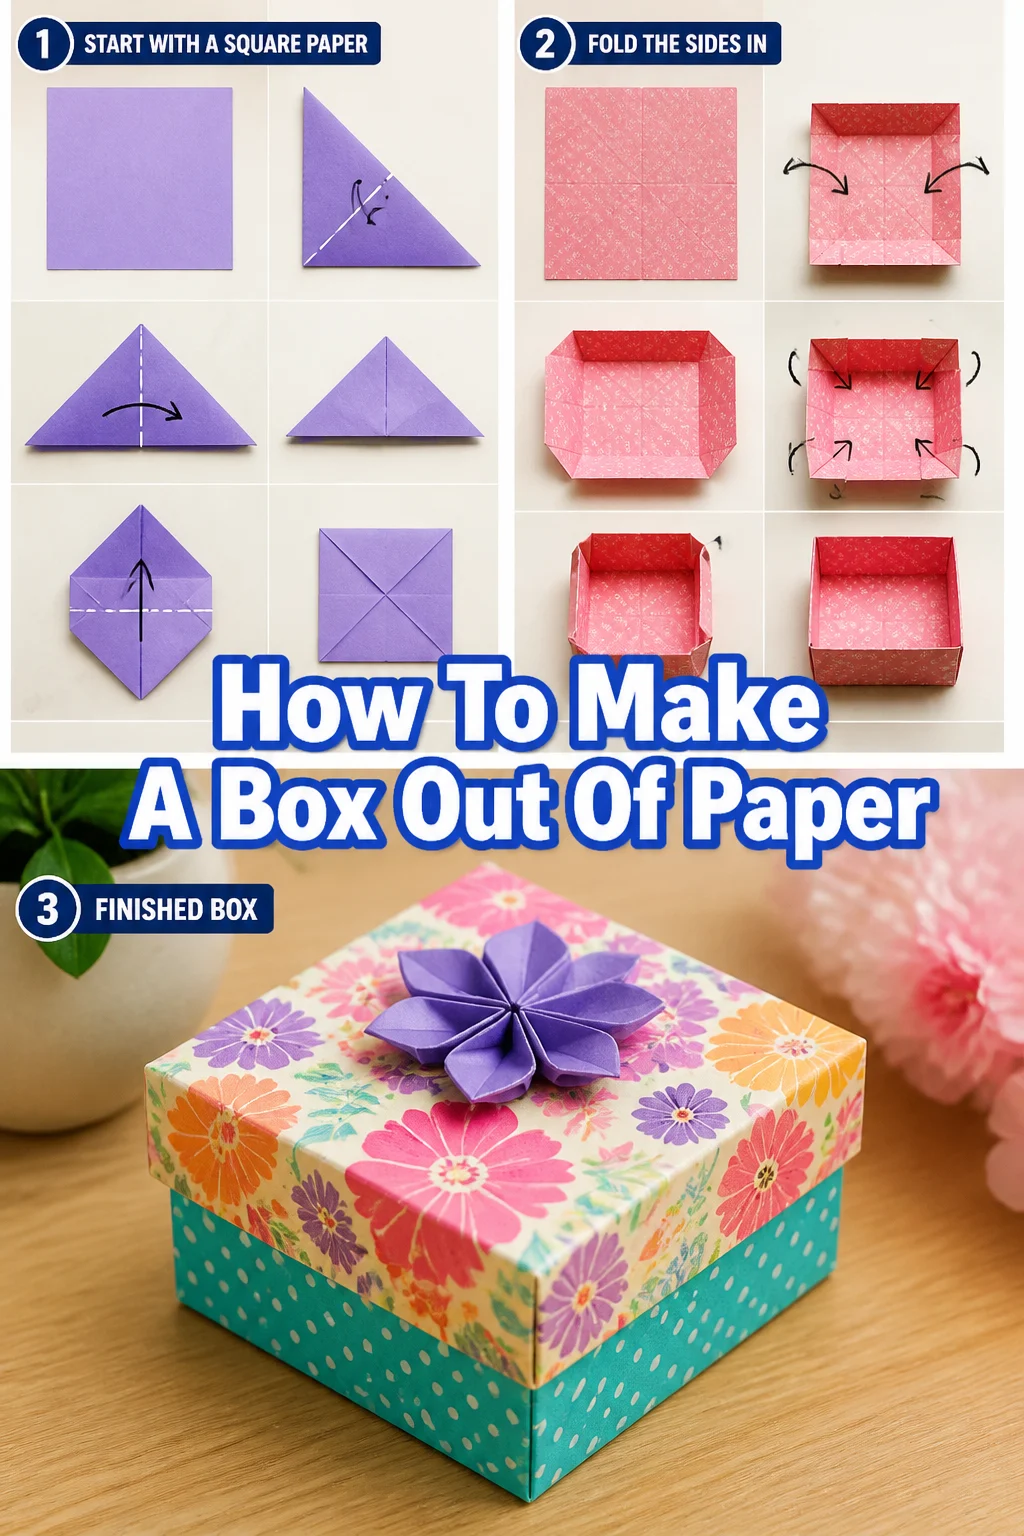
📦 How To Make A Box Out Of Paper

Beginner-friendly templates, step-by-step guides,
and weekly project ideas in your inbox.
There’s a unique satisfaction in creating something useful with your own hands, especially from a simple sheet of paper.
I’ve personally crafted countless paper boxes for small gifts, organizing tiny treasures, or just for the sheer joy of transforming a flat surface into a functional 3D object.
This guide draws on years of hands-on experience to show you exactly how to make a sturdy, beautiful paper box, step by step.

Quick Overview
You’re about to learn a fundamental paper crafting skill that opens up a world of possibilities for gifts, storage, and decoration.
By the end, you’ll have a perfectly formed paper box, ready for whatever you imagine.
- Time needed: 20-40 minutes (for your first attempt)
- Difficulty: Beginner
- What you’ll need: A square sheet of paper, scissors, a ruler, and a pencil.
Step-by-Step Instructions
Step 1: Gather Your Materials
Before you begin, make sure you have everything laid out. A tidy workspace helps keep your folds precise and your mind focused.
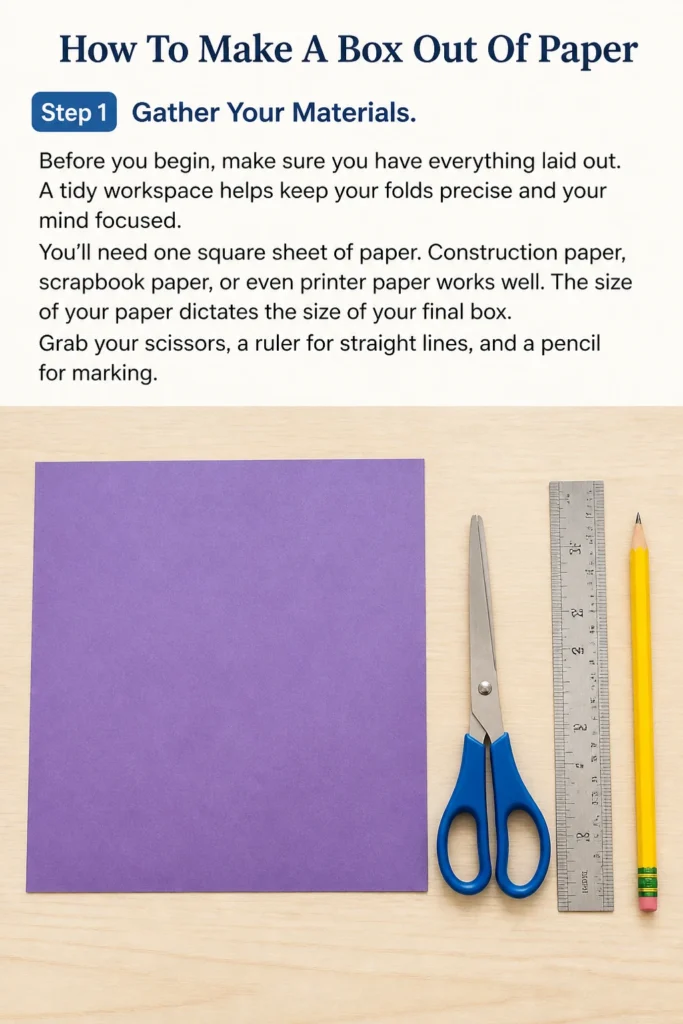
You’ll need one square sheet of paper. Construction paper, scrapbook paper, or even printer paper works well. The size of your paper dictates the size of your final box.
Grab your scissors, a ruler for straight lines, and a pencil for marking.
Step 2: Prepare Your Paper (Create a Perfect Square)
If your paper isn’t already square, you’ll need to make it one. This is a crucial first step for a well-proportioned box.
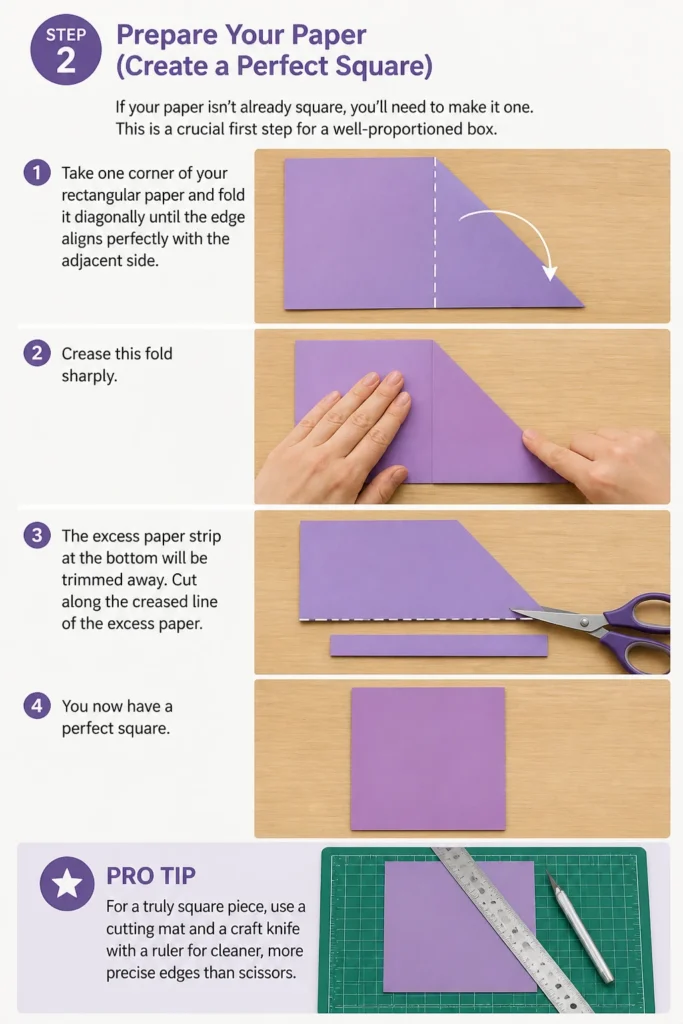
Take one corner of your rectangular paper and fold it diagonally until the edge aligns perfectly with the adjacent side.
Crease this fold sharply. The excess paper strip at the bottom will be trimmed away.
Cut along the creased line of the excess paper. You now have a perfect square.
Pro Tip: For a truly square piece, use a cutting mat and a craft knife with a ruler for cleaner, more precise edges than scissors.
Step 3: Fold in Half (Both Ways)
Lay your square paper flat with the colored or patterned side facing down, if applicable.
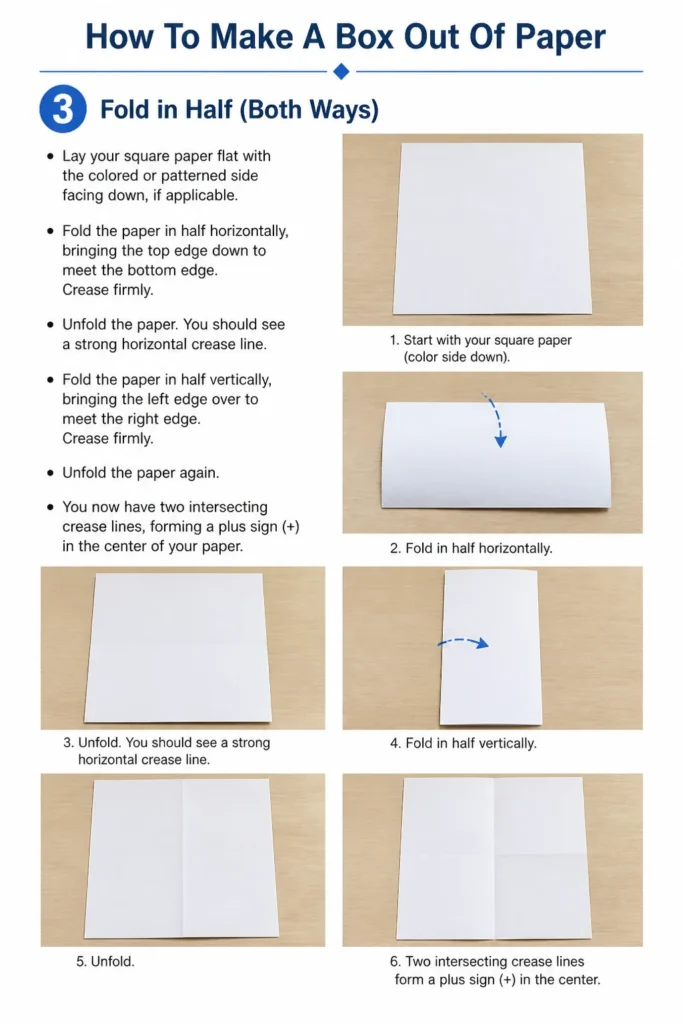
Fold the paper in half horizontally, bringing the top edge down to meet the bottom edge. Crease firmly.
Unfold the paper. You should see a strong horizontal crease line.
Fold the paper in half vertically, bringing the left edge over to meet the right edge. Crease firmly.
Unfold the paper again. You now have two intersecting crease lines, forming a plus sign (+) in the center of your paper.
Step 4: Create Quarter Folds
These folds will define the initial sides of your box.
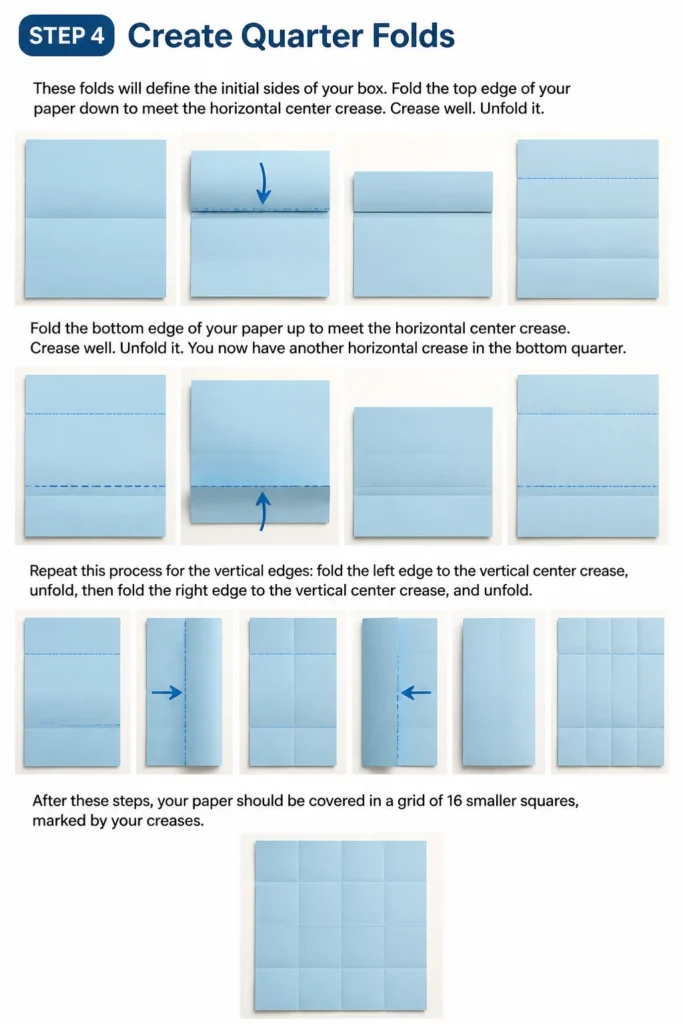
Fold the top edge of your paper down to meet the horizontal center crease. Crease well.
Unfold it. You’ll see a new horizontal crease line in the top quarter of your paper.
Fold the bottom edge of your paper up to meet the horizontal center crease. Crease well.
Unfold it. You now have another horizontal crease in the bottom quarter.
Repeat this process for the vertical edges: fold the left edge to the vertical center crease, unfold, then fold the right edge to the vertical center crease, and unfold.
After these steps, your paper should be covered in a grid of 16 smaller squares, marked by your creases.
Step 5: Prepare for Cutting (Marking and Initial Cuts)
This is where your box starts to take shape and requires careful attention.
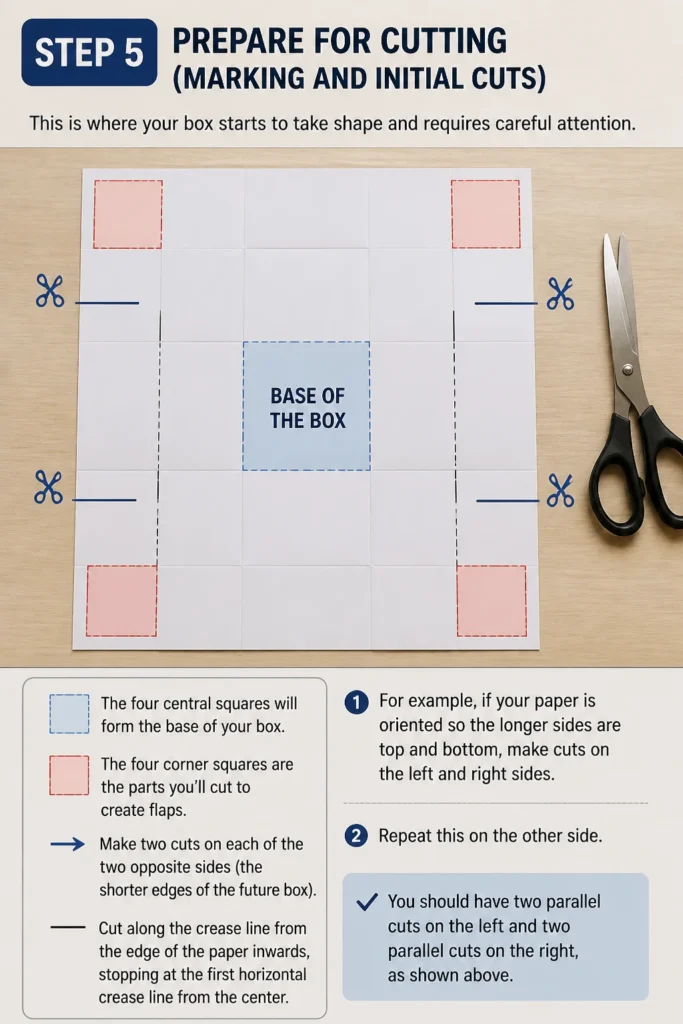
Orient your paper so that the grid is clearly visible. The goal is to cut specific lines that will allow the sides to fold up.
Identify the four central squares. These will form the base of your box.
Locate the four squares in each corner of your grid. These are the parts you’ll be cutting to create flaps.
Make two cuts on each of the two opposite sides (the shorter edges of the future box). For example, if your paper is oriented so the longer sides are top and bottom, make cuts on the left and right sides.
Cut along the crease line from the edge of the paper inwards, stopping at the first horizontal crease line from the center.
Repeat this on the other side. You should have two parallel cuts on the left and two parallel cuts on the right, creating four flaps in total (two on each side).
Pro Tip: Use a ruler and pencil to lightly mark where your cuts should stop. This prevents over-cutting, which can weaken your box.
Step 6: Form the Sides of the Box
Now, let’s bring those flat creases to life and create the box’s walls.
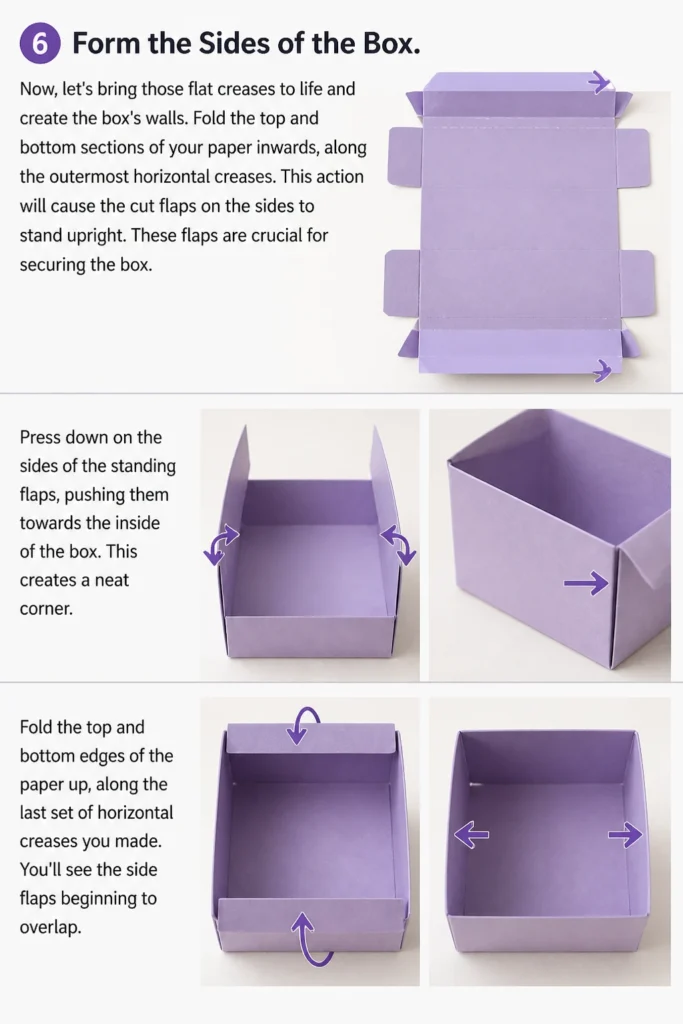
Fold the top and bottom sections of your paper inwards, along the outermost horizontal creases.
This action will cause the cut flaps on the sides to stand upright. These flaps are crucial for securing the box.
Press down on the sides of the standing flaps, pushing them towards the inside of the box. This creates a neat corner.
Fold the top and bottom edges of the paper up, along the last set of horizontal creases you made.
You’ll see the side flaps beginning to overlap.
Step 7: Secure the Box
With the sides formed, it’s time to lock everything into place.
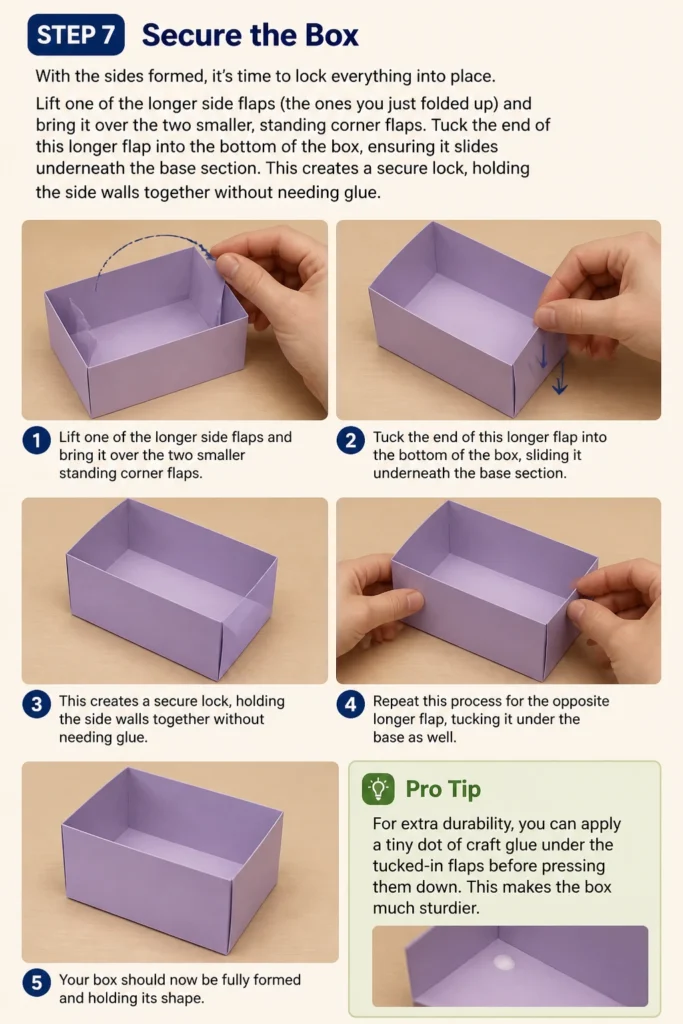
Lift one of the longer side flaps (the ones you just folded up) and bring it over the two smaller, standing corner flaps.
Tuck the end of this longer flap into the bottom of the box, ensuring it slides underneath the base section.
This creates a secure lock, holding the side walls together without needing glue.
Repeat this process for the opposite longer flap, tucking it under the base as well.
Your box should now be fully formed and holding its shape.
Pro Tip: For extra durability, you can apply a tiny dot of craft glue under the tucked-in flaps before pressing them down. This makes the box much sturdier.
Step 8: Make a Matching Lid (Optional, but Recommended)
A box isn’t complete without a lid! This step uses the same process but with a slight size adjustment.
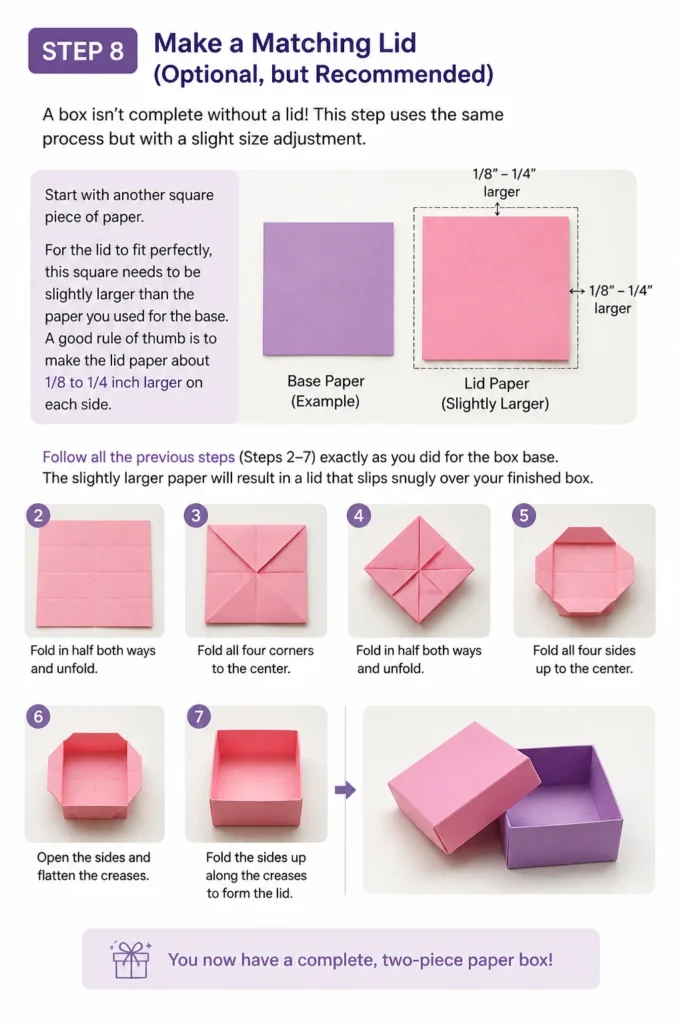
Start with another square piece of paper. For the lid to fit perfectly, this square needs to be slightly larger than the paper you used for the base.
A good rule of thumb is to make the lid paper about 1/8 to 1/4 inch larger on each side.
Follow all the previous steps (Steps 2-7) exactly as you did for the box base.
The slightly larger paper will result in a lid that slips snugly over your finished box.
You now have a complete, two-piece paper box!
Common Mistakes to Avoid
Uneven Folds
One of the most common pitfalls is not making precise folds. If your initial folds are even slightly off, every subsequent fold will amplify that inaccuracy.
This leads to a crooked box that doesn’t sit flat or has gaps in its corners. Always take your time to align edges perfectly before creasing, and use a ruler to press down firmly for sharp lines.
Incorrect Cuts
Cutting too far or not far enough is another frequent error. If you cut past the first crease line, your flaps won’t have enough material to tuck in securely, making the box unstable.
If you don’t cut far enough, the paper won’t fold up properly to form the sides. Mark your cutting lines lightly with a pencil before you snip to ensure accuracy.
Rushing the Process
Paper crafting, especially for beginners, benefits from patience. Trying to rush through the steps often results in sloppy folds, torn paper, or misaligned edges.
Take your time with each fold and crease. Enjoy the process of transforming a flat sheet into a three-dimensional object. The extra minutes spent will yield a much more satisfying result.
Using Flimsy Paper
While printer paper can work, using very thin or flimsy paper often leads to a weak, easily damaged box. It struggles to hold its shape and can tear during the folding process.
Opt for paper with a bit more weight, like cardstock, scrapbook paper, or construction paper. This provides a sturdier structure and a more professional finish to your handmade box.
Troubleshooting
Box Doesn’t Hold Shape
If your finished box feels wobbly or keeps collapsing, it’s likely due to either imprecise folds or the flaps not being securely tucked in.
Go back and re-crease all your folds, ensuring they are sharp and defined. Make sure the side flaps are fully tucked underneath the base of the box, creating a tight lock. A small dot of glue can also help reinforce these critical connections.
Lid Doesn’t Fit
A lid that’s too tight or too loose usually comes down to the initial paper size. If the lid paper was the exact same size as the base paper, it will be too tight or won’t fit at all.
If it’s too loose, the lid paper might have been cut too large. For a good fit, the lid paper should be just slightly larger (about 1/8 to 1/4 inch) than the base paper.
Paper Tears Easily
Tearing during the folding process often indicates that the paper is too thin or that you’re creasing too aggressively. Very thin paper simply can’t withstand sharp folds.
Try using a heavier weight paper for better durability. Also, avoid using your fingernail to crease; instead, use the side of your thumb, a ruler, or a bone folder for smooth, firm creases without tearing.
Key Takeaways
- Precision in folding and cutting is essential for a well-formed paper box.
- Always start with a perfectly square piece of paper for best results.
- Sharp creases are crucial for the box to hold its structure firmly.
- Consider using slightly heavier paper for increased durability and a professional finish.
- Making the lid paper slightly larger than the base paper ensures a snug fit.
- Patience and attention to detail will lead to a successful and satisfying crafting experience.
Frequently Asked Questions
Can I make different size boxes?
Absolutely! The size of your finished box is directly proportional to the size of your starting square of paper. A larger square yields a larger box, and a smaller square makes a smaller box. The folding technique remains the same, regardless of the paper dimensions.
What’s the best paper to use?
For beginners, medium-weight cardstock (around 65-80lb) or scrapbook paper is ideal. It’s sturdy enough to hold its shape but flexible enough to fold easily. Thinner papers like printer paper can work for very small, delicate boxes, but heavier options provide more durability.
How do I make a lid?
To make a lid that fits, follow all the same steps as you did for the box base. The key difference is to start with a square of paper that is approximately 1/8 to 1/4 inch larger on each side than the paper used for the base. This slight size increase allows the lid to slip over the box comfortably.
Can I decorate my box?
Yes, decorating your box is part of the fun! You can use patterned paper from the start, or decorate a plain paper box with paint, markers, stickers, glitter, or even glued-on embellishments like ribbons or beads. Decorate before the final folds for easier access to flat surfaces, or after assembly for a more hands-on approach.
Our Top Recommended Finds
- Craft Paper Pack: A variety pack of colored or patterned craft paper offers endless possibilities and a good weight for box making.
- Precision Scissors: Sharp, comfortable scissors make clean cuts, which are vital for accurate box construction.
- Craft Glue Stick: While optional, a good quality glue stick can provide extra security for your box’s folds, especially for heavier items.
Embrace Your Inner Paper Artisan Today!
You’ve just unlocked a fantastic, practical skill that goes beyond simply making a box.
This method forms the foundation for countless other paper crafts, from intricate origami to custom gift packaging.
Why not gather your supplies right now and try creating your very first paper box? You might be surprised at how quickly you master it.
Once you’ve made one, consider making a set, or experiment with different paper types and sizes. The world of paper crafting awaits!
Beginner-friendly templates, step-by-step guides,
and weekly project ideas in your inbox.