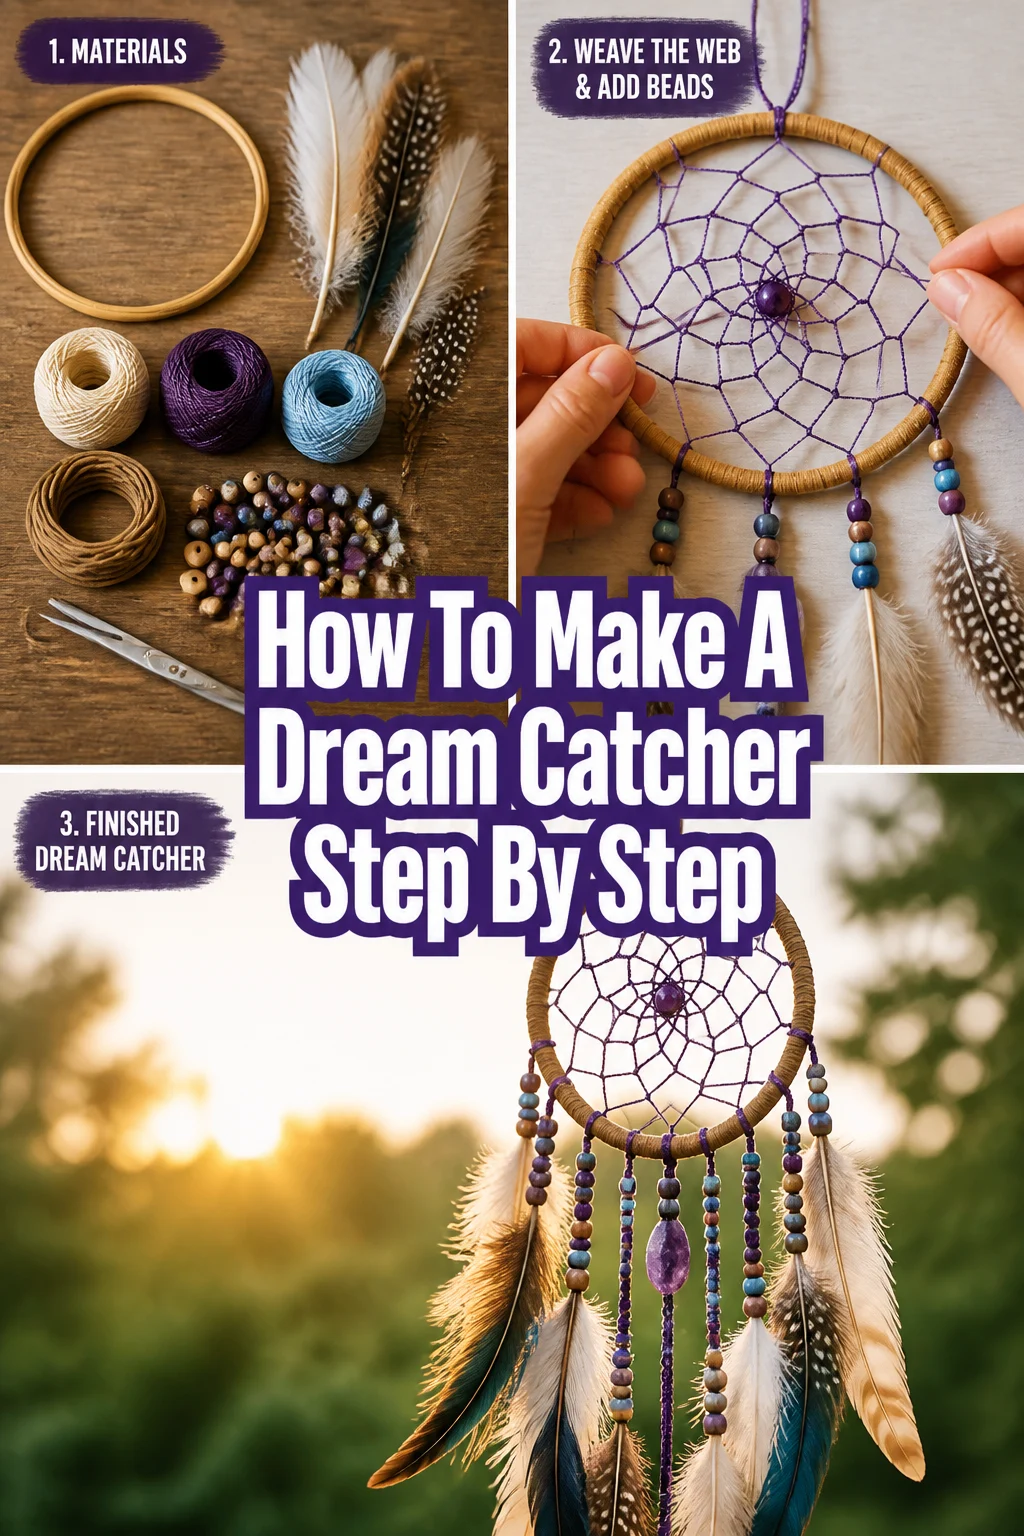
🕸️ How To Make A Dream Catcher Step By Step

Beginner-friendly templates, step-by-step guides,
and weekly project ideas in your inbox.
I remember the quiet satisfaction of completing my first dream catcher. It wasn’t just a craft; it felt like creating a small piece of magic. This guide shares that experience, offering clear steps honed from years of crafting.
You’ll soon discover the joy of weaving your own beautiful dream catcher, ready to adorn your space.

Quick Overview
This guide will walk you through crafting a traditional-style dream catcher, from wrapping the hoop to adding decorative elements. You’ll learn essential techniques for creating a sturdy and aesthetically pleasing piece.
- Time needed: 1.5 – 3 hours (depending on detail and experience)
- Difficulty: Beginner to Intermediate
- What you’ll need: A hoop, string/cord, beads, feathers, scissors, optional glue.
Step-by-Step Instructions
Step 1: Gather Your Materials
Collect all the necessary items before you begin. A clear workspace helps keep everything organized. Ensure your string and hoop are suitable for the size you envision.
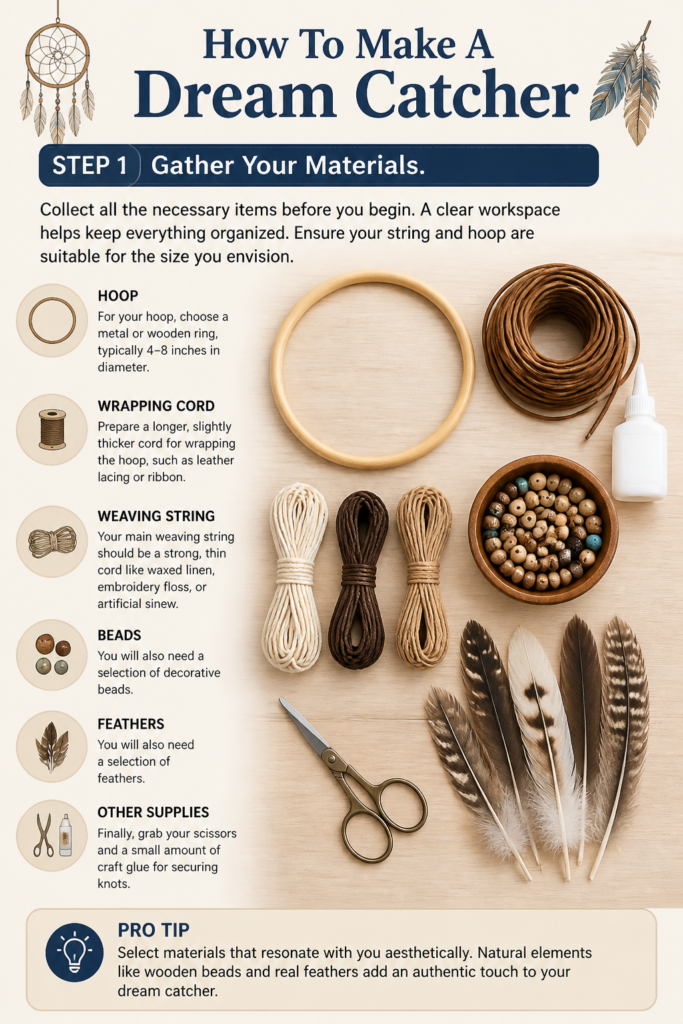
For your hoop, choose a metal or wooden ring, typically 4-8 inches in diameter. Your main weaving string should be a strong, thin cord like waxed linen, embroidery floss, or artificial sinew. Prepare a longer, slightly thicker cord for wrapping the hoop, such as leather lacing or ribbon.
You will also need a selection of decorative beads and feathers. Finally, grab your scissors and a small amount of craft glue for securing knots.
Pro Tip: Select materials that resonate with you aesthetically. Natural elements like wooden beads and real feathers add an authentic touch to your dream catcher.
Step 2: Wrap the Hoop
Start by securing one end of your hoop-wrapping material to the hoop. You can use a small dab of glue or tie a secure knot to hold it in place. This forms the base for your dream catcher.
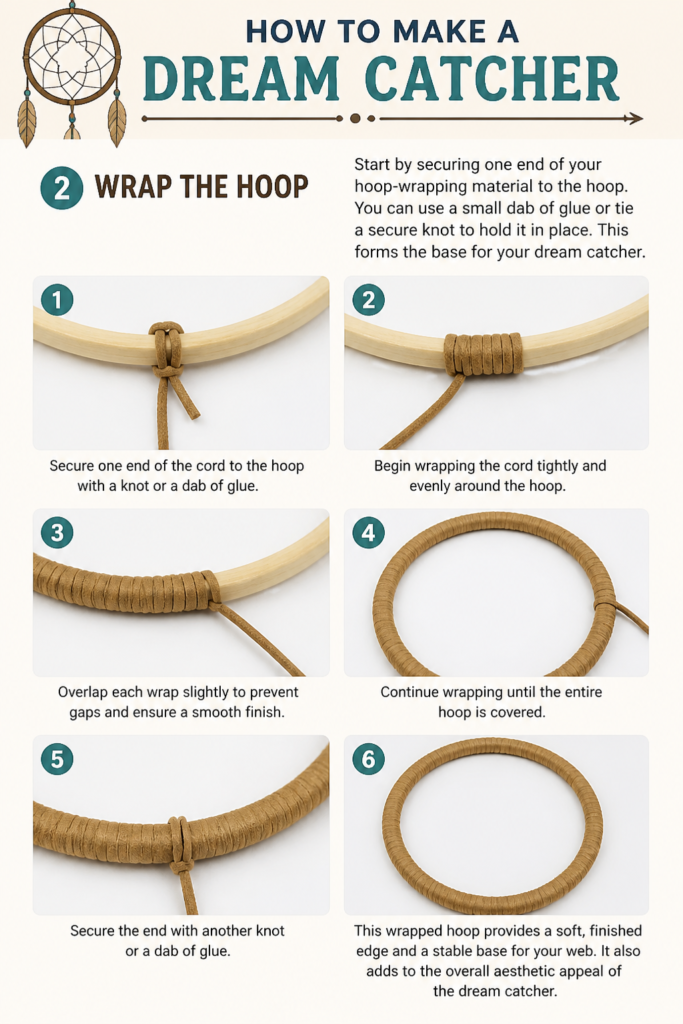
Begin wrapping the cord tightly and evenly around the entire hoop. Overlap each wrap slightly to prevent gaps and ensure a smooth finish. Continue until the entire hoop is covered, then secure the end with another knot or a dab of glue.
This wrapped hoop provides a soft, finished edge and a stable base for your web. It also adds to the overall aesthetic appeal of the dream catcher.
Step 3: Prepare the Weaving String
Cut a generous length of your chosen weaving string. For a 6-inch hoop, you might need 8-10 feet of string, but it’s always better to have too much than too little. You can always trim excess later.
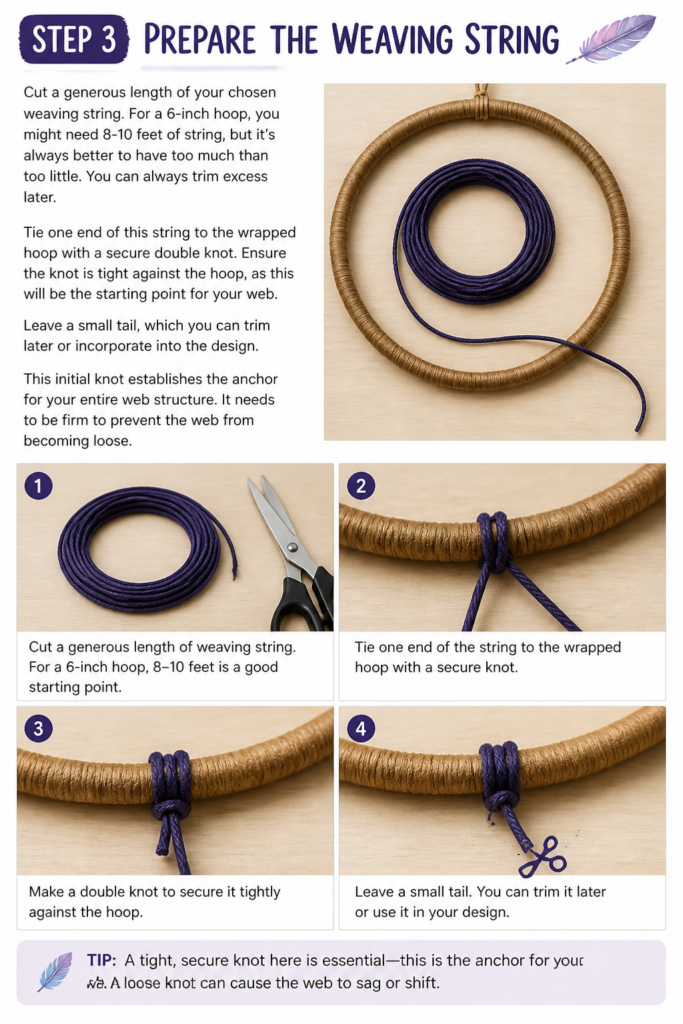
Tie one end of this string to the wrapped hoop with a secure double knot. Ensure the knot is tight against the hoop, as this will be the starting point for your web. Leave a small tail, which you can trim later or incorporate into the design.
This initial knot establishes the anchor for your entire web structure. It needs to be firm to prevent the web from becoming loose.
Step 4: Weave the First Layer of the Web
Create your first loop by bringing the string over the top of the hoop. Pass it underneath the hoop and back up through the loop you just created. This forms a simple half-hitch knot.
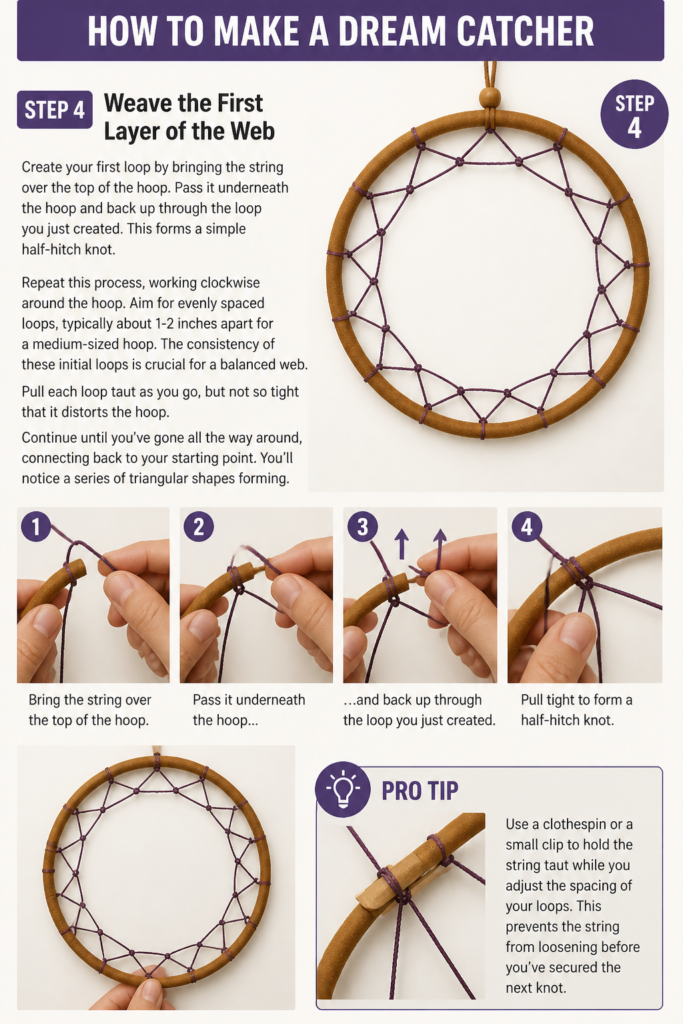
Repeat this process, working clockwise around the hoop. Aim for evenly spaced loops, typically about 1-2 inches apart for a medium-sized hoop. The consistency of these initial loops is crucial for a balanced web.
Pull each loop taut as you go, but not so tight that it distorts the hoop. Continue until you’ve gone all the way around, connecting back to your starting point. You’ll notice a series of triangular shapes forming.
Pro Tip: Use a clothespin or a small clip to hold the string taut while you adjust the spacing of your loops. This prevents the string from loosening before you’ve secured the next knot.
Step 5: Weave Subsequent Layers
Begin the second layer by taking your string and looping it through the middle of the first string segment of the previous row. You will not loop it around the hoop anymore. This creates a new, smaller loop.
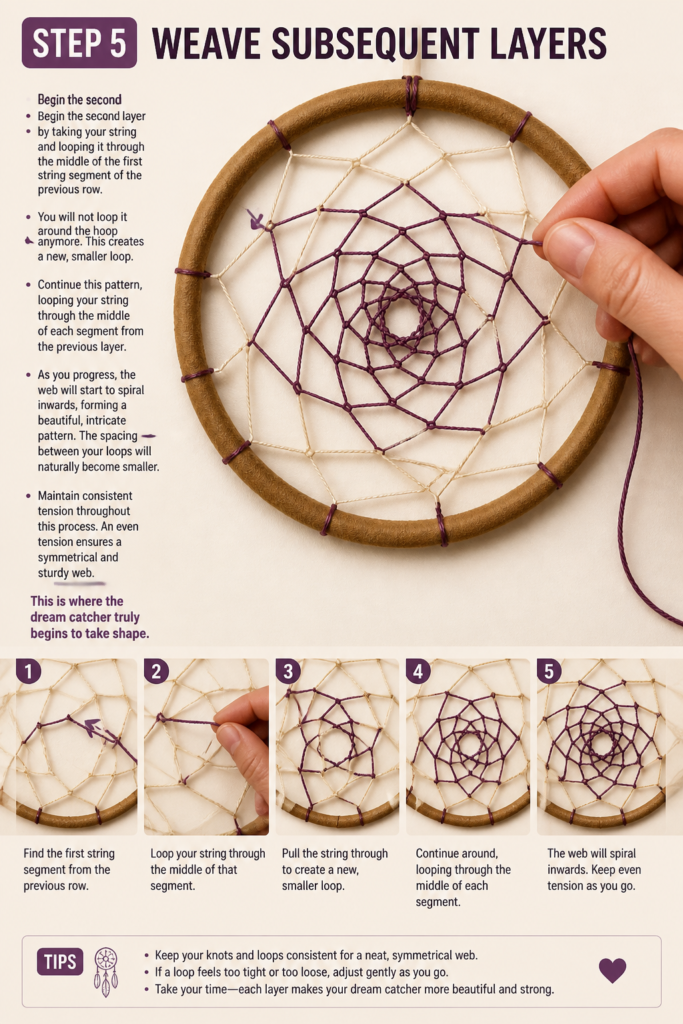
Continue this pattern, looping your string through the middle of each segment from the previous layer. As you progress, the web will start to spiral inwards, forming a beautiful, intricate pattern. The spacing between your loops will naturally become smaller.
Maintain consistent tension throughout this process. An even tension ensures a symmetrical and sturdy web. This is where the dream catcher truly begins to take shape.
Step 6: Incorporate Beads into the Web
Pause your weaving at various points to add beads. To do this, simply thread a bead onto your string before making your next loop. The bead will sit snugly within the web.
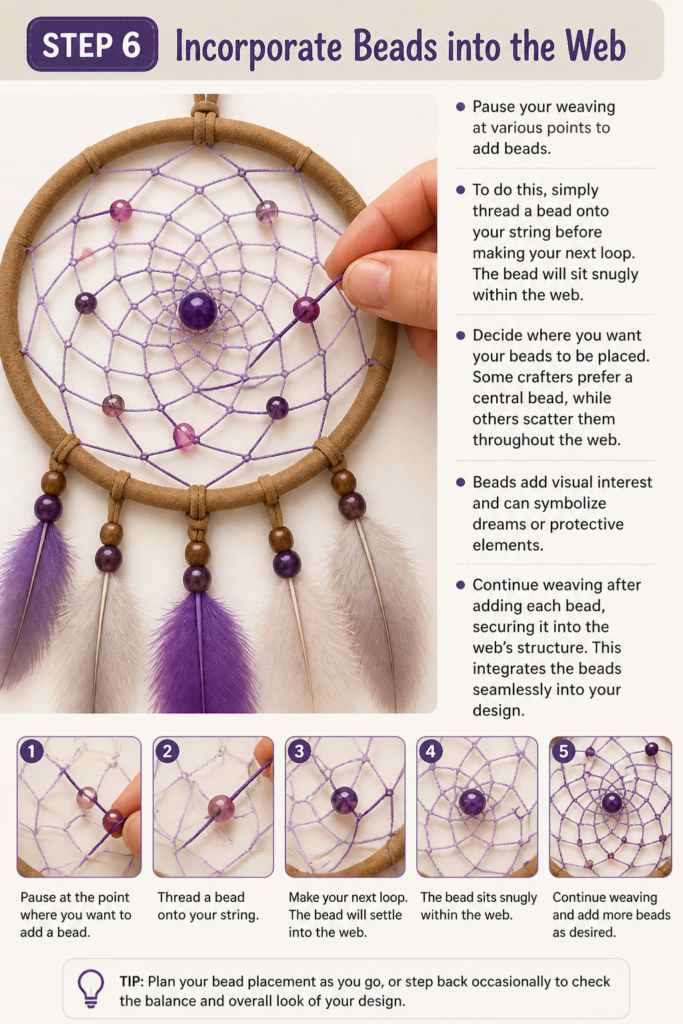
Decide where you want your beads to be placed. Some crafters prefer a central bead, while others scatter them throughout the web. Beads add visual interest and can symbolize dreams or protective elements.
Continue weaving after adding each bead, securing it into the web’s structure. This integrates the beads seamlessly into your design.
Step 7: Finish the Web and Attach Hanging Elements
Weave until you reach the desired center of your dream catcher. This might be a small central hole, or you might weave until there’s no more space. Secure the final loop with a tight double knot.
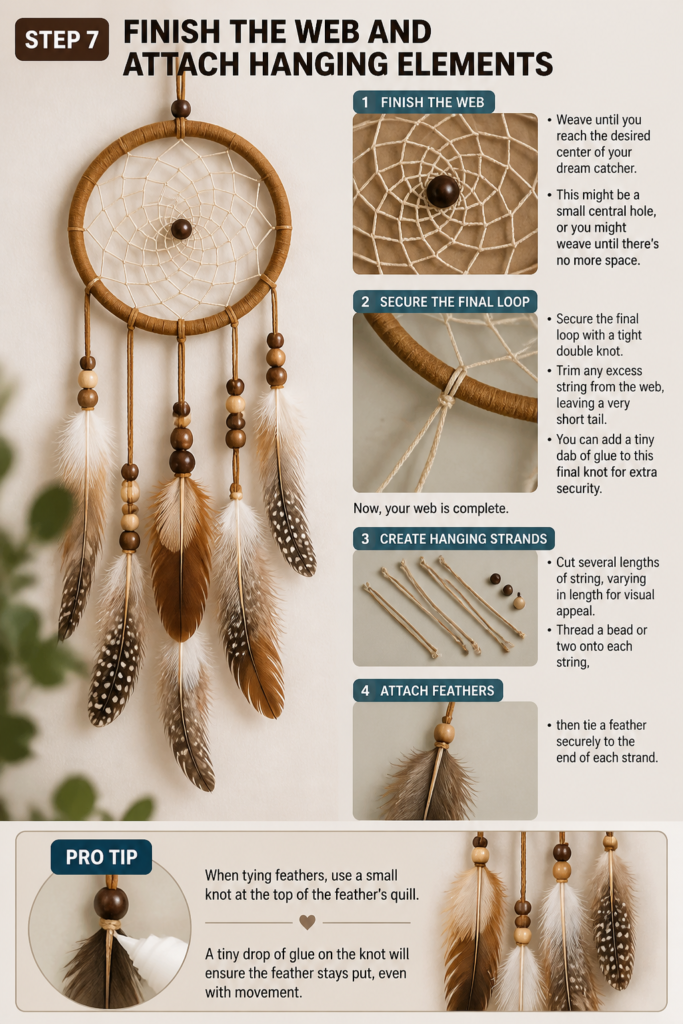
Trim any excess string from the web, leaving a very short tail. You can add a tiny dab of glue to this final knot for extra security. Now, your web is complete.
Create hanging strands for your feathers. Cut several lengths of string, varying in length for visual appeal. Thread a bead or two onto each string, then tie a feather securely to the end of each strand.
Pro Tip: When tying feathers, use a small knot at the top of the feather’s quill. A tiny drop of glue on the knot will ensure the feather stays put, even with movement.
Step 8: Attach Feathers and Hanging Loop
Tie your feather strands to the bottom of the dream catcher hoop. Arrange them aesthetically, often with the longest feather in the center and shorter ones on either side. Ensure they are evenly spaced.
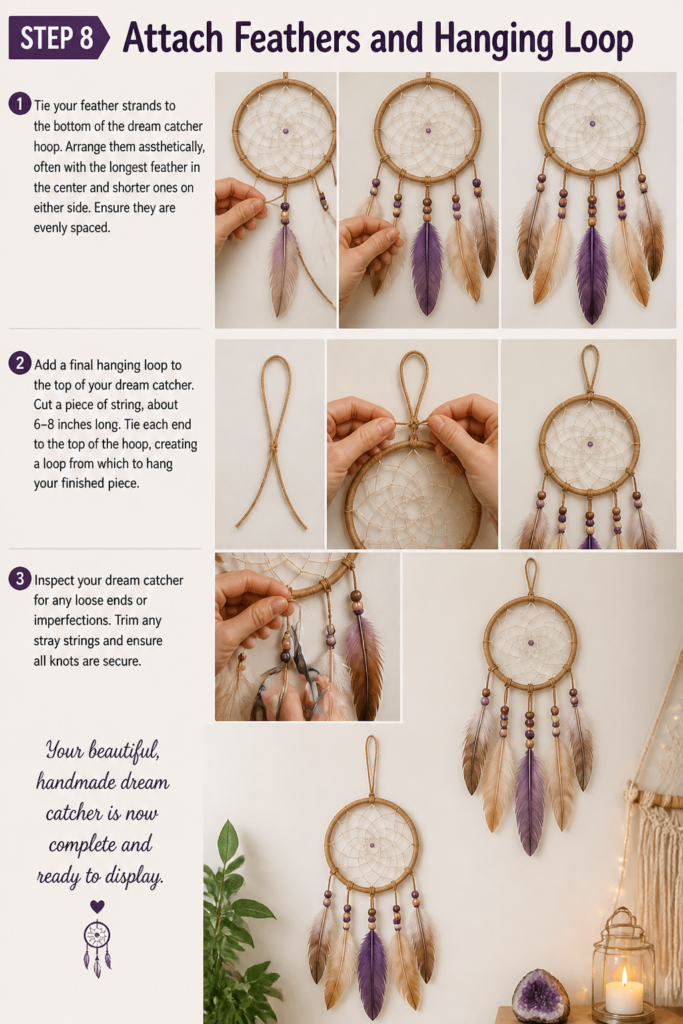
Add a final hanging loop to the top of your dream catcher. Cut a piece of string, about 6-8 inches long. Tie each end to the top of the hoop, creating a loop from which to hang your finished piece.
Inspect your dream catcher for any loose ends or imperfections. Trim any stray strings and ensure all knots are secure. Your beautiful, handmade dream catcher is now complete and ready to display.
Common Mistakes to Avoid
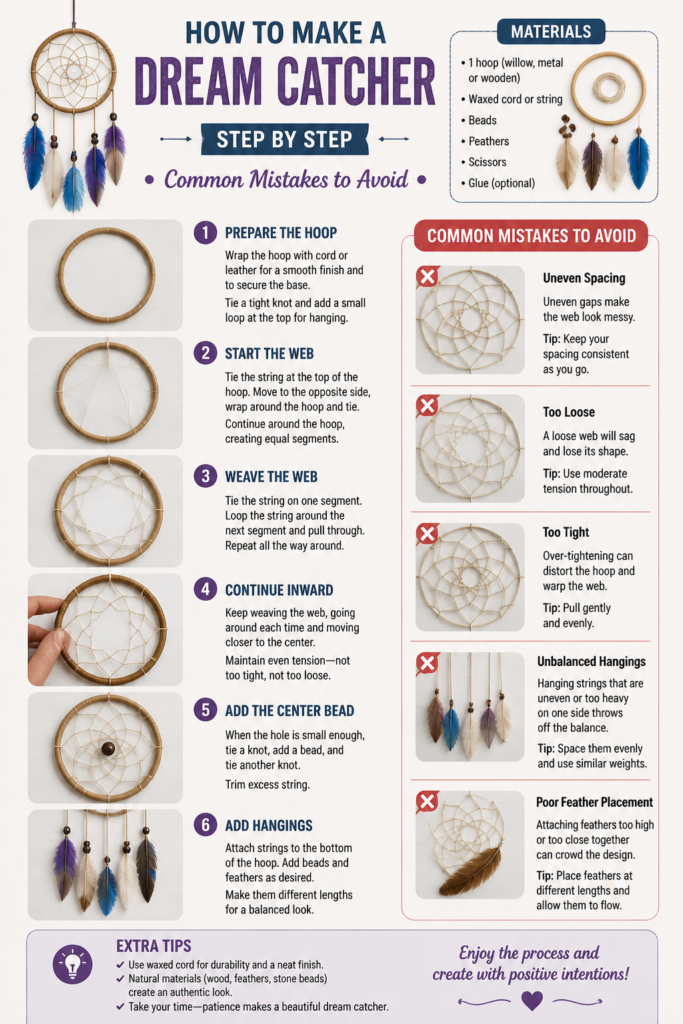
Inconsistent Web Tension
A common pitfall is weaving the web with uneven tension. Some sections might be too loose, causing the web to sag, while others are too tight, potentially distorting the hoop. Always pull each loop with consistent, firm pressure to ensure a symmetrical and stable web. This creates a visually balanced and stronger dream catcher.
Loose Hoop Wrapping
If the cord wrapped around the hoop is not tight enough, it can unravel or shift over time. This exposes the bare hoop and detracts from the finished look. Ensure each wrap overlaps slightly and is pulled snugly against the previous one, securing the ends with glue for durability.
Overcrowding with Decorations
While beads and feathers add charm, using too many can make the dream catcher look cluttered and heavy. It can also obscure the intricate web design. Choose your decorative elements thoughtfully, aiming for balance and allowing the web to remain the focal point. Less is often more for an elegant finish.
Weak Knots
Poorly tied knots can lead to the dream catcher unraveling, especially the starting and ending knots of the web, or those securing feathers. Always use double knots for critical connections and consider adding a tiny dab of craft glue to secure them permanently. Strong knots ensure the longevity of your creation.
Troubleshooting
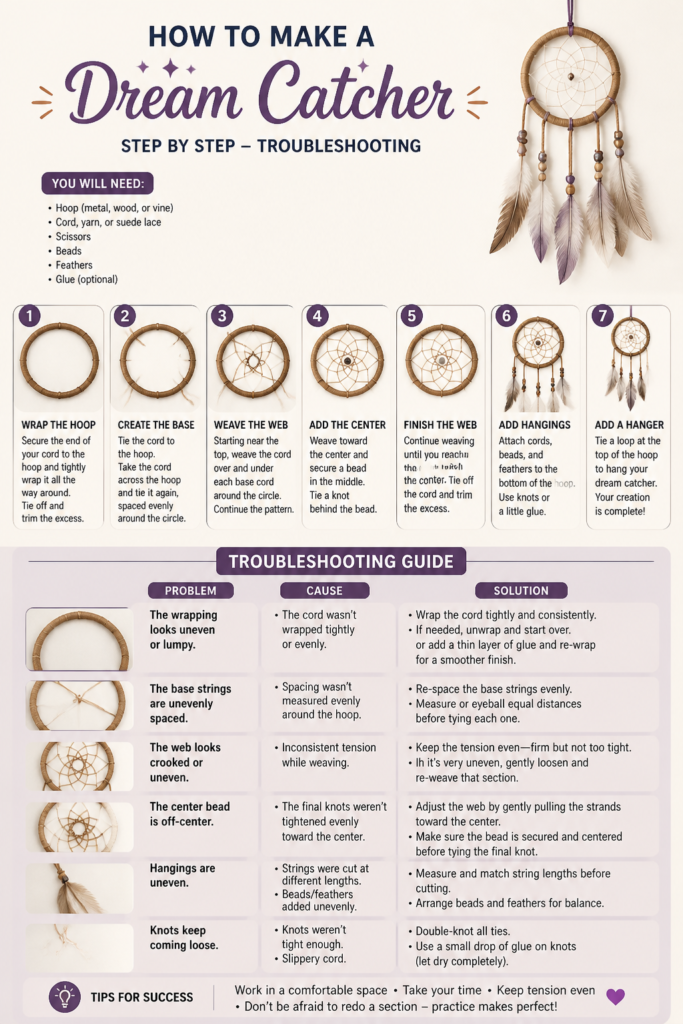
My Web Looks Uneven or Lopsided
This usually happens due to inconsistent spacing or tension in the initial layers. Go back and carefully adjust the loops in the first one or two rows. Gently pull the string to even out the tension, working slowly around the hoop. If it’s too far along, you might need to undo a few rows and re-weave, paying close attention to spacing and tautness.
The String Keeps Slipping on the Hoop
If your weaving string slides around on the wrapped hoop, it might be due to a slippery cord or insufficient initial knot security. Try using a small dot of craft glue on your starting knot to anchor it firmly. For slippery cords, a waxed cord can offer better grip, or you can roughen the surface of your wrapped hoop slightly with fine sandpaper if it’s a fabric wrap.
My Feathers Keep Falling Off
Feathers often detach if the knot securing them is not tight enough or if it’s placed too high on the fragile part of the quill. Make sure to tie the string around the sturdy base of the quill. Use a double knot and, for extra security, apply a small drop of super glue or craft glue directly onto the knot once it’s tied. This will fuse the string to the quill.
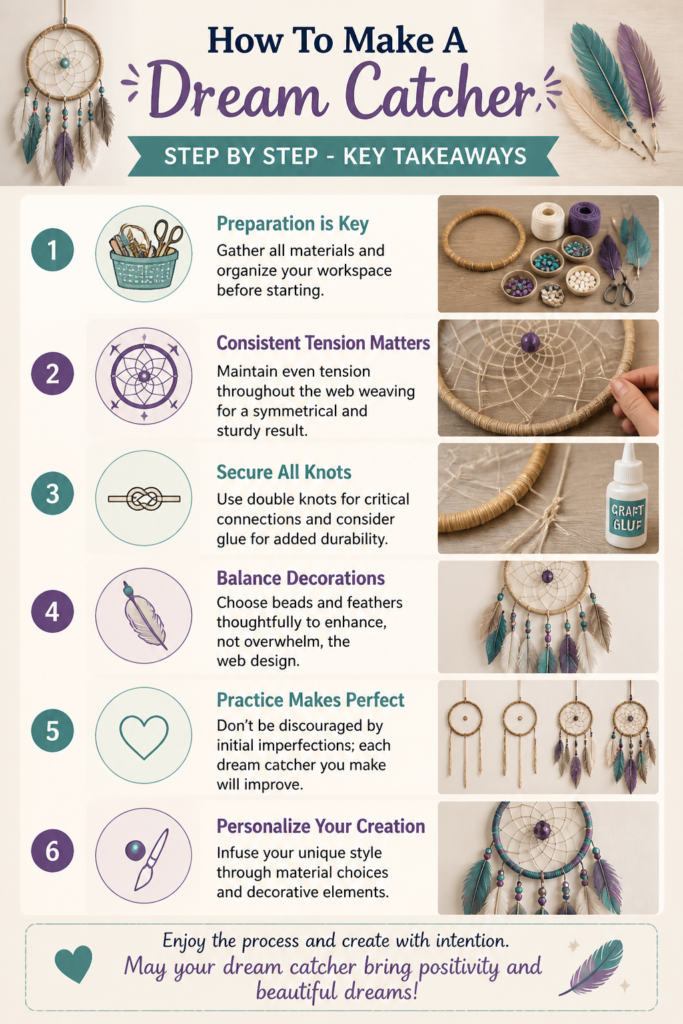
Key Takeaways
- Preparation is Key: Gather all materials and organize your workspace before starting.
- Consistent Tension Matters: Maintain even tension throughout the web weaving for a symmetrical and sturdy result.
- Secure All Knots: Use double knots for critical connections and consider glue for added durability.
- Balance Decorations: Choose beads and feathers thoughtfully to enhance, not overwhelm, the web design.
- Practice Makes Perfect: Don’t be discouraged by initial imperfections; each dream catcher you make will improve.
- Personalize Your Creation: Infuse your unique style through material choices and decorative elements.
Frequently Asked Questions
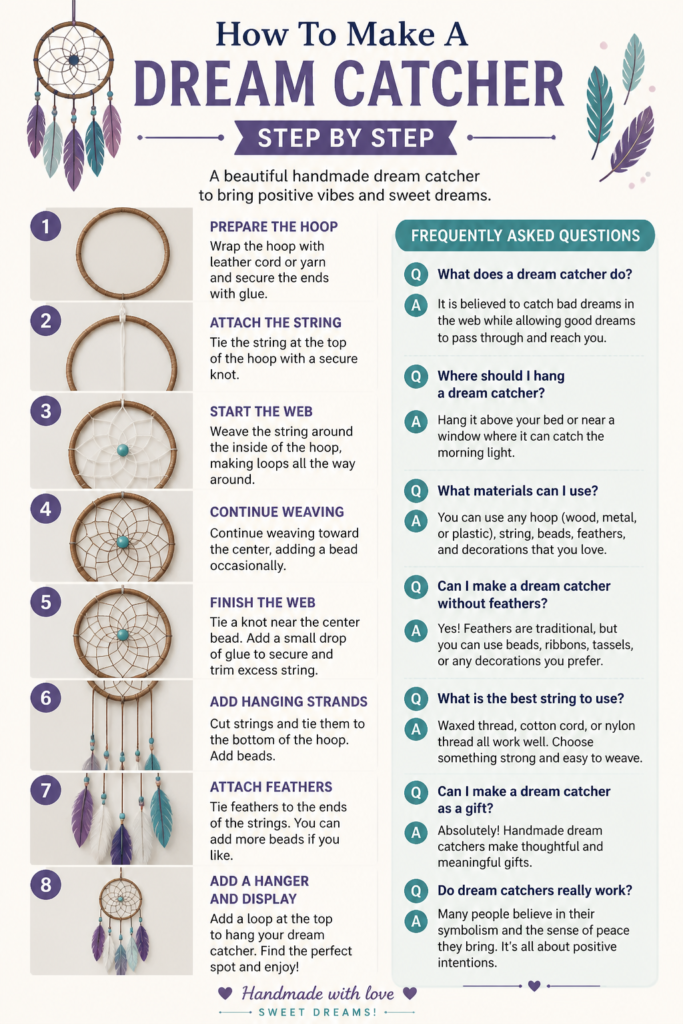
What kind of hoop is best for a dream catcher?
Metal hoops are durable and readily available, often used for embroidery. Wooden hoops offer a more natural, rustic look and feel. Both work well, but metal hoops might require a bit more wrapping to soften their appearance. Choose based on your desired aesthetic.
How long should my weaving string be?
A good rule of thumb is to cut your weaving string about 8-10 times the diameter of your hoop. For example, a 6-inch hoop would need 48-60 inches (4-5 feet) of string. It’s always better to have extra and trim it than to run short mid-weave.
Can I use different types of string for the web?
Absolutely! While waxed linen or artificial sinew are traditional for their strength and grip, you can experiment with embroidery floss, thin yarn, or even fishing line for different effects. Just ensure it’s strong enough to hold tension without breaking.
How do I make a tiny dream catcher?
The process is identical, just on a smaller scale. Use a smaller hoop (e.g., 2-3 inches), very thin string or thread, and tiny beads and feathers. Be prepared for more intricate work, as the smaller size requires greater precision.
Our Top Recommended Finds
- Metal Craft Hoops: Available in various sizes, these provide a sturdy and consistent base for your dream catcher.
- Waxed Polyester Cord: Ideal for weaving, this cord is strong, doesn’t fray easily, and holds knots well, making the process smoother.
- Assorted Feather and Bead Kits: These kits offer a wide variety of colors and styles, perfect for personalizing your dream catcher without buying individual packs.
Your Dream Weaver Journey Begins Now
You’ve now got all the knowledge to create your very own dream catcher. Imagine the satisfaction of seeing your handcrafted piece hanging proudly, ready to inspire peaceful nights. Don’t let hesitation hold you back; gather your materials and embark on this rewarding creative journey today. Perhaps your next project could be a multi-hoop dream catcher or one using unconventional materials. The possibilities are as endless as your imagination.
Beginner-friendly templates, step-by-step guides,
and weekly project ideas in your inbox.