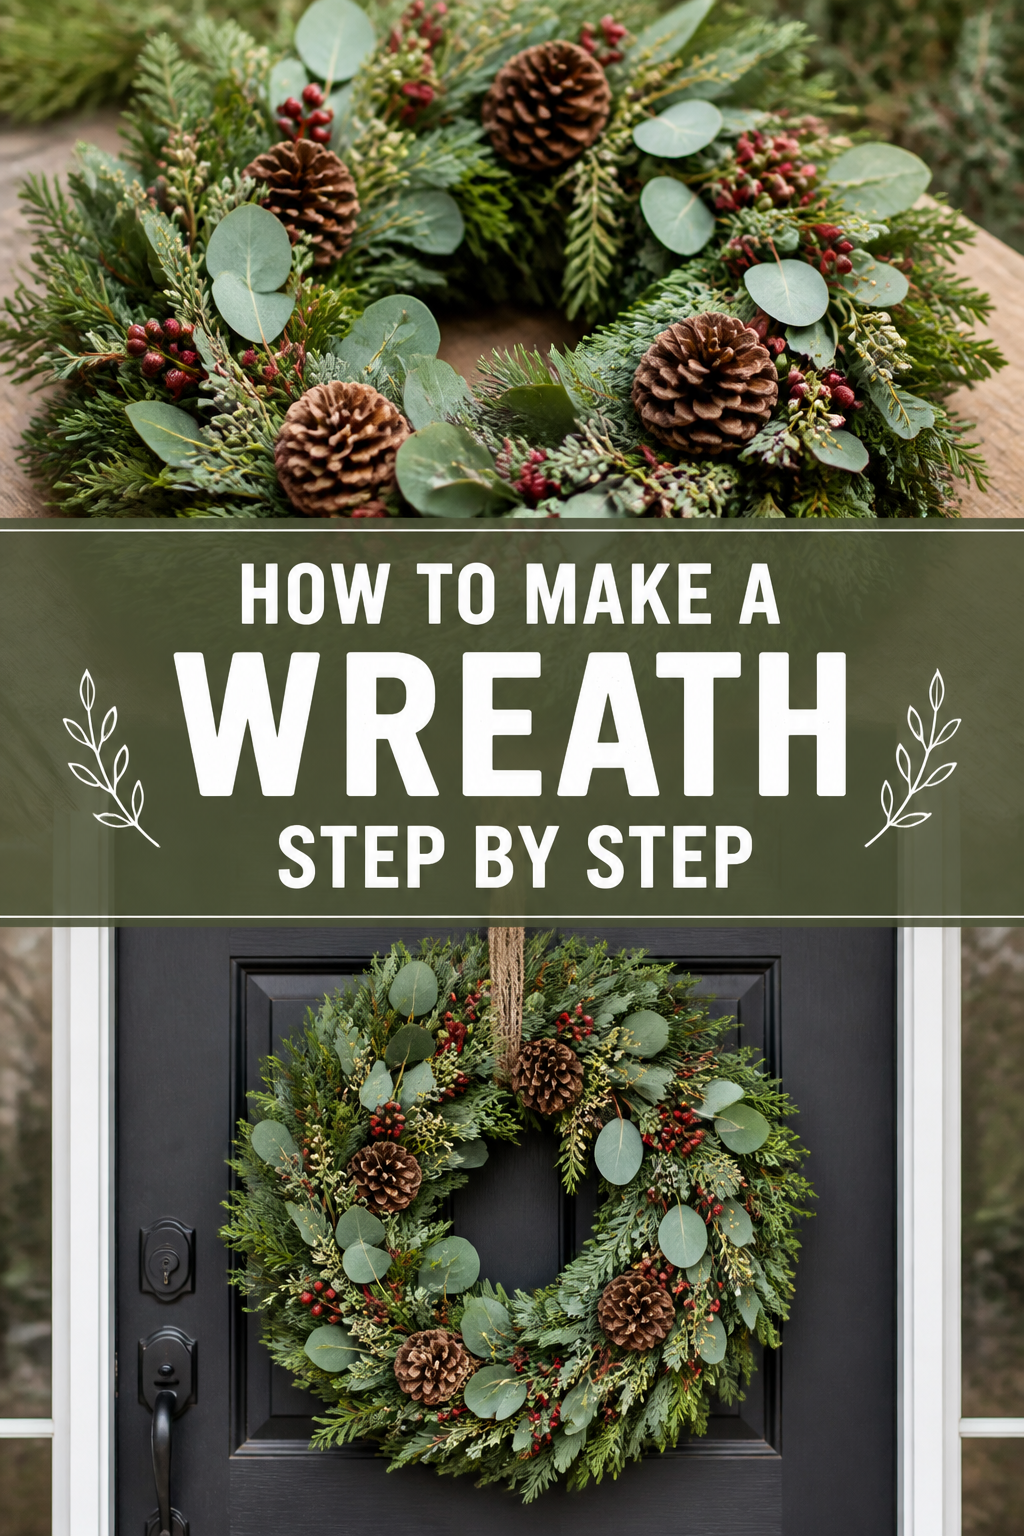
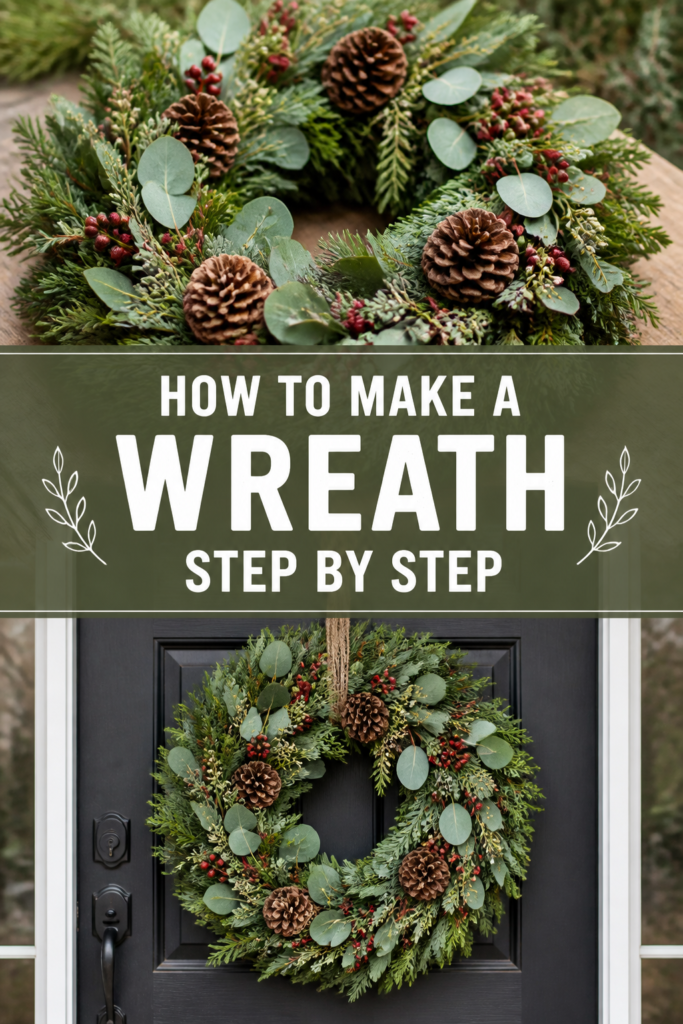
🌿 How To Make A Wreath Step By Step

Beginner-friendly templates, step-by-step guides,
and weekly project ideas in your inbox.
There’s a special kind of magic in creating something beautiful with your own hands.
I’ve spent countless hours transforming simple materials into stunning wreaths for every season and occasion.
This guide distills my favorite techniques, ensuring you can craft a gorgeous wreath, even if you’ve never tried before.
Quick Overview
You’re about to embark on a rewarding creative journey. By the end of this guide, you will have crafted a beautiful, custom wreath ready to adorn your home or give as a thoughtful gift.
We’ll cover everything from selecting your materials to the final touches, making the process enjoyable and straightforward.
- Time needed: 1-3 hours (depending on complexity and drying time for adhesives)
- Difficulty: Beginner
- What you’ll need: Wreath form, floral wire, wire cutters, scissors, various greens, decorative elements, optional hot glue gun.
Step-by-Step Instructions
Step 1: Gather Your Materials
Collect all the items you plan to use before you begin. This helps streamline your creative flow and ensures you have everything within reach.
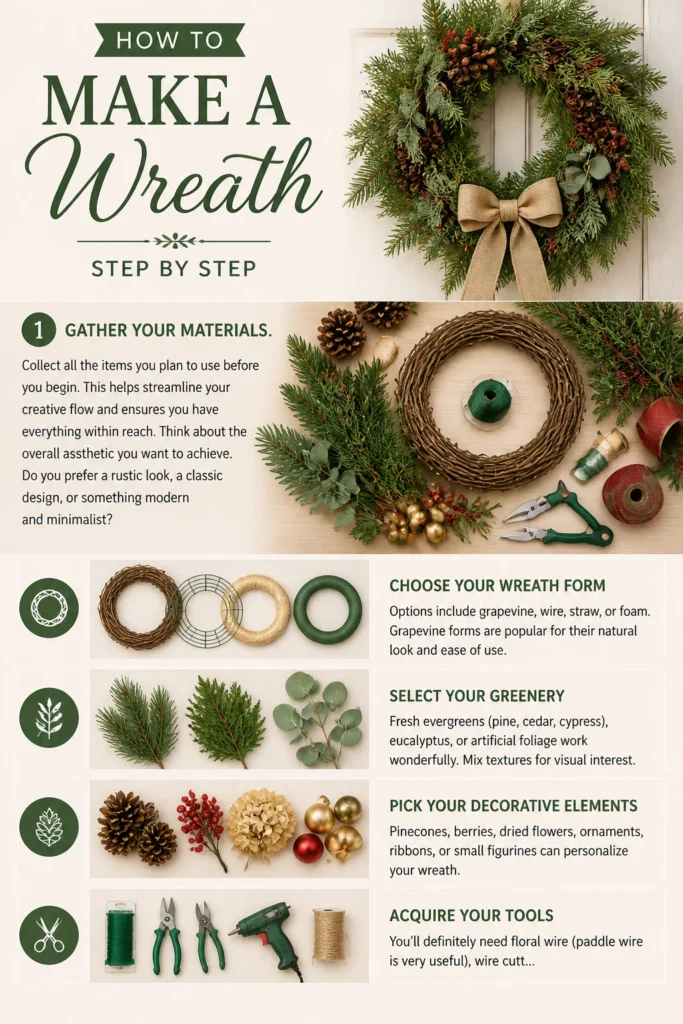
Think about the overall aesthetic you want to achieve. Do you prefer a rustic look, a classic design, or something modern and minimalist?
- Choose your wreath form: Options include grapevine, wire, straw, or foam. Grapevine forms are popular for their natural look and ease of use.
- Select your greenery: Fresh evergreens (pine, cedar, cypress), eucalyptus, or artificial foliage work wonderfully. Mix textures for visual interest.
- Pick your decorative elements: Pinecones, berries, dried flowers, ornaments, ribbons, or small figurines can personalize your wreath.
- Acquire your tools: You’ll definitely need floral wire (paddle wire is very useful), wire cutters, and sharp scissors. A hot glue gun can be helpful for attaching lighter elements.
Pro Tip: For fresh wreaths, consider what’s in season and locally available. For artificial wreaths, invest in high-quality elements that look realistic and will last for years.
Step 2: Prepare Your Wreath Form
Inspect your chosen wreath form. If using a wire form, you might want to wrap it with moss or burlap ribbon first to create a softer base and help secure your greenery.
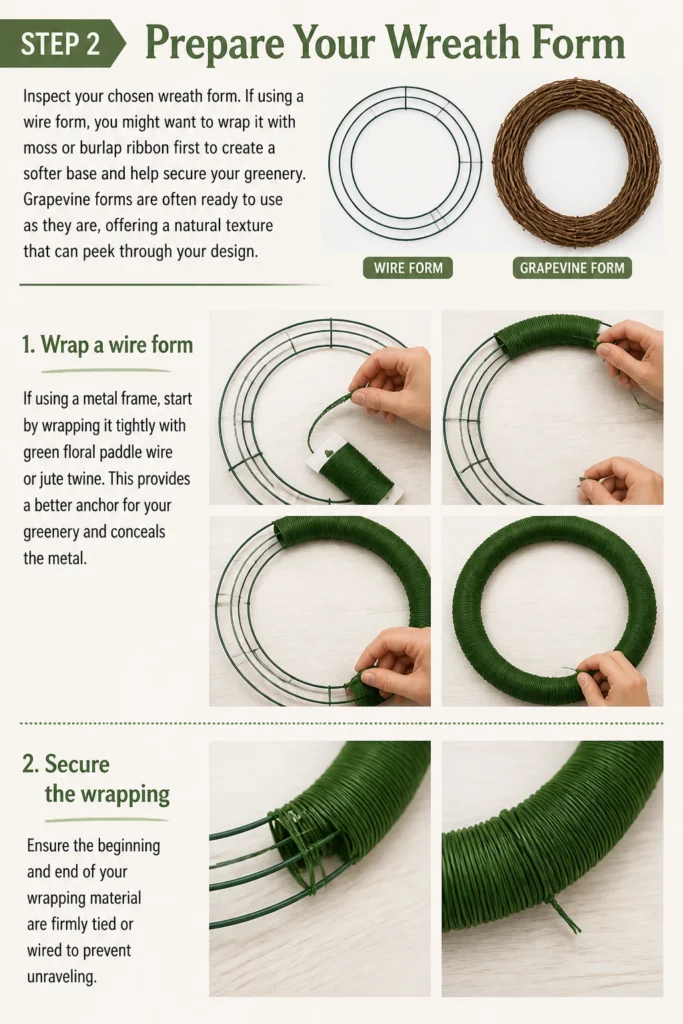
Grapevine forms are often ready to use as they are, offering a natural texture that can peek through your design.
- Wrap a wire form: If using a metal frame, start by wrapping it tightly with green floral paddle wire or jute twine. This provides a better anchor for your greenery and conceals the metal.
- Secure the wrapping: Ensure the beginning and end of your wrapping material are firmly tied or wired to prevent unraveling.
Step 3: Create Small Bundles of Greenery
Cut your chosen greenery into manageable sprigs and small bundles. Aim for pieces roughly 6-10 inches long, depending on the desired fullness of your wreath.
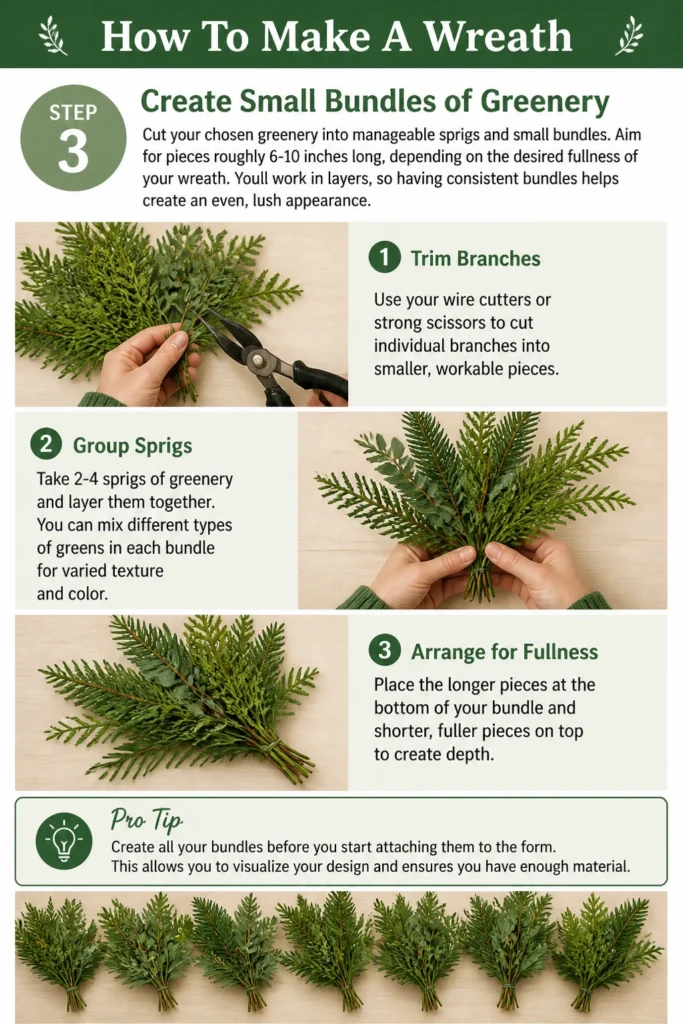
You’ll work in layers, so having consistent bundles helps create an even, lush appearance.
- Trim branches: Use your wire cutters or strong scissors to cut individual branches into smaller, workable pieces.
- Group sprigs: Take 2-4 sprigs of greenery and layer them together. You can mix different types of greens in each bundle for varied texture and color.
- Arrange for fullness: Place the longer pieces at the bottom of your bundle and shorter, fuller pieces on top to create depth.
Pro Tip: Create all your bundles before you start attaching them to the form. This allows you to visualize your design and ensures you have enough material.
Step 4: Attach Greenery to the Form
Begin attaching your greenery bundles to the wreath form, working in one direction around the circle. This creates a natural, flowing look.
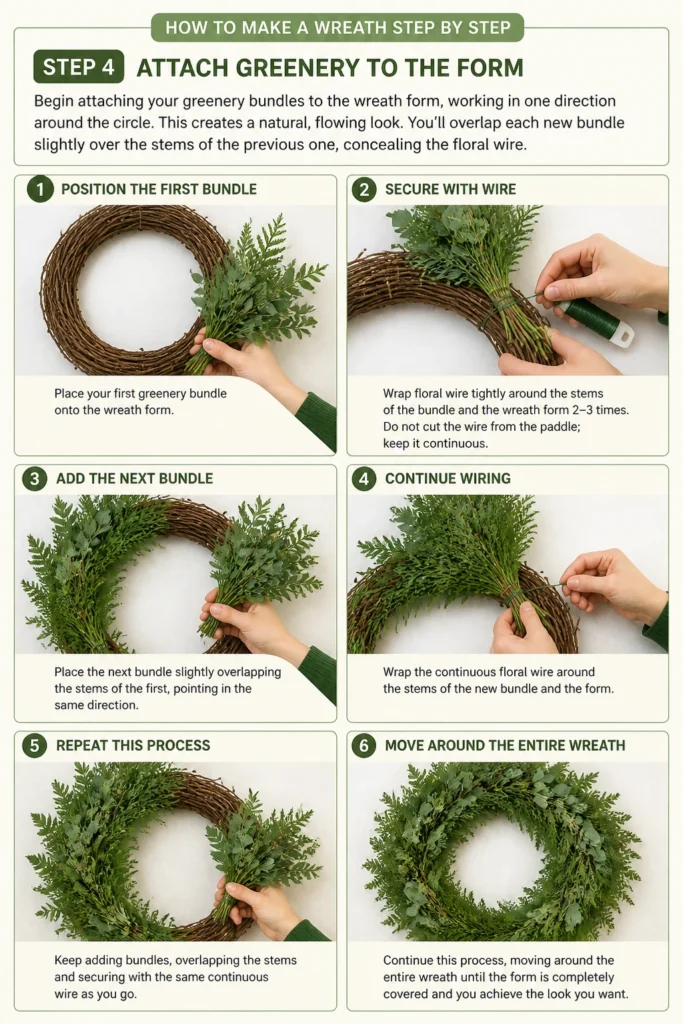
You’ll overlap each new bundle slightly over the stems of the previous one, concealing the floral wire.
- Position the first bundle: Place your first greenery bundle onto the wreath form.
- Secure with wire: Wrap floral wire tightly around the stems of the bundle and the wreath form 2-3 times. Do not cut the wire from the paddle; keep it continuous.
- Add the next bundle: Place the next bundle slightly overlapping the stems of the first, pointing in the same direction.
- Continue wiring: Wrap the continuous floral wire around the stems of the new bundle and the form. Repeat this process, moving around the entire wreath.
Step 5: Build Volume and Texture
Layer different types of greenery and additional elements to add depth and visual interest. Don’t be afraid to experiment with placement.
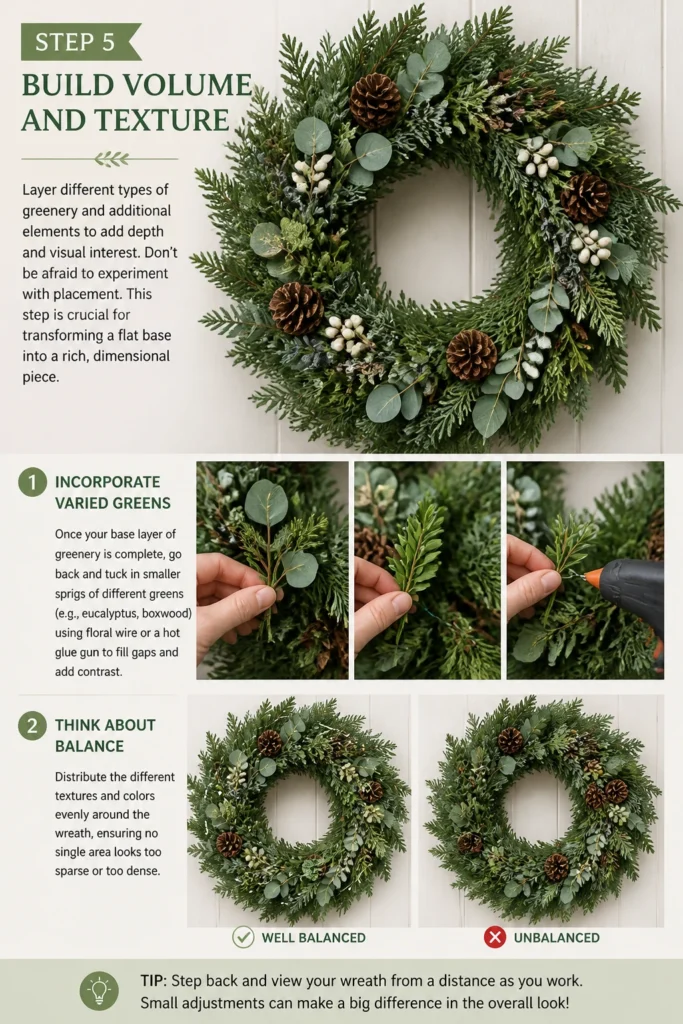
This step is crucial for transforming a flat base into a rich, dimensional piece.
- Incorporate varied greens: Once your base layer of greenery is complete, go back and tuck in smaller sprigs of different greens (e.g., eucalyptus, boxwood) using floral wire or a hot glue gun to fill gaps and add contrast.
- Think about balance: Distribute the different textures and colors evenly around the wreath, ensuring no single area looks too sparse or too dense.
Step 6: Incorporate Decorative Elements
Place your chosen decorative elements to enhance your wreath. Pinecones, berries, dried oranges, or small ornaments can add pops of color and personality.
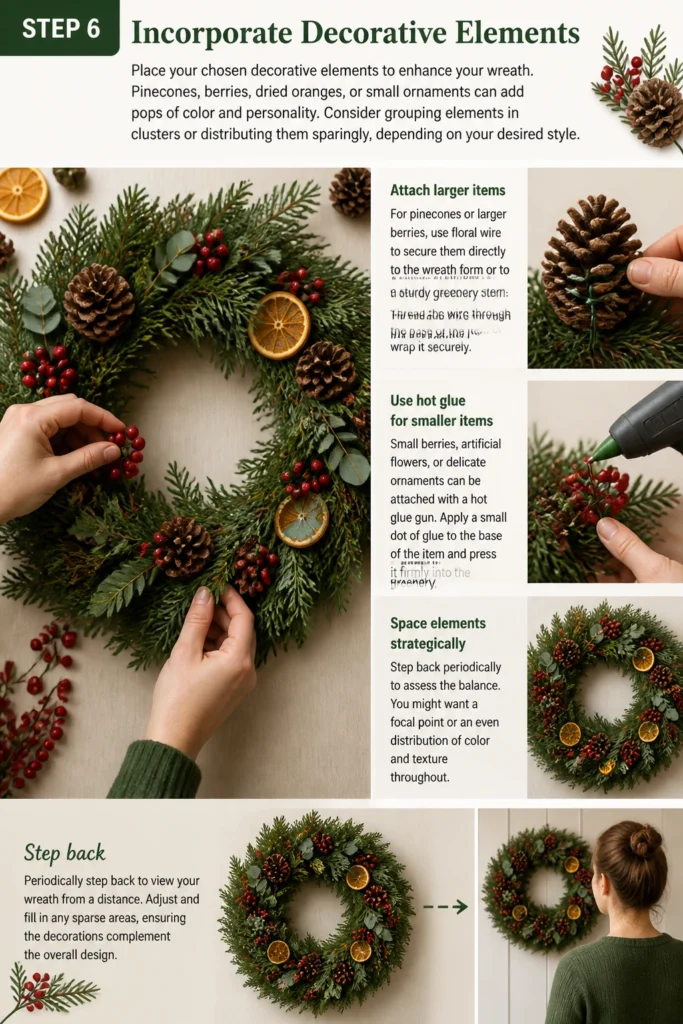
Consider grouping elements in clusters or distributing them sparingly, depending on your desired style.
- Attach larger items: For pinecones or larger berries, use floral wire to secure them directly to the wreath form or to a sturdy greenery stem. Thread the wire through the base of the item or wrap it securely.
- Use hot glue for smaller items: Small berries, artificial flowers, or delicate ornaments can be attached with a hot glue gun. Apply a small dot of glue to the base of the item and press it firmly into the greenery.
- Space elements strategically: Step back periodically to assess the balance. You might want a focal point or an even distribution.
Pro Tip: Before permanently attaching decorative elements, lay them out on the wreath to visualize the arrangement. Take a photo to compare different layouts.
Step 7: Add a Ribbon or Bow
Tie a beautiful bow or simply drape a ribbon to complete your wreath. The ribbon can be a strong focal point or a subtle accent.
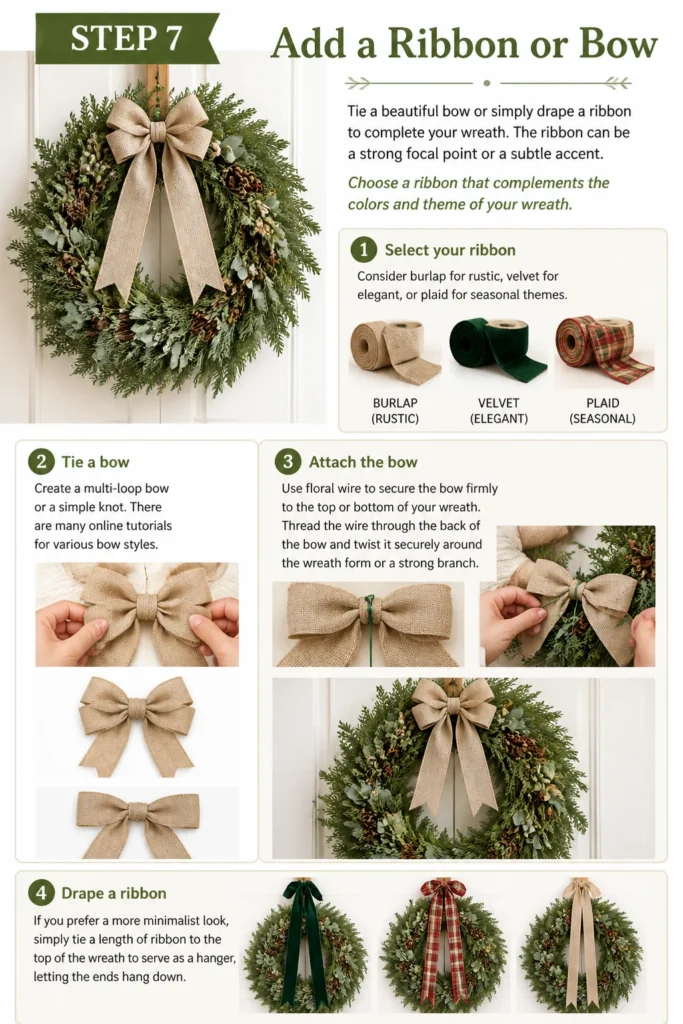
Choose a ribbon that complements the colors and theme of your wreath.
- Select your ribbon: Consider burlap for rustic, velvet for elegant, or plaid for seasonal themes.
- Tie a bow: Create a multi-loop bow or a simple knot. There are many online tutorials for various bow styles.
- Attach the bow: Use floral wire to secure the bow firmly to the top or bottom of your wreath. Thread the wire through the back of the bow and twist it securely around the wreath form or a strong branch.
- Drape a ribbon: If you prefer a more minimalist look, simply tie a length of ribbon to the top of the wreath to serve as a hanger, letting the ends hang down.
Step 8: Inspect and Refine Your Wreath
Review your entire wreath from all angles. Look for any gaps, uneven areas, or elements that seem out of place.
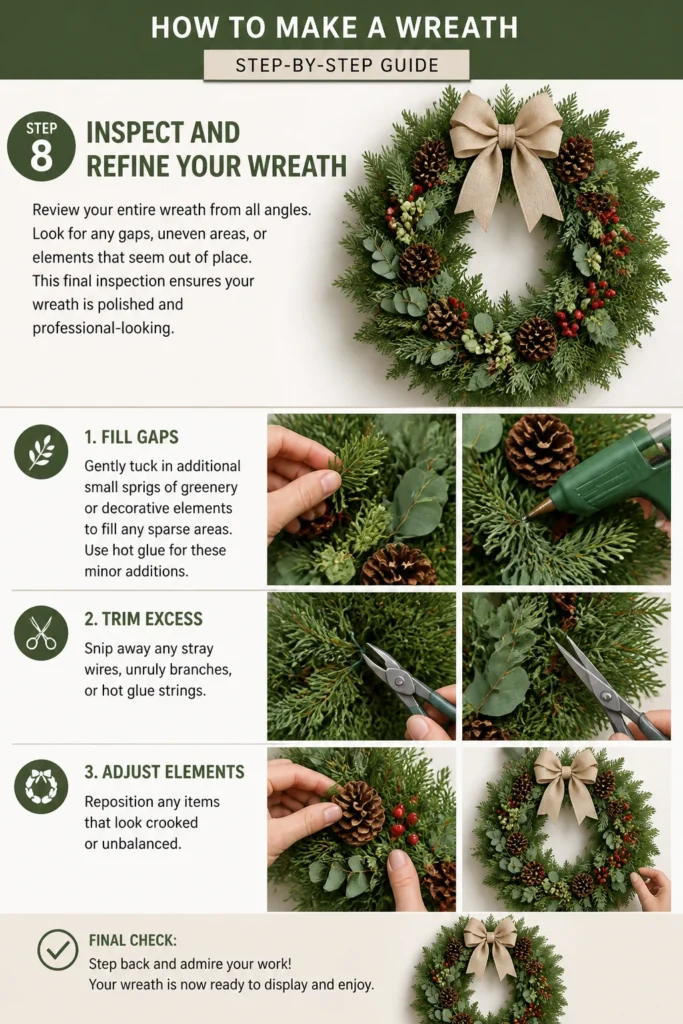
This final inspection ensures your wreath is polished and professional-looking.
- Fill gaps: Gently tuck in additional small sprigs of greenery or decorative elements to fill any sparse areas. Use hot glue for these minor additions.
- Trim excess: Snip away any stray wires, unruly branches, or hot glue strings.
- Adjust elements: Reposition any items that look crooked or unbalanced.
Step 9: Prepare for Hanging
Attach a secure hanging mechanism to your wreath. This ensures it can be displayed safely without falling.
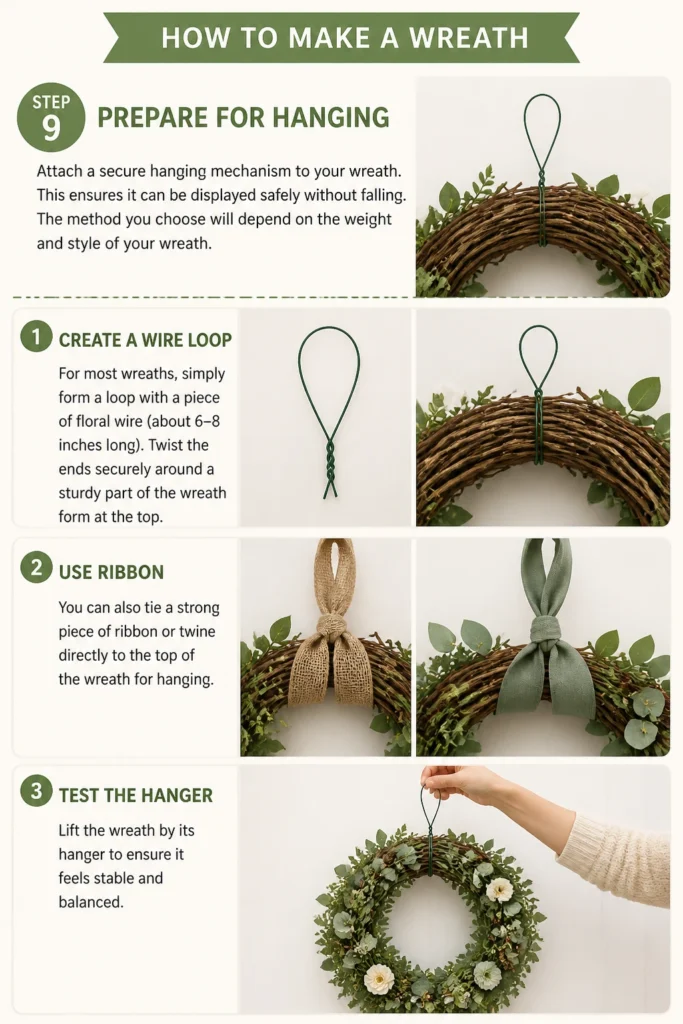
The method you choose will depend on the weight and style of your wreath.
- Create a wire loop: For most wreaths, simply form a loop with a piece of floral wire (about 6-8 inches long). Twist the ends securely around a sturdy part of the wreath form at the top.
- Use ribbon: You can also tie a strong piece of ribbon or twine directly to the top of the wreath for hanging.
- Test the hanger: Lift the wreath by its hanger to ensure it feels stable and balanced.
Step 10: Display Your Creation
Hang your beautiful, handmade wreath with pride! Choose a spot where it can be admired by all.
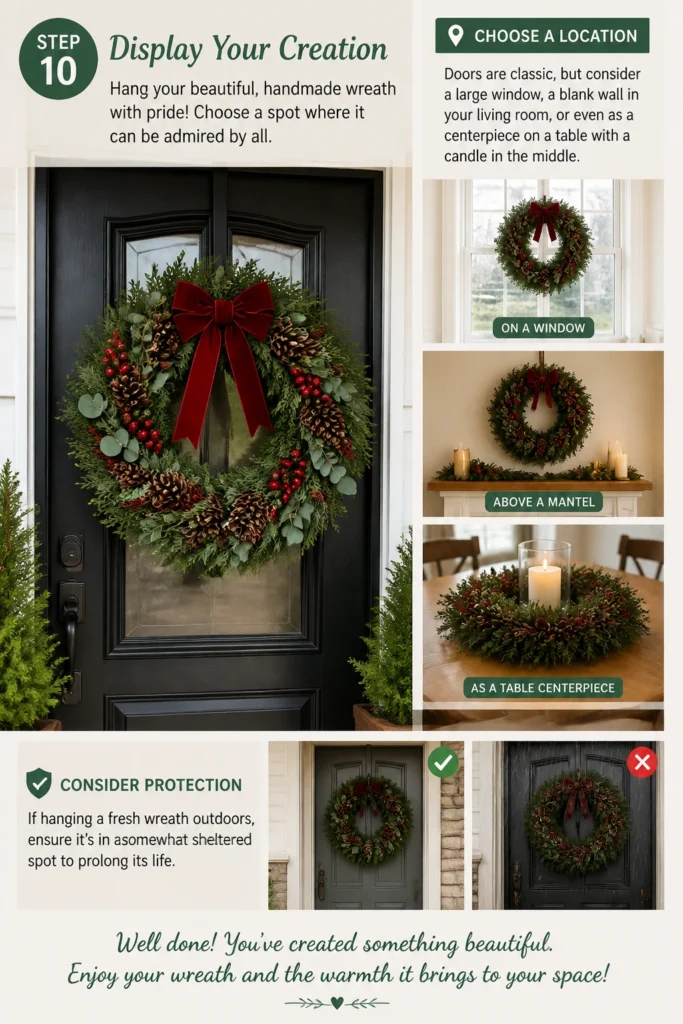
Wreaths are perfect for front doors, above mantels, or on interior walls.
- Choose a location: Doors are classic, but consider a large window, a blank wall in your living room, or even as a centerpiece on a table with a candle in the middle.
- Consider protection: If hanging a fresh wreath outdoors, ensure it’s in a somewhat sheltered spot to prolong its life.
Common Mistakes to Avoid
Overloading the Wreath
A common pitfall is adding too much material. While you want a full and lush wreath, excessive greenery or too many decorative elements can make it look cluttered and heavy. This also makes it harder to secure everything properly.
Instead, aim for balance and allow some of the natural form or base greenery to show through. Sometimes, less is more, creating an elegant and refined look.
Uneven Distribution of Elements
Failing to evenly distribute your greenery and decorations can result in a lopsided or unbalanced wreath. One side might look sparse while another is overly dense, detracting from the overall aesthetic.
Work systematically around the wreath, adding elements in small sections. Step back frequently to assess the balance and make adjustments as you go. Imagine dividing your wreath into quadrants and ensure each section has similar visual weight.
Forgetting to Secure Elements Properly
Nothing is more frustrating than having elements fall off your beautiful wreath. Using insufficient wire or relying too heavily on weak glue can lead to decorative pieces detaching, especially if the wreath is exposed to movement or weather.
Always use floral wire for heavier items and ensure it’s twisted tightly. For hot glue, use enough to create a strong bond, pressing the item firmly until the glue sets. Double-check all attachments before declaring your wreath finished.
Rushing the Process
Wreath making is a craft that benefits from patience. Rushing through the steps can lead to overlooked details, poorly secured elements, and a less polished final product. The creative process is part of the enjoyment.
Allow yourself ample time to gather materials, create bundles, attach items, and refine your design. Enjoy each step, and you’ll find the experience more rewarding and the outcome far superior.
Troubleshooting
Wreath Looks Sparse or Gappy
Sometimes, after you’ve completed your initial layers, you might notice areas where the wreath looks thin or gaps appear, revealing the form underneath. This often happens if bundles weren’t overlapped enough or if some greenery shifted.
To fix this, go back with smaller sprigs of greenery. Gently tuck them into the sparse spots, securing them with small pieces of floral wire or dabs of hot glue. Layering these smaller pieces helps build volume and hide any imperfections effectively.
Elements Keep Falling Off
If your decorative elements, such as pinecones or berries, are detaching, it’s usually a sign they weren’t secured firmly enough. Hot glue might not have been sufficient, or wire wasn’t twisted tightly.
Re-attach the fallen elements with a more robust method. For heavier items, always use floral wire, threading it through the item and twisting it tightly around the wreath form or a strong branch. For lighter items, ensure a generous amount of hot glue is used, and hold the item in place until the glue is completely set.
Wreath Looks Lopsided or Uneven
An unbalanced wreath can be frustrating to display. This issue typically arises from uneven distribution of weight or bulk, making one side heavier or fuller than the other.
Lay your wreath flat on a table and spin it slowly to identify the heavy or sparse areas. You might need to remove some greenery from a dense section and redistribute it to a lighter one. Alternatively, add small, lightweight decorative elements to the lighter side to visually balance it out without adding significant weight.
Key Takeaways
- Preparation is key: Gather all your materials and tools before you start to ensure a smooth creative process.
- Build in layers: Overlapping greenery bundles consistently creates a full, lush base and conceals attachment points.
- Secure everything firmly: Use floral wire for heavy items and hot glue for lighter ones, ensuring all elements are well-attached.
- Step back and assess: Regularly pause to inspect your wreath from a distance to check for balance, fullness, and overall aesthetic.
- Personalize your design: Don’t be afraid to experiment with different greens, colors, and decorative elements to make your wreath uniquely yours.
- Enjoy the process: Wreath making is a relaxing and rewarding craft. Embrace the journey of creating something beautiful.
Frequently Asked Questions
What’s the best type of wreath form for beginners?
Grapevine wreath forms are excellent for beginners. Their natural texture provides a rustic base, and it’s easy to tuck in and wire greenery directly to the branches. Wire forms are also good, especially if you plan to cover them completely with greenery or moss.
How long will a fresh wreath last?
The lifespan of a fresh wreath depends on the type of greenery, climate, and whether it’s kept indoors or outdoors. Typically, a fresh evergreen wreath can last 3-6 weeks outdoors in cooler temperatures. Indoors, they may dry out faster, lasting 2-3 weeks. Misting with water can help prolong their freshness.
Can I mix fresh and artificial elements?
Absolutely! Mixing fresh and artificial elements is a fantastic way to combine the beauty of natural materials with the longevity of artificial ones. You can use a base of fresh evergreens and then add artificial berries, flowers, or ornaments that will last season after season.
How do I store my wreath?
For artificial wreaths, store them in a cool, dry place away from direct sunlight to prevent fading. A dedicated wreath storage bag or box helps protect it from dust and crushing. Fresh wreaths are not typically stored; they are composted after the season.
Our Top Recommended Finds
- Wire Wreath Forms: A sturdy foundation for any design, allowing for easy attachment of materials.
- Green Floral Paddle Wire: Indispensable for securing greenery and decorations invisibly and effectively.
- Hot Glue Gun and Glue Sticks: Perfect for attaching smaller, lighter decorative elements with precision.
Craft Your Own Masterpiece Today
You now have all the knowledge and practical steps to create a stunning wreath.
Embrace the creative journey, gather your chosen materials, and let your imagination guide you.
Why not start planning your first seasonal wreath today? The satisfaction of hanging your handmade creation is truly unmatched.
Beginner-friendly templates, step-by-step guides,
and weekly project ideas in your inbox.