💐 How To Make Money Bouquet Step By Step

Beginner-friendly templates, step-by-step guides,
and weekly project ideas in your inbox.
Giving cash in a plain white envelope often feels a bit cold and impersonal.
I started making money bouquets five years ago for a friend’s wedding, and the reaction from the guests was incredible.
This guide shares the exact methods I use to create professional, high-end arrangements that look like they cost a fortune to commission.

Quick Overview
Before you start gathering your supplies, here is a high-level look at what this project entails.
- Time needed: 60 to 90 minutes
- Difficulty: Intermediate
- What you’ll need: Crisp currency, bamboo skewers, floral foam, wrapping paper, ribbon, and double-sided tape.
Step-by-Step Instructions
Step 1: Source Crisp Currency
Visit your local bank branch to withdraw the specific denominations you plan to use for the bouquet.
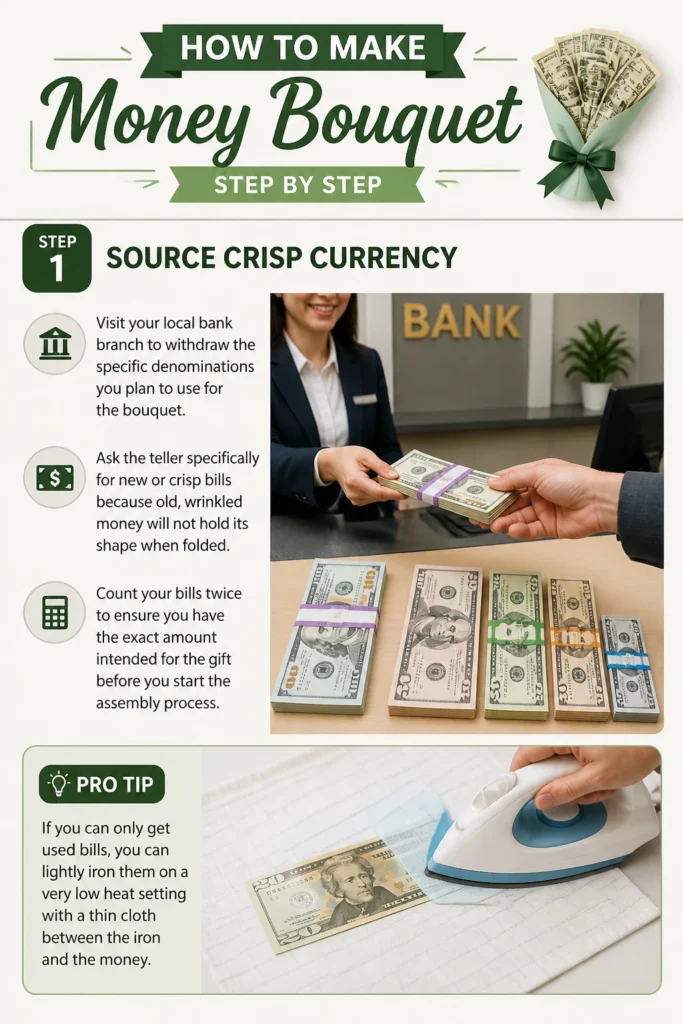
Ask the teller specifically for “new” or “crisp” bills because old, wrinkled money will not hold its shape when folded.
Count your bills twice to ensure you have the exact amount intended for the gift before you start the assembly process.
Pro Tip: If you can only get used bills, you can lightly iron them on a very low heat setting with a thin cloth between the iron and the money.
Step 2: Fold the Butterfly Petals
Lay a bill flat on a clean surface and fold it in half lengthwise to create a center crease.
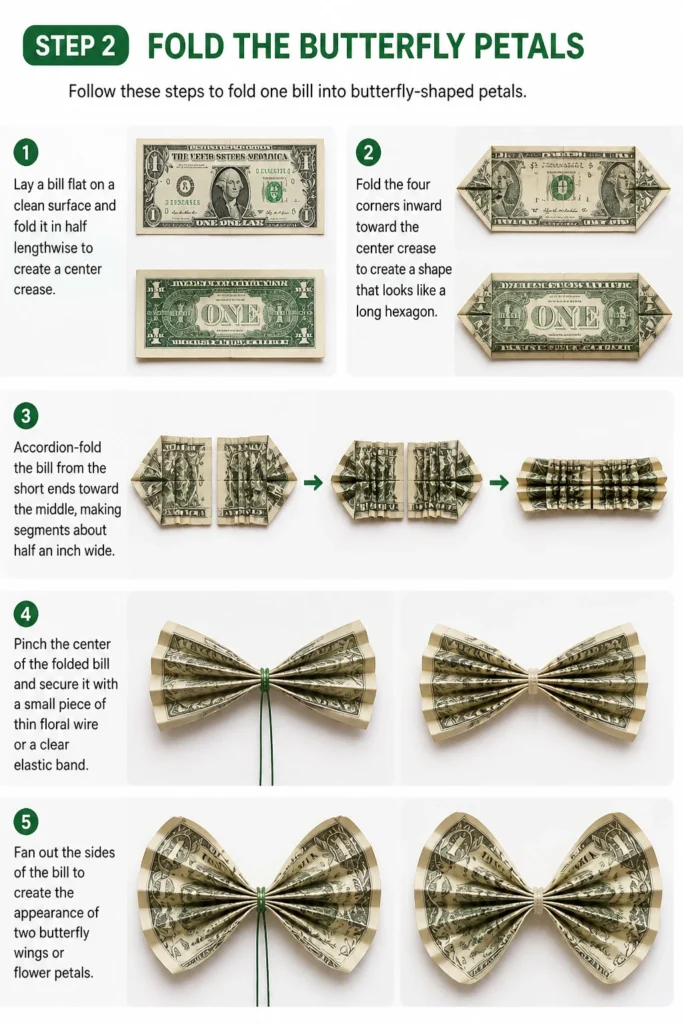
Fold the four corners inward toward the center crease to create a shape that looks like a long hexagon.
Accordion-fold the bill from the short ends toward the middle, making segments about half an inch wide.
Pinch the center of the folded bill and secure it with a small piece of thin floral wire or a clear elastic band.
Fan out the sides of the bill to create the appearance of two butterfly wings or flower petals.
Step 3: Attach Bills to Skewers
Place a bamboo skewer against the back of the pinched center of your folded bill.
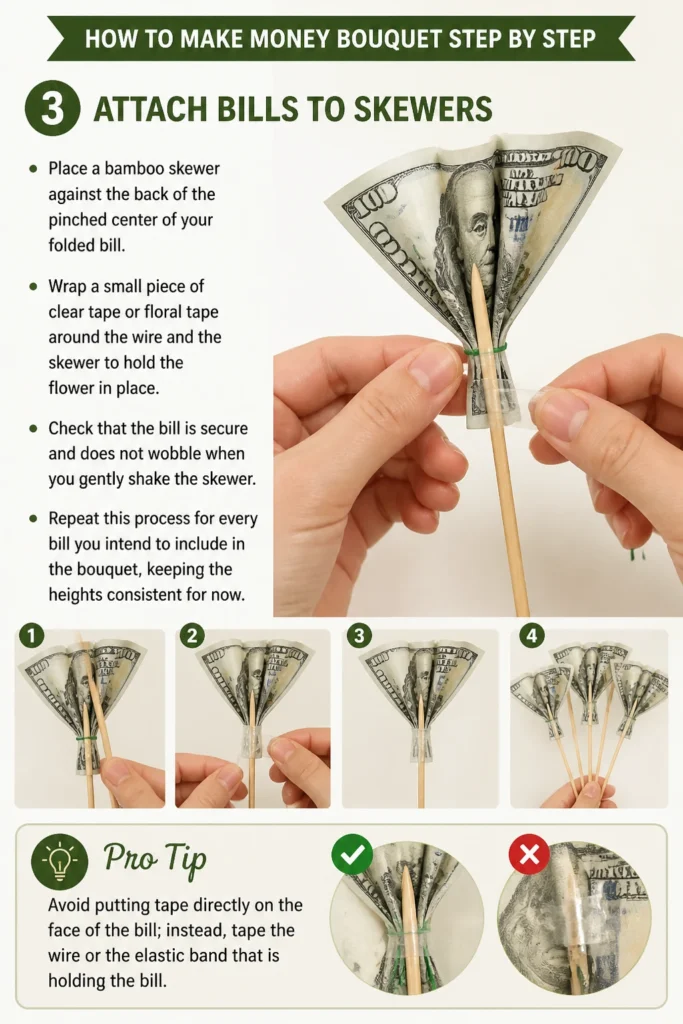
Wrap a small piece of clear tape or floral tape around the wire and the skewer to hold the “flower” in place.
Check that the bill is secure and does not wobble when you gently shake the skewer.
Repeat this process for every bill you intend to include in the bouquet, keeping the heights consistent for now.
Pro Tip: Avoid putting tape directly on the face of the bill; instead, tape the wire or the elastic band that is holding the bill.
Step 4: Prepare the Floral Foam
Cut your dry floral foam to fit snugly inside your chosen container or to serve as a handheld base.
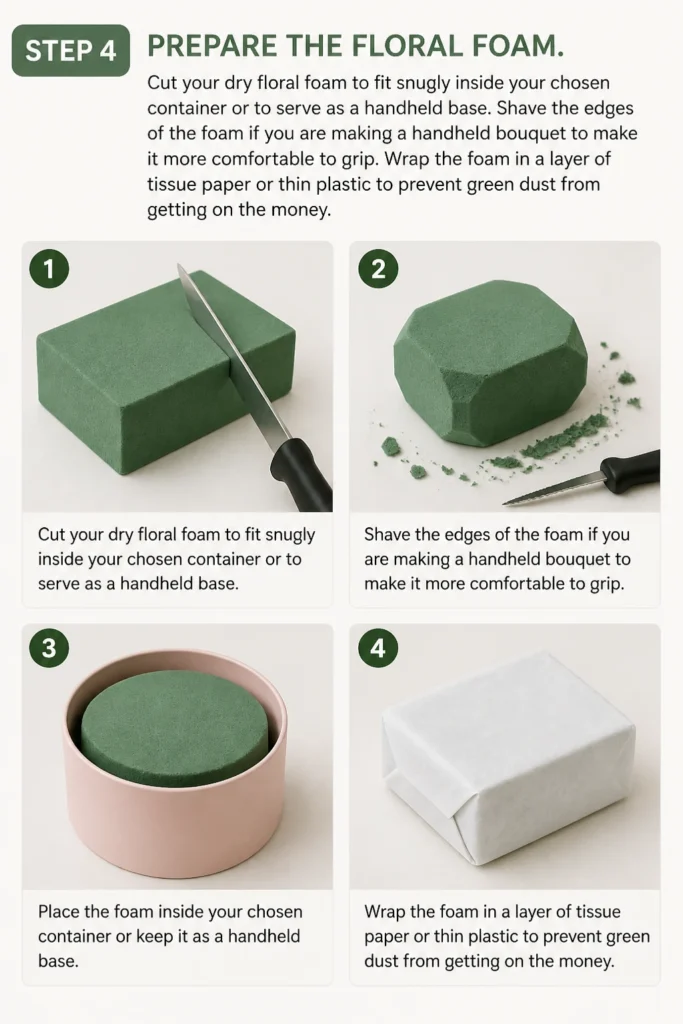
Shave the edges of the foam if you are making a handheld bouquet to make it more comfortable to grip.
Wrap the foam in a layer of tissue paper or thin plastic to prevent green dust from getting on the money.
Step 5: Integrate Filler Flowers
Select a few stems of artificial or dried flowers like baby’s breath or small silk roses.
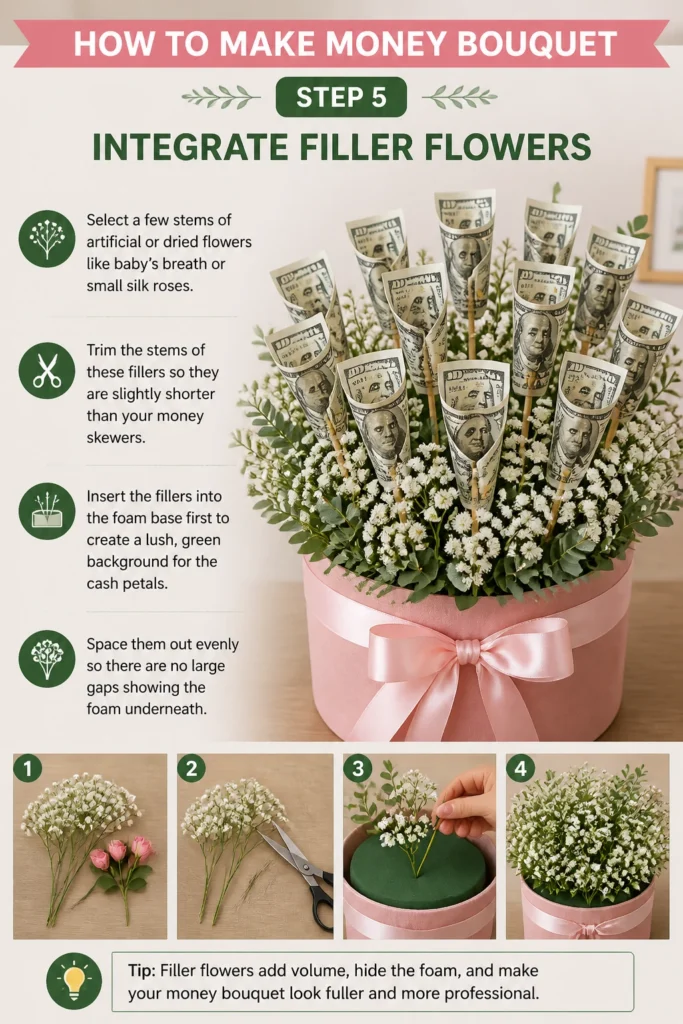
Trim the stems of these fillers so they are slightly shorter than your money skewers.
Insert the fillers into the foam base first to create a lush, green background for the cash petals.
Space them out evenly so there are no large gaps showing the foam underneath.
Step 6: Arrange the Money Stems
Insert your central money flower into the middle of the foam at the highest point.
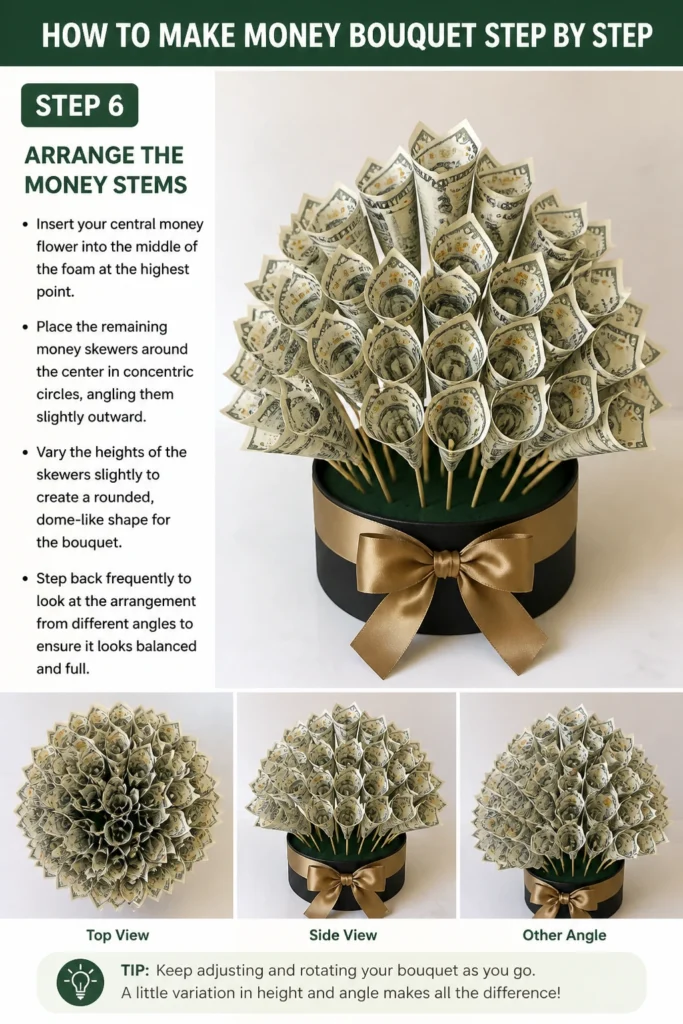
Place the remaining money skewers around the center in concentric circles, angling them slightly outward.
Vary the heights of the skewers slightly to create a rounded, dome-like shape for the bouquet.
Step back frequently to look at the arrangement from different angles to ensure it looks balanced and full.
Step 7: Layer the Wrapping Paper
Cut four to six squares of waterproof floral wrapping paper or heavy decorative paper.
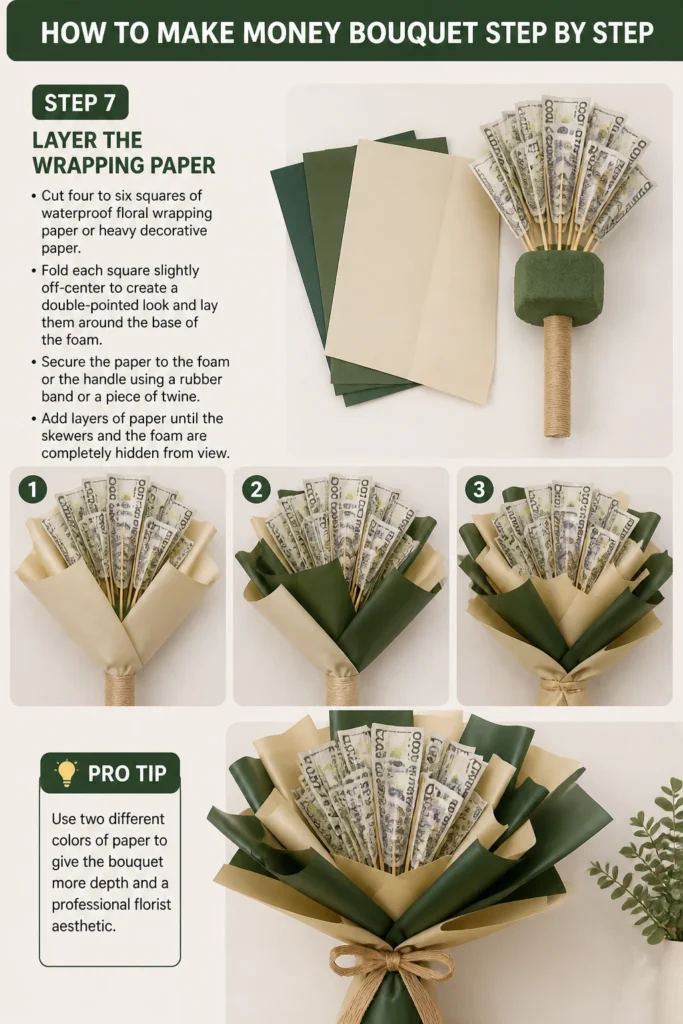
Fold each square slightly off-center to create a “double-pointed” look and lay them around the base of the foam.
Secure the paper to the foam or the handle using a rubber band or a piece of twine.
Add layers of paper until the skewers and the foam are completely hidden from view.
Pro Tip: Use two different colors of paper to give the bouquet more depth and a professional florist aesthetic.
Step 8: Secure the Handle and Bow
Wrap the bottom part of the paper tightly where you will be holding the bouquet.
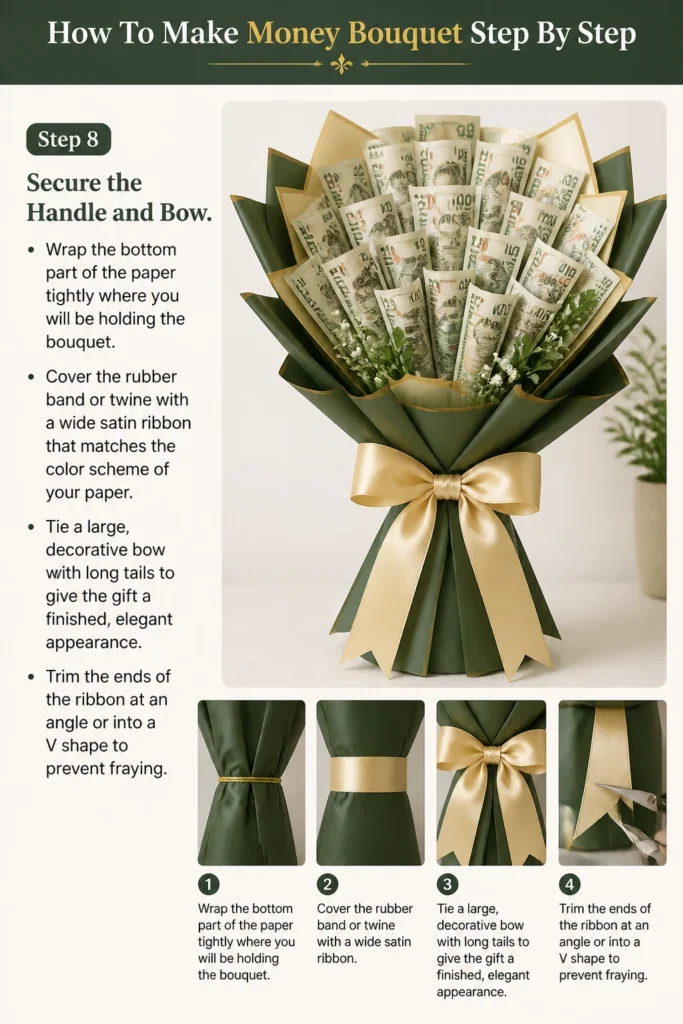
Cover the rubber band or twine with a wide satin ribbon that matches the color scheme of your paper.
Tie a large, decorative bow with long tails to give the gift a finished, elegant appearance.
Trim the ends of the ribbon at an angle or into a “V” shape to prevent fraying.
Common Mistakes to Avoid
Using Heavy Adhesives
Many beginners use hot glue or strong packing tape directly on the currency. This is a major mistake because it can tear the bills when the recipient tries to spend them. Always use floral wire or removable glue dots if you must touch the paper directly.
Ignoring Weight Distribution
If you put all the money on one side, the bouquet will lean and eventually fall over. You must balance the weight of the skewers and the fillers evenly around the center of the foam. This ensures the bouquet stays upright when placed on a table or held in a photo.
Using Thin Wrapping Paper
Standard gift wrap is often too thin and will wilt or tear under the weight of the skewers. Professional bouquets use “Korean-style” floral paper which is thicker and holds its shape. If you only have thin paper, use multiple layers to provide the necessary structural support.
Troubleshooting
The Money Skewers Are Wobbly
This usually happens when the foam is too soft or the skewers are too thin. You can fix this by adding a small dab of hot glue at the entry point where the skewer meets the foam. Just be careful not to let the glue touch the actual money.
The Bouquet Looks Empty
If you can see the skewers or the foam, you need more filler material. You do not necessarily need more money; instead, add more tissue paper puffs or silk leaves. These inexpensive additions fill the gaps and make the bouquet look much more expensive.
The Paper Keeps Sliding Down
If your wrapping won’t stay in place, your grip point is likely too oily or smooth. Wrap a layer of double-sided tape around the handle area before you put the paper on. This gives the paper something to “bite” onto so it stays exactly where you want it.
Key Takeaways
- Use crisp bills to ensure the folds stay sharp and the bouquet looks professional.
- Protect the currency by using wire or elastics instead of permanent glue or heavy tapes.
- Build a solid foundation with high-density floral foam to prevent the arrangement from sagging.
- Layer your wrapping to hide the mechanics of the bouquet and add visual volume.
- Balance your colors by matching the ribbon and filler flowers to the denominations of the bills.
Frequently Asked Questions
How much money should I use for a standard bouquet?
Most medium-sized bouquets use between 20 and 30 bills. If you are on a budget, you can use one-dollar bills for the bulk of the flowers and place larger denominations in the center. The total value is up to you, but the bill count determines the fullness.
Is it legal to fold money this way?
Yes, folding money is perfectly legal as long as you do not permanently deface or destroy it. As long as the recipient can unfold the bills and they remain intact with their serial numbers visible, the money is still legal tender. Avoid cutting or stapling the bills.
How long will a money bouquet last?
If you use artificial fillers, the bouquet can last indefinitely as a keepsake. However, most people eventually want to spend the gift. Advise the recipient to carefully untwist the wires or remove the elastics to keep the bills in good condition for the bank.
Can I use real flowers with money?
You can use real flowers, but you must be careful with moisture. Ensure the money is protected by plastic sleeves or kept far away from the water source of the flowers. Damp money can mold or become fragile, which makes it difficult to use later.
Our Top Recommended Finds
- Korean Style Waterproof Flower Wrapping Paper: This paper is thick, matte, and holds its shape perfectly for the outer layers.
- High-Density Dry Floral Foam: Unlike wet foam, this version is sturdy enough to hold heavy skewers without crumbling.
- 12-Inch Bamboo Skewers: These provide the perfect length for a handheld bouquet and are strong enough to support multiple bills.
Elevate Your Gift Giving Game
Now that you know the secrets to a perfect money bouquet, it is time to start your first project.
Think about the upcoming birthdays or graduations on your calendar and choose a color theme that matches the occasion.
Once you master the basic butterfly fold, you can experiment with more complex shapes like money roses or fans.
The effort you put into the presentation will make the cash feel like a heartfelt, creative gift rather than a last-minute thought.
Beginner-friendly templates, step-by-step guides,
and weekly project ideas in your inbox.