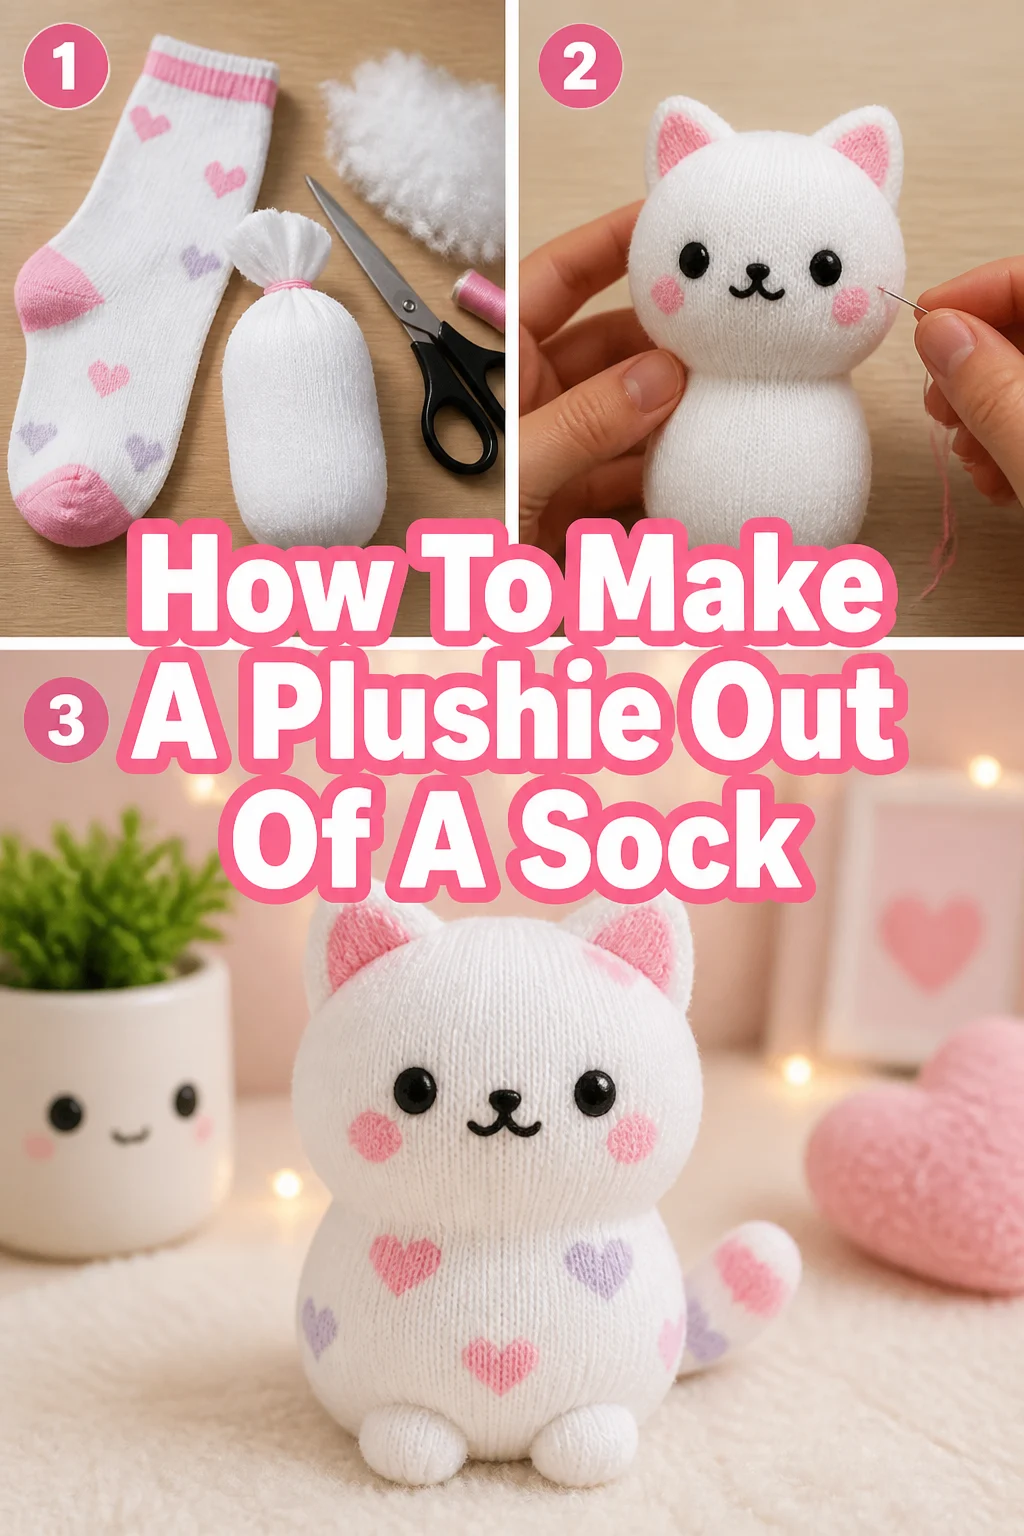
🧸 How To Make A Plushie Out Of A Sock

Beginner-friendly templates, step-by-step guides,
and weekly project ideas in your inbox.
Do you remember those childhood days, filled with rainy afternoons and a desire for something new to play with?
I certainly do, and that’s how I first discovered the magic of transforming an ordinary sock into an adorable, cuddly friend.
This guide shares all the practical tips I’ve learned, ensuring your first sock plushie is a delightful success.

Quick Overview
You’re about to embark on a fun, creative journey that transforms a simple sock into a unique, handmade plushie.
It’s a wonderful way to repurpose old items and unleash your inner crafter.
- Time needed: 1-2 hours
- Difficulty: Beginner
- What you’ll need: A clean sock, stuffing material, scissors, needle, thread, and decorative items.
Step-by-Step Instructions
Step 1: Gather Your Creative Arsenal
Before you begin, make sure you have all your materials neatly organized. This saves time and keeps your crafting space tidy.
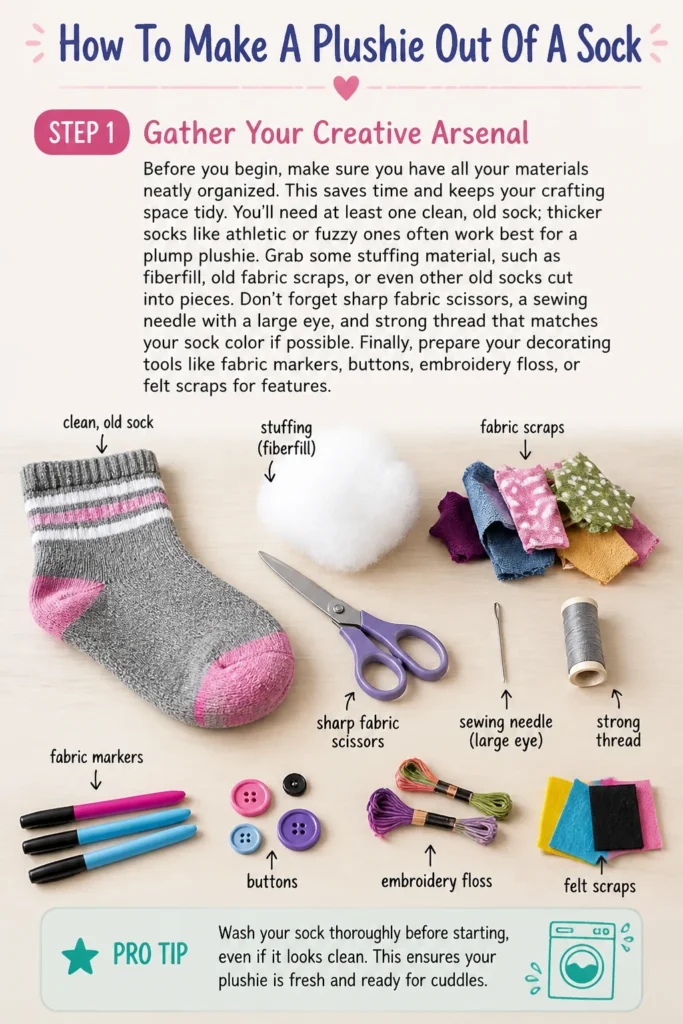
You’ll need at least one clean, old sock; thicker socks like athletic or fuzzy ones often work best for a plump plushie.
Grab some stuffing material, such as fiberfill, old fabric scraps, or even other old socks cut into pieces.
Don’t forget sharp fabric scissors, a sewing needle with a large eye, and strong thread that matches your sock color if possible.
Finally, prepare your decorating tools like fabric markers, buttons, embroidery floss, or felt scraps for features.
Pro Tip: Wash your sock thoroughly before starting, even if it looks clean. This ensures your plushie is fresh and ready for cuddles.
Step 2: Prepare Your Sock Canvas
Lay your chosen sock flat on a clean surface. Decide which end will be the head and which will be the body.
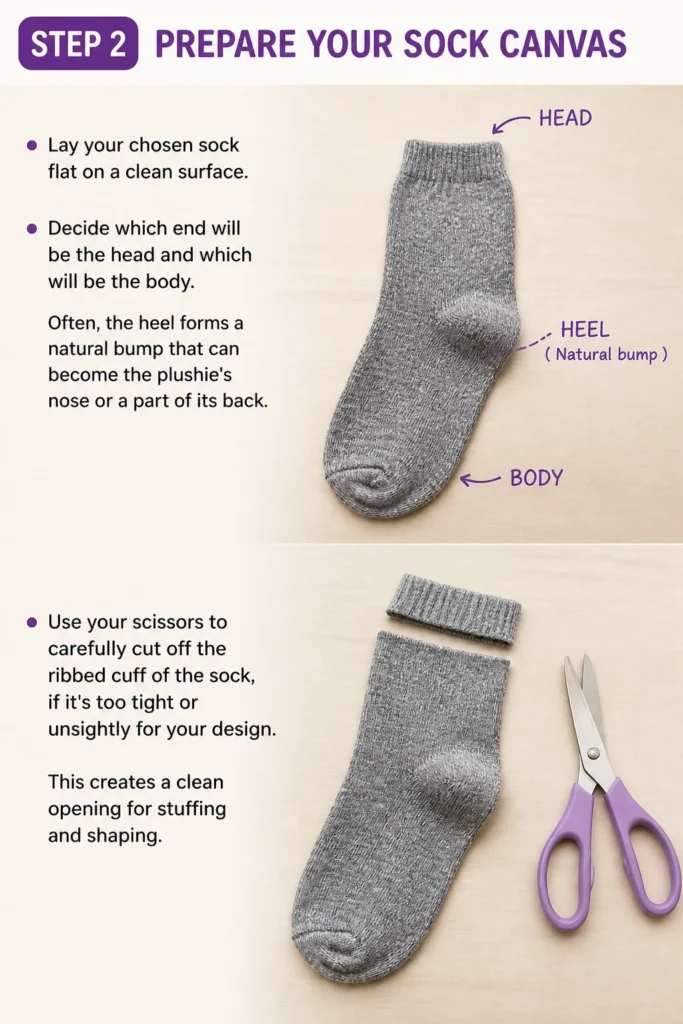
Often, the heel forms a natural bump that can become the plushie’s nose or a part of its back.
Use your scissors to carefully cut off the ribbed cuff of the sock, if it’s too tight or unsightly for your design.
This creates a clean opening for stuffing and shaping.
Step 3: Sculpt the Body and Head
Turn your sock inside out. This makes it easier to mark and sew without visible lines on the outside.
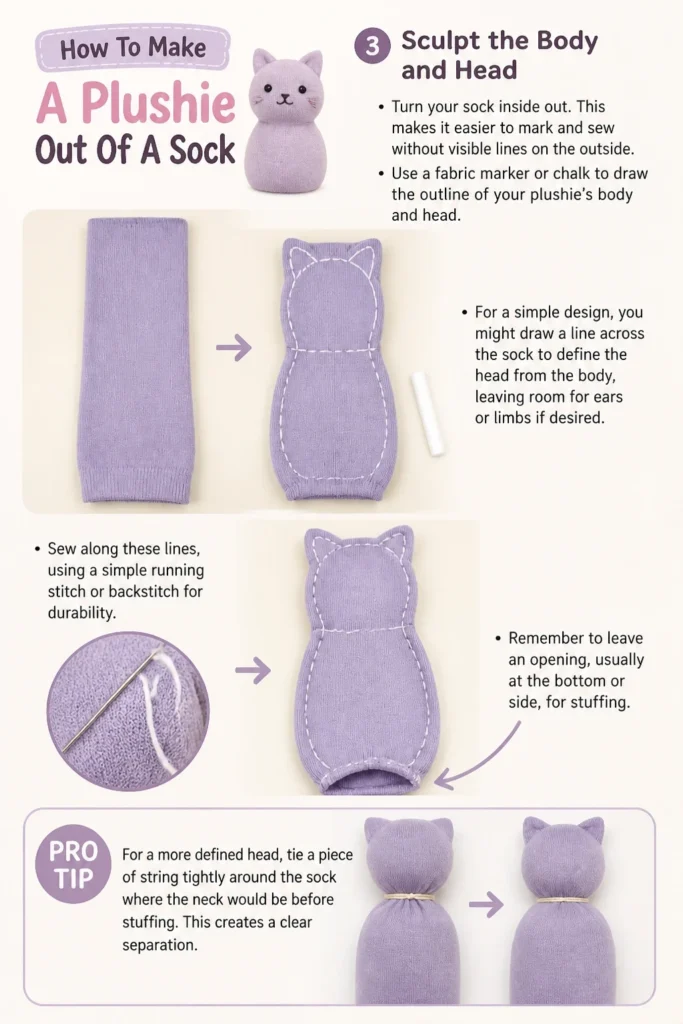
Use a fabric marker or chalk to draw the outline of your plushie’s body and head.
For a simple design, you might draw a line across the sock to define the head from the body, leaving room for ears or limbs if desired.
Sew along these lines, using a simple running stitch or backstitch for durability.
Remember to leave an opening, usually at the bottom or side, for stuffing.
Pro Tip: For a more defined head, tie a piece of string tightly around the sock where the neck would be before stuffing. This creates a clear separation.
Step 4: Bring Your Plushie to Life with Stuffing
Turn your sock right side out again. Now it’s time to give your plushie its shape and squishiness.
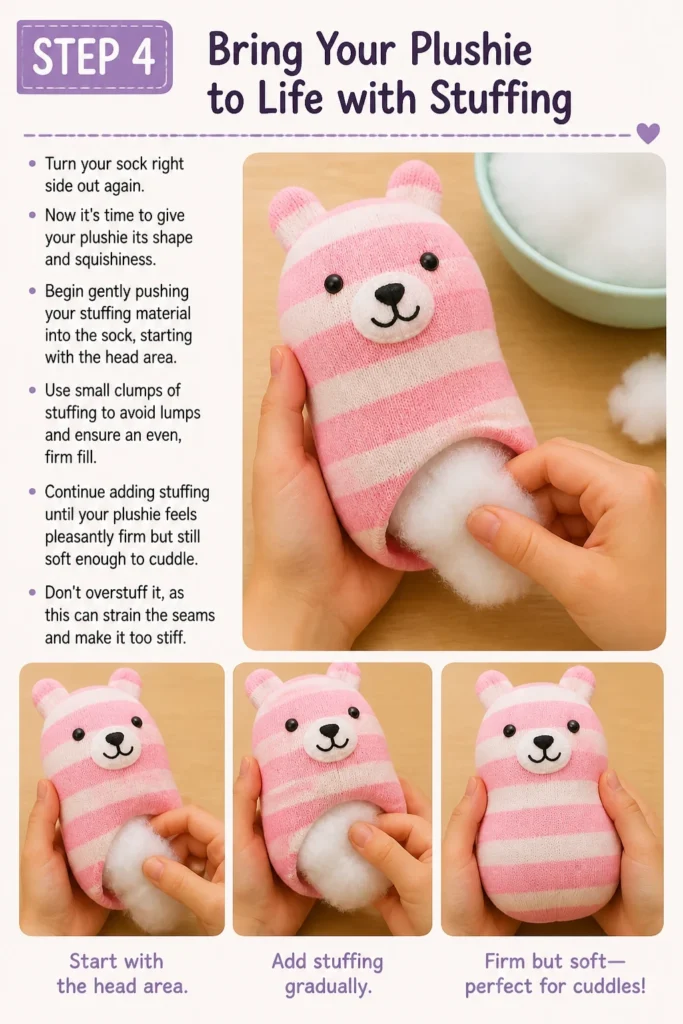
Begin gently pushing your stuffing material into the sock, starting with the head area.
Use small clumps of stuffing to avoid lumps and ensure an even, firm fill.
Continue adding stuffing until your plushie feels pleasantly firm but still soft enough to cuddle.
Don’t overstuff it, as this can strain the seams and make it too stiff.
Step 5: Seal the Deal
Once your plushie is perfectly stuffed, it’s time to close the opening you left earlier.
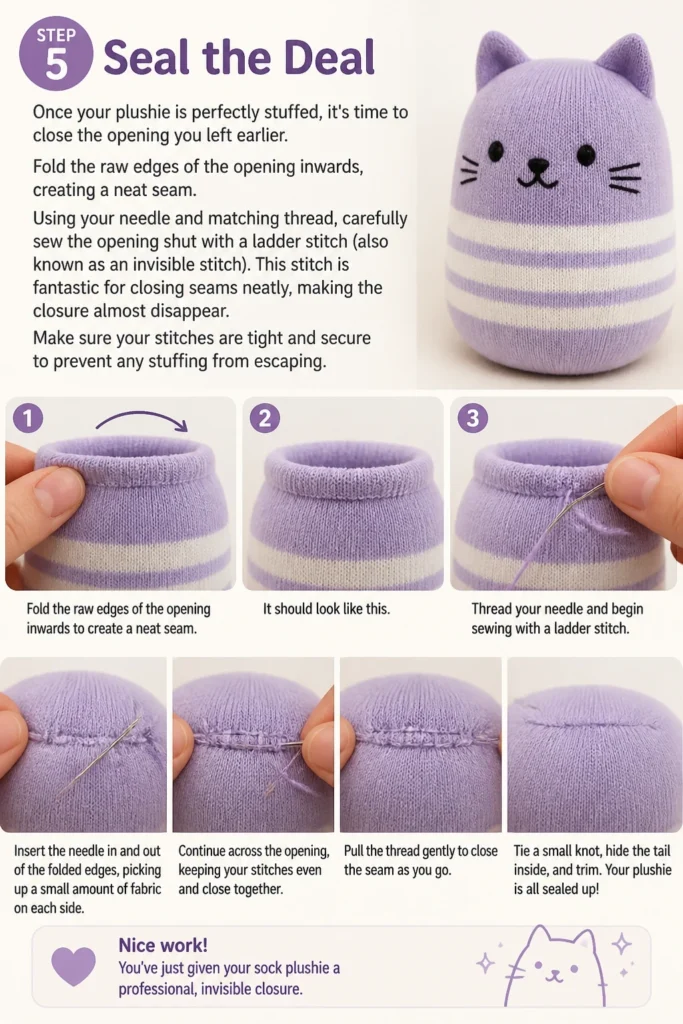
Fold the raw edges of the opening inwards, creating a neat seam.
Using your needle and matching thread, carefully sew the opening shut with a ladder stitch (also known as an invisible stitch).
This stitch is fantastic for closing seams neatly, making the closure almost disappear.
Make sure your stitches are tight and secure to prevent any stuffing from escaping.
Step 6: Craft Charming Ears or Limbs (Optional)
This step adds personality and character to your sock plushie.
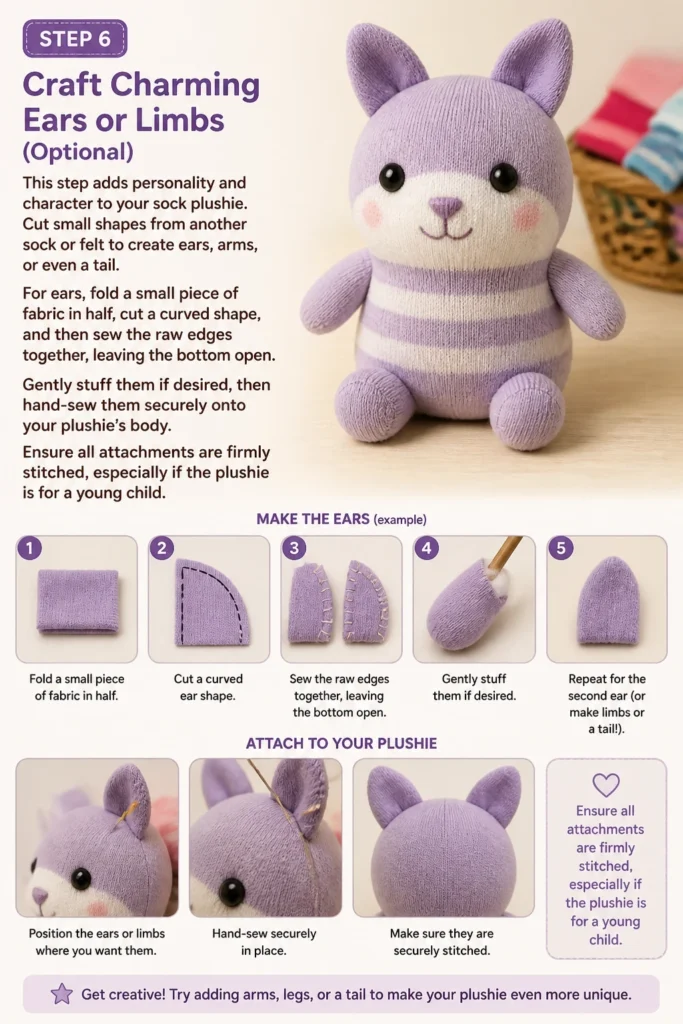
Cut small shapes from another sock or felt to create ears, arms, or even a tail.
For ears, fold a small piece of fabric in half, cut a curved shape, and then sew the raw edges together, leaving the bottom open.
Gently stuff them if desired, then hand-sew them securely onto your plushie’s body.
Ensure all attachments are firmly stitched, especially if the plushie is for a young child.
Step 7: Give Your Plushie a Face
This is where your plushie truly comes alive! Decide on the expression you want your friend to have.
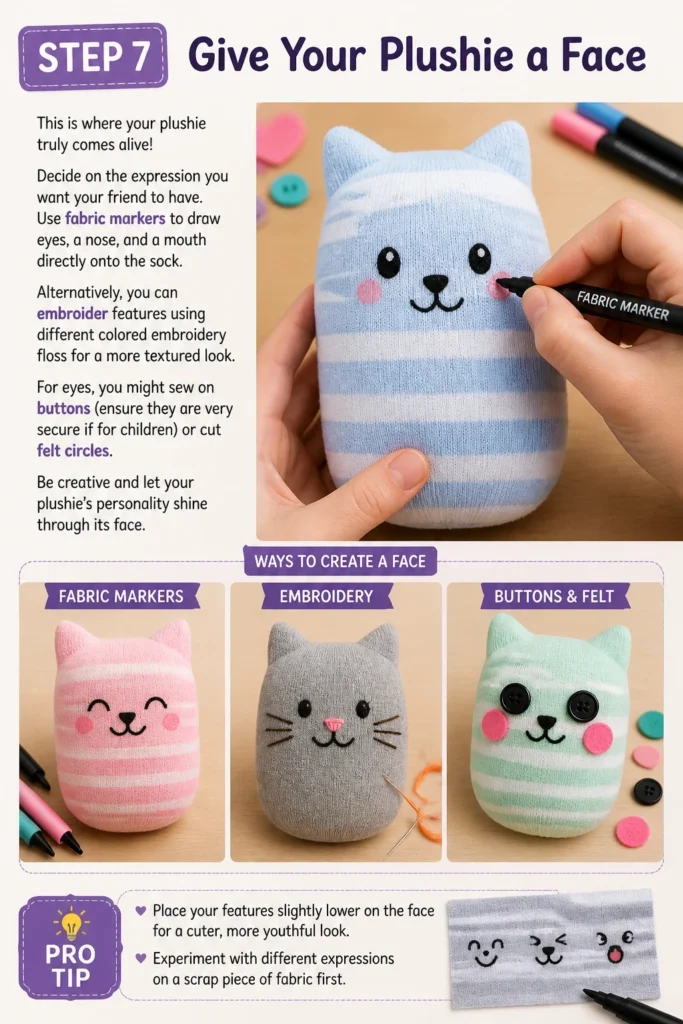
Use fabric markers to draw eyes, a nose, and a mouth directly onto the sock.
Alternatively, you can embroider features using different colored embroidery floss for a more textured look.
For eyes, you might sew on buttons (ensure they are very secure if for children) or cut felt circles.
Be creative and let your plushie’s personality shine through its face.
Pro Tip: Place your features slightly lower on the face for a cuter, more youthful look. Experiment with different expressions on a scrap piece of fabric first.
Step 8: Personalize and Finish
Now that your plushie has a face, you can add any extra embellishments.
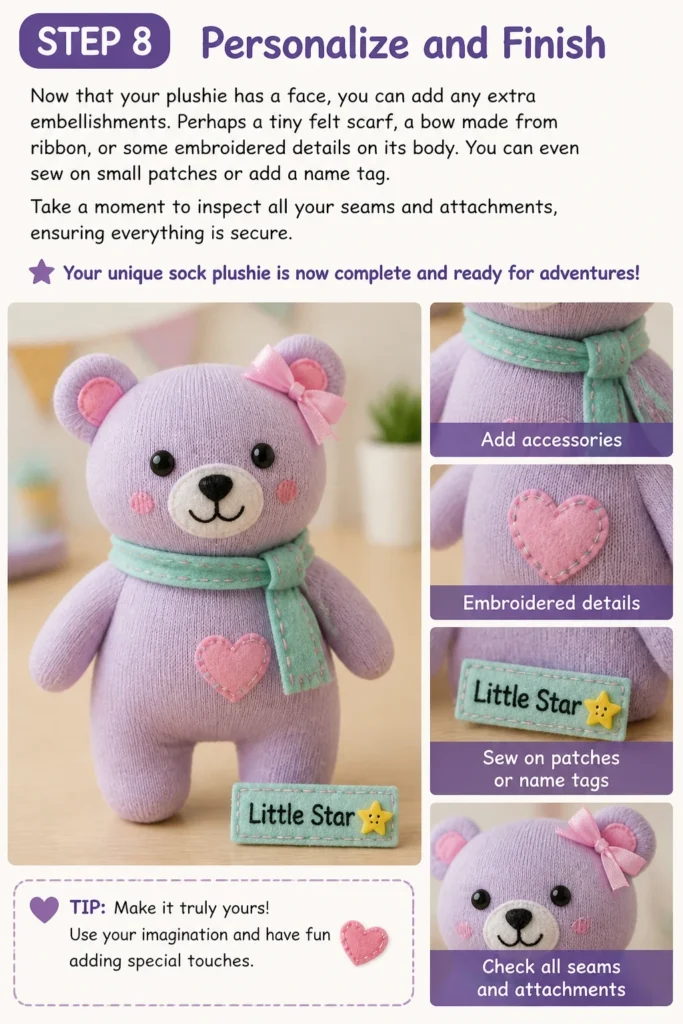
Perhaps a tiny felt scarf, a bow made from ribbon, or some embroidered details on its body.
You can even sew on small patches or add a name tag.
Take a moment to inspect all your seams and attachments, ensuring everything is secure.
Your unique sock plushie is now complete and ready for adventures!
Common Mistakes to Avoid
Under- or Over-Stuffing
Stuffing your plushie incorrectly can significantly impact its final look and feel. Under-stuffing leaves your plushie floppy and shapeless, making it less appealing to cuddle.
Conversely, over-stuffing can make it rock-hard, strain your seams to the point of tearing, and give it an unnatural, lumpy appearance.
Aim for a firm but yielding consistency, where the plushie holds its shape but still has a pleasant squish.
Using the Wrong Sock
Not all socks are created equal when it comes to plushie making. Thin, worn-out socks might develop holes easily during stuffing or play, leading to a short lifespan for your creation.
Socks with very intricate patterns or bright, clashing colors might also make it harder to see and appreciate the plushie’s features.
Opt for clean, relatively thick socks in a good condition, ideally with a solid color or a simple, appealing pattern that complements your design idea.
Skipping Secure Stitches
Rushing through the sewing process or using weak stitches is a common pitfall. Loose stitches mean your plushie’s seams can easily come undone, spilling stuffing everywhere.
This is particularly problematic for plushies intended for children, as small parts or stuffing can become choking hazards.
Always take your time with your stitches, ensuring they are tight, even, and reinforced, especially at stress points like the neck or limb attachments.
Rushing Decoration
The face and decorations are what give your plushie its personality. Rushing this step often leads to uneven eyes, a crooked mouth, or poorly attached embellishments.
Once features are applied, they are difficult to remove or adjust without damaging the fabric.
Take your time to plan out the placement of eyes, nose, and mouth, perhaps drawing them lightly with a washable marker first before making them permanent.
Troubleshooting
Lumpy Plushie
If your plushie feels lumpy after stuffing, it’s usually because you’ve used large, uneven clumps of stuffing material. The key to a smooth finish is to use small, consistent pieces.
You can try gently massaging the plushie to redistribute the stuffing. If that doesn’t work, carefully open a small seam and remove some stuffing, then re-stuff using smaller, more uniform pieces, pushing them into all corners with a blunt tool like a chopstick.
Holes Appearing
Finding small holes after stuffing or during play can be disheartening. This often happens if the sock fabric was too thin or stretched too much, or if your stitches weren’t strong enough.
To fix this, you can hand-sew the hole closed with a ladder stitch and matching thread, reinforcing the area with several passes.
For larger or persistent holes, consider sewing a decorative patch over the area, which can also add to the plushie’s charm.
Plushie Won’t Stand/Sit Right
If your plushie has trouble maintaining its posture, it might be due to uneven stuffing or an imbalance in its shape. Check if one side is heavier or if the stuffing is concentrated in one area.
You might need to adjust the stuffing, pushing it more firmly into the base or legs to create a stable foundation.
For more permanent solutions, you could add a small bag of rice or poly pellets (securely sewn into a fabric pouch) into the bottom of the plushie for added weight and stability.
Key Takeaways
- Repurposing old socks is a fantastic way to practice creativity and reduce waste.
- Careful preparation and gathering all materials beforehand make the crafting process smoother.
- Attention to detail in stuffing ensures your plushie has a pleasing, cuddly texture.
- Secure stitching is paramount for durability and safety, especially for children’s toys.
- Personalizing your plushie’s features and decorations truly brings its unique character to life.
- Don’t be afraid to experiment with different sock types and embellishments to create diverse characters.
Frequently Asked Questions
What kind of socks work best for making plushies?
Thicker socks like athletic socks, fuzzy socks, or even knee-high socks are ideal. They hold their shape better, are more durable, and provide a good base for stuffing. Avoid very thin dress socks or heavily worn socks that might tear easily.
What can I use for stuffing if I don’t have fiberfill?
You have many eco-friendly options! Old fabric scraps, cut into small pieces, work wonderfully. You can also use batting from old pillows, cotton balls, or even other old socks or t-shirts cut into strips. Just ensure your chosen material is clean and dry.
Is this project safe for kids to do?
This project can be very safe and enjoyable for kids with adult supervision. Younger children can help with stuffing and decorating with fabric markers. Older children, with guidance, can learn basic sewing stitches. Always supervise when using scissors and needles, and avoid small, detachable embellishments like buttons if the plushie is for very young children.
How do I wash my sock plushie?
For best results, hand wash your sock plushie gently with mild soap and cool water, especially if it has delicate embellishments or stitched features. Squeeze out excess water without twisting, then air dry thoroughly. If machine washing, place it in a laundry bag on a delicate cycle with cold water and air dry.
Our Top Recommended Finds
- Good Quality Fabric Scissors: Sharp scissors make precise cuts, which are crucial for neat plushie shapes and details.
- Assorted Embroidery Floss Set: A variety of colors allows for expressive facial features and decorative stitching, adding professional touches.
- Hypoallergenic Fiberfill Stuffing: This ensures your plushie is safe for everyone to cuddle, reducing allergy concerns and maintaining a soft, even texture.
Your Next Creative Adventure Awaits
You’ve just transformed a simple sock into a cherished companion, a testament to your creativity and resourcefulness.
This skill opens up a world of possibilities for handmade gifts and unique decor.
Why not gather some more forgotten socks and try making a whole family of plushie friends?
Embrace the joy of crafting and see what other wonders you can create today!
Beginner-friendly templates, step-by-step guides,
and weekly project ideas in your inbox.