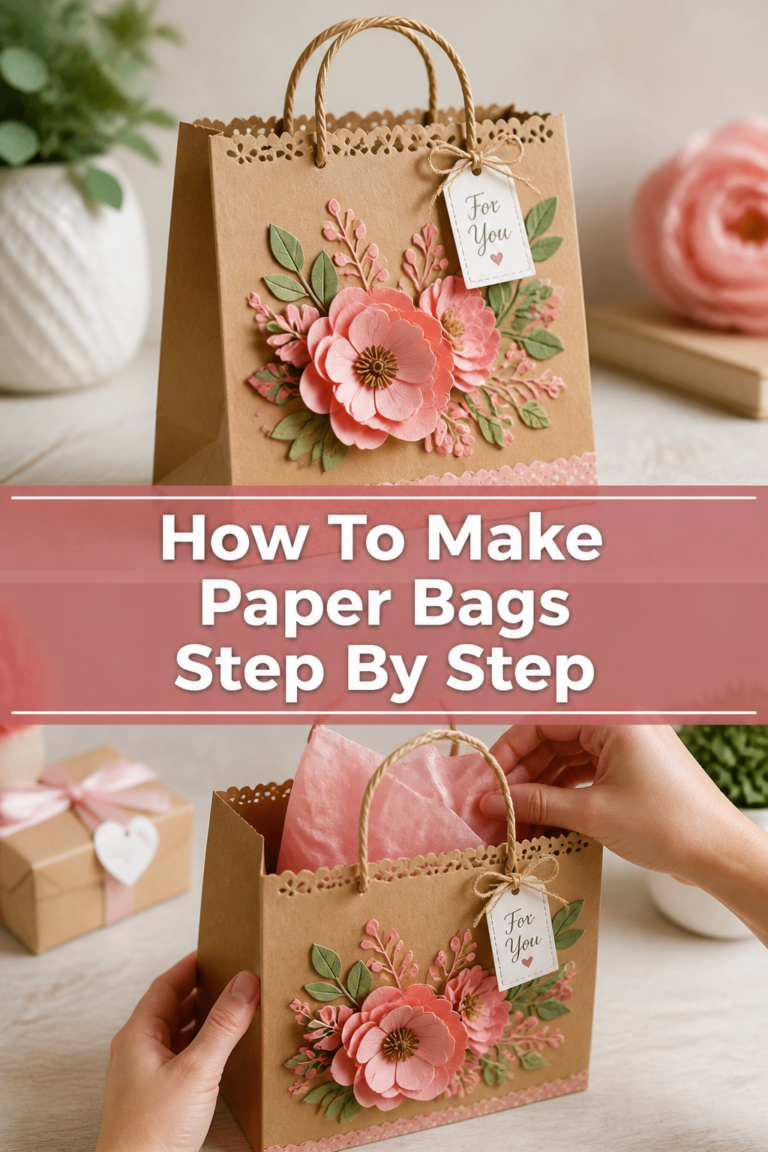
🎁 How To Make A Bag From Wrapping Paper
There’s something truly special about beautifully wrapped gifts. Often, the wrapping paper itself is a work of art. I always feel a pang of guilt tossing it after the presents are opened.
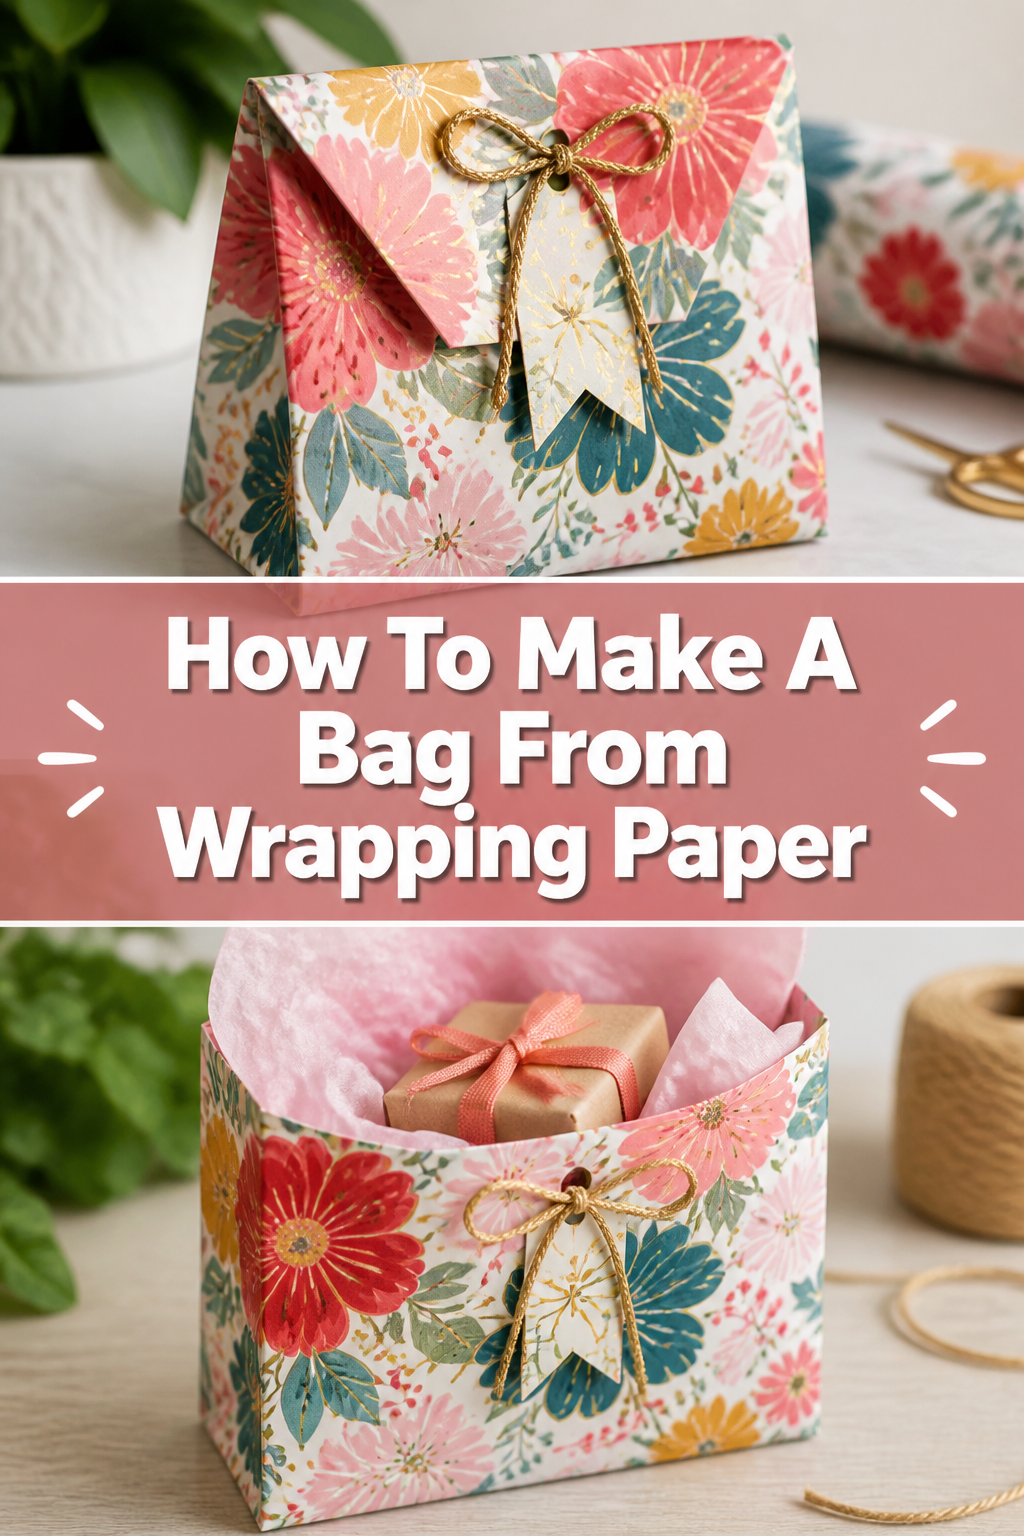
This guide shares my favorite method for transforming that gorgeous paper into a functional, charming gift bag. You’ll be surprised how simple it is to give your wrapping paper a second life.
Quick Overview
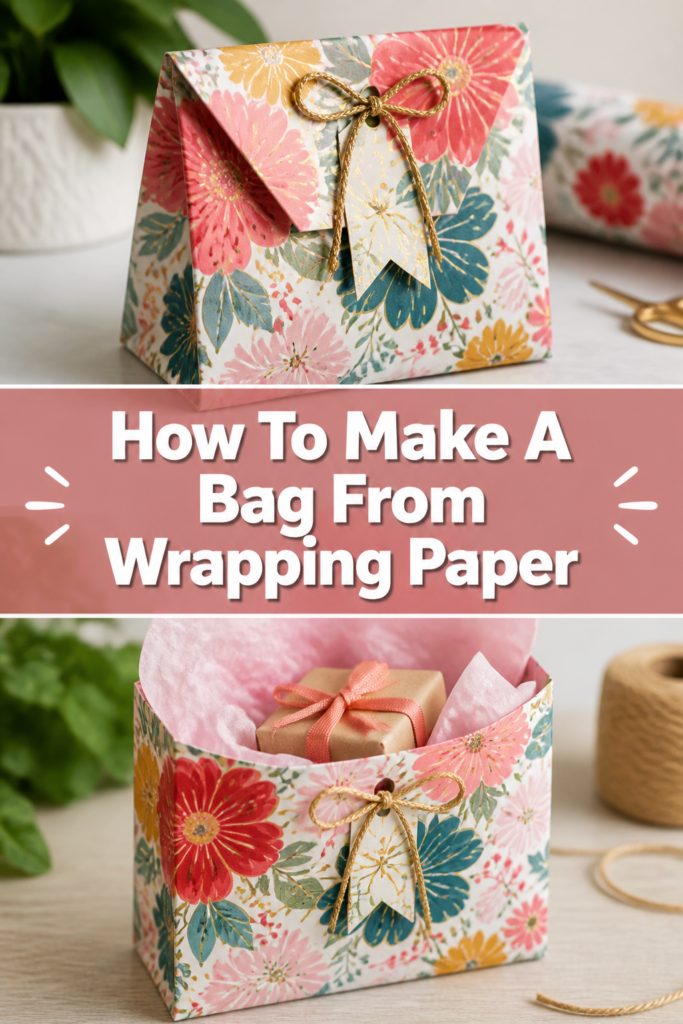
You’re about to craft a unique gift bag, perfect for any small present or party favor. This project is not only fun but also a fantastic way to practice sustainability.
You’ll end up with a personalized bag that truly stands out.
- Time needed: 30-60 minutes
- Difficulty: Beginner
- What you’ll need: Wrapping paper, scissors, ruler, pencil, strong adhesive (glue stick or double-sided tape), optional hole punch and ribbon.
Step-by-Step Instructions
Step 1: Gather Your Materials
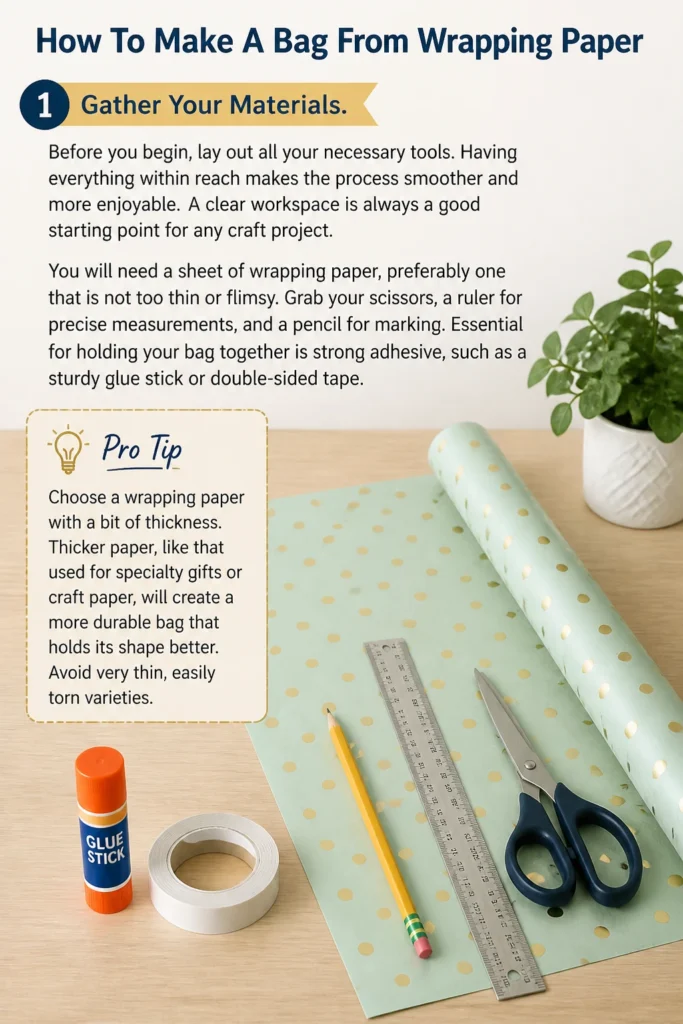
Before you begin, lay out all your necessary tools. Having everything within reach makes the process smoother and more enjoyable. A clear workspace is always a good starting point for any craft project.
You will need a sheet of wrapping paper, preferably one that is not too thin or flimsy. Grab your scissors, a ruler for precise measurements, and a pencil for marking. Essential for holding your bag together is strong adhesive, such as a sturdy glue stick or double-sided tape.
Pro Tip: Choose a wrapping paper with a bit of thickness. Thicker paper, like that used for specialty gifts or craft paper, will create a more durable bag that holds its shape better. Avoid very thin, easily torn varieties.
Step 2: Prepare Your Paper
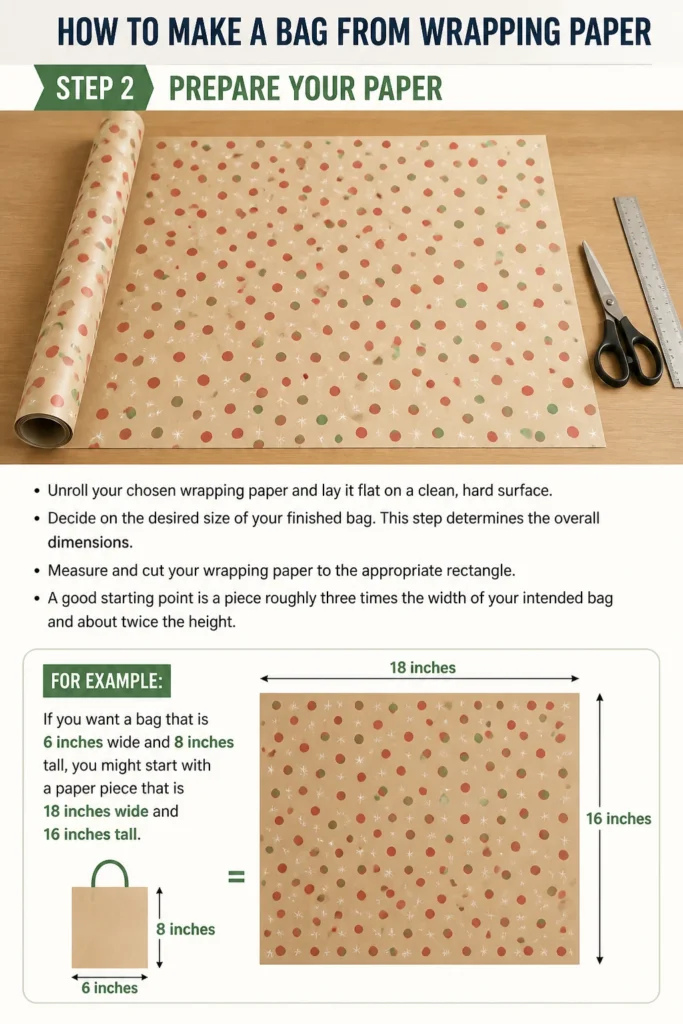
Unroll your chosen wrapping paper and lay it flat on a clean, hard surface. Decide on the desired size of your finished bag. This step determines the overall dimensions.
Measure and cut your wrapping paper to the appropriate rectangle. A good starting point is a piece roughly three times the width of your intended bag and about twice the height. For example, if you want a bag that is 6 inches wide and 8 inches tall, you might start with a paper piece that is 18 inches wide and 16 inches tall.
Step 3: Fold the Sides to Create the Bag Body
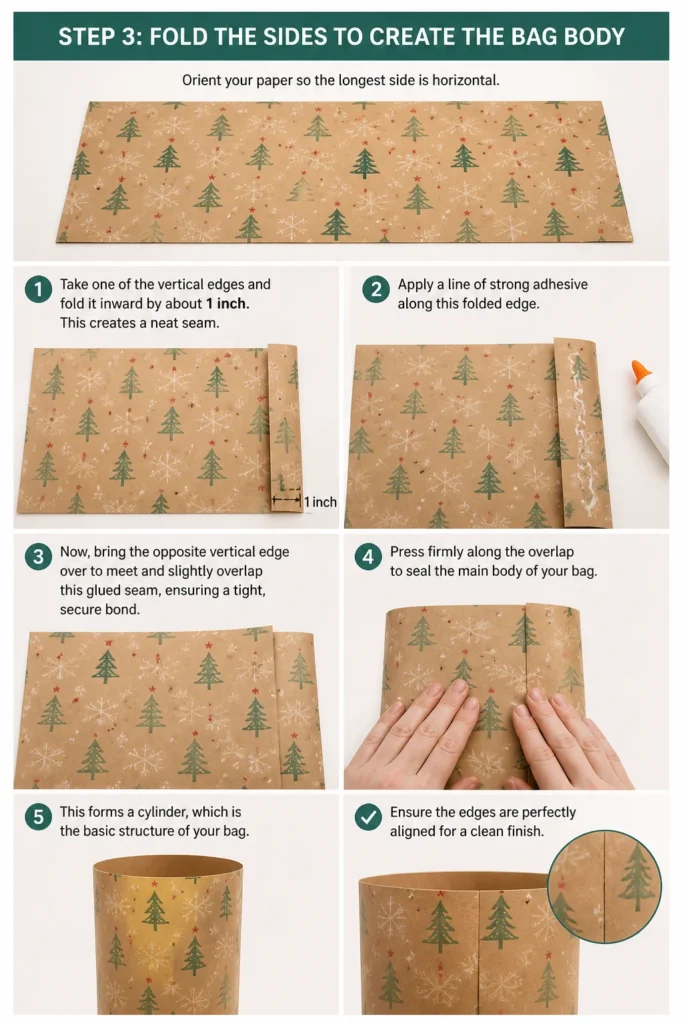
Orient your paper so the longest side is horizontal. Take one of the vertical edges and fold it inward by about 1 inch. This creates a neat seam.
Apply a line of strong adhesive along this folded edge. Now, bring the opposite vertical edge over to meet and slightly overlap this glued seam, ensuring a tight, secure bond.
Press firmly along the overlap to seal the main body of your bag. This forms a cylinder, which is the basic structure of your bag. Ensure the edges are perfectly aligned for a clean finish.
Step 4: Form the Bottom Flap
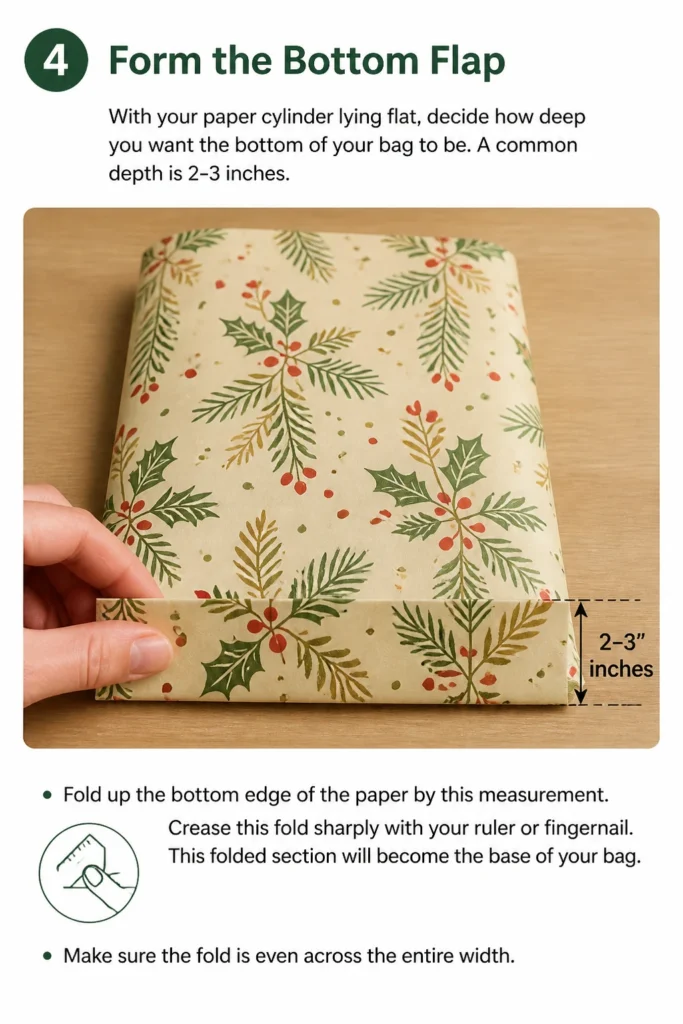
With your paper cylinder lying flat, decide how deep you want the bottom of your bag to be. A common depth is 2-3 inches. Fold up the bottom edge of the paper by this measurement.
Crease this fold sharply with your ruler or fingernail. This folded section will become the base of your bag. Make sure the fold is even across the entire width.
Step 5: Reinforce the Base
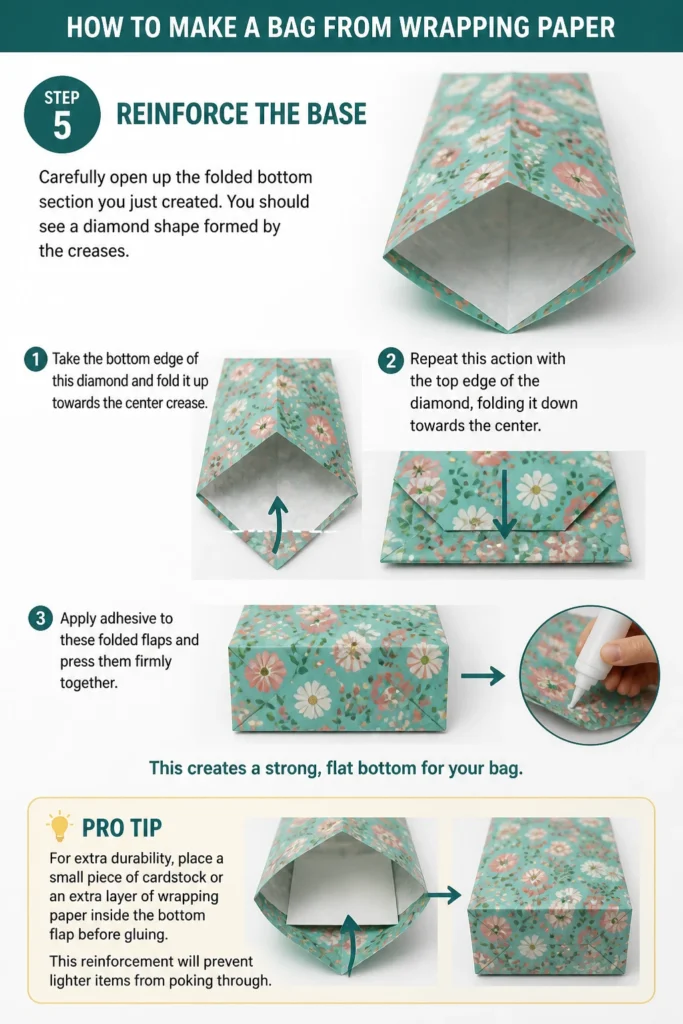
Carefully open up the folded bottom section you just created. You should see a diamond shape formed by the creases. Take the bottom edge of this diamond and fold it up towards the center crease.
Repeat this action with the top edge of the diamond, folding it down towards the center. Apply adhesive to these folded flaps and press them firmly together. This creates a strong, flat bottom for your bag.
Pro Tip: For extra durability, place a small piece of cardstock or an extra layer of wrapping paper inside the bottom flap before gluing. This reinforcement will prevent lighter items from poking through.
Step 6: Shape the Side Gussets
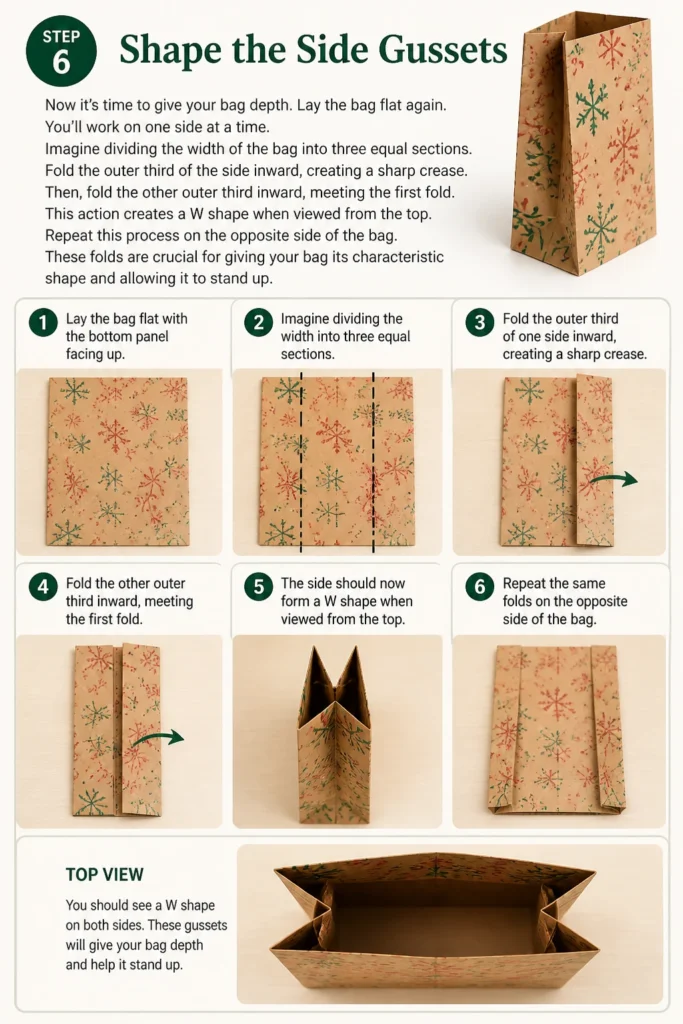
Now it’s time to give your bag depth. Lay the bag flat again. You’ll work on one side at a time.
Imagine dividing the width of the bag into three equal sections. Fold the outer third of the side inward, creating a sharp crease. Then, fold the other outer third inward, meeting the first fold.
This action creates a “W” shape when viewed from the top. Repeat this process on the opposite side of the bag. These folds are crucial for giving your bag its characteristic shape and allowing it to stand up.
Step 7: Crease and Open the Bag
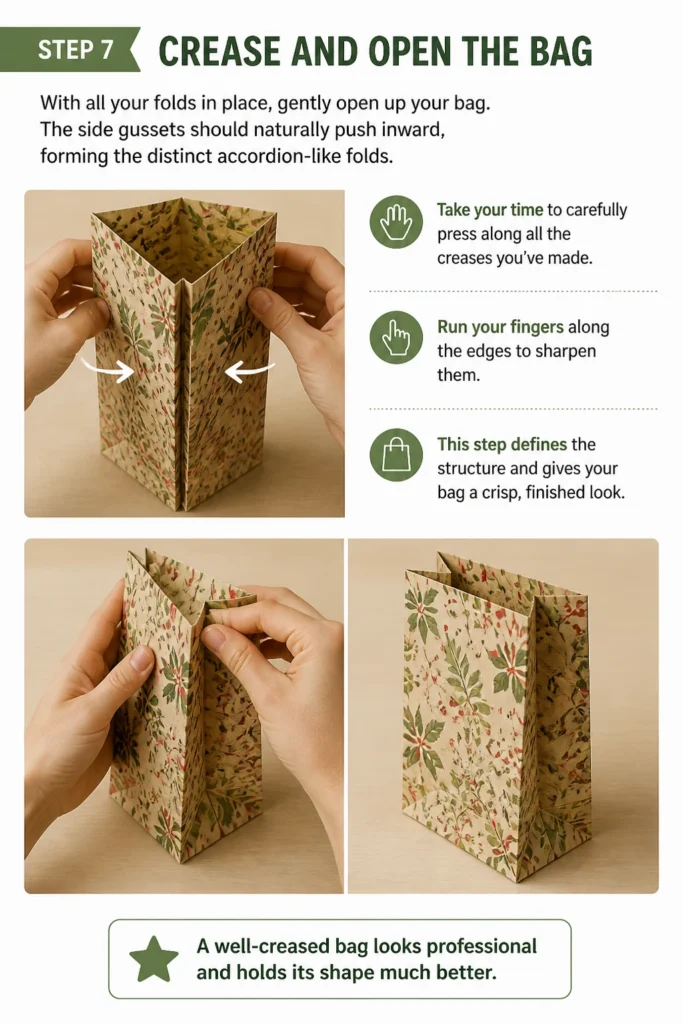
With all your folds in place, gently open up your bag. The side gussets should naturally push inward, forming the distinct accordion-like folds. Take your time to carefully press along all the creases you’ve made.
Run your fingers along the edges to sharpen them. This step defines the structure and gives your bag a crisp, finished look. A well-creased bag looks professional and holds its shape much better.
Step 8: Add Handles (Optional)
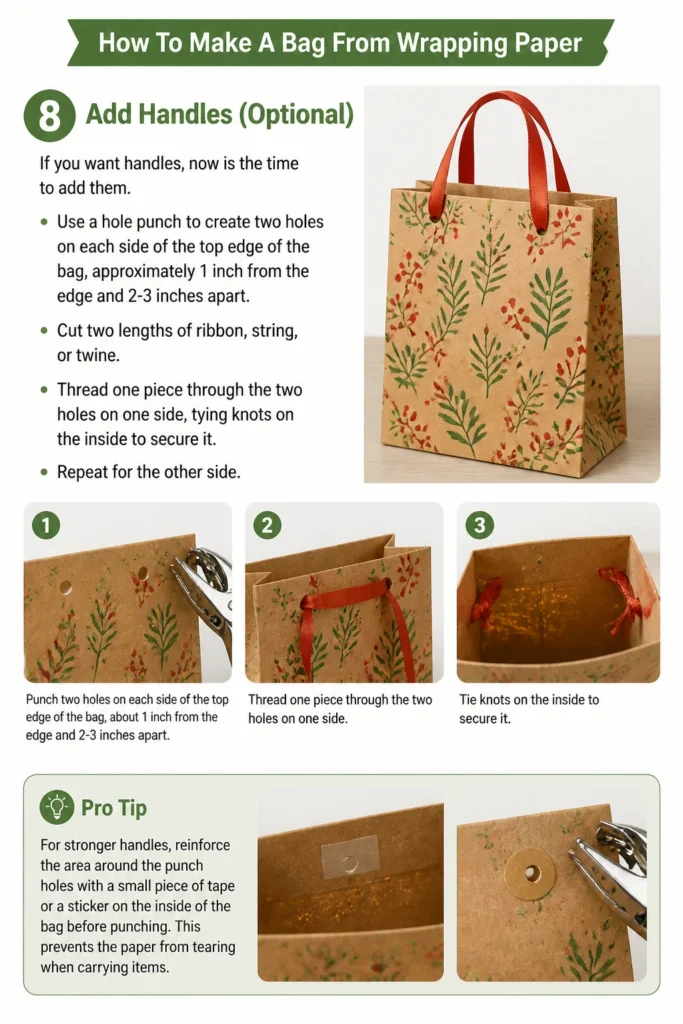
If you want handles, now is the time to add them. Use a hole punch to create two holes on each side of the top edge of the bag, approximately 1 inch from the edge and 2-3 inches apart.
Cut two lengths of ribbon, string, or twine. Thread one piece through the two holes on one side, tying knots on the inside to secure it. Repeat for the other side.
Pro Tip: For stronger handles, reinforce the area around the punch holes with a small piece of tape or a sticker on the inside of the bag before punching. This prevents the paper from tearing when carrying items.
Step 9: Decorate Your Bag
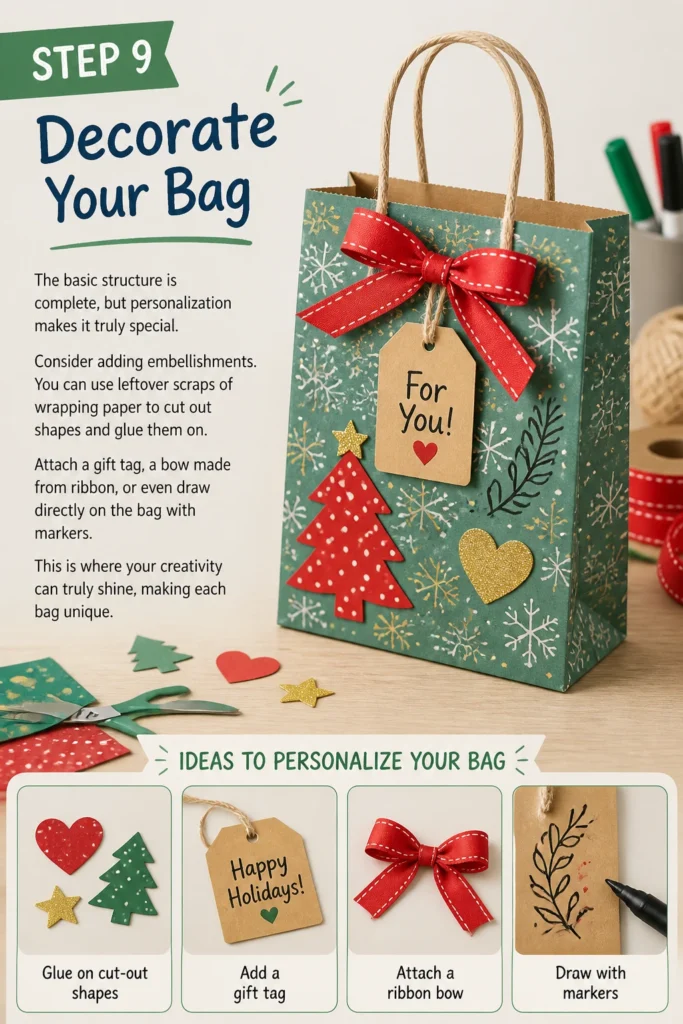
The basic structure is complete, but personalization makes it truly special. Consider adding embellishments. You can use leftover scraps of wrapping paper to cut out shapes and glue them on.
Attach a gift tag, a bow made from ribbon, or even draw directly on the bag with markers. This is where your creativity can truly shine, making each bag unique.
Step 10: Fill and Present
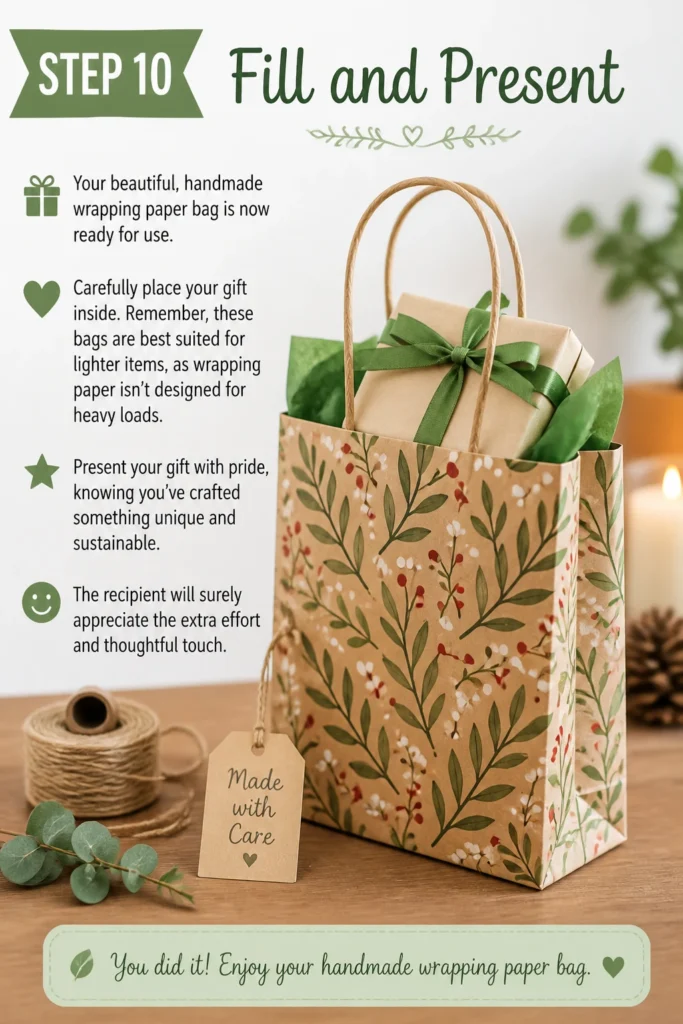
Your beautiful, handmade wrapping paper bag is now ready for use. Carefully place your gift inside. Remember, these bags are best suited for lighter items, as wrapping paper isn’t designed for heavy loads.
Present your gift with pride, knowing you’ve crafted something unique and sustainable. The recipient will surely appreciate the extra effort and thoughtful touch.
Common Mistakes to Avoid
Crafting can be rewarding, but sometimes small errors can lead to big frustrations. Being aware of potential pitfalls will help you create a perfect bag every time.
Using Flimsy Paper
One of the most common mistakes is selecting wrapping paper that is too thin or delicate. While beautiful patterns exist on all types of paper, a very thin sheet will tear easily under the stress of folding and carrying, especially at the creases and handle points. Your bag will lack structural integrity and likely fall apart. Always opt for a slightly heavier-grade wrapping paper for better durability and a more professional finish.
Uneven Folds
Precision is key in bag making. If your initial folds for the body or the bottom are not perfectly straight and even, the entire bag will be crooked. This can lead to a lopsided appearance and make the subsequent steps, like forming the side gussets, much more challenging. Take your time with a ruler and pencil to mark your folds before creasing, ensuring symmetry and a balanced final product.
Insufficient Adhesive
A bag is only as strong as its weakest seam. Skimping on glue or tape, or using a low-quality adhesive, will result in your bag falling apart. The bottom flap and the main body seam are particularly vulnerable. Apply a generous, even layer of strong glue stick or double-sided tape along all edges that need to be secured. Press firmly and allow adequate drying time for the adhesive to bond properly, ensuring a lasting hold.
Rushing the Creases
Sharp, defined creases give a bag its crisp, professional look and help it hold its shape. Rushing through the folding process without properly defining each crease will result in a soft, rounded, and less structured bag. Use a ruler or the back of your fingernail to press down firmly along every fold. This extra effort ensures clean lines and a sturdy, attractive finished product.
Troubleshooting
Even with the best intentions, you might encounter a few hiccups. Here are solutions to common problems you might face.
Bag Sagging or Weak Bottom
If your bag’s bottom doesn’t feel sturdy enough or sags when you put an item inside, it likely needs more reinforcement. The solution is simple: cut a piece of cardstock or a second layer of wrapping paper to the exact dimensions of your bag’s finished bottom. Apply strong adhesive to this piece and secure it firmly inside the bag, pressing it against the base. This added layer will significantly strengthen the bottom, preventing sagging and providing more support for your contents.
Sides Don’t Stay Folded
Sometimes, the side gussets might not want to stay neatly folded inward, causing the bag to look less crisp. This usually indicates that the creases aren’t sharp enough or the paper is particularly springy. To fix this, lay the bag flat again and re-crease all the side folds using a ruler or bone folder for extra pressure. You can also apply a tiny dot of glue or a small piece of double-sided tape at the very top and bottom of the inside of each gusset fold, pressing it against the main bag body. This will help them stay put.
Handles Tear Out
If your handles tear out easily, the issue is often insufficient reinforcement around the punch holes. To prevent this, cut small squares (about 1×1 inch) of cardstock or extra wrapping paper. Fold each square in half and glue it over the area where you intend to punch the holes, both inside and outside the bag. Once the glue is dry, punch through these reinforced spots. This distributes the stress over a larger area, making the handles much more secure and resistant to tearing, especially when carrying items.
Key Takeaways
Creating a wrapping paper bag is a rewarding and practical craft. Keep these main points in mind for successful projects.
- Material choice significantly impacts the bag’s durability and final appearance.
- Precision in measuring and folding is crucial for a symmetrical and well-structured bag.
- Using strong, reliable adhesive ensures the bag holds together securely.
- Take your time to create sharp creases; they define the bag’s shape and professional look.
- Don’t be afraid to personalize your bag with decorations and unique touches.
- These bags are best suited for lighter items, making them perfect for small gifts or party favors.
Frequently Asked Questions
People often wonder about the specifics of working with wrapping paper for this project. Here are answers to some common questions.
Can I use any type of wrapping paper?
While you technically can use any wrapping paper, not all types are ideal. Thicker, heavier-grade wrapping paper or craft paper works best as it provides more structural integrity. Very thin or flimsy paper tends to tear easily, especially at the folds and where handles are attached, resulting in a less durable bag.
What if I don’t have a hole punch for handles?
No hole punch? No problem! You can create alternative handles. Simply fold the top edge of the bag inward by an inch or two and glue it down for a reinforced top edge. Then, you can tie a ribbon around the entire bag, creating an elegant closure, or use a decorative clothespin to secure a tag and ribbon loop to the top.
How much weight can these bags hold?
Bags made from wrapping paper are generally designed for lighter items. They are perfect for small gifts, jewelry, candies, small books, or party favors. They are not intended for heavy objects like bottles or multiple large items, as the paper will likely tear under too much strain.
Can I make different sizes of bags?
Absolutely! The beauty of this guide is its adaptability. To make different sized bags, simply adjust the initial dimensions of your rectangular wrapping paper accordingly. A larger initial rectangle will result in a larger bag, and a smaller one will yield a smaller bag. Maintain the same proportions for folds relative to your paper size for the best results.
Our Top Recommended Finds
Having the right tools can make all the difference in your crafting experience. These items can elevate your bag-making game.
- High-Quality Double-Sided Tape: Offers a strong, instant bond without the mess of liquid glue, perfect for securing seams quickly.
- Craft Glue Stick (Acid-Free): Provides a clean application and a reliable hold, especially useful for larger areas and less prone to wrinkling paper.
- Bone Folder or Ruler: Essential for achieving crisp, sharp creases that give your bag a professional and structured appearance.
Unwrap Your Creativity
Making a bag from wrapping paper is more than just a craft; it’s a small act of sustainability and a wonderful way to personalize your gift-giving. Each bag you create carries a unique story, transforming discarded paper into something beautiful and functional once more.
Why not gather your materials today and give it a try? You might discover a new favorite way to present gifts, or simply find joy in the process of creating something with your own hands. This skill opens up possibilities for custom packaging, party favors, or even just charming storage for tiny treasures.