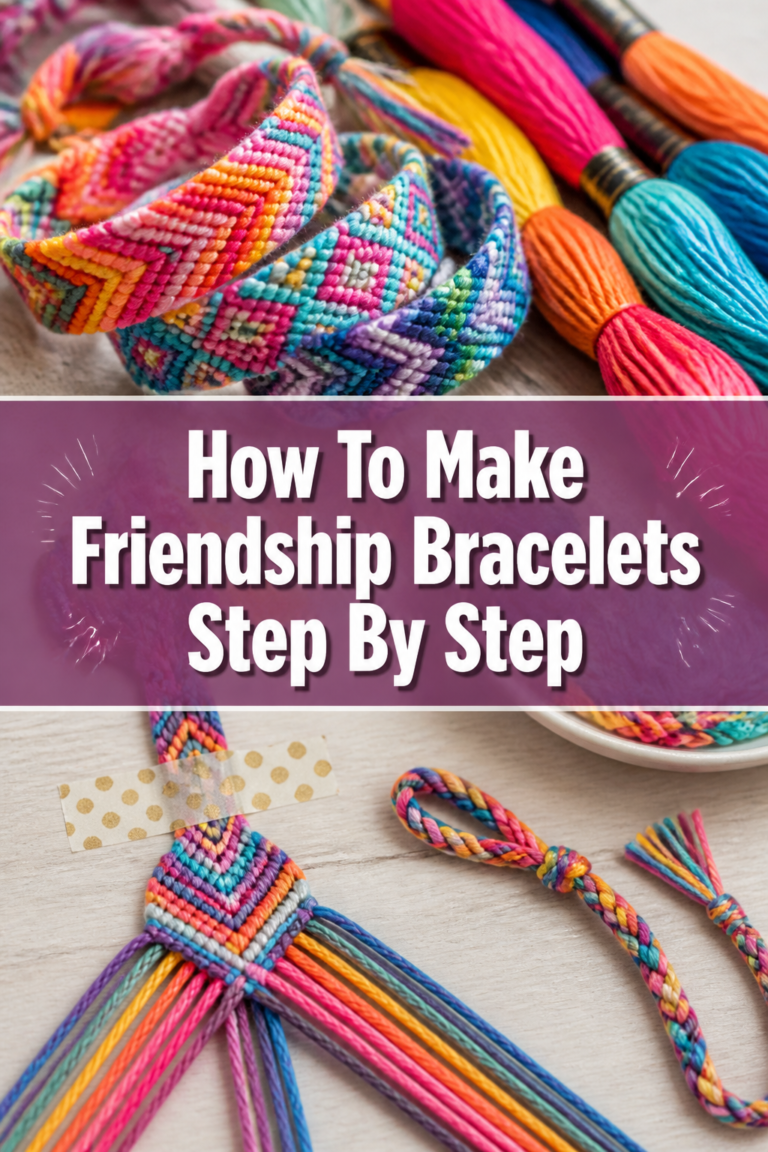
How To Make A Knot On A Bracelet

Beginner-friendly templates, step-by-step guides,
and weekly project ideas in your inbox.
Making a secure, beautiful knot on a bracelet is more than just a functional task. It’s the finishing touch that ensures your creation lasts and looks professional. I’ve spent countless hours crafting and repairing bracelets, understanding that a good knot is the foundation of a durable piece. This guide shares my practical experience, helping you master this essential skill with confidence.
Quick Overview
Learning to tie a reliable knot for your bracelet can elevate your crafting game significantly. You’ll master both basic finishing knots and the popular adjustable sliding knot. These techniques will ensure your bracelets are secure and comfortable to wear.
- Time needed: 15-30 minutes (depending on knot type and practice)
- Difficulty: Beginner to Intermediate
- What you’ll need: Bracelet material, sharp scissors, measuring tape, optional fabric glue/clear nail polish.
Step-by-Step Instructions
Step 1: Gather Your Materials and Prepare Your Bracelet
Before you begin knotting, lay out all your necessary tools. A clear workspace helps prevent frustration and lost components. Ensure your bracelet material is ready for its final step.
Measure the desired length of your bracelet, adding extra for the knot itself. A good rule of thumb is to add at least 6-8 inches to each end for comfortable knotting, especially for adjustable styles. This extra length gives you plenty of material to work with.
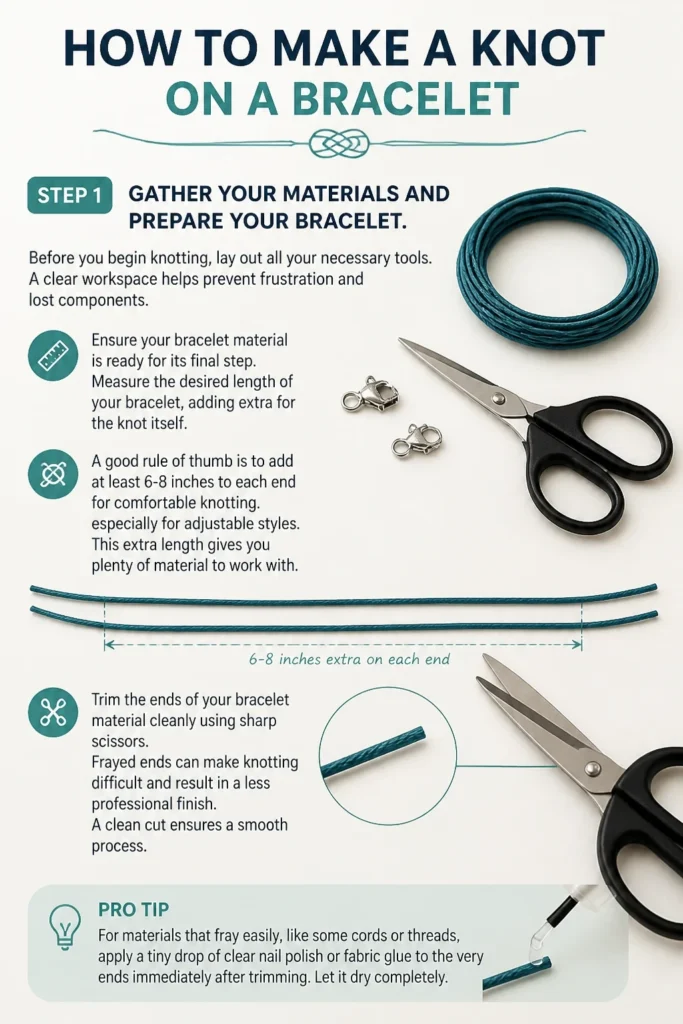
Trim the ends of your bracelet material cleanly using sharp scissors. Frayed ends can make knotting difficult and result in a less professional finish. A clean cut ensures a smooth process.
Pro Tip: For materials that fray easily, like some cords or threads, apply a tiny drop of clear nail polish or fabric glue to the very ends immediately after trimming. Let it dry completely before proceeding. This stiffens the ends and makes them much easier to thread and knot.
Step 2: Understand the Basic Overhand Knot
The overhand knot is the simplest and most fundamental knot. It forms the basis for many other, more complex knots you might use on a bracelet. Mastering this basic motion is crucial.
Hold one end of your bracelet material in your dominant hand. Create a loop by bringing the working end over the standing part of the cord. The working end is the part you’re actively manipulating.
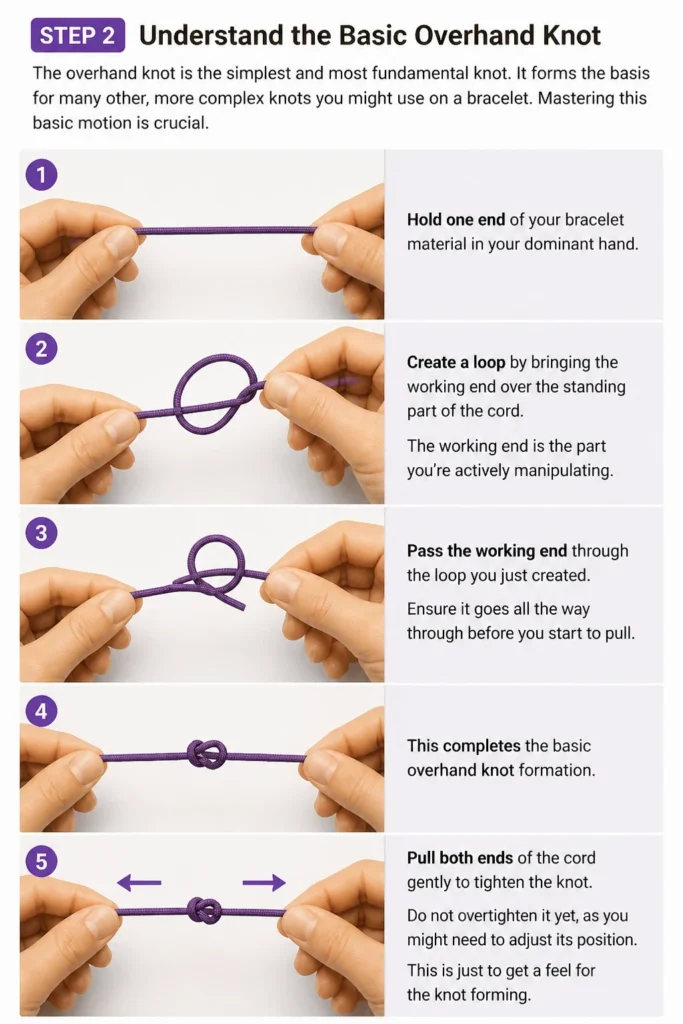
Pass the working end through the loop you just created. Ensure it goes all the way through before you start to pull. This completes the basic overhand knot formation.
Pull both ends of the cord gently to tighten the knot. Do not overtighten it yet, as you might need to adjust its position. This is just to get a feel for the knot forming.
Step 3: Tie a Secure Finishing Knot (Surgeon’s Knot)
For non-adjustable bracelets, a secure finishing knot is paramount. The surgeon’s knot is an excellent choice, offering superior security compared to a simple overhand knot. It resists slipping and holds firm.
Overlap the two ends of your bracelet cord. Position them so they cross over each other by a few inches. This creates the initial structure for the knot.
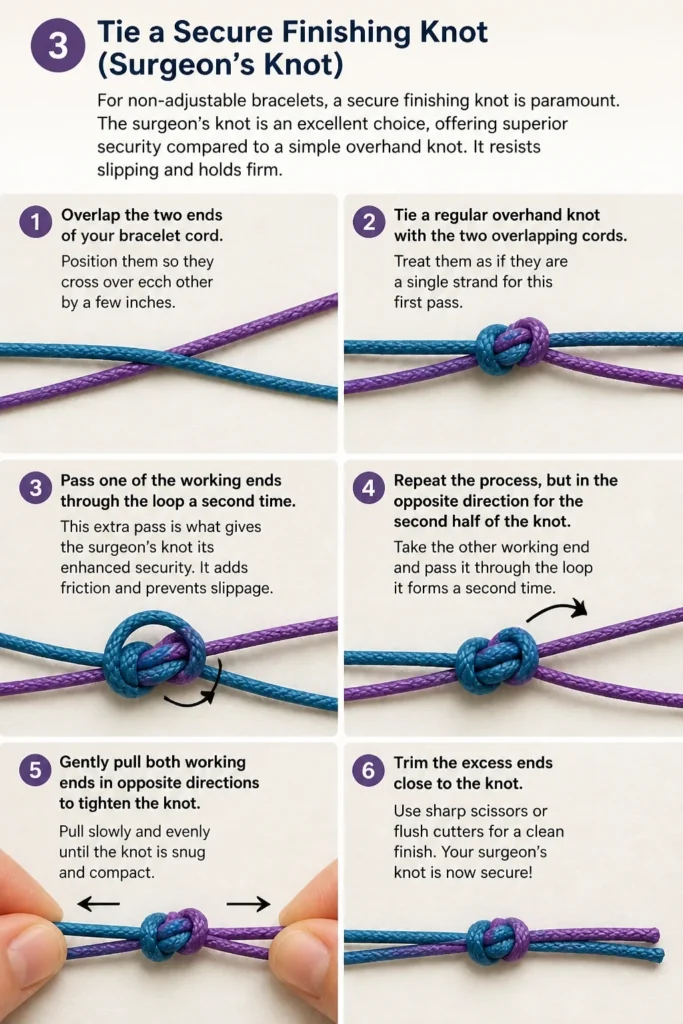
Tie a regular overhand knot with the two overlapping cords. Treat them as if they are a single strand for this first pass. This forms the first half of the surgeon’s knot.
Pass one of the working ends through the loop a second time. This extra pass is what gives the surgeon’s knot its enhanced security. It adds friction and prevents slippage.
Repeat the process, but in the opposite direction for the second half of the knot. Take the cord that is now on top and cross it over the other cord. Tie another overhand knot, passing the working end through the loop twice again.
Tighten both halves of the knot firmly and evenly. Pull on all four ends (the two main bracelet strands and the two working ends) until the knot is snug and compact. This ensures the knot will not unravel with wear.
Pro Tip: When tightening, apply pressure consistently to all four strands. This helps the knot cinch down symmetrically and prevents one side from becoming loose. A lopsided knot is more prone to unraveling.
Step 4: Secure the Knot with Adhesive
Once your finishing knot is perfectly tied and tightened, you need to ensure its permanence. This step adds an extra layer of security, especially for high-wear bracelets.
Apply a tiny drop of clear-drying fabric glue or clear nail polish directly onto the knot. Use a toothpick or the tip of a sewing needle for precise application. You only need a very small amount.
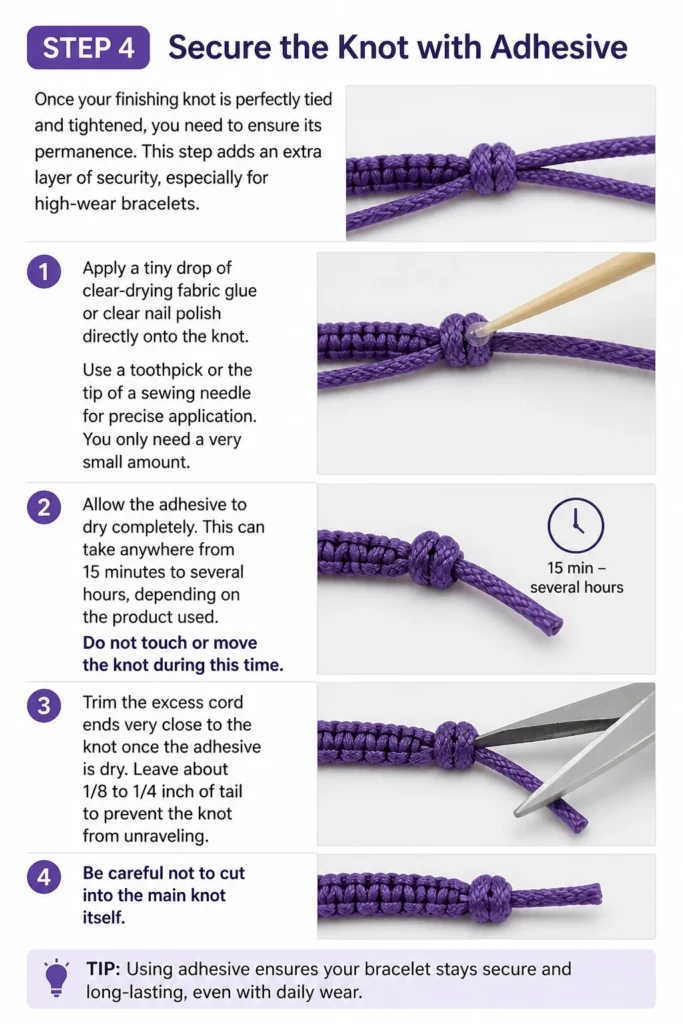
Allow the adhesive to dry completely. This can take anywhere from 15 minutes to several hours, depending on the product used. Do not touch or move the knot during this time.
Trim the excess cord ends very close to the knot once the adhesive is dry. Leave about 1/8 to 1/4 inch of tail to prevent the knot from unraveling. Be careful not to cut into the main knot itself.
Step 5: Create an Adjustable Sliding Knot (Macrame Style)
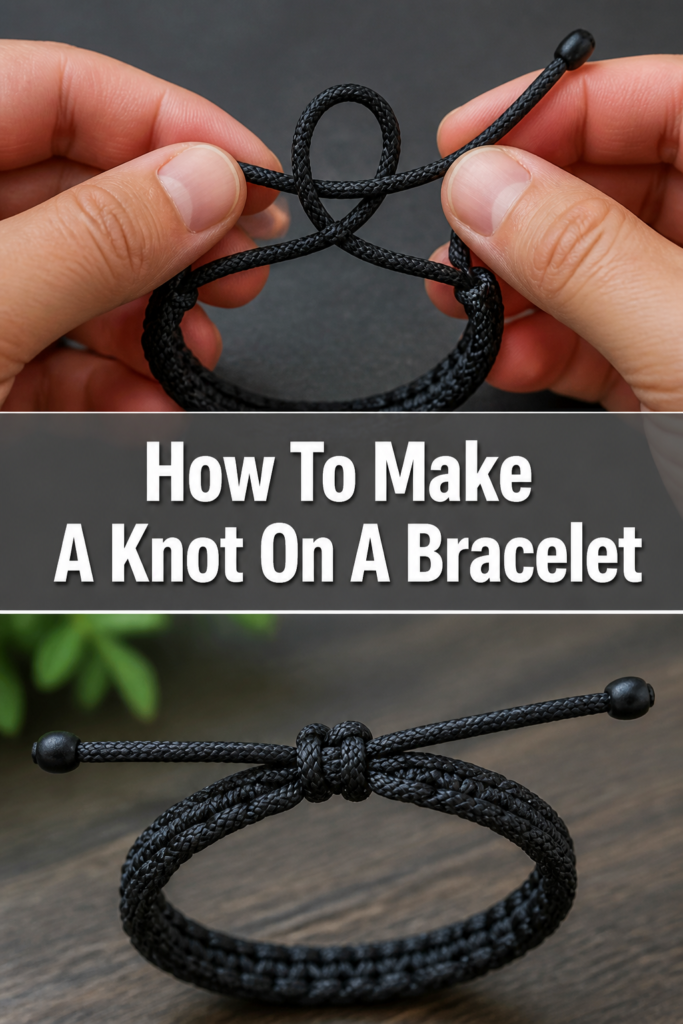
An adjustable sliding knot is perfect for bracelets that need to fit various wrist sizes or be easily put on and taken off. This technique involves two separate knots that slide along the main bracelet strands.
Lay your bracelet flat, with the two main ends overlapping by about 2-3 inches. These overlapping ends will become the “rails” for your sliding knot. Ensure they are parallel.
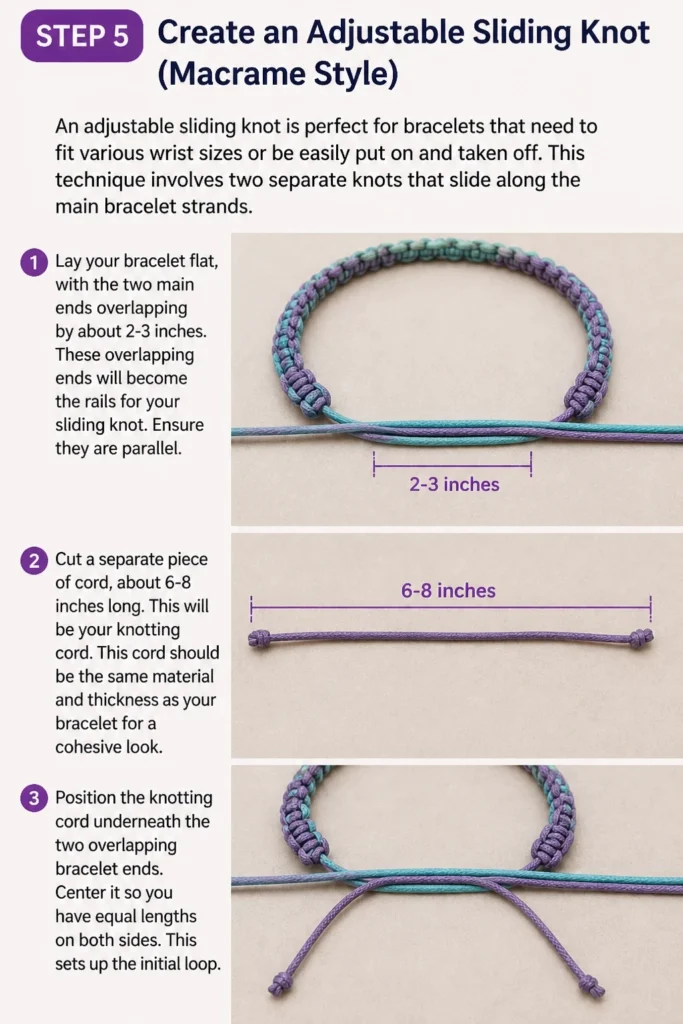
Cut a separate piece of cord, about 6-8 inches long. This will be your “knotting cord.” This cord should be the same material and thickness as your bracelet for a cohesive look.
Position the knotting cord underneath the two overlapping bracelet ends. Center it so you have equal lengths on both sides. This sets up the initial loop.
Step 6: Tie the First Half of the Sliding Knot
The adjustable sliding knot is essentially a series of square knots. We’ll start with the first half, ensuring it’s snug around the bracelet ends.
Take the left end of your knotting cord and bring it over the two main bracelet strands. Then, pass it under the right end of the knotting cord. This creates a loop on the left side.
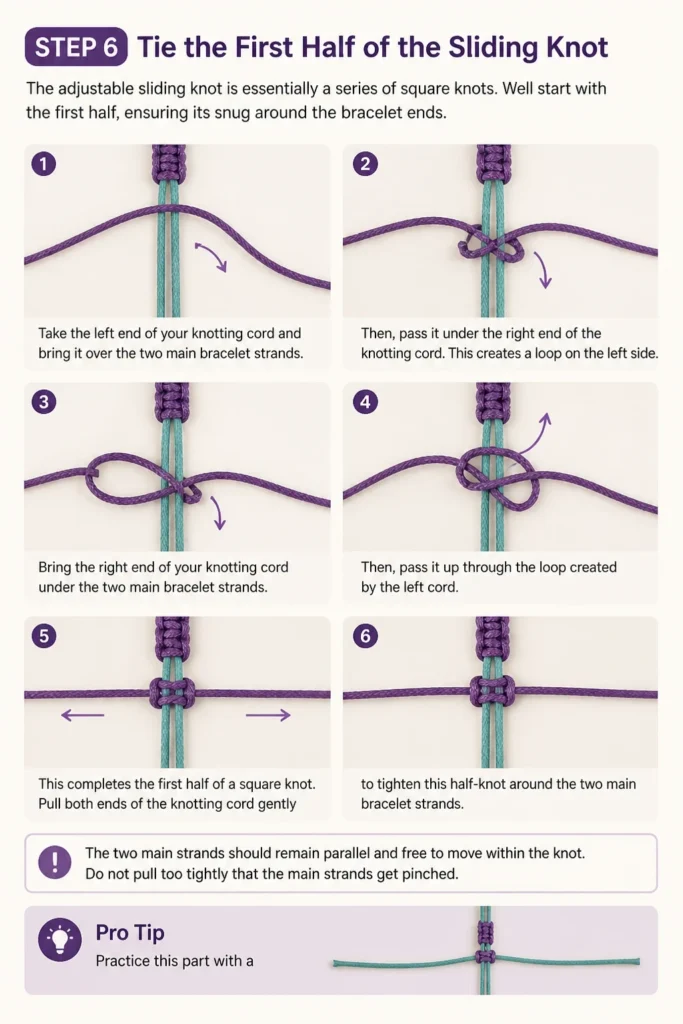
Bring the right end of your knotting cord under the two main bracelet strands. Then, pass it up through the loop created by the left cord. This completes the first half of a square knot.
Pull both ends of the knotting cord gently to tighten this half-knot around the two main bracelet strands. The two main strands should remain parallel and free to move within the knot. Do not pull too tightly that the main strands get pinched.
Pro Tip: Practice this part with a different colored cord first. This helps visualize which strand goes over and which goes under, making it easier to replicate with your actual bracelet. Precision here ensures a smooth slide later.
Step 7: Complete the Sliding Knot
Now, you will repeat the process, but starting from the opposite side. This creates a complete square knot that can slide along the bracelet.
Take the right end of your knotting cord and bring it over the two main bracelet strands. Then, pass it under the left end of the knotting cord. This is the mirror image of the previous step.
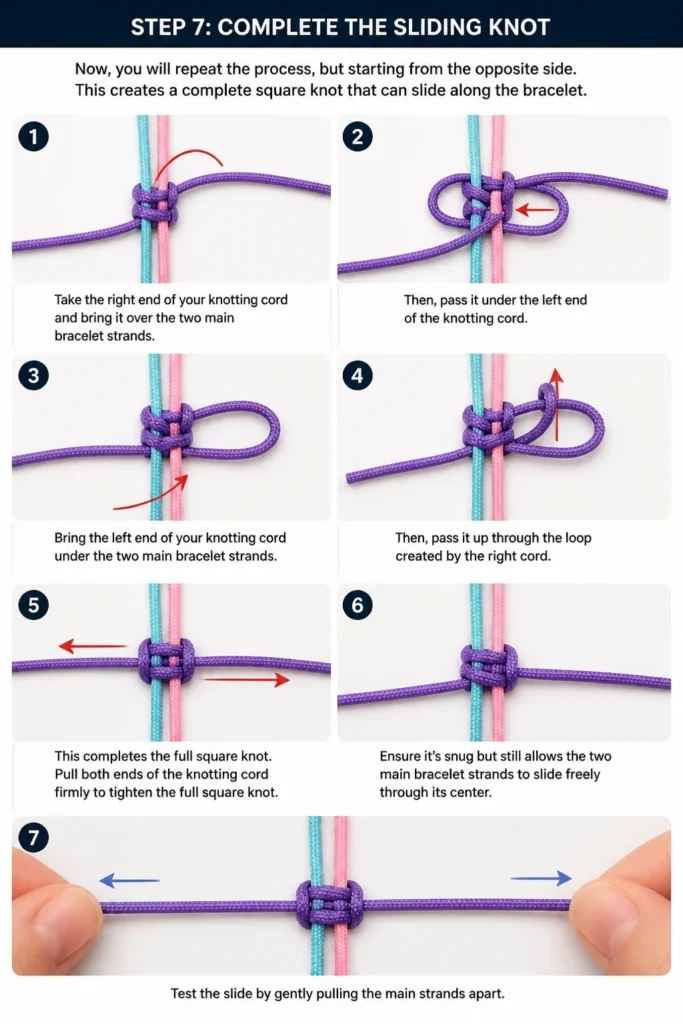
Bring the left end of your knotting cord under the two main bracelet strands. Then, pass it up through the loop created by the right cord. This completes the full square knot.
Pull both ends of the knotting cord firmly to tighten the full square knot. Ensure it’s snug but still allows the two main bracelet strands to slide freely through its center. Test the slide by gently pulling the main strands apart.
Step 8: Repeat for Desired Length and Finish
To create a robust and functional adjustable knot, you will need to repeat the square knot sequence several times. This builds up the body of the sliding mechanism.
Continue tying square knots, alternating which side you start from each time (left over, then right over). Aim for 4-6 full square knots to create a solid sliding mechanism. The length of the knot should be about 1/2 to 3/4 inch.
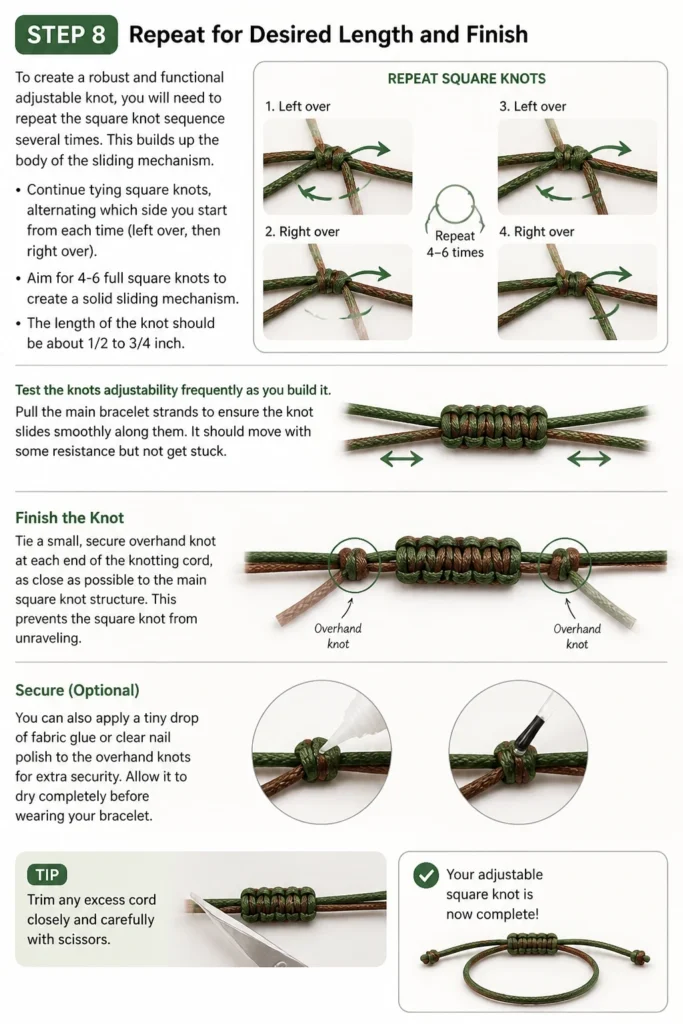
Test the knot’s adjustability frequently as you build it. Pull the main bracelet strands to ensure the knot slides smoothly along them. It should move with some resistance but not get stuck.
Tie a small, secure overhand knot at each end of the knotting cord, as close as possible to the main square knot structure. This prevents the square knot from unraveling. You can also apply a tiny drop of fabric glue to these small knots.
Trim the excess knotting cord tails very close to these small overhand knots. Leave a minimal tail, about 1/8 inch. Be careful not to cut the main bracelet strands. Your adjustable knot is now complete.
Common Mistakes to Avoid
Not Tightening Knots Enough
A common error is leaving knots too loose, especially for finishing knots. An insufficiently tightened knot will unravel over time, causing your bracelet to fall apart. Always pull firmly and evenly on all strands involved to ensure the knot is compact and secure.
Cutting Tails Too Short
After securing a knot, it’s tempting to trim the excess cord extremely close to the knot. However, cutting the tails too short can lead to the knot slipping or unraveling, especially with materials that stretch or compress. Leave a small tail, typically 1/8 to 1/4 inch, to give the knot a buffer against slippage.
Using the Wrong Knot for the Purpose
Not all knots are created equal. A simple overhand knot might suffice for temporary fastening, but it’s often not secure enough for a permanent bracelet closure. Using a surgeon’s knot for finishing or a square knot for adjustability ensures the functionality matches the design. Choosing the right knot prevents frustration and enhances durability.
Forgetting to Secure with Adhesive
While a well-tied knot is strong, an extra layer of security can make a world of difference. Skipping the step of adding a tiny drop of fabric glue or clear nail polish to finishing knots leaves them vulnerable to loosening over time. This small detail significantly boosts the longevity of your bracelet.
Troubleshooting
Knot Keeps Slipping or Unraveling
This usually indicates the knot wasn’t tightened enough or the wrong type of knot was used. Re-tie the knot, ensuring you pull firmly and evenly on all strands until it feels very compact. If it’s a finishing knot, consider using a surgeon’s knot for extra security. Always apply a small amount of fabric glue or clear nail polish to fully set it.
Adjustable Knot is Too Tight and Won’t Slide
If your sliding knot is stuck, it means you likely pulled the knotting cord too tightly around the main bracelet strands. Untie the adjustable knot carefully and re-tie it, being mindful to tighten the square knots just enough to secure them without pinching the inner strands. The main strands should still be able to move freely within the knot.
Cord Ends Fraying, Making Knotting Difficult
Fraying ends are a common nuisance, especially with certain cord types. Before you even start knotting, apply a small amount of clear nail polish or super glue to the very tips of your cord ends. Let it dry completely to stiffen them. This makes threading and manipulating the cord much easier. You can also briefly melt synthetic cords with a flame to prevent fraying, but exercise extreme caution.
Key Takeaways
- Preparation is key: Always gather your materials and trim cord ends cleanly before starting.
- Choose the right knot: Select a secure finishing knot like the surgeon’s knot for permanent closures, or a square knot for adjustable designs.
- Tighten firmly and evenly: Ensure all knots are pulled snug to prevent slippage and unraveling.
- Secure with adhesive: A small drop of fabric glue or clear nail polish adds significant durability to finishing knots.
- Practice makes perfect: Don’t be discouraged if your first few knots aren’t perfect; consistency comes with repetition.
- Leave adequate tails: Trim excess cord carefully, leaving a small buffer to prevent the knot from coming undone.
Frequently Asked Questions
What’s the best knot for a permanent bracelet closure?
For a permanent and very secure closure, the surgeon’s knot is highly recommended. It’s essentially an overhand knot with an extra pass, providing increased friction and stability. Always reinforce it with a tiny drop of fabric glue for maximum longevity.
Can I use any type of cord for an adjustable sliding knot?
Most cords can be used for adjustable sliding knots, but some work better than others. Smooth, round cords like nylon, waxed cotton, or leather cord tend to slide more easily than flat or very textured cords. Ensure the knotting cord is the same or slightly thinner than the main bracelet strands for optimal function.
How do I make sure the knot doesn’t irritate my skin?
When trimming the excess cord, try to cut it very close to the knot and then melt the tiny remaining synthetic fibers with a thread zapper or lighter (if safe for the material). For natural fibers, a tiny dot of clear glue on the trimmed end can prevent fraying and create a smoother surface. Ensure the knot itself is compact and free of sharp edges.
Is it possible to undo a knot if I make a mistake?
Yes, most knots can be undone if you catch the mistake quickly. Use a fine-tipped tool like tweezers or a needle to carefully pick apart the knot. It’s much harder to undo a knot that has been fully tightened or secured with adhesive, so try to check your work as you go.
Our Top Recommended Finds
- Sharp Craft Scissors: Essential for clean cuts that prevent fraying and make knotting easier. Look for a pair with fine tips.
- Fabric/Jewelry Adhesive: A small tube of clear-drying glue (like E6000 or specific fabric glues) is invaluable for securing knots permanently.
- Measuring Tape: Crucial for accurate bracelet sizing and ensuring you have enough cord for your knots.
Craft Your Connection Today
Mastering the art of knotting on a bracelet opens up a world of creative possibilities. From securing a cherished beaded design to crafting a stylish adjustable piece, a well-tied knot is your secret weapon. You now have the practical steps to confidently tackle any bracelet project.
Don’t let the fear of a flimsy knot hold you back. Grab your materials, refer back to these steps, and start practicing. Soon, you’ll be creating durable, beautiful bracelets that stand the test of time. Why not try your hand at a friendship bracelet or a beaded design this afternoon?
Beginner-friendly templates, step-by-step guides,
and weekly project ideas in your inbox.