📦 How To Make A Box With Paper

Beginner-friendly templates, step-by-step guides,
and weekly project ideas in your inbox.
Making a paper box is a surprisingly satisfying craft. It’s a simple skill that opens up a world of creative possibilities for gifts, storage, or just for fun.
I’ve made countless paper boxes over the years, from tiny decorative ones to sturdy containers for handmade gifts. This guide distills that hands-on experience into clear, easy-to-follow steps.
You’ll soon be folding your own perfect paper boxes with confidence.
Quick Overview
This guide will walk you through creating a classic paper box, often called a Masu box, using a single sheet of square paper. You’ll learn the fundamental folds to construct a sturdy and attractive container.
- Time needed: 15-30 minutes
- Difficulty: Beginner
- What you’ll need: Square paper, ruler (optional), bone folder (optional)
Step-by-Step Instructions
Step 1: Prepare Your Paper
The foundation of a good paper box is your paper choice. A square sheet is essential for this particular method.
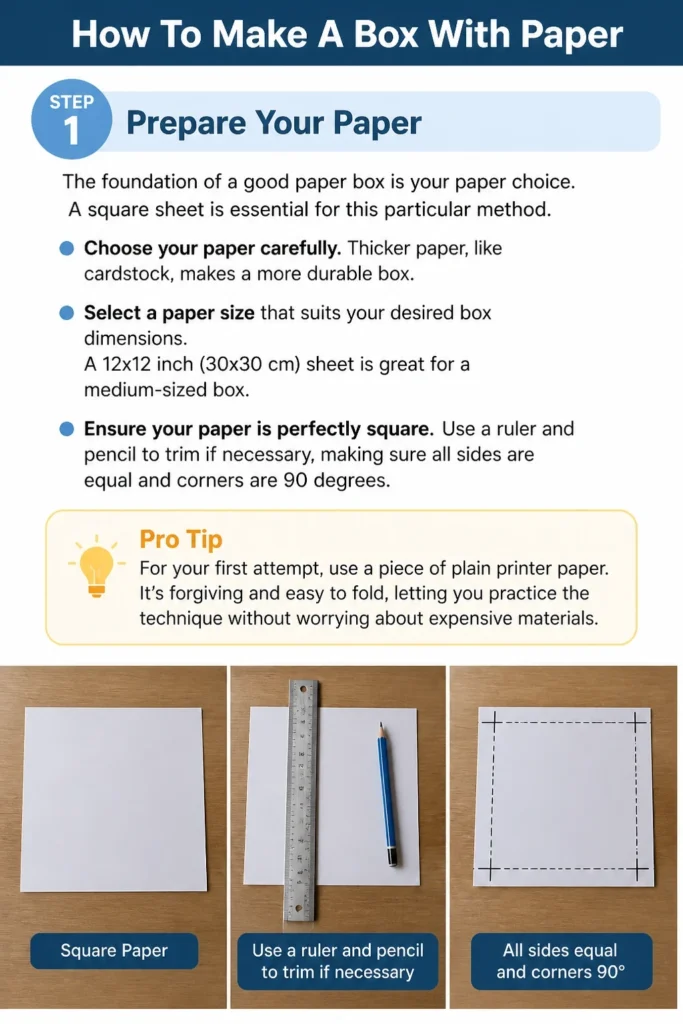
- Choose your paper carefully. Thicker paper, like cardstock, makes a more durable box.
- Select a paper size that suits your desired box dimensions. A 12×12 inch (30×30 cm) sheet is great for a medium-sized box.
- Ensure your paper is perfectly square. Use a ruler and pencil to trim if necessary, making sure all sides are equal and corners are 90 degrees.
Pro Tip: For your first attempt, use a piece of plain printer paper. It’s forgiving and easy to fold, letting you practice the technique without worrying about expensive materials.
Step 2: Fold Diagonals and Halves
Creating initial creases will guide all subsequent folds, ensuring symmetry and precision.
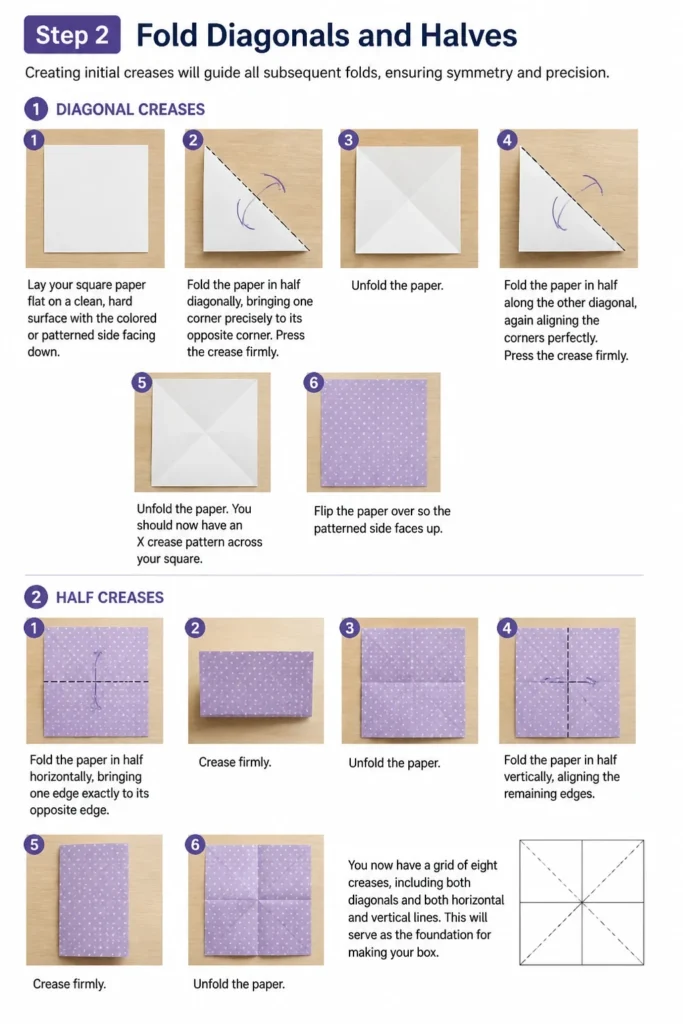
- Lay your square paper flat on a clean, hard surface with the colored or patterned side facing down.
- Fold the paper in half diagonally, bringing one corner precisely to its opposite corner. Press the crease firmly.
- Unfold the paper.
- Fold the paper in half along the other diagonal, again aligning the corners perfectly.
- Unfold the paper. You should now have an “X” crease pattern across your square.
- Flip the paper over so the patterned side faces up.
- Fold the paper in half horizontally, bringing one edge exactly to its opposite edge. Crease firmly.
- Unfold the paper.
- Fold the paper in half vertically, aligning the remaining edges. Crease firmly.
- Unfold the paper. You now have a grid of eight creases, including the diagonals and the horizontal/vertical midpoints.
Step 3: Bring Corners to the Center
This fold begins to define the base of your box.
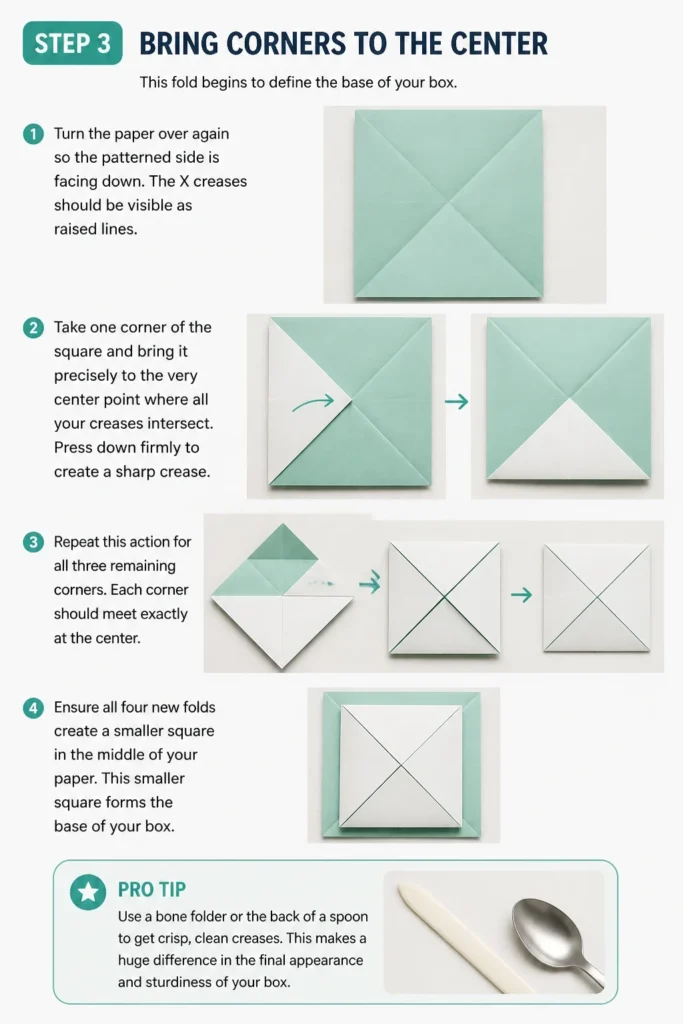
- Turn the paper over again so the patterned side is facing down. The “X” creases should be visible as raised lines.
- Take one corner of the square and bring it precisely to the very center point where all your creases intersect.
- Press down firmly to create a sharp crease.
- Repeat this action for all three remaining corners. Each corner should meet exactly at the center.
- Ensure all four new folds create a smaller square in the middle of your paper. This smaller square forms the base of your box.
Pro Tip: Use a bone folder or the back of a spoon to get crisp, clean creases. This makes a huge difference in the final appearance and sturdiness of your box.
Step 4: Fold Edges to the Center
These folds establish the height of your box walls.
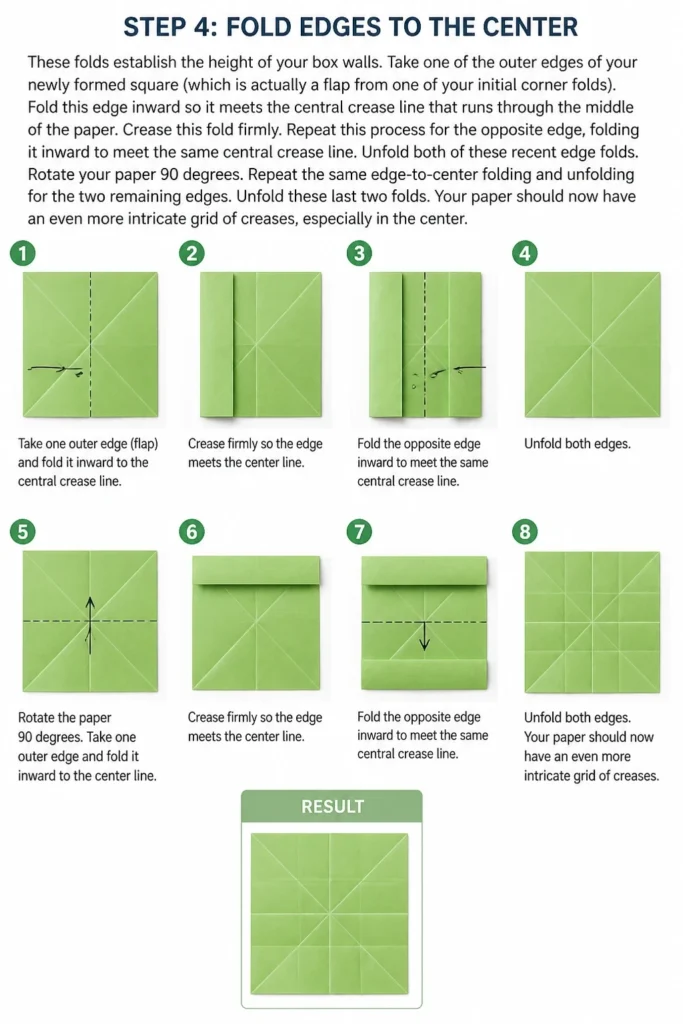
- Take one of the outer edges of your newly formed square (which is actually a flap from one of your initial corner folds).
- Fold this edge inward so it meets the central crease line that runs through the middle of the paper.
- Crease this fold firmly.
- Repeat this process for the opposite edge, folding it inward to meet the same central crease line.
- Unfold both of these recent edge folds.
- Rotate your paper 90 degrees.
- Repeat the same edge-to-center folding and unfolding for the two remaining edges.
- Unfold these last two folds. Your paper should now have an even more intricate grid of creases, especially in the center.
Step 5: Create the Side Walls
Now the box starts to take its three-dimensional shape.
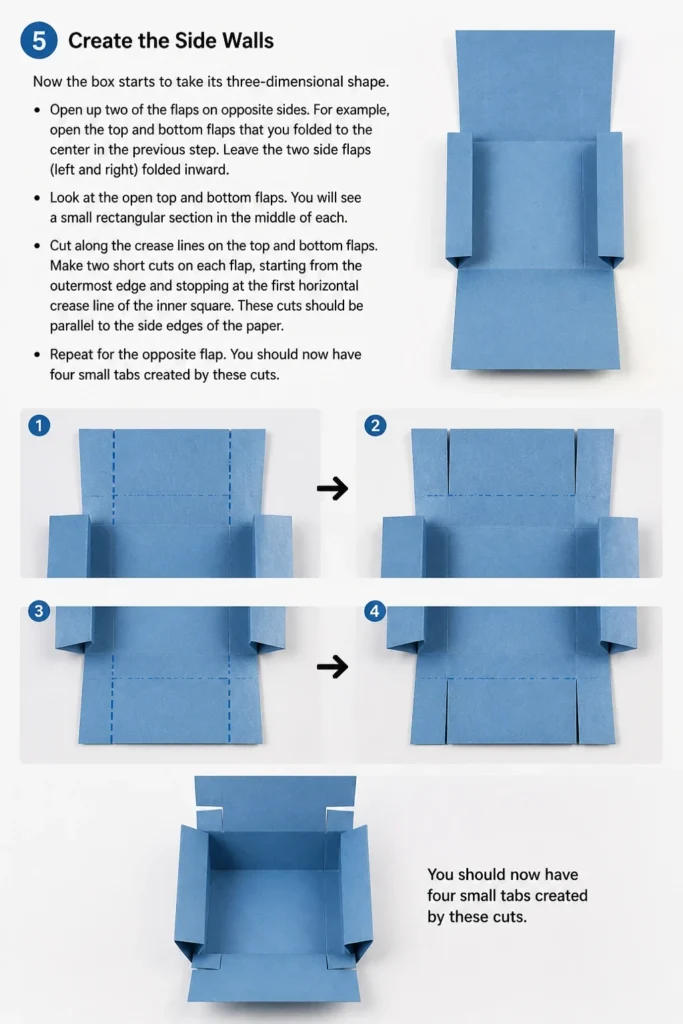
- Open up two of the flaps on opposite sides. For example, open the top and bottom flaps that you folded to the center in the previous step.
- Leave the two side flaps (left and right) folded inward.
- Look at the open top and bottom flaps. You will see a small rectangular section in the middle of each.
- Cut along the crease lines on the top and bottom flaps. Make two short cuts on each flap, starting from the outermost edge and stopping at the first horizontal crease line of the inner square. These cuts should be parallel to the side edges of the paper. You are essentially cutting two short slits into the flap.
- Repeat for the opposite flap. You should now have four small “tabs” created by these cuts.
Step 6: Form the Box Structure
This is where the magic happens and the box takes shape.
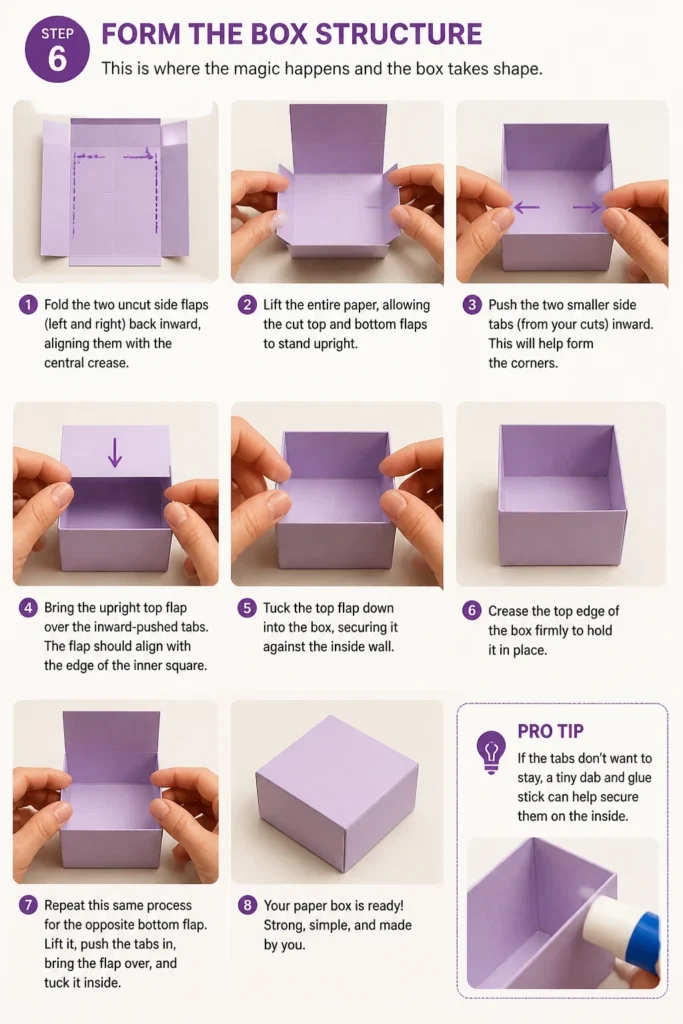
- Fold the two uncut side flaps (left and right) back inward, aligning them with the central crease.
- Lift the entire paper, allowing the cut top and bottom flaps to stand upright.
- Push the two smaller side tabs (from your cuts) inward. This will help form the corners.
- Bring the upright top flap over the inward-pushed tabs. The flap should align with the edge of the inner square.
- Tuck the top flap down into the box, securing it against the inside wall.
- Crease the top edge of the box firmly to hold it in place.
- Repeat this same process for the opposite bottom flap. Lift it, push the tabs in, bring the flap over, and tuck it inside.
Pro Tip: If the tabs don’t want to stay, a tiny dab of glue stick can help secure them on the inside. However, a well-creased paper box should hold its shape without adhesive.
Step 7: Finalize the Box
A few last touches complete your handmade paper box.
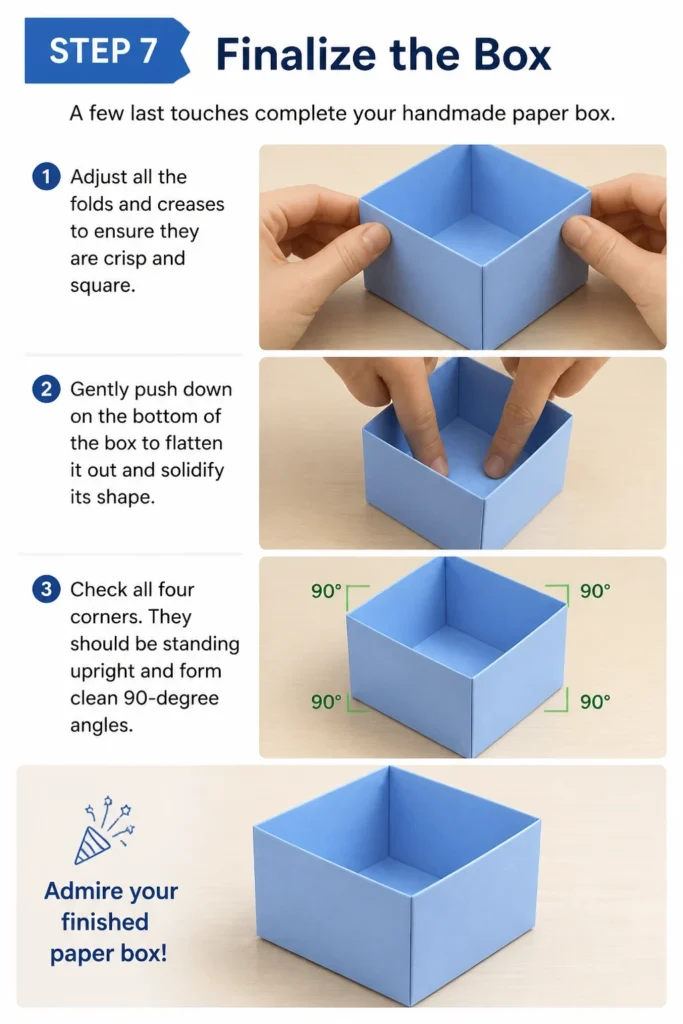
- Adjust all the folds and creases to ensure they are crisp and square.
- Gently push down on the bottom of the box to flatten it out and solidify its shape.
- Check all four corners. They should be standing upright and form clean 90-degree angles.
- Admire your finished paper box!
Common Mistakes to Avoid
Inaccurate Initial Folds
Many people rush the very first diagonal and half folds. If these initial creases are not perfectly aligned, every subsequent fold will be off-center.
This leads to a crooked box that won’t sit flat or have straight walls. Take your time with the initial setup, ensuring every corner meets precisely and every crease is sharp.
Uneven Pressure on Creases
A common error is applying inconsistent pressure when creasing. Some folds might be weak, while others are too harsh, potentially tearing the paper.
Aim for firm, even pressure along the entire length of each fold. Using a bone folder helps distribute pressure evenly and creates professional-looking results.
Cutting Too Far or Not Far Enough
The small cuts made in Step 5 are crucial. Cutting past the designated crease line will weaken the box structure, making it wobbly or causing gaps.
Cutting not far enough will prevent the flaps from folding correctly and tucking in neatly. Double-check your cut lines before snipping, ensuring they stop exactly at the intersecting crease.
Troubleshooting
My Box Walls Are Not Straight
If your box walls lean or appear uneven, it usually points back to the precision of your initial folds.
Go back and check your diagonal and horizontal/vertical midpoint creases. If they weren’t perfectly aligned, the subsequent folds for the walls will also be misaligned. Try unfolding the box and carefully re-creasing all the base folds, paying close attention to symmetry.
The Flaps Don’t Stay Tucked In
When the final flaps refuse to stay securely tucked, it often means the creases along the top edge of the box aren’t firm enough, or the paper is too thick and springy.
Press down very firmly on the top edges of the box after tucking the flaps. You can also apply a tiny dot of glue stick to the inside of the flap before tucking it in, especially if you’re using heavier cardstock.
The Box Feels Flimsy
A flimsy box is typically a result of using paper that is too thin or not creasing firmly enough throughout the process.
For a sturdier box, opt for heavier paper or cardstock. Also, ensure every single crease, from the first diagonal to the final tuck, is pressed down with consistent, firm pressure. A bone folder is invaluable for this.
Key Takeaways
- Precision in your initial folds is paramount for a well-structured box.
- Consistent, firm creasing with a bone folder or similar tool enhances durability and appearance.
- Careful, accurate cuts are essential for the final assembly of the box walls.
- Practice makes perfect; don’t be discouraged if your first box isn’t flawless.
- Experiment with different paper types and sizes to achieve varied results.
- A handmade paper box is a versatile item, perfect for gifts, organization, or decor.
Frequently Asked Questions
Can I make a lid for this box?
Yes, you can easily make a matching lid. Simply use a piece of square paper that is ever so slightly larger (e.g., 1/8 inch or 3-5mm larger on each side) than the paper you used for the base. Follow the exact same folding steps. This slight size difference will allow the lid to fit snugly over the base.
What kind of paper is best for making paper boxes?
For beginners, regular printer paper is excellent for practice. For finished boxes, cardstock (65-80lb/176-216gsm) works wonderfully, providing good rigidity. Decorative scrapbook paper or origami paper also makes beautiful boxes, but ensure it’s not too thin if you want a sturdy result.
Do I need any special tools?
Technically, you only need square paper. However, a ruler can help ensure your paper is perfectly square. A bone folder is highly recommended for creating crisp, professional-looking creases, which significantly improves the final box’s appearance and stability.
How can I customize my paper box?
Customization is endless! Use patterned paper, stamp designs on plain paper, or decorate it with stickers, ribbon, or embellishments. You can also line the inside with a contrasting paper for an elegant touch. Consider adding a small handle or a tag for gifts.
Our Top Recommended Finds
- Bone Folder: Essential for sharp, professional creases that make your box sturdy and neat.
- Scrapbook Paper Packs: Offer a wide variety of patterns and weights, perfect for decorative boxes.
- Self-Healing Cutting Mat & Craft Knife: Great for precise paper trimming, especially when you need perfectly square sheets.
Fold Your Way to Fantastic Creations
You now have all the knowledge and steps to create your very own paper box. This simple craft is incredibly rewarding, offering a blend of precision and creativity.
Think of all the possibilities: small gift boxes, desktop organizers, or even charming party favors. Each box you make will improve your technique and inspire new ideas.
Don’t just read about it; grab some paper right now and start folding. You’ll be amazed at what you can create with your own hands!
Beginner-friendly templates, step-by-step guides,
and weekly project ideas in your inbox.