🧵 How To Make A Jelly Roll Rugs

Beginner-friendly templates, step-by-step guides,
and weekly project ideas in your inbox.
Creating a jelly roll rug is a truly rewarding sewing project. It transforms simple fabric strips into a durable and beautiful piece for your home. This guide shares the practical steps I’ve learned from making several of these unique rugs.
You’ll discover how satisfying it is to watch your rug take shape, from a pile of fabric to a functional work of art. Trust this guide to walk you through each stage with clear, actionable advice.
Quick Overview
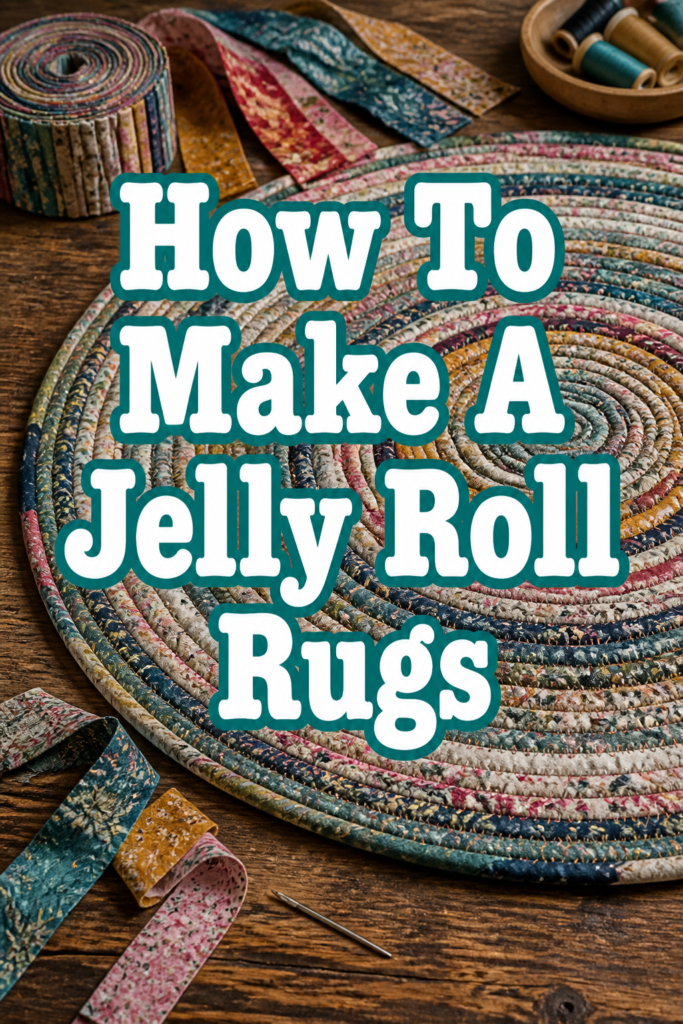
You are about to embark on a creative journey, resulting in a charming, handcrafted rug perfect for any room. This project allows you to showcase beautiful fabrics in a practical way. You’ll create a sturdy, coiled rug that adds warmth and personality to your space.
- Time needed: 8-12 hours (spread over a few sessions)
- Difficulty: Intermediate
- What you’ll need: Jelly roll fabric strips, cotton batting, polyester thread, sewing machine, basic sewing tools.
Step-by-Step Instructions
Step 1: Gather Your Supplies
Before you begin, make sure you have all your materials ready. A well-prepared workspace helps the project flow smoothly. This initial organization saves time and prevents interruptions later on.
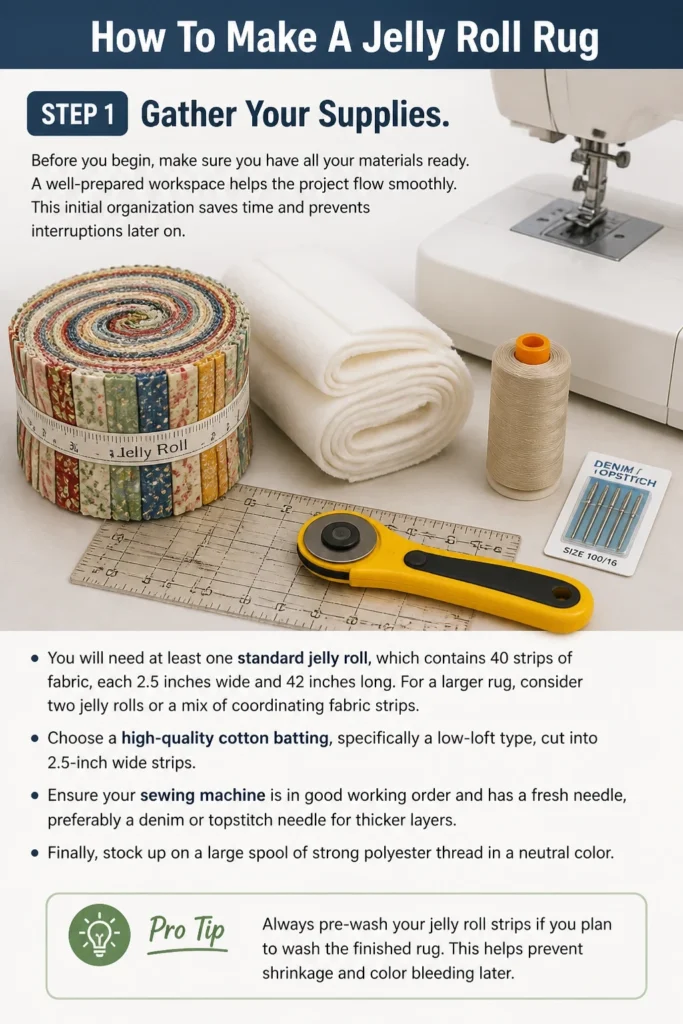
You will need at least one standard jelly roll, which contains 40 strips of fabric, each 2.5 inches wide and 42 inches long. For a larger rug, consider two jelly rolls or a mix of coordinating fabric strips.
Choose a high-quality cotton batting, specifically a low-loft type, cut into 2.5-inch wide strips. Ensure your sewing machine is in good working order and has a fresh needle, preferably a denim or topstitch needle for thicker layers. Finally, stock up on a large spool of strong polyester thread in a neutral color.
Pro Tip: Always pre-wash your jelly roll strips if you plan to wash the finished rug. This prevents any potential shrinking or color bleeding after the rug is made.
Step 2: Prepare the Batting Strips
Your batting needs to be cut into strips that match the width of your jelly roll fabric. You’ll want strips that are exactly 2.5 inches wide. This precision is important for a neat finish.
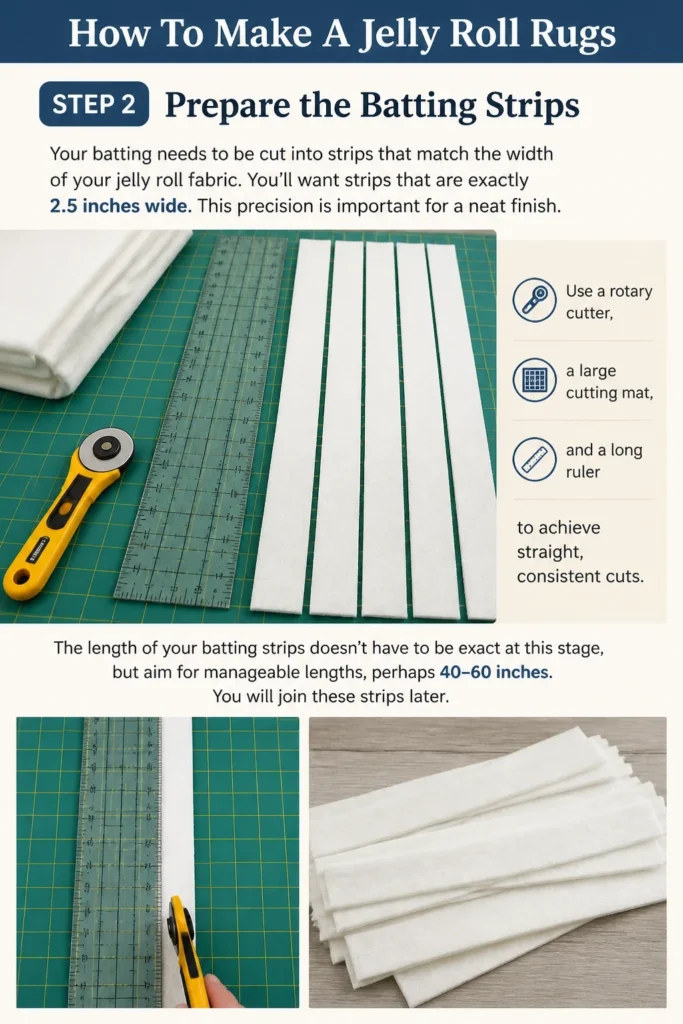
Use a rotary cutter, a large cutting mat, and a long ruler to achieve straight, consistent cuts. The length of your batting strips doesn’t have to be exact at this stage, but aim for manageable lengths, perhaps 40-60 inches. You will join these strips later.
Step 3: Join Jelly Roll Strips
Begin by sewing your jelly roll fabric strips together end-to-end. Take two strips and place them right sides together, perpendicular to each other, forming an ‘L’ shape. Stitch diagonally across the corner from one point to the other.
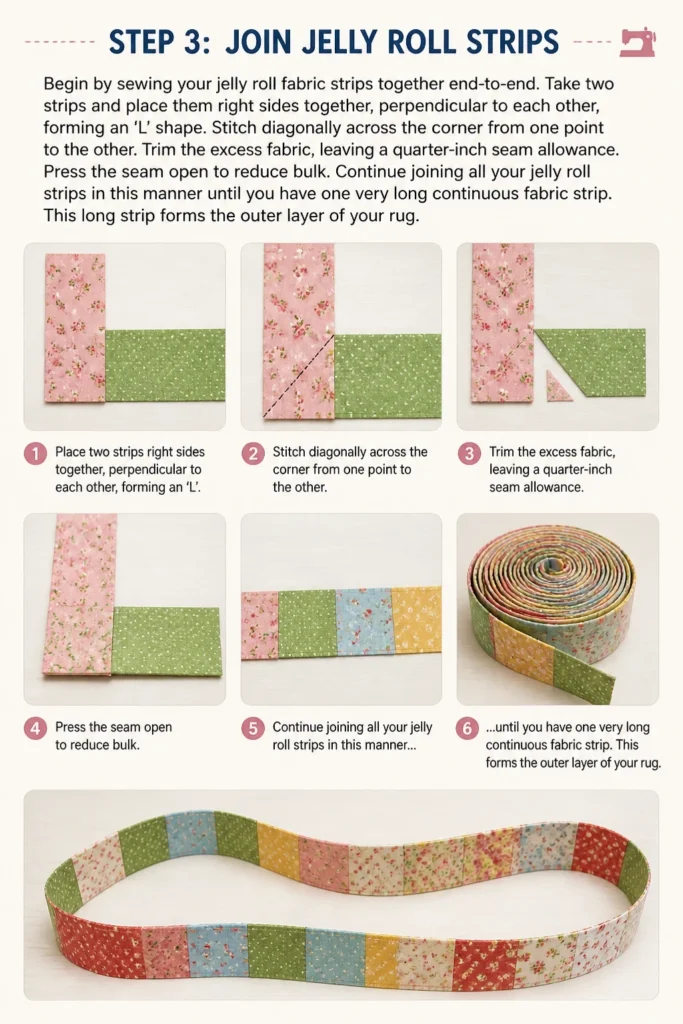
Trim the excess fabric, leaving a quarter-inch seam allowance. Press the seam open to reduce bulk. Continue joining all your jelly roll strips in this manner until you have one very long continuous fabric strip. This long strip forms the outer layer of your rug.
Step 4: Attach Fabric to Batting
Now it’s time to encase the batting within the fabric. Take one end of your long jelly roll fabric strip and one end of a batting strip. Place the batting strip in the center of the wrong side of the fabric strip.
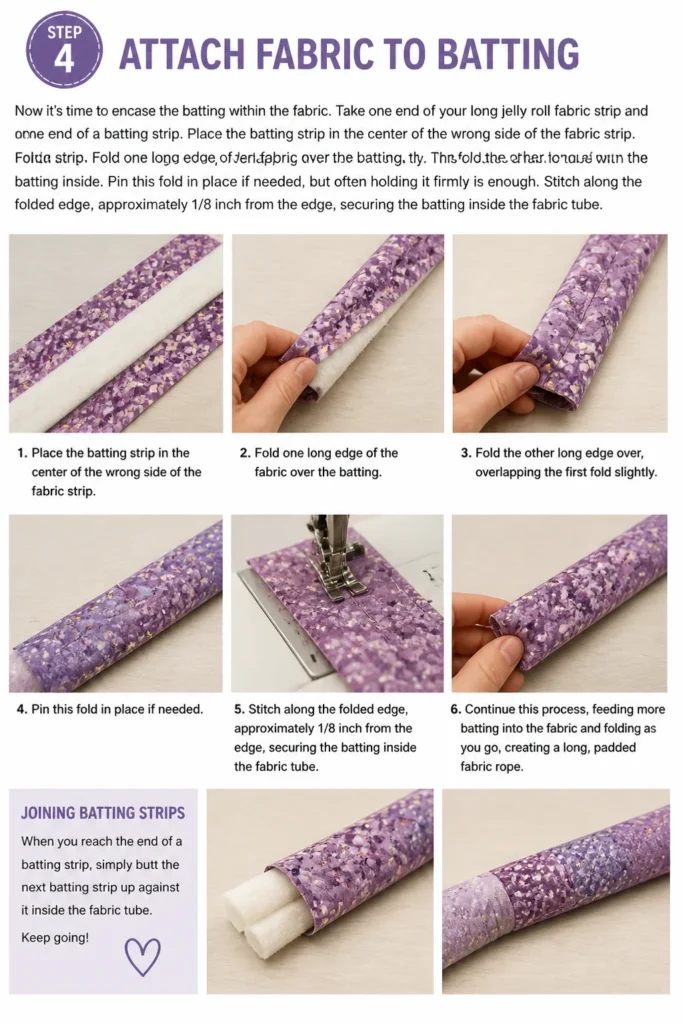
Fold one long edge of the fabric over the batting, then fold the other long edge over, overlapping the first fold slightly. This creates a fabric tube with the batting inside. Pin this fold in place if needed, but often holding it firmly is enough.
Stitch along the folded edge, approximately 1/8 inch from the edge, securing the batting inside the fabric tube. Continue this process, feeding more batting into the fabric and folding as you go, creating a long, padded fabric rope. When you reach the end of a batting strip, simply butt the next batting strip up against it inside the fabric tube and continue sewing.
Pro Tip: Use a walking foot on your sewing machine if you have one. This attachment helps feed the multiple layers of fabric and batting evenly, preventing stretching and puckering.
Step 5: Coil and Sew the Rug Base
With your long padded fabric rope ready, it’s time to start forming the rug. Begin by tightly coiling one end of the rope into a small spiral, forming the center of your rug. Use a few pins to hold this initial coil in place.
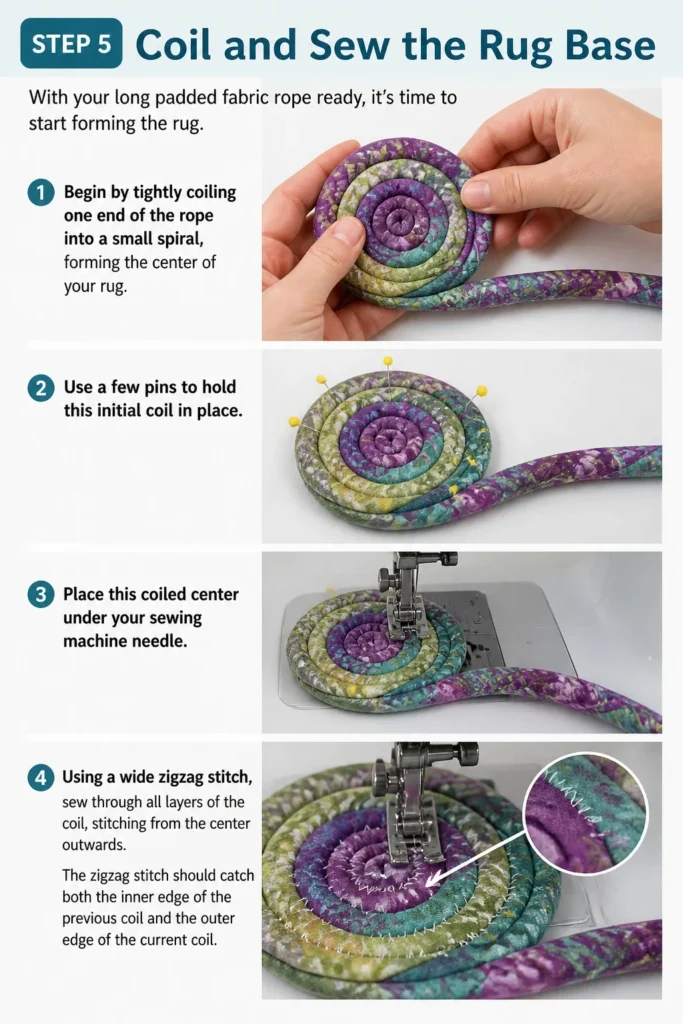
Place this coiled center under your sewing machine needle. Using a wide zigzag stitch, sew through all layers of the coil, stitching from the center outwards. The zigzag stitch should catch both the inner edge of the previous coil and the outer edge of the current coil.
Step 6: Continue Coiling and Sewing
As you sew, slowly and carefully coil the fabric rope around the growing center of the rug. Keep the coils tight and flat against each other. The zigzag stitch will join each new coil to the one beside it.
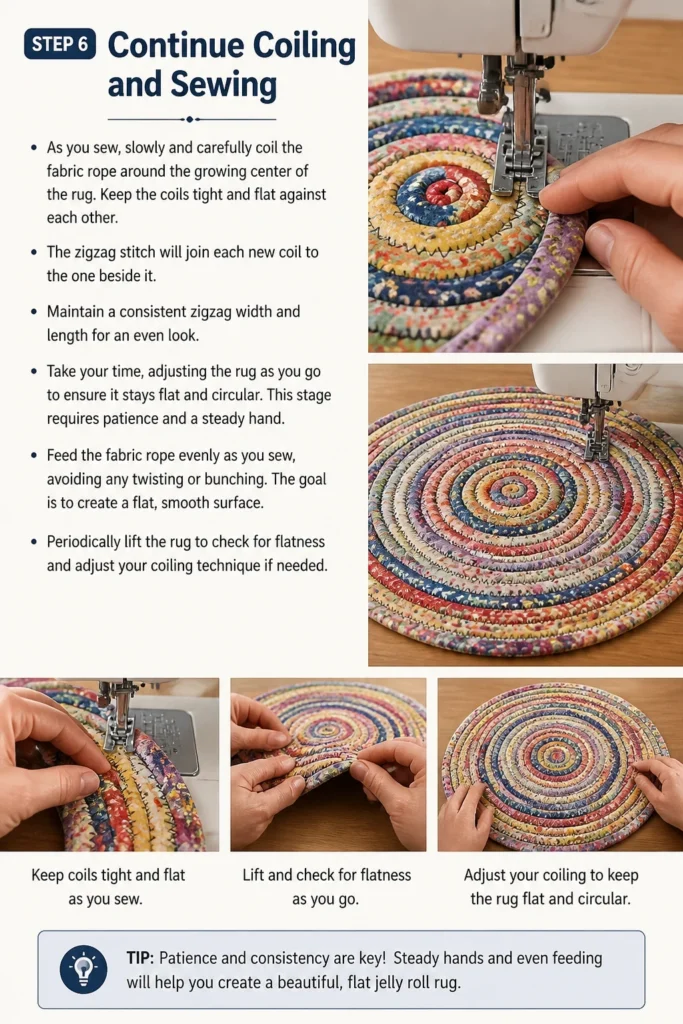
Maintain a consistent zigzag width and length for an even look. Take your time, adjusting the rug as you go to ensure it stays flat and circular. This stage requires patience and a steady hand.
Feed the fabric rope evenly as you sew, avoiding any twisting or bunching. The goal is to create a flat, smooth surface. Periodically lift the rug to check for flatness and adjust your coiling technique if needed.
Step 7: Finish the Rug Edge
Once your rug reaches the desired size, it’s time to finish the outer edge. Continue coiling and sewing until you have about 6-8 inches of your fabric rope remaining. Gently taper the end of the fabric rope by trimming the batting inside.
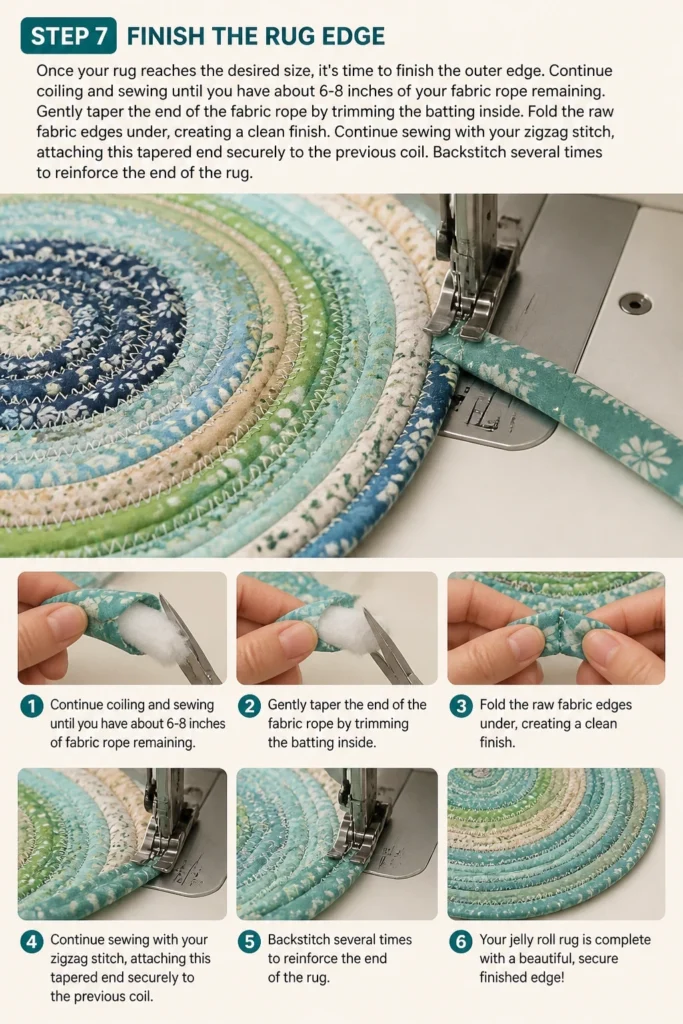
Fold the raw fabric edges under, creating a clean finish. Continue sewing with your zigzag stitch, attaching this tapered end securely to the previous coil. Backstitch several times to reinforce the end of the rug.
Step 8: Final Touches and Enjoy
Inspect your finished rug for any loose threads or skipped stitches. Trim all excess threads close to the fabric. If any areas feel less secure, you can add a few extra zigzag stitches.
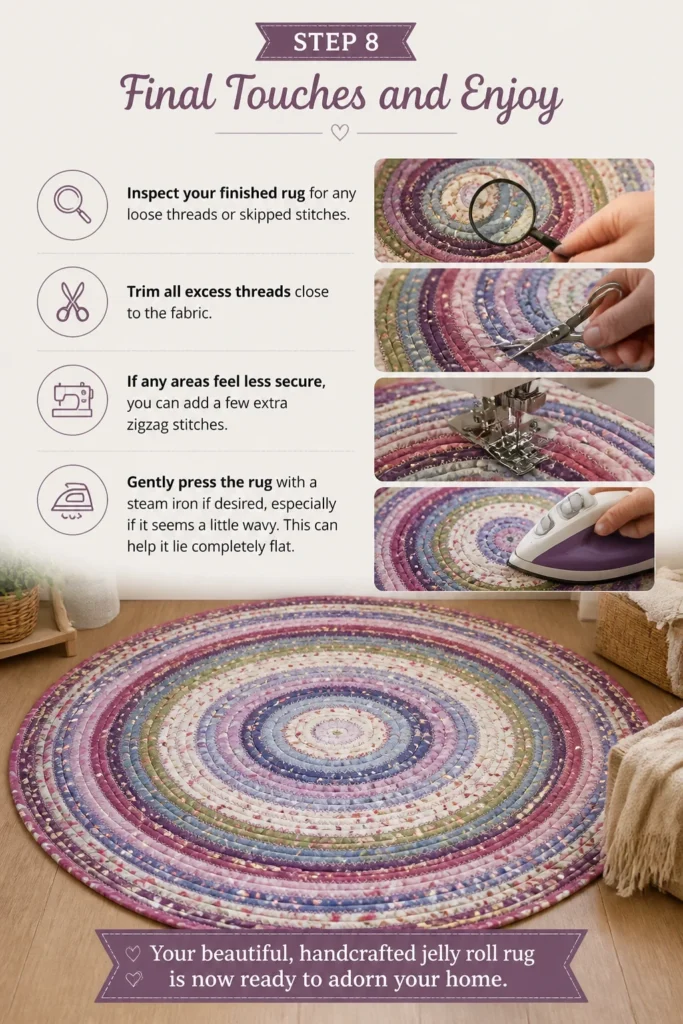
Gently press the rug with a steam iron if desired, especially if it seems a little wavy. This can help it lie completely flat. Your beautiful, handcrafted jelly roll rug is now ready to adorn your home.
Common Mistakes to Avoid
Uneven Fabric Strips
Cutting your fabric or batting strips unevenly can lead to a wavy or lopsided rug. Precision is key in the initial stages. Always use a rotary cutter and a ruler to ensure all strips are exactly 2.5 inches wide, creating a consistent base for your coils.
Skipping Batting Preparation
Some makers might be tempted to use batting that is too thick or not cut into strips. Using the wrong batting, or not cutting it to size, makes the rug difficult to coil and sew. Always use a low-loft cotton batting cut to the same 2.5-inch width as your fabric.
Not Enough Thread or Wrong Type
Running out of thread mid-project is frustrating, and using weak thread can compromise the rug’s durability. Always start with a large spool of good quality, strong polyester thread. Cotton thread can break more easily under the stress of a rug.
Rushing the Coiling Process
Attempting to coil and sew too quickly often results in a rug that isn’t flat or has uneven coils. This project benefits greatly from patience. Take your time with each coil, ensuring it lays flat against the previous one, creating a smooth and even surface.
Troubleshooting
Rug Not Lying Flat
If your rug is not lying flat and appears to be cupping or doming, it’s usually due to inconsistent tension or uneven coiling. When sewing, ensure you are not pulling the current coil too tightly or pushing it too loosely against the previous one. Try to maintain consistent pressure as you guide the rug.
Sometimes, a rug can also cup if the zigzag stitch isn’t wide enough to catch both coils evenly. Check your stitch settings and widen the zigzag slightly if needed. Gently pressing the finished rug with steam can sometimes help flatten minor imperfections.
Stitches Skipping
Skipping stitches indicates a problem with your needle, thread, or machine tension. First, replace your sewing machine needle with a fresh, sharp one, preferably a denim or topstitch needle which is stronger for thick layers. Ensure the needle is inserted correctly.
Check your thread path to make sure the thread is properly seated in all tension discs and guides. Adjusting your upper thread tension slightly might also resolve the issue. If problems persist, clean the bobbin area of any lint buildup.
Fabric Bunching
Fabric bunching as you sew is often a sign that the layers are not feeding evenly through the machine. This is where a walking foot becomes invaluable. If you don’t have one, try increasing your stitch length slightly.
Ensure you are not pulling or pushing the fabric through the machine too aggressively. Let the machine’s feed dogs do most of the work, gently guiding the rug. Smooth out the fabric rope before it enters the needle area, ensuring the batting is evenly distributed inside.
Key Takeaways
- Preparation is crucial for a successful jelly roll rug; cut all strips accurately.
- Patience yields the best results, especially when coiling and sewing the rug.
- Use quality materials, including strong polyester thread and low-loft cotton batting.
- A walking foot on your sewing machine significantly helps with even feeding.
- Don’t be afraid to experiment with fabric colors and patterns for a unique look.
- Enjoy the process of creating a durable and beautiful handmade item for your home.
Frequently Asked Questions
What size rug will a single jelly roll make?
A single standard jelly roll (40 strips, 2.5″ x 42″) combined with batting typically creates a round rug approximately 20-24 inches in diameter. The exact size can vary slightly depending on how tightly you coil and your seam allowances. For a larger rug, you will need more jelly rolls.
Can I use regular fabric strips instead of a jelly roll?
Absolutely. You can cut your own fabric strips from yardage. Just ensure they are consistently 2.5 inches wide and long enough to be joined into a continuous strip. This allows for even more customization in fabric choice and pattern.
How do I wash a jelly roll rug?
For best results, machine wash your jelly roll rug on a gentle cycle with cold water. Use a mild detergent. You can tumble dry on low heat or air dry flat to maintain its shape. Avoid high heat, which could cause shrinkage or damage.
What kind of batting is best?
A low-loft, 100% cotton batting is ideal for jelly roll rugs. It provides the right amount of softness and structure without being too bulky, making it easier to coil and sew. Avoid high-loft or polyester battings as they can be too puffy or difficult to work with.
Our Top Recommended Finds
- Pellon Flex-Foam Batting: This specific type of batting adds excellent structure and durability, making your rug robust and long-lasting. Its consistent thickness is easy to work with.
- Schmetz Denim Needles (Size 90/14 or 100/16): These needles are designed for sewing through multiple thick layers, preventing skips and breaks. They are essential for smooth rug construction.
- Gutermann Sew-All Polyester Thread (Large Spool): Known for its strength and versatility, this thread holds up well under the stress of a rug. A large spool ensures you won’t run out mid-project.
Stitch Your Way to a Beautiful Home
You’ve now learned all the steps to create a charming jelly roll rug. This project is more than just sewing; it’s about crafting a piece of art that brings warmth and personality to your living space. Each rug tells a story through its fabric choices and the care put into its creation.
Now is the perfect time to gather your supplies and begin your own jelly roll rug adventure. Consider making a smaller one first as practice, then move on to a larger statement piece. You might even find yourself inspired to explore other coiled fabric projects once you master this technique.
Beginner-friendly templates, step-by-step guides,
and weekly project ideas in your inbox.