👕 How To Make A Tank Top Out Of A Tshirt

Beginner-friendly templates, step-by-step guides,
and weekly project ideas in your inbox.
Do you have a stack of old t-shirts gathering dust in your closet?
Perhaps you’re looking for a fun, eco-friendly project to refresh your wardrobe without spending a dime.
I’ve personally transformed countless forgotten tees into stylish, comfortable tank tops, and it’s a remarkably satisfying process that anyone can master.
Quick Overview
This guide will walk you through turning a basic t-shirt into a custom-fit tank top, perfect for layering, workouts, or just lounging.
You’ll learn essential cutting and finishing techniques to achieve a professional-looking result, even if you’re new to DIY fashion.
- Time needed: 30-60 minutes (depending on finishing method)
- Difficulty: Beginner
- What you’ll need: An old t-shirt, sharp scissors, fabric chalk or marker, a ruler, pins, and optionally, a sewing machine or needle and thread.
Step-by-Step Instructions
Step 1: Gather Your Materials and Choose Your T-Shirt
Collect all your tools before you begin. Having everything at hand makes the process smoother and more enjoyable.
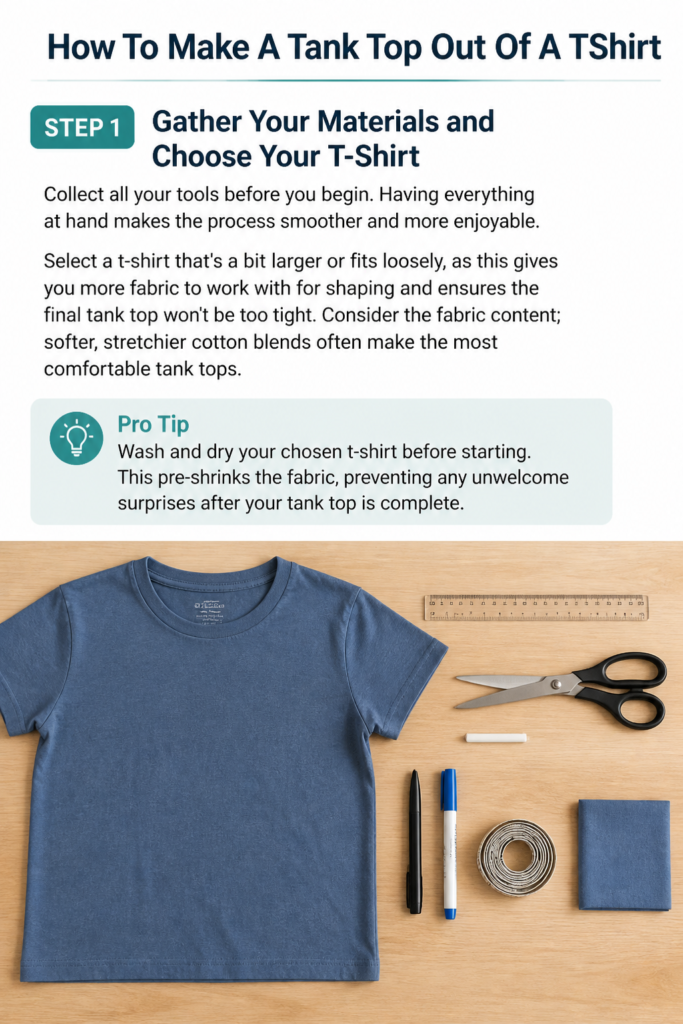
Select a t-shirt that’s a bit larger or fits loosely, as this gives you more fabric to work with for shaping and ensures the final tank top won’t be too tight.
Consider the fabric content; softer, stretchier cotton blends often make the most comfortable tank tops.
Pro Tip: Wash and dry your chosen t-shirt before starting. This pre-shrinks the fabric, preventing any unwelcome surprises after your tank top is complete.
Step 2: Prepare Your Workspace and Lay Out the T-Shirt
Clear a large, flat surface like a table or clean floor. You need ample space to lay your t-shirt out smoothly without wrinkles.
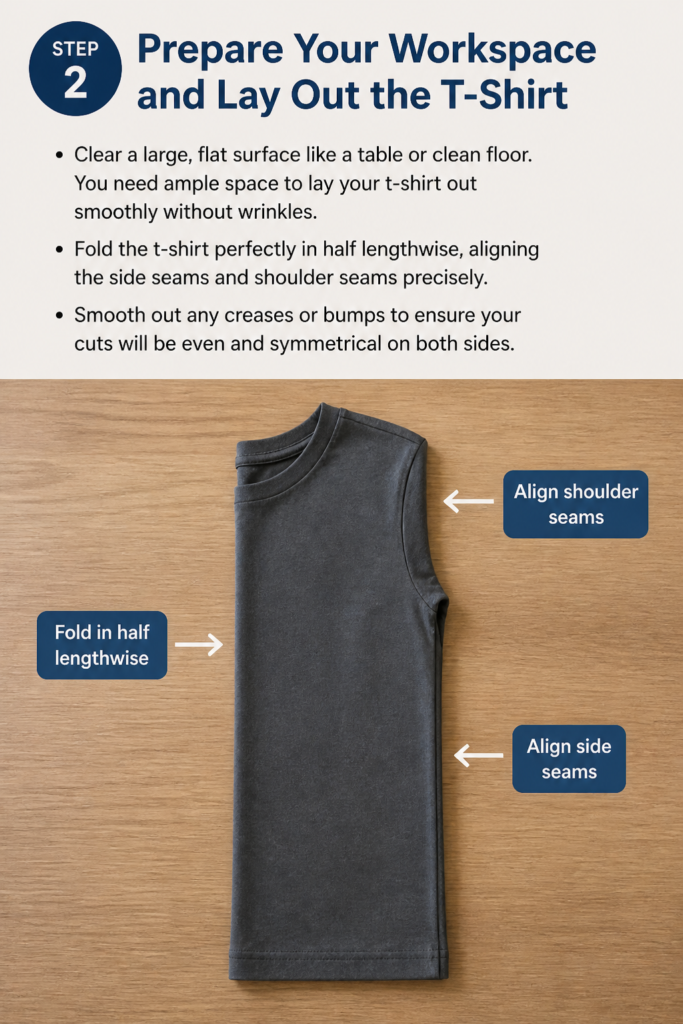
Fold the t-shirt perfectly in half lengthwise, aligning the side seams and shoulder seams precisely.
Smooth out any creases or bumps to ensure your cuts will be even and symmetrical on both sides.
Step 3: Determine Your Desired Tank Top Shape and Fit
Find a tank top you already own and love the fit of. This will serve as your template.
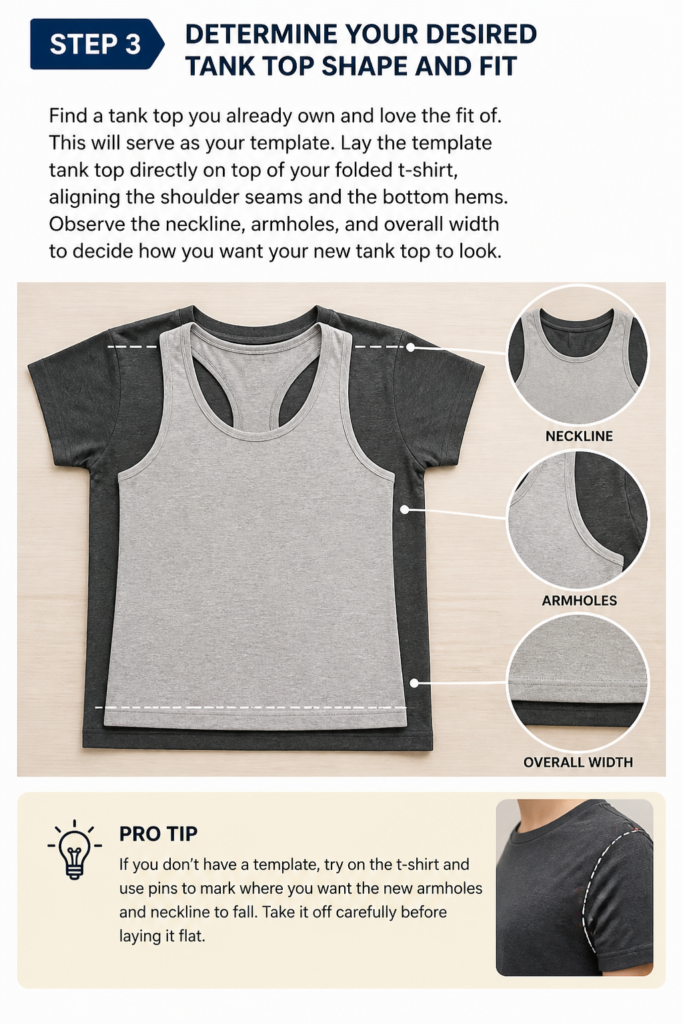
Lay the template tank top directly on top of your folded t-shirt, aligning the shoulder seams and the bottom hems.
Observe the neckline, armholes, and overall width to decide how you want your new tank top to look.
Pro Tip: If you don’t have a template, try on the t-shirt and use pins to mark where you want the new armholes and neckline to fall. Take it off carefully before laying it flat.
Step 4: Mark the New Neckline
Trace around the neckline of your template tank top onto the t-shirt using fabric chalk or a washable marker.
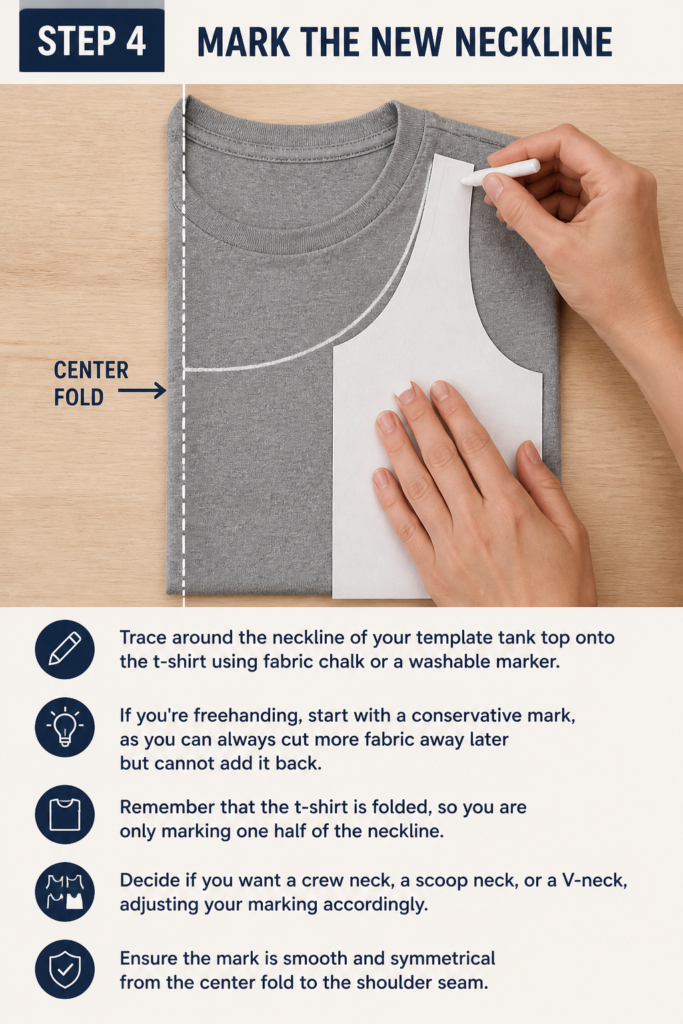
If you’re freehanding, start with a conservative mark, as you can always cut more fabric away later but cannot add it back.
Remember that the t-shirt is folded, so you are only marking one half of the neckline.
Decide if you want a crew neck, a scoop neck, or a V-neck, adjusting your marking accordingly.
Ensure the mark is smooth and symmetrical from the center fold to the shoulder seam.
Step 5: Mark the New Armholes
Draw the armholes next, following the line of your template tank top or your desired shape.
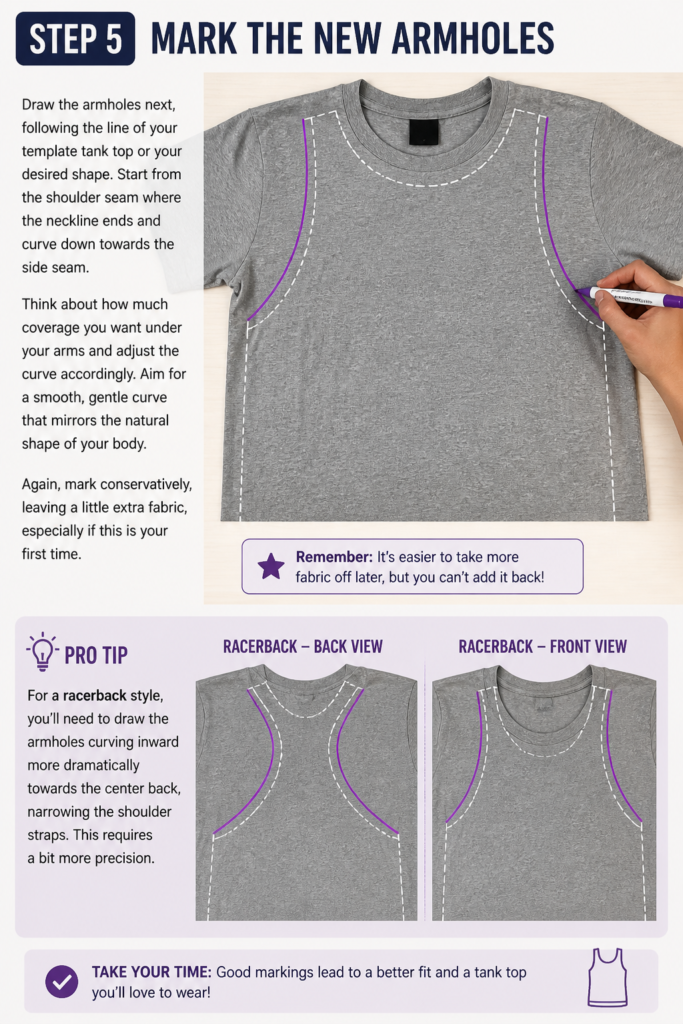
Start from the shoulder seam where the neckline ends and curve down towards the side seam.
Think about how much coverage you want under your arms and adjust the curve accordingly.
Aim for a smooth, gentle curve that mirrors the natural shape of your body.
Again, mark conservatively, leaving a little extra fabric, especially if this is your first time.
Pro Tip: For a racerback style, you’ll need to draw the armholes curving inward more dramatically towards the center back, narrowing the shoulder straps. This requires a bit more precision.
Step 6: Cut Along Your Marked Lines
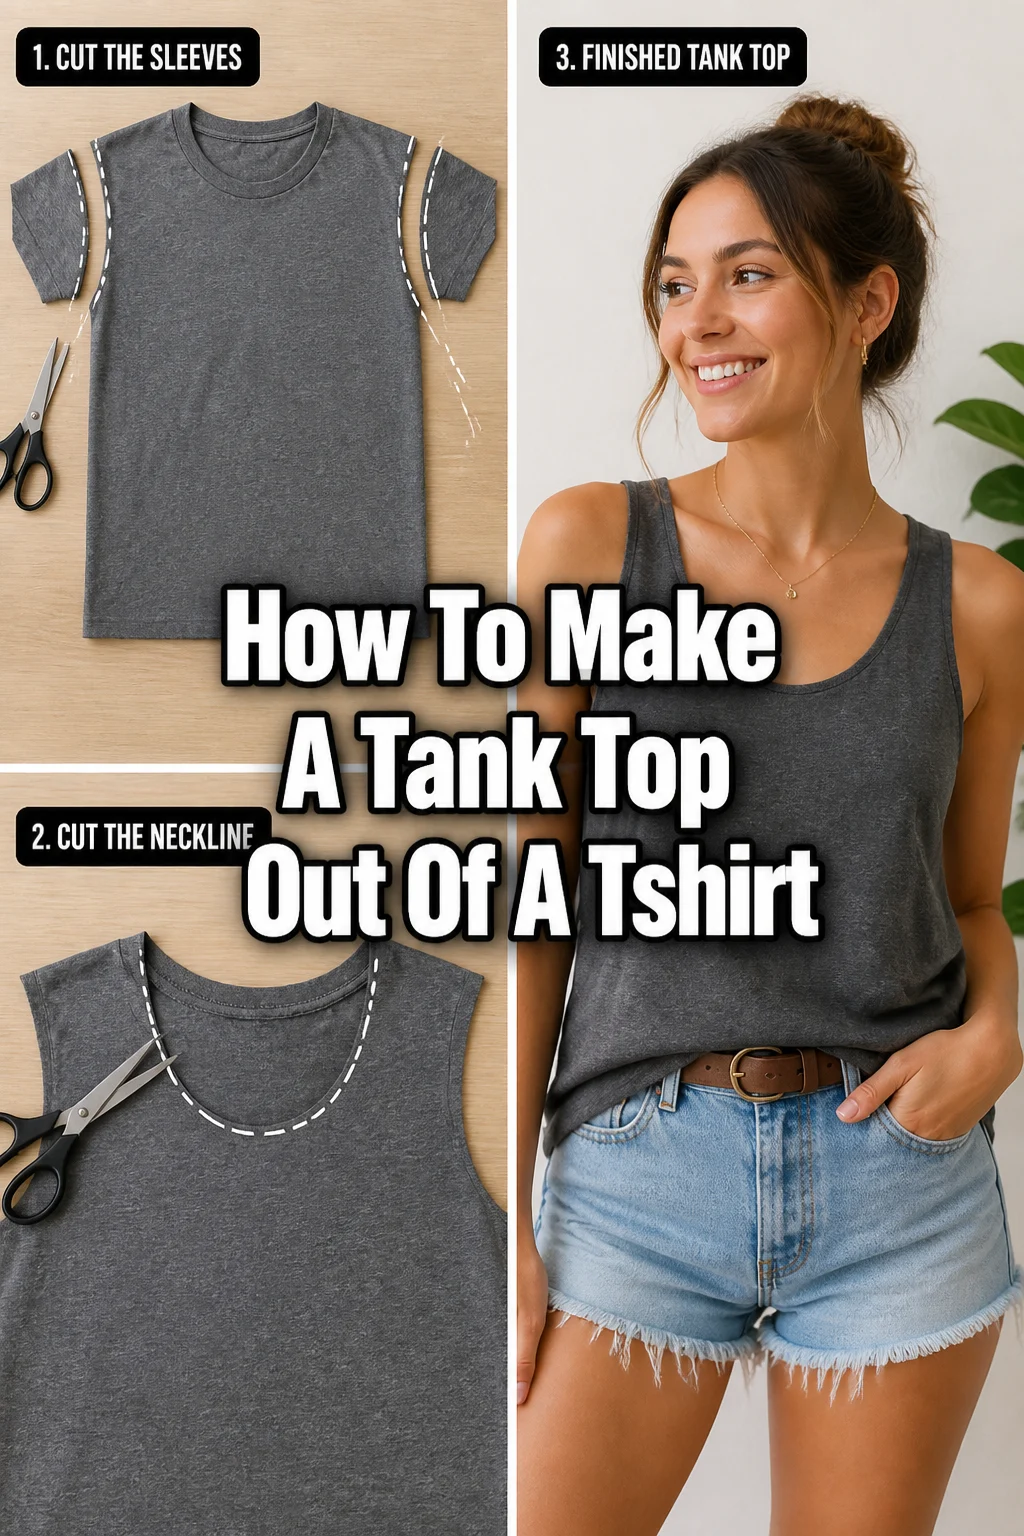
Use sharp fabric scissors to carefully cut along the chalk lines you’ve drawn for both the neckline and the armholes.
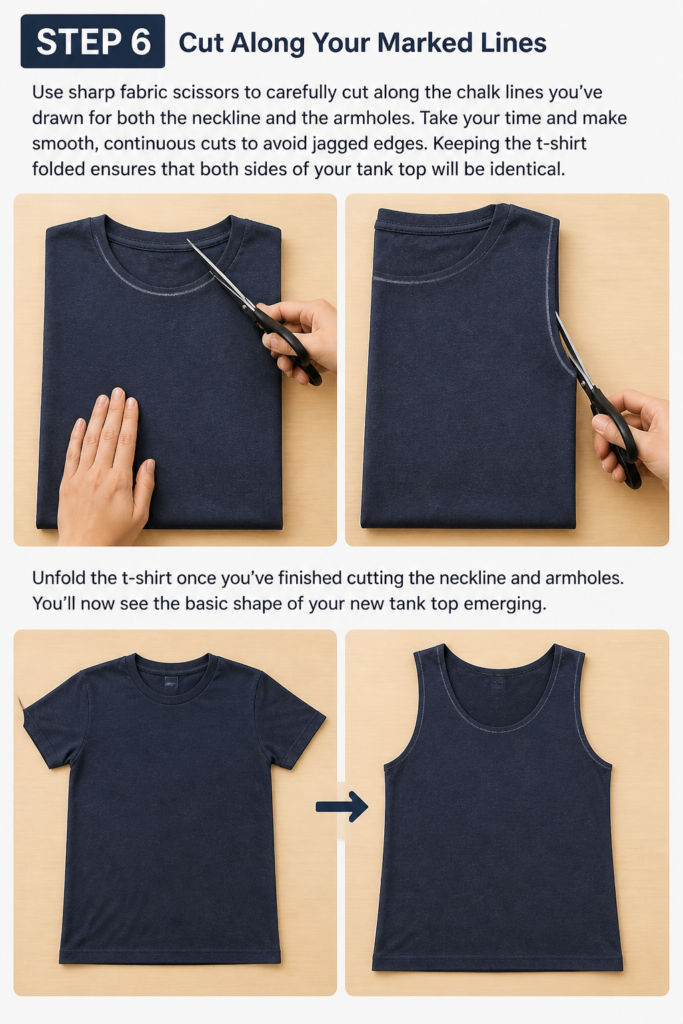
Take your time and make smooth, continuous cuts to avoid jagged edges.
Keeping the t-shirt folded ensures that both sides of your tank top will be identical.
Unfold the t-shirt once you’ve finished cutting the neckline and armholes.
You’ll now see the basic shape of your new tank top emerging.
Step 7: Try It On and Make Adjustments
Slip on your newly cut tank top to check the fit and appearance.
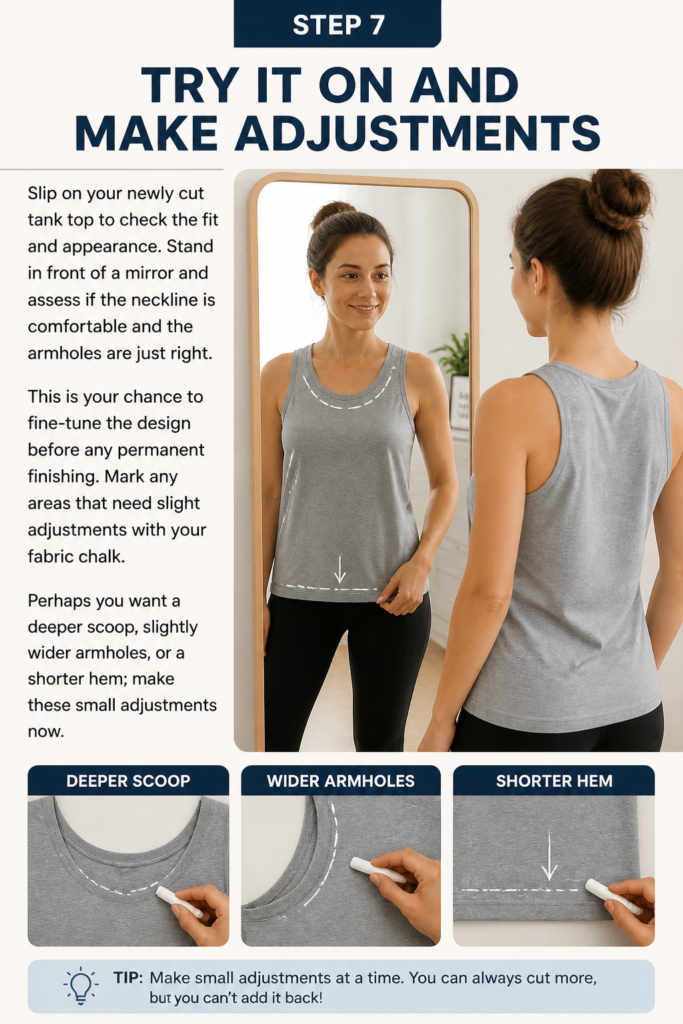
Stand in front of a mirror and assess if the neckline is comfortable and the armholes are just right.
This is your chance to fine-tune the design before any permanent finishing.
Mark any areas that need slight adjustments with your fabric chalk.
Perhaps you want a deeper scoop, slightly wider armholes, or a shorter hem; make these small adjustments now.
Step 8: Finish the Edges (Optional but Recommended)
Decide how you want to finish the raw edges of your new tank top. Leaving them raw creates a casual, rolled-edge look, but they might fray over time.
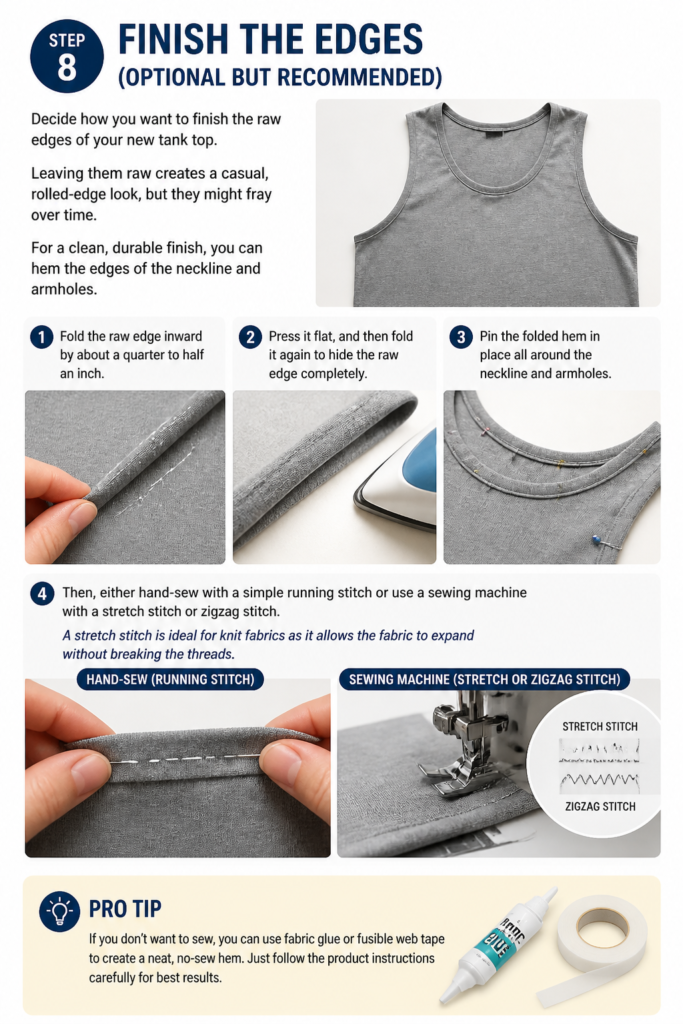
For a clean, durable finish, you can hem the edges of the neckline and armholes.
Fold the raw edge inward by about a quarter to half an inch, press it flat, and then fold it again to hide the raw edge completely.
Pin the folded hem in place all around the neckline and armholes.
Then, either hand-sew with a simple running stitch or use a sewing machine with a stretch stitch or zigzag stitch.
A stretch stitch is ideal for knit fabrics as it allows the fabric to expand without breaking the threads.
Pro Tip: If you don’t want to sew, you can use fabric glue or fusible web tape to create a neat, no-sew hem. Just follow the product instructions carefully for a lasting bond.
Common Mistakes to Avoid
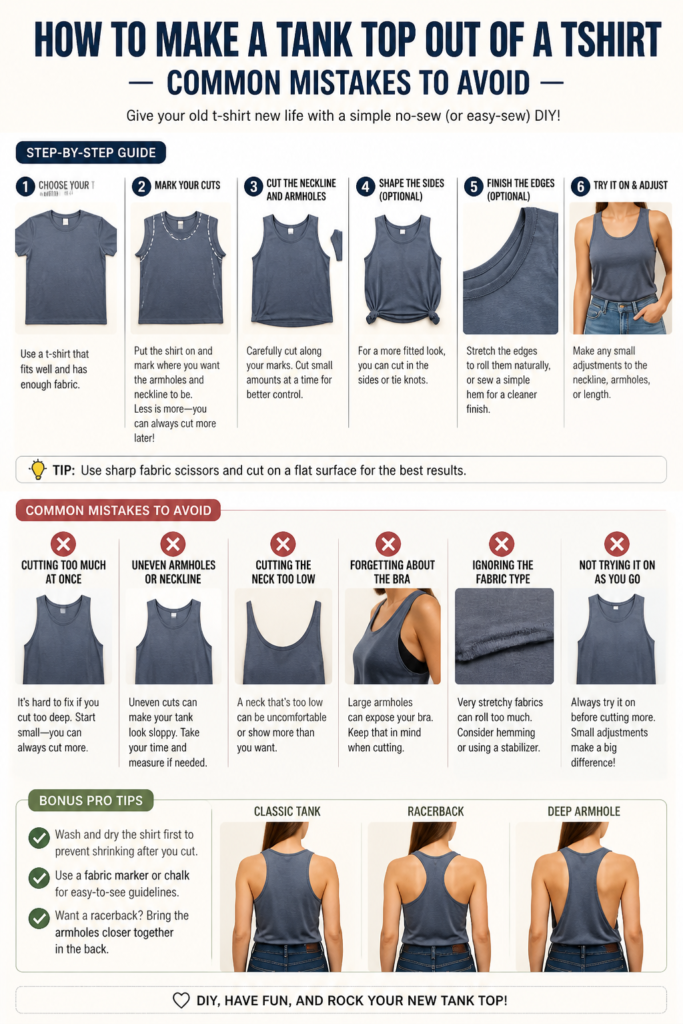
Cutting Too Much Too Soon
Many beginners get excited and cut a large amount of fabric from the neckline or armholes right away. This often results in a tank top that’s too revealing or has armholes that gape uncomfortably.
Always start by cutting conservatively, leaving a little extra fabric. You can always trim more away later, but you can’t put fabric back once it’s cut.
Not Aligning the T-Shirt Properly
Failing to fold and smooth the t-shirt perfectly symmetrical before marking and cutting is a common pitfall. This leads to uneven necklines and armholes, making one side look different from the other.
Take the extra minute to align all seams and smooth out wrinkles. Use pins along the fold if necessary to keep the layers from shifting while you work.
Using Dull Scissors
Attempting to cut through fabric with dull scissors can lead to ragged, frayed edges that are difficult to hem cleanly. Dull scissors also make the cutting process frustrating and less precise.
Invest in a good pair of sharp fabric scissors. Only use them for fabric to maintain their sharpness, and consider getting them professionally sharpened periodically.
Ignoring Fabric Stretch
T-shirt fabric is usually knit and has stretch. When marking and cutting, if you stretch the fabric, your lines might become distorted, leading to an ill-fitting garment.
Lay the t-shirt flat and relaxed, without stretching it, while marking and cutting. When hemming, use a stretch stitch or zigzag stitch on a sewing machine to allow the hem to stretch with the fabric.
Troubleshooting
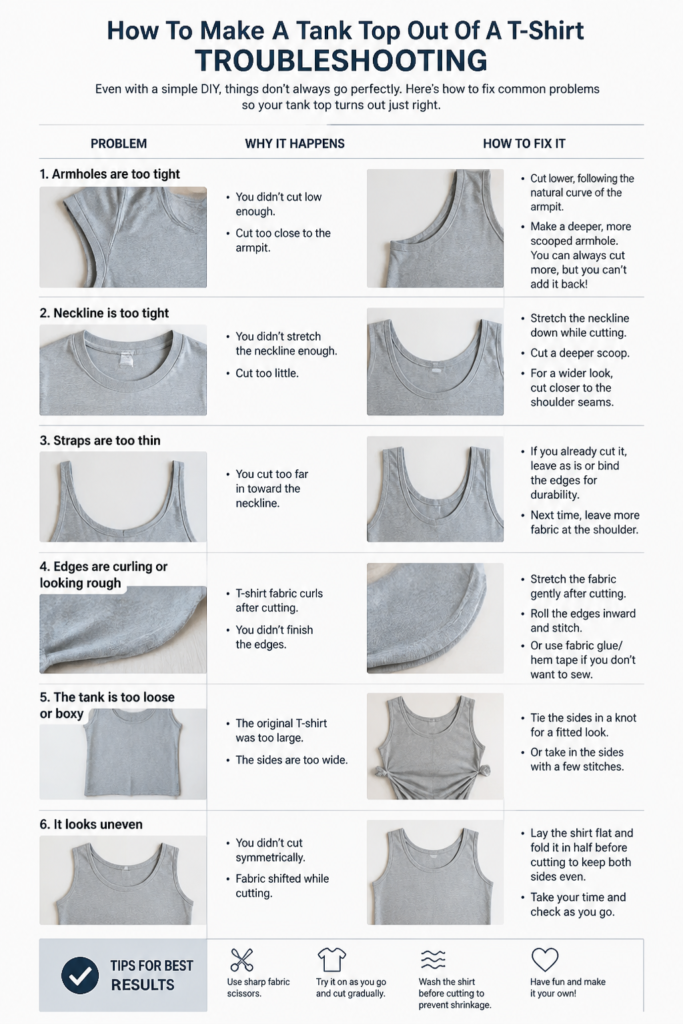
The Neckline or Armholes Look Uneven
If you unfold your t-shirt and notice that your cuts are not perfectly symmetrical, don’t worry. This is a common issue, especially for first-timers.
Refold the tank top carefully, aligning the original seams. Identify the side that is longer or curvier. Use your fabric chalk to mark a new, even line, then trim off the excess very carefully, a tiny bit at a time.
The Armholes Gape Open
Sometimes, the armholes might be cut too wide or too deep, causing them to gape when you wear the tank top. This can be a tricky fix, but it’s not impossible.
You can try taking in the side seams slightly, which will pull the armholes closer to your body. Alternatively, you can add a small dart under the armpit area, folding and sewing a small triangle of fabric to reduce the opening. For a simpler solution, wear a bralette or camisole underneath.
Raw Edges Are Fraying
If you opted for raw edges but find they’re fraying more than you like after a wash, you still have options. The natural curl of knit fabric often minimizes fraying, but some fabrics are more prone to it.
You can go back and hem the edges as described in Step 8, either by hand or machine. If you want to maintain the raw look, a thin line of fabric glue along the inside edge can help prevent further fraying without being visible.
Key Takeaways
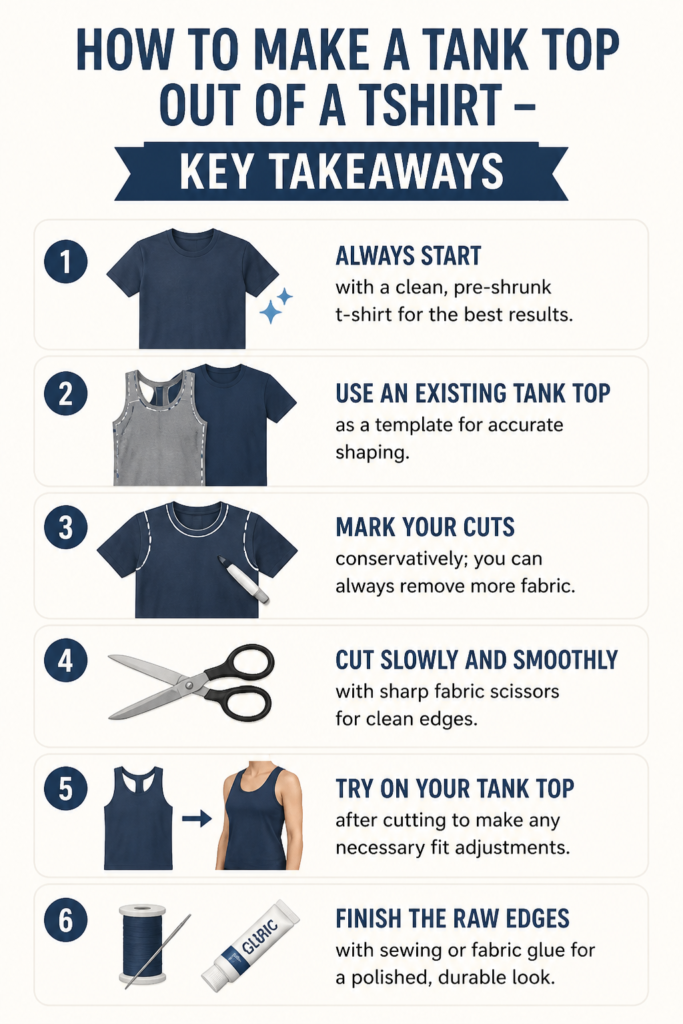
- Always start with a clean, pre-shrunk t-shirt for the best results.
- Use an existing tank top as a template for accurate shaping.
- Mark your cuts conservatively; you can always remove more fabric.
- Cut slowly and smoothly with sharp fabric scissors for clean edges.
- Try on your tank top after cutting to make any necessary fit adjustments.
- Finish the raw edges with sewing or fabric glue for a polished, durable look.
Frequently Asked Questions
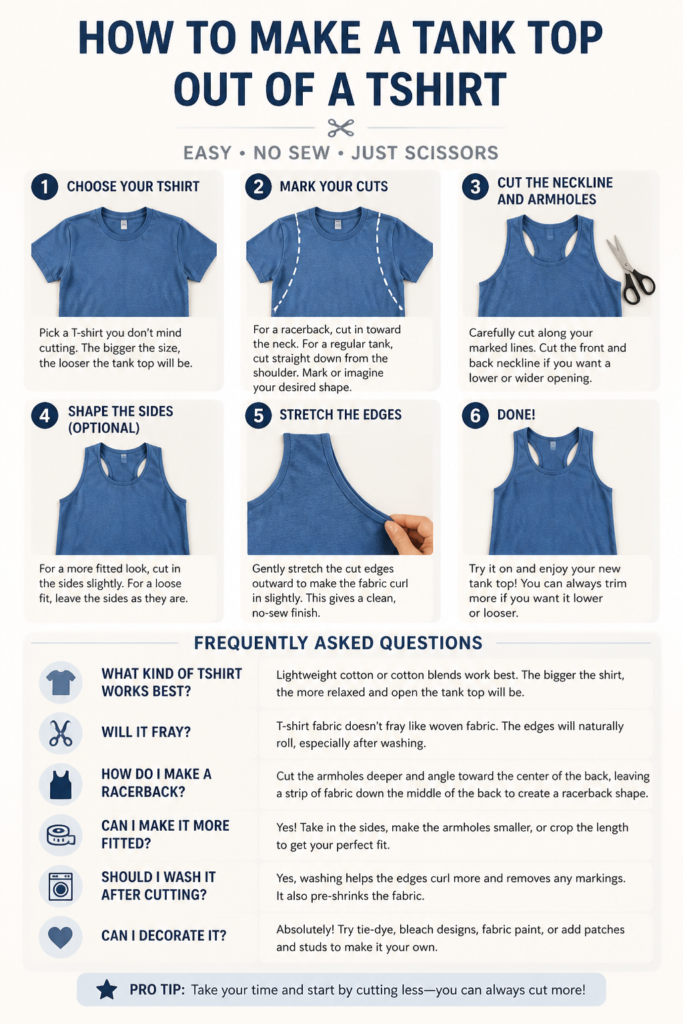
Can I make a tank top from any t-shirt?
While you can theoretically use any t-shirt, those made from softer, stretchier knit fabrics like cotton or cotton blends work best. Stiffer fabrics might not drape as nicely and could feel less comfortable as a tank top. A t-shirt that’s a bit oversized will also give you more flexibility in shaping.
Do I have to sew the edges?
No, sewing the edges is optional. Many people prefer the raw, rolled-edge look that knit fabrics naturally create. However, sewing or using fabric glue will provide a more durable and finished appearance, preventing excessive fraying over time. It depends on the aesthetic you’re aiming for.
What if I don’t have a sewing machine?
No sewing machine? No problem! You can easily hand-sew a simple hem using a needle and thread. A basic running stitch or whipstitch will work perfectly. Alternatively, fabric glue or fusible web tape offers a completely no-sew solution for neat, finished edges.
How can I make a racerback tank top?
To create a racerback, when marking your armholes, draw the lines curving more dramatically inward towards the center back of the t-shirt. This will narrow the shoulder straps significantly and create the signature Y-shape in the back. Make sure to keep the curve smooth and symmetrical for a balanced look.
Our Top Recommended Finds
- Sharp Fabric Scissors: Essential for clean, precise cuts that won’t fray your fabric.
- Fabric Chalk or Washable Marker: Allows you to mark your cutting lines clearly and accurately without leaving permanent traces.
- Good Quality Pins: Helpful for holding your template in place or securing hems before sewing.
Transform Your Wardrobe, One Tee at a Time
Turning an old t-shirt into a custom tank top is more than just a craft project; it’s a step towards sustainable fashion and personal expression.
You’ve got all the knowledge and steps now to breathe new life into your forgotten garments.
Grab that t-shirt you’ve been meaning to get rid of and start creating your next favorite piece today!
Beginner-friendly templates, step-by-step guides,
and weekly project ideas in your inbox.