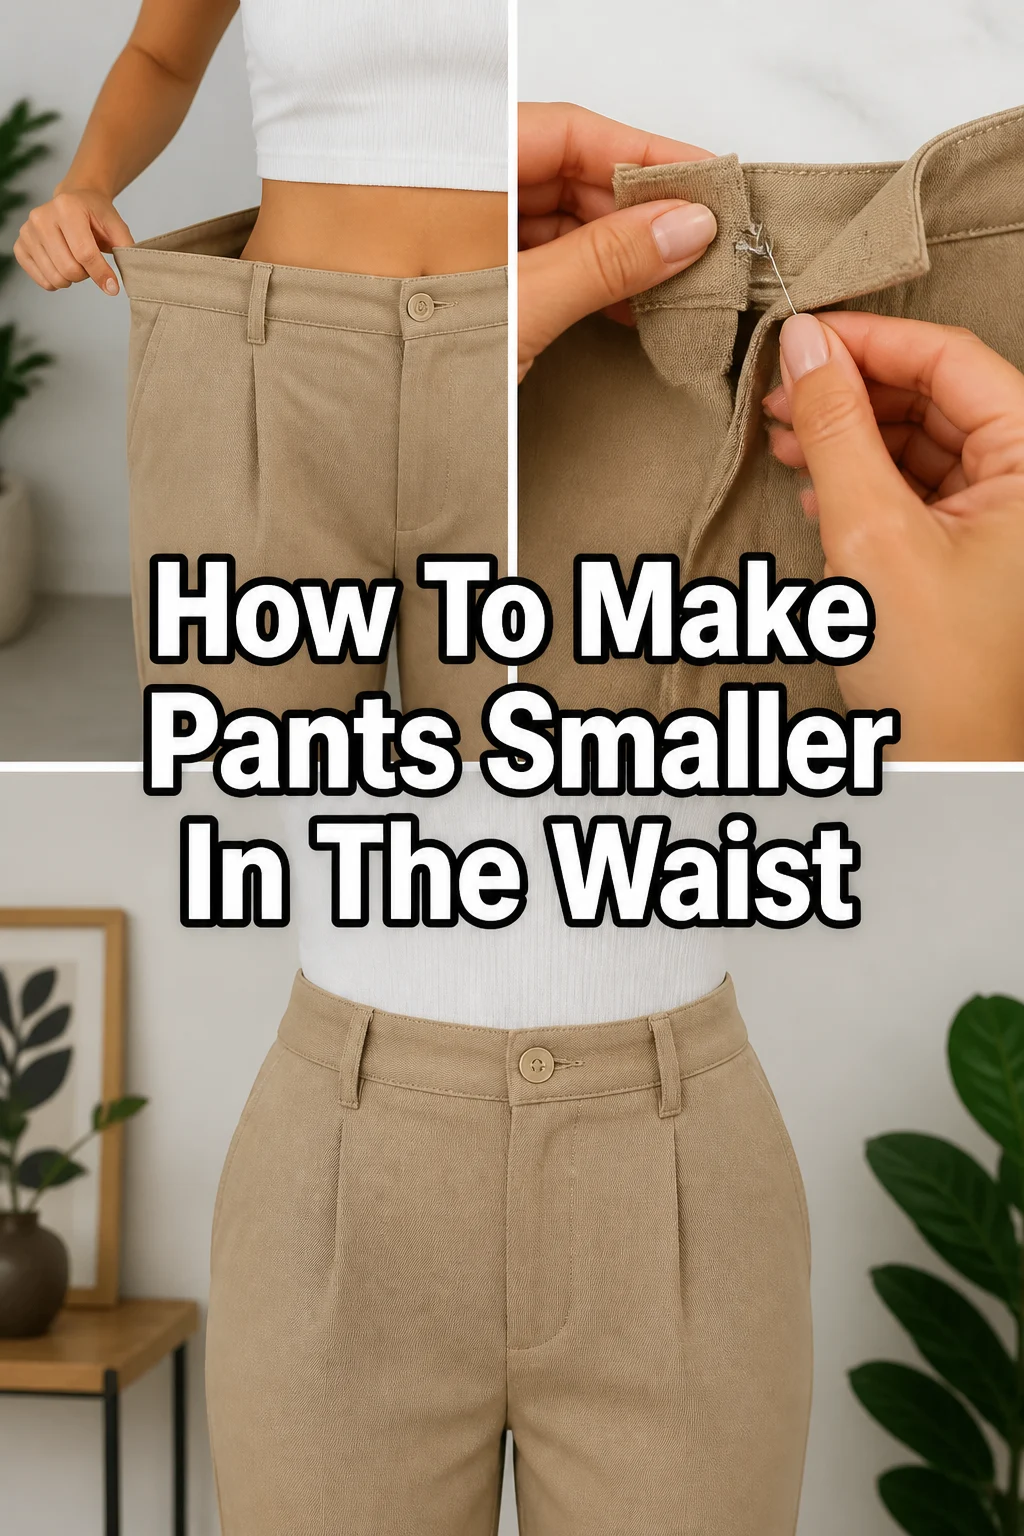
👖 How To Make Pants Smaller In The Waist

Beginner-friendly templates, step-by-step guides,
and weekly project ideas in your inbox.
Ever found a perfect pair of pants, only to discover the waist gapes awkwardly? It’s a common fit issue many people face. I’ve been there, staring at a pair of otherwise great trousers, wishing they fit just right.
Learning to adjust the waistband yourself is incredibly satisfying. This guide will walk you through the process, making sure your pants fit perfectly without a trip to the tailor. You can achieve a custom fit with just a few tools and some patience.

Quick Overview
This guide will show you how to reduce the waist size of your pants. You’ll learn to measure, mark, and stitch for a snug, comfortable fit. We’ll cover common techniques to get professional-looking results at home.
- Time needed: 1-3 hours (depending on experience and method)
- Difficulty: Intermediate
- What you’ll need: Sewing machine (optional, but recommended), thread, pins, fabric chalk, seam ripper, measuring tape, iron, scissors.
Step-by-Step Instructions
Step 1: Try On and Measure the Excess
Put on the pants you want to alter. Fasten them as usual, even if they’re loose. Use your fingers to pinch the excess fabric at the back of the waistband.
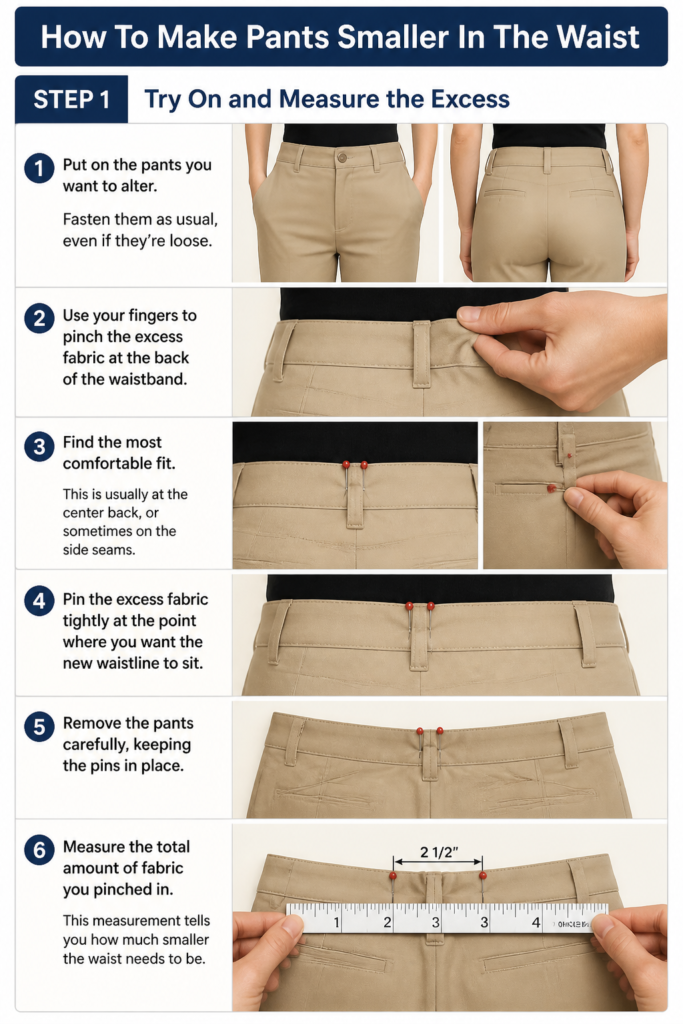
Find the most comfortable fit. This is usually at the center back, or sometimes on the side seams. Pin the excess fabric tightly at the point where you want the new waistline to sit.
Remove the pants carefully, keeping the pins in place. Measure the total amount of fabric you pinched in. This measurement tells you how much smaller the waist needs to be.
Step 2: Choose Your Alteration Method
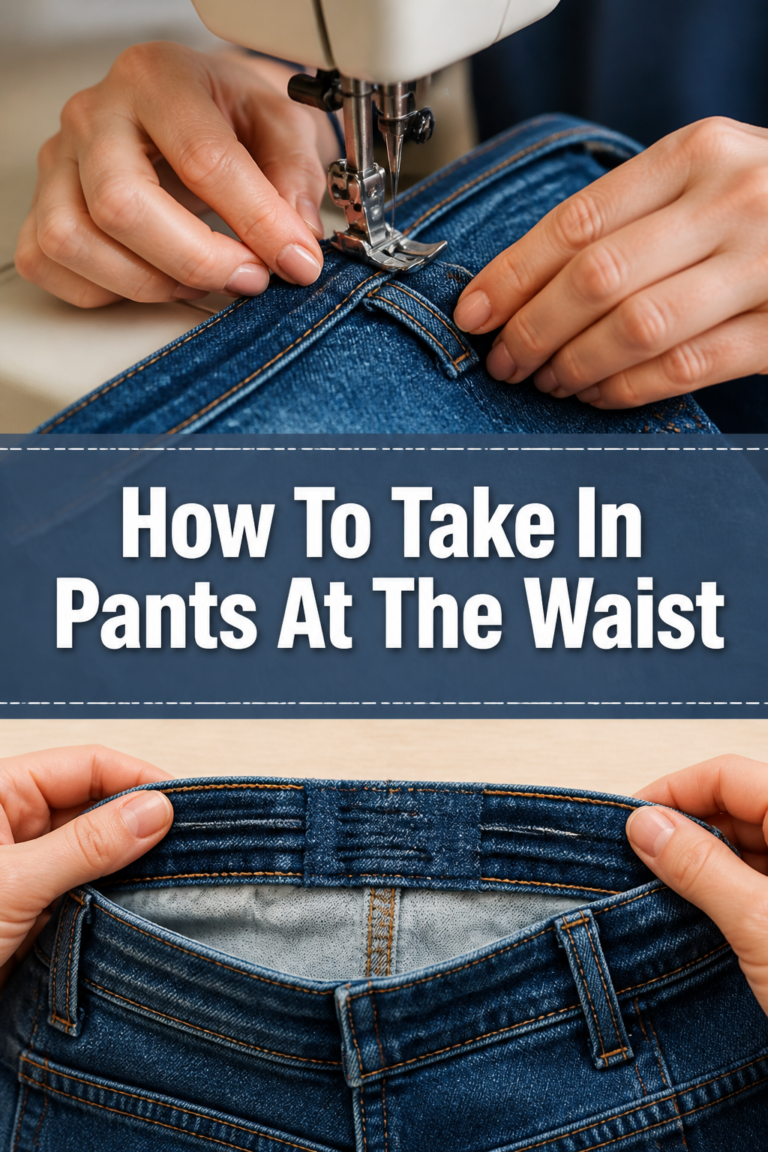
There are a few ways to make a waistband smaller. The most common methods involve creating darts or taking in the center back seam. Darts are triangular folds of fabric sewn into the garment.
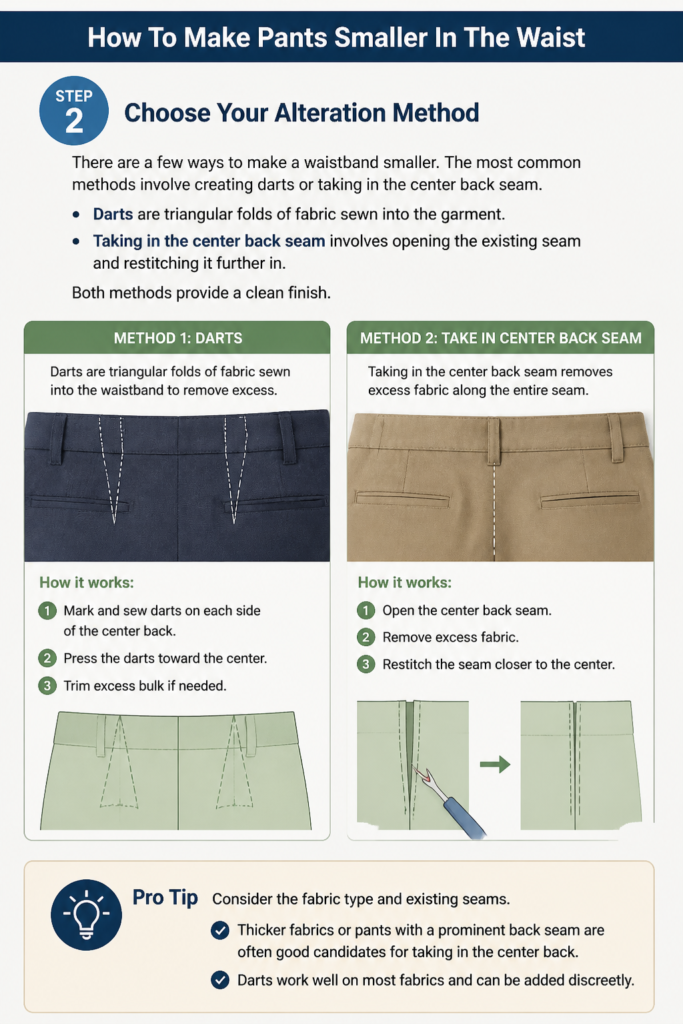
Taking in the center back seam involves opening the existing seam and restitching it further in. Both methods provide a clean finish. For beginners, darts can often be simpler, especially if the waistband is simple.
Pro Tip: Consider the fabric type and existing seams. Thicker fabrics or pants with a prominent back seam are often good candidates for taking in the center back. Darts work well on most fabrics and can be added discreetly.
Step 3: Prepare the Pants for Alteration
Lay your pants flat on a clean, well-lit surface. If you’re adding darts, locate where you want them. Typically, two darts are placed symmetrically on either side of the center back.
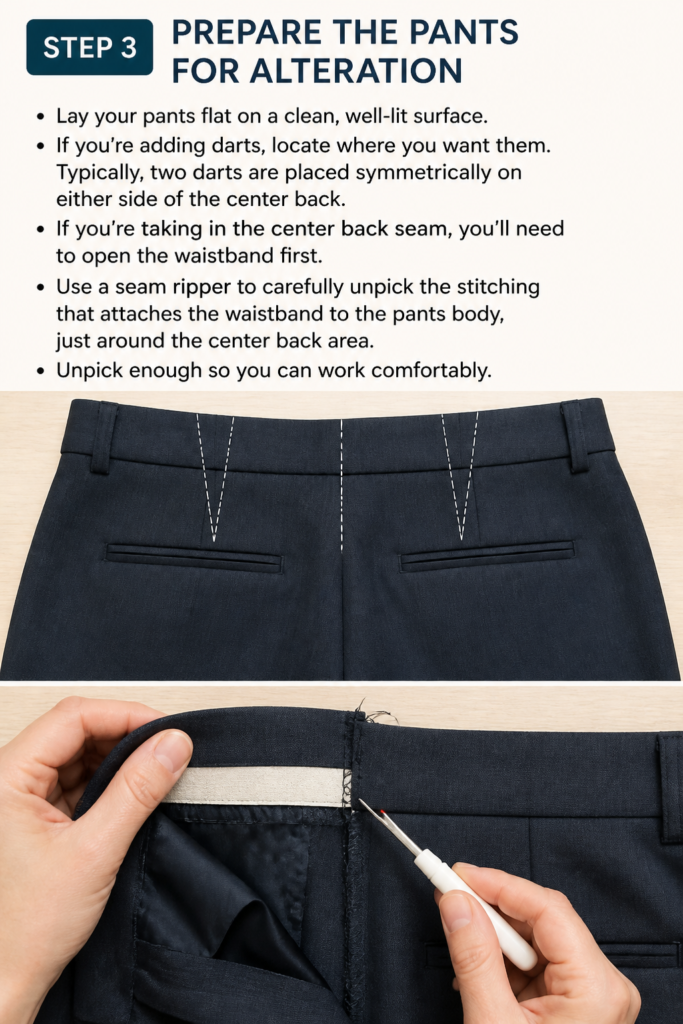
If you’re taking in the center back seam, you’ll need to open the waistband first. Use a seam ripper to carefully unpick the stitching that attaches the waistband to the pants body, just around the center back area. Unpick enough so you can work comfortably.
Step 4: Mark Your Alteration Lines
For darts: Divide the total excess measurement by the number of darts you’re making (e.g., if you have 2 inches of excess and want two darts, each dart will take in 1 inch). Mark the top edge of the waistband with chalk, centering each dart. The dart will be widest at the top and taper to a point.
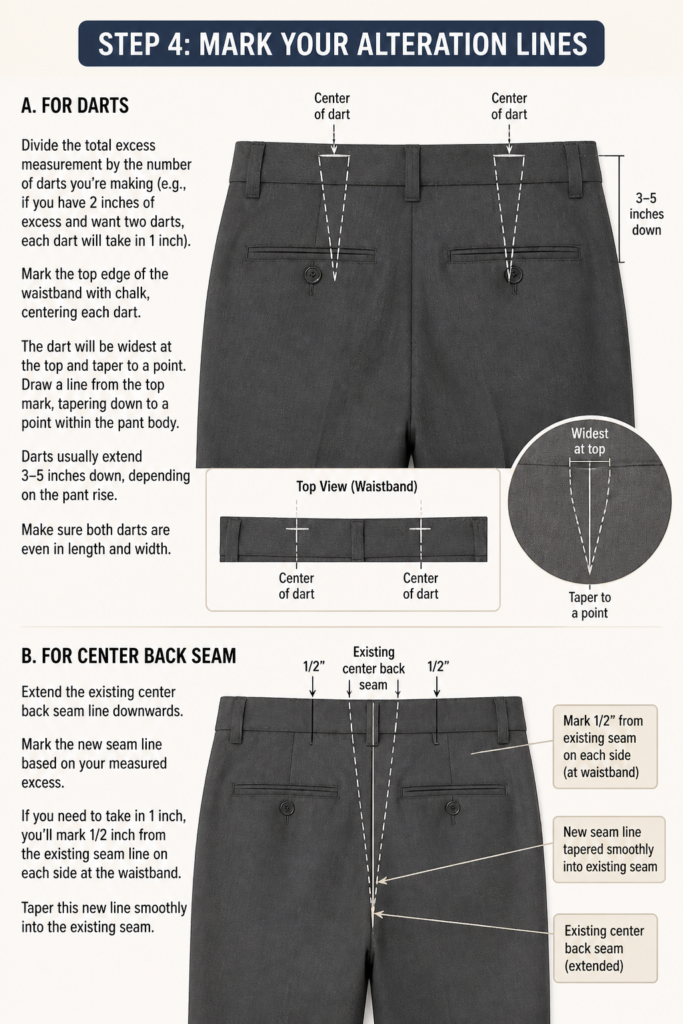
Draw a line from the top mark, tapering down to a point within the pant body. Darts usually extend 3-5 inches down, depending on the pant rise. Make sure both darts are even in length and width.
For the center back seam: Extend the existing center back seam line downwards. Mark the new seam line based on your measured excess. If you need to take in 1 inch, you’ll mark 1/2 inch from the existing seam line on each side at the waistband. Taper this new line smoothly into the existing seam below the waistband.
Step 5: Stitch Your Alterations
If you’re sewing darts: Fold the fabric along your chalk line, right sides together. Pin the dart in place. Stitch from the widest point at the waistband, smoothly tapering to the point.
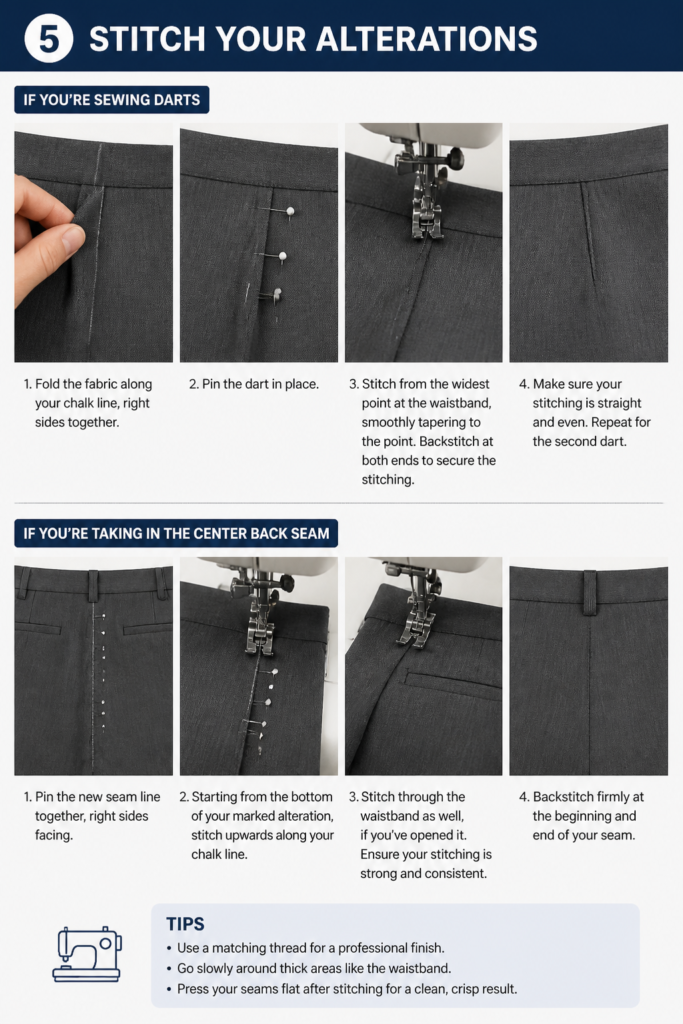
Backstitch at both ends to secure the stitching. Make sure your stitching is straight and even. Repeat for the second dart.
If you’re taking in the center back seam: Pin the new seam line together, right sides facing. Starting from the bottom of your marked alteration, stitch upwards along your chalk line. Stitch through the waistband as well, if you’ve opened it.
Ensure your stitching is strong and consistent. Backstitch firmly at the beginning and end of your seam.
Step 6: Finish the Seams and Press
Once your alteration is stitched, trim any excess fabric if you took in a seam. Leave about a 1/2 inch seam allowance. Press the new seam open or to one side with an iron.
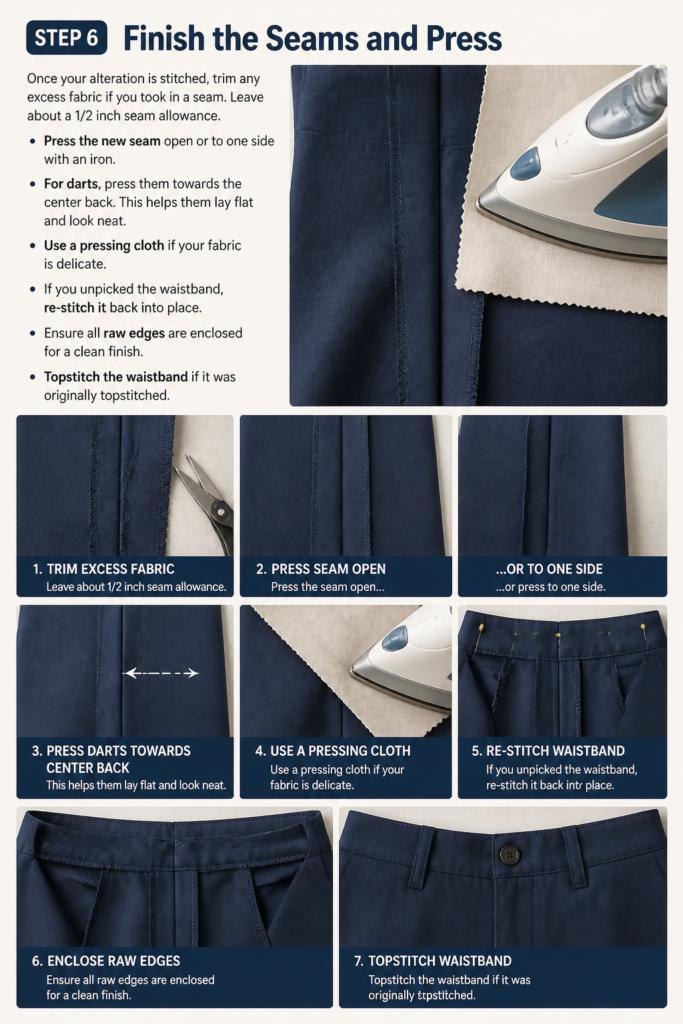
For darts, press them towards the center back. This helps them lay flat and look neat. Use a pressing cloth if your fabric is delicate.
If you unpicked the waistband, re-stitch it back into place. Ensure all raw edges are enclosed for a clean finish. Topstitch the waistband if it was originally topstitched.
Step 7: Test the Fit
Try on your pants to check the new fit. They should now feel snug and comfortable around the waist. If they’re still a little loose, you can make minor adjustments.
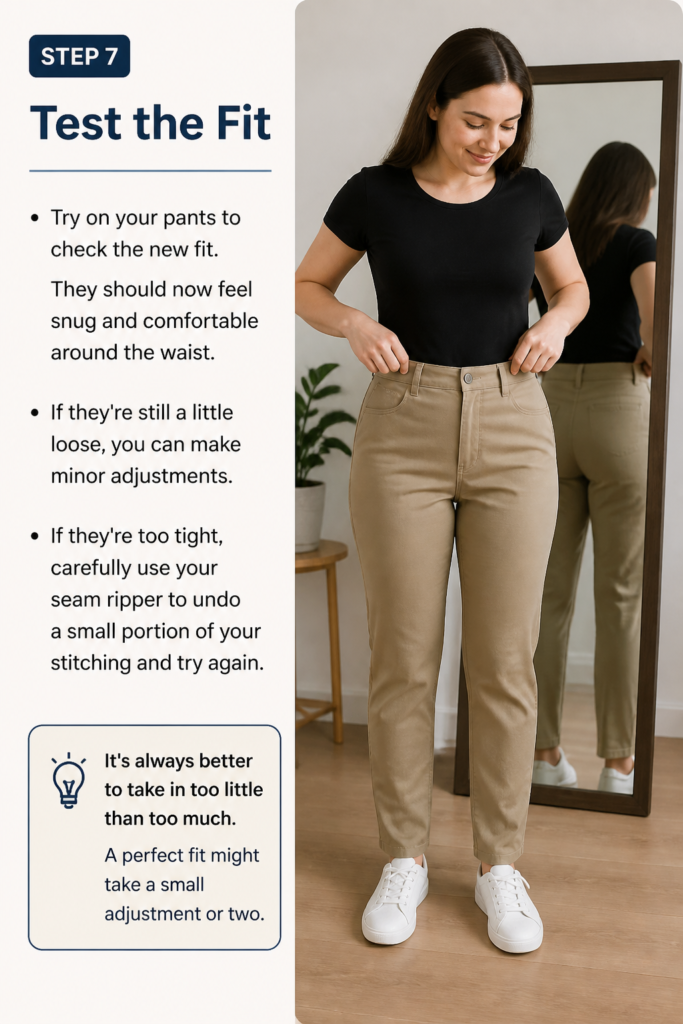
If they’re too tight, carefully use your seam ripper to undo a small portion of your stitching and try again. It’s always better to take in too little than too much. A perfect fit might take a small adjustment or two.
Common Mistakes to Avoid
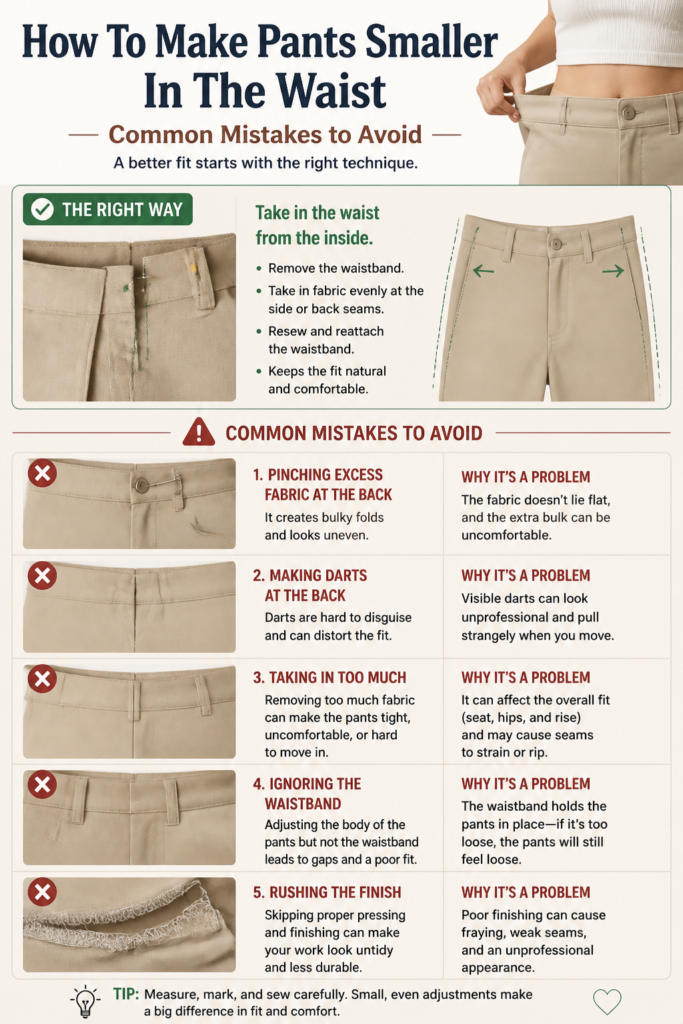
Not Measuring Accurately
Guessing how much to take in is a recipe for disaster. Always try on the pants and use pins to mark the exact amount of excess. A small error in measurement can lead to pants that are either still too loose or too tight. Take your time with this crucial first step.
Uneven Darts or Seams
If your darts are not symmetrical or your new seam line isn’t smooth, the pants will look lopsided. This can create an awkward silhouette. Use a ruler and fabric chalk to draw precise lines. Stitch slowly and steadily, following your marks carefully.
Ignoring Fabric Type
Some fabrics, like stretch denim or very fine silks, require different needles and thread tension. Sewing thick seams on delicate fabric can cause puckering or damage. Always test your stitch on a scrap piece of similar fabric first. Adjust your machine settings as needed for the best results.
Not Pressing Properly
Pressing is a vital step often overlooked by beginners. A well-pressed seam lies flat and gives a professional finish. Without pressing, your alterations can look bulky or amateurish. Always press seams open or to one side, and darts towards the center.
Troubleshooting
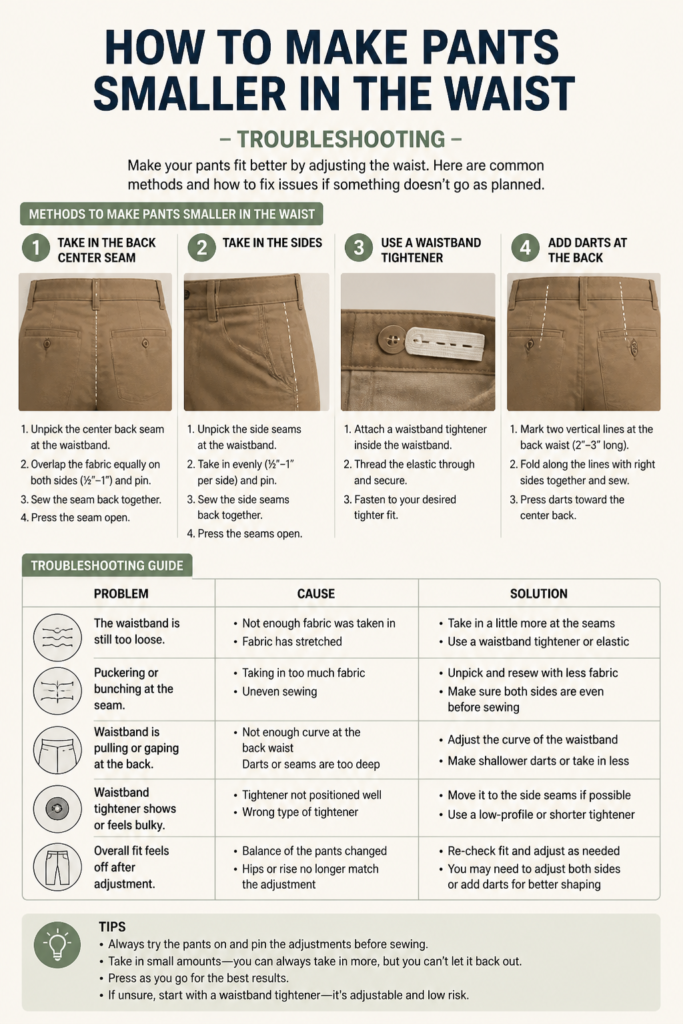
Pants Still Too Loose
If you’ve stitched your alteration and the pants are still a bit loose, don’t worry. You can usually take them in a little more. Carefully unpick your existing stitches. Then, mark a slightly wider dart or a deeper seam allowance. Restitch and test the fit again.
Pants Are Too Tight
This is a common issue when altering clothing. If your pants are now too tight, you’ll need to release some of the stitching. Use your seam ripper to carefully unpick a small portion of the seam or dart. Try them on again, letting out just enough fabric for comfort. Restitch the altered area.
Puckering Along the Seam
Puckering often occurs when the fabric is stretched while sewing or if the tension on your sewing machine is off. Try adjusting your machine’s tension settings. Also, ensure you’re not pulling the fabric through the machine. Let the feed dogs do the work. Using a walking foot can also help with tricky fabrics.
Key Takeaways
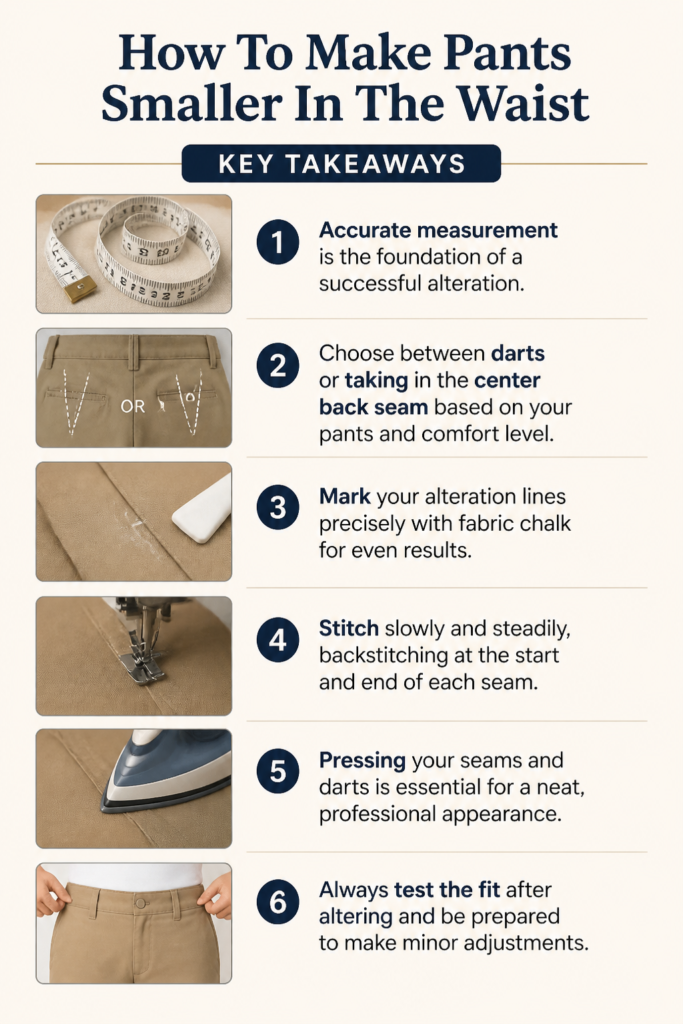
- Accurate measurement is the foundation of a successful alteration.
- Choose between darts or taking in the center back seam based on your pants and comfort level.
- Mark your alteration lines precisely with fabric chalk for even results.
- Stitch slowly and steadily, backstitching at the start and end of each seam.
- Pressing your seams and darts is essential for a neat, professional appearance.
- Always test the fit after altering and be prepared to make minor adjustments.
Frequently Asked Questions
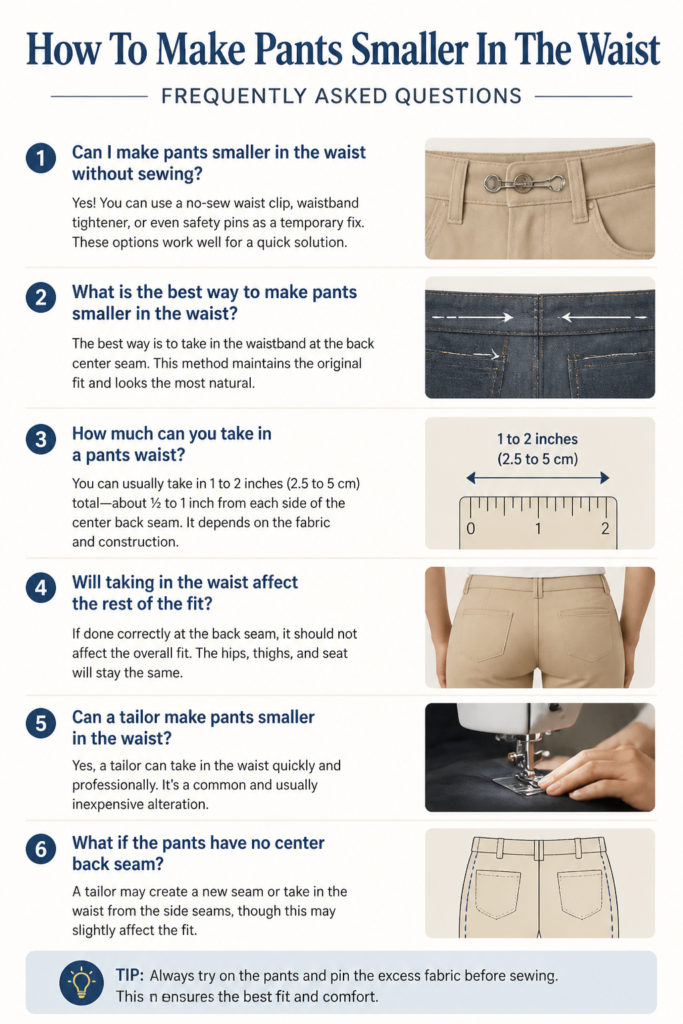
Can I make pants smaller in the waist without a sewing machine?
Yes, you can hand-sew the alterations. It will take more time and require careful, even stitches to achieve a durable finish. Use a strong thread and a backstitch for security. A sewing machine is faster and often creates a stronger seam, but hand-sewing is definitely an option.
How do I know if I should use darts or take in the center back seam?
If your pants have a distinct center back seam and minimal design elements, taking in that seam is often the cleanest option. If the pants have a flat back or you only need to take in a small amount, adding two darts can be more discreet. Consider the existing construction of your pants.
What kind of thread should I use?
Always use an all-purpose polyester thread that matches the color of your pants. Polyester thread is strong and durable, suitable for most fabric types. Matching the color ensures your stitches blend in seamlessly with the garment.
Will this alteration work on all types of pants?
This method works well for most woven fabrics like denim, cotton twill, and wool trousers. It might be trickier on very stretchy knits or heavily embellished waistbands. With stretchy fabrics, be mindful not to overstretch the fabric as you sew, as this can lead to rippling.
Our Top Recommended Finds
- Good Quality Seam Ripper: Essential for carefully undoing stitches without damaging fabric. Look for one with a comfortable grip.
- Fabric Chalk Wheel: Provides precise, clear lines that are easy to remove. Much better than traditional chalk for accuracy.
- All-Purpose Polyester Thread Assortment: Having a range of colors on hand means you’ll always have a match for your projects.
Achieve Your Perfect Fit Today
Taking the time to alter your pants for a better fit is a skill that pays off. No more sagging waistbands or awkward gaps. You’ll feel more confident and comfortable in your clothes.
Now that you have these practical steps, grab those ill-fitting pants. Follow this guide and experience the satisfaction of a perfectly tailored waist. Your wardrobe will thank you.
Beginner-friendly templates, step-by-step guides,
and weekly project ideas in your inbox.