👖 How To Cut And Fray Bottom Of Jeans

Beginner-friendly templates, step-by-step guides,
and weekly project ideas in your inbox.
Giving your old jeans a fresh, stylish look is incredibly satisfying.
I’ve transformed countless pairs from tired to trendy, and it’s a simple project anyone can master.
This guide shares all my best tips and tricks, ensuring you get that perfect frayed edge every time.

Quick Overview
You’re about to learn how to expertly cut and fray the hem of your jeans, giving them a custom, worn-in vibe.
This project is fantastic for breathing new life into older denim or customizing a new pair.
- Time needed: 1-2 hours (including washing/drying)
- Difficulty: Beginner
- What you’ll need: Jeans, sharp fabric scissors, ruler or measuring tape, fabric marker/chalk, seam ripper (optional), tweezers, washing machine, dryer.
Step-by-Step Instructions
Step 1: Choose Your Jeans Wisely
Not all denim is created equal when it comes to fraying.
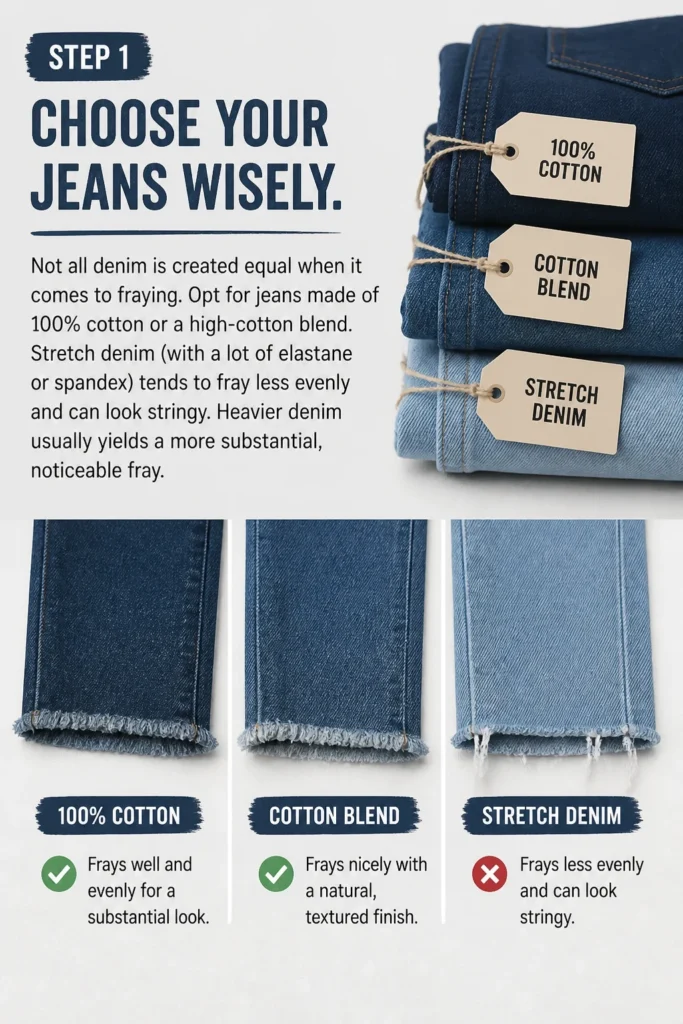
Opt for jeans made of 100% cotton or a high-cotton blend. Stretch denim (with a lot of elastane or spandex) tends to fray less evenly and can look stringy.
Heavier denim usually yields a more substantial, noticeable fray.
Step 2: Determine Your Desired Length
Try on your jeans and decide exactly where you want the new hem to fall.
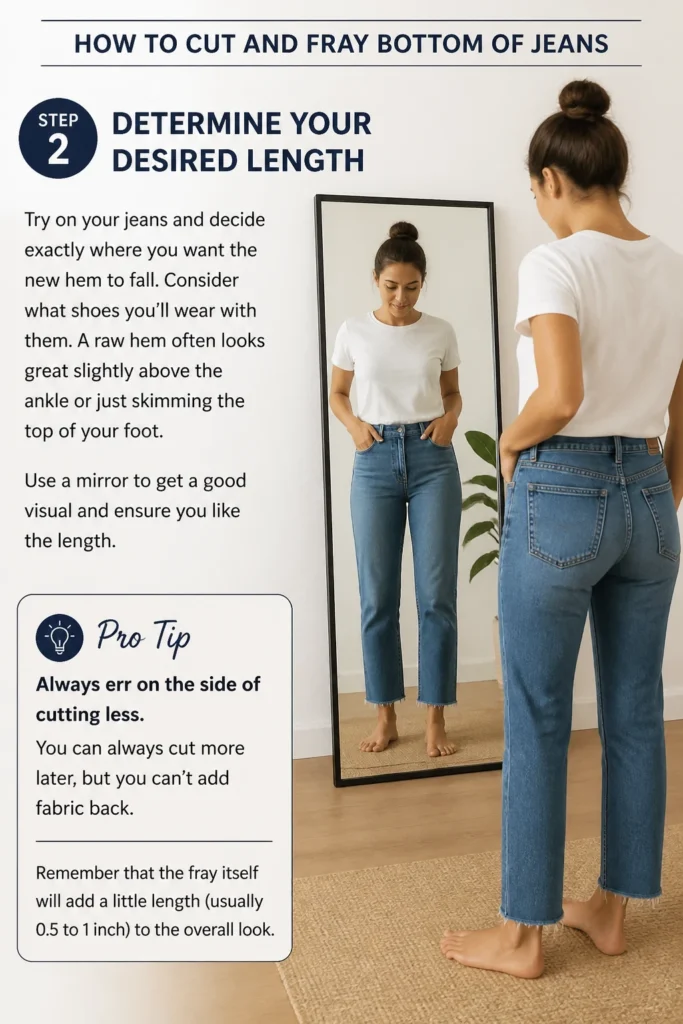
Consider what shoes you’ll wear with them. A raw hem often looks great slightly above the ankle or just skimming the top of your foot.
Use a mirror to get a good visual and ensure you like the length.
Pro Tip: Always err on the side of cutting less. You can always cut more later, but you can’t add fabric back. Remember that the fray itself will add a little length (usually 0.5 to 1 inch) to the overall look.
Step 3: Mark Your Cut Line
Lay your jeans flat on a hard, even surface.
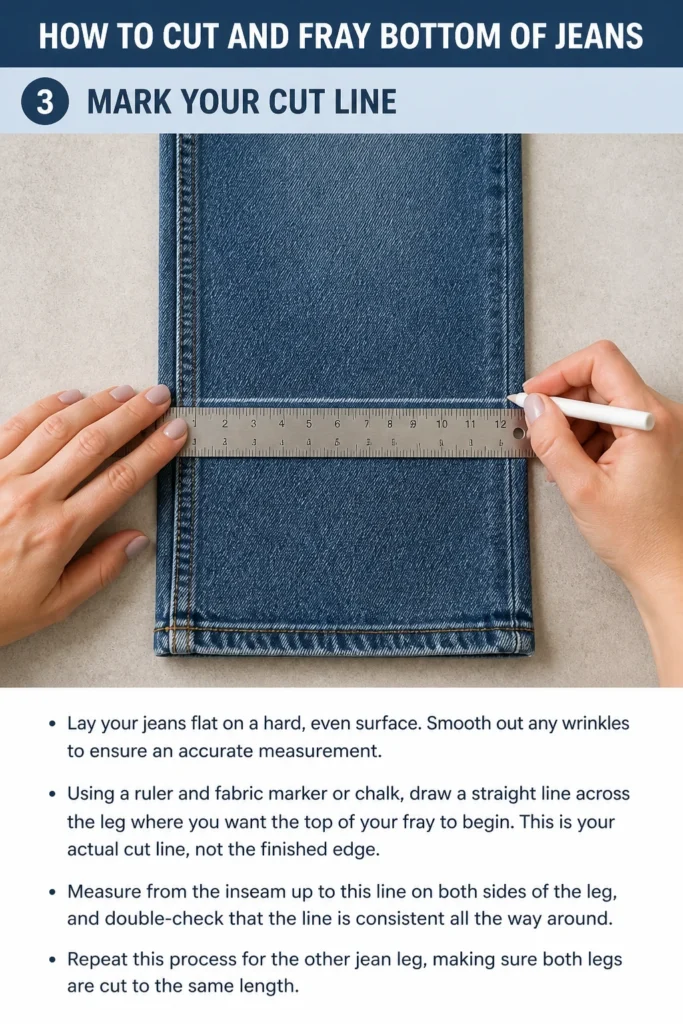
Smooth out any wrinkles to ensure an accurate measurement.
Using a ruler and fabric marker or chalk, draw a straight line across the leg where you want the top of your fray to begin.
This is your actual cut line, not the finished edge.
Measure from the inseam up to this line on both sides of the leg, and double-check that the line is consistent all the way around.
Repeat this process for the other jean leg, making sure both legs are cut to the same length.
Step 4: Make the Initial Cut
With your sharp fabric scissors, carefully cut along the marked line.
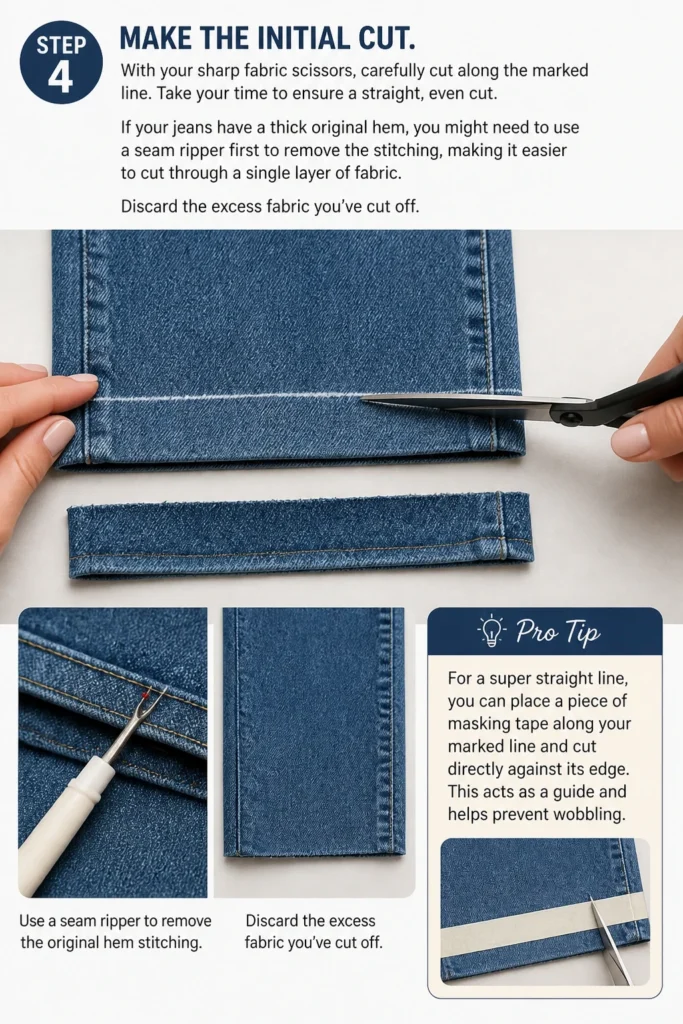
Take your time to ensure a straight, even cut.
If your jeans have a thick original hem, you might need to use a seam ripper first to remove the stitching, making it easier to cut through a single layer of fabric.
Discard the excess fabric you’ve cut off.
Pro Tip: For a super straight line, you can place a piece of masking tape along your marked line and cut directly against its edge. This acts as a guide and helps prevent wobbling.
Step 5: Start the Fraying Process Manually
Now, it’s time to encourage those threads to unravel.
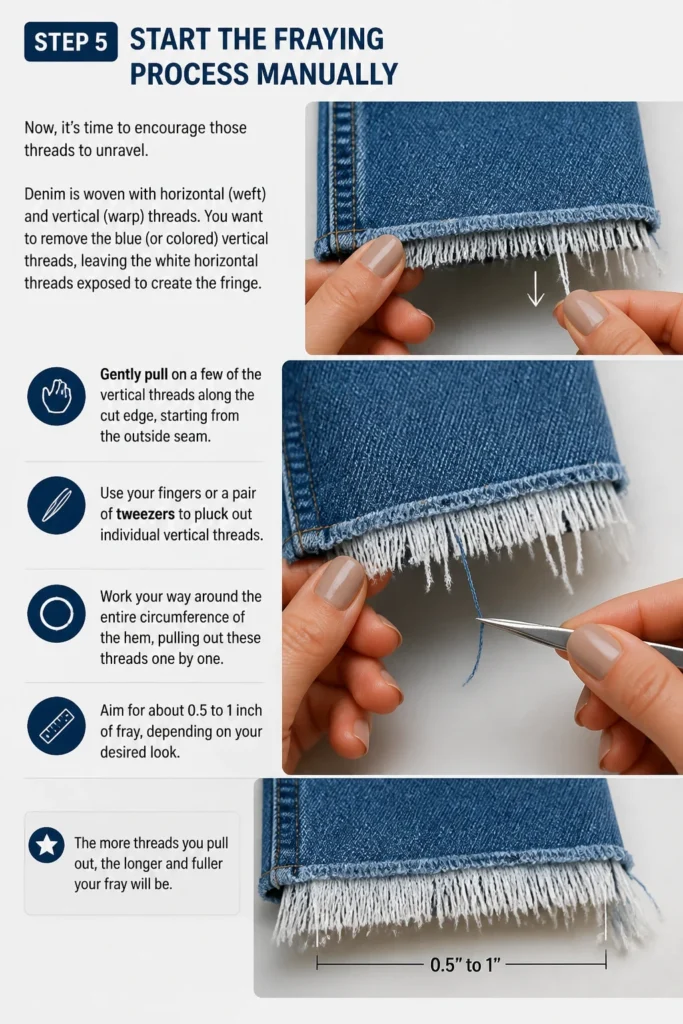
Denim is woven with horizontal (weft) and vertical (warp) threads.
You want to remove the blue (or colored) vertical threads, leaving the white horizontal threads exposed to create the fringe.
Gently pull on a few of the vertical threads along the cut edge, starting from the outside seam.
Use your fingers or a pair of tweezers to pluck out individual vertical threads.
Work your way around the entire circumference of the hem, pulling out these threads one by one.
Aim for about 0.5 to 1 inch of fray, depending on your desired look.
The more threads you pull out, the longer and fuller your fray will be.
Step 6: Wash and Dry Your Jeans
This is where the magic truly happens for a natural, soft fray.
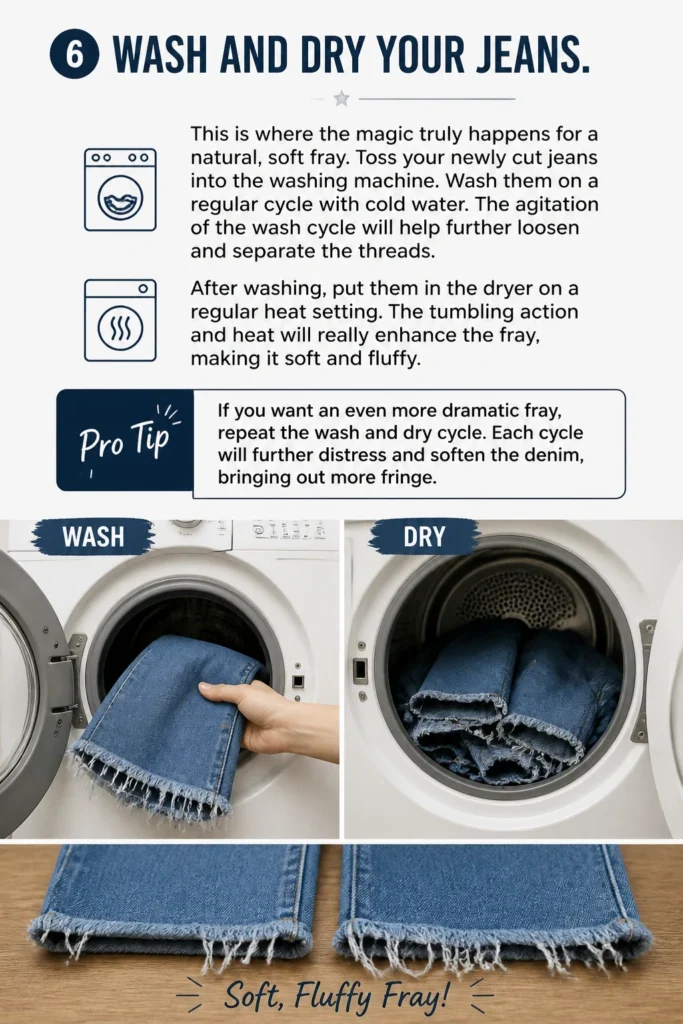
Toss your newly cut jeans into the washing machine.
Wash them on a regular cycle with cold water.
The agitation of the wash cycle will help further loosen and separate the threads.
After washing, put them in the dryer on a regular heat setting.
The tumbling action and heat will really enhance the fray, making it soft and fluffy.
Pro Tip: If you want an even more dramatic fray, repeat the wash and dry cycle. Each cycle will further distress and soften the denim, bringing out more fringe.
Step 7: Refine and Trim (Optional)
Once your jeans are dry, inspect the fray.
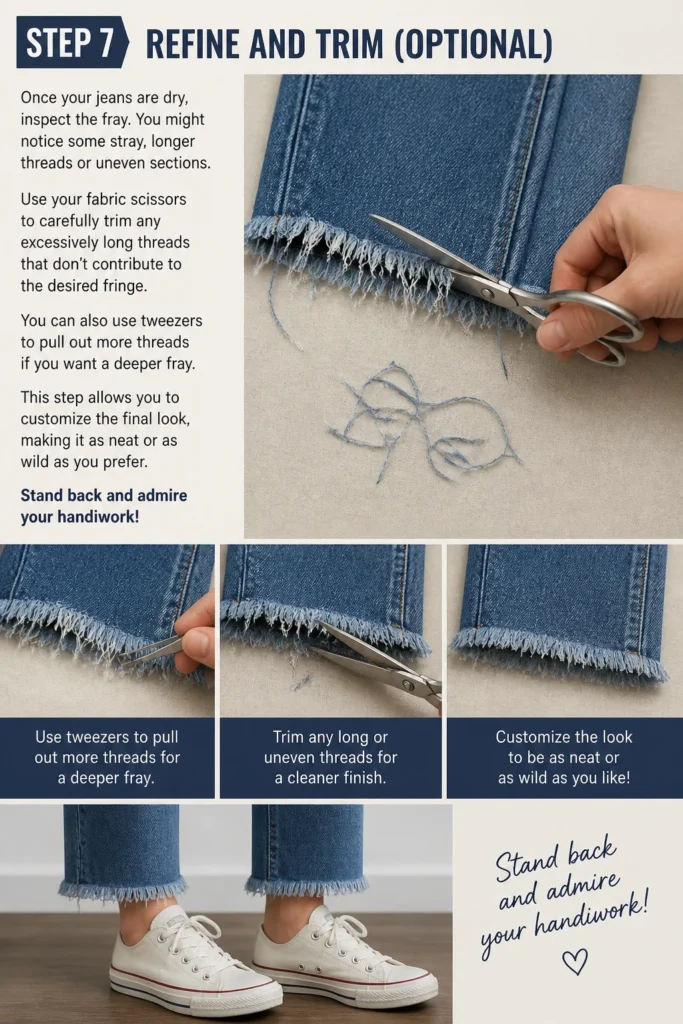
You might notice some stray, longer threads or uneven sections.
Use your fabric scissors to carefully trim any excessively long threads that don’t contribute to the desired fringe.
You can also use tweezers to pull out more threads if you want a deeper fray.
This step allows you to customize the final look, making it as neat or as wild as you prefer.
Stand back and admire your handiwork!
Common Mistakes to Avoid
Cutting Too Much Fabric
A common pitfall is cutting the jeans too short initially.
Once the fabric is cut, there’s no going back, and the frayed edge will naturally add a little length.
Always measure carefully while wearing the jeans and mark conservatively, remembering you can always shorten them more later.
Using Dull Scissors
Cutting denim with dull scissors can lead to jagged, uneven edges.
This makes the initial cut difficult and can result in a less attractive fray.
Always use sharp fabric scissors designed for textiles to achieve a clean, straight line.
Forgetting the Wash Cycle
Many people manually fray a bit and then stop, thinking the job is done.
The washing and drying cycles are crucial for achieving that soft, natural, and full frayed look.
Skipping this step leaves the fray looking stiff and unfinished.
Not Considering Denim Type
Trying to fray highly stretchy denim often leads to disappointment.
The synthetic fibers in stretch denim don’t unravel in the same way as pure cotton.
Choose jeans with a high cotton content for the best and most satisfying fraying results.
Troubleshooting
Fray Not Fraying Enough After Wash
If your fray isn’t as pronounced as you’d like after the first wash, don’t worry.
The denim might be a tighter weave or less prone to immediate unraveling.
Simply repeat the manual fraying process (pulling more vertical threads) and then run the jeans through another wash and dry cycle.
Uneven Fray Line
Sometimes, despite your best efforts, the fray can look a bit uneven.
This is often due to an initial crooked cut or inconsistent manual fraying.
You can carefully trim the longer sections of the fray with small, sharp scissors to create a more uniform line, or embrace the slightly imperfect, natural look.
Too Many Loose Threads
After a few washes, you might notice an excessive amount of very long, straggly threads.
This is normal as the denim continues to break down.
Simply take a pair of scissors and trim these longer threads to the desired length, maintaining the neatness of your frayed edge.
Key Takeaways
- Always choose jeans with a high cotton content for the best fraying results.
- Measure your desired length carefully while wearing the jeans, erring on the side of caution.
- Use sharp fabric scissors for a clean, straight initial cut.
- Manually pull out vertical threads to kickstart the fraying process.
- The washing machine and dryer are essential for a soft, natural, and full fray.
- Don’t be afraid to repeat washing and drying or manually refine the fray for your perfect look.
Frequently Asked Questions
Can I fray any type of jeans?
While you can cut any jeans, the best fraying results come from 100% cotton or high-cotton blend denim.
Jeans with a lot of stretch material (like spandex) won’t fray as effectively or naturally.
How do I stop the fray from going too far up the leg?
The fray will typically only go as far as the threads you’ve loosened and pulled.
To prevent it from unraveling too high, you can sew a small, tight stitch line (a straight stitch or zigzag) just above your desired fray length.
This acts as a barrier, stopping the unraveling at that point.
Will the fray get longer over time?
Yes, the fray will naturally continue to evolve and potentially lengthen slightly with continued wear and washes.
You can periodically trim any excessively long threads to maintain your desired look.
Embrace the ongoing, distressed evolution of your denim.
Do I need a special tool to fray jeans?
You don’t need highly specialized tools.
Sharp fabric scissors, a ruler, and a fabric marker are essential for cutting.
Tweezers are very helpful for manually pulling individual threads to start the fray, but fingers often work just as well.
Our Top Recommended Finds
- Sharp Fabric Scissors: A good pair makes all the difference for clean cuts and less hand strain. Look for ones specifically for fabric.
- Fabric Chalk or Marker: Essential for precise marking that washes out easily. Avoid regular pens which might stain.
- Fine-Point Tweezers: Great for meticulous thread-pulling to control the depth and evenness of your fray.
Transform Your Denim Today
You now have all the knowledge and practical steps to give your jeans a stylish, custom update.
This simple DIY project is a fantastic way to personalize your wardrobe and extend the life of your favorite denim.
Why not grab an old pair of jeans and start experimenting this weekend?
You’ll love the unique character a perfectly frayed hem adds to your outfits.
Beginner-friendly templates, step-by-step guides,
and weekly project ideas in your inbox.