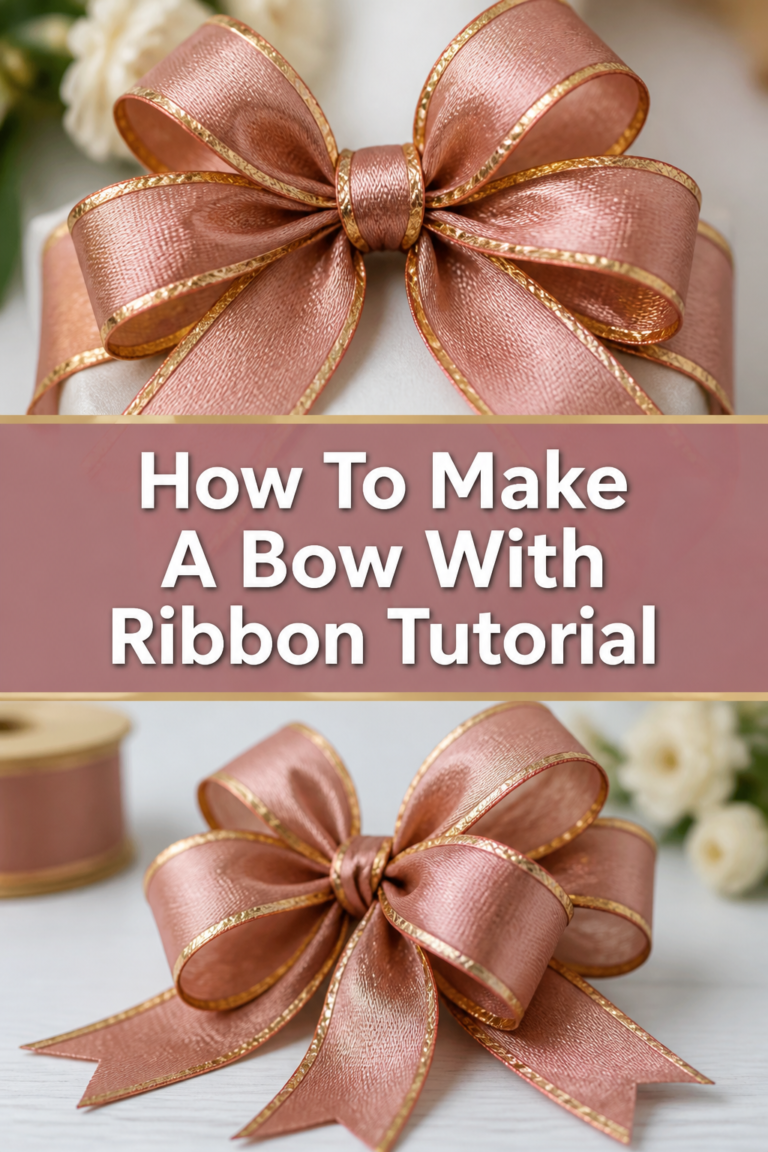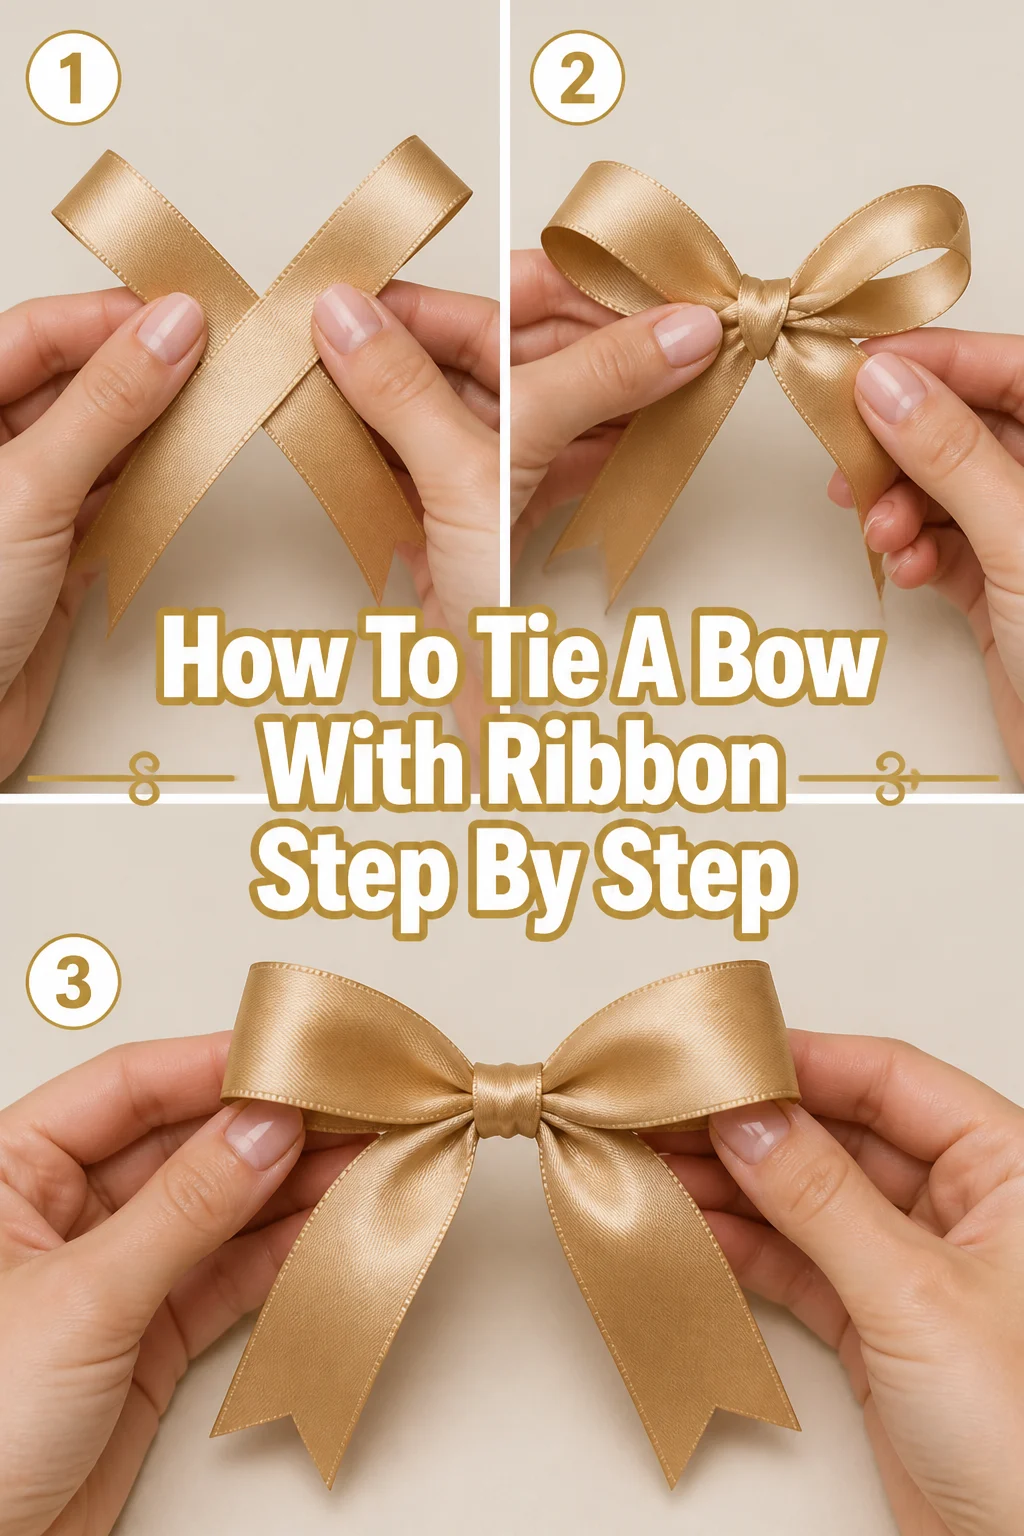
🎀 How To Tie A Bow With Ribbon Step By Step

Beginner-friendly templates, step-by-step guides,
and weekly project ideas in your inbox.
I remember my first attempts at tying a perfect bow. It seemed simple, yet often turned out lopsided or flimsy.
Over the years, I’ve tied countless bows for gifts, crafts, and decorations. I’ve learned the tricks to achieve that beautiful, symmetrical finish every time.
This guide shares all those practical insights. You’ll soon be tying elegant bows with confidence and ease.

Quick Overview
This guide will walk you through creating a classic, symmetrical bow. You’ll learn the fundamental technique, ensuring your bows look polished and professional. It’s a skill that adds a touch of elegance to any project.
- Time needed: 5-10 minutes per bow (once you get the hang of it)
- Difficulty: Beginner
- What you’ll need: A length of ribbon, a flat surface, sharp scissors
Step-by-Step Instructions
Step 1: Prepare Your Ribbon
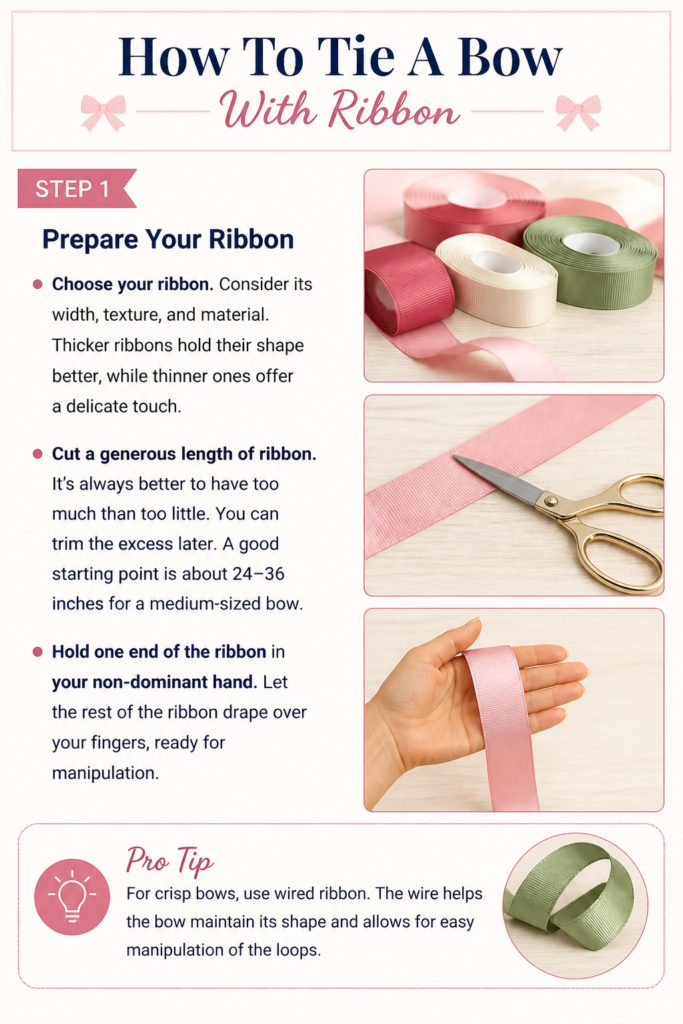
Choose your ribbon. Consider its width, texture, and material. Thicker ribbons hold their shape better, while thinner ones offer a delicate touch.
Cut a generous length of ribbon. It’s always better to have too much than too little. You can trim the excess later. A good starting point is about 24-36 inches for a medium-sized bow.
Hold one end of the ribbon in your non-dominant hand. Let the rest of the ribbon drape over your fingers, ready for manipulation.
Pro Tip: For crisp bows, use wired ribbon. The wire helps the bow maintain its shape and allows for easy manipulation of the loops.
Step 2: Form the First Loop
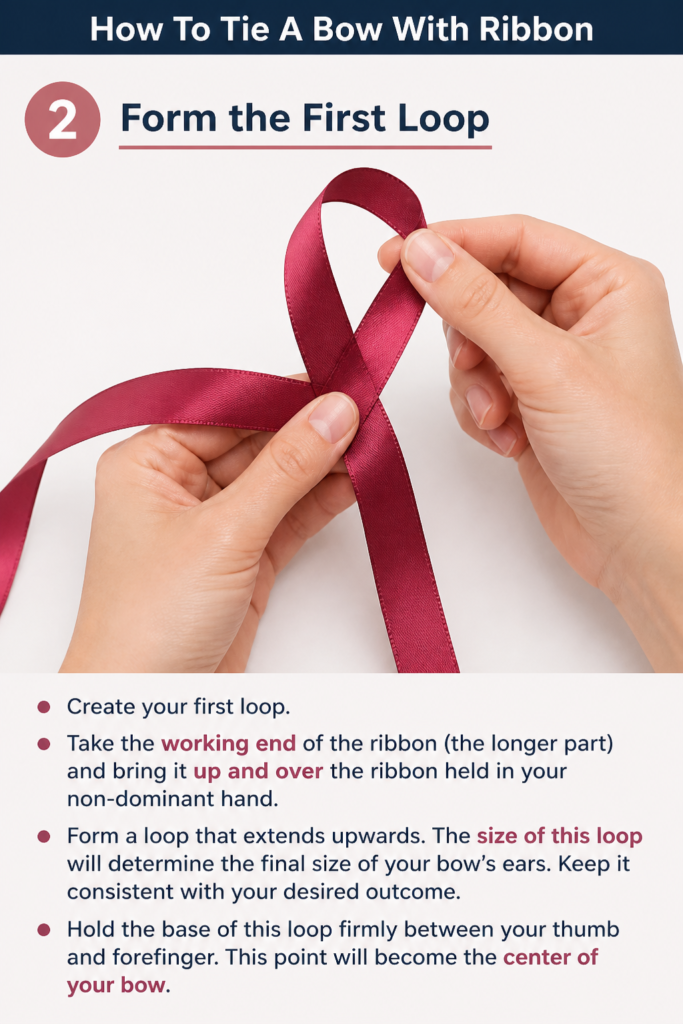
Create your first loop. Take the working end of the ribbon (the longer part) and bring it up and over the ribbon held in your non-dominant hand.
Form a loop that extends upwards. The size of this loop will determine the final size of your bow’s “ears.” Keep it consistent with your desired outcome.
Hold the base of this loop firmly between your thumb and forefinger. This point will become the center of your bow.
Step 3: Cross the Ribbon Over
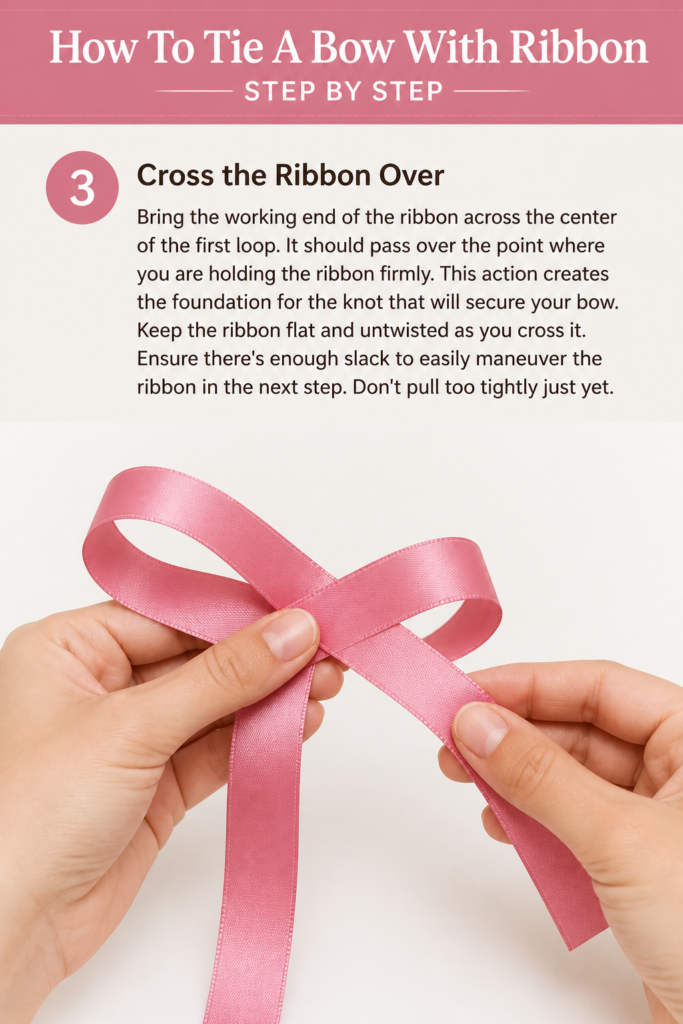
Bring the working end of the ribbon across the center of the first loop. It should pass over the point where you are holding the ribbon firmly.
This action creates the foundation for the knot that will secure your bow. Keep the ribbon flat and untwisted as you cross it.
Ensure there’s enough slack to easily maneuver the ribbon in the next step. Don’t pull too tightly just yet.
Step 4: Feed Through the Center Loop
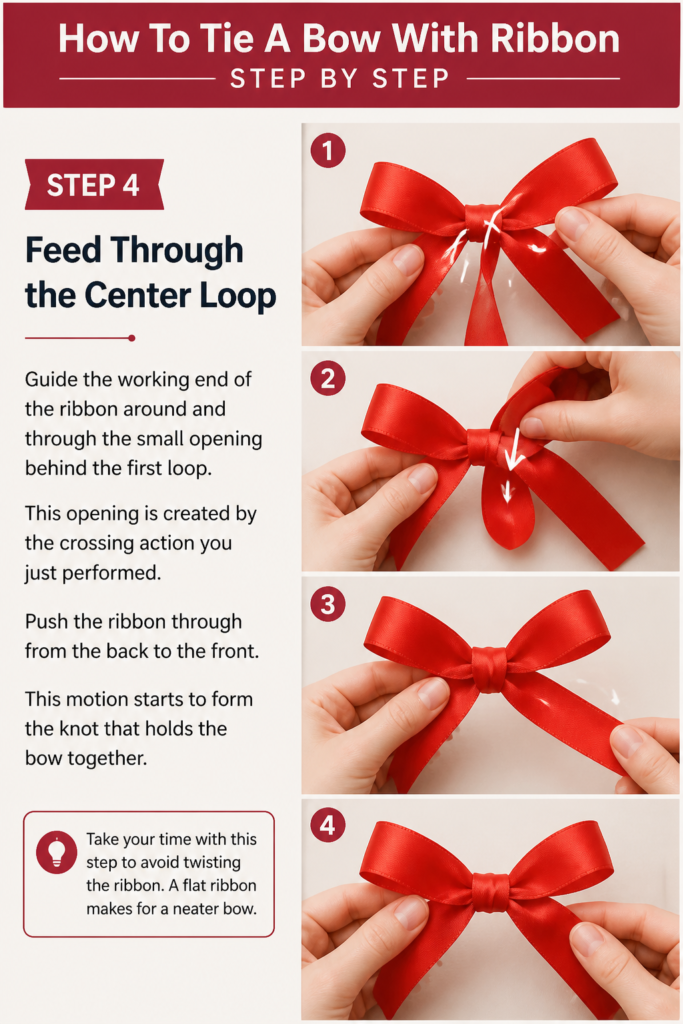
Guide the working end of the ribbon around and through the small opening behind the first loop. This opening is created by the crossing action you just performed.
Push the ribbon through from the back to the front. This motion starts to form the knot that holds the bow together.
Take your time with this step to avoid twisting the ribbon. A flat ribbon makes for a neater bow.
Step 5: Form the Second Loop
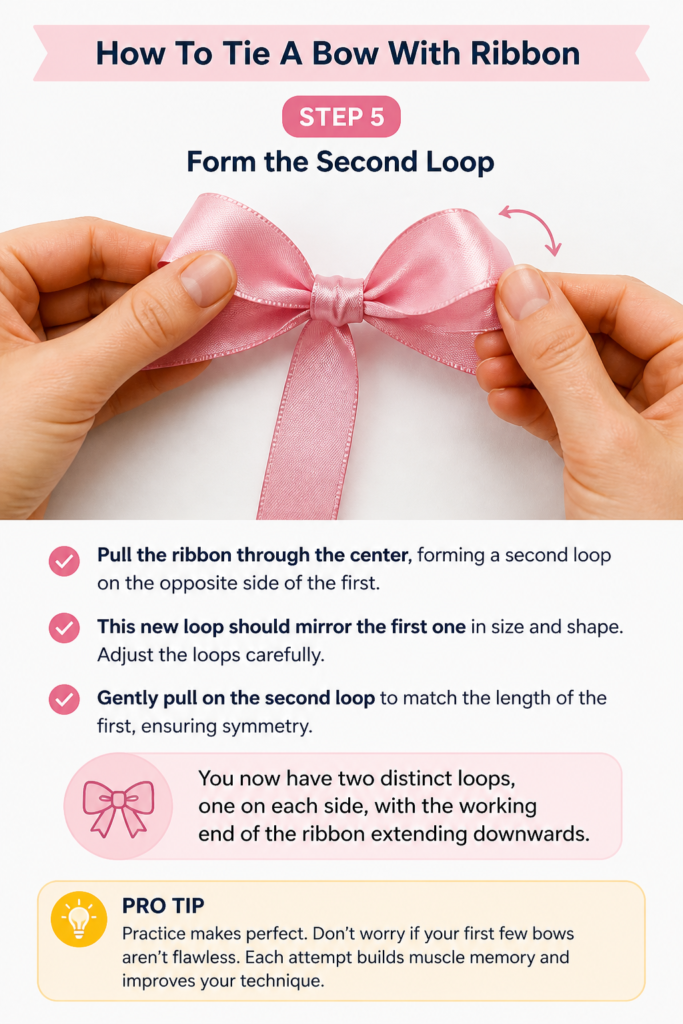
Pull the ribbon through the center, forming a second loop on the opposite side of the first. This new loop should mirror the first one in size and shape.
Adjust the loops carefully. Gently pull on the second loop to match the length of the first, ensuring symmetry.
You now have two distinct loops, one on each side, with the working end of the ribbon extending downwards.
Pro Tip: Practice makes perfect. Don’t worry if your first few bows aren’t flawless. Each attempt builds muscle memory and improves your technique.
Step 6: Tighten the Knot
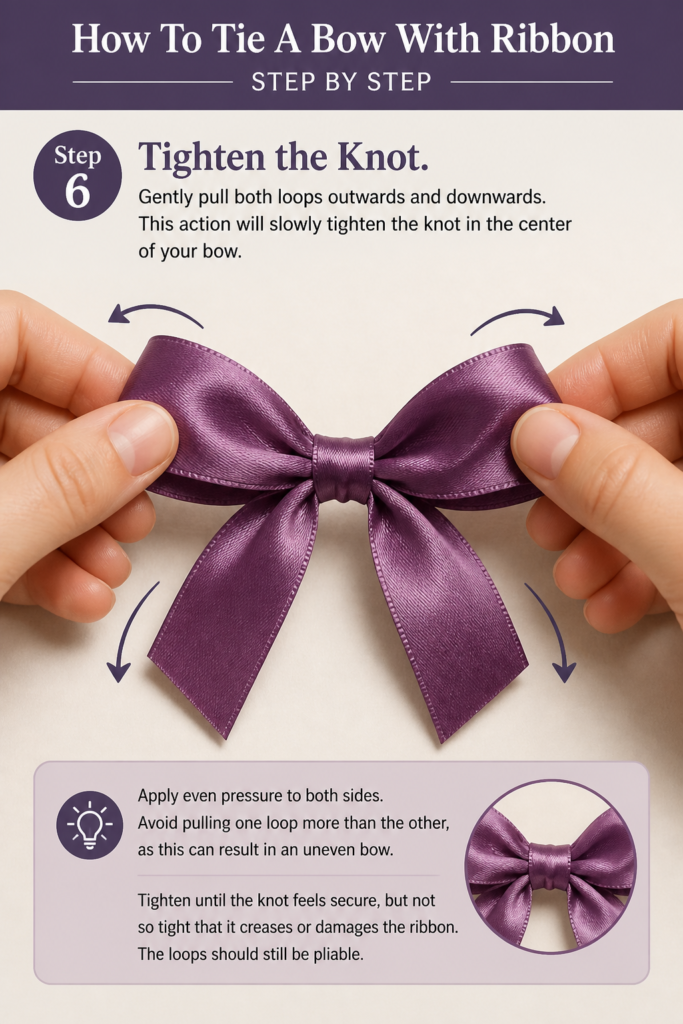
Gently pull both loops outwards and downwards. This action will slowly tighten the knot in the center of your bow.
Apply even pressure to both sides. Avoid pulling one loop more than the other, as this can result in an uneven bow.
Tighten until the knot feels secure, but not so tight that it creases or damages the ribbon. The loops should still be pliable.
Step 7: Adjust and Refine Loops
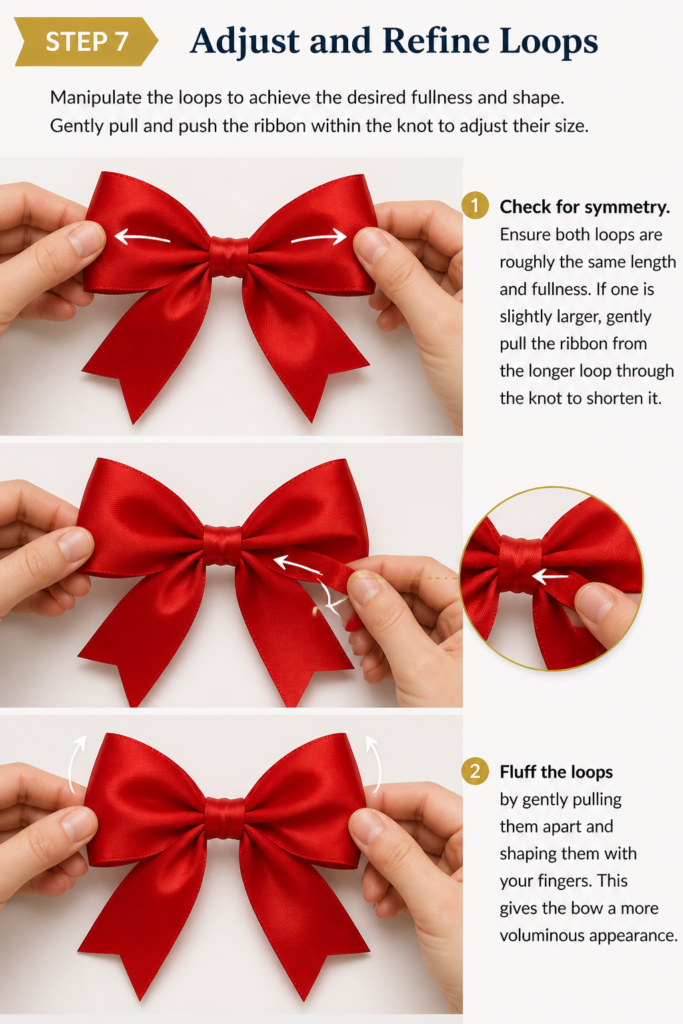
Manipulate the loops to achieve the desired fullness and shape. Gently pull and push the ribbon within the knot to adjust their size.
Check for symmetry. Ensure both loops are roughly the same length and fullness. If one is slightly larger, gently pull the ribbon from the longer loop through the knot to shorten it.
Fluff the loops by gently pulling them apart and shaping them with your fingers. This gives the bow a more voluminous appearance.
Step 8: Trim the Ends
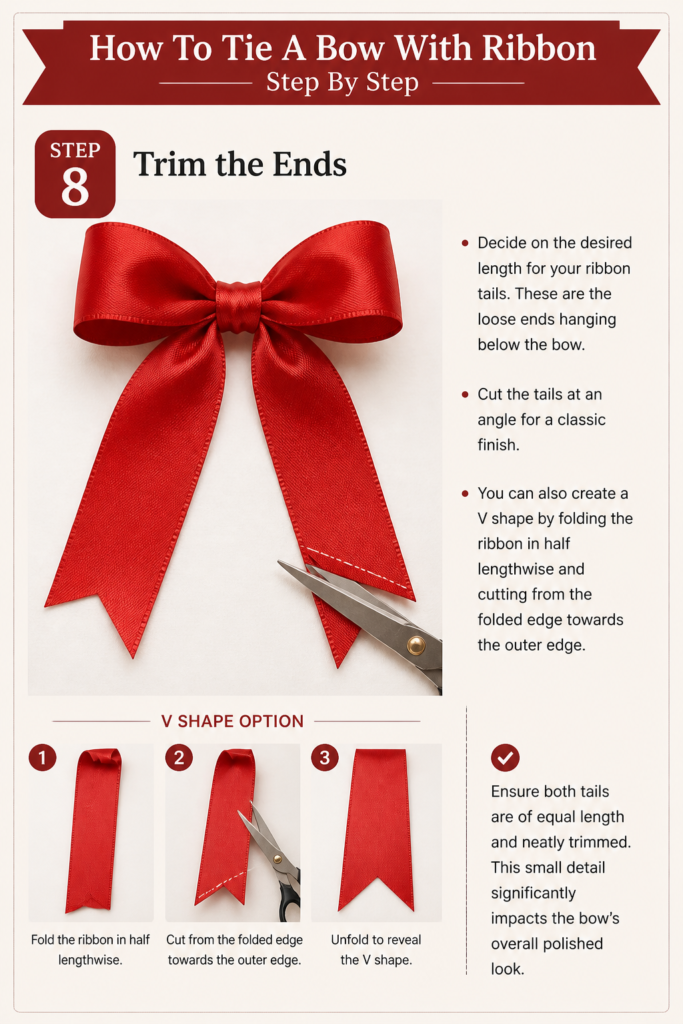
Decide on the desired length for your ribbon tails. These are the loose ends hanging below the bow.
Cut the tails at an angle for a classic finish. You can also create a “V” shape by folding the ribbon in half lengthwise and cutting from the folded edge towards the outer edge.
Ensure both tails are of equal length and neatly trimmed. This small detail significantly impacts the bow’s overall polished look.
Common Mistakes to Avoid
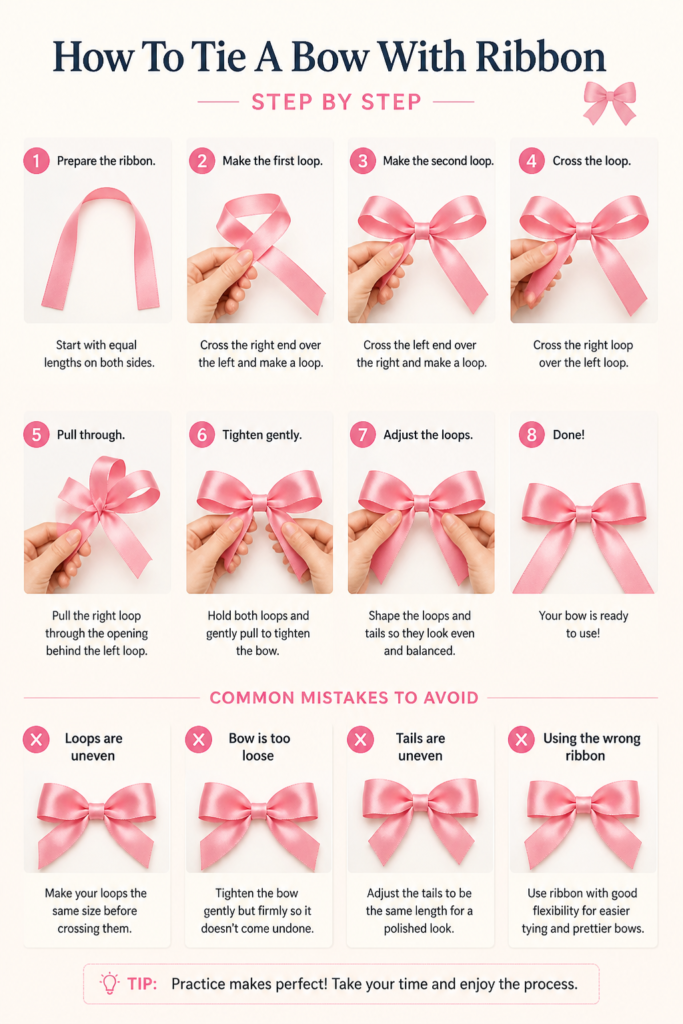
Uneven Loops
One of the most common issues is having loops that are different sizes. This often happens when you pull one side of the ribbon tighter than the other during the knotting process. It makes the bow look lopsided and unprofessional.
To fix this, consciously adjust both loops as you tighten the knot. Gently tug on the longer loop to feed more ribbon back into the center, balancing the lengths. Don’t be afraid to loosen the knot slightly to make these adjustments before the final pull.
Too Loose or Too Tight
A bow that is too loose will unravel easily and lose its shape. Conversely, a bow that is pulled too tight can crease the ribbon, making it look flattened and less appealing. It also makes it harder to adjust the loops.
Find a happy medium. The knot should be firm enough to hold the loops securely without distorting the ribbon’s texture. Practice will help you develop a feel for the right tension.
Flimsy Ribbon Choice
Using a ribbon that is too thin or too soft can make it difficult to create a bow with good structure. Such ribbons tend to flop and don’t hold their shape well, no matter how perfectly you tie them.
For bows that need to stand up or maintain volume, opt for ribbons with a bit more body. Wired ribbons are excellent for this, as are grosgrain or satin ribbons with a firmer weave. Consider the ribbon’s purpose before choosing.
Messy Tails
Untidy or unevenly cut tails can detract from an otherwise beautiful bow. Ragged edges or tails of different lengths make the entire presentation look less polished and thought out.
Always use sharp scissors to achieve clean cuts. Take the time to measure or visually align the tails before trimming them. Angled or V-cuts add a professional touch and prevent fraying.
Troubleshooting
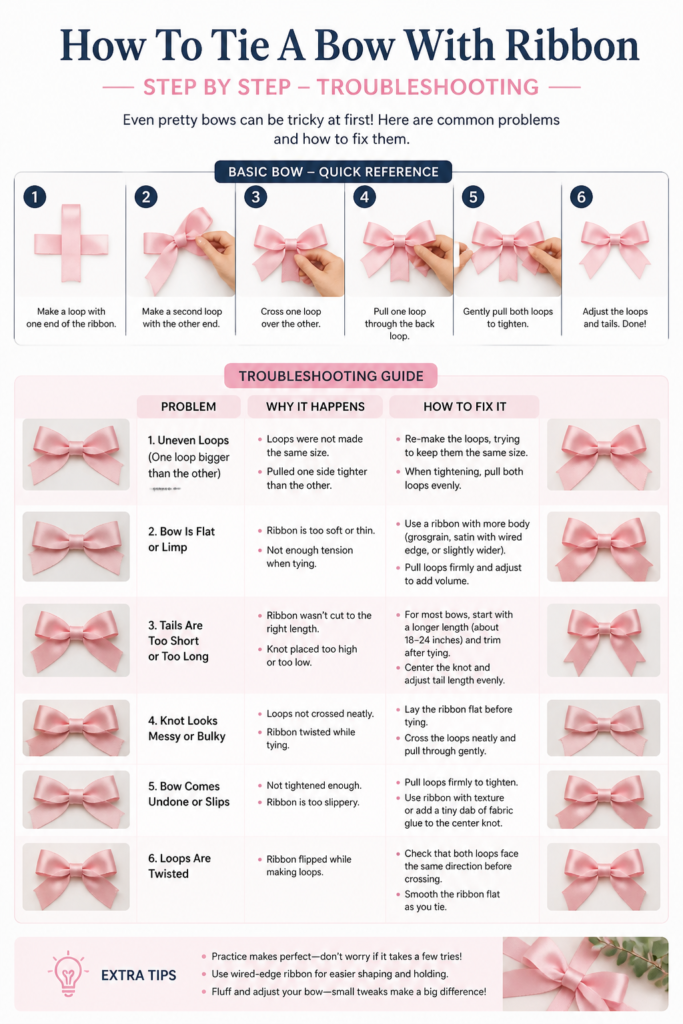
Bow Keeps Unraveling
If your bow consistently comes undone, the knot likely isn’t tight enough, or it wasn’t tied correctly from the start. A loose knot can’t secure the loops, especially with slippery ribbon types.
Double-check that you’ve fed the ribbon completely through the central opening. Then, pull firmly and evenly on both loops to secure the knot. For very slick ribbons like satin, consider adding a tiny dab of fabric glue to the center of the knot on the back, once you’re satisfied with the bow’s shape.
Loops Are Different Sizes
Having one loop significantly larger or smaller than the other is a common frustration. This usually happens because you’ve pulled more ribbon into one loop than the other during the tightening phase.
To fix this, gently loosen the central knot just enough to allow some movement. Then, pull the ribbon from the longer loop back through the knot, effectively shortening it, until it matches the other loop. Once balanced, re-tighten the knot carefully.
Ribbon Gets Twisted
Twisted ribbon within the loops or tails can make your bow look messy and unprofessional. This often occurs when you’re rushing or not paying attention to the ribbon’s orientation as you form the loops and pull through the knot.
Slow down and ensure the ribbon lies flat at every stage. Before pulling the ribbon through the center, check that it’s not spiraled. If you notice a twist, gently untwist it before proceeding to the next step. Flat ribbon creates a much cleaner, smoother bow.
Key Takeaways
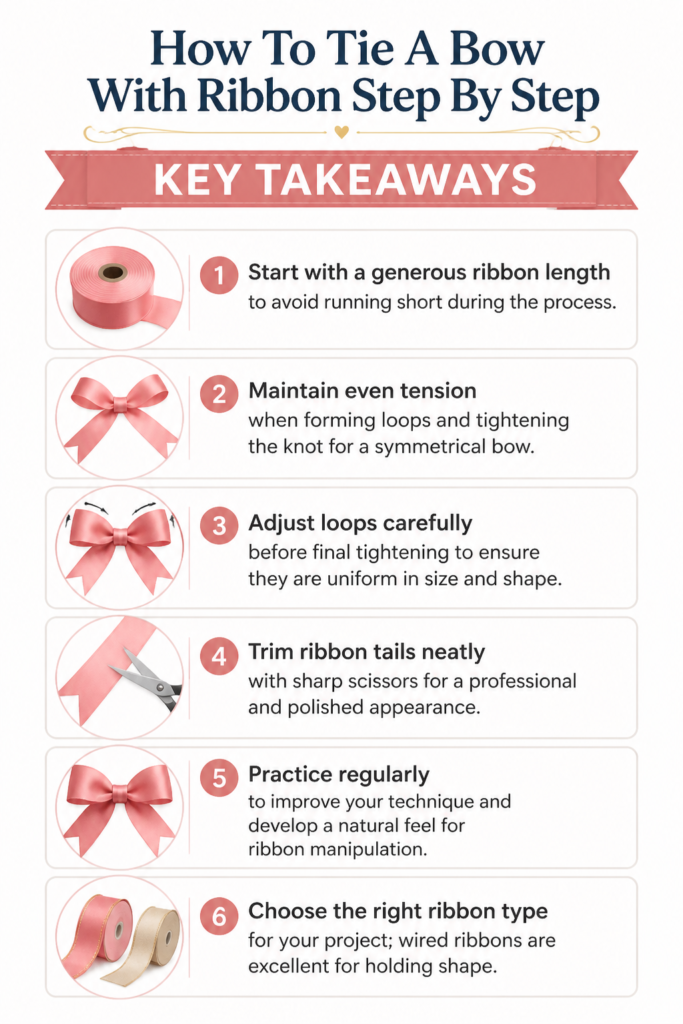
- Start with a generous ribbon length to avoid running short during the process.
- Maintain even tension when forming loops and tightening the knot for a symmetrical bow.
- Adjust loops carefully before final tightening to ensure they are uniform in size and shape.
- Trim ribbon tails neatly with sharp scissors for a professional and polished appearance.
- Practice regularly to improve your technique and develop a natural feel for ribbon manipulation.
- Choose the right ribbon type for your project; wired ribbons are excellent for holding shape.
Frequently Asked Questions
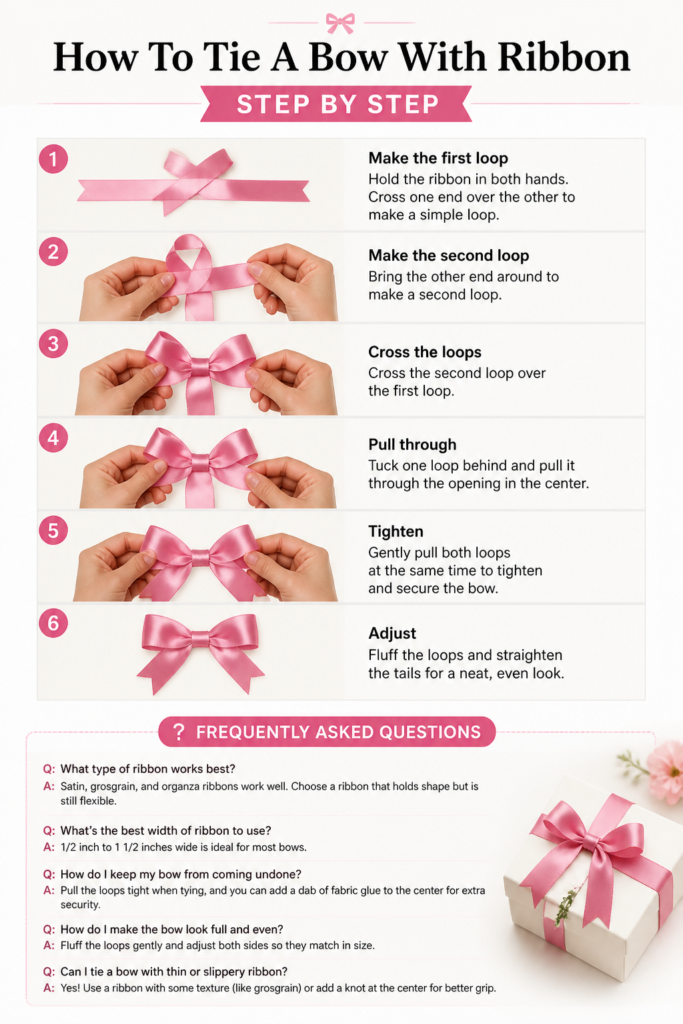
What’s the best ribbon type for bows?
The “best” ribbon depends on your project. For bows that need to hold a firm shape and stand up, wired ribbon, grosgrain, or a stiff satin ribbon works wonderfully. If you want a softer, more flowing look, opt for sheer, silk, or softer satin ribbons. Consider the ribbon’s body and drape.
How much ribbon do I need for a bow?
A good rule of thumb for a basic bow is to use a length of ribbon that is 8 to 10 times the desired width of your finished bow. For example, if you want a bow that is 4 inches wide, start with 32-40 inches of ribbon. It’s always safer to cut more than you think you’ll need.
Can I tie a bow with very short ribbon?
Tying a bow with very short ribbon is challenging but possible for small, simple bows. You’ll need to work carefully and precisely, as there’s less room for adjustment. Consider using a fork bow-tying method or a small bow maker tool for tiny bows with limited ribbon.
How do I make a bow stand up straight?
To make a bow stand up straight, especially on a gift or package, ensure you’re using a ribbon with good body, like wired ribbon. After tying, gently fluff and shape the loops. You can also use a small piece of double-sided tape or a dot of hot glue on the back of the bow’s knot to secure it to your surface.
Our Top Recommended Finds
- Assorted Ribbon Pack: A variety pack offers different widths, colors, and textures. This lets you experiment and find your favorite ribbon types for various bows.
- Sharp Fabric Scissors: Precision is key for clean cuts. High-quality fabric scissors prevent fraying and ensure crisp, professional-looking ribbon tails every time.
- Ribbon Storage Box: Keep your ribbons organized and untangled. A clear storage box allows you to see your collection and quickly find the perfect ribbon for your next project.
Embrace Your Inner Bow Artisan
You now have a solid foundation for tying beautiful, symmetrical bows. This skill is incredibly versatile, enhancing gifts, crafts, and decorations with a touch of handmade elegance. Don’t let your creativity stop here.
Experiment with different ribbon types, widths, and patterns. Try adding multiple layers or combining colors to create unique designs. Each bow you tie will build your confidence and refine your technique.
Grab some ribbon today and start practicing. The more you tie, the more natural and effortless it will become. Soon, you’ll be creating stunning bows for every occasion with ease.
Beginner-friendly templates, step-by-step guides,
and weekly project ideas in your inbox.