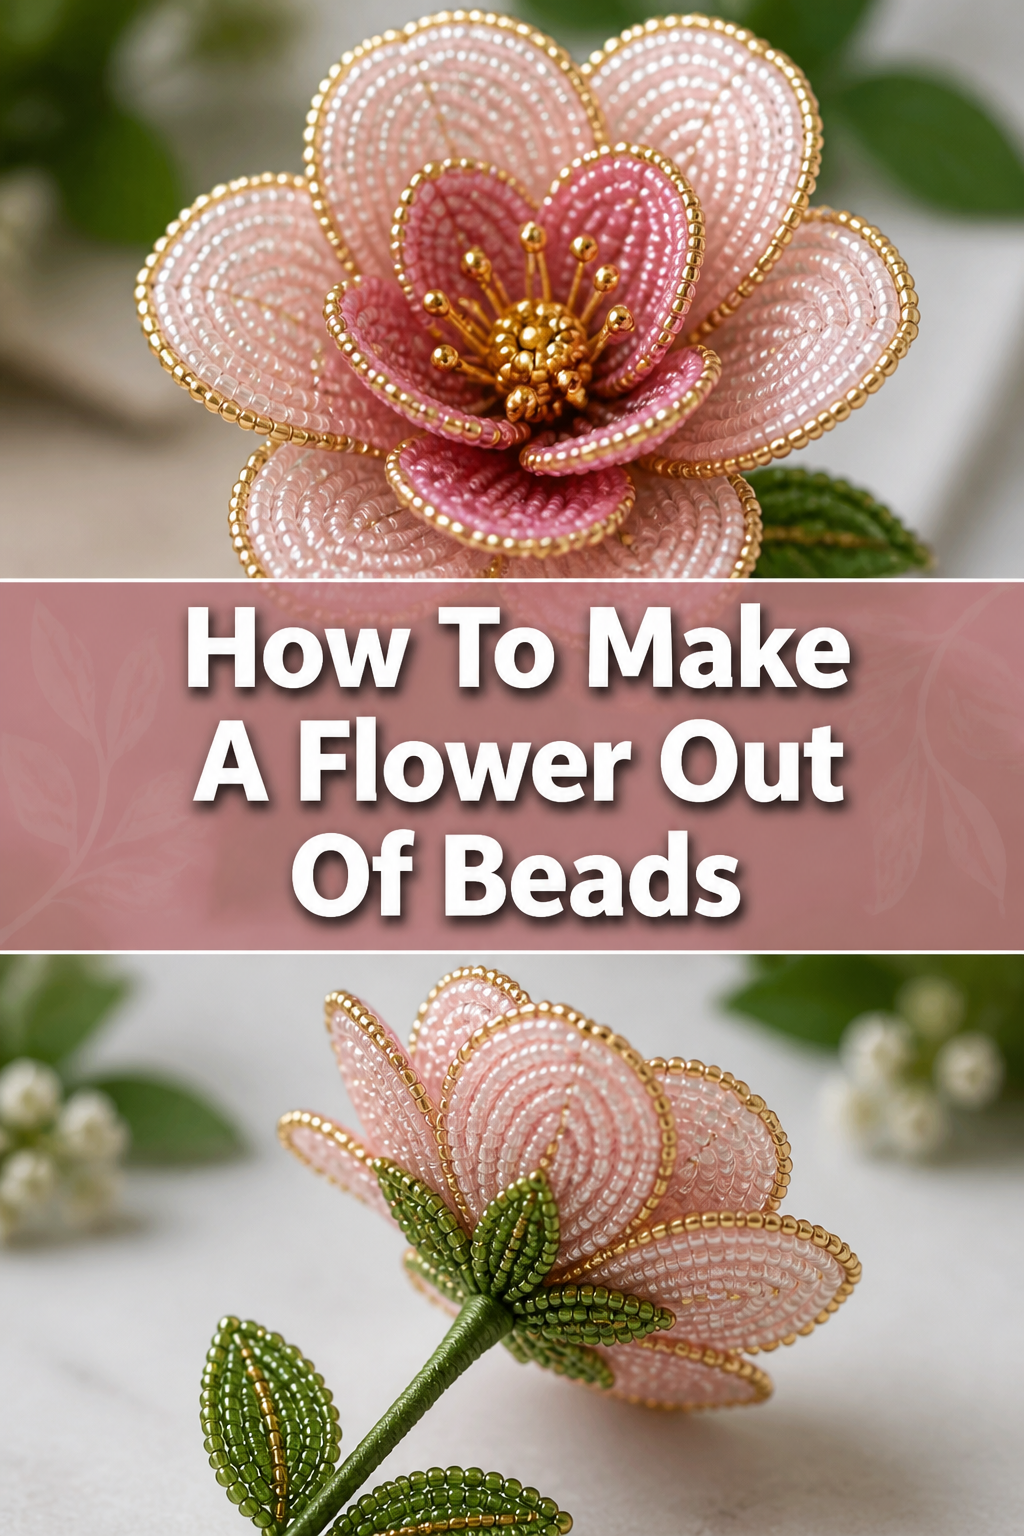
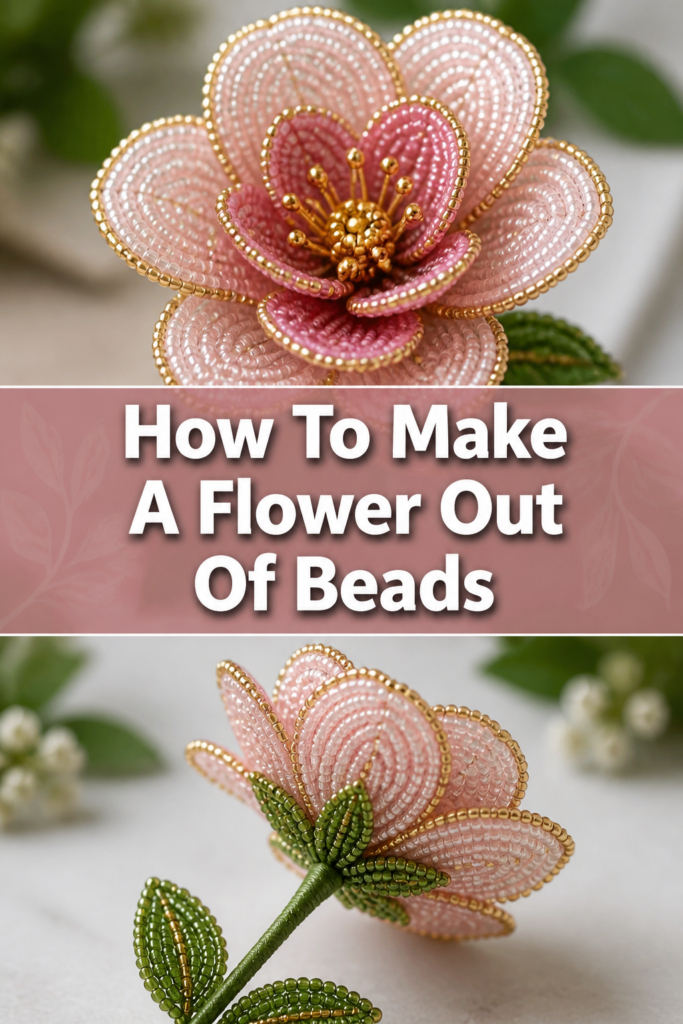
🌸 How To Make A Flower Out Of Beads

Beginner-friendly templates, step-by-step guides,
and weekly project ideas in your inbox.
Making beautiful things with your hands brings immense joy. I remember the first time I strung tiny beads onto wire, unsure of what would emerge. Seeing that first delicate flower take shape was incredibly rewarding.
This guide comes from years of experimenting with beads and wire. I’m excited to share the practical steps and insider tips to help you create your own stunning beaded flower.
Quick Overview
You’re about to embark on a delightful crafting journey. By following these steps, you’ll transform simple beads and wire into an elegant, lasting floral decoration. It’s a project that combines precision with artistic flair.
- Time needed: 2-4 hours (depending on complexity and experience)
- Difficulty: Beginner to Intermediate
- What you’ll need: Seed beads, floral wire, pliers, wire cutters, floral tape
Step-by-Step Instructions
Step 1: Gather Your Materials
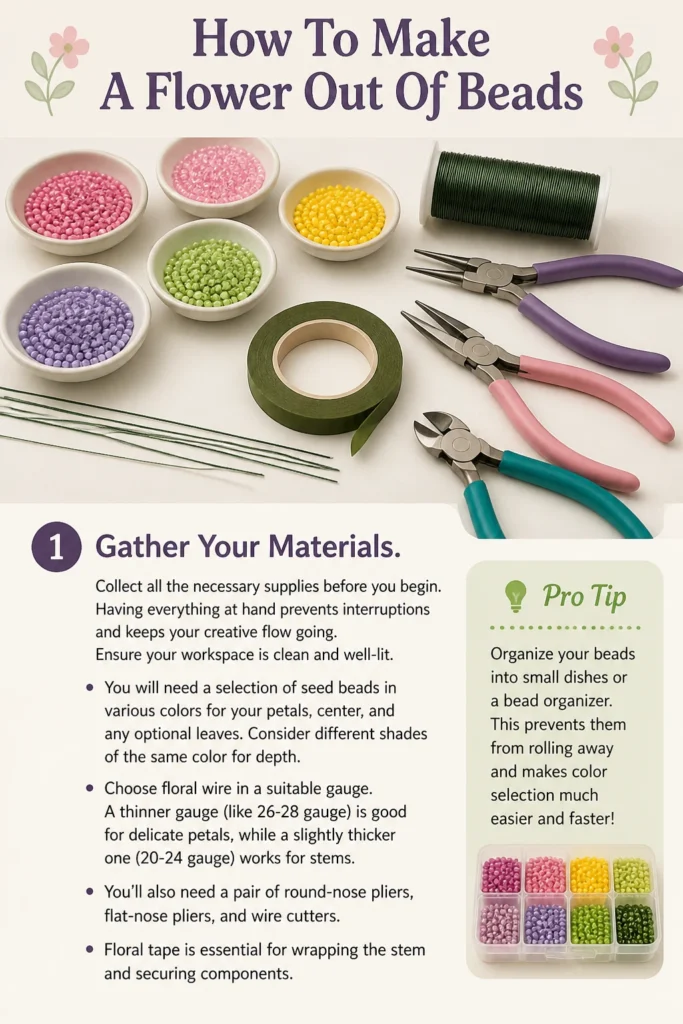
Collect all the necessary supplies before you begin. Having everything at hand prevents interruptions and keeps your creative flow going. Ensure your workspace is clean and well-lit.
You will need a selection of seed beads in various colors for your petals, center, and any optional leaves. Consider different shades of the same color for depth.
Choose floral wire in a suitable gauge. A thinner gauge (like 26-28 gauge) is good for delicate petals, while a slightly thicker one (20-24 gauge) works for stems.
You’ll also need a pair of round-nose pliers, flat-nose pliers, and wire cutters. Floral tape is essential for wrapping the stem and securing components.
Pro Tip: Organize your beads into small dishes or a bead organizer. This prevents them from rolling away and makes color selection much easier.
Step 2: Prepare Your Wire
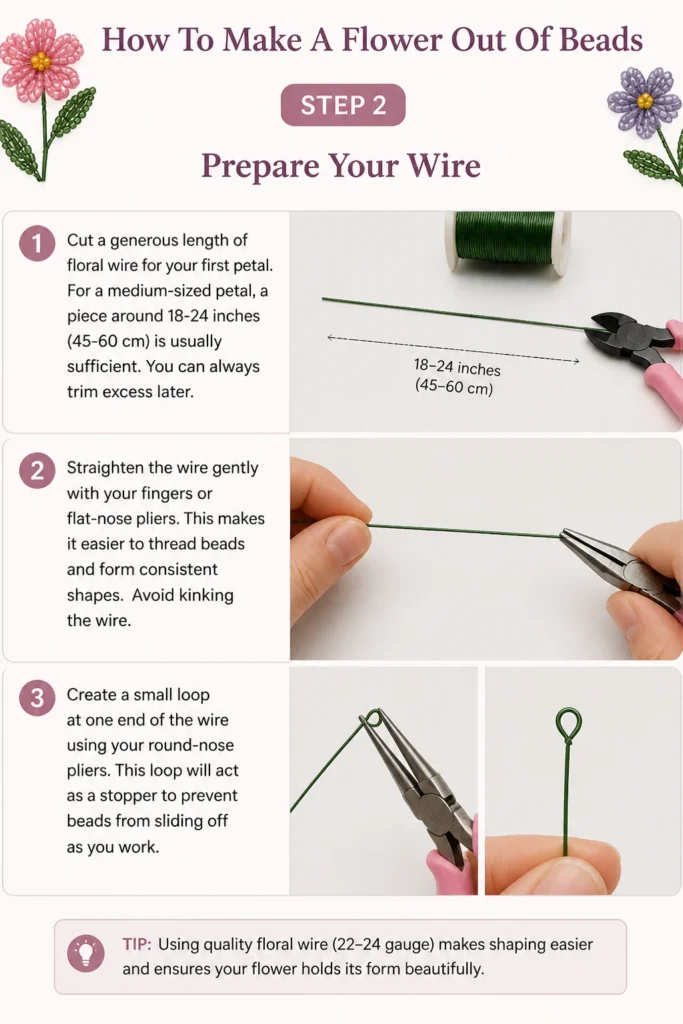
Cut a generous length of floral wire for your first petal. For a medium-sized petal, a piece around 18-24 inches (45-60 cm) is usually sufficient. You can always trim excess later.
Straighten the wire gently with your fingers or flat-nose pliers. This makes it easier to thread beads and form consistent shapes. Avoid kinking the wire.
Create a small loop at one end of the wire using your round-nose pliers. This loop will act as a stopper to prevent beads from sliding off as you work.
Step 3: Start the First Petal (Looping Technique)
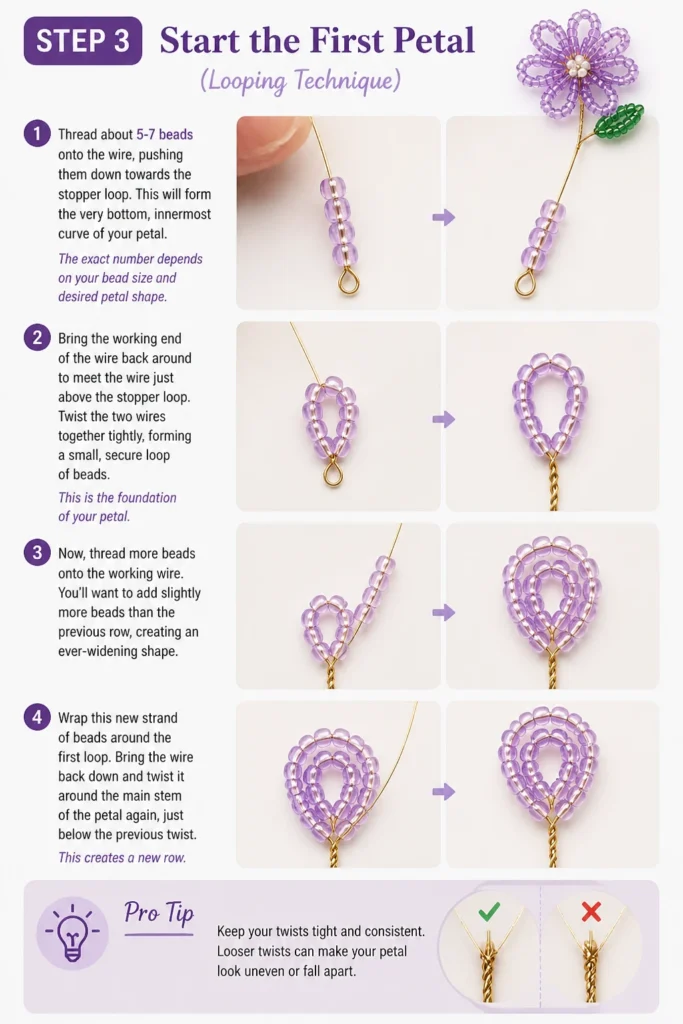
Thread about 5-7 beads onto the wire, pushing them down towards the stopper loop. This will form the very bottom, innermost curve of your petal. The exact number depends on your bead size and desired petal shape.
Bring the working end of the wire back around to meet the wire just above the stopper loop. Twist the two wires together tightly, forming a small, secure loop of beads. This is the foundation of your petal.
Now, thread more beads onto the working wire. You’ll want to add slightly more beads than the previous row, creating an ever-widening shape.
Wrap this new strand of beads around the first loop. Bring the wire back down and twist it around the main stem of the petal again, just below the previous twist. This creates a new row.
Pro Tip: Keep your twists tight and consistent. Loose twists can make your petal less stable and prone to unraveling over time.
Step 4: Form Subsequent Petals
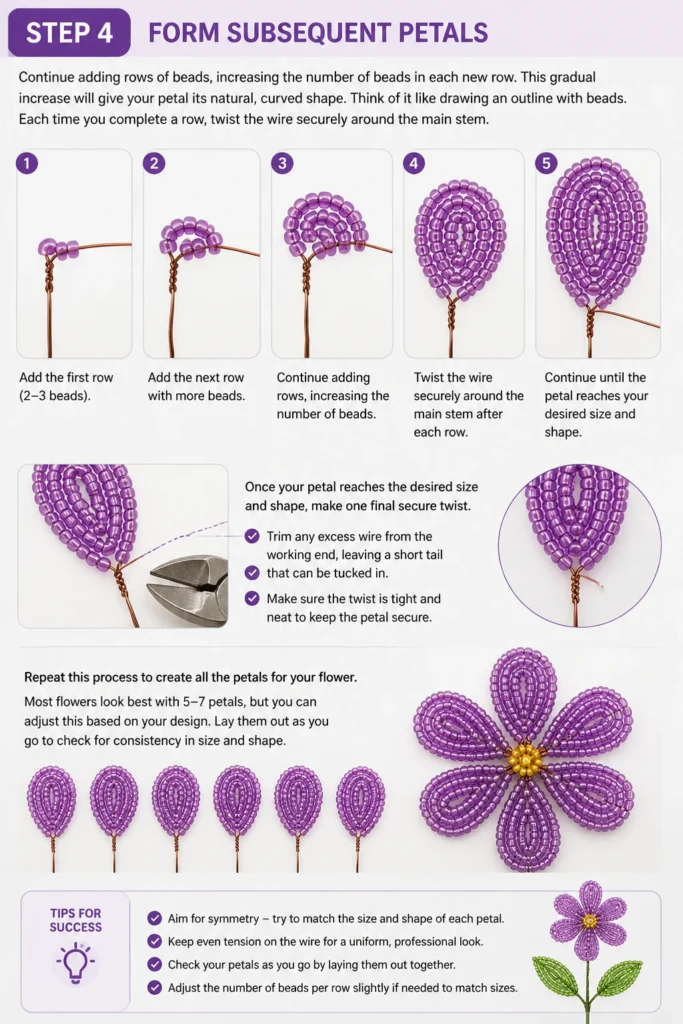
Continue adding rows of beads, increasing the number of beads in each new row. This gradual increase will give your petal its natural, curved shape. Think of it like drawing an outline with beads.
Each time you complete a row, twist the wire securely around the main stem. Aim for symmetry and an even tension across all rows. This ensures a uniform look.
Once your petal reaches the desired size and shape, make one final secure twist. Trim any excess wire from the working end, leaving a short tail that can be tucked in.
Repeat this process to create all the petals for your flower. Most flowers look best with 5-7 petals, but you can adjust this based on your design. Lay them out as you go to check for consistency in size and shape.
Step 5: Create the Center of the Flower
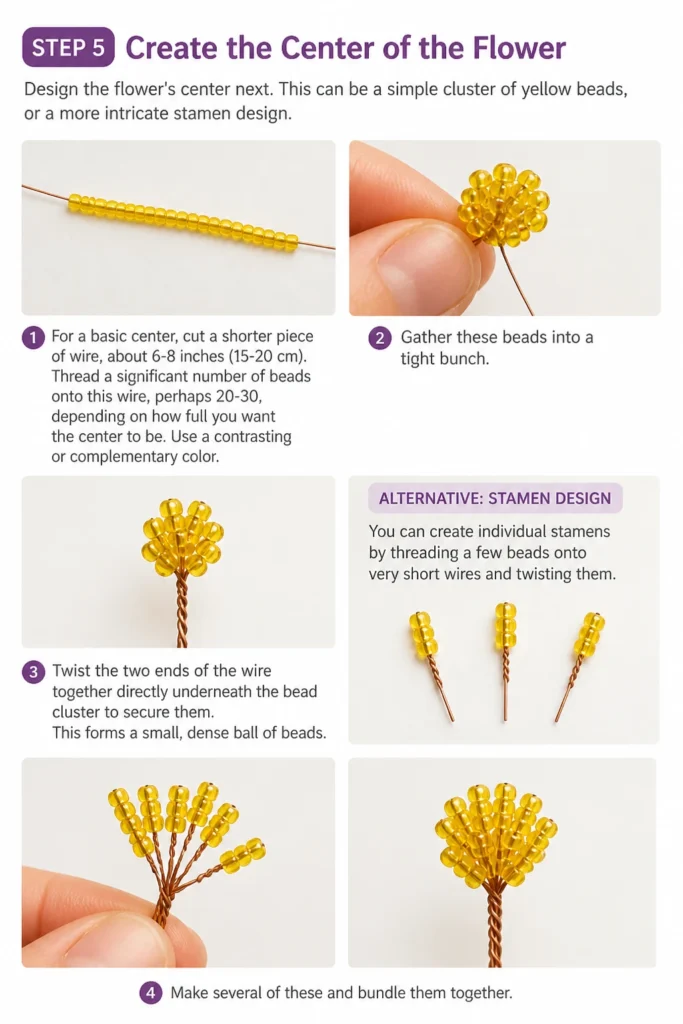
Design the flower’s center next. This can be a simple cluster of yellow beads, or a more intricate stamen design. For a basic center, cut a shorter piece of wire, about 6-8 inches (15-20 cm).
Thread a significant number of beads onto this wire, perhaps 20-30, depending on how full you want the center to be. Use a contrasting or complementary color.
Gather these beads into a tight bunch. Twist the two ends of the wire together directly underneath the bead cluster to secure them. This forms a small, dense ball of beads.
Alternatively, you can create individual stamens by threading a few beads onto very short wires and twisting them. Make several of these and bundle them together.
Step 6: Assemble the Flower Head
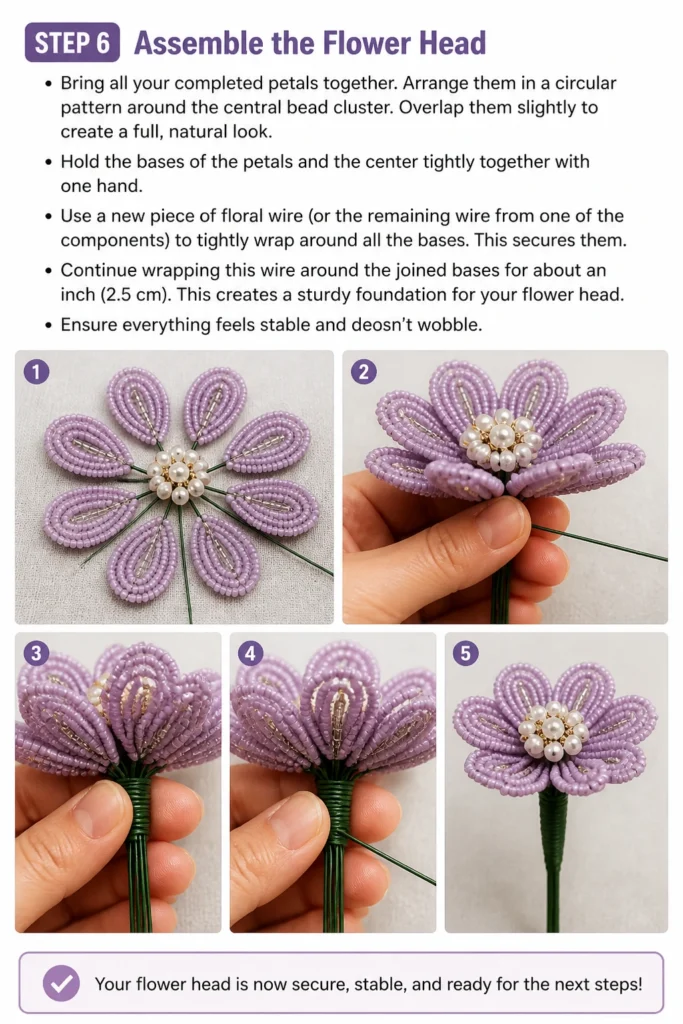
Bring all your completed petals together. Arrange them in a circular pattern around the central bead cluster. Overlap them slightly to create a full, natural look.
Hold the bases of the petals and the center tightly together with one hand. Use a new piece of floral wire (or the remaining wire from one of the components) to tightly wrap around all the bases. This secures them.
Continue wrapping this wire around the joined bases for about an inch (2.5 cm). This creates a sturdy foundation for your flower head. Ensure everything feels stable and doesn’t wobble.
Step 7: Add Leaves (Optional)
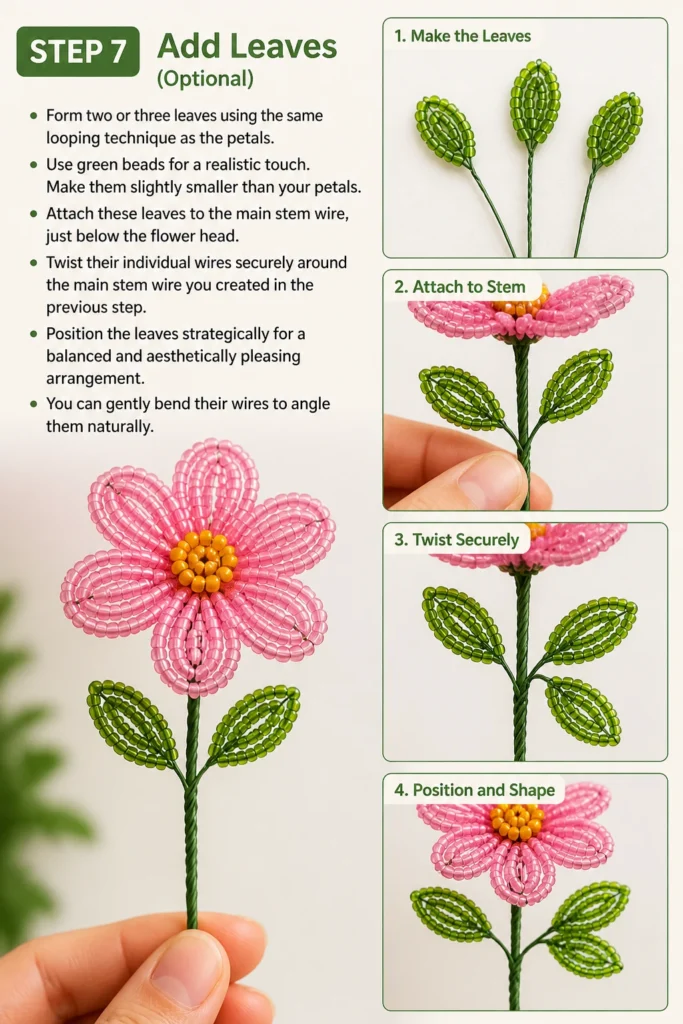
Form two or three leaves using the same looping technique as the petals. Use green beads for a realistic touch. Make them slightly smaller than your petals.
Attach these leaves to the main stem wire, just below the flower head. Twist their individual wires securely around the main stem wire you created in the previous step.
Position the leaves strategically for a balanced and aesthetically pleasing arrangement. You can gently bend their wires to angle them naturally.
Step 8: Finish the Stem
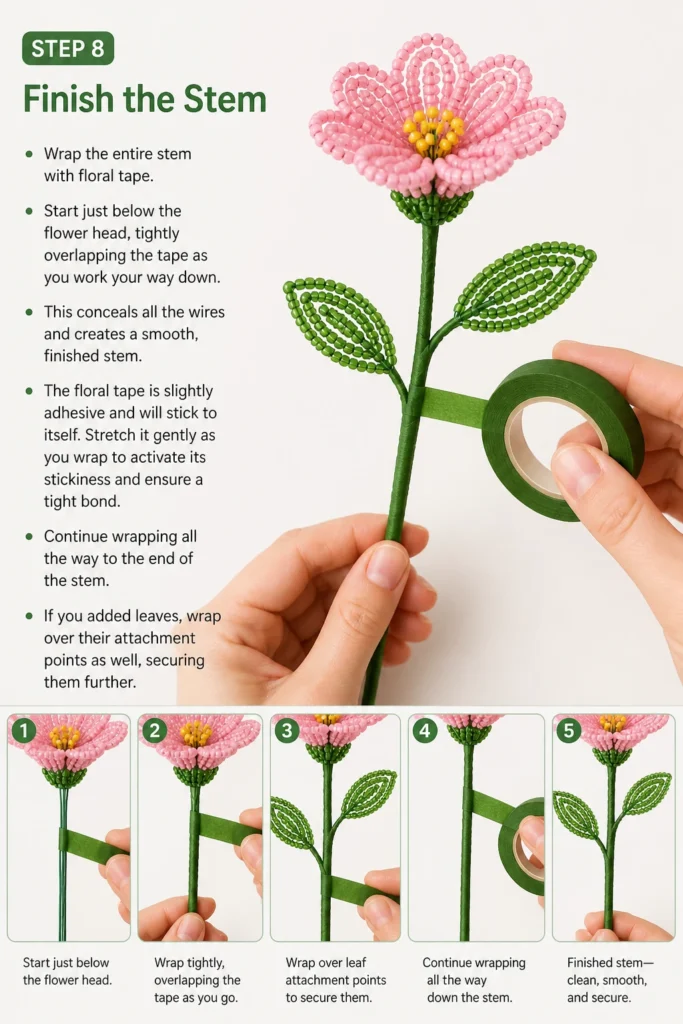
Wrap the entire stem with floral tape. Start just below the flower head, tightly overlapping the tape as you work your way down. This conceals all the wires and creates a smooth, finished stem.
The floral tape is slightly adhesive and will stick to itself. Stretch it gently as you wrap to activate its stickiness and ensure a tight bond.
Continue wrapping all the way to the end of the stem. If you added leaves, wrap over their attachment points as well, securing them further.
Step 9: Refine and Shape
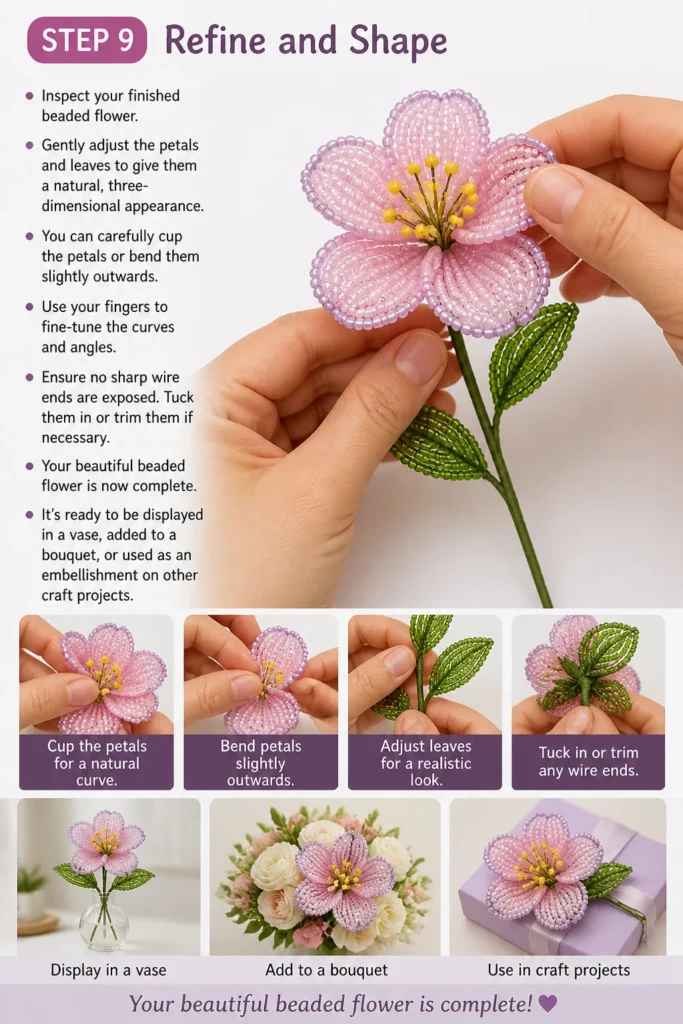
Inspect your finished beaded flower. Gently adjust the petals and leaves to give them a natural, three-dimensional appearance. You can carefully cup the petals or bend them slightly outwards.
Use your fingers to fine-tune the curves and angles. Ensure no sharp wire ends are exposed. Tuck them in or trim them if necessary.
Your beautiful beaded flower is now complete. It’s ready to be displayed in a vase, added to a bouquet, or used as an embellishment on other craft projects.
Common Mistakes to Avoid
Using Too Little Wire
A common pitfall is cutting wire too short for your petals. This forces you to add extensions, which can weaken the structure and make the twists less clean. Always err on the side of cutting a longer piece; you can trim excess, but you can’t easily add more seamlessly. A generous length ensures smooth, continuous work.
Inconsistent Wire Tension
If you twist your wire too loosely, your beads might shift, and the petal can lose its shape or even unravel over time. Conversely, twisting too tightly can weaken or even break the wire. Aim for firm, consistent tension throughout your entire project to ensure durability and a professional finish.
Uneven Petal Sizing
Creating petals of varying sizes without intention can make your flower look lopsided or unfinished. Strive for consistency if you want a uniform flower. Lay out your completed petals side-by-side as you work to compare their dimensions and make adjustments early on.
Forgetting to Secure Ends
Leaving wire ends exposed or improperly tucked can lead to snags or scratches. Always ensure all wire ends are neatly trimmed, bent, and tucked into the main stem or behind other components. This makes your flower safe to handle and visually appealing.
Troubleshooting
My Petals Aren’t Lying Flat/Are Warped
This often happens if the wire tension was inconsistent while forming the rows. To fix it, gently use flat-nose pliers to press down on the problematic areas, carefully reshaping the wire. You can also use your fingers to gently cup or flatten the petal until it looks right. For future petals, focus on even tension.
Beads Keep Sliding Off the Wire
This is usually a sign that your initial stopper loop isn’t tight enough, or the working end of the wire wasn’t twisted securely after each row. Double-check your starting loop to ensure it’s firmly crimped. When adding rows, make sure each twist around the main stem is snug and secure.
The Flower Head Feels Wobbly
A wobbly flower head means the components weren’t bound tightly enough during assembly. To fix this, you may need to carefully unwrap some of the floral tape. Then, use an additional piece of strong floral wire to tightly wrap around the bases of all petals and the center, securing them firmly before re-taping.
Key Takeaways
- Preparation is crucial: Gather all tools and materials before starting.
- Wire gauge matters: Use appropriate wire thickness for petals, stems, and centers.
- Consistent tension: Maintain firm, even twists for durable and shapely components.
- Layer and build: Create petals by gradually increasing bead counts in each row.
- Secure assembly: Bind all components tightly to form a stable flower head.
- Finish neatly: Use floral tape to cover wires and create a polished stem.
Frequently Asked Questions
What type of beads are best for making flowers?
Seed beads are generally the best choice for making beaded flowers. They come in a vast array of colors, sizes (like 11/0 or 15/0), and finishes, offering great versatility. Their small size allows for intricate detailing and delicate petal shapes.
Can I use different wire colors?
Absolutely! While traditional floral wire is green, you can experiment with different wire colors. Silver or gold wire can add a metallic sheen to your flower, especially if it’s visible. Consider matching the wire color to your beads for a seamless look, or using a contrasting color for a unique effect.
How can I make my flower more durable?
To enhance durability, ensure all your wire twists are very tight and secure. You can also use a slightly thicker gauge wire for the main stem to provide more rigidity. A thin coat of clear nail polish or a craft sealant applied to the wire twists can also offer extra protection against unraveling.
Can I make different types of flowers with this technique?
Yes, the basic looping technique described here is highly adaptable. By varying the number of beads, petal shapes, and the size of your central cluster, you can create a wide variety of flowers like roses, daisies, or even abstract blooms. Experiment with different bead colors and sizes for unique results.
Our Top Recommended Finds
- Assorted Seed Bead Kit: A kit with a variety of colors and sizes allows for endless creative possibilities. It’s perfect for beginners to experiment.
- Multi-Gauge Floral Wire Pack: This provides different wire thicknesses, ensuring you have the right gauge for delicate petals and sturdy stems.
- Jewelry Pliers Set (Round, Flat, Cutter): Having a dedicated set of quality pliers makes the wire manipulation much easier and more precise.
Craft Your Own Beaded Garden
You now have the knowledge and steps to create your very own beaded flower. Imagine the vibrant colors and delicate forms you can bring to life. This isn’t just about crafting; it’s about creating lasting beauty with your own hands.
Why wait? Gather your beads and wire today. Start with a simple petal, and watch as your confidence and creativity bloom. Soon, you’ll have a delightful collection of beaded flowers, each a testament to your skill and patience.
Beginner-friendly templates, step-by-step guides,
and weekly project ideas in your inbox.