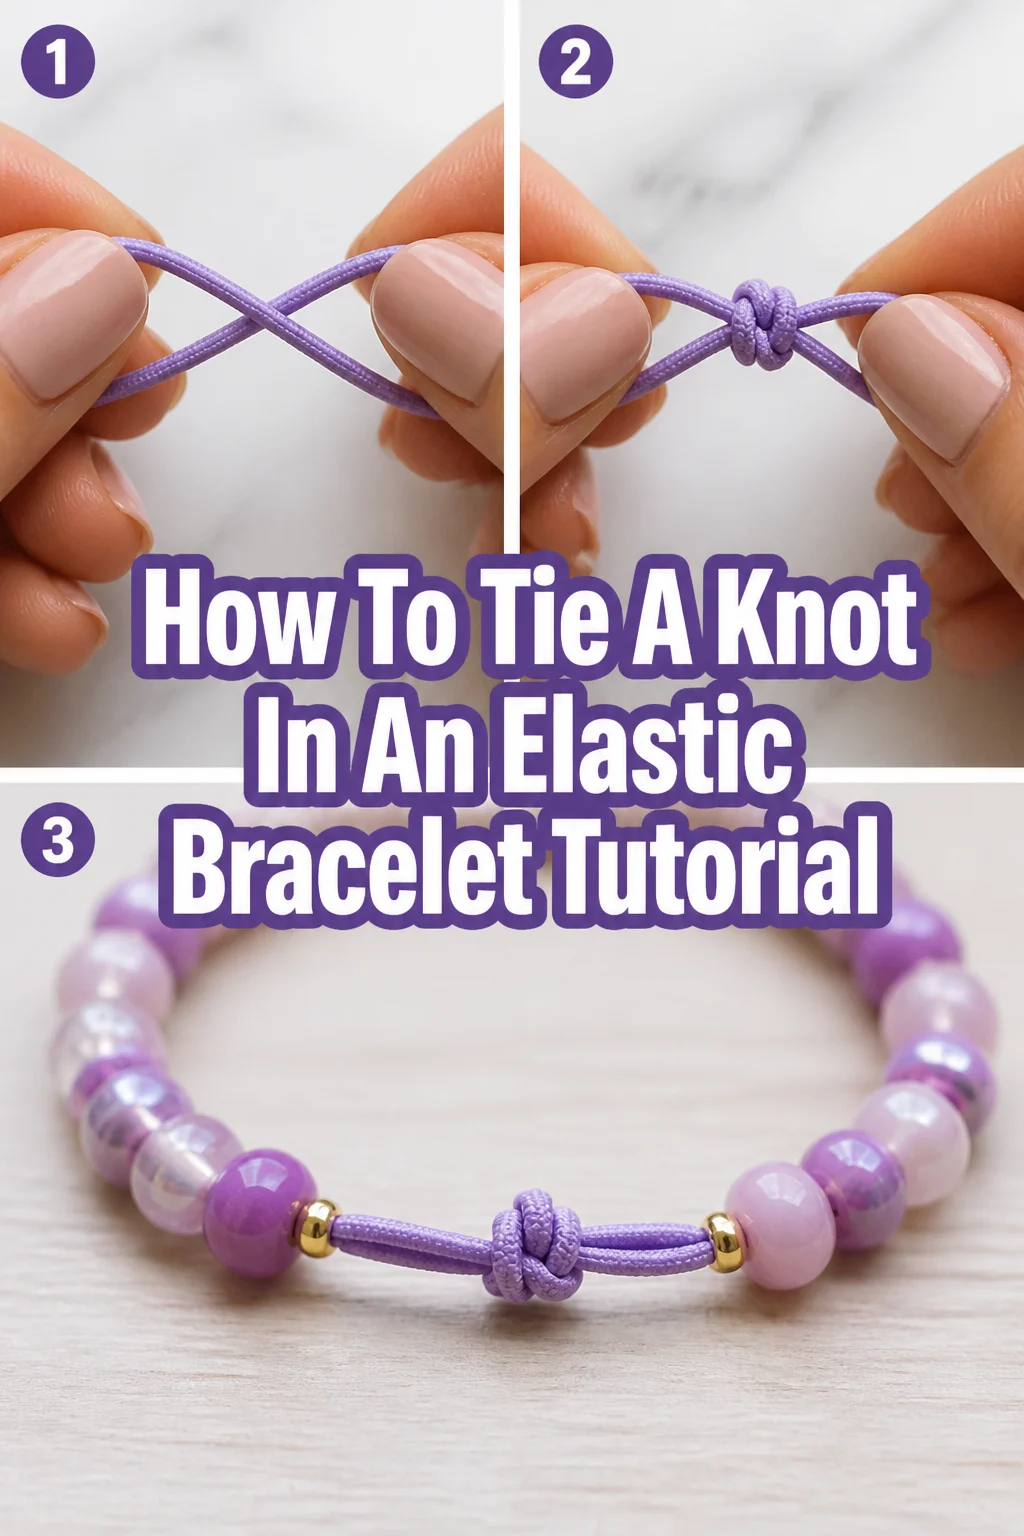
How To Tie A Knot In An Elastic Bracelet Tutorial

Beginner-friendly templates, step-by-step guides,
and weekly project ideas in your inbox.
Learning to properly tie a knot in an elastic bracelet can feel tricky at first. I remember struggling with flimsy knots that would come undone, scattering beads everywhere.
It’s a skill that ensures your beautiful creations last. With the right technique, you can make strong, secure knots every time.
This guide will show you exactly how to achieve that.

Quick Overview
This tutorial will guide you through creating a secure, durable knot for your elastic bracelets. You’ll learn a technique that minimizes bulk and maximizes strength, ensuring your handmade jewelry stands the test of time.
- Time needed: 5-10 minutes
- Difficulty: Beginner
- What you’ll need: Elastic beading cord, beads (optional, for practice), scissors, clear jewelry glue (optional, but recommended)
Step-by-Step Instructions
Step 1: Prepare Your Cord and Beads
First, gather all your materials. Lay out your elastic cord, beads, and scissors on a clean, flat surface.
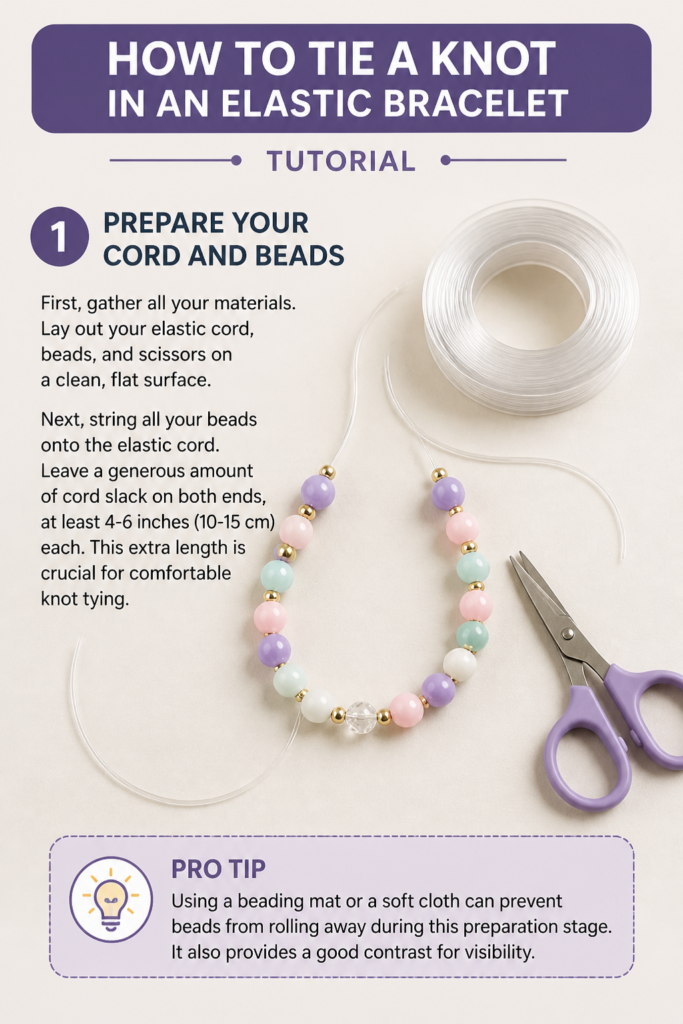
Next, string all your beads onto the elastic cord. Leave a generous amount of cord slack on both ends, at least 4-6 inches (10-15 cm) each. This extra length is crucial for comfortable knot tying.
Pro Tip: Using a beading mat or a soft cloth can prevent beads from rolling away during this preparation stage. It also provides a good contrast for visibility.
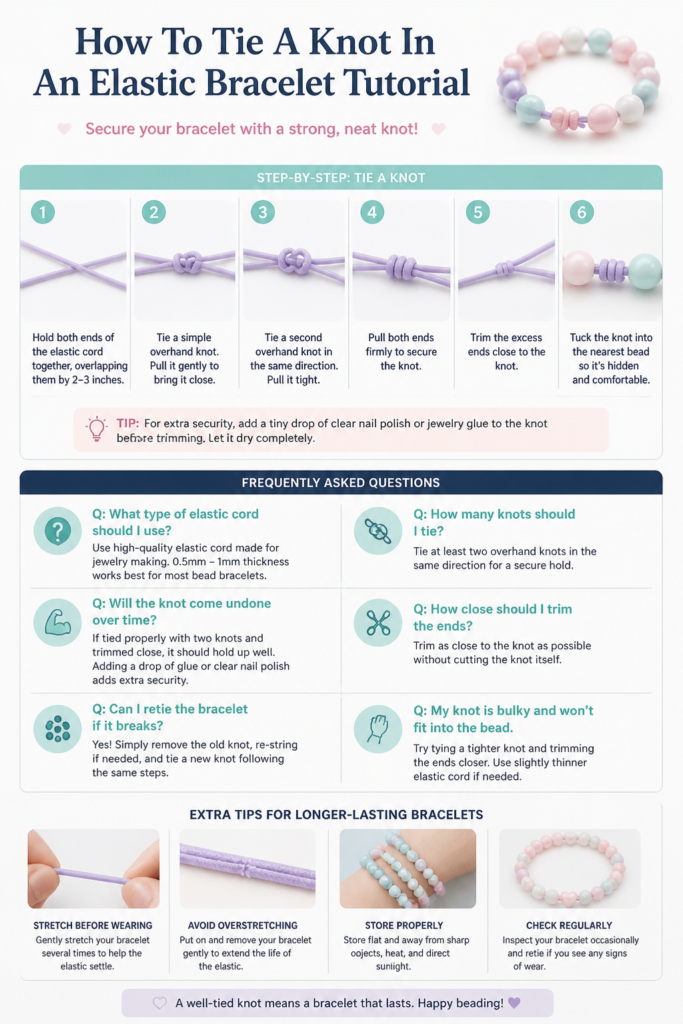
Step 2: Cross the Cord Ends
Bring the two ends of your elastic cord together. Ensure the beads are snugly, but not tightly, against each other in a circle.
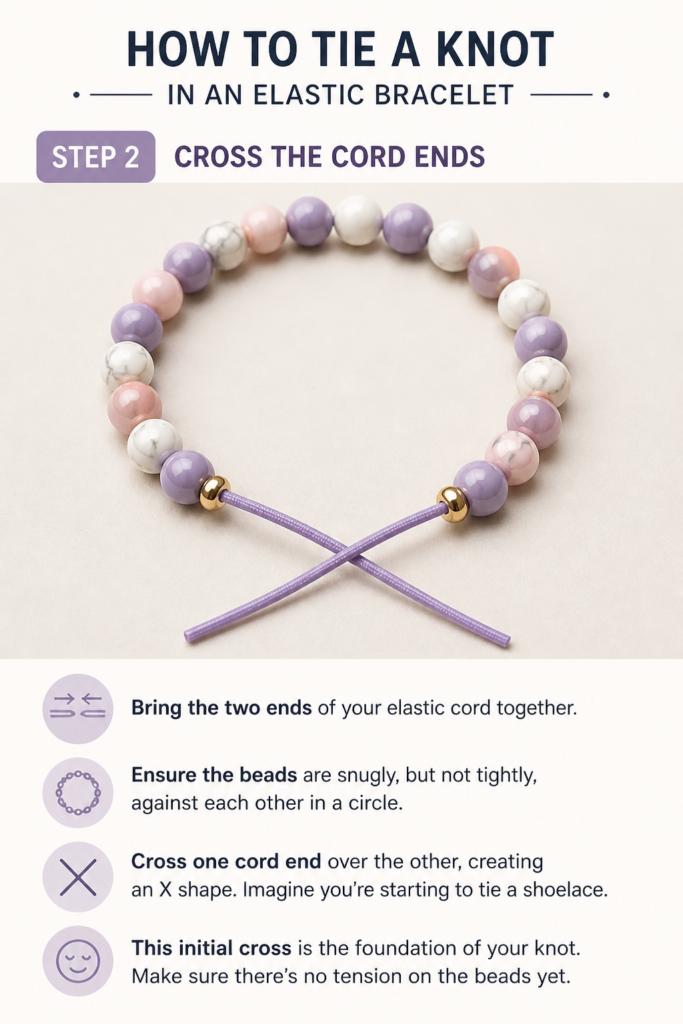
Cross one cord end over the other, creating an “X” shape. Imagine you’re starting to tie a shoelace.
This initial cross is the foundation of your knot. Make sure there’s no tension on the beads yet.
Step 3: Form the First Half of a Surgeon’s Knot
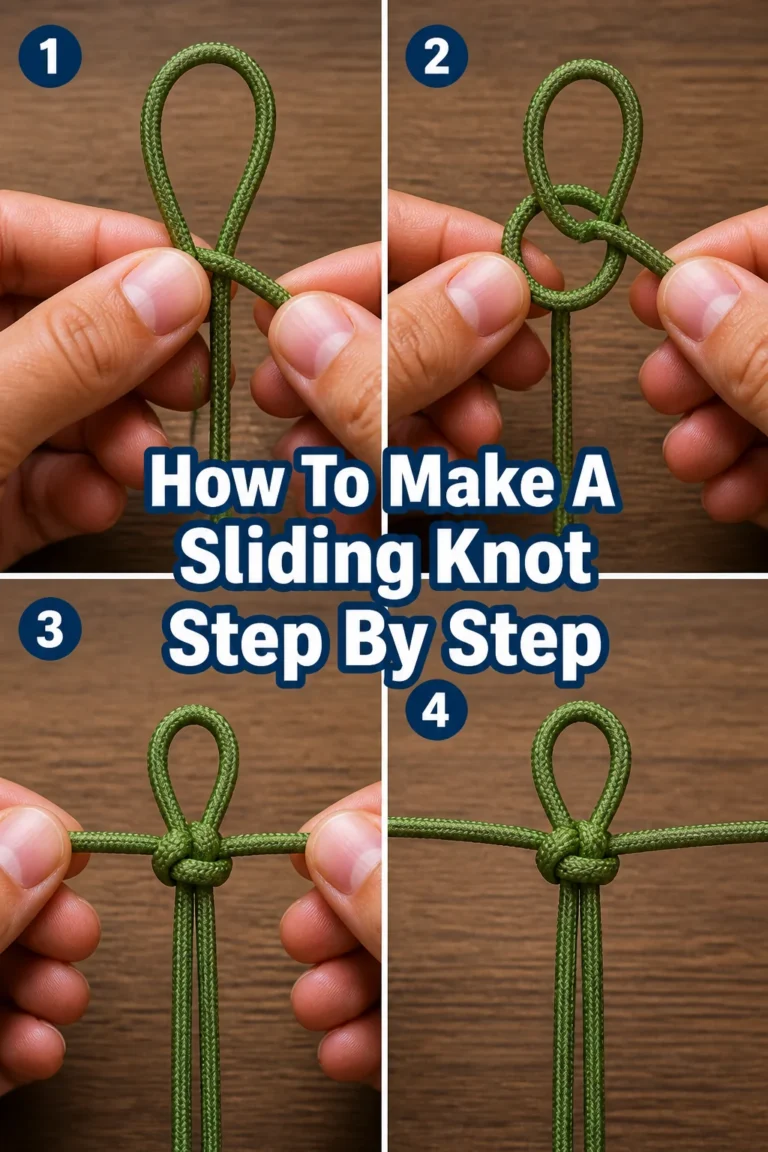
Loop one cord end underneath the other. Pull it through the opening you just created. This is a basic overhand knot.
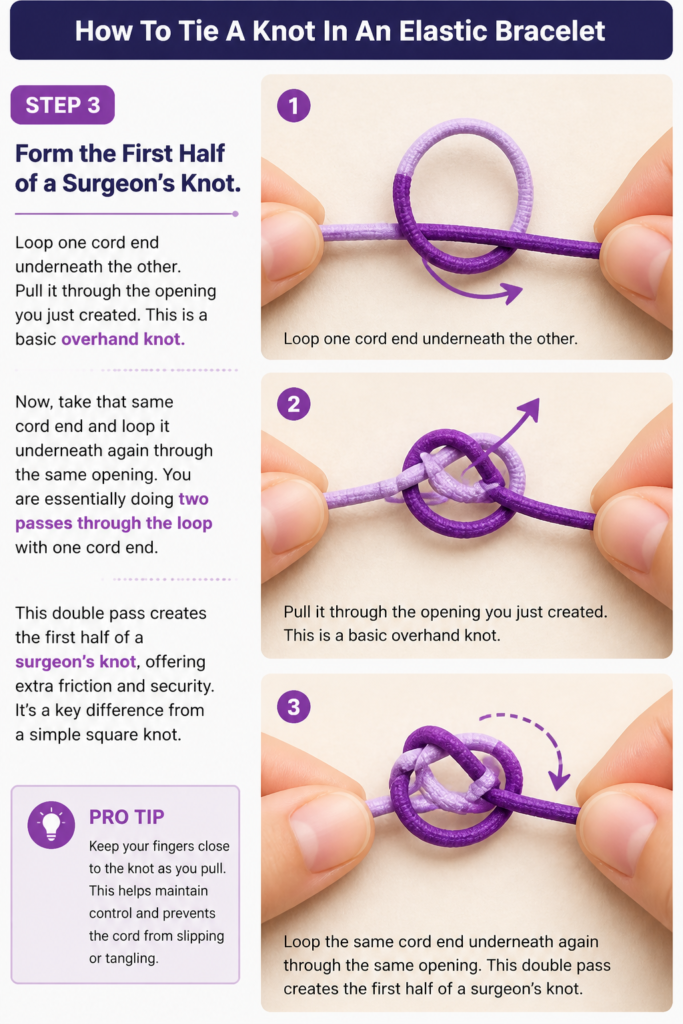
Now, take that same cord end and loop it underneath again through the same opening. You are essentially doing two passes through the loop with one cord end.
This double pass creates the first half of a surgeon’s knot, offering extra friction and security. It’s a key difference from a simple square knot.
Pro Tip: Keep your fingers close to the knot as you pull. This helps maintain control and prevents the cord from slipping or tangling.
Step 4: Gently Tighten the First Half
Pull both cord ends in opposite directions. Do this slowly and with even tension.
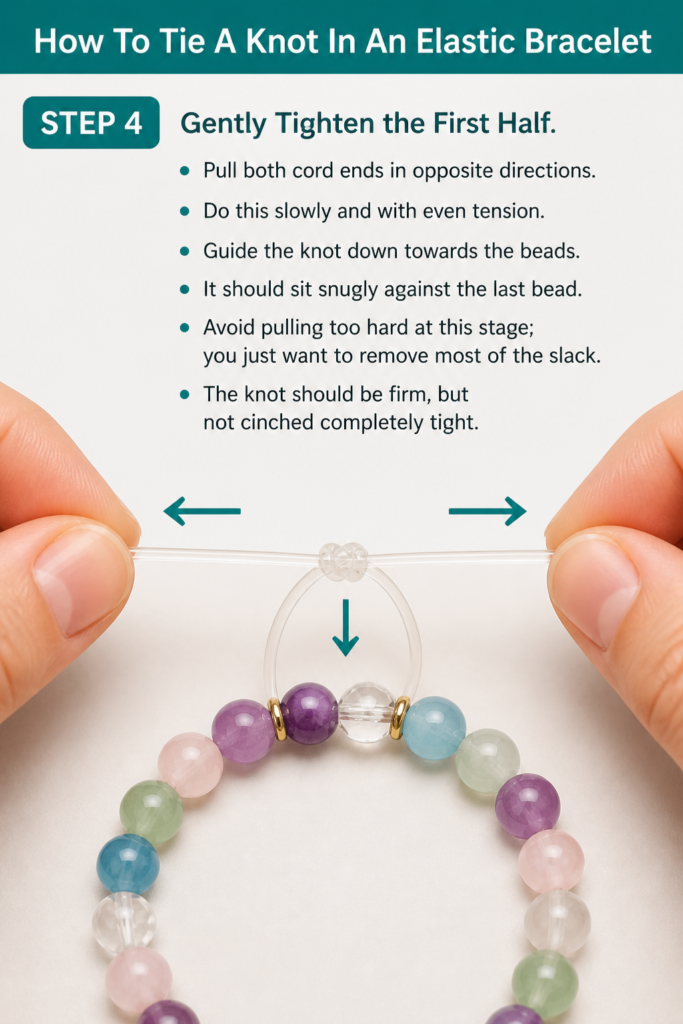
Guide the knot down towards the beads. It should sit snugly against the last bead.
Avoid pulling too hard at this stage; you just want to remove most of the slack. The knot should be firm, but not cinched completely tight.
Step 5: Form the Second Half of the Surgeon’s Knot
Now, take the cord end that is currently on top. Cross it over the other cord end. This is the opposite direction of your first cross.
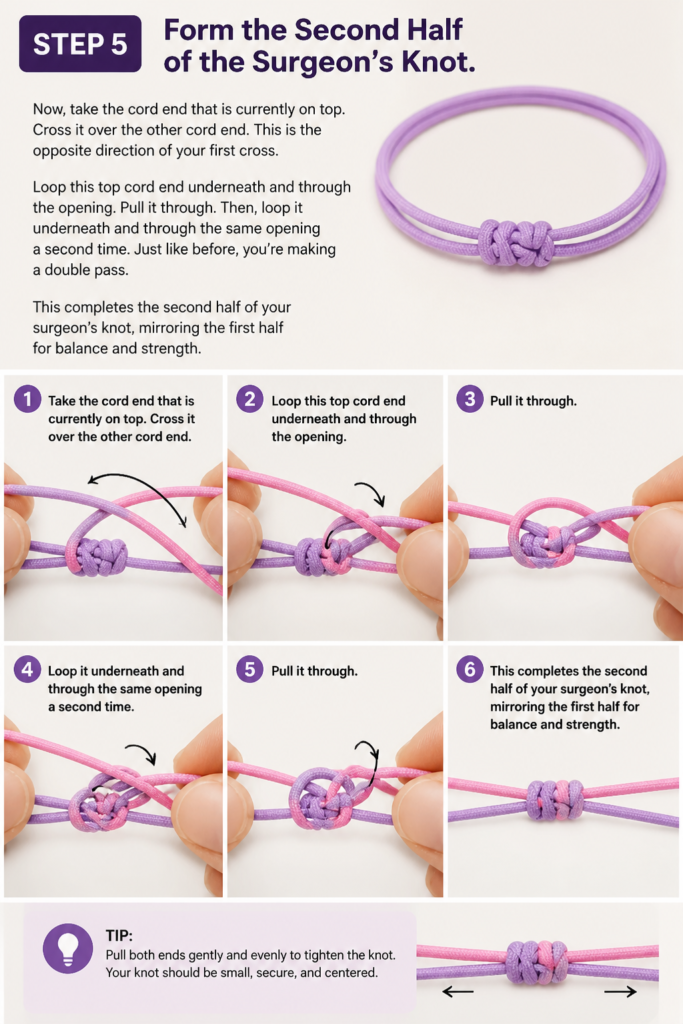
Loop this top cord end underneath and through the opening. Pull it through.
Then, loop it underneath and through the same opening a second time. Just like before, you’re making a double pass.
This completes the second half of your surgeon’s knot, mirroring the first half for balance and strength.
Step 6: Securely Tighten the Full Knot
Pull both cord ends firmly in opposite directions. Apply steady, increasing pressure. You should feel the knot cinch down tightly.
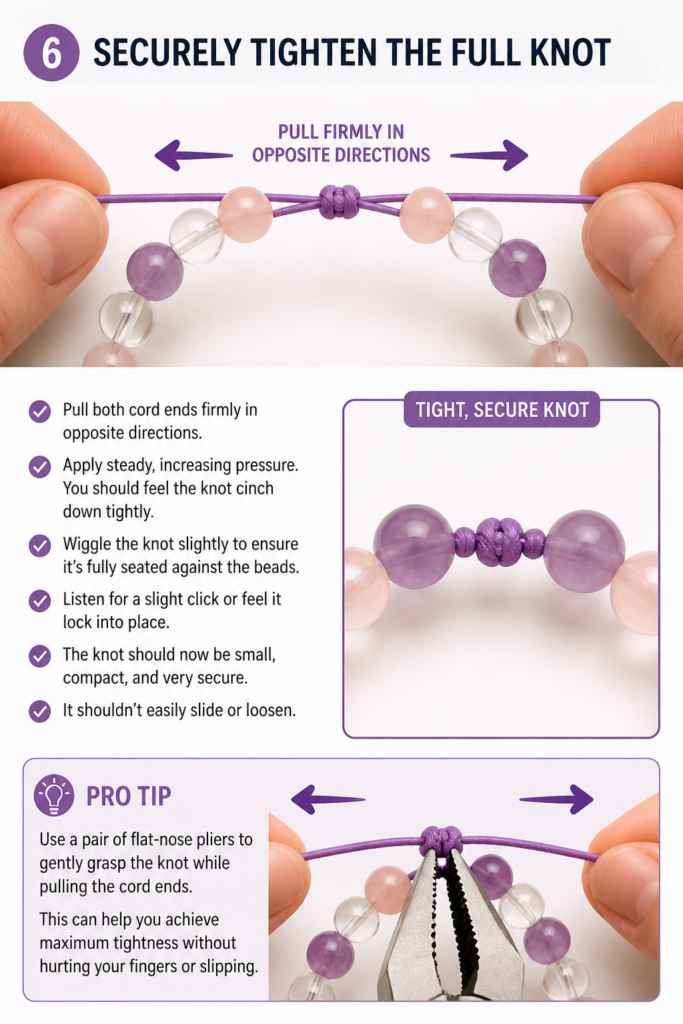
Wiggle the knot slightly to ensure it’s fully seated against the beads. Listen for a slight “click” or feel it lock into place.
The knot should now be small, compact, and very secure. It shouldn’t easily slide or loosen.
Pro Tip: Use a pair of flat-nose pliers to gently grasp the knot while pulling the cord ends. This can help you achieve maximum tightness without hurting your fingers or slipping.
Step 7: Trim Excess Cord
Once you are confident the knot is tight and secure, trim the excess cord. Cut as close to the knot as possible without cutting the knot itself.
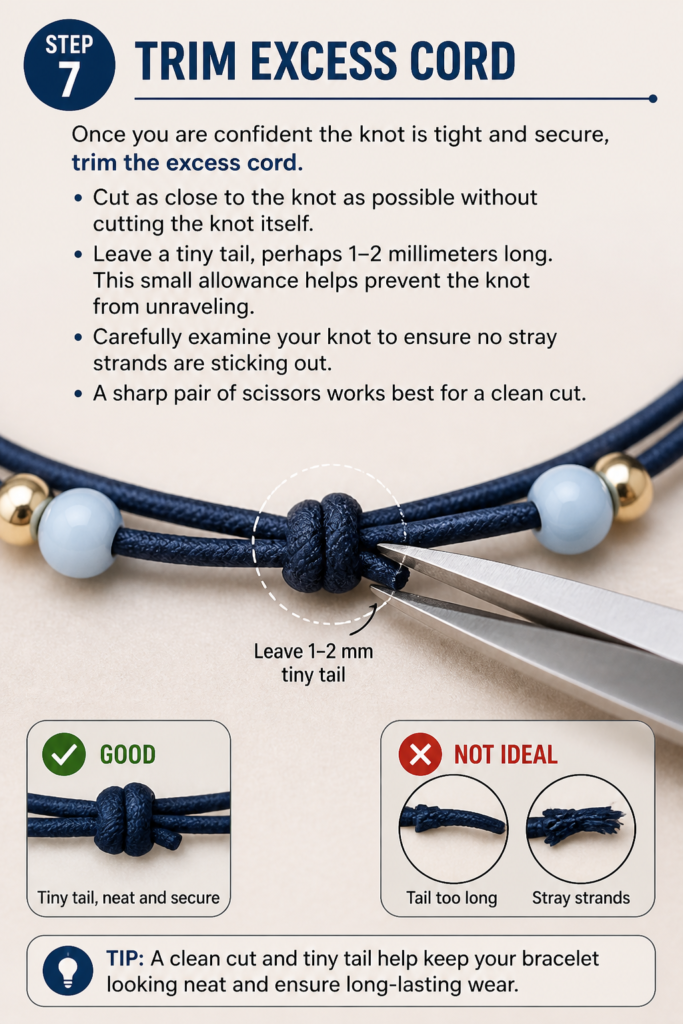
Leave a tiny tail, perhaps 1-2 millimeters long. This small allowance helps prevent the knot from unraveling.
Carefully examine your knot to ensure no stray strands are sticking out. A sharp pair of scissors works best for a clean cut.
Step 8: Apply Optional Jewelry Glue
For an extra layer of security, apply a tiny drop of clear jewelry glue to the knot. E6000 or Hypo-Tube Cement work well.
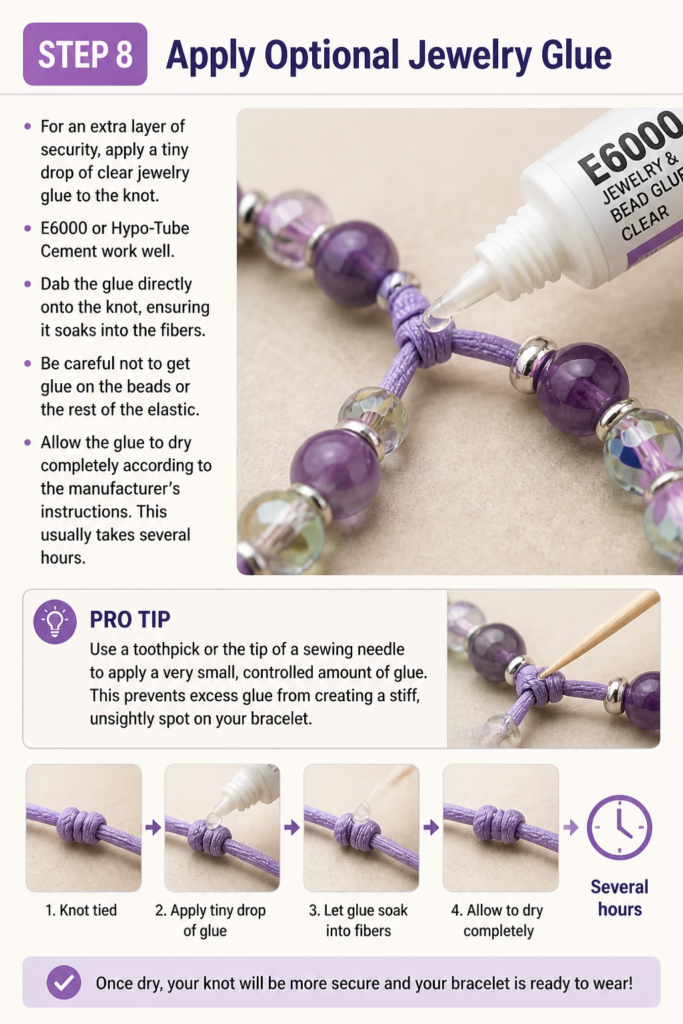
Dab the glue directly onto the knot, ensuring it soaks into the fibers. Be careful not to get glue on the beads or the rest of the elastic.
Allow the glue to dry completely according to the manufacturer’s instructions. This usually takes several hours.
Pro Tip: Use a toothpick or the tip of a sewing needle to apply a very small, controlled amount of glue. This prevents excess glue from creating a stiff, unsightly spot on your bracelet.
Common Mistakes to Avoid
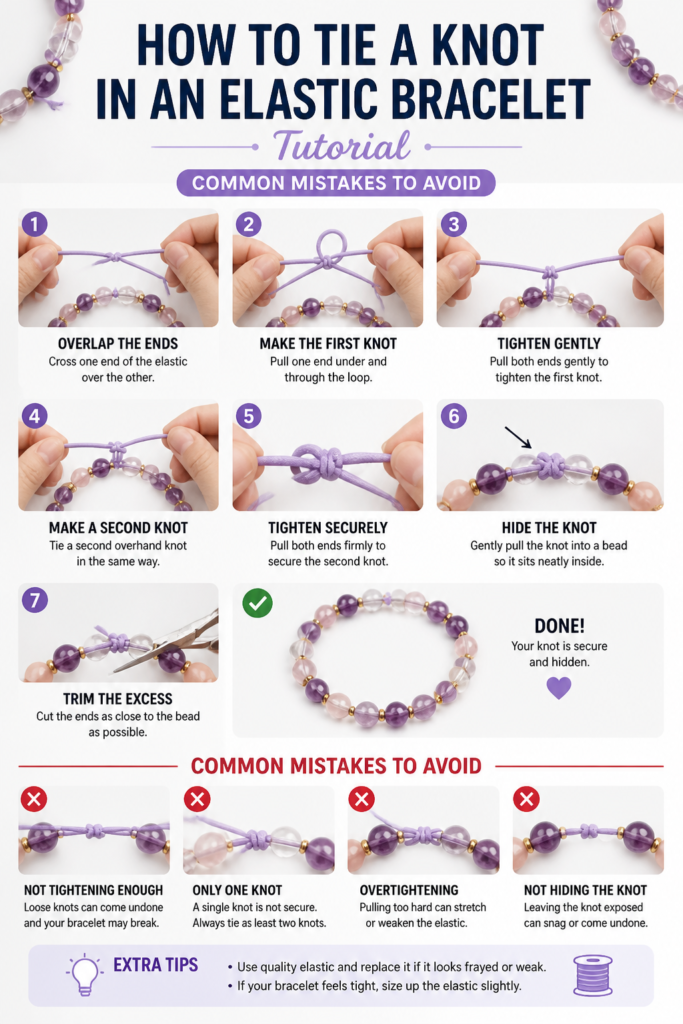
Using a Single Overhand Knot
Many beginners simply tie a single overhand knot, or even a basic square knot without the double passes. While these knots might hold for a short while, they lack the necessary friction and grip for elastic materials. Elastic cord is smooth and stretchy, making it prone to unraveling from simpler knots. Always use the double-pass surgeon’s knot technique described.
Not Leaving Enough Slack
Trying to tie a knot with only an inch or two of cord on each side is incredibly frustrating. You won’t have the leverage or space to properly manipulate the cord, leading to loose, poorly formed knots. Always ensure you have at least 4-6 inches of working cord on each side for comfortable and effective knot tying.
Over-tightening Too Early
Pulling the knot extremely tight before it’s properly formed can cause issues. It might kink the elastic, weaken the cord, or prevent the knot from seating correctly against the beads. Tighten gently at first, guiding the knot into place, then apply firm, final pressure once both halves of the surgeon’s knot are complete.
Trimming Too Close
Cutting the cord flush with the knot immediately after tying can be risky. If the knot shifts even slightly or wasn’t as tight as you thought, it can unravel. Always leave a tiny tail (1-2mm) for added security, especially if you’re not using glue. This small tail provides a buffer.
Troubleshooting
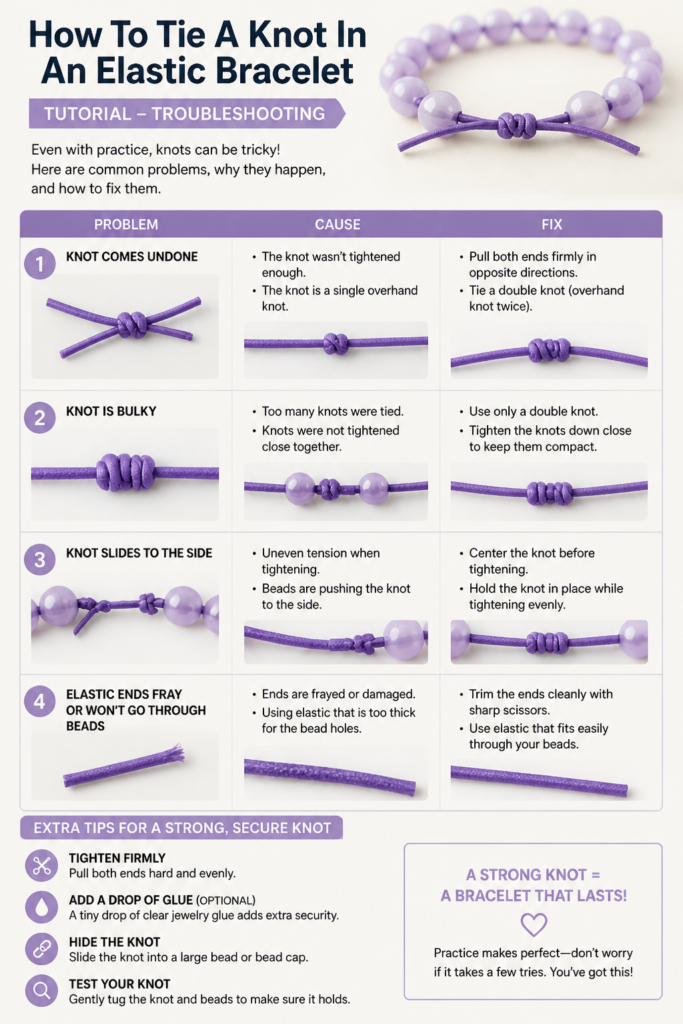
The Knot Keeps Unraveling
If your knot repeatedly comes undone, it’s likely due to one of two reasons. First, you might not be performing the double-pass surgeon’s knot correctly; ensure you loop each cord end twice through the opening for both halves of the knot. Second, you might not be tightening it enough. Use pliers for extra leverage and apply firm, steady pressure until it feels completely locked.
The Knot Looks Bulky or Uneven
A bulky knot often indicates that it hasn’t been properly cinched down. After forming both halves, pull firmly on all four strands (the two cord ends and the two loops of the bracelet itself) simultaneously to evenly distribute tension and pull the knot tight. An uneven knot can also happen if the two halves aren’t formed symmetrically. Practice ensures both passes are consistent.
The Bracelet Breaks After Tying
If your bracelet snaps shortly after you’ve tied the knot, it could be a few things. You might have pulled the elastic cord too forcefully during tightening, weakening it at the knot point. Alternatively, the cord might have been old or of poor quality. Ensure you’re using fresh, good-quality elastic designed for jewelry, and apply firm but controlled pressure when tightening.
Key Takeaways
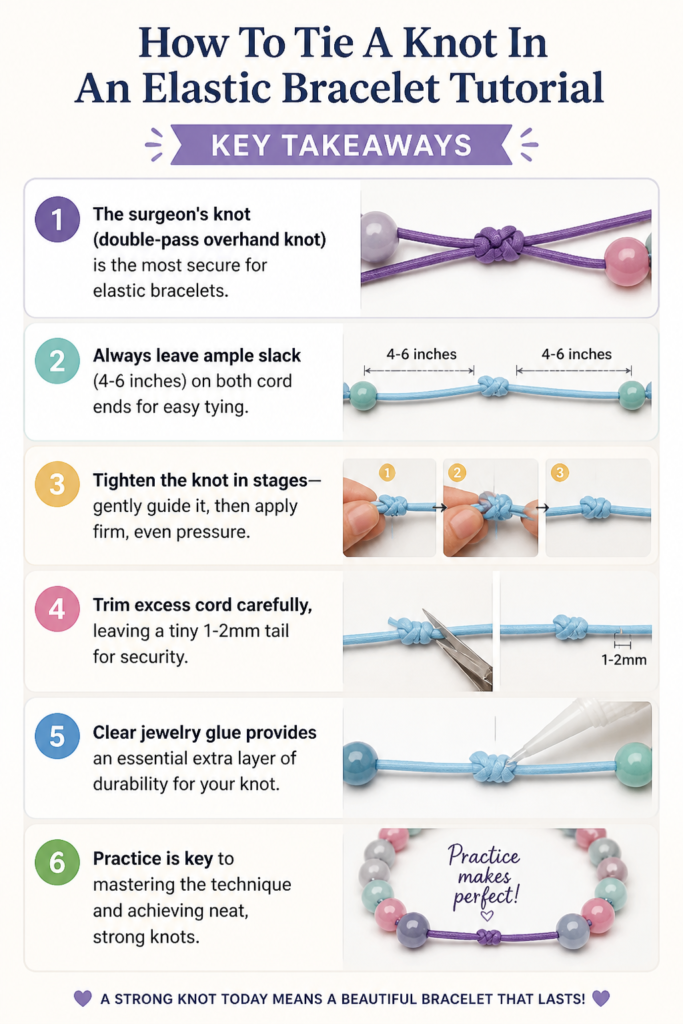
- The surgeon’s knot (double-pass overhand knot) is the most secure for elastic bracelets.
- Always leave ample slack (4-6 inches) on both cord ends for easy tying.
- Tighten the knot in stages: gently guide it, then apply firm, even pressure.
- Trim excess cord carefully, leaving a tiny 1-2mm tail for security.
- Clear jewelry glue provides an essential extra layer of durability for your knot.
- Practice is key to mastering the technique and achieving neat, strong knots.
Frequently Asked Questions
What type of elastic cord is best for bracelets?
The best elastic cord for bracelets is typically a strong, multi-strand elastic, often called “Stretch Magic” or similar brands. These cords are durable, resistant to fraying, and come in various thicknesses to suit different bead hole sizes. Avoid thin, single-strand elastic as it’s more prone to breaking.
Can I use super glue to secure the knot?
While super glue can technically secure a knot, it’s not ideal for elastic. Super glue can make elastic brittle and stiff, leading to premature breakage. Clear jewelry glue, specifically designed for flexible materials like E6000 or Hypo-Tube Cement, is a much better choice as it remains flexible and won’t degrade the elastic.
How do I hide the knot in my bracelet?
The best way to hide the knot is to make it as small and compact as possible, then gently “pop” it into the hole of an adjacent bead. After applying glue and allowing it to dry, you can sometimes use the tip of a needle or pliers to push the knot into a slightly larger bead hole. Choose a bead with a slightly larger drill hole for this purpose.
How can I make my elastic bracelet stronger?
Beyond using a surgeon’s knot and glue, you can enhance bracelet strength by using thicker elastic cord appropriate for your bead weight. For very heavy beads, consider stringing with two strands of elastic through each bead, then tying a knot with all four ends. This doubles the strength and durability.
Our Top Recommended Finds
- Stretch Magic Elastic Cord: Known for its strength and durability, it’s a staple for elastic bracelet making. It’s available in various gauges.
- Hypo-Tube Cement or E6000 Jewelry Glue: These clear, flexible glues are perfect for securing knots without making the elastic brittle.
- Sharp Craft Scissors or Flush Cutters: Essential for making clean, precise cuts close to the knot without fraying the elastic.
Create Your Own Wearable Art Today
You now have the knowledge and steps to tie a truly secure knot in any elastic bracelet. This skill will transform your jewelry-making projects, giving them a professional finish and lasting durability.
Don’t let the fear of a flimsy knot hold you back. Grab your supplies, follow these instructions, and start crafting beautiful, reliable elastic bracelets. Practice makes perfect, and soon you’ll be tying knots with confidence and ease.
Beginner-friendly templates, step-by-step guides,
and weekly project ideas in your inbox.