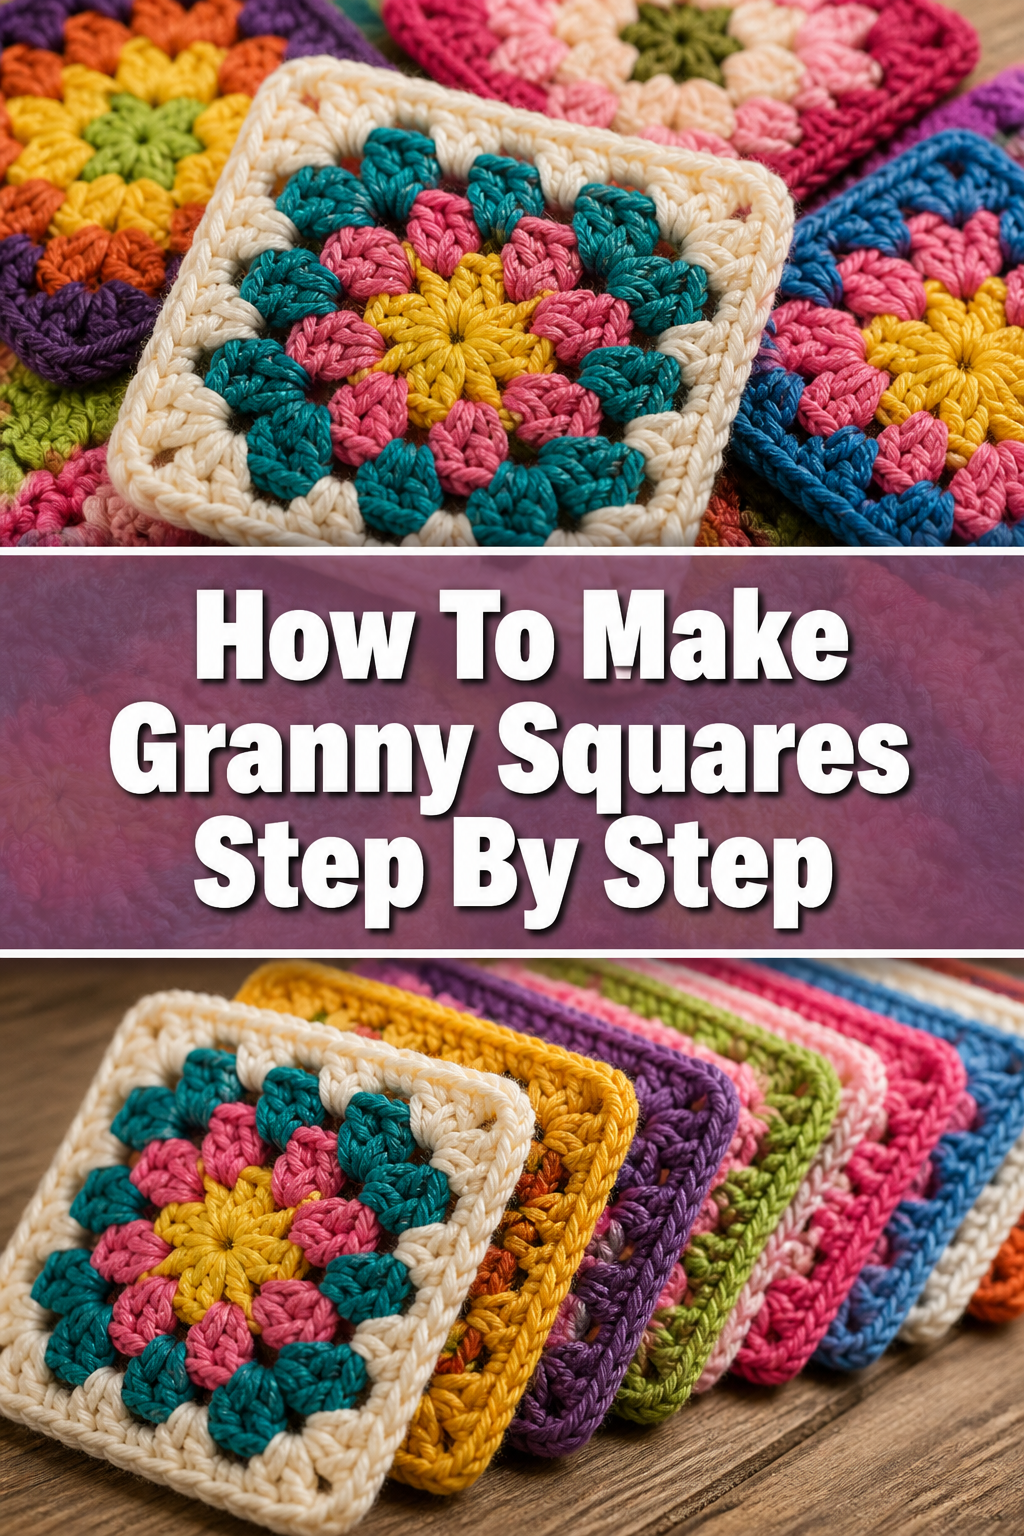
🧶 How To Make Granny Squares Step By Step

Beginner-friendly templates, step-by-step guides,
and weekly project ideas in your inbox.
There’s something truly special about a handmade granny square. I remember the first time I learned to make one; it felt like unlocking a secret language of yarn.
This guide comes from countless hours with hook and yarn, ensuring you have clear, practical instructions to create your very own.
You’re about to discover the joy of crafting these iconic crochet motifs.
Quick Overview
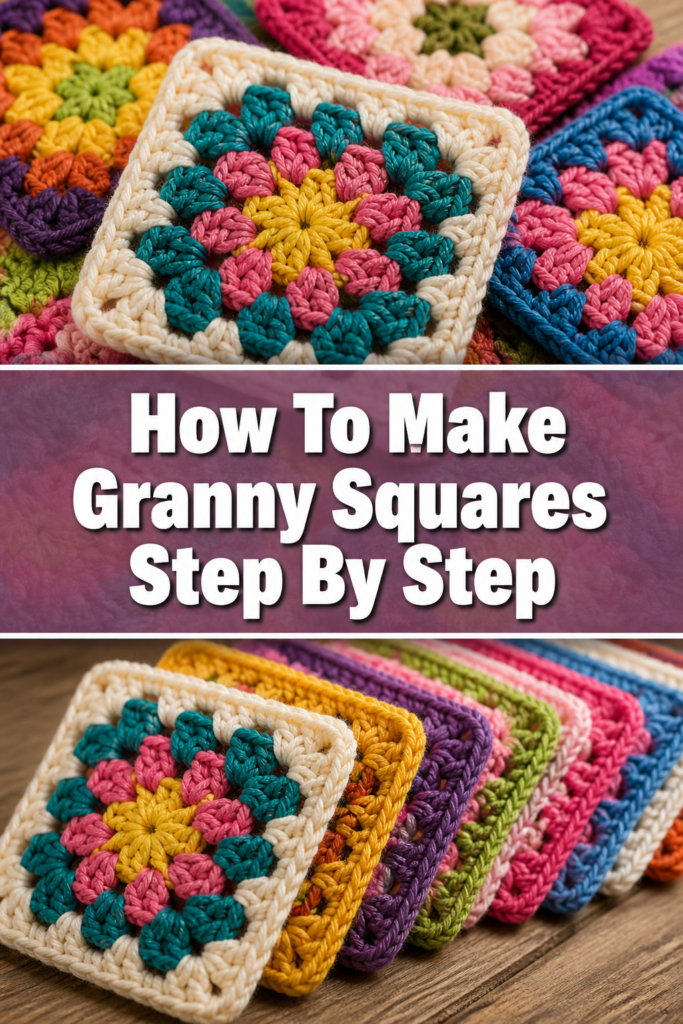
You’ll learn to crochet a classic granny square, a versatile building block for countless projects. This fundamental skill opens up a world of creative possibilities in yarn.
- Time needed: 30-60 minutes for your first square, much faster with practice
- Difficulty: Beginner
- What you’ll need: Yarn, crochet hook, scissors, tapestry needle
Step-by-Step Instructions
Step 1: Gather Your Materials
Before you begin, make sure you have everything ready. This prevents interruptions and helps you focus on the craft.
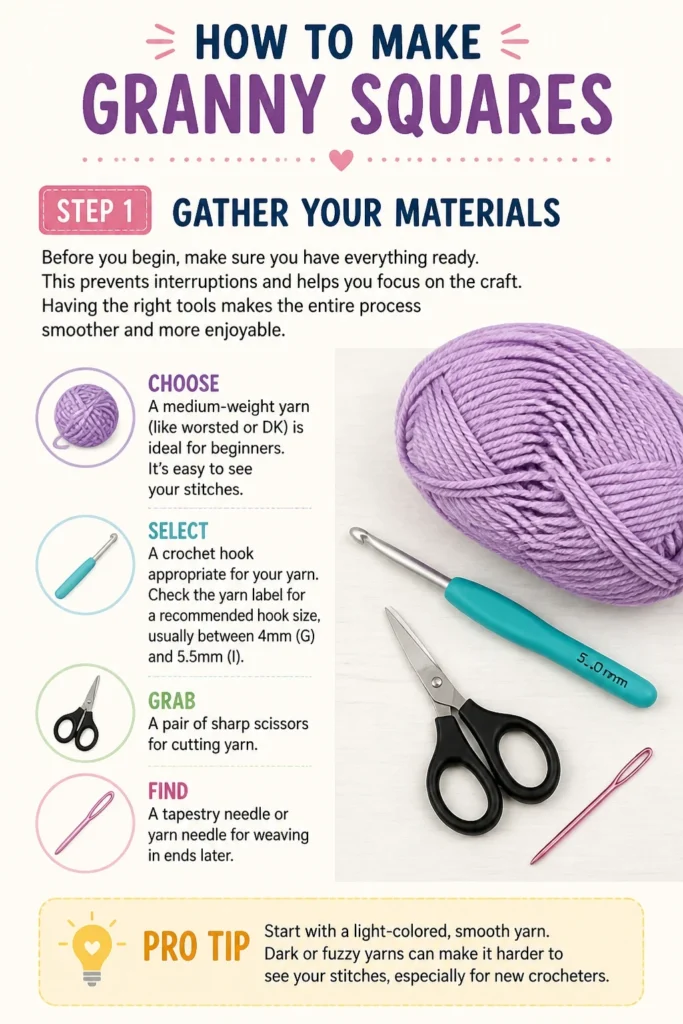
Having the right tools makes the entire process smoother and more enjoyable.
- Choose: A medium-weight yarn (like worsted or DK) is ideal for beginners. It’s easy to see your stitches.
- Select: A crochet hook appropriate for your yarn. Check the yarn label for a recommended hook size, usually between 4mm (G) and 5.5mm (I).
- Grab: A pair of sharp scissors for cutting yarn.
- Find: A tapestry needle or yarn needle for weaving in ends later.
Pro Tip: Start with a light-colored, smooth yarn. Dark or fuzzy yarns can make it harder to see your stitches, especially for new crocheters.
Step 2: Create a Slip Knot
The slip knot is the very first step in most crochet projects. It secures your yarn to the hook.
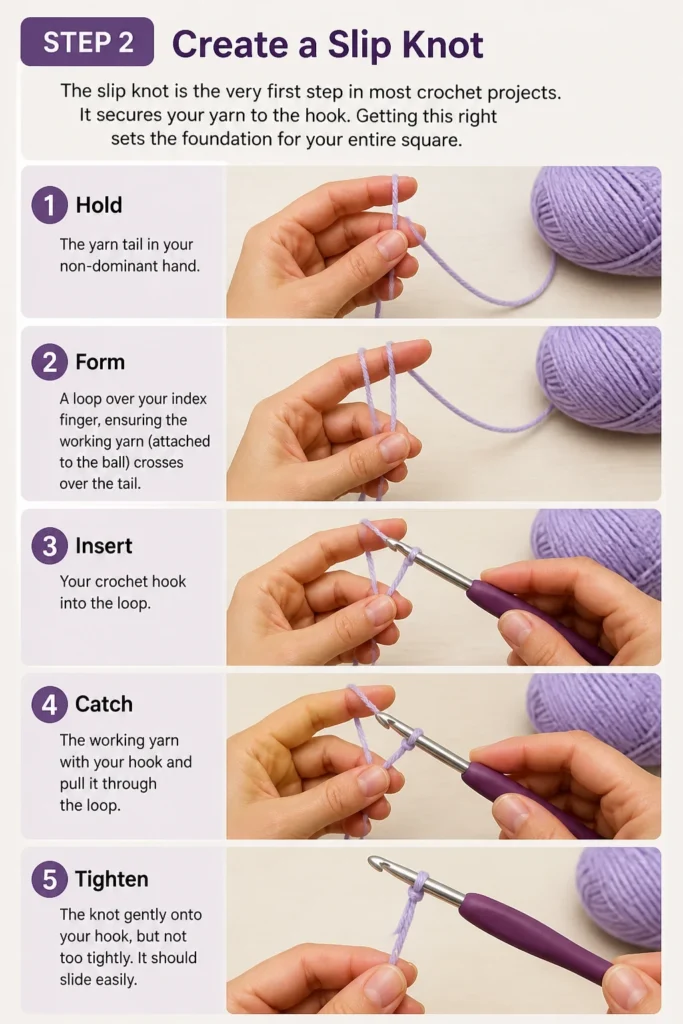
Getting this right sets the foundation for your entire square.
- Hold: The yarn tail in your non-dominant hand.
- Form: A loop over your index finger, ensuring the working yarn (attached to the ball) crosses over the tail.
- Insert: Your crochet hook into the loop.
- Catch: The working yarn with your hook and pull it through the loop.
- Tighten: The knot gently onto your hook, but not too tightly. It should slide easily.
Step 3: Chain Four and Form a Ring
This creates the central opening of your granny square. It’s where all subsequent stitches will be worked into.
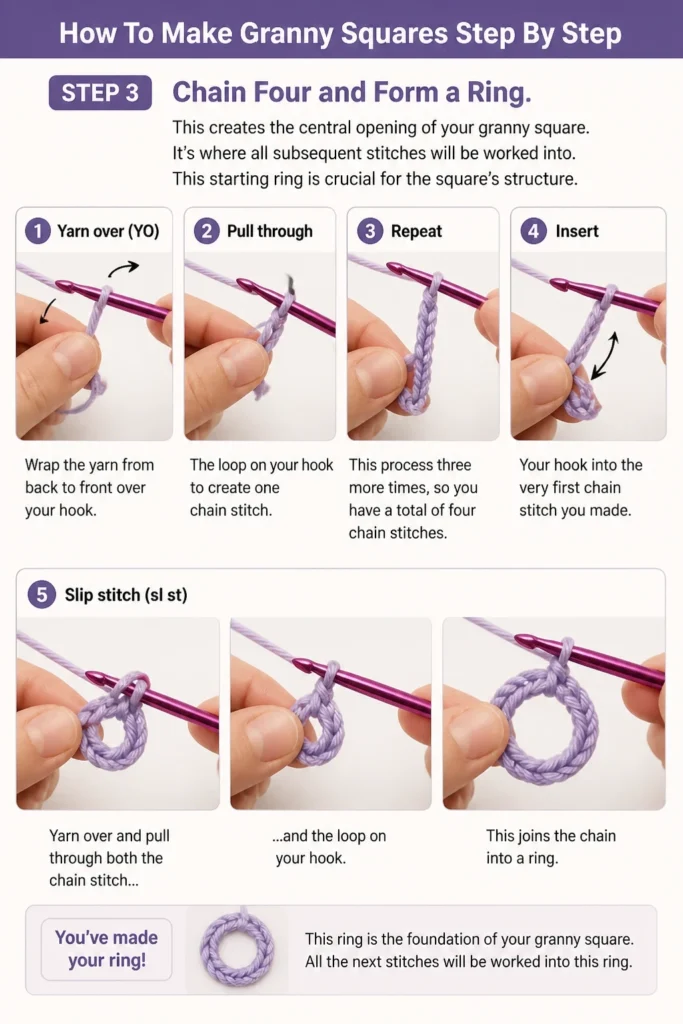
This starting ring is crucial for the square’s structure.
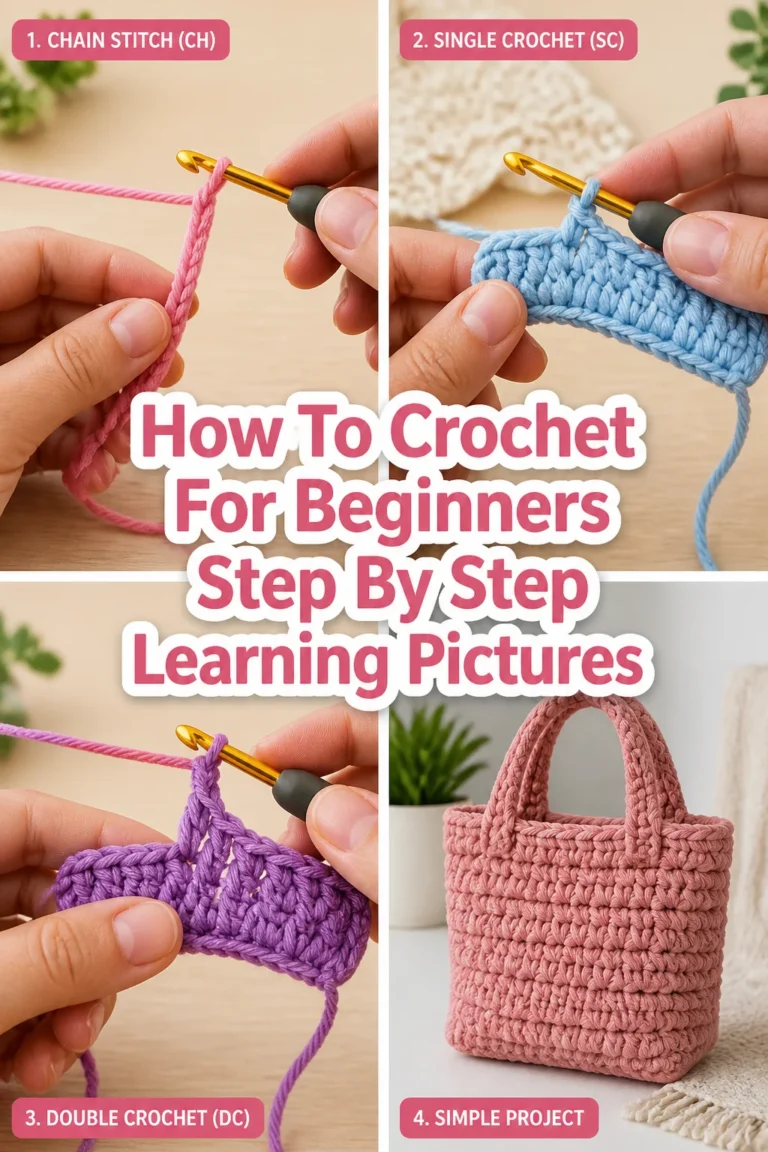
- Yarn over (YO): Wrap the yarn from back to front over your hook.
- Pull through: The loop on your hook to create one chain stitch.
- Repeat: This process three more times, so you have a total of four chain stitches.
- Insert: Your hook into the very first chain stitch you made.
- Slip stitch (sl st): Yarn over and pull through both the chain stitch and the loop on your hook. This joins the chain into a ring.
Step 4: Begin Round 1 with Chain-3 and First Cluster
Round 1 establishes the first “cluster” and the corner of your square. It’s the building block for all subsequent rounds.
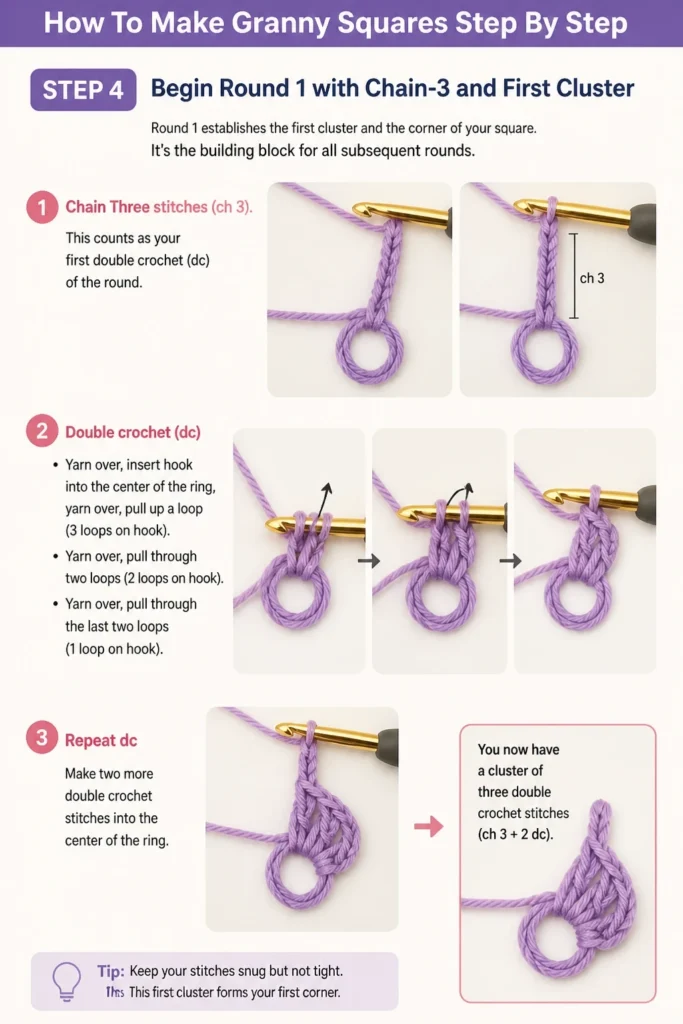
The chain-3 counts as your first double crochet stitch.
- Chain: Three stitches (ch 3). This counts as your first double crochet (dc) of the round.
- Double crochet (dc): Yarn over, insert hook into the center of the ring, yarn over, pull up a loop (3 loops on hook). Yarn over, pull through two loops (2 loops on hook). Yarn over, pull through the last two loops (1 loop on hook).
- Repeat dc: Make two more double crochet stitches into the center of the ring. You now have a cluster of three double crochet stitches (ch 3 + 2 dc).
Step 5: Create Corners and Complete Round 1
This step defines the square’s shape by adding chain spaces between clusters. These spaces will become the corners.
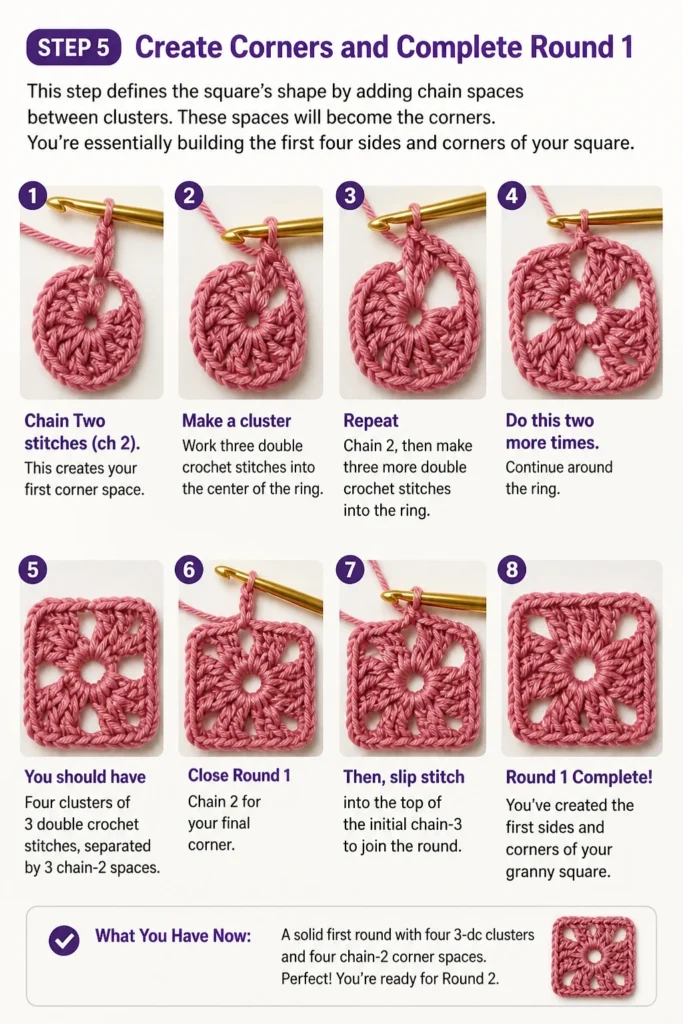
You’re essentially building the first four sides and corners of your square.
- Chain: Two stitches (ch 2). This creates your first corner space.
- Make a cluster: Work three double crochet stitches into the center of the ring.
- Repeat: Chain 2, then make three more double crochet stitches into the ring. Do this two more times.
- You should have: Four clusters of 3 double crochet stitches, separated by 3 chain-2 spaces.
- Close Round 1: Chain 2 for your final corner. Then, slip stitch into the top of the initial chain-3 to join the round.
Step 6: Begin Round 2 – Working into Corner Spaces
Round 2 starts building outwards from the first round. You’ll now work into the chain spaces created in the previous round.
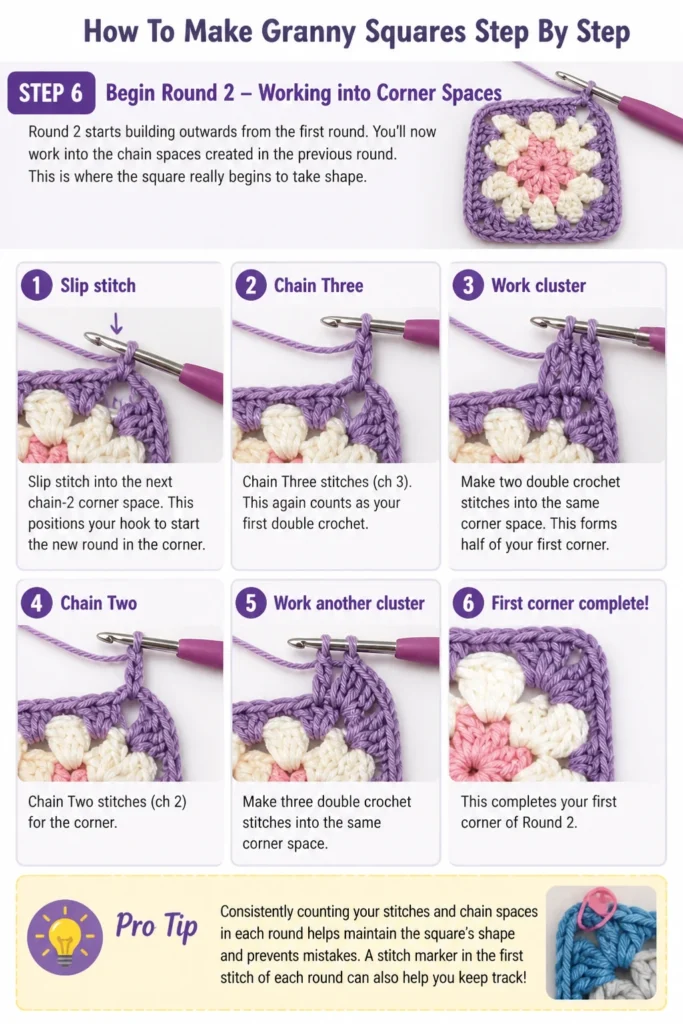
This is where the square really begins to take shape.
- Slip stitch: Into the next chain-2 corner space. This positions your hook to start the new round in the corner.
- Chain: Three stitches (ch 3). This again counts as your first double crochet.
- Work cluster: Make two double crochet stitches into the same corner space. This forms half of your first corner.
- Chain: Two stitches (ch 2) for the corner.
- Work another cluster: Make three double crochet stitches into the same corner space. This completes your first corner of Round 2.
Pro Tip: Consistently counting your stitches and chain spaces in each round helps maintain the square’s shape and prevents mistakes. A stitch marker can be helpful for the starting chain-3.
Step 7: Continue Round 2 Sides and Corners
Now you’ll repeat the corner pattern around the square. This expands the design and forms the next layer.
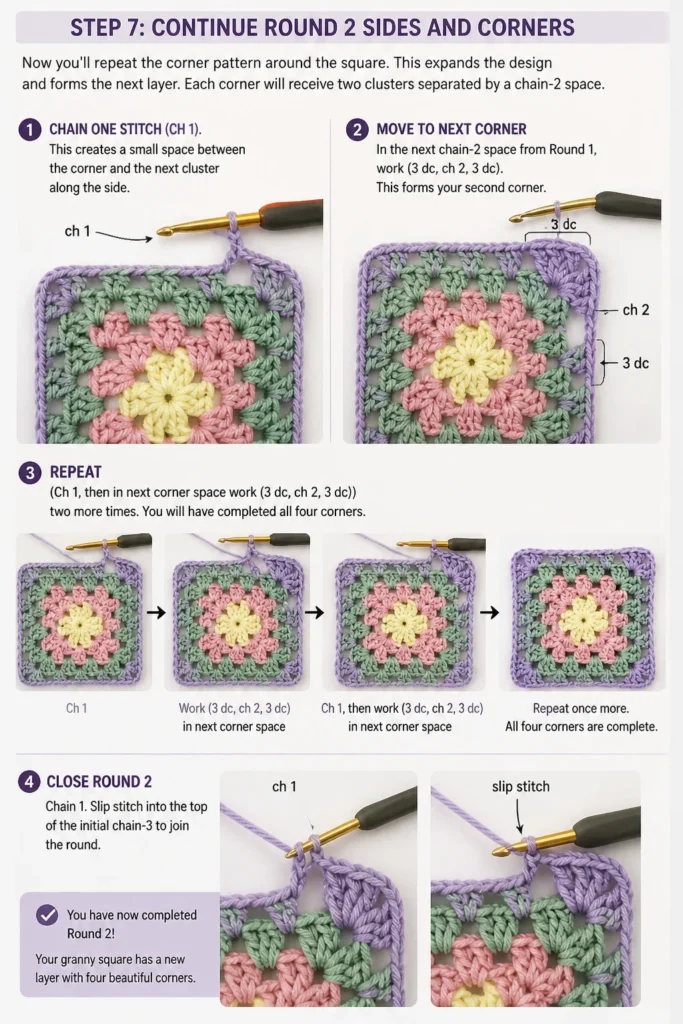
Each corner will receive two clusters separated by a chain-2 space.
- Chain: One stitch (ch 1). This creates a small space between the corner and the next cluster along the “side”.
- Move to next corner: In the next chain-2 space from Round 1, work (3 dc, ch 2, 3 dc). This forms your second corner.
- Repeat: (Ch 1, then in next corner space work (3 dc, ch 2, 3 dc)) two more times. You will have completed all four corners.
- Close Round 2: Chain 1. Slip stitch into the top of the initial chain-3 to join the round.
Step 8: Expand Your Square with More Rounds
Granny squares can be as large as you like. Each subsequent round follows a similar pattern, expanding the square.
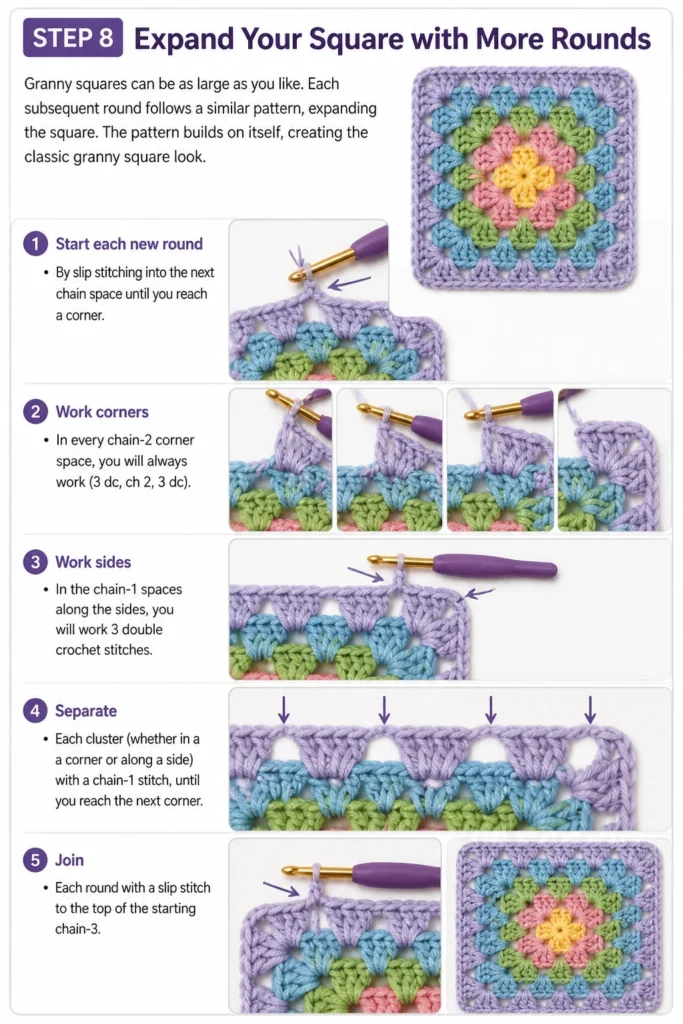
The pattern builds on itself, creating the classic granny square look.
- Start each new round: By slip stitching into the next chain space until you reach a corner.
- Work corners: In every chain-2 corner space, you will always work (3 dc, ch 2, 3 dc).
- Work sides: In the chain-1 spaces along the sides, you will work 3 double crochet stitches.
- Separate: Each cluster (whether in a corner or along a side) with a chain-1 stitch, until you reach the next corner.
- Join: Each round with a slip stitch to the top of the starting chain-3.
Step 9: Finish Your Square
Once your square is the desired size, it’s time to secure your work. This prevents it from unraveling.
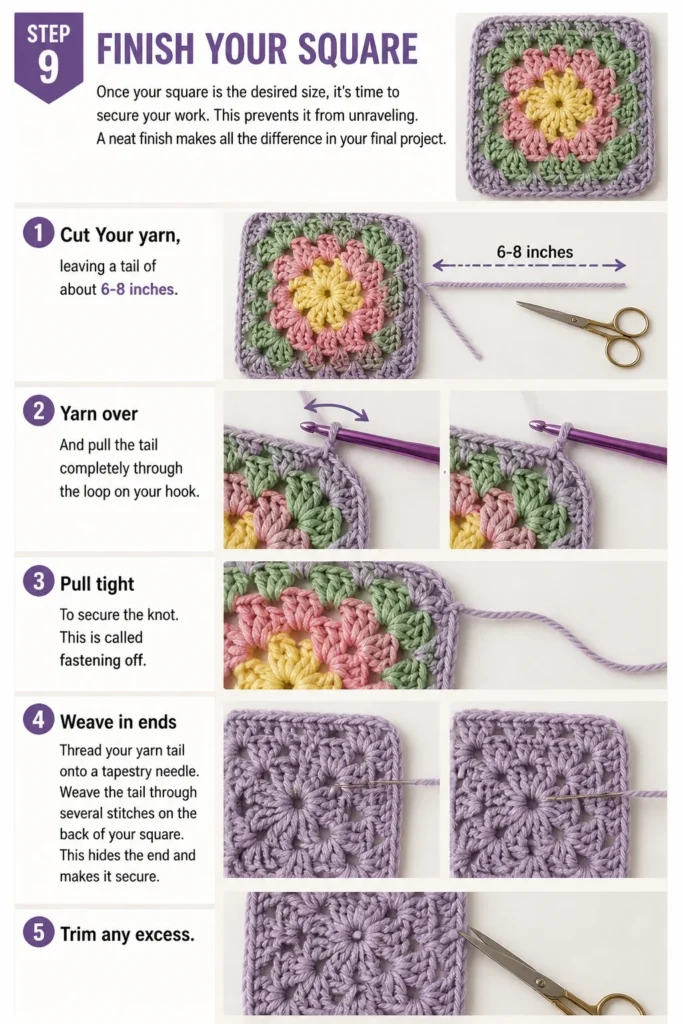
A neat finish makes all the difference in your final project.
- Cut: Your yarn, leaving a tail of about 6-8 inches.
- Yarn over: And pull the tail completely through the loop on your hook.
- Pull tight: To secure the knot. This is called fastening off.
- Weave in ends: Thread your yarn tail onto a tapestry needle. Weave the tail through several stitches on the back of your square. This hides the end and makes it secure. Trim any excess.
Common Mistakes to Avoid
Inconsistent Tension
Many beginners struggle with keeping their stitches even. One round might be tight, the next loose, causing the square to warp or pucker.
Practice helps immensely, but consciously try to keep your yarn flowing smoothly and your hook grip relaxed. Aim for stitches that are firm but not rigid.
Incorrect Stitch Count
Missing a chain-1 space on a side or forgetting a chain-2 in a corner can throw off the entire shape. Your square will become distorted or not lay flat.
Always count your chain spaces and clusters at the end of each round. A simple count ensures your square grows evenly.
Starting Chain-3 Not Counting as a Stitch
The initial chain-3 at the beginning of each round often counts as the first double crochet. If you then make three more double crochets, you’ll have four stitches in that cluster instead of three.
Remember that chain-3 is doing double duty. Adjust your subsequent double crochet count accordingly to maintain the proper cluster size.
Too Tight Slip Knot
If your initial slip knot is too tight, it can be very difficult to insert your hook into the first chain stitch to form the ring. This can lead to frustration right at the start.
Ensure your slip knot is snug on the hook but still slides easily. You should be able to move it slightly without force.
Troubleshooting
My Square Is Curling
If your granny square is curling up like a bowl, it often means your tension is too tight or you’re not making enough chain stitches in your corners.
Try using a slightly larger hook size to loosen your stitches. Also, double-check that you are consistently chaining two for each corner space.
My Square Has Gaps or Is Too Loose
Large gaps, especially between clusters, usually indicate your tension is too loose. This can make the fabric feel flimsy.
Try using a smaller hook size, or consciously practice maintaining a firmer, more consistent tension as you crochet. Ensure your yarn overs are not overly loose.
My Square Isn’t Square, It’s More Like a Hexagon
If your square isn’t forming proper corners, you might be working too many clusters or not enough chain spaces in the corners. This prevents the sharp angles from forming.
Make sure each corner consistently has (3 dc, ch 2, 3 dc) worked into it. Also, ensure you are only working 3 dc clusters in the side chain-1 spaces, not adding extra clusters.
Key Takeaways
- Start with a slip knot and chain into a ring to form the square’s center.
- Round 1 establishes the four initial corners with chain-2 spaces.
- Subsequent rounds build upon these corners, always working (3 dc, ch 2, 3 dc) into each corner space.
- Chain-1 stitches separate clusters along the sides of the square in later rounds.
- Consistent tension and accurate stitch counting are vital for a well-shaped square.
- Always weave in your yarn tails securely for a professional and durable finish.
Frequently Asked Questions
Can I use different yarn weights for granny squares?
Absolutely! Granny squares are incredibly adaptable. While worsted weight is great for beginners, you can use anything from thin lace yarn for delicate squares to chunky yarn for large, cozy projects. Just adjust your hook size accordingly.
How many rounds should a granny square have?
The number of rounds depends entirely on your project. A small square might have only 2-3 rounds, while a blanket square could have 10-20 rounds or more. You can stop at any point once you reach your desired size.
Can I change colors in a granny square?
Yes, changing colors is a classic feature of granny squares! The simplest way is to fasten off your current color at the end of a round and join the new color with a slip stitch into a corner space at the start of the next round. This creates beautiful, distinct color changes.
What can I make with granny squares?
The possibilities are endless! Granny squares are perfect for blankets, scarves, bags, sweaters, coasters, placemats, and even clothing items. They are a versatile foundation for countless creative projects.
Our Top Recommended Finds
- Ergonomic Crochet Hook Set: Comfortable hooks reduce hand fatigue, making long crafting sessions more enjoyable. A set offers various sizes for different yarns.
- Worsted Weight Acrylic Yarn Pack: Affordable and available in many colors, acrylic yarn is perfect for practice and colorful projects. It’s durable and easy to care for.
- Blunt-Tip Tapestry Needles: Essential for weaving in ends without splitting your yarn. Blunt tips are safer and easier to use than sharp sewing needles.
Start Your Crochet Journey Today
You now have the tools and knowledge to create your very first granny square. Don’t worry if it’s not perfect; every stitch is a step in your crafting journey.
The satisfaction of transforming a simple strand of yarn into a beautiful fabric is truly rewarding.
Pick up your hook, choose your yarn, and begin your exciting adventure in crochet. Perhaps your next step will be joining squares to make a colorful blanket or even exploring different crochet stitches!
Beginner-friendly templates, step-by-step guides,
and weekly project ideas in your inbox.