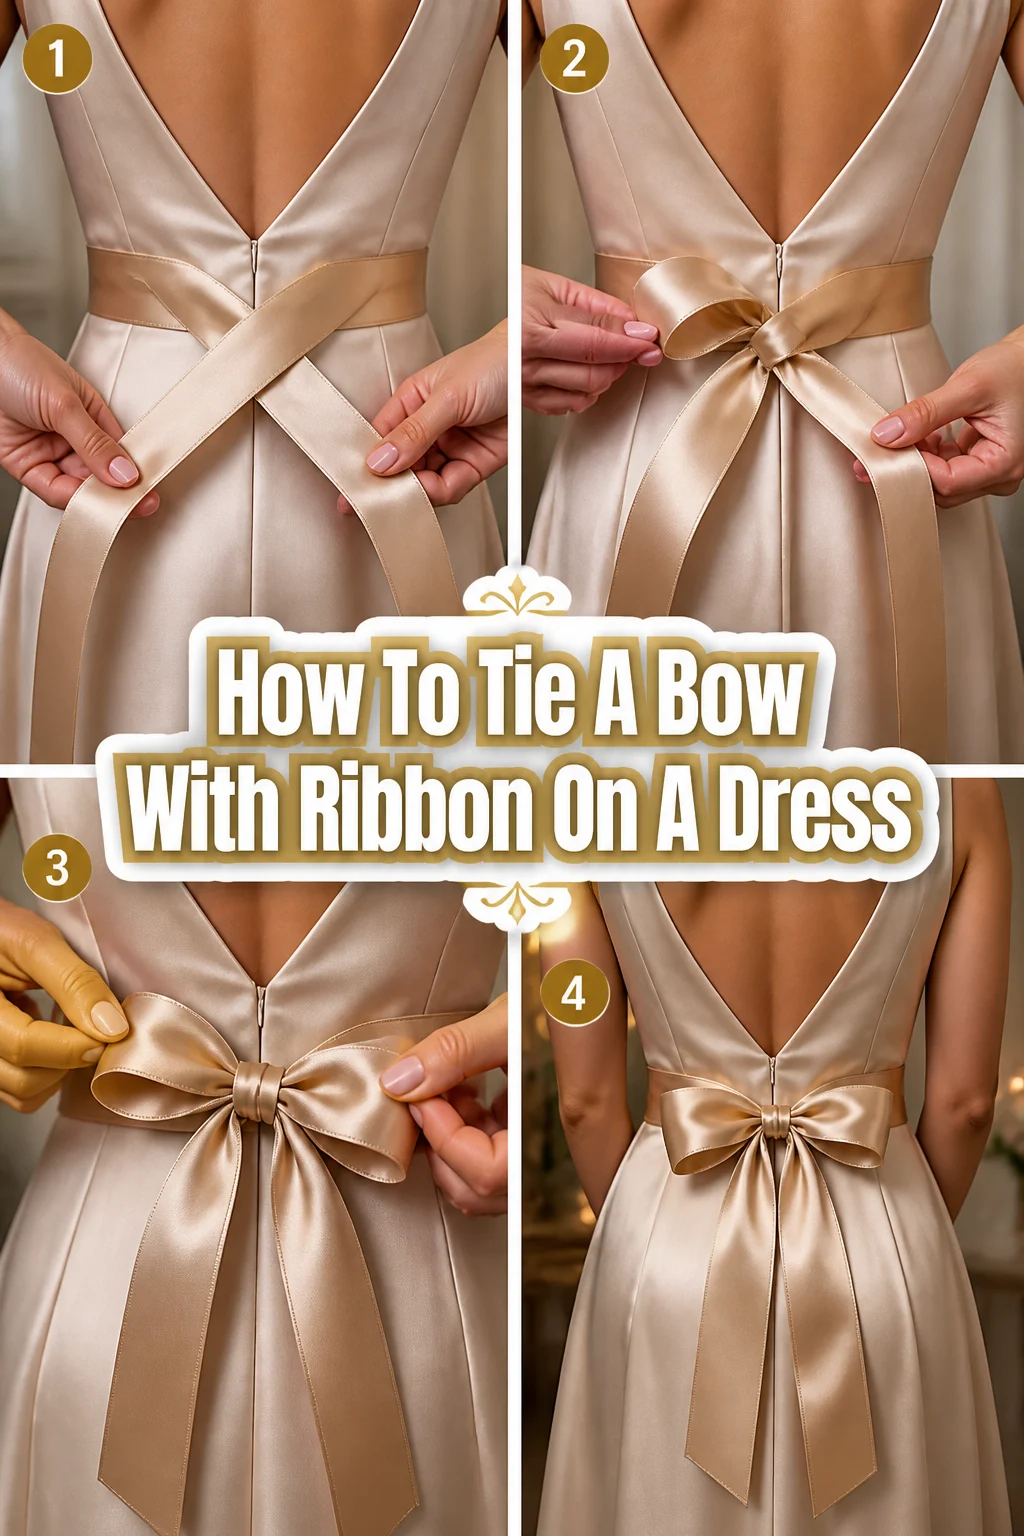
How To Tie A Bow With Ribbon On A Dress

Beginner-friendly templates, step-by-step guides,
and weekly project ideas in your inbox.
I remember standing in front of a mirror for twenty minutes before my best friend’s wedding, struggling with a sash that refused to cooperate.
The ribbon was beautiful, but every time I pulled the loops, the bow ended up looking limp, lopsided, and completely unprofessional.
After years of working in bridal boutiques and helping hundreds of women find their perfect fit, I have mastered the art of the “perfect bow” that stays crisp and symmetrical all day long.

Quick Overview
This guide will teach you how to transform a simple piece of fabric into a structured, elegant accessory that enhances the silhouette of any dress.
- Time needed: 3 to 5 minutes
- Difficulty: Beginner
- What you’ll need: A dress with a sash or ribbon, a mirror, and sharp fabric scissors (optional).
Step-by-Step Instructions
Step 1: Prepare the Ribbon and the Surface
Before you even touch the fabric, ensure the ribbon is completely free of wrinkles or creases from storage.
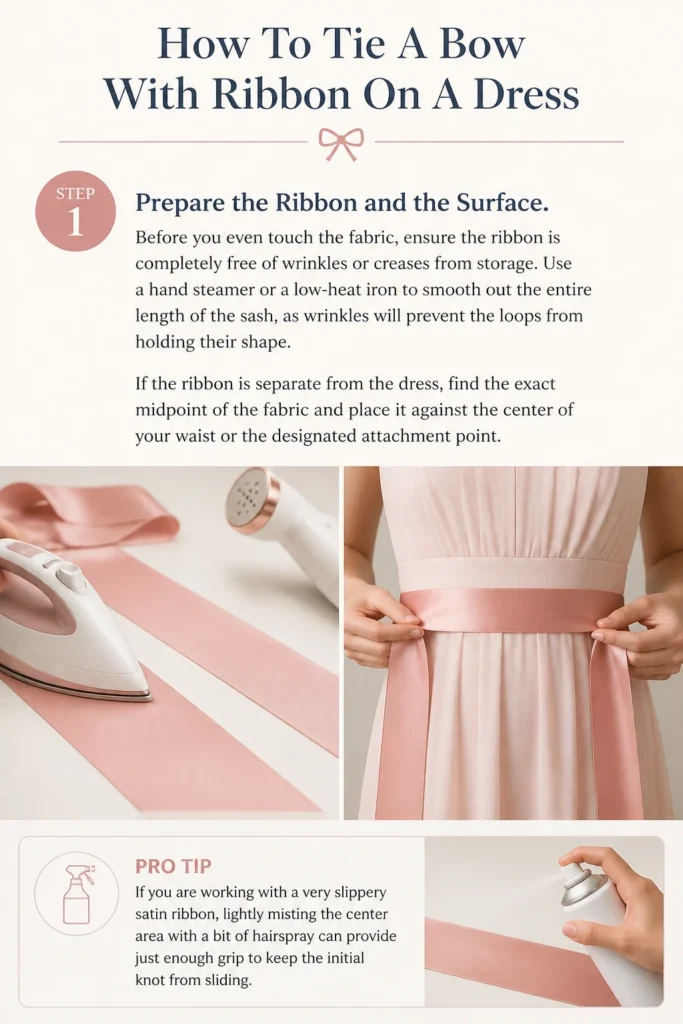
Use a hand steamer or a low-heat iron to smooth out the entire length of the sash, as wrinkles will prevent the loops from holding their shape.
If the ribbon is separate from the dress, find the exact midpoint of the fabric and place it against the center of your waist or the designated attachment point.
Pro Tip: If you are working with a very slippery satin ribbon, lightly misting the center area with a bit of hairspray can provide just enough “grip” to keep the initial knot from sliding.
Step 2: Create the Foundation Cross
Hold one end of the ribbon in each hand and bring them together at the point where you want the bow to sit.
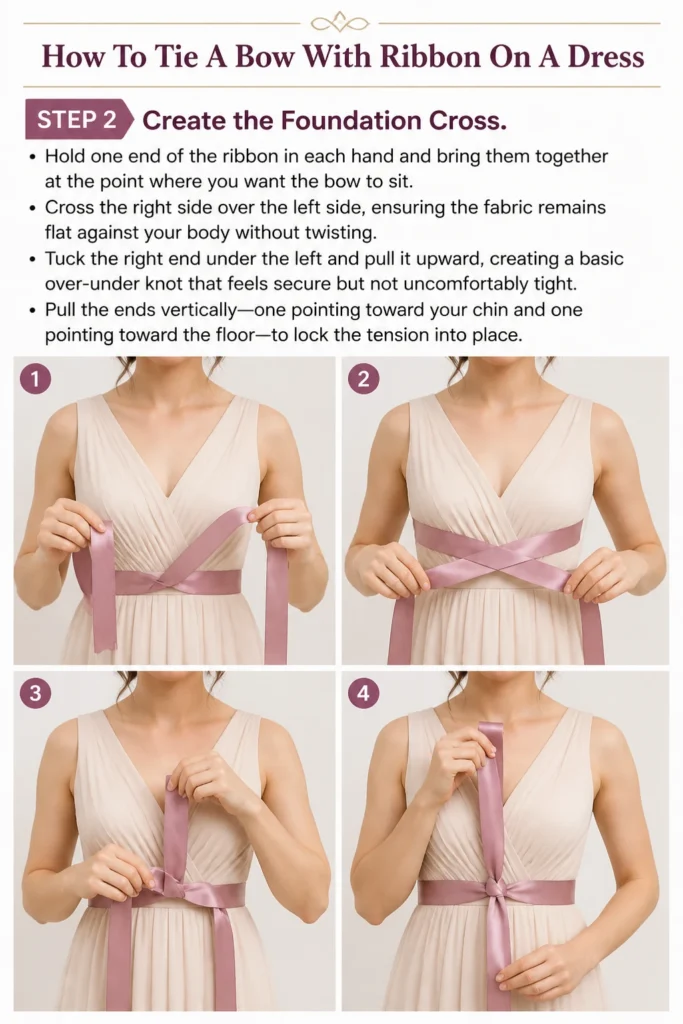
Cross the right side over the left side, ensuring the fabric remains flat against your body without twisting.
Tuck the right end under the left and pull it upward, creating a basic over-under knot that feels secure but not uncomfortably tight.
Pull the ends vertically—one pointing toward your chin and one pointing toward the floor—to lock the tension into place.
Step 3: Form the First Loop
Take the end of the ribbon that is currently hanging downward and fold it back on itself to create a loop.
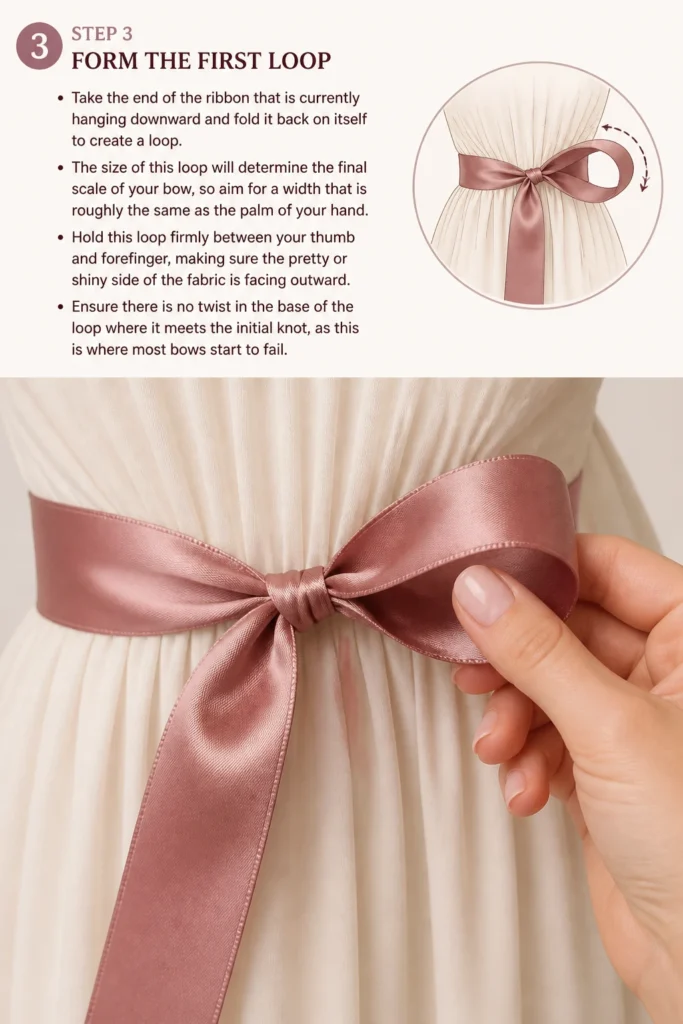
The size of this loop will determine the final scale of your bow, so aim for a width that is roughly the same as the palm of your hand.
Hold this loop firmly between your thumb and forefinger, making sure the “pretty” or shiny side of the fabric is facing outward.
Ensure there is no twist in the base of the loop where it meets the initial knot, as this is where most bows start to fail.
Step 4: Wrap the Top Tail
Take the tail that is pointing upward and bring it down over the front of the loop you are holding.
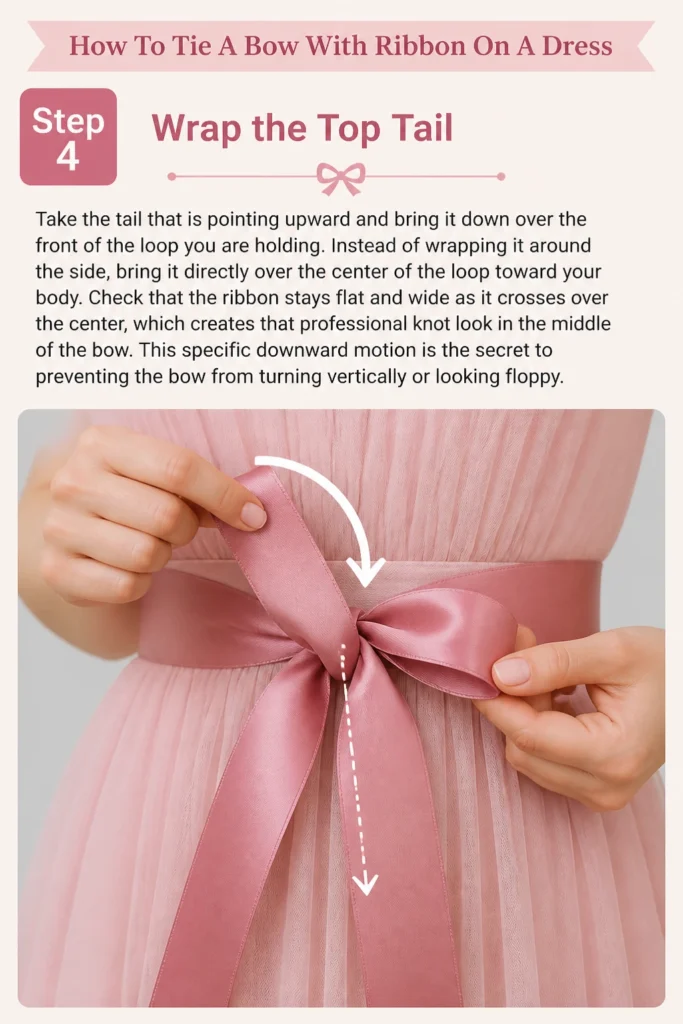
Instead of wrapping it around the side, bring it directly over the center of the loop toward your body.
Check that the ribbon stays flat and wide as it crosses over the center, which creates that professional “knot” look in the middle of the bow.
This specific downward motion is the secret to preventing the bow from turning vertically or looking “floppy.”
Step 5: Create the Second Loop
As you bring the top tail around, you will notice a small opening or “tunnel” has formed behind the first loop.
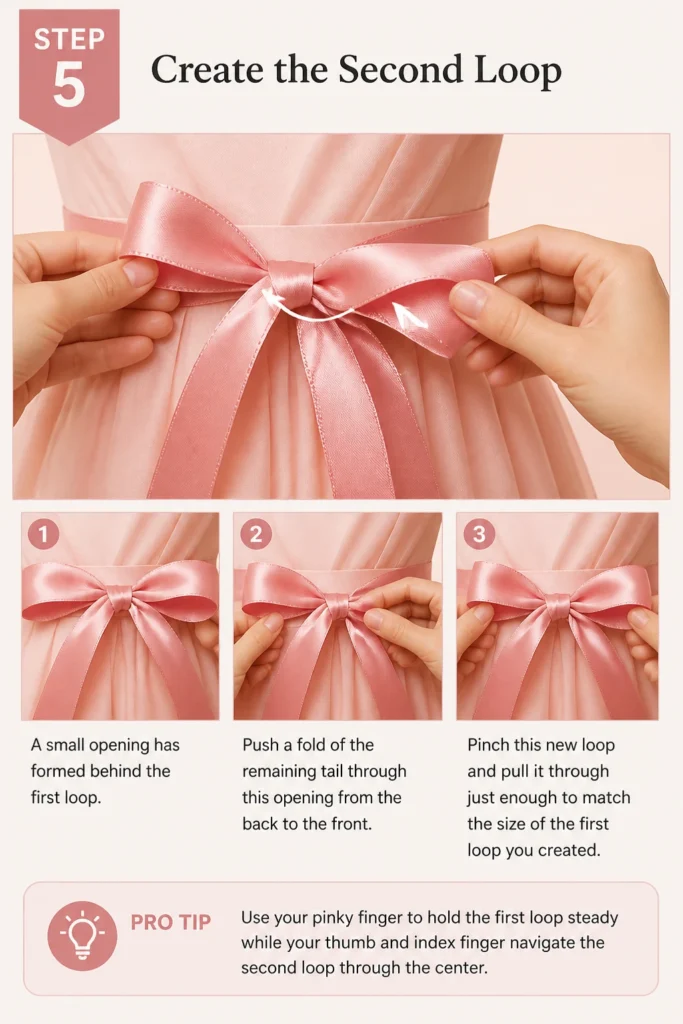
Push a fold of the remaining tail through this opening from the back to the front.
Pinch this new loop and pull it through just enough to match the size of the first loop you created.
Pro Tip: Use your pinky finger to hold the first loop steady while your thumb and index finger navigate the second loop through the center.
Step 6: Adjust for Tension and Symmetry
Now that you have two loops and two tails, you need to balance the tension to make the bow look crisp.
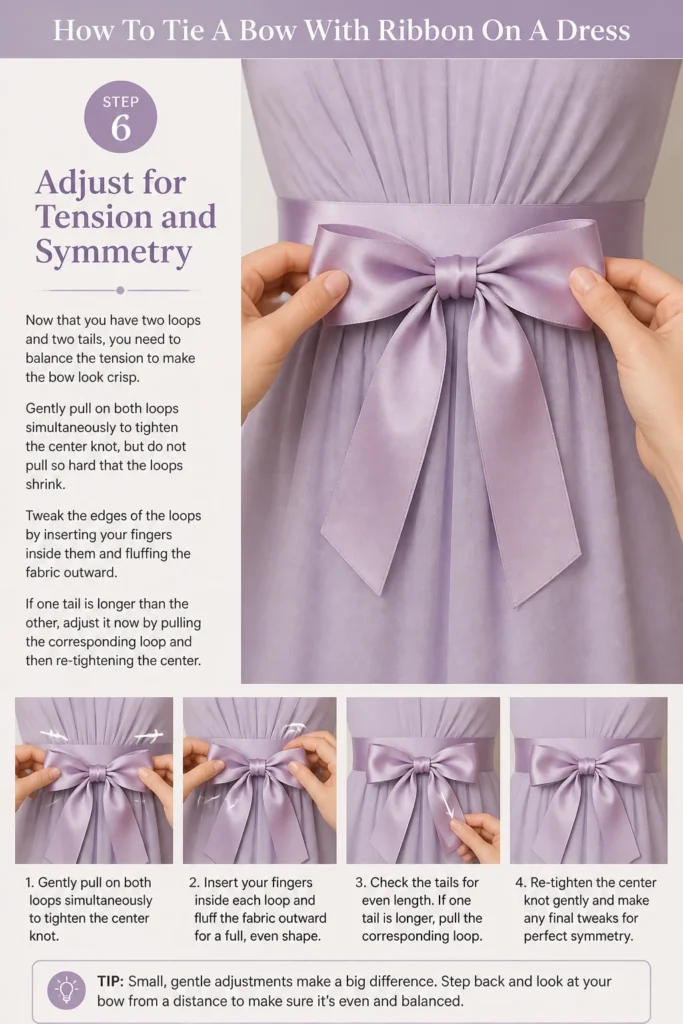
Gently pull on both loops simultaneously to tighten the center knot, but do not pull so hard that the loops shrink.
Tweak the edges of the loops by inserting your fingers inside them and “fluffing” the fabric outward.
If one tail is longer than the other, adjust it now by pulling the corresponding loop and then re-tightening the center.
Step 7: Angle the Tails
The way the tails hang can change the entire vibe of the dress, from whimsical and long to short and structured.
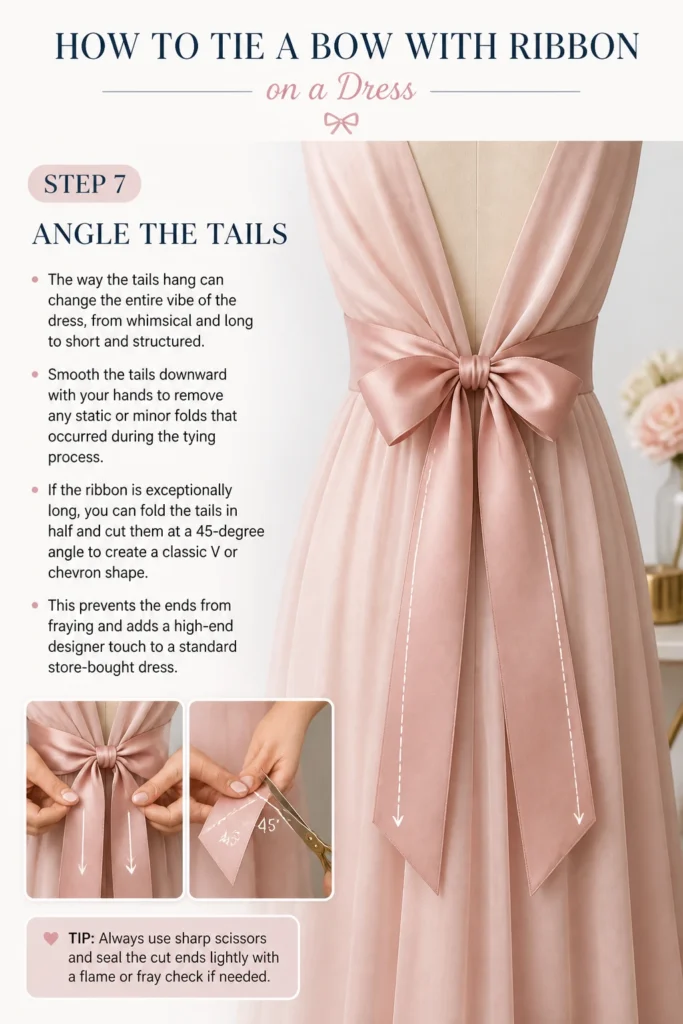
Smooth the tails downward with your hands to remove any static or minor folds that occurred during the tying process.
If the ribbon is exceptionally long, you can fold the tails in half and cut them at a 45-degree angle to create a classic “V” or chevron shape.
This prevents the ends from fraying and adds a high-end designer touch to a standard store-bought dress.
Common Mistakes to Avoid
The Vertical “Granny” Knot
Many people find that their bow ends up sitting vertically (up and down) rather than horizontally across the waist.
This happens because the initial cross-over was done in the wrong direction or the second loop was wrapped the wrong way.
Always ensure the top tail wraps over the front and through the back to keep the bow sitting perfectly level.
Twisting the Fabric in the Center
If the center knot of your bow looks messy or bulky, it is likely because the ribbon twisted while you were pulling it through the loop.
Keep the ribbon flat against your fingers at every stage of the process to ensure the sheen of the fabric remains consistent.
A twisted center knot will often cause the loops to stand out at odd angles rather than lying flat against the dress.
Uneven Loop Sizes
A bow that is significantly larger on one side can make the entire dress look asymmetrical and poorly fitted.
Take the time to look in a mirror and adjust the loops so they are mirror images of each other.
Small adjustments at the very end are easier than trying to fix the bow once you have pulled the center knot into a permanent position.
Troubleshooting
The Ribbon is Too Slippery
Fine silk or high-polish satin ribbons often slide right out of their knots the moment you move or sit down.
To fix this, you can place a small safety pin through the back of the center knot, anchoring it directly to the fabric of the dress.
Make sure the pin is hidden behind the knot so it remains invisible while providing the structural support you need for a long event.
The Loops are Drooping
Heavy velvet or wide organza ribbons can sometimes “wilt” under their own weight, losing that crisp, perky look.
You can solve this by inserting a small piece of clear fishing line or a thin wire into the edges of the ribbon if you are crafting the sash yourself.
For pre-made sashes, a light dusting of starch during the ironing phase can give the fabric the stiffness required to hold a shape.
The Knot is Too Bulky
If your ribbon is very thick, the center knot can become a large, unattractive lump that sticks out from your waist.
Instead of a standard bow, try a “half-bow” or a simple flat knot with long tails to reduce the volume at the center.
You can also try pulling the loops slightly smaller to minimize the amount of fabric gathered in the middle.
Key Takeaways
- Preparation is key: Always steam or iron your ribbon before tying to ensure the loops have a crisp, clean appearance.
- Direction matters: Wrapping the top tail over the front of the first loop is the secret to a horizontal, balanced bow.
- Maintain tension: Keep a firm grip on the center of the knot while adjusting the loops to prevent the whole structure from falling apart.
- Symmetry check: Use a mirror to ensure both loops and tails are balanced in size and length for a professional finish.
- Finish the ends: A clean diagonal or V-cut on the tails prevents fraying and adds an expensive-looking detail to the garment.
Frequently Asked Questions
How do I tie a bow on the back of my own dress?
Tying a bow behind your back is significantly harder because you are working blindly and upside down. The best method is to tie the bow at your waist in the front where you can see it, then carefully slide the sash around to the back. If the sash is attached to the dress, you may need to use a large mirror or ask a friend for assistance to ensure the loops are not twisted.
What is the best type of ribbon for a dress bow?
Grosgrain ribbon is often the easiest to work with because its ribbed texture provides natural friction that holds the knot in place. Satin is the most popular for formal events but requires more care because it is slippery and shows every wrinkle. Organza is excellent for a lightweight, airy look, though it can be difficult to make the loops look uniform due to its sheer nature.
How can I prevent the ribbon ends from fraying?
After cutting your tails at an angle, you can use a small amount of clear nail polish or a specialized “fray check” liquid on the very edge of the fabric. For synthetic ribbons like polyester satin, you can very carefully pass the edge of the ribbon near a flame to melt the fibers together. Be extremely cautious with this method, as it can easily scorch the fabric if held too close.
Can I use this method for a side-waist bow?
Yes, the technique remains exactly the same regardless of where the bow is positioned on the waistline. A side-waist bow often looks best when it is slightly smaller and more structured, as it draws attention to the curve of the hip. Ensure the tails are not so long that they interfere with your stride or get caught in the fabric of the skirt.
Our Top Recommended Finds
- Professional Fabric Shears: A sharp pair of scissors is essential for getting those clean, crisp V-cuts on the ends of your ribbon without jagged edges.
- Portable Hand Steamer: This tool is a lifesaver for removing creases from ribbons and sashes right before you head out the door.
- Fray Check Liquid: A tiny bottle of this clear adhesive will keep your ribbon tails looking brand new through multiple wears and washes.
Mastering Your Signature Style
Once you have practiced these steps a few times, tying a perfect bow will become second nature.
The beauty of this skill is that it applies to more than just dresses; you can use it for gift wrapping, hair accessories, and home decor.
Try experimenting with different ribbon widths and textures to see how they change the overall aesthetic of your favorite outfits.
Take a moment today to grab a spare ribbon and practice the “over-the-front” wrap until your loops sit perfectly flat every single time.
Beginner-friendly templates, step-by-step guides,
and weekly project ideas in your inbox.