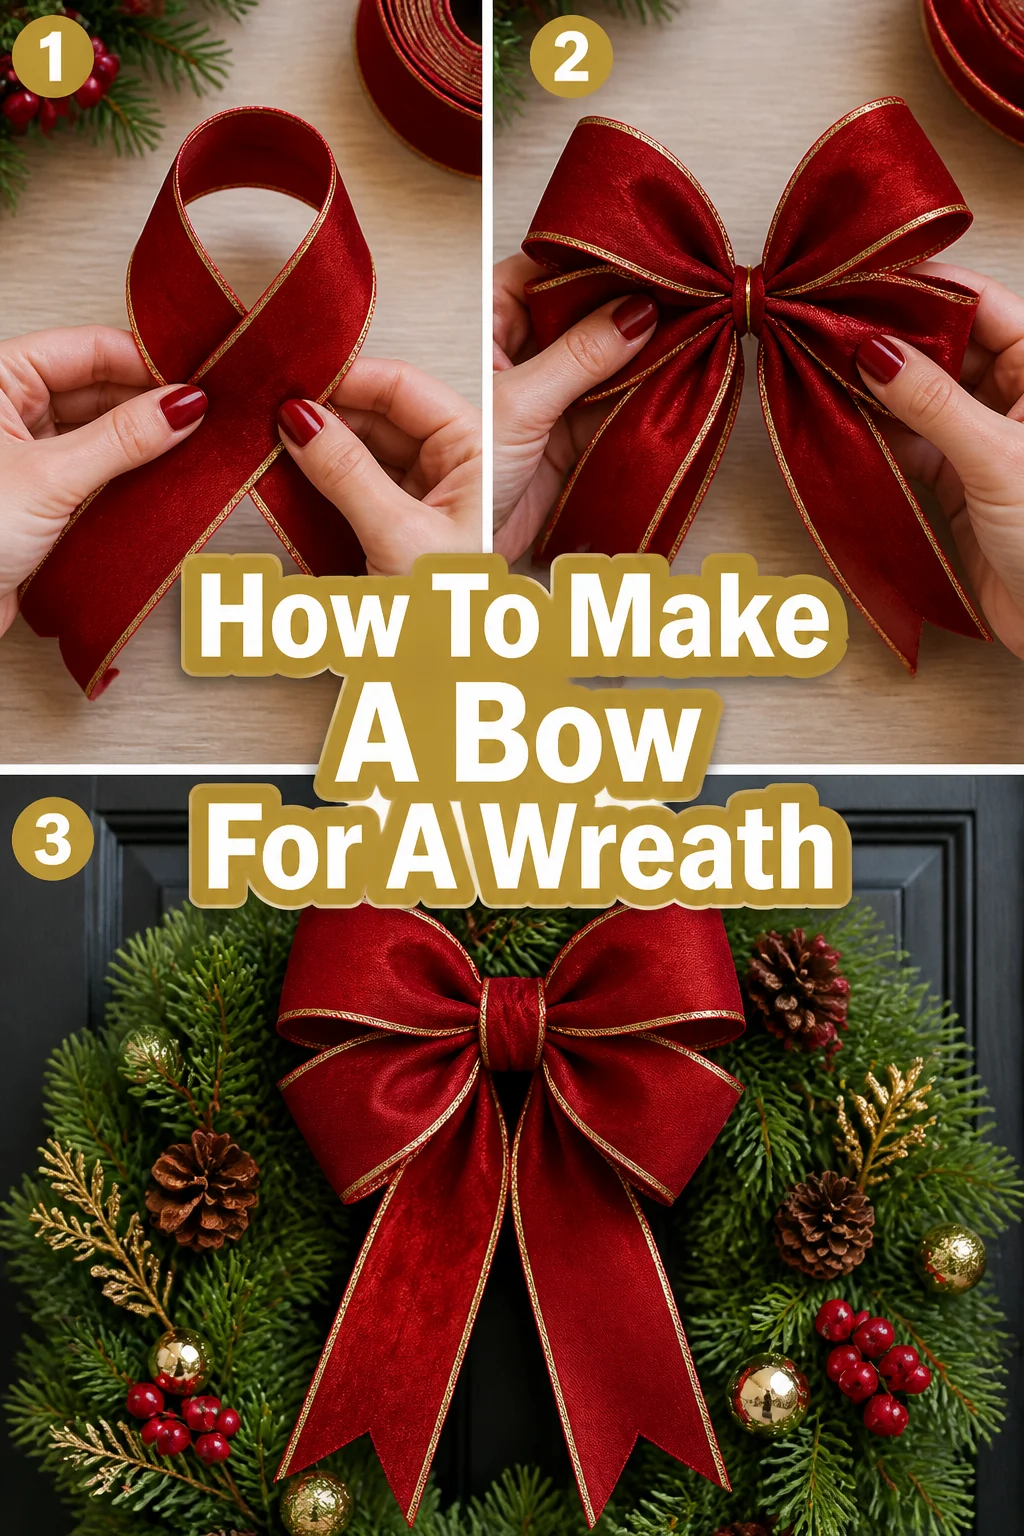
🎀 How To Make A Bow For A Wreath

Beginner-friendly templates, step-by-step guides,
and weekly project ideas in your inbox.
Creating a beautiful bow for your wreath adds a personal touch that store-bought options just can’t match.
I’ve been crafting wreaths for years, and mastering the art of the perfect bow transformed my creations from nice to truly stunning.
This guide will walk you through the process, ensuring you can craft a gorgeous bow with confidence.

Quick Overview
Crafting your own wreath bow is a rewarding experience that allows for endless customization. You’ll learn to select the right ribbon, form elegant loops, and secure your bow for a professional finish.
- Time needed: 15-30 minutes
- Difficulty: Beginner
- What you’ll need: Wired ribbon, floral wire or pipe cleaner, sharp scissors, measuring tape
Step-by-Step Instructions
Step 1: Gather Your Materials
Before you begin, ensure all your supplies are within reach. Having everything organized makes the process smoother and more enjoyable. A clean, flat workspace is also very helpful.
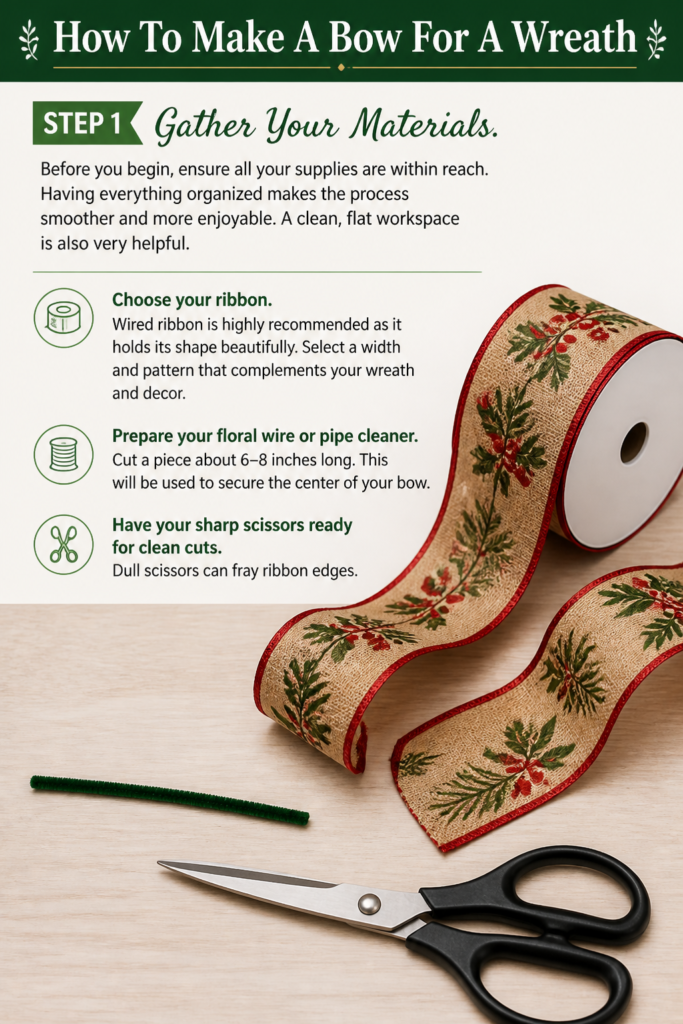
- Choose your ribbon. Wired ribbon is highly recommended as it holds its shape beautifully. Select a width and pattern that complements your wreath and decor.
- Prepare your floral wire or pipe cleaner. Cut a piece about 6-8 inches long. This will be used to secure the center of your bow.
- Have your sharp scissors ready for clean cuts. Dull scissors can fray ribbon edges.
Step 2: Measure and Cut Your First Tail
The tails of your bow are the pieces that hang down from the loops. Deciding on their length is a matter of personal preference and wreath size. Longer tails often create a more dramatic effect.
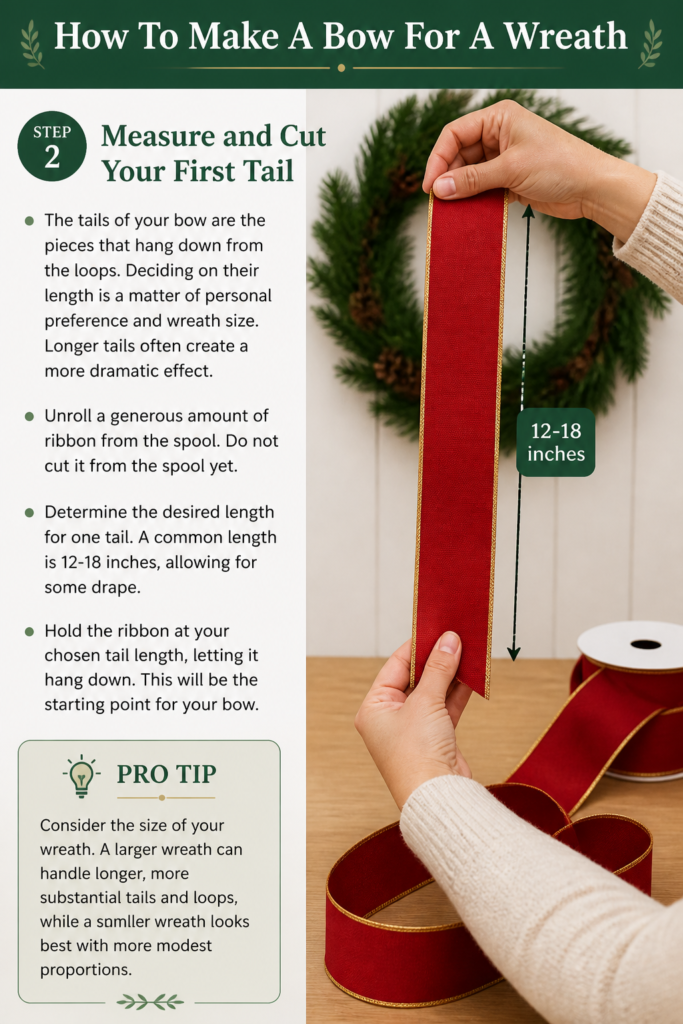
- Unroll a generous amount of ribbon from the spool. Do not cut it from the spool yet.
- Determine the desired length for one tail. A common length is 12-18 inches, allowing for some drape.
- Hold the ribbon at your chosen tail length, letting it hang down. This will be the starting point for your bow.
Pro Tip: Consider the size of your wreath. A larger wreath can handle longer, more substantial tails and loops, while a smaller wreath looks best with more modest proportions.
Step 3: Create the First Loop
Now you’ll begin forming the foundational loops of your bow. The size of these loops dictates the overall dimension of your finished bow. Aim for symmetry, but don’t worry about perfection at this stage.
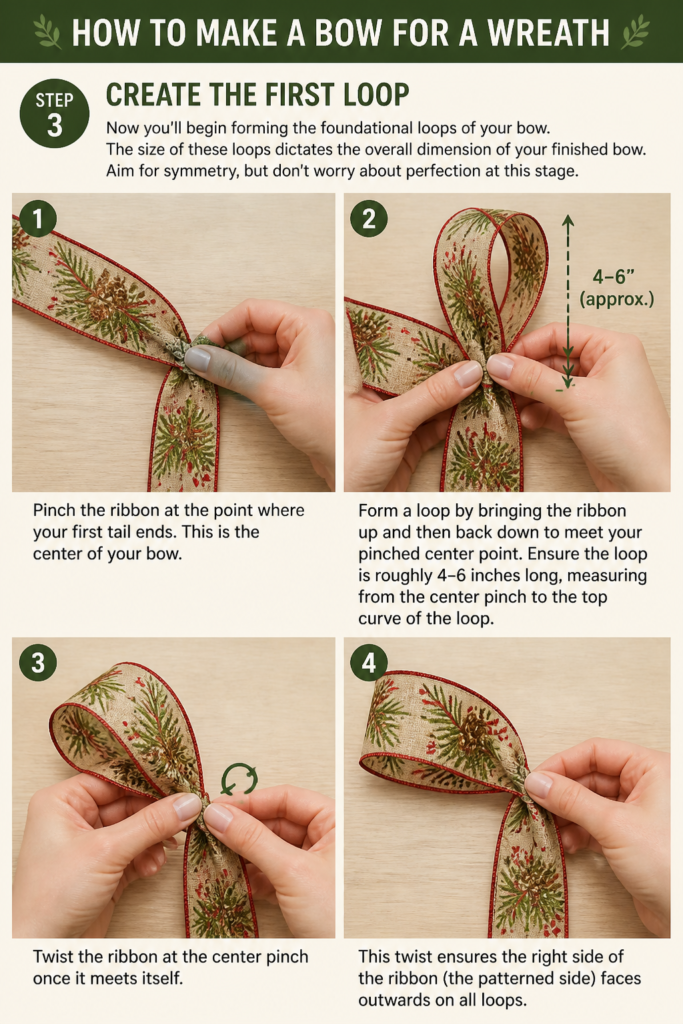
- Pinch the ribbon at the point where your first tail ends. This is the center of your bow.
- Form a loop by bringing the ribbon up and then back down to meet your pinched center point.
- Ensure the loop is roughly 4-6 inches long, measuring from the center pinch to the top curve of the loop.
- Twist the ribbon at the center pinch once it meets itself. This twist ensures the “right” side of the ribbon (the patterned side) faces outwards on all loops.
Step 4: Build Subsequent Loops
This step involves repeating the looping process, alternating sides to create a balanced bow. Each loop should be approximately the same size as the first for a cohesive look. The number of loops is up to you, but 3-5 loops on each side creates a full bow.
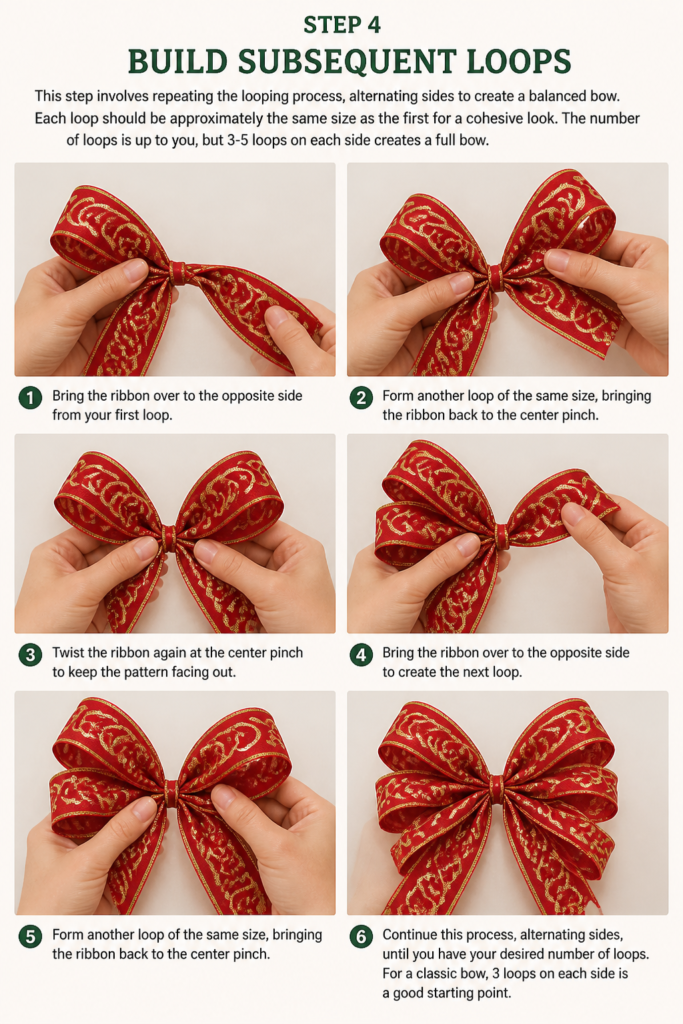
- Bring the ribbon over to the opposite side from your first loop.
- Form another loop of the same size, bringing the ribbon back to the center pinch.
- Twist the ribbon again at the center pinch to keep the pattern facing out.
- Continue this process, alternating sides, until you have your desired number of loops. For a classic bow, 3 loops on each side is a good starting point.
Step 5: Add the Second Tail
Once you’ve created all your loops, it’s time to finish the bow with the second tail. This tail should mirror the length of your first tail for a balanced design.
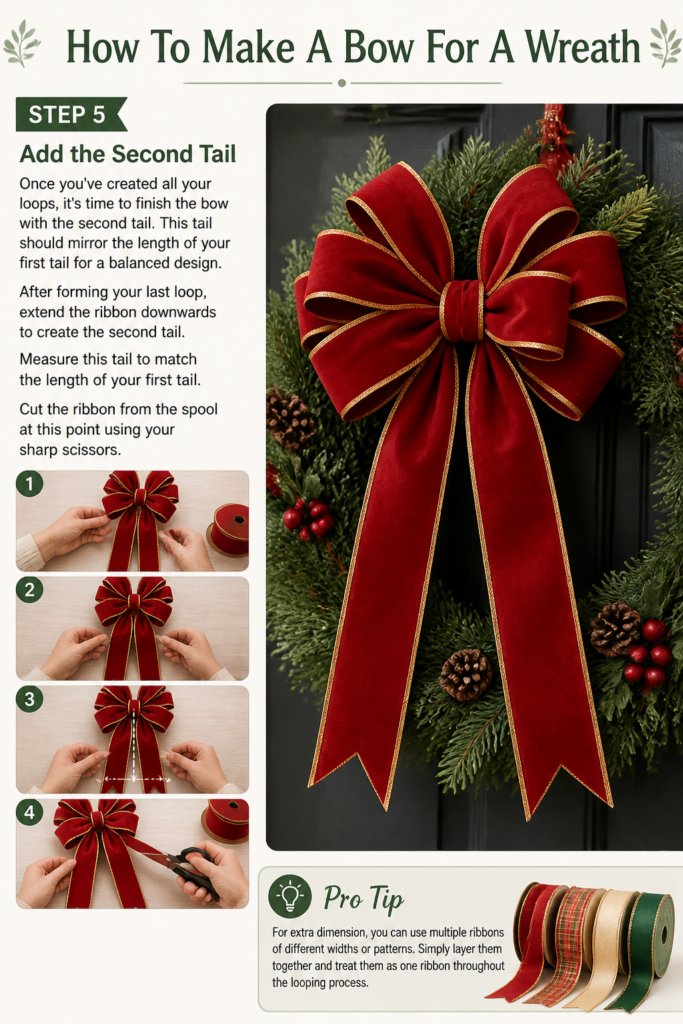
- After forming your last loop, extend the ribbon downwards to create the second tail.
- Measure this tail to match the length of your first tail.
- Cut the ribbon from the spool at this point using your sharp scissors.
Pro Tip: For extra dimension, you can use multiple ribbons of different widths or patterns. Simply layer them together and treat them as one ribbon throughout the looping process.
Step 6: Secure the Center
This is a critical step for holding your bow together. A tight securement ensures your bow maintains its shape and doesn’t unravel.
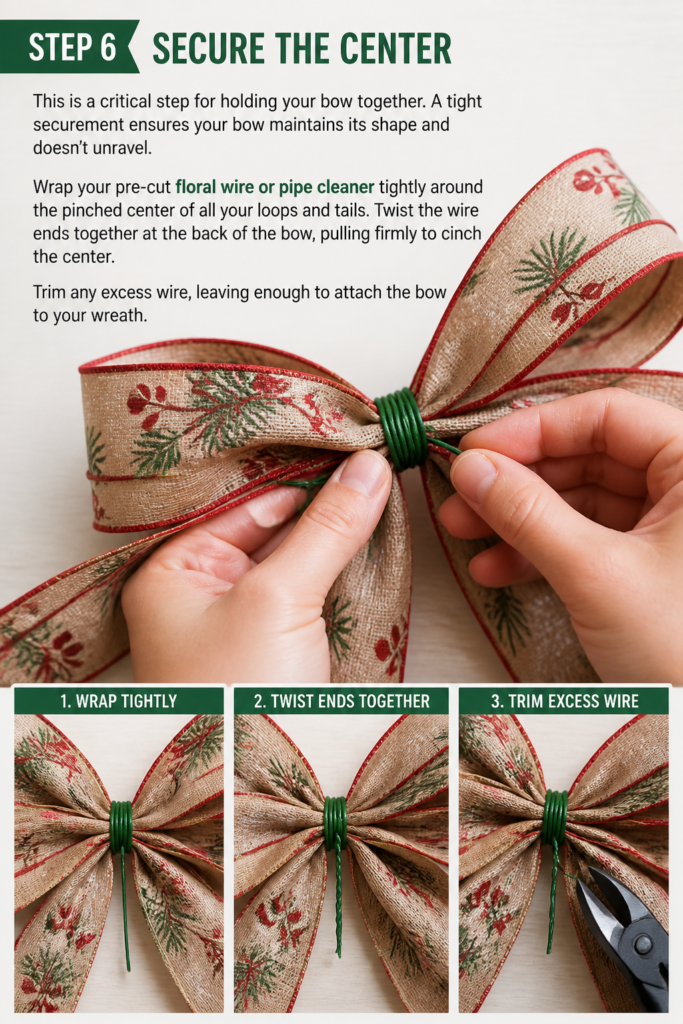
- Wrap your pre-cut floral wire or pipe cleaner tightly around the pinched center of all your loops and tails.
- Twist the wire ends together at the back of the bow, pulling firmly to cinch the center.
- Trim any excess wire, leaving enough to attach the bow to your wreath.
Step 7: Fluff and Shape Your Bow
Once secured, your bow might look a bit flat. This is where the magic happens as you bring it to life by shaping the loops.
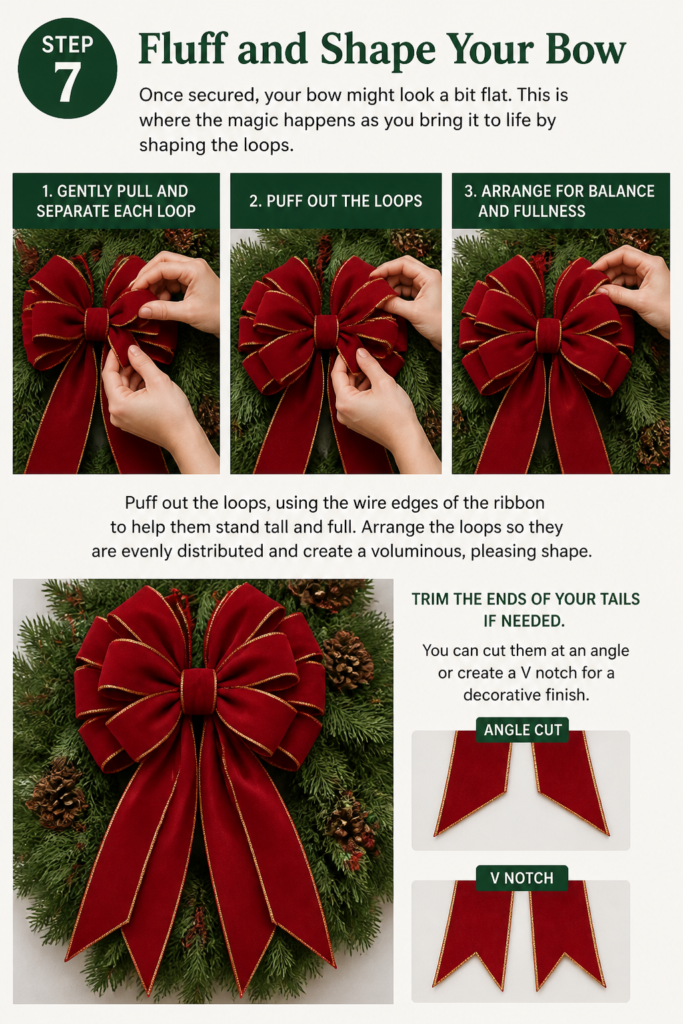
- Gently pull and separate each loop, starting from the innermost ones.
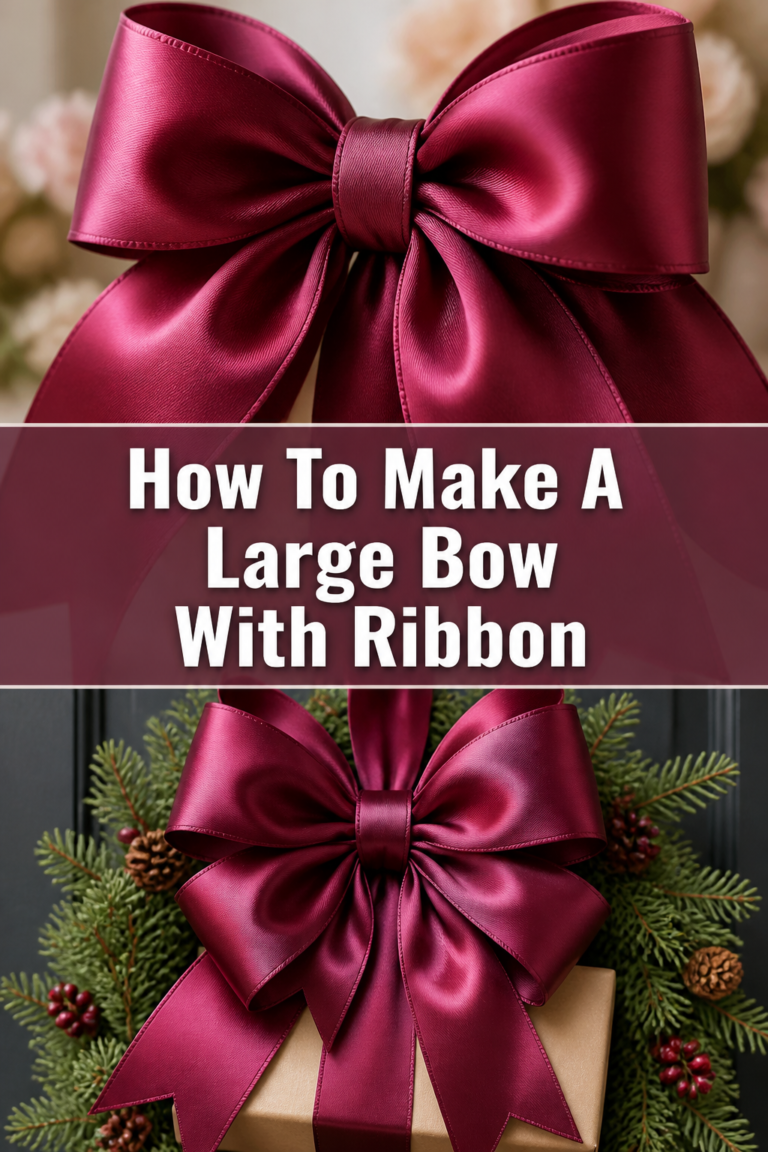
- Puff out the loops, using the wire edges of the ribbon to help them stand tall and full.
- Arrange the loops so they are evenly distributed and create a voluminous, pleasing shape.
- Trim the ends of your tails if needed. You can cut them at an angle or create a “V” notch for a decorative finish.
Step 8: Attach to Your Wreath
The final step is to place your beautiful handmade bow onto your wreath. The floral wire or pipe cleaner you used to secure the bow’s center will also serve as your attachment method.
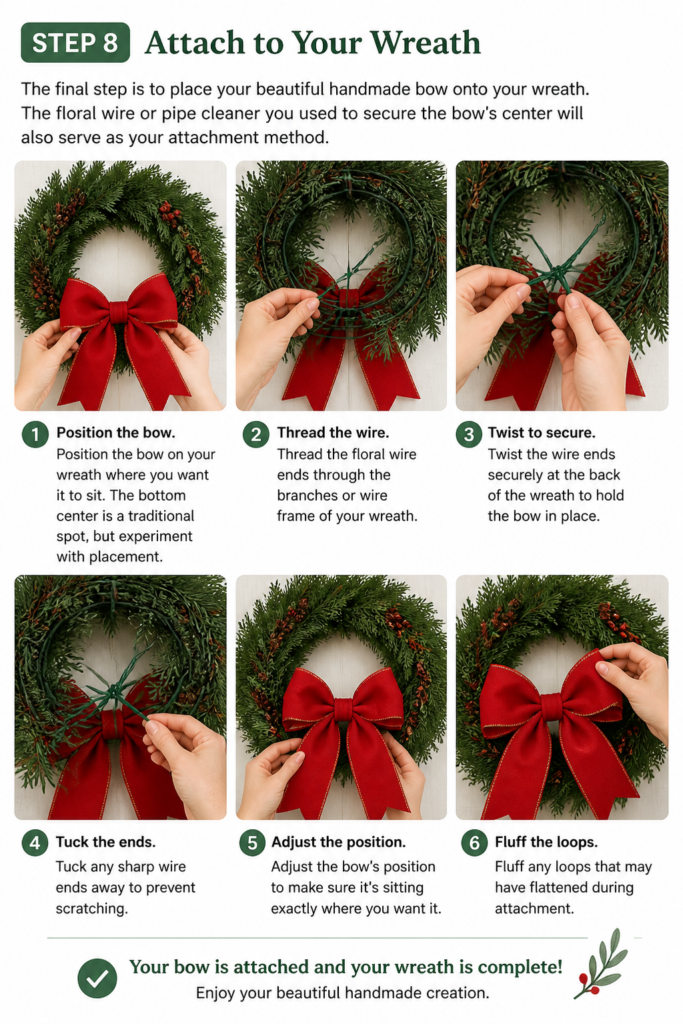
- Position the bow on your wreath where you want it to sit. The bottom center is a traditional spot, but experiment with placement.
- Thread the floral wire ends through the branches or wire frame of your wreath.
- Twist the wire ends securely at the back of the wreath to hold the bow in place. Tuck any sharp wire ends away to prevent scratching.
- Adjust the bow’s position and fluff any loops that may have flattened during attachment.
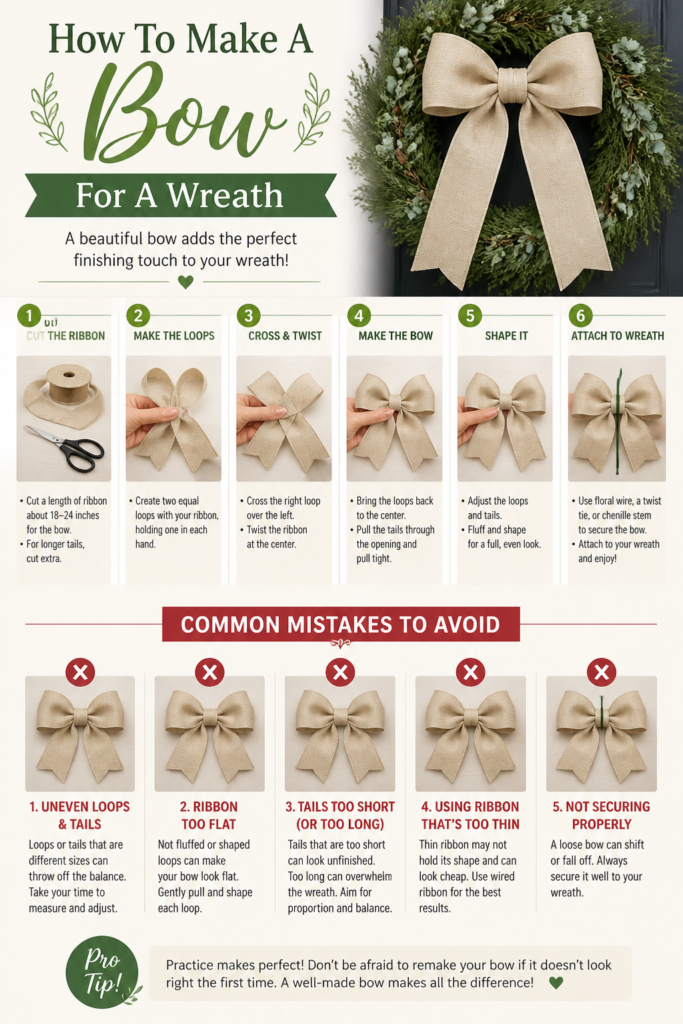
Common Mistakes to Avoid
Using Non-Wired Ribbon
Many beginners opt for non-wired ribbon because it’s often softer or less expensive. However, non-wired ribbon struggles to hold its shape. It tends to flatten and droop over time, losing that desired full and perky look. Always choose wired ribbon for wreath bows; the wire edge gives you the structural support needed to shape and maintain your loops beautifully.
Not Twisting the Ribbon at the Center
When forming loops, it’s easy to forget to twist the ribbon at the central pinch point before creating the next loop. This oversight results in the back side of your ribbon showing on some of your loops. A simple twist ensures the decorative side of your ribbon is always facing outward, creating a consistent and polished appearance.
Uneven Loop Sizes
A common pitfall is making loops of varying sizes. While a slight difference might not be noticeable, drastically different loop lengths can make your bow look lopsided and unbalanced. Take a moment to visually check and adjust each loop as you form it, striving for consistent dimensions to achieve a harmonious and professional-looking bow.
Troubleshooting
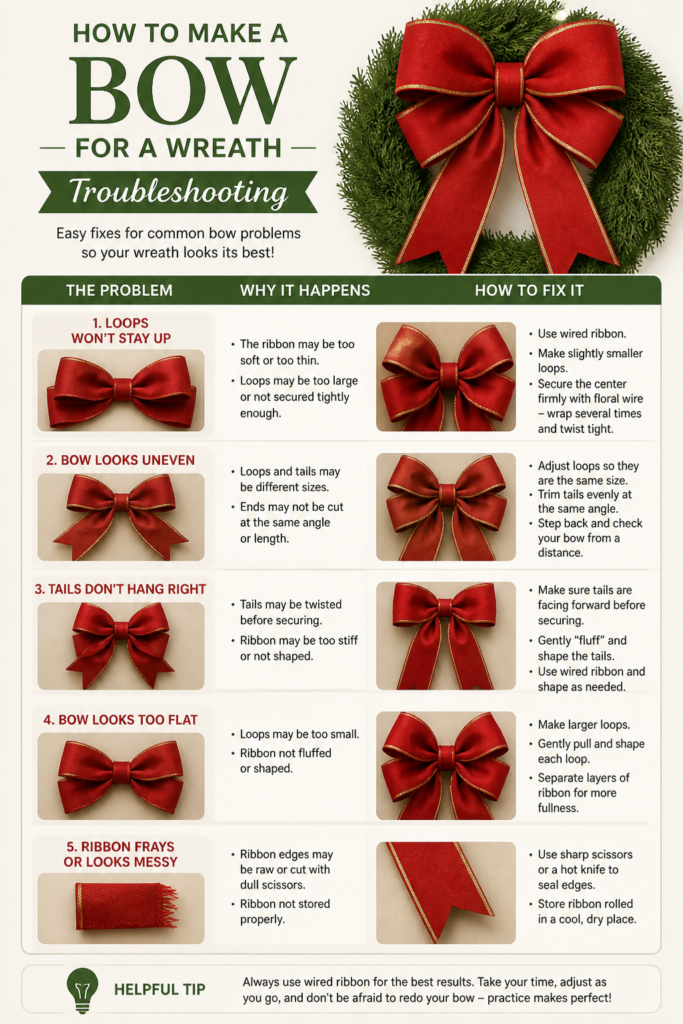
Bow Looks Flat or Lifeless
If your bow isn’t as full as you’d hoped, it’s likely a shaping issue. The key to a vibrant bow is in the fluffing. Gently pull apart each individual loop, working from the center outwards. Use your fingers to encourage the wired edges of the ribbon to stand up and outward, creating volume. Don’t be afraid to really work with the wire inside the ribbon; it’s designed for this purpose.
Ribbon Keeps Slipping or Unraveling
This problem usually points to insufficient tightening at the center. Ensure your floral wire or pipe cleaner is wrapped very tightly around the pinched ribbon, and twist the ends firmly several times. The tighter the cinch, the more securely your loops and tails will be held in place. If using very thick ribbon, you might need a stronger gauge floral wire.
Tails Are Uneven
It’s common for tails to end up slightly different lengths after all the twisting and shaping. Don’t worry, this is easily fixed. Once your bow is completely formed and fluffed, lay it on a flat surface or hold it up to eye level. Compare the two tails and use your sharp scissors to trim the longer one until both are symmetrical. You can also re-cut the decorative notches if needed.
Key Takeaways
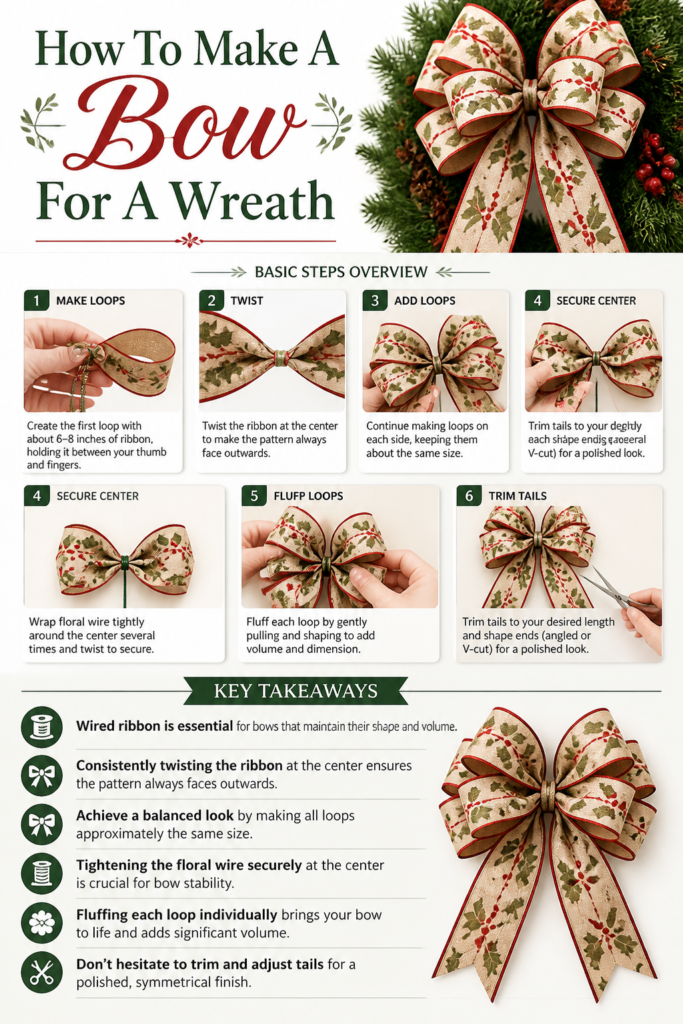
- Wired ribbon is essential for bows that maintain their shape and volume.
- Consistently twisting the ribbon at the center ensures the pattern always faces outwards.
- Achieve a balanced look by making all loops approximately the same size.
- Tightening the floral wire securely at the center is crucial for bow stability.
- Fluffing each loop individually brings your bow to life and adds significant volume.
- Don’t hesitate to trim and adjust tails for a polished, symmetrical finish.
Frequently Asked Questions
What’s the best type of ribbon for a wreath bow?
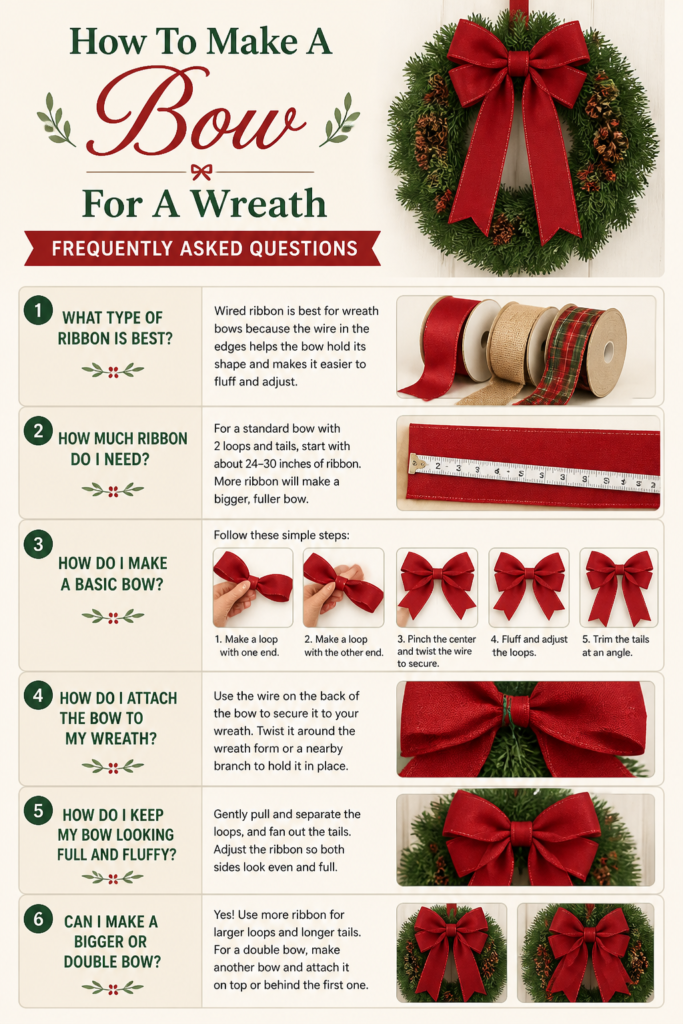
Wired ribbon is hands down the best choice for wreath bows. The thin wire along its edges allows you to shape and mold the loops, ensuring your bow stays full and perky. Without this wire, your bow would quickly go flat and lose its form.
How much ribbon do I need for a standard bow?
For a medium-sized bow with 3-4 loops on each side and two tails, you’ll generally need about 3-5 yards of ribbon. The exact amount depends on the ribbon width, desired loop size, and tail length. It’s always better to have a little extra than to run short.
Can I make a multi-layered bow with different ribbons?
Absolutely! Creating a multi-layered bow adds depth and visual interest. To do this, simply stack two or three different ribbons (e.g., a wide solid ribbon layered with a thinner patterned one) and treat them as a single piece throughout the entire bow-making process.
How do I make a bow look fuller?
To make your bow look fuller, focus on two main things: the number of loops and the fluffing technique. Increase the number of loops you create (e.g., 5 loops per side instead of 3). After securing, meticulously pull and separate each loop, using the wired edges to expand and shape them, creating air and volume between them.
Our Top Recommended Finds
- Wired Edge Christmas Ribbon Set: Offers a variety of patterns and widths, perfect for holiday wreaths and ensuring your bows hold their festive shape.
- 22 Gauge Floral Wire: This is the ideal thickness for securing bows. It’s strong enough to hold everything together but flexible enough to twist easily.
- Fabric Scissors: Investing in a good pair of sharp fabric scissors ensures clean, crisp cuts on your ribbon, preventing fraying and giving your bow a professional finish.
Your Wreath’s New Centerpiece Awaits
You now have all the knowledge and steps to create a beautiful, custom bow that will elevate any wreath. This skill is not just for holiday decor; imagine crafting unique bows for seasonal wreaths, special occasions, or even gifts. The possibilities are truly endless.
Don’t just read about it – gather your materials and give it a try today. You’ll be amazed at what you can create with your own hands, adding a personalized touch to your home decor. Your next stunning wreath is just a few loops away.
Beginner-friendly templates, step-by-step guides,
and weekly project ideas in your inbox.