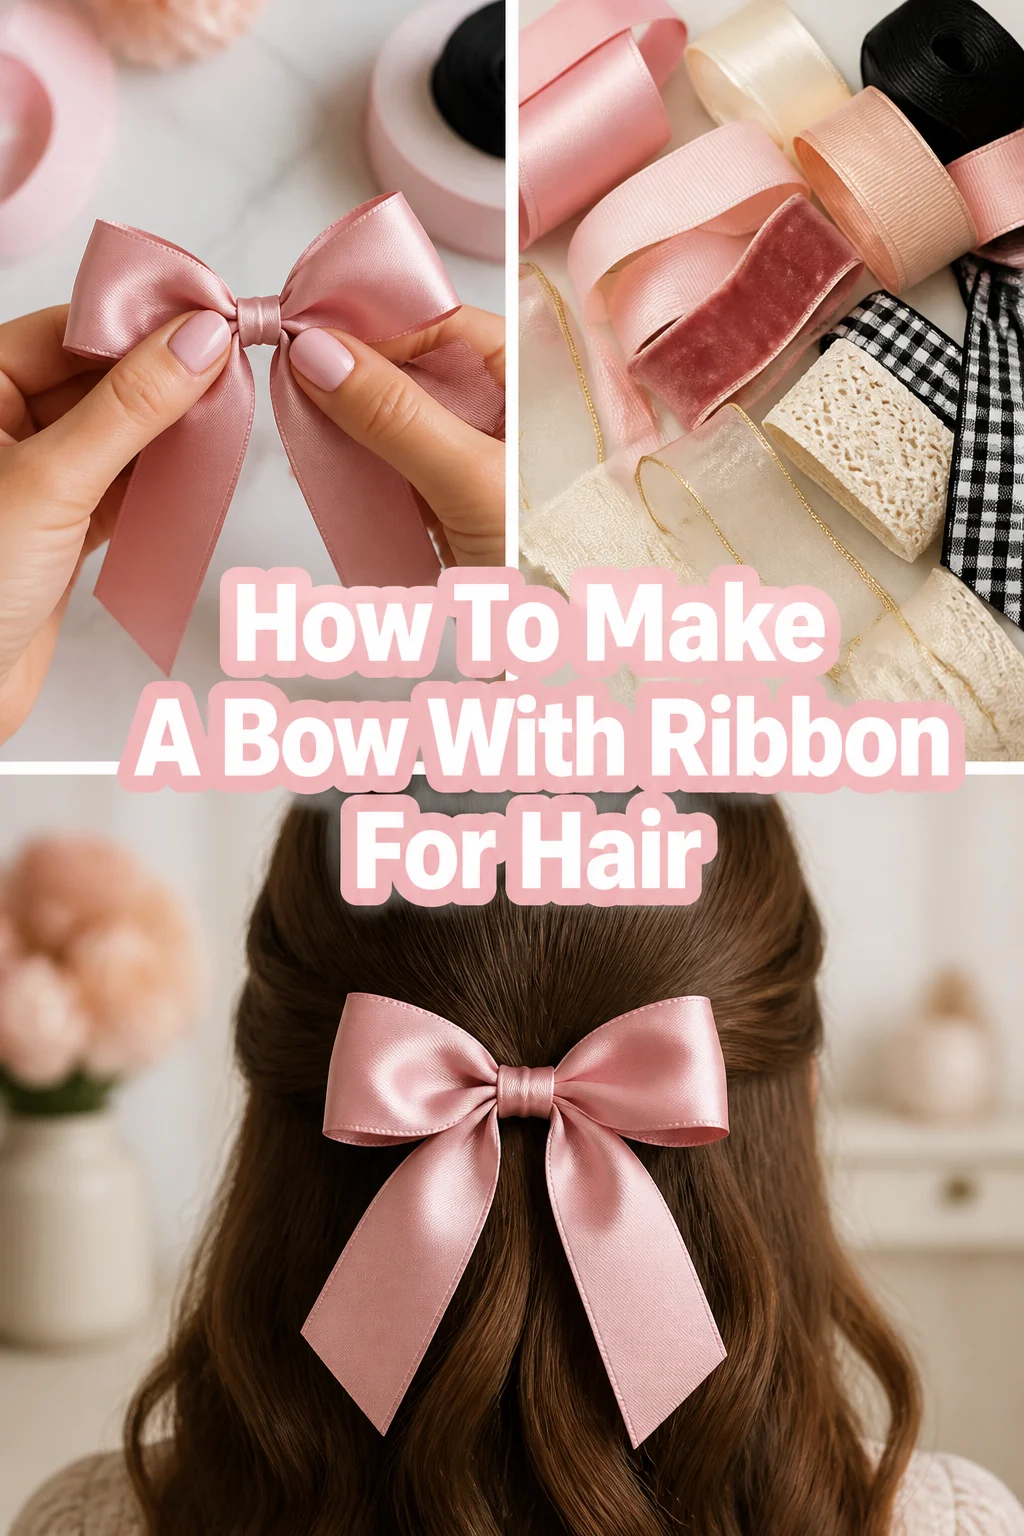
🎀 How To Make A Bow With Ribbon For Hair

Beginner-friendly templates, step-by-step guides,
and weekly project ideas in your inbox.
Creating your own hair bows is a delightful experience. It allows for endless creativity and adds a personal touch to any outfit. I remember making my first bow for a school play, and the sense of accomplishment was truly special.
This guide will walk you through each step, ensuring you can confidently craft beautiful hair bows. You’ll learn the techniques to make professional-looking accessories right at home.

Quick Overview
You’re about to create a lovely, custom hair bow. This project is perfect for beginners and yields impressive results. You’ll finish with a charming accessory ready to wear or gift.
- Time needed: 20-40 minutes
- Difficulty: Beginner
- What you’ll need: Ribbon, scissors, hot glue gun, hair clip
Step-by-Step Instructions
Step 1: Gather Your Materials
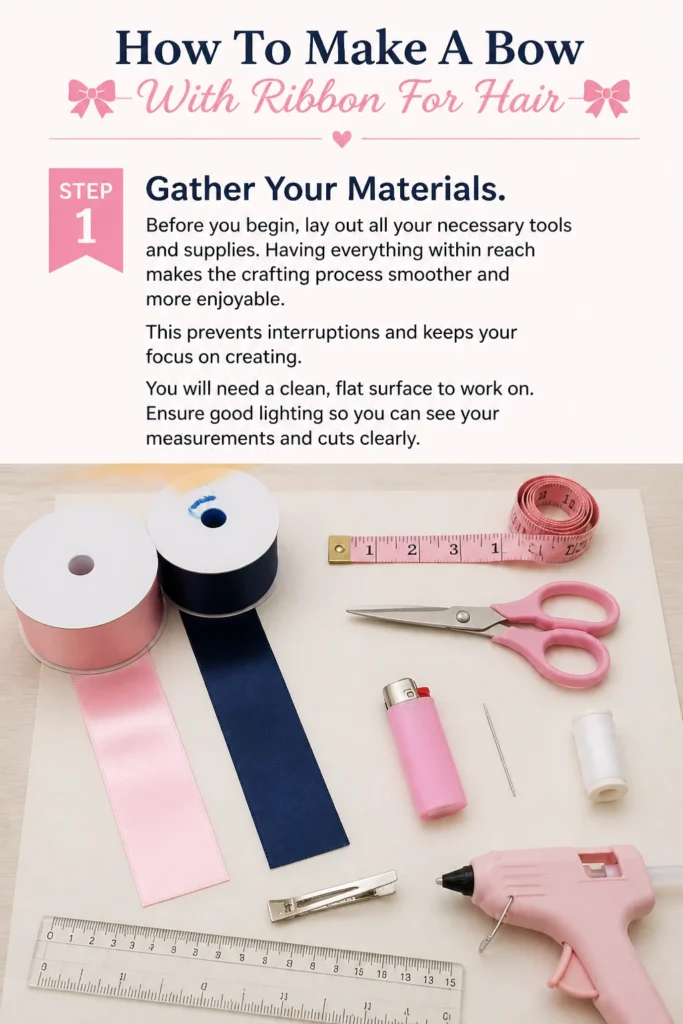
Before you begin, lay out all your necessary tools and supplies. Having everything within reach makes the crafting process smoother and more enjoyable. This prevents interruptions and keeps your focus on creating.
You will need a clean, flat surface to work on. Ensure good lighting so you can see your measurements and cuts clearly.
Step 2: Choose and Prepare Your Ribbon
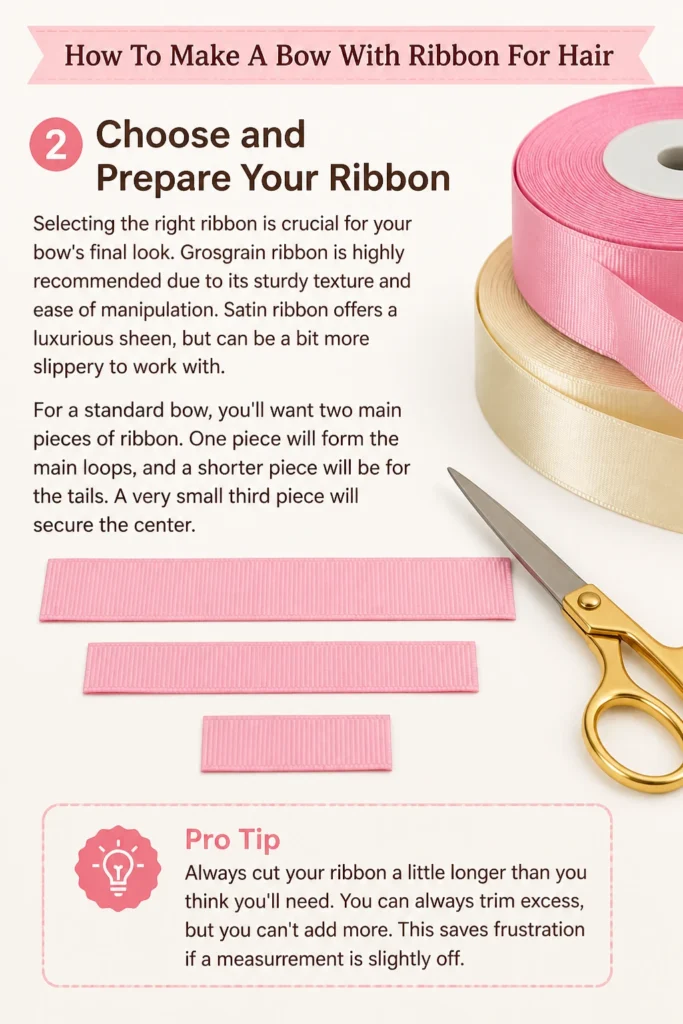
Selecting the right ribbon is crucial for your bow’s final look. Grosgrain ribbon is highly recommended due to its sturdy texture and ease of manipulation. Satin ribbon offers a luxurious sheen, but can be a bit more slippery to work with.
For a standard bow, you’ll want two main pieces of ribbon. One piece will form the main loops, and a shorter piece will be for the tails. A very small third piece will secure the center.
Pro Tip: Always cut your ribbon a little longer than you think you’ll need. You can always trim excess, but you can’t add more. This saves frustration if a measurement is slightly off.
Step 3: Measure and Cut Your Main Ribbon Pieces
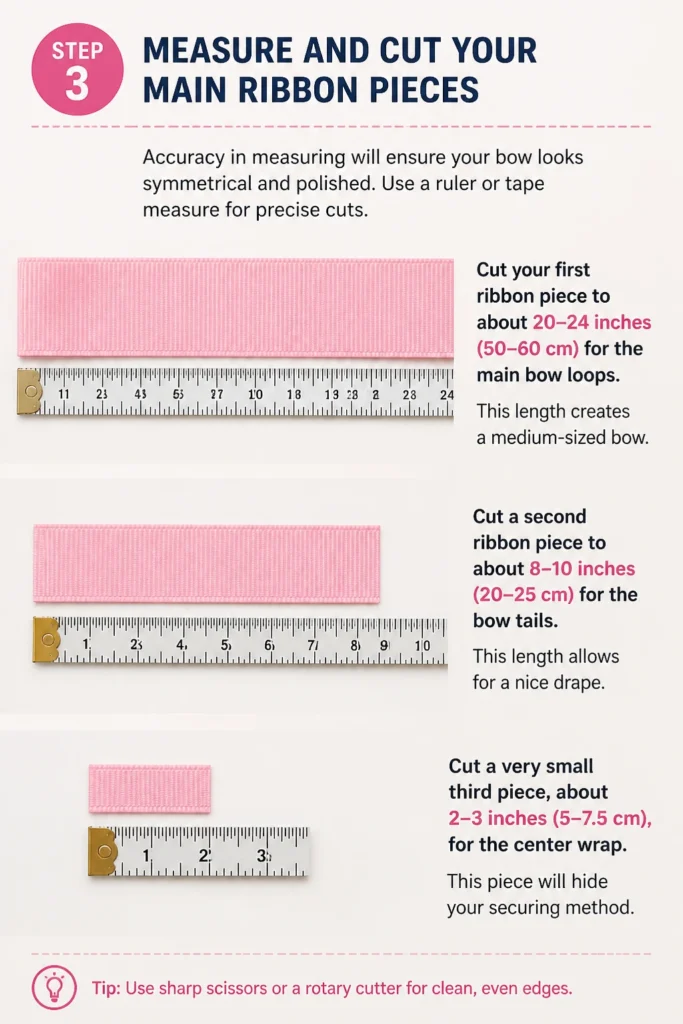
Accuracy in measuring will ensure your bow looks symmetrical and polished. Use a ruler or tape measure for precise cuts.
Cut your first ribbon piece to about 20-24 inches (50-60 cm) for the main bow loops. This length creates a medium-sized bow.
Cut a second ribbon piece to about 8-10 inches (20-25 cm) for the bow tails. This length allows for a nice drape.
Cut a very small third piece, about 2-3 inches (5-7.5 cm), for the center wrap. This piece will hide your securing method.
Step 4: Form the Main Bow Loops
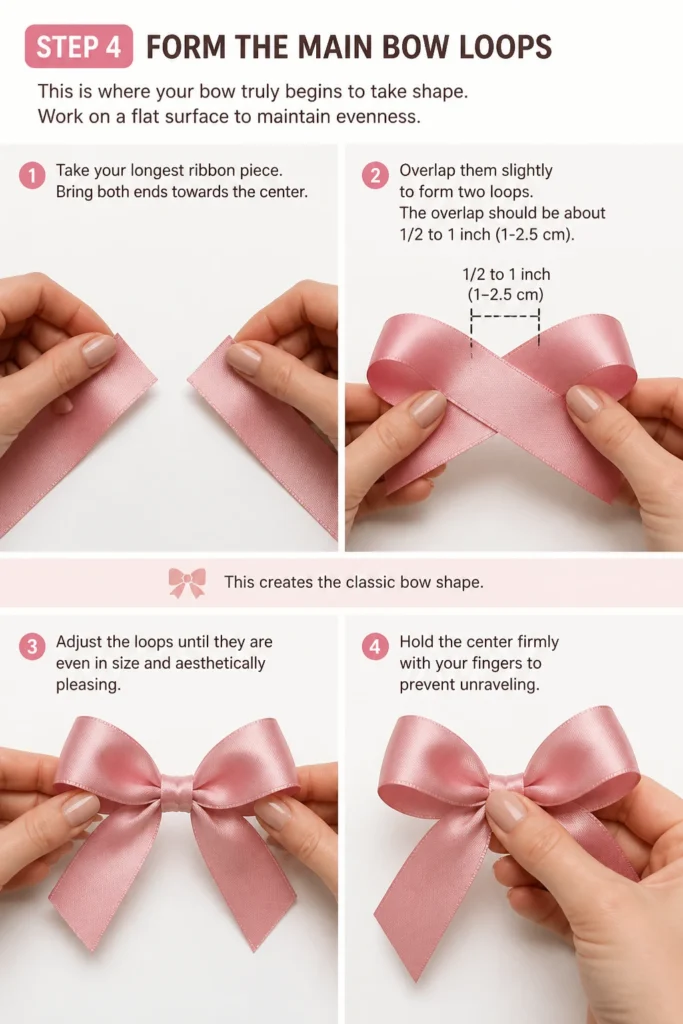
This is where your bow truly begins to take shape. Work on a flat surface to maintain evenness.
Take your longest ribbon piece. Bring both ends towards the center, overlapping them slightly to form two loops. The overlap should be about 1/2 to 1 inch (1-2.5 cm). This creates the classic bow shape.
Adjust the loops until they are even in size and aesthetically pleasing. Hold the center firmly with your fingers to prevent unraveling.
Step 5: Secure the Center of the Loops
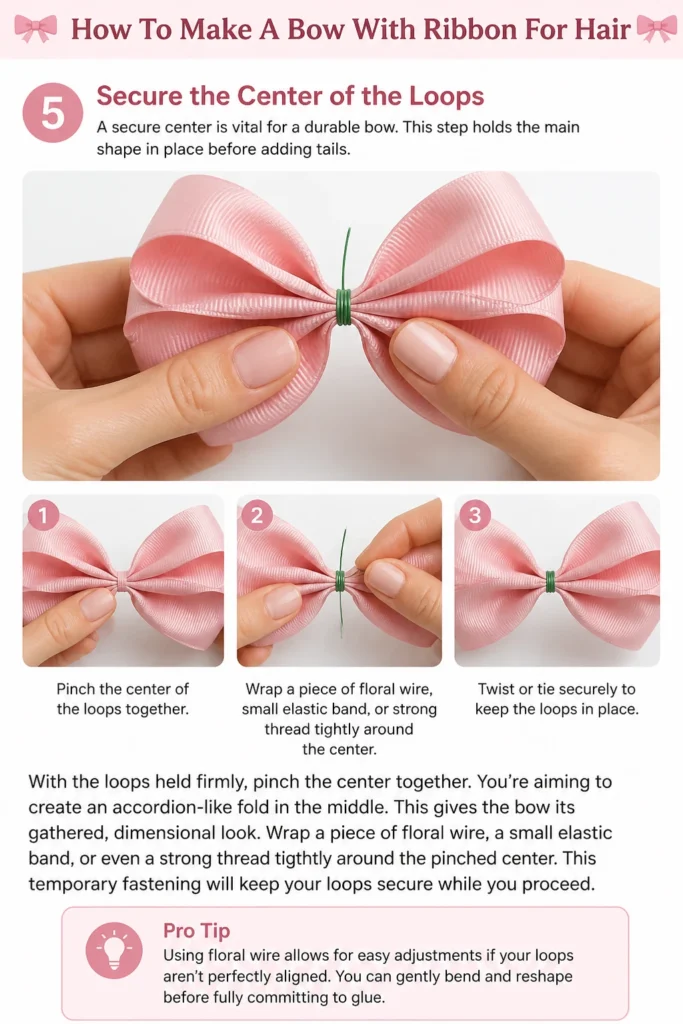
A secure center is vital for a durable bow. This step holds the main shape in place before adding tails.
With the loops held firmly, pinch the center together. You’re aiming to create an accordion-like fold in the middle. This gives the bow its gathered, dimensional look.
Wrap a piece of floral wire, a small elastic band, or even a strong thread tightly around the pinched center. This temporary fastening will keep your loops secure while you proceed.
Pro Tip: Using floral wire allows for easy adjustments if your loops aren’t perfectly aligned. You can gently bend and reshape before fully committing to glue.
Step 6: Attach the Bow Tails
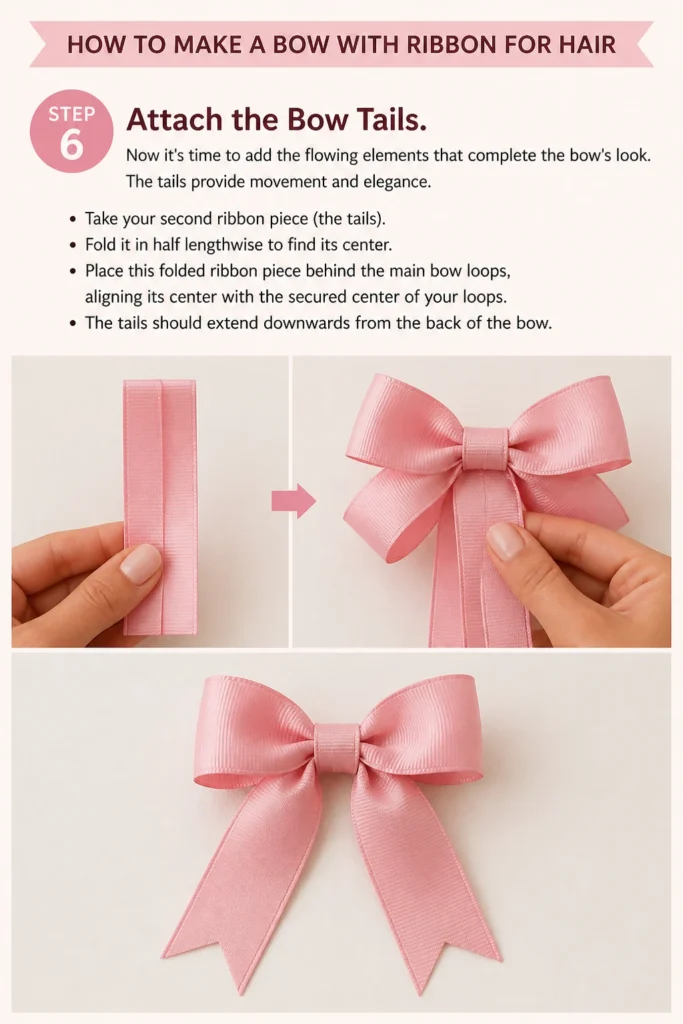
Now it’s time to add the flowing elements that complete the bow’s look. The tails provide movement and elegance.
Take your second ribbon piece (the tails). Fold it in half lengthwise to find its center.
Place this folded ribbon piece behind the main bow loops, aligning its center with the secured center of your loops. The tails should extend downwards from the back of the bow.
Step 7: Permanently Secure the Center and Tails
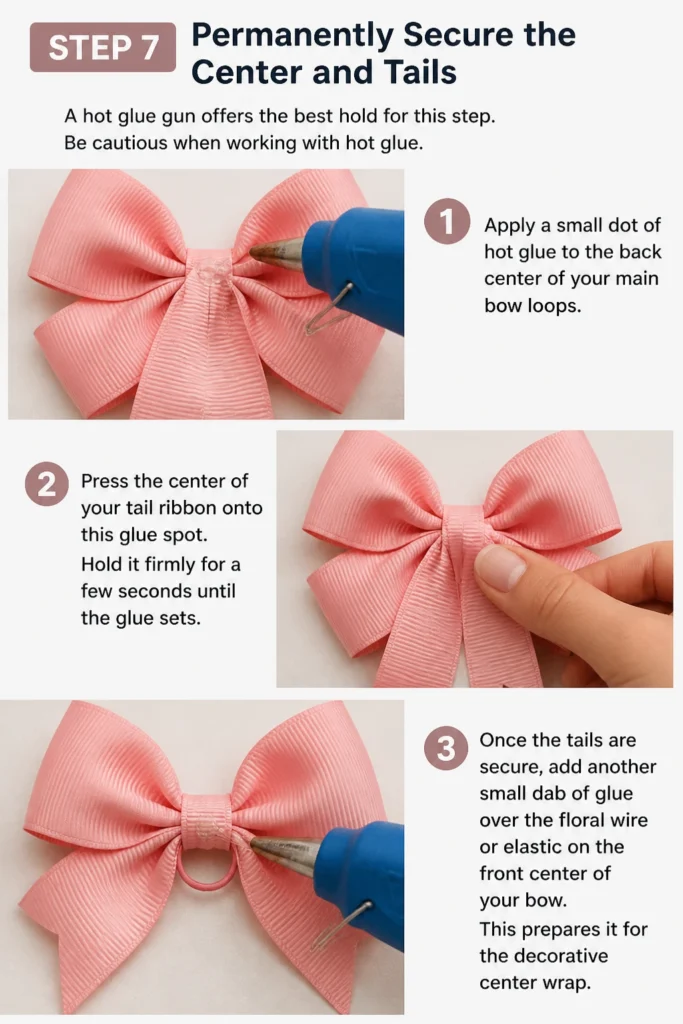
A hot glue gun offers the best hold for this step. Be cautious when working with hot glue.
Apply a small dot of hot glue to the back center of your main bow loops. Press the center of your tail ribbon onto this glue spot. Hold it firmly for a few seconds until the glue sets.
Once the tails are secure, add another small dab of glue over the floral wire or elastic on the front center of your bow. This prepares it for the decorative center wrap.
Step 8: Wrap the Center Strip
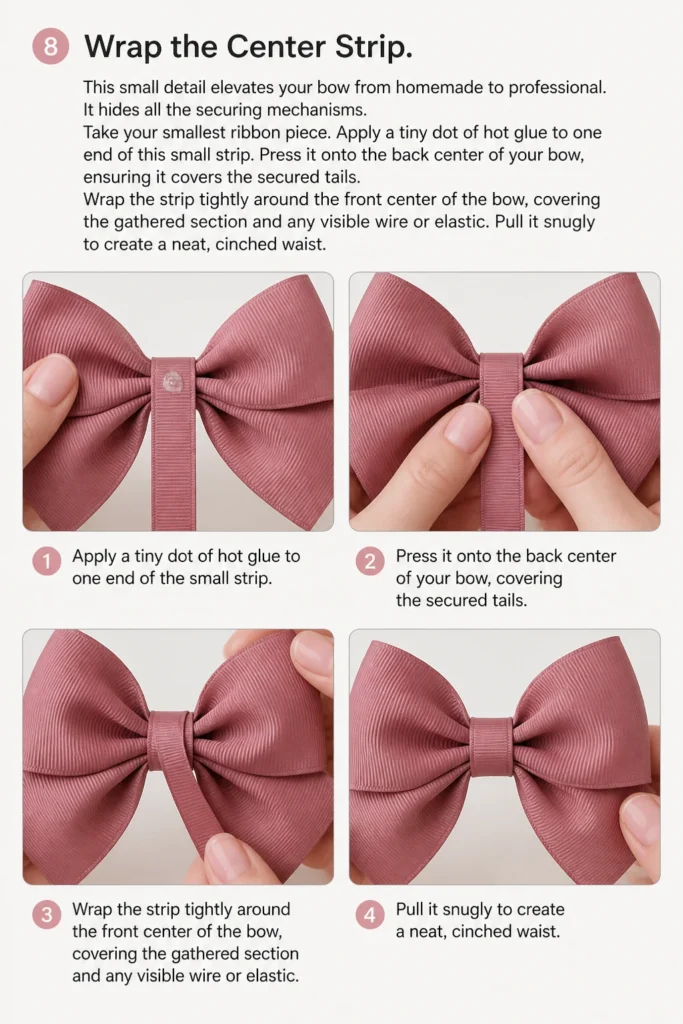
This small detail elevates your bow from homemade to professional. It hides all the securing mechanisms.
Take your smallest ribbon piece. Apply a tiny dot of hot glue to one end of this small strip. Press it onto the back center of your bow, ensuring it covers the secured tails.
Wrap the strip tightly around the front center of the bow, covering the gathered section and any visible wire or elastic. Pull it snugly to create a neat, cinched waist.
Step 9: Finish the Center Wrap and Attach Hair Clip
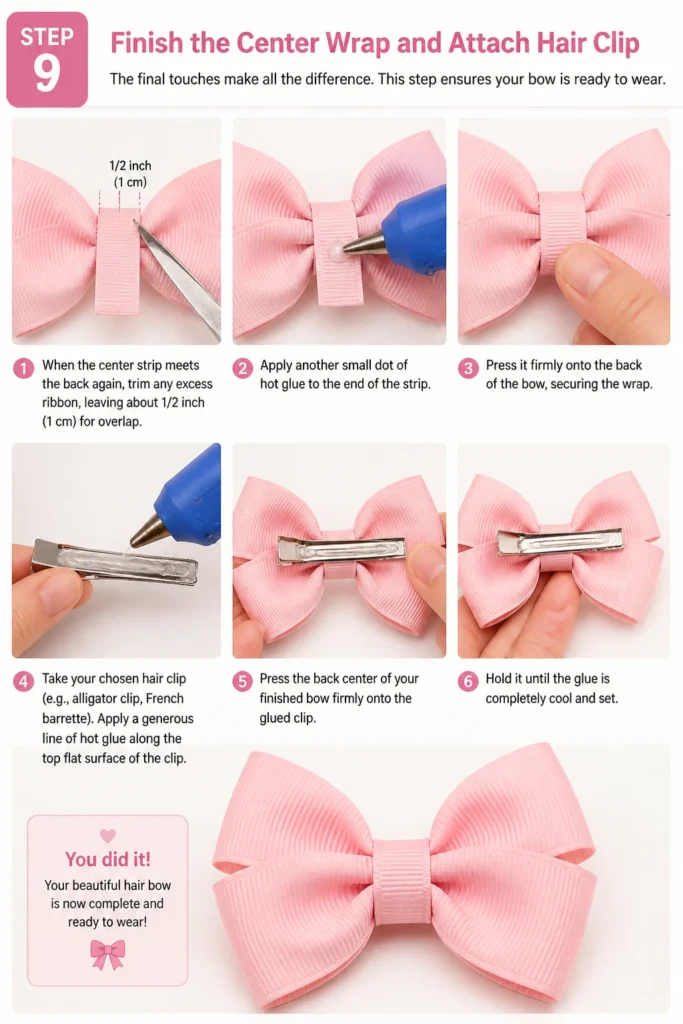
The final touches make all the difference. This step ensures your bow is ready to wear.
When the center strip meets the back again, trim any excess ribbon, leaving about 1/2 inch (1 cm) for overlap. Apply another small dot of hot glue to the end of the strip. Press it firmly onto the back of the bow, securing the wrap.
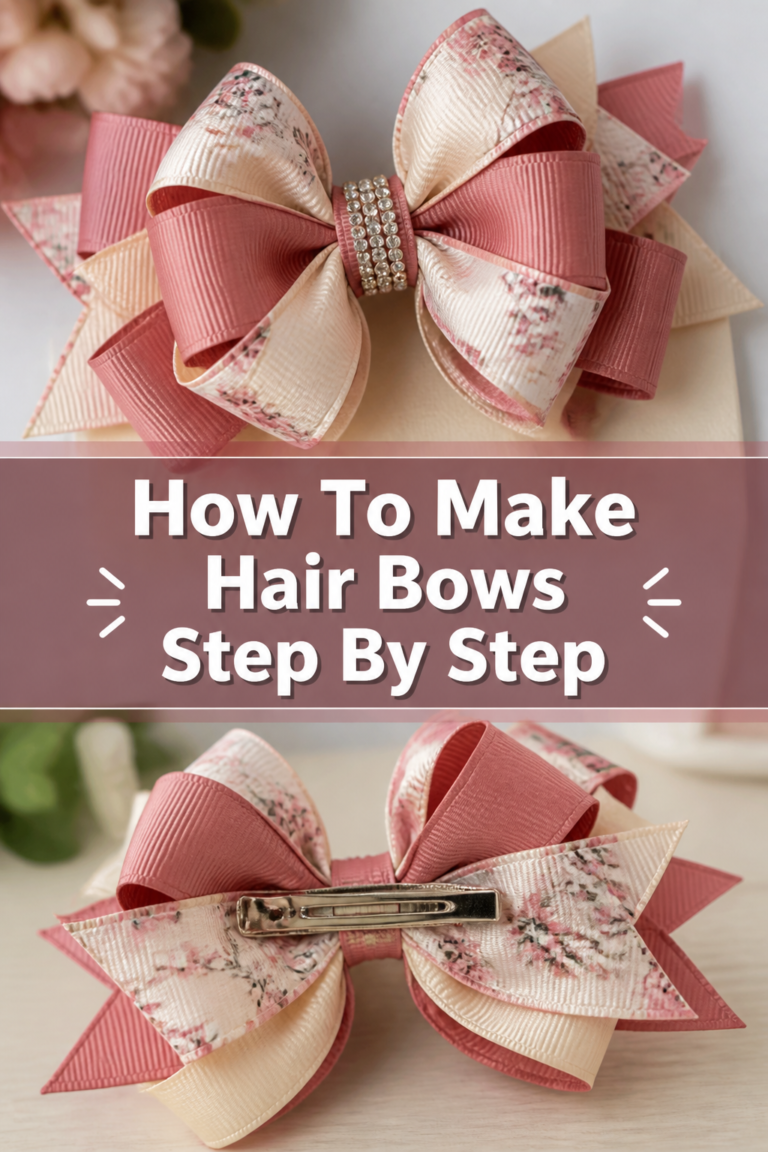
Now, take your chosen hair clip (e.g., alligator clip, French barrette). Apply a generous line of hot glue along the top flat surface of the clip. Press the back center of your finished bow firmly onto the glued clip. Hold it until the glue is completely cool and set.
Step 10: Trim and Embellish (Optional)
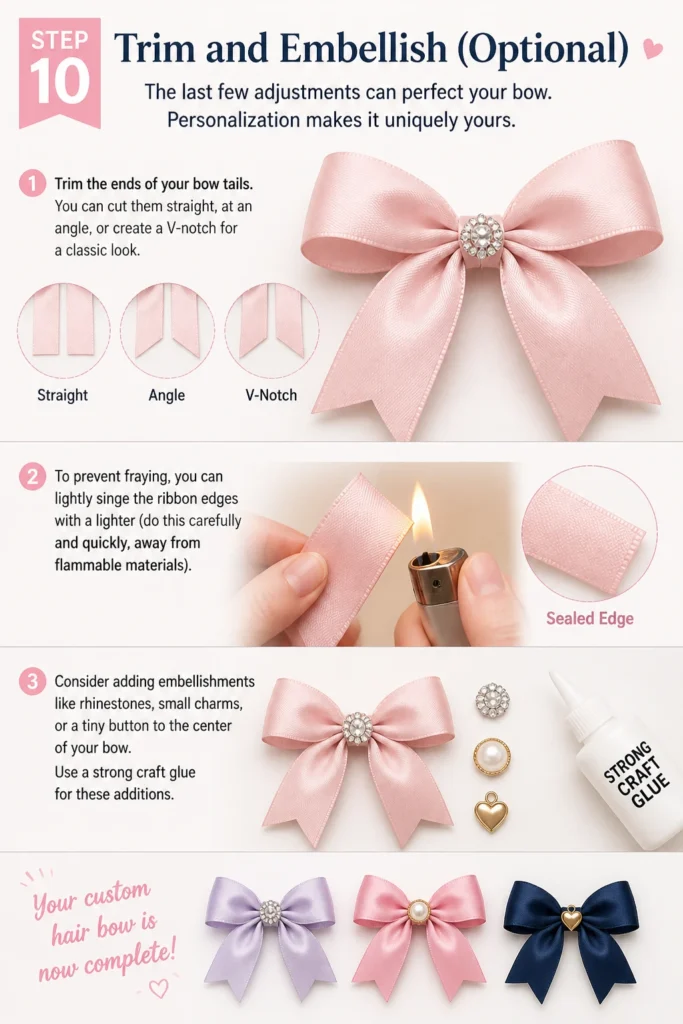
The last few adjustments can perfect your bow. Personalization makes it uniquely yours.
Trim the ends of your bow tails. You can cut them straight, at an angle, or create a V-notch for a classic look. To prevent fraying, you can lightly singe the ribbon edges with a lighter (do this carefully and quickly, away from flammable materials).
Consider adding embellishments like rhinestones, small charms, or a tiny button to the center of your bow. Use a strong craft glue for these additions. Your custom hair bow is now complete!
Common Mistakes to Avoid
Uneven Loops
One common pitfall is creating loops that aren’t quite the same size. This makes the bow look lopsided and less polished. To prevent this, always work on a flat surface and constantly compare the size of your loops as you form them. Make small adjustments before securing the center.
Visible Glue Spots
Nothing detracts from a beautiful bow like obvious, stringy glue. Too much glue or messy application can leave shiny, hard spots. Use small, controlled dots or lines of hot glue. Practice makes perfect when it comes to glue gun control, and always wipe the nozzle clean before use.
Flimsy Center
A poorly secured center can lead to a bow that quickly loses its shape or falls apart. If the center isn’t pinched tightly or the temporary fastening isn’t snug, the loops will flatten. Ensure your initial pinch is firm and the temporary wrap (wire or elastic) is very tight before applying permanent glue.
Wrong Ribbon Choice
Using ribbon that is too thin, too stiff, or too slippery can make bow-making frustrating. Satin ribbon can be beautiful but is often harder for beginners to manage. Opt for grosgrain ribbon when starting out, as its texture holds shape well and is easier to manipulate.
Troubleshooting
My Bow Looks Lopsided
If your bow appears uneven, it’s usually due to the loops not being symmetrical. Gently try to reshape the loops. If you used floral wire to secure the center, you might be able to subtly adjust the wire and ribbon. For glued bows, you might need to carefully unglue and re-position. Next time, take extra care to measure and eyeball loop symmetry before finalizing.
Ribbon Ends Are Fraying
Fraying ribbon ends can quickly make a bow look untidy. The best solution is prevention. After trimming your ribbon tails, lightly seal the edges. You can use a lighter to quickly run the flame along the cut edge (be very careful not to burn the ribbon). Alternatively, apply a tiny dot of clear fabric sealant or clear nail polish to the very edge.
The Hair Clip Won’t Stay Attached
If your bow separates from the hair clip, it’s likely a glue issue. Either not enough glue was used, or the glue wasn’t allowed to cool and set completely under pressure. Use a generous, but not excessive, amount of hot glue on the clip’s flat surface. Press the bow firmly onto the clip for at least 30-60 seconds, allowing the glue to fully cure before handling.
Key Takeaways
- Precision matters: Accurate measuring and even loops create a professional-looking bow.
- Secure the center: A tight temporary wrap and strong glue are essential for durability.
- Choose the right ribbon: Grosgrain is excellent for beginners, offering good structure.
- Use hot glue wisely: Small, controlled amounts prevent messy and visible glue spots.
- Don’t rush the process: Allow glue to cool and set completely for a strong hold.
- Personalize your creation: Embellishments add unique flair to your handmade bows.
Frequently Asked Questions
What type of ribbon is best for hair bows?
Grosgrain ribbon is widely considered the best choice for hair bows. Its ribbed texture provides good stiffness and holds its shape beautifully. It’s also durable and comes in a vast array of colors and patterns, making it versatile for many styles.
How can I make my hair bows waterproof?
While no ribbon bow will be truly waterproof, you can make them more water-resistant. After completing your bow, you can spray it with a fabric protector spray or a clear acrylic sealant. This will help repel moisture and protect the ribbon from light splashes, but avoid full submersion.
Can I use fabric glue instead of a hot glue gun?
Yes, you can use strong fabric glue, but it will require a much longer drying time. Hot glue offers instant adhesion, which is ideal for crafting and holding shapes. If using fabric glue, you’ll need to clamp or hold pieces together for an extended period to ensure a strong bond.
How do I make bigger or smaller bows?
To make bigger bows, simply increase the length of your ribbon pieces proportionally. For smaller bows, decrease the ribbon lengths. Experiment with different lengths to find what works best for your desired size. The basic technique remains the same regardless of bow size.
Our Top Recommended Finds
- Assorted Grosgrain Ribbon Pack: Provides a variety of colors and widths, perfect for experimentation and different bow styles.
- Mini Hot Glue Gun with Fine Tip: Essential for precise application, minimizing visible glue and making intricate details easier.
- Sharp Fabric Scissors: Crucial for clean, crisp cuts that prevent fraying and give your bows a professional finish.
Ready to Tie One On?
You now have all the knowledge and steps to create stunning ribbon hair bows. This craft is not only rewarding but also incredibly practical. Imagine the joy of wearing a custom accessory you made yourself, or gifting a personalized bow to a friend.
Don’t let the idea of crafting intimidate you. Start with a simple design, follow these steps, and watch your creativity blossom. Perhaps your next project could be experimenting with layered bows or combining different ribbon textures. The world of ribbon crafts awaits your touch!
Beginner-friendly templates, step-by-step guides,
and weekly project ideas in your inbox.