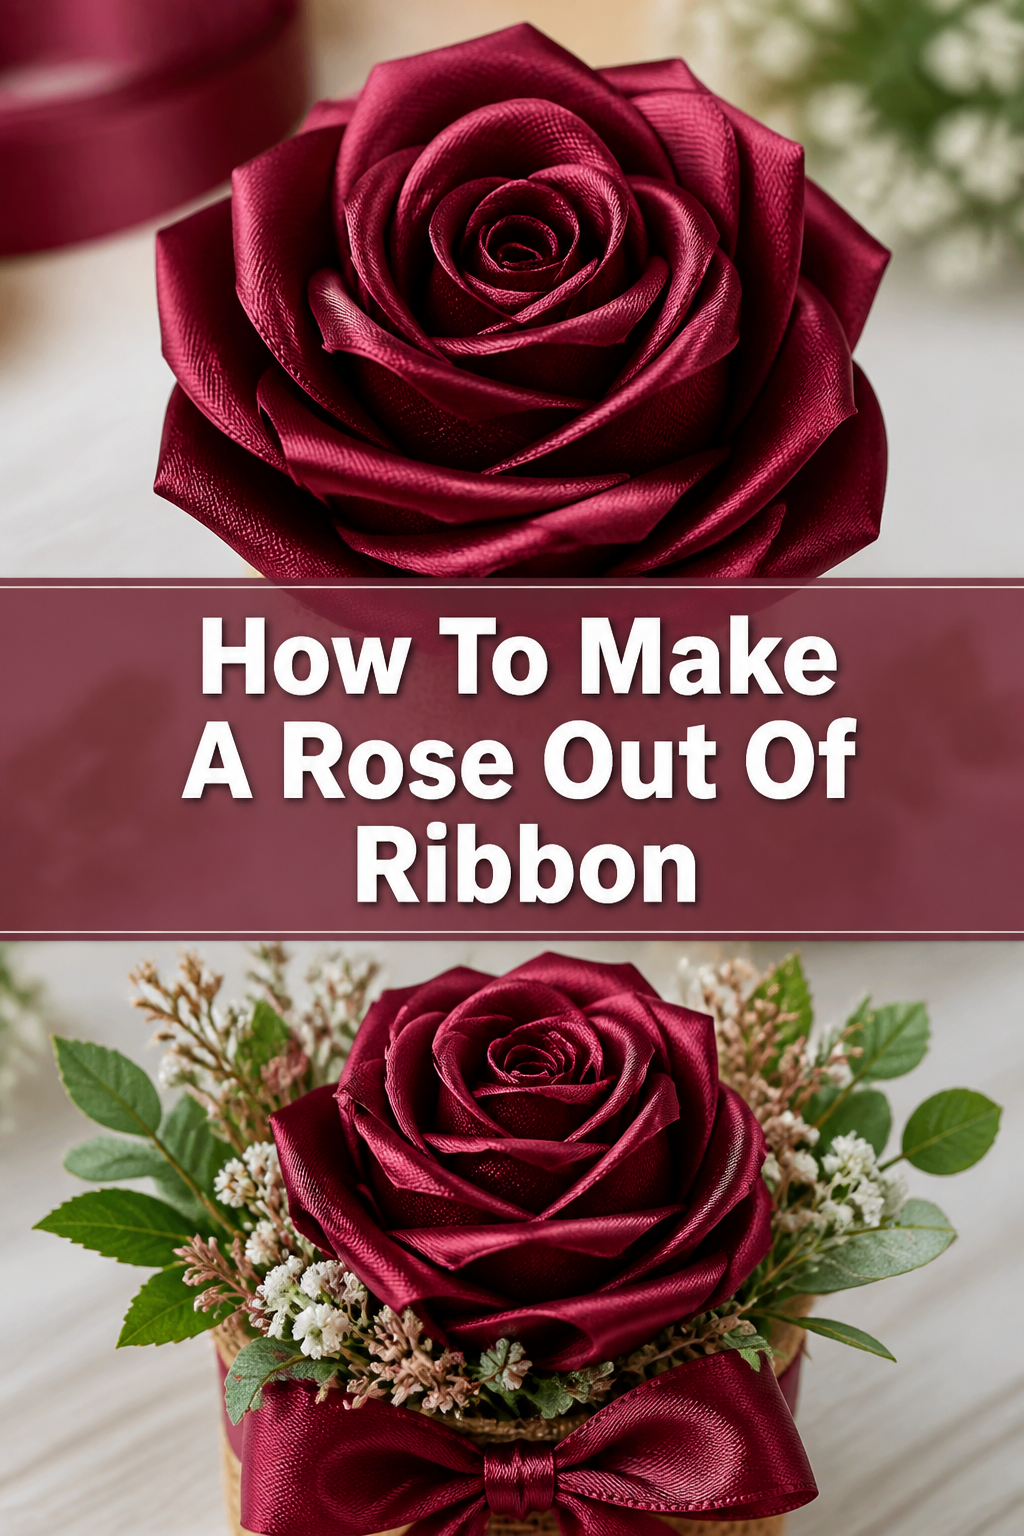
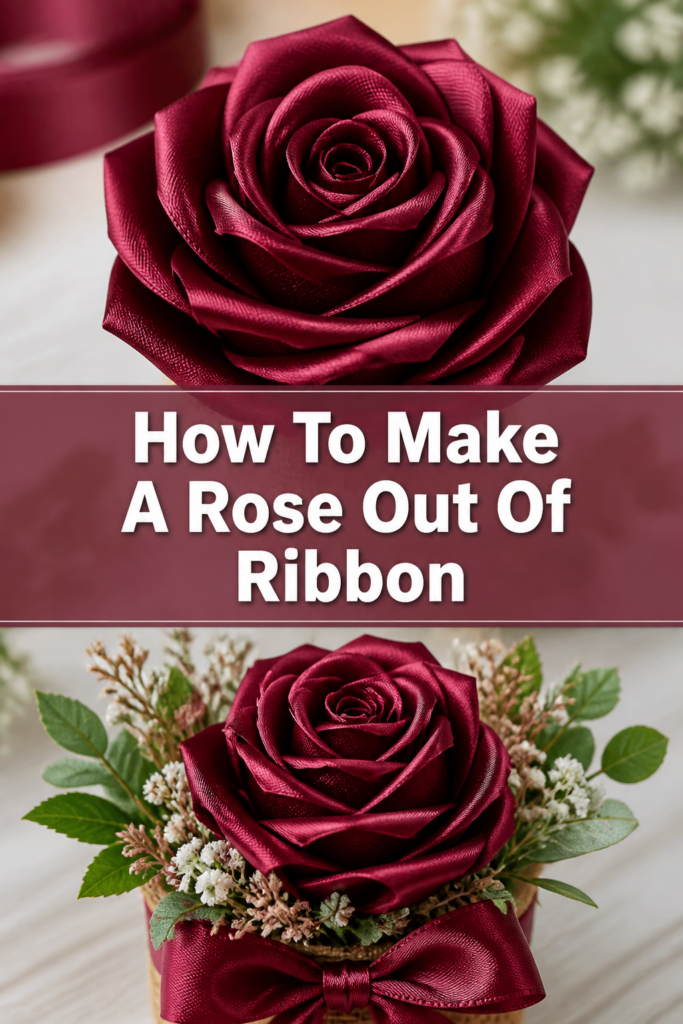
🌷 How To Make A Rose Out Of Ribbon

Beginner-friendly templates, step-by-step guides,
and weekly project ideas in your inbox.
Have you ever admired those intricate ribbon roses, wondering how they come to life? They often look complex, yet crafting one is a truly rewarding experience. I’ve spent countless hours perfecting this craft, and I’m excited to share my simplified method with you.
This guide will walk you through each stage, from selecting your ribbon to forming the delicate petals. You’ll soon be creating beautiful, lasting roses for all your decorative needs. Let’s start crafting something wonderful together.
Quick Overview
Creating a ribbon rose is a delightful project that combines patience with simple techniques. You’ll transform a flat piece of ribbon into a three-dimensional floral masterpiece. This process is incredibly satisfying for crafters of all levels.
- Time needed: 30-60 minutes (per rose, varies with practice)
- Difficulty: Beginner (with a steady hand and patience)
- What you’ll need: Ribbon, sharp scissors, needle, matching thread, ruler or measuring tape, hot glue gun (optional)
Step-by-Step Instructions
Step 1: Gather Your Materials
Before you begin, ensure all your supplies are within easy reach. A clear, well-lit workspace helps immensely. Having everything prepared prevents interruptions once you start folding.
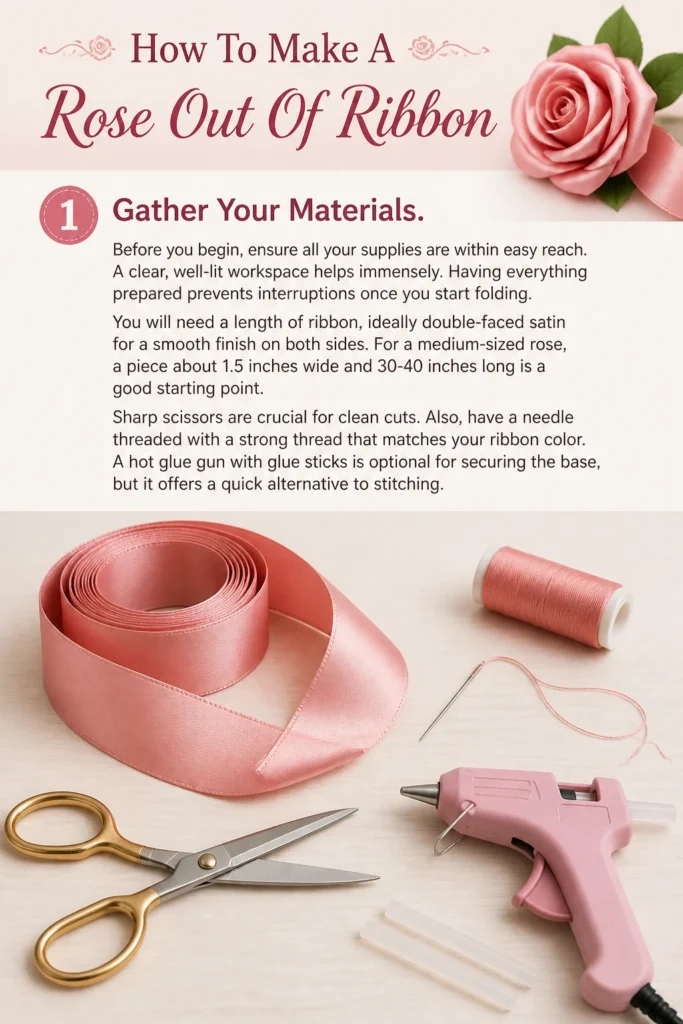
You will need a length of ribbon, ideally double-faced satin for a smooth finish on both sides. For a medium-sized rose, a piece about 1.5 inches wide and 30-40 inches long is a good starting point. Sharp scissors are crucial for clean cuts.
Also, have a needle threaded with a strong thread that matches your ribbon color. A hot glue gun with glue sticks is optional for securing the base, but it offers a quick alternative to stitching.
Step 2: Prepare the Ribbon End
Take one end of your ribbon. You will create the initial fold that forms the rose’s core. This first step sets the foundation for your entire flower.
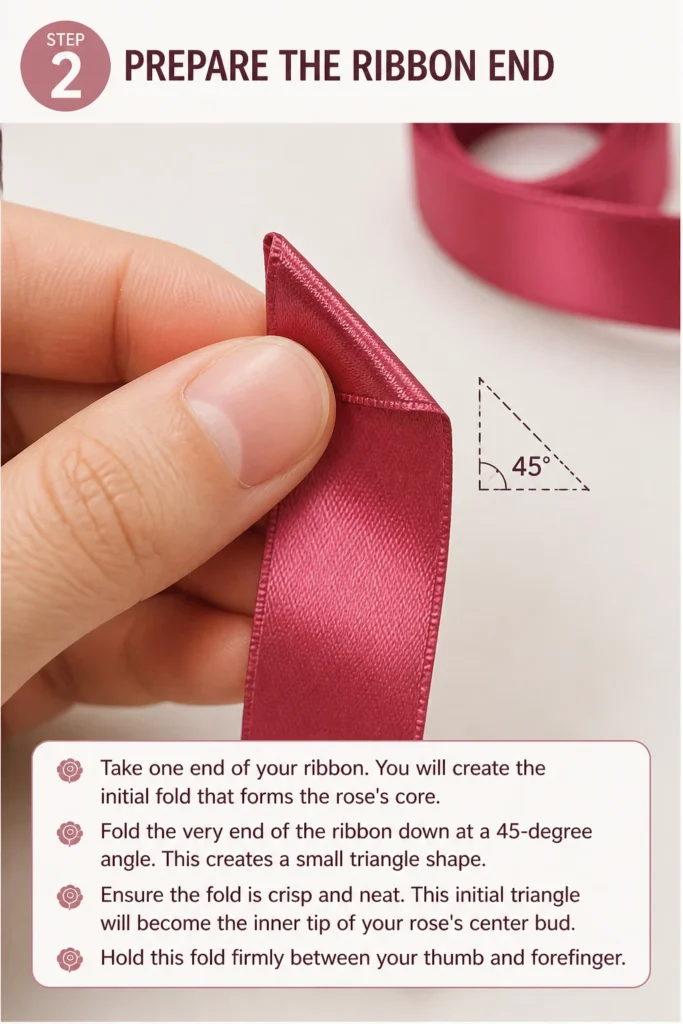
Fold the very end of the ribbon down at a 45-degree angle. This creates a small triangle shape. Ensure the fold is crisp and neat.
This initial triangle will become the inner tip of your rose’s center bud. Hold this fold firmly between your thumb and forefinger.
Step 3: Create the Center Bud
The center bud is the heart of your rose, giving it shape and dimension. This part requires careful, tight rolling. Keep the ribbon taut as you work.
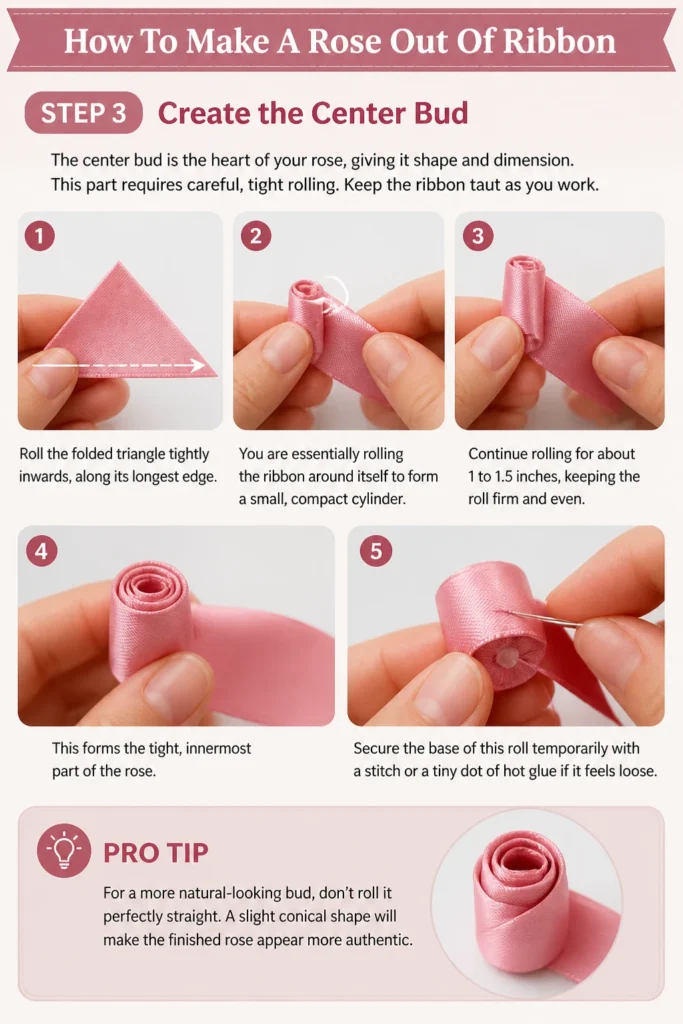
Roll the folded triangle tightly inwards, along its longest edge. You are essentially rolling the ribbon around itself to form a small, compact cylinder. This cylinder is the very center of your rose.
Continue rolling for about 1 to 1.5 inches, keeping the roll firm and even. This forms the tight, innermost part of the rose. Secure the base of this roll temporarily with a stitch or a tiny dot of hot glue if it feels loose.
Pro Tip: For a more natural-looking bud, don’t roll it perfectly straight. A slight conical shape will make the finished rose appear more authentic.
Step 4: Form the First Petals
Now you will start creating the distinct petal shapes around your central bud. This involves a series of folding and wrapping actions. Each fold adds a new layer to your rose.
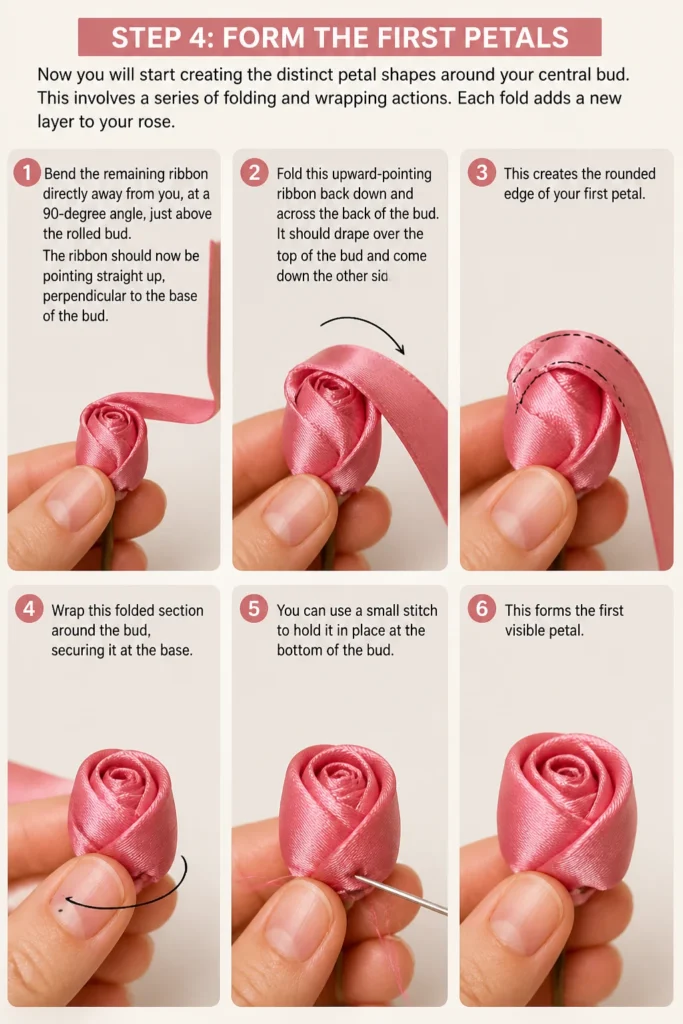
Bend the remaining ribbon directly away from you, at a 90-degree angle, just above the rolled bud. The ribbon should now be pointing straight up, perpendicular to the base of the bud. This forms the first “petal” segment.
Fold this upward-pointing ribbon back down and across the back of the bud. It should drape over the top of the bud and come down the other side. This creates the rounded edge of your first petal.
Wrap this folded section around the bud, securing it at the base. You can use a small stitch to hold it in place at the bottom of the bud. This forms the first visible petal.
Step 5: Build the Outer Layers
This is where your rose truly begins to take shape, as you add more petals. The rhythm of folding, wrapping, and securing becomes intuitive. Varying the tightness of your wraps will add depth.
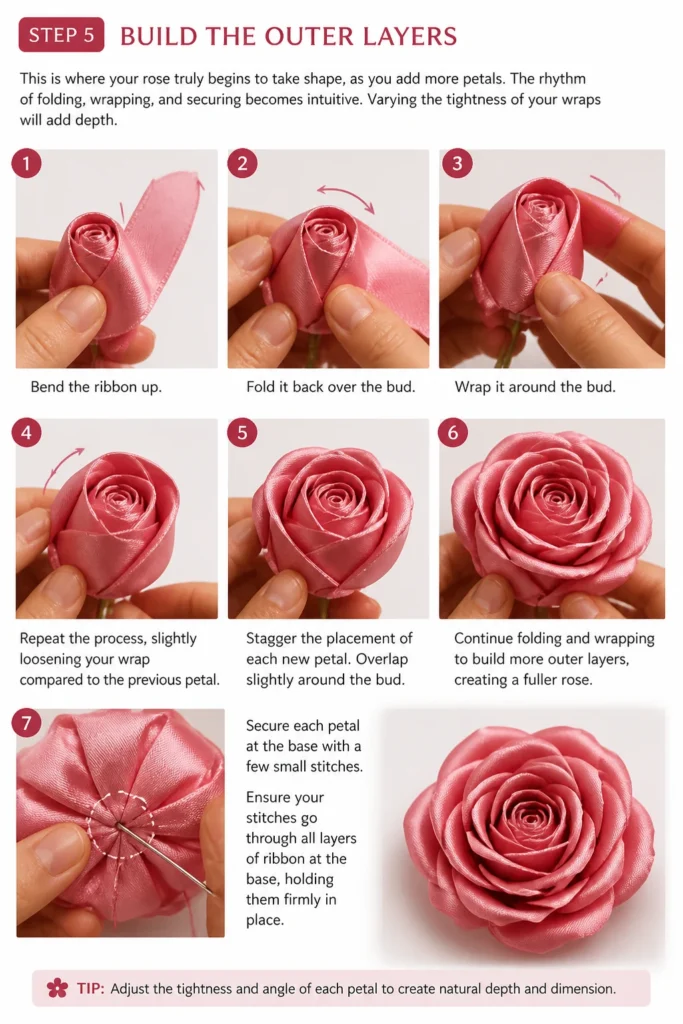
Repeat the process of bending the ribbon up, folding it back over the bud, and wrapping it around. Each time, slightly loosen your wrap compared to the previous petal. This creates the illusion of opening petals.
Stagger the placement of each new petal. Don’t place them directly on top of each other. Overlap them slightly, moving clockwise or counter-clockwise around the bud. This gives the rose a fuller, more organic look.
Continue this folding and wrapping, securing each petal at the base with a few small stitches. Ensure your stitches go through all layers of ribbon at the base, holding them firmly.
Pro Tip: For larger, more open petals, make your folds wider and wrap them a bit looser. For a tighter, smaller rose, keep everything more compact. Experiment with tension.
Step 6: Continue Adding Petals and Secure the Base
As you near the end of your ribbon, focus on creating the final, outermost petals. These often appear more open and relaxed. The most critical part of this step is securing the entire structure.
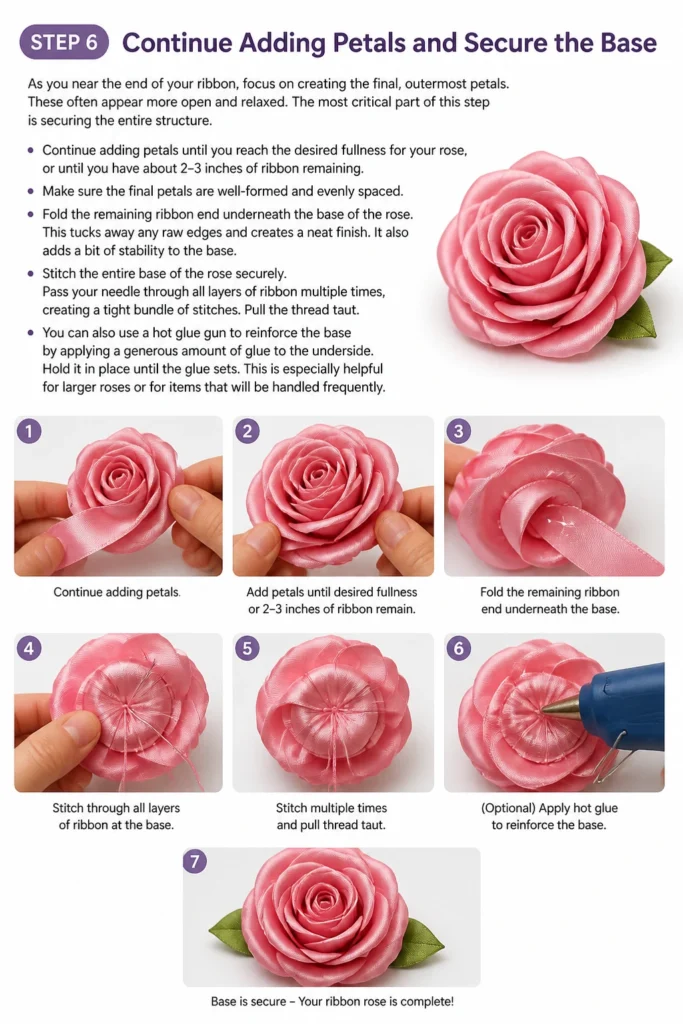
Continue adding petals until you reach the desired fullness for your rose, or until you have about 2-3 inches of ribbon remaining. Make sure the final petals are well-formed and evenly spaced.
Fold the remaining ribbon end underneath the base of the rose. This tucks away any raw edges and creates a neat finish. It also adds a bit of stability to the base.
Stitch the entire base of the rose securely. Pass your needle through all layers of ribbon multiple times, creating a tight bundle of stitches. Pull the thread taut. You can also use a hot glue gun to reinforce the base by applying a generous amount of glue to the underside.
Step 7: Trim and Finish
The final touches make all the difference, giving your rose a polished look. This step prepares your ribbon rose for display or attachment to other projects.
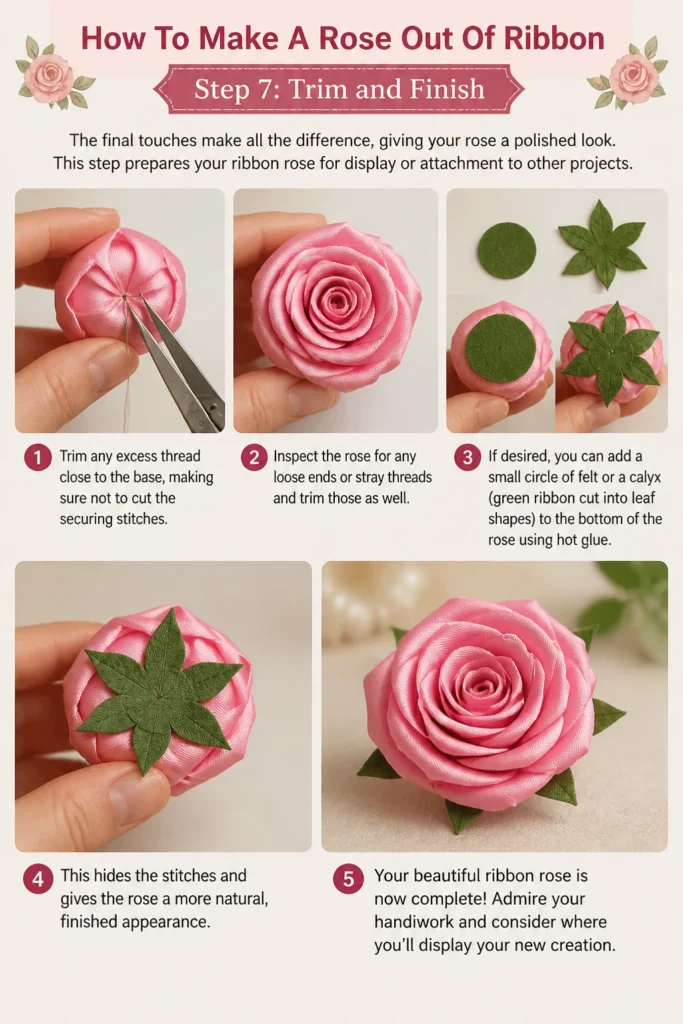
Trim any excess thread close to the base, making sure not to cut the securing stitches. Inspect the rose for any loose ends or stray threads and trim those as well.
If desired, you can add a small circle of felt or a calyx (green ribbon cut into leaf shapes) to the bottom of the rose using hot glue. This hides the stitches and gives the rose a more natural, finished appearance.
Your beautiful ribbon rose is now complete! Admire your handiwork and consider where you’ll display your new creation.
Common Mistakes to Avoid
Using the Wrong Ribbon Type
Many beginners grab any ribbon they have on hand, but material choice significantly impacts the outcome. Stiff ribbons like grosgrain or wired ribbons are difficult to fold smoothly and create harsh creases. They resist the gentle curves needed for petals.
Always opt for a soft, pliable ribbon, with double-faced satin being the best choice. Its smooth texture on both sides ensures a consistent look, and its flexibility allows for graceful petal formation. Single-faced satin can also work, but be mindful of the “wrong” side showing occasionally.
Inconsistent Folding and Wrapping
One of the most common reasons for a lopsided or uneven rose is inconsistent folding. If some petals are folded wide and others narrow, the rose will lack symmetry and appear less professional. Similarly, varying the angle of your initial bend can lead to an irregular shape.
Strive for uniformity in your initial folds for each petal. While you want to vary the tightness for an organic look, the actual size and angle of the folded ribbon section should be consistent. This creates a balanced foundation for the rose.
Securing the Base Insufficiently
A beautiful rose can quickly unravel if its base isn’t properly secured. Rushing this step or using too few stitches can lead to disappointment. The entire structure relies on a strong, stable foundation.
Take your time when stitching the base. Use strong thread and pass the needle through all ribbon layers multiple times, creating a tight bundle. If using hot glue, ensure a generous amount is applied evenly to hold everything together firmly.
Trying to Achieve Perfection Too Quickly
Crafting, especially something as delicate as a ribbon rose, takes practice. Many beginners get discouraged if their first attempt isn’t flawless. Expecting immediate perfection can lead to frustration and giving up too soon.
Embrace the learning process. Your first rose might be a bit wonky, and that’s perfectly normal. Each attempt refines your technique, improves your hand-eye coordination, and teaches you valuable lessons. Patience and persistence are your greatest tools.
Troubleshooting
Rose Looks Lopsided or Uneven
This usually happens when petals are not evenly distributed or the tension varies too much. It can be frustrating to see your rose leaning to one side. The key is to address the issue as you build.
When forming petals, ensure you are consistently wrapping them around the central bud. Try to maintain a relatively even spacing between each new petal. If you notice a lopsided appearance early on, gently unwrap the last few petals and re-fold them, adjusting their position before re-securing.
Ribbon Frays at the Edges
Fraying ribbon can make your rose look messy and unpolished. This often occurs with lower-quality ribbons or when using dull scissors. Raw edges can quickly unravel, especially with handling.
To prevent fraying, always use sharp fabric scissors for clean cuts. For synthetic ribbons (like most satins), you can gently heat-seal the cut edges with a lighter. Quickly pass the flame along the edge to melt the fibers slightly, but be very careful not to burn the ribbon.
Stitches are Visible on the Finished Rose
Visible stitches can detract from the delicate beauty of a ribbon rose. This often happens if the thread color doesn’t match well or if stitches are too large and not hidden within the folds. The goal is for the securing stitches to be discreet.
Always use a thread color that precisely matches your ribbon. When stitching, try to keep your stitches small and tight, burying them within the layers of ribbon at the base. If a stitch is still visible, you can carefully adjust the surrounding ribbon folds to conceal it. A small dab of hot glue at the very base can often replace visible stitches.
Key Takeaways
- Patience is paramount; crafting ribbon roses improves with practice.
- Selecting the right ribbon type, like double-faced satin, greatly simplifies the process.
- Consistent folding and strategic wrapping are crucial for a well-formed, symmetrical rose.
- Thoroughly securing the rose’s base with stitches or hot glue prevents unraveling.
- Embrace imperfections and learn from each attempt to refine your technique.
- Varying petal tightness adds depth and realism to your finished flower.
Frequently Asked Questions
What ribbon type is best for beginners?
Double-faced satin ribbon, typically 1.5 inches (3.8 cm) wide, is highly recommended for beginners. It’s soft, drapes beautifully, and has a smooth, consistent finish on both sides, making it forgiving to work with. The width provides enough material to easily manipulate.
Can I make different size roses using this method?
Absolutely! You can easily adjust the size of your rose by changing the width and length of your ribbon. A wider, longer ribbon will create a larger, fuller rose, while a narrower, shorter ribbon will result in a more petite flower. Experiment with different dimensions to achieve various effects.
How do I attach a finished ribbon rose to other projects?
Ribbon roses are incredibly versatile for embellishments. You can attach them using a hot glue gun for quick, strong adhesion to headbands, cards, or gift wraps. For fabric projects like clothing or bags, you can hand-stitch the base of the rose onto the material using a needle and thread. You can also glue a brooch pin to the back to make a wearable accessory.
Can ribbon roses be washed?
Generally, it’s best to avoid washing ribbon roses. The delicate folds and secured base can be damaged by water and agitation, causing the rose to lose its shape or unravel. If a ribbon rose gets dirty, gently spot clean it with a damp cloth and a very mild detergent, then allow it to air dry completely.
Our Top Recommended Finds
Investing in good tools makes the crafting process much more enjoyable and yields better results. These items are staples in any ribbon crafter’s kit. They will serve you well for many projects to come.
- Double-Faced Satin Ribbon Set: Essential for smooth, elegant roses. A multi-color pack allows for diverse creations.
- Sharp Fabric Shears: Precision scissors ensure clean, fray-free cuts, which is vital for a professional finish.
- Mini Hot Glue Gun with Fine-Tip Nozzle: Offers precise application for securing delicate folds without excess glue showing.
Unleash Your Inner Florist
You’ve just learned how to transform a simple length of ribbon into a beautiful, lasting rose. This craft is not just about making a flower; it’s about the joy of creation. Each rose you make will carry a piece of your artistic touch.
Now that you’ve mastered the basics, why not explore different ribbon widths or colors? You could even try adding a few small green ribbon leaves to your creations. Share your beautiful ribbon roses with friends and family, or use them to adorn gifts and home decor. The possibilities are endless.
Beginner-friendly templates, step-by-step guides,
and weekly project ideas in your inbox.