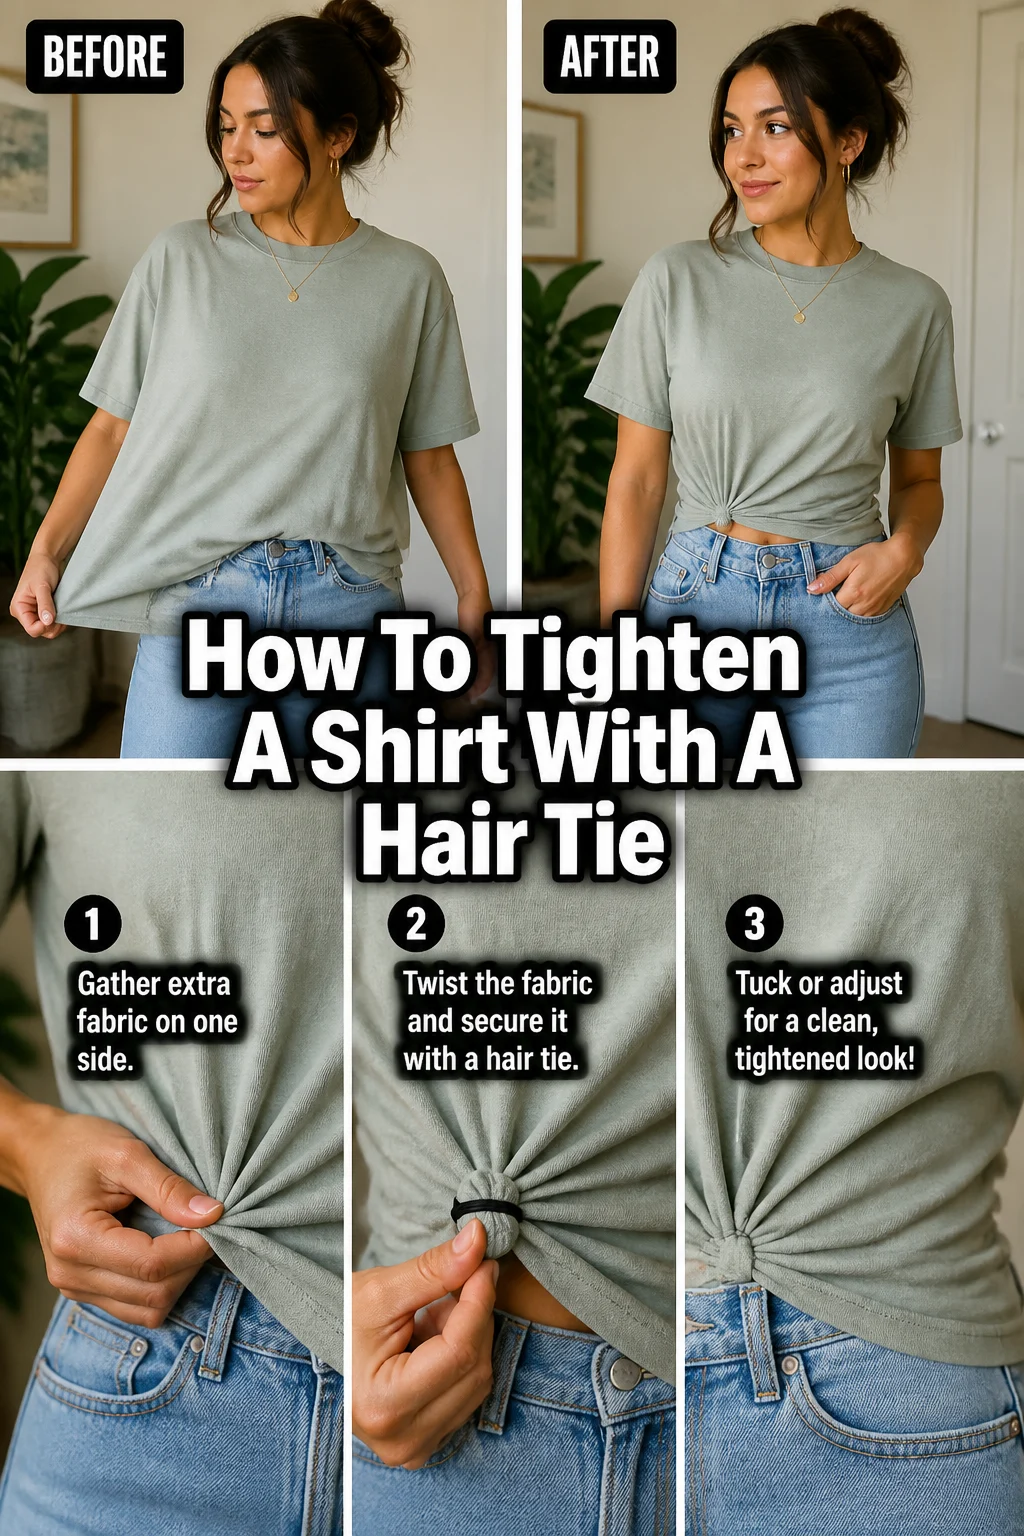
👕 How To Tighten A Shirt With A Hair Tie

Beginner-friendly templates, step-by-step guides,
and weekly project ideas in your inbox.
Ever found yourself with a favorite shirt that’s just a little too baggy?
It’s a common wardrobe dilemma, leaving you feeling less than confident in your outfit.
Having personally used this trick countless times to rescue outfits, I’m here to share the exact method for a perfectly tailored look without any sewing or permanent alterations.

Quick Overview
Transforming a loose shirt into a perfectly fitted garment is easier than you think. You’ll learn how to use a simple hair tie to create a flattering silhouette, giving your existing wardrobe a fresh, new lease on life.
- Time needed: 5-10 minutes
- Difficulty: Beginner
- What you’ll need: A shirt, a hair tie, a full-length mirror
Step-by-Step Instructions
Step 1: Select Your Shirt
Begin by choosing the shirt you wish to tighten. This method works best with slightly looser-fitting tops, t-shirts, oversized blouses, or even some dresses.
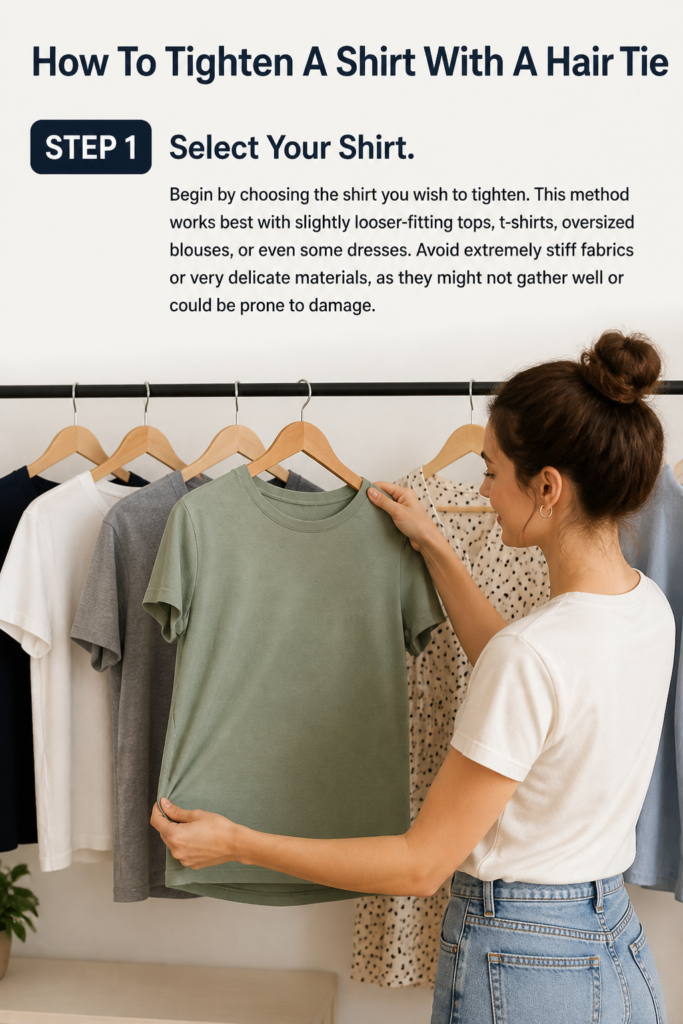
Avoid extremely stiff fabrics or very delicate materials, as they might not gather well or could be prone to damage.
Step 2: Gather Your Tools
The only essential tool you’ll need is a hair tie. Opt for a hair tie that is strong enough to hold fabric but also soft and snag-free.
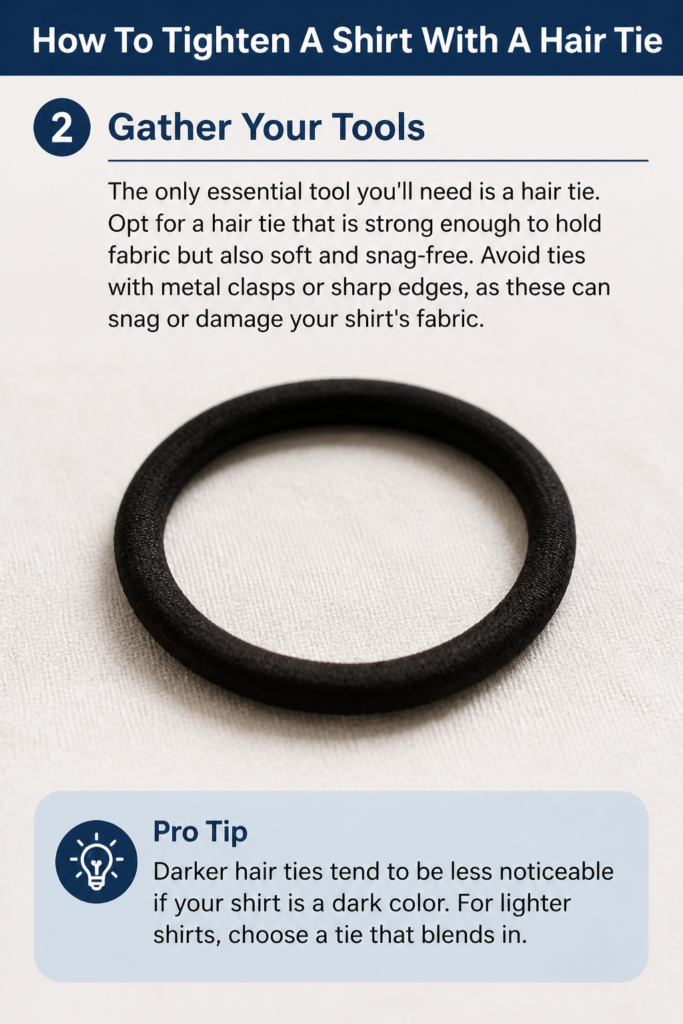
Avoid ties with metal clasps or sharp edges, as these can snag or damage your shirt’s fabric.
Pro Tip: Darker hair ties tend to be less noticeable if your shirt is a dark color. For lighter shirts, choose a tie that blends in.
Step 3: Put On The Shirt
Wear the shirt as you normally would. Stand in front of a full-length mirror to get a clear view of how the shirt currently fits.
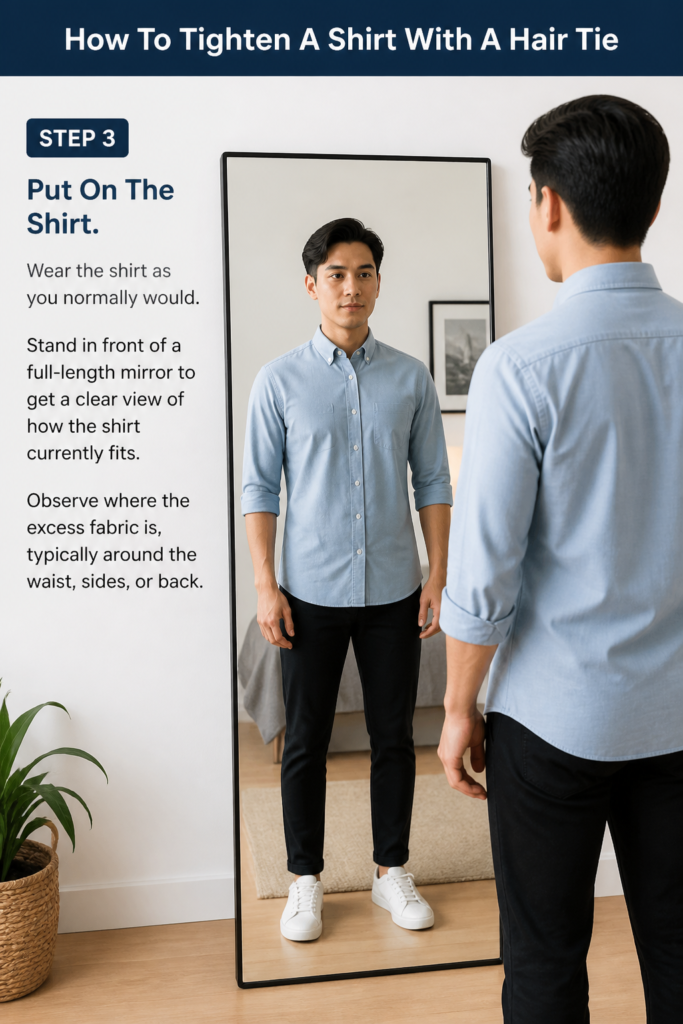
Observe where the excess fabric is, typically around the waist, sides, or back.
Step 4: Identify The Excess Fabric
Locate the area where you want the shirt to be tighter. For most people, this is around the natural waistline or slightly above the hips.
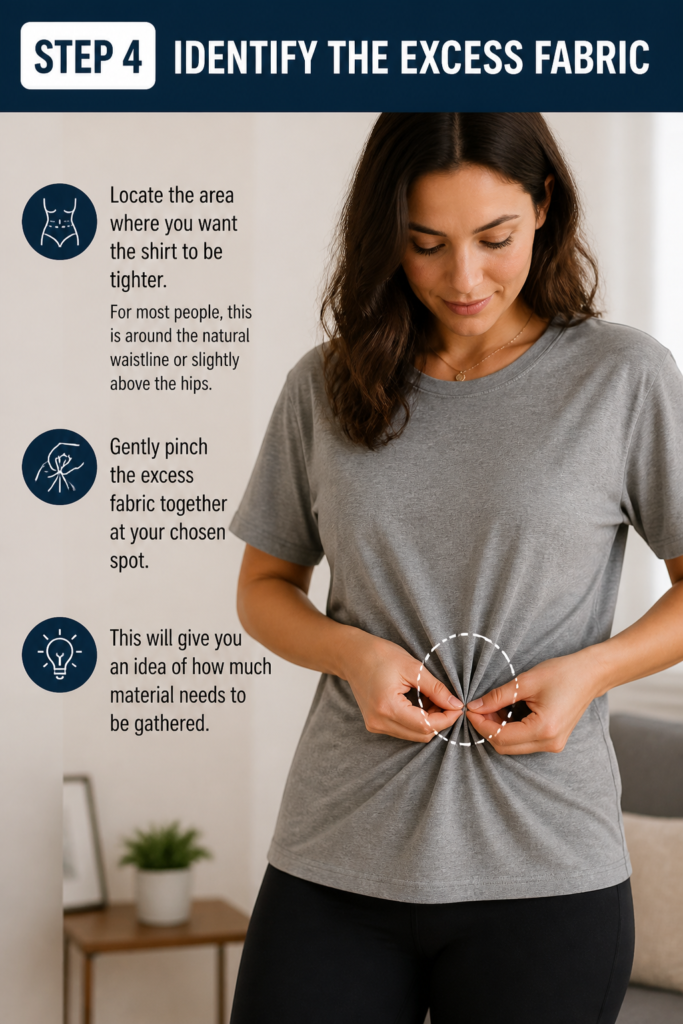
Gently pinch the excess fabric together at your chosen spot. This will give you an idea of how much material needs to be gathered.
Step 5: Pinch and Pull The Fabric
Reach behind you with both hands, or use one hand to gather the fabric at the desired tightening point.
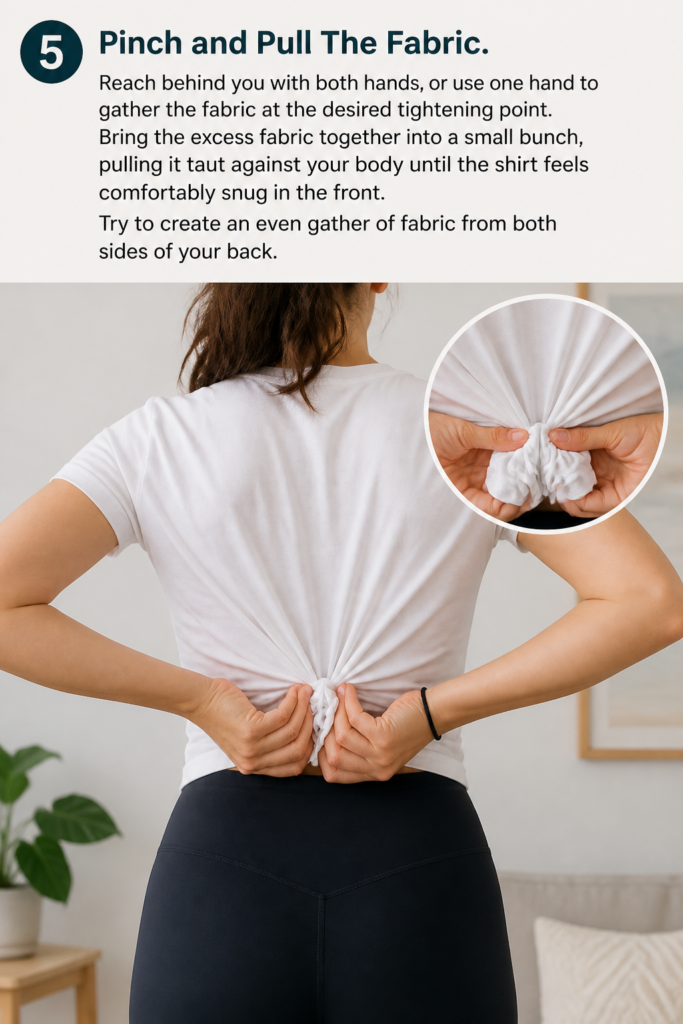
Bring the excess fabric together into a small bunch, pulling it taut against your body until the shirt feels comfortably snug in the front.
Try to create an even gather of fabric from both sides of your back.
Step 6: Secure With The Hair Tie
While holding the gathered fabric firmly, take your hair tie and wrap it around the bunched fabric.
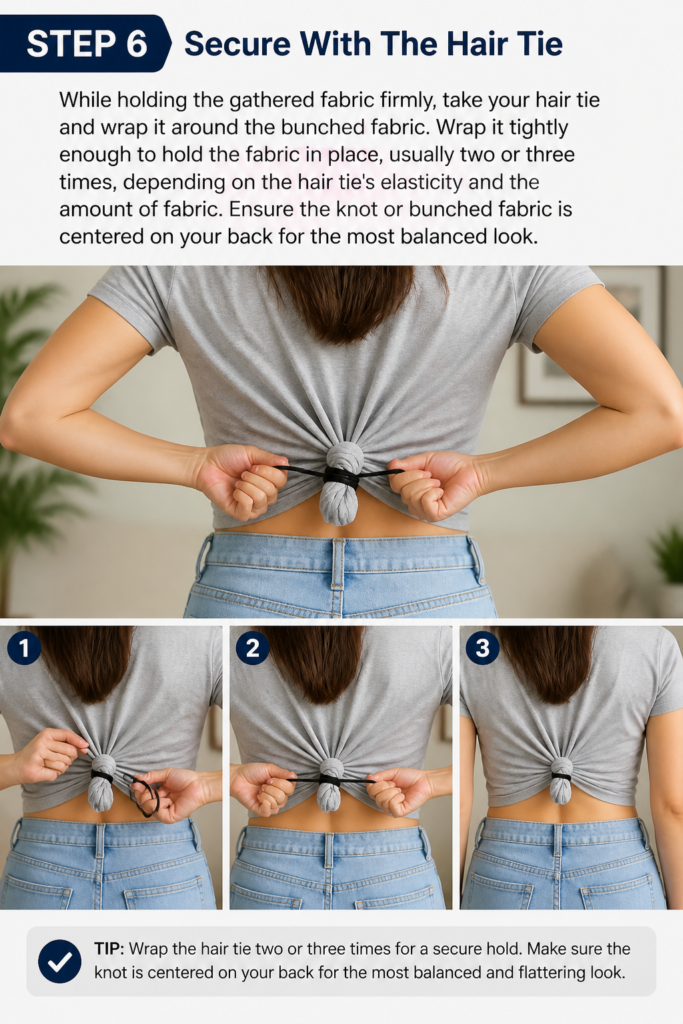
Wrap it tightly enough to hold the fabric in place, usually two or three times, depending on the hair tie’s elasticity and the amount of fabric.
Ensure the knot or bunched fabric is centered on your back for the most balanced look.
Step 7: Adjust and Conceal The Tie
Once the hair tie is secured, release your hands and let the shirt fall naturally. Turn to face the mirror and assess the front and sides.
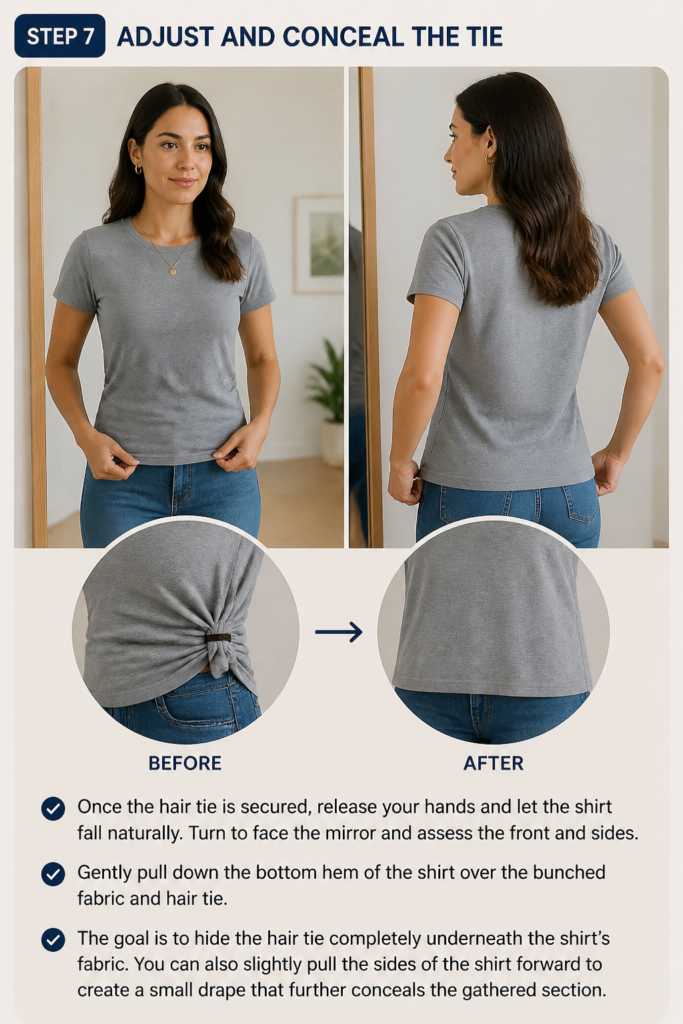
Gently pull down the bottom hem of the shirt over the bunched fabric and hair tie. The goal is to hide the hair tie completely underneath the shirt’s fabric.
You can also slightly pull the sides of the shirt forward to create a small drape that further conceals the gathered section.
Step 8: Check Your Reflection
Walk around, sit down, and move your arms to ensure the shirt remains comfortable and the hair tie stays hidden.
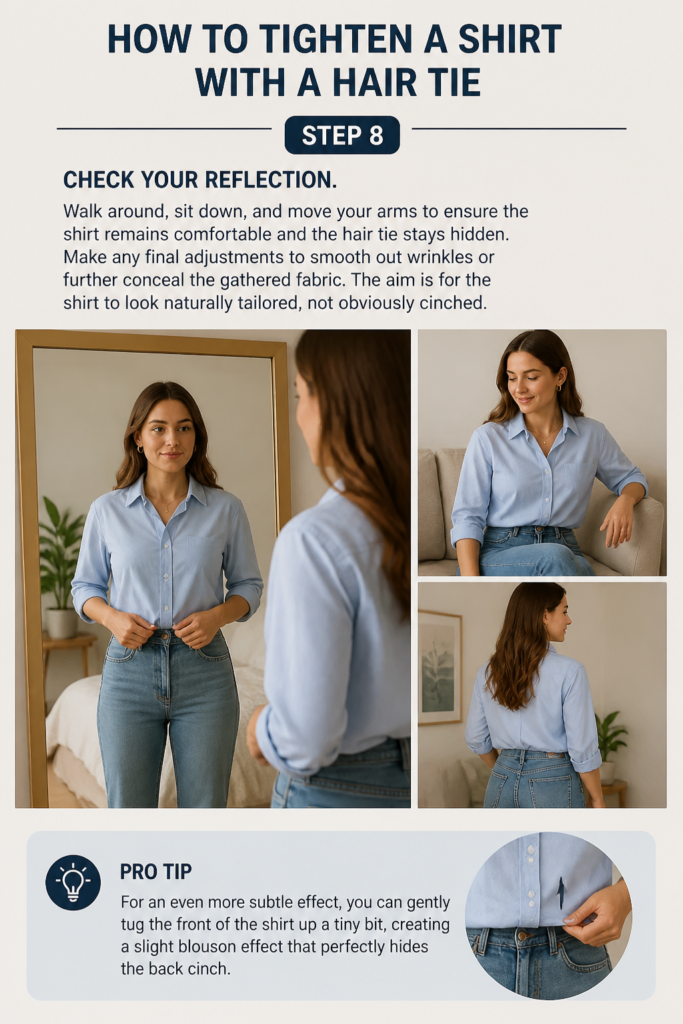
Make any final adjustments to smooth out wrinkles or further conceal the gathered fabric. The aim is for the shirt to look naturally tailored, not obviously cinched.
Pro Tip: For an even more subtle effect, you can gently tug the front of the shirt up a tiny bit, creating a slight blouson effect that perfectly hides the back cinch.
Common Mistakes to Avoid
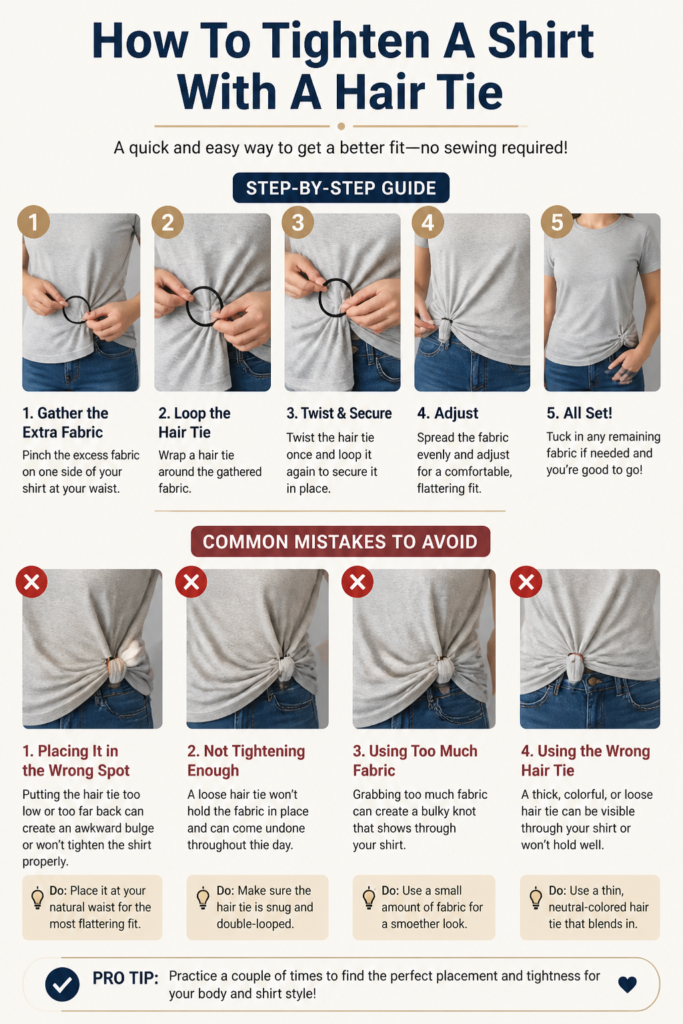
Using the Wrong Hair Tie
Opting for a hair tie that is too weak or too strong can cause problems. A weak tie might slip, leaving your shirt loose again, while a tie that’s too tight or has metal parts can damage the fabric or create an uncomfortable bulge.
Always choose a soft, elastic, and snag-free hair tie that provides firm but gentle hold. Look for fabric-covered ties or seamless elastic bands.
Over-Gathering Fabric
Pinching too much fabric can lead to an unnatural-looking bump or bulge at the back of your shirt. This can make the adjustment obvious and less flattering.
Gather only the amount of fabric necessary to achieve your desired tightness. Start with a smaller amount and gradually increase if needed, aiming for a smooth, subtle cinch.
Placing the Tie Incorrectly
Placing the hair tie too high, too low, or off-center can distort the shirt’s silhouette. If it’s too high, it can make your shirt ride up; too low, and it might not create the desired waist definition.
Position the hair tie at your natural waistline or just above it, ensuring it’s centered on your back. This creates the most flattering and balanced shape.
Not Adjusting Properly
Simply tying the fabric and walking away often leaves the gathered section visible or creates an uneven look. The magic is in the final adjustments.
After securing the tie, spend a moment to smooth out the fabric, pull the shirt’s hem down to conceal the tie, and check from all angles in a mirror. Slight tugs and drapes can make a huge difference.
Troubleshooting
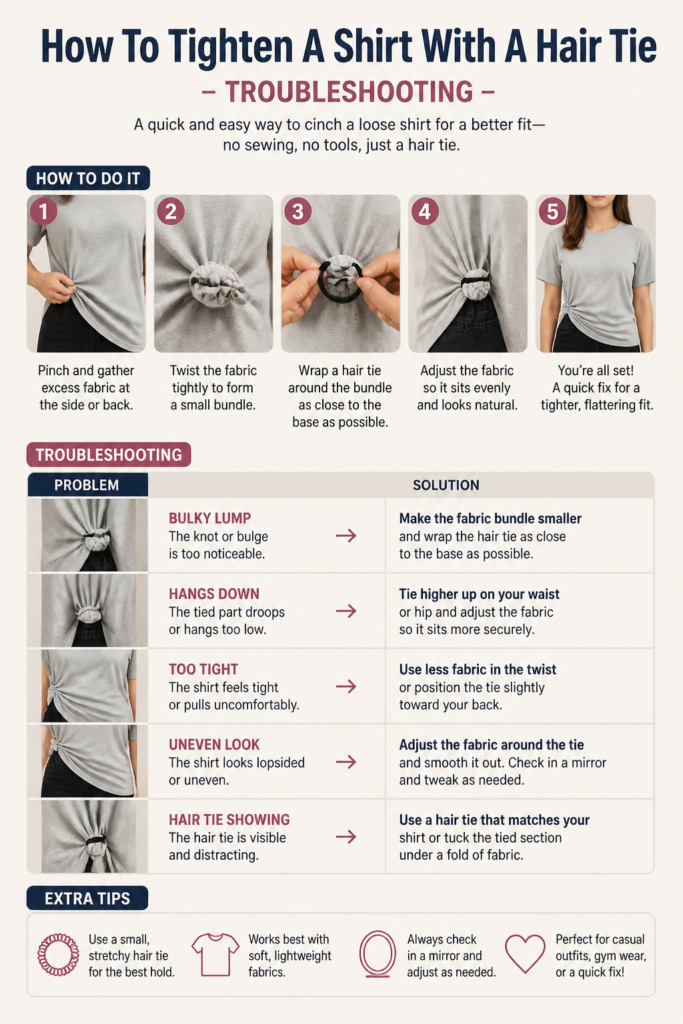
Hair Tie is Visible
If the hair tie or the bunched fabric is peeking out, it detracts from the tailored look. This usually happens if the shirt isn’t draped correctly over the cinch.
Gently pull the bottom hem of your shirt downwards and slightly outwards, allowing it to billow just enough to cover the gathered section. For some shirts, pulling the front fabric up slightly can create a blouson effect that hides the back.
Shirt Still Feels Loose
If you’ve tied the hair tie but the shirt still feels too baggy, you likely haven’t gathered enough fabric. The initial pinch might have been too conservative.
Untie the hair tie and re-gather more fabric from the back. Ensure you’re pulling the fabric taut against your body before securing it. You might need an extra wrap of the hair tie for a tighter hold.
Fabric Looks Bumpy/Uneven
A lumpy or uneven look can occur if the fabric isn’t gathered smoothly or if the hair tie is too tight in one spot. This makes the adjustment look less natural.
Release the hair tie and try to gather the fabric more evenly across the back. Distribute the folds smoothly as you secure the tie. Ensure the hair tie itself isn’t creating deep indentations in the fabric.
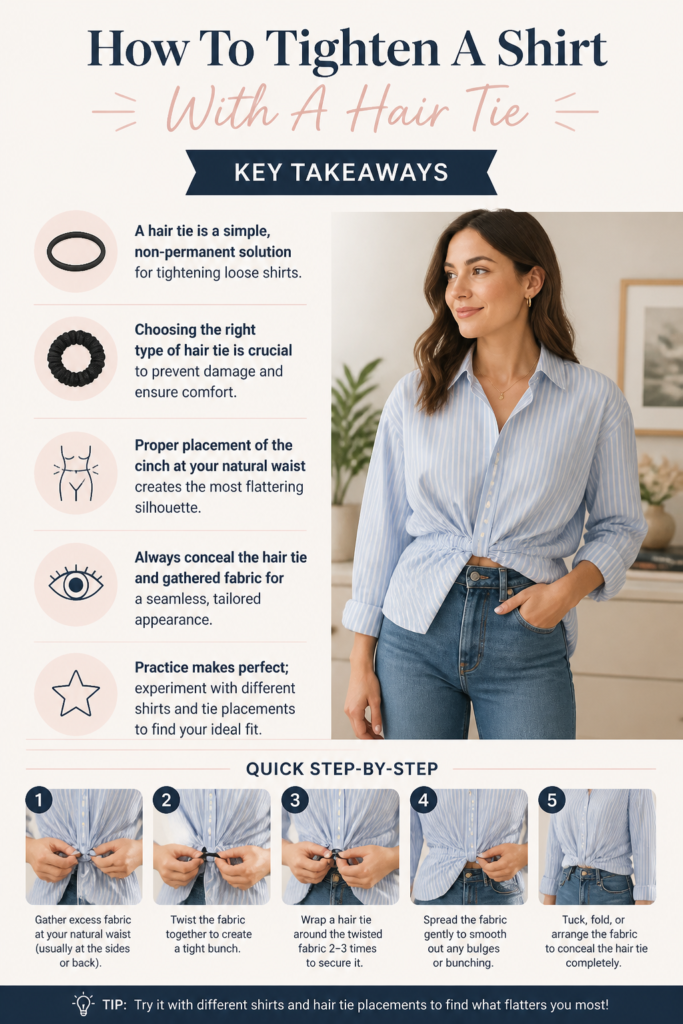
Key Takeaways
- A hair tie is a simple, non-permanent solution for tightening loose shirts.
- Choosing the right type of hair tie is crucial to prevent damage and ensure comfort.
- Proper placement of the cinch at your natural waist creates the most flattering silhouette.
- Always conceal the hair tie and gathered fabric for a seamless, tailored appearance.
- Practice makes perfect; experiment with different shirts and tie placements to find your ideal fit.
Frequently Asked Questions
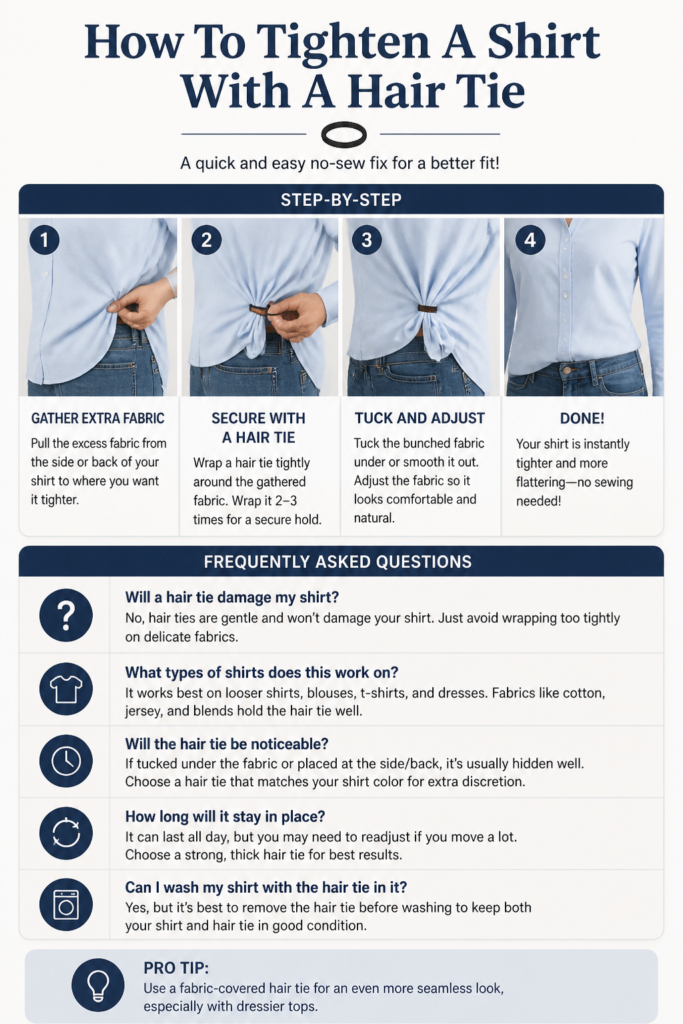
Can this work on all shirt types?
While effective on many, this method works best on shirts made from softer, more pliable fabrics like cotton, jersey, rayon, or blends. Stiffer materials like heavy denim or crisp linen may not gather as smoothly and could create an awkward bulk. Very delicate fabrics like silk might also be at risk of snagging with some hair ties.
Will the hair tie damage my shirt?
If you use a soft, snag-free hair tie without metal parts, the risk of damage is minimal. Avoid ties with sharp edges or excessive tightness, as these could potentially stretch or crease the fabric over time. Always ensure the tie is gentle on your chosen garment.
How long will this hold up?
Once properly secured and adjusted, the hair tie method can hold your shirt in place for an entire day of wear. Its durability depends on the quality of the hair tie and the fabric of the shirt. Active movement might require occasional minor readjustments, but generally, it’s a reliable fix.
Are there alternatives to hair ties?
Yes, other items can achieve a similar effect. Small, clear elastic bands (like those used for braiding hair) can work for very light fabrics. Fabric clips or even small safety pins can also be used, though these might be more visible or carry a higher risk of damaging the fabric if not used carefully. Belts are another common way to cinch a waist, but they are a visible accessory.
Our Top Recommended Finds
- Snag-Free Elastic Hair Ties: Look for seamless, fabric-covered options that are gentle on clothing and hair alike.
- Full-Length Mirror: Essential for checking your adjustments from every angle and ensuring a perfect, hidden cinch.
- Fabric Cinch Clips: As an alternative, these clips can offer a more permanent-looking, adjustable solution for some garments.
Transform Your Wardrobe Today
You now have a powerful, simple trick up your sleeve to make your clothes fit better and look more polished. No more letting perfectly good shirts languish in your closet because of a slightly off fit.
This method not only saves you money on tailoring but also opens up a world of styling possibilities with your existing wardrobe.
Experiment with different shirts and embrace the confidence that comes with a perfectly fitting outfit. Give it a try on your next outfit, and see the difference for yourself!
Beginner-friendly templates, step-by-step guides,
and weekly project ideas in your inbox.