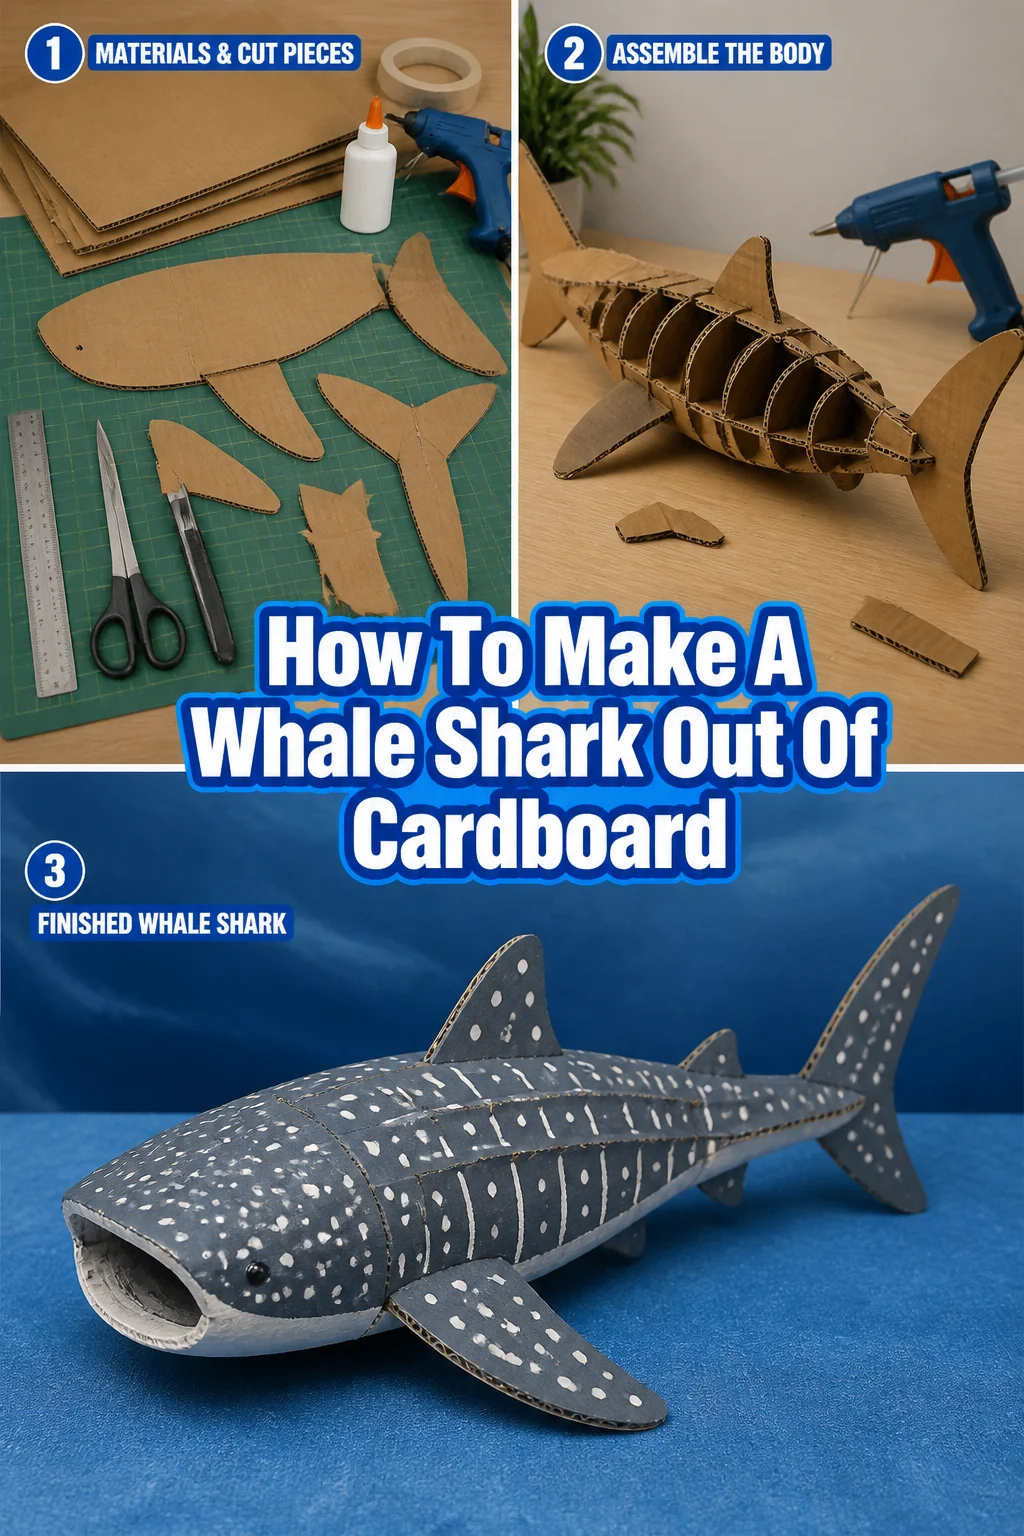
🐳 How To Make A Whale Shark Out Of Cardboard

Beginner-friendly templates, step-by-step guides,
and weekly project ideas in your inbox.
Building something truly spectacular with your own hands brings immense satisfaction.
I remember the first time I transformed a stack of plain cardboard into a dynamic, three-dimensional sculpture; it felt like magic.
This guide shares years of practical crafting experience, making the impressive task of creating a whale shark model both achievable and fun for you.

Quick Overview
You’re about to embark on a fantastic crafting journey. You will transform simple, readily available cardboard into an impressive, life-like whale shark model, perfect for display.
- Time needed: 10-15 hours (spread over several days for drying and detailed work)
- Difficulty: Intermediate
- What you’ll need: Large cardboard sheets, strong craft knife, metal ruler, cutting mat, hot glue gun with many glue sticks, pencil, permanent marker, sandpaper (fine grit), acrylic paints, paintbrushes, clear sealant spray, string or fishing line.
Step-by-Step Instructions
Step 1: Gather Your Materials and Workspace
Collect all your necessary tools and materials before you begin. This ensures a smooth workflow and prevents interruptions.
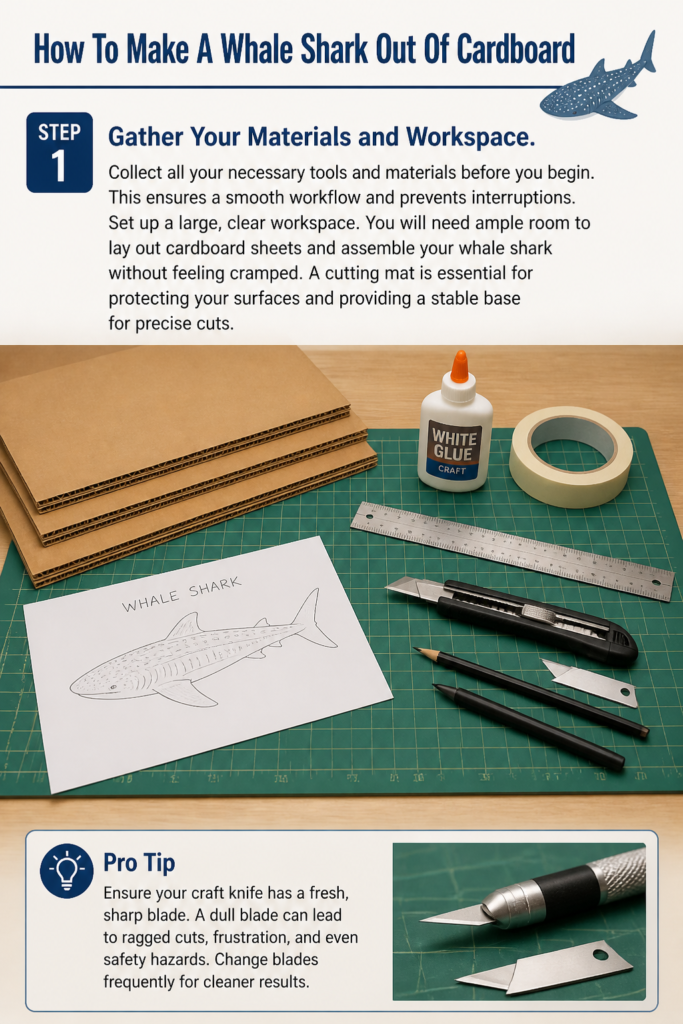
Set up a large, clear workspace. You will need ample room to lay out cardboard sheets and assemble your whale shark without feeling cramped.
A cutting mat is essential for protecting your surfaces and providing a stable base for precise cuts.
Pro Tip: Ensure your craft knife has a fresh, sharp blade. A dull blade can lead to ragged cuts, frustration, and even safety hazards. Change blades frequently for cleaner results.
Step 2: Design Your Whale Shark Blueprint
Find several reference images of whale sharks from different angles. Pay close attention to their unique body shape, fin placement, and distinctive spotted patterns.
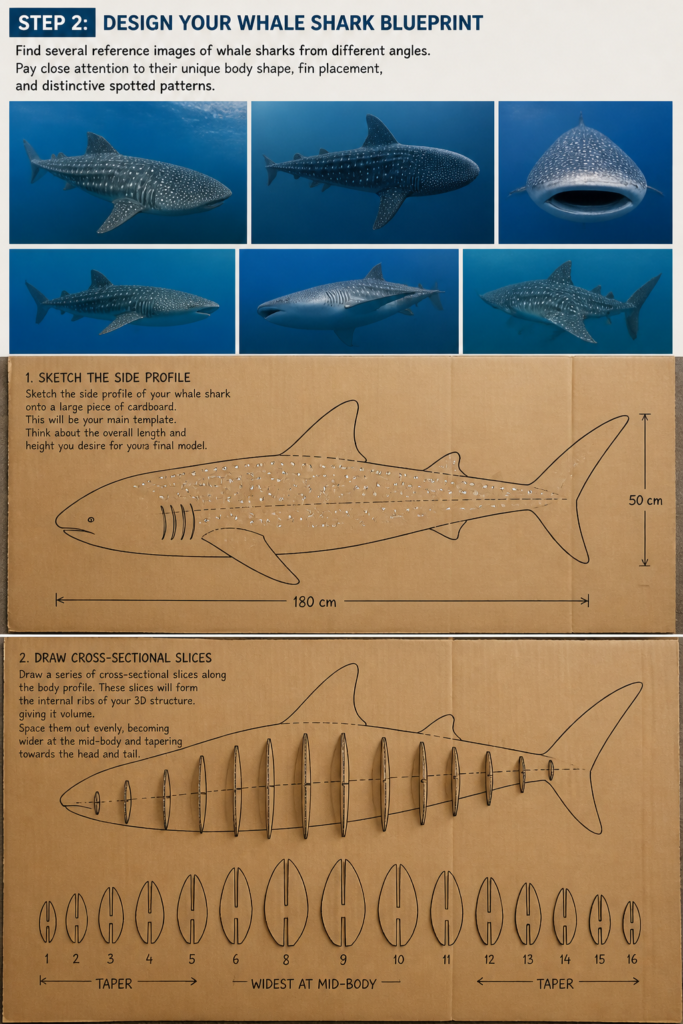
Sketch the side profile of your whale shark onto a large piece of cardboard. This will be your main template. Think about the overall length and height you desire for your final model.
Draw a series of cross-sectional slices along the body profile. These slices will form the internal ribs of your 3D structure, giving it volume. Space them out evenly, becoming wider at the mid-body and tapering towards the head and tail.
Step 3: Cut the Main Body Segments
Carefully cut out your main side profile template. This serves as the backbone for your entire model.
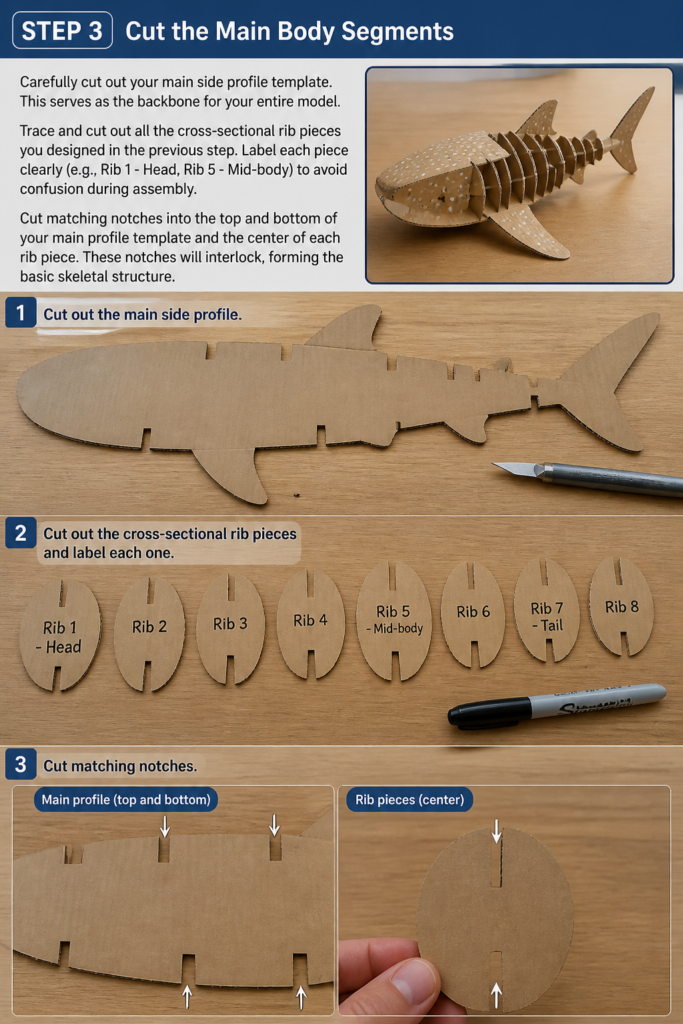
Trace and cut out all the cross-sectional rib pieces you designed in the previous step. Label each piece clearly (e.g., “Rib 1 – Head,” “Rib 5 – Mid-body”) to avoid confusion during assembly.
Cut matching notches into the top and bottom of your main profile template and the center of each rib piece. These notches will interlock, forming the basic skeletal structure.
Step 4: Assemble the Core Structure
Interlock the cross-sectional rib pieces into the notches of your main side profile template. This creates a sturdy, three-dimensional framework.
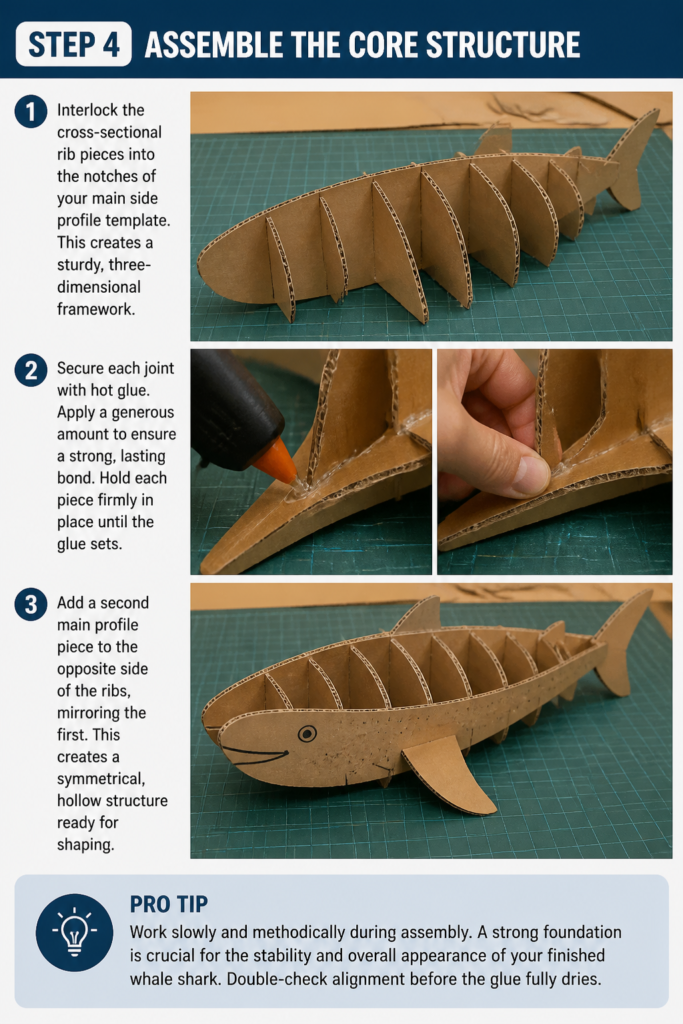
Secure each joint with hot glue. Apply a generous amount to ensure a strong, lasting bond. Hold each piece firmly in place until the glue sets.
Add a second main profile piece to the opposite side of the ribs, mirroring the first. This creates a symmetrical, hollow structure ready for shaping.
Pro Tip: Work slowly and methodically during assembly. A strong foundation is crucial for the stability and overall appearance of your finished whale shark. Double-check alignment before the glue fully dries.
Step 5: Attach Fins, Gills, and Tail
Draw and cut out the distinctive fins of the whale shark: the large dorsal fin, pectoral fins, and the unique crescent-shaped tail fin. Remember the smaller pelvic and anal fins.
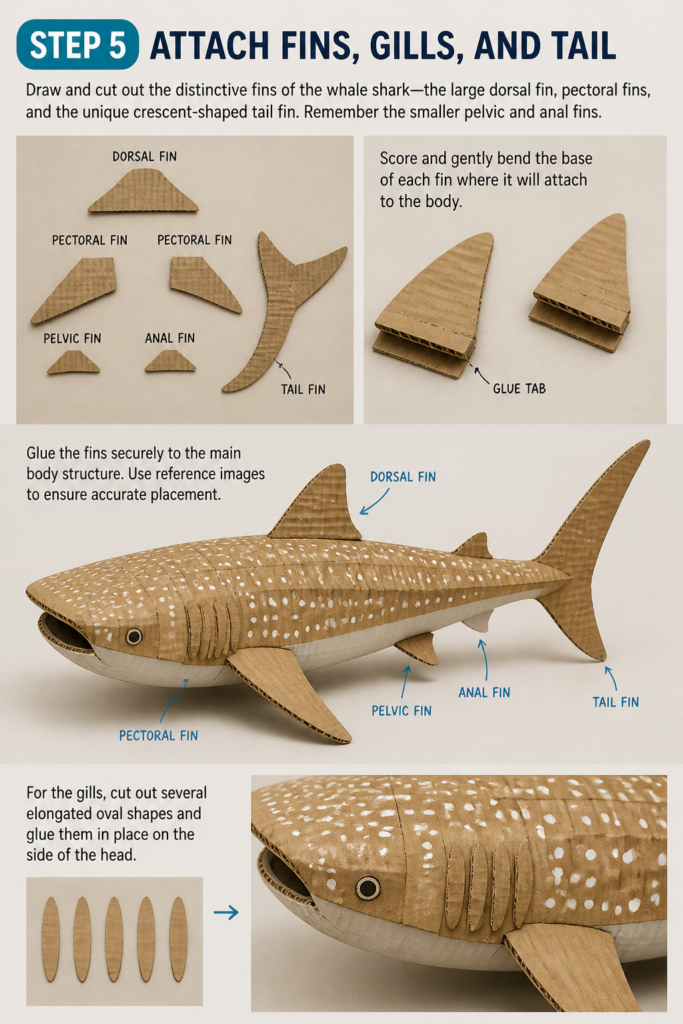
Score and gently bend the base of each fin where it will attach to the body. This creates a small tab for gluing and allows the fins to sit at a natural angle.
Glue the fins securely to the main body structure. Use reference images to ensure accurate placement. For the gills, cut out several elongated oval shapes and glue them in place on the side of the head.
Step 6: Refine the Shape with Cardboard Strips
Cut numerous long, flexible strips of cardboard. These strips will be used to create the smooth, curved contours of the whale shark’s body.
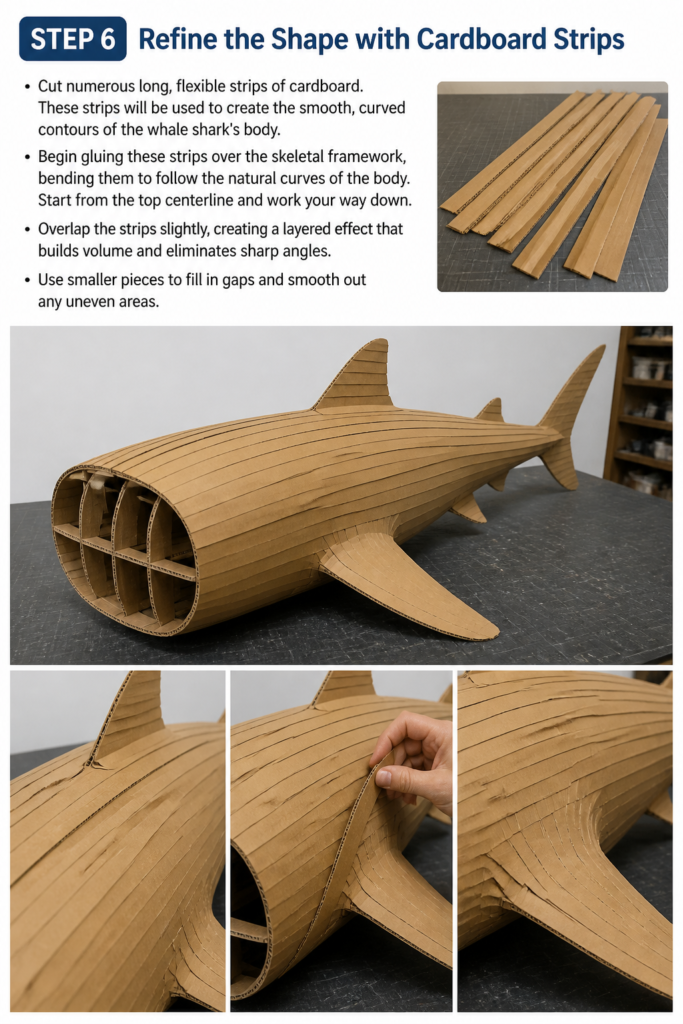
Begin gluing these strips over the skeletal framework, bending them to follow the natural curves of the body. Start from the top centerline and work your way down.
Overlap the strips slightly, creating a layered effect that builds volume and eliminates sharp angles. Use smaller pieces to fill in gaps and smooth out any uneven areas.
Step 7: Prepare for Painting
Inspect your whale shark model thoroughly for any loose pieces of cardboard or rough edges. Trim away excess glue and smooth out any sharp points.
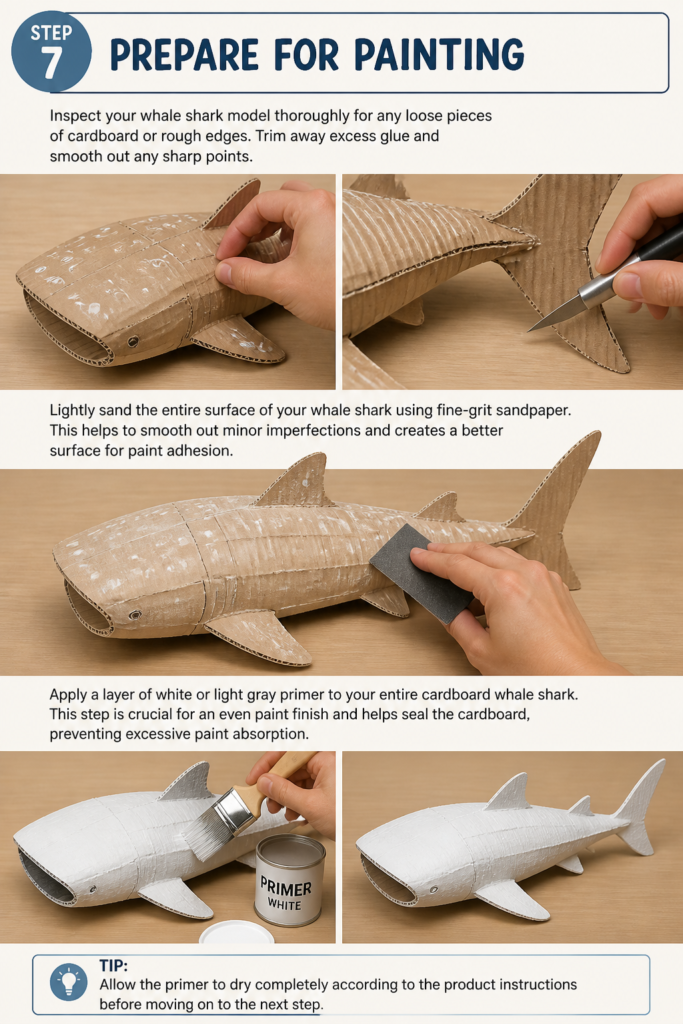
Lightly sand the entire surface of your whale shark using fine-grit sandpaper. This helps to smooth out minor imperfections and creates a better surface for paint adhesion.
Apply a layer of white or light gray primer to your entire cardboard whale shark. This step is crucial for an even paint finish and helps seal the cardboard, preventing excessive paint absorption.
Step 8: Paint Your Whale Shark
Begin by painting the base color of the whale shark’s back, typically a dark grey or bluish-grey. Apply thin, even coats to avoid drips and ensure thorough coverage.
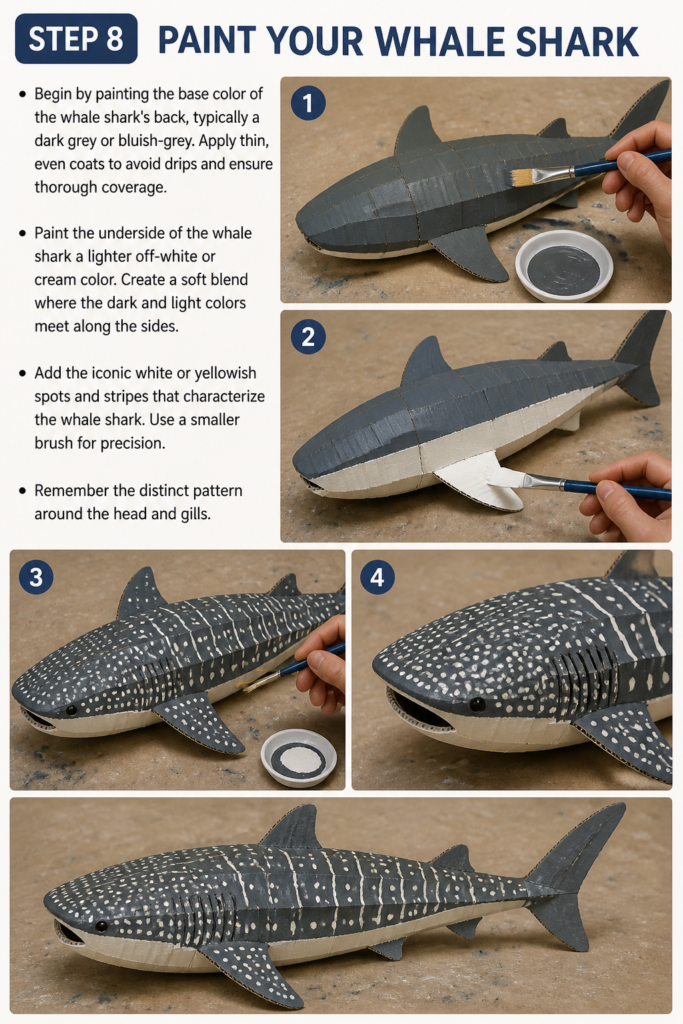
Paint the underside of the whale shark a lighter off-white or cream color. Create a soft blend where the dark and light colors meet along the sides.
Add the iconic white or yellowish spots and stripes that characterize the whale shark. Use a smaller brush for precision. Remember the distinct pattern around the head and gills.
Step 9: Add Finishing Touches and Seal
Paint the eyes using black or a dark color, adding a small white dot for highlight to bring them to life. You can also paint a subtle mouth line.
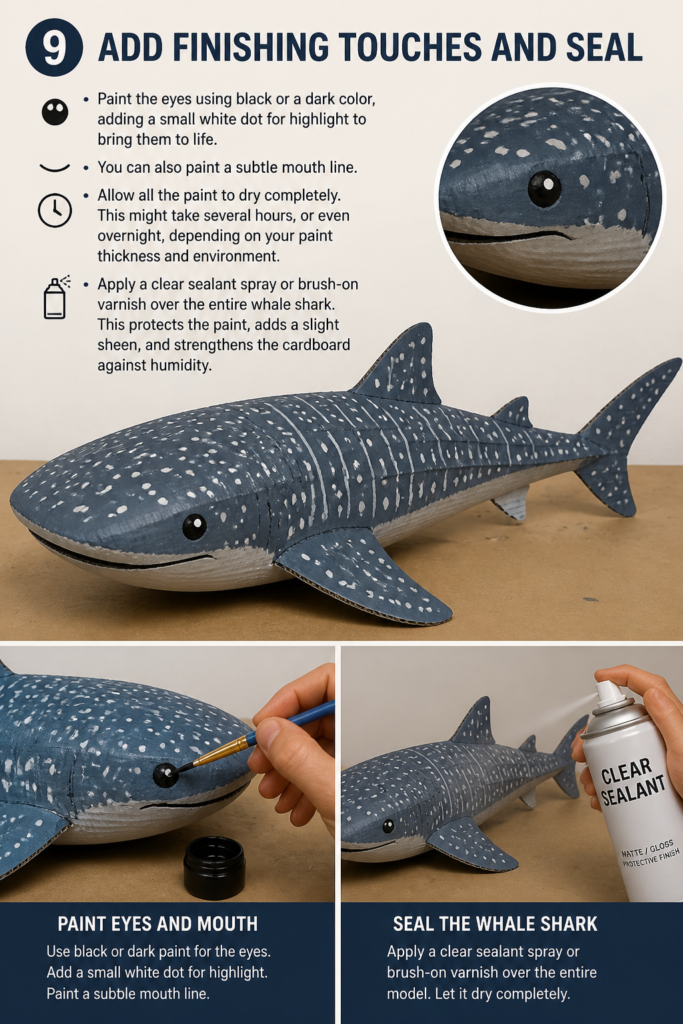
Allow all the paint to dry completely. This might take several hours, or even overnight, depending on your paint thickness and environment.
Apply a clear sealant spray or brush-on varnish over the entire whale shark. This protects the paint, adds a slight sheen, and strengthens the cardboard against humidity.
Step 10: Create a Display or Hanging Mechanism
Decide how you want to display your magnificent creation. For a desktop display, ensure the fins provide enough stability.
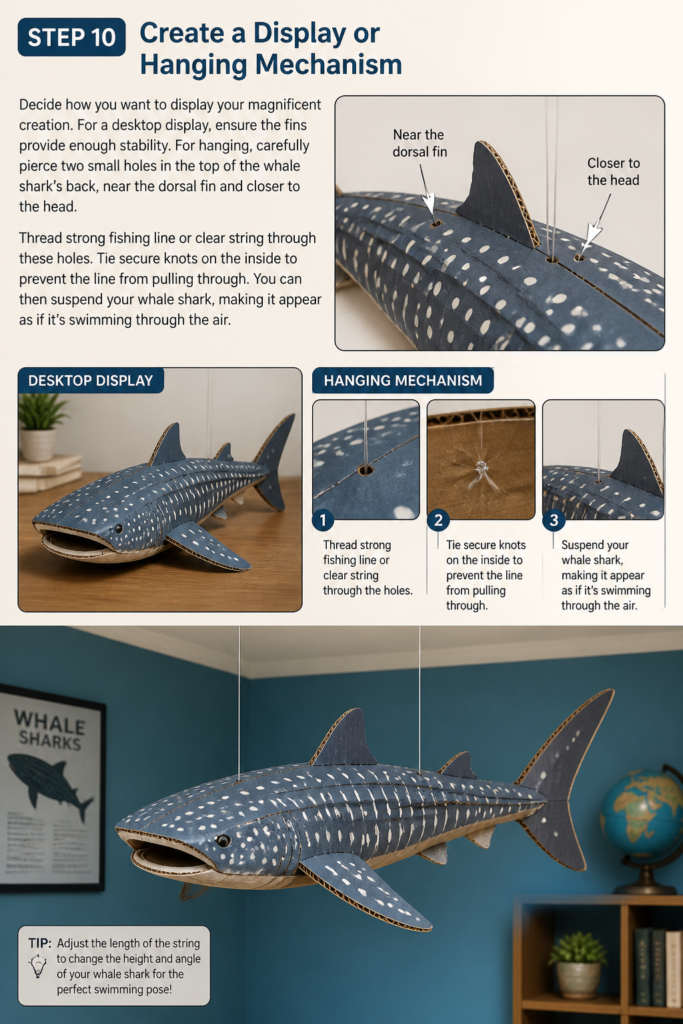
For hanging, carefully pierce two small holes in the top of the whale shark’s back, near the dorsal fin and closer to the head. Thread strong fishing line or clear string through these holes.
Tie secure knots on the inside to prevent the line from pulling through. You can then suspend your whale shark, making it appear as if it’s swimming through the air.
Common Mistakes to Avoid
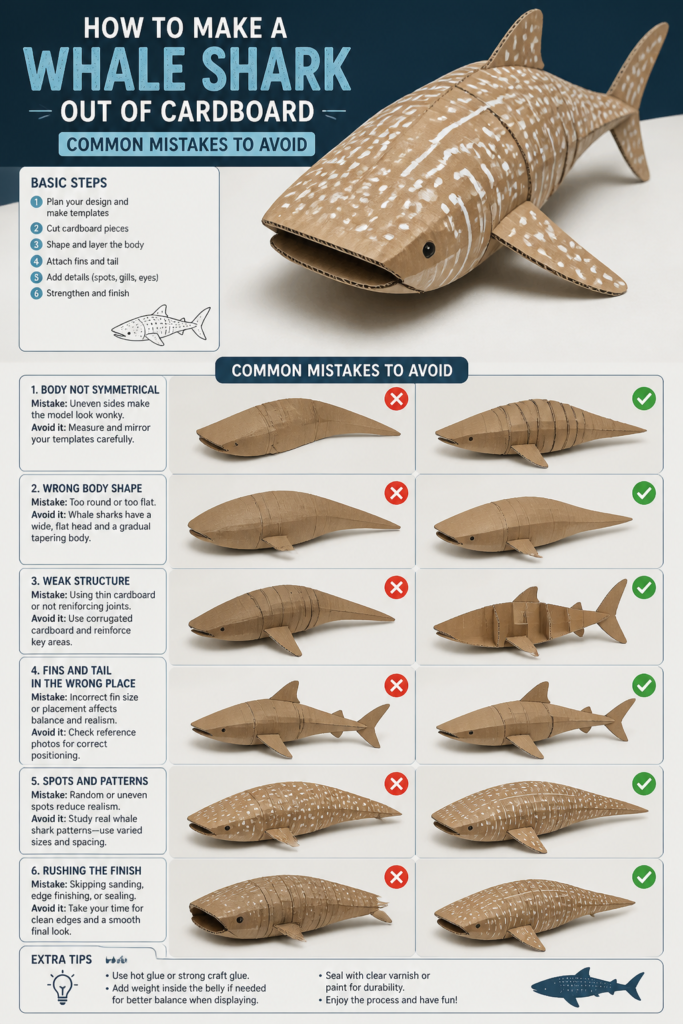
Rushing the Glue Drying Process
Many crafters become impatient and try to move to the next step before hot glue has fully cured. This often results in weak joints that can easily come apart, compromising the entire structure.
Always allow ample time for each glue joint to set completely. Holding pieces in place for 30-60 seconds after application can make a significant difference in bond strength.
Ignoring Structural Integrity
It’s easy to focus solely on the outer appearance and neglect the internal support. A whale shark made without a robust internal frame will sag, warp, or even collapse under its own weight.
Prioritize creating a strong skeletal structure with interlocking ribs. Reinforce critical stress points, like fin attachments, with extra layers of cardboard or additional hot glue.
Using Dull Blades for Cutting
Working with a dull craft knife makes cutting cardboard much harder and more dangerous. You’ll need to apply more pressure, increasing the risk of slips and uneven cuts.
Always use a fresh, sharp blade. Change blades frequently, especially when cutting thick or corrugated cardboard. Sharp tools make the job easier, safer, and result in cleaner edges.
Forgetting Reference Images During Detailing
Once you start painting, it’s tempting to freehand the details. However, whale sharks have a very specific and iconic pattern of spots and stripes that are crucial for realism.
Keep your reference images close by throughout the painting process. Constantly compare your work to actual whale shark photos to ensure accuracy in color, pattern, and proportion.
Troubleshooting
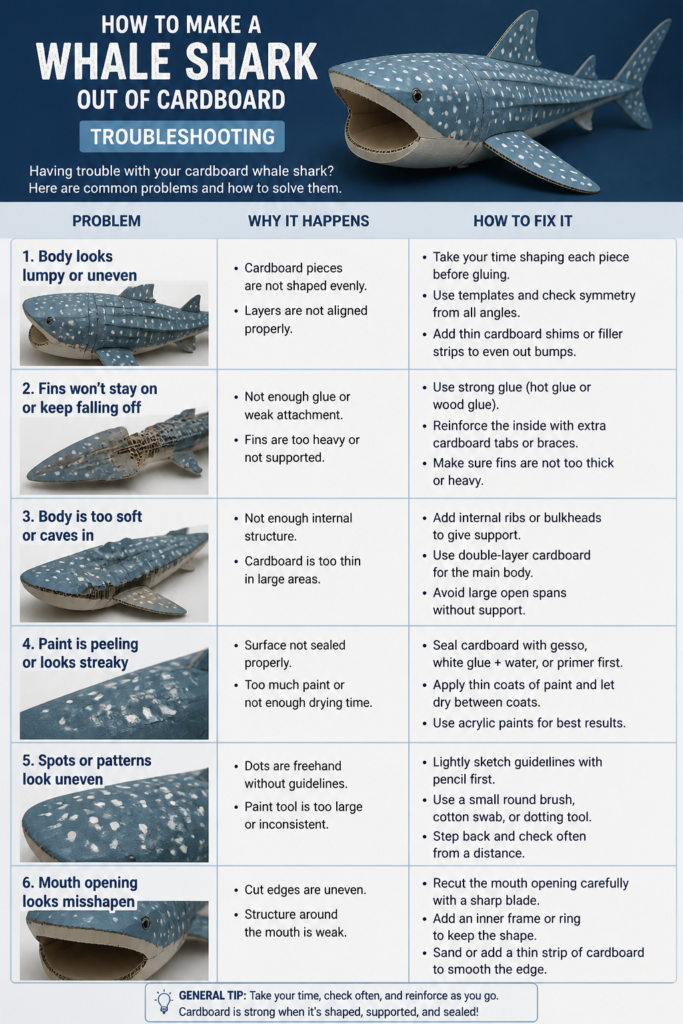
My Shark Looks Flat or Blocky
If your whale shark model lacks natural curves and appears too angular, it likely means you didn’t use enough cardboard strips to contour the body, or your internal ribs were too far apart.
To fix this, cut more thin, flexible cardboard strips. Gently glue them over the existing structure, overlapping them to build up volume and create smoother transitions between your rib sections. Use smaller pieces to fill in any abrupt edges.
Joints Are Weak or Come Apart
Weak joints often result from insufficient glue, not holding pieces long enough for the glue to set, or the cardboard surface being too smooth for good adhesion.
Reinforce weak joints by applying more hot glue, ensuring it creates a strong bead around the connection. For critical areas, you can cut small, triangular cardboard tabs and glue them over the joint for added strength.
Paint Bleeds or Soaks Into the Cardboard
This issue typically occurs when the cardboard hasn’t been properly primed or sealed before painting. Unprimed cardboard is porous and will absorb paint unevenly, leading to a patchy finish.
If you haven’t primed, apply a layer of white or light-colored primer. If you already started painting, let it dry completely, then apply a layer of primer over the affected areas before repainting. Always ensure your primer fully dries before adding color.
Key Takeaways
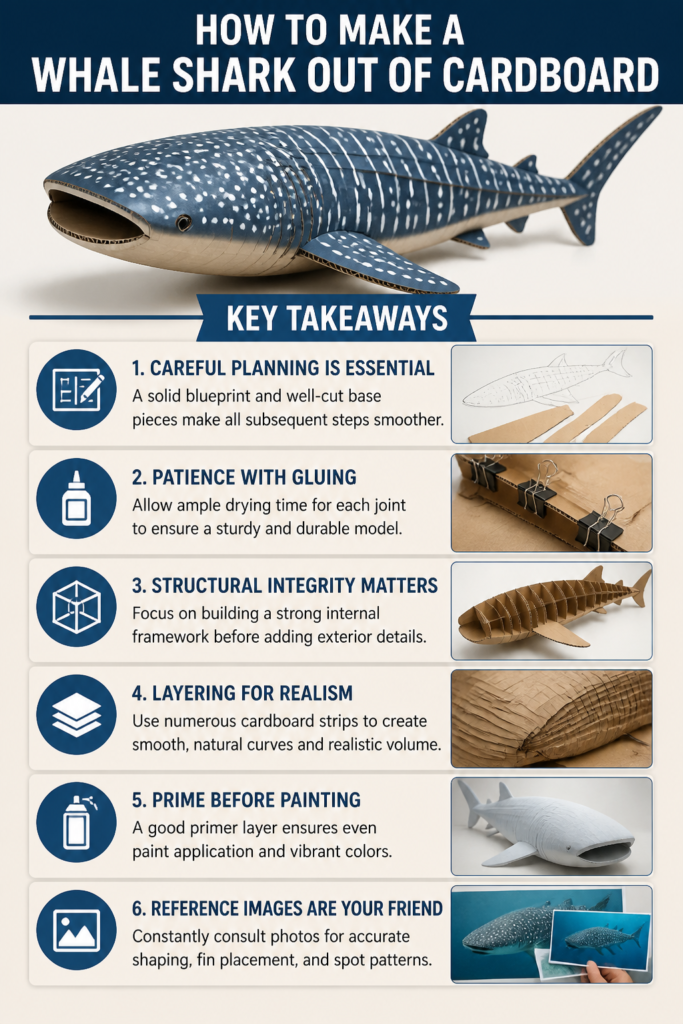
- Careful Planning is Essential: A solid blueprint and well-cut base pieces make all subsequent steps smoother.
- Patience with Gluing: Allow ample drying time for each joint to ensure a sturdy and durable model.
- Structural Integrity Matters: Focus on building a strong internal framework before adding exterior details.
- Layering for Realism: Use numerous cardboard strips to create smooth, natural curves and realistic volume.
- Prime Before Painting: A good primer layer ensures even paint application and vibrant colors.
- Reference Images are Your Friend: Constantly consult photos for accurate shaping, fin placement, and spot patterns.
Frequently Asked Questions
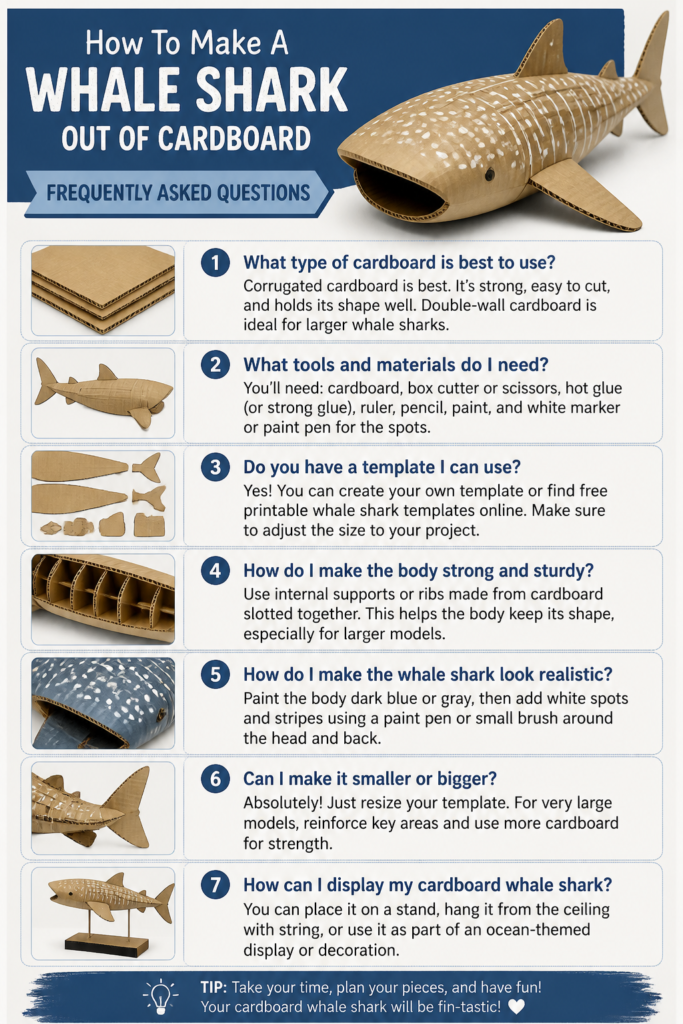
What kind of cardboard is best for this project?
For the main structural elements like the side profile and ribs, use sturdy, double-wall corrugated cardboard for maximum rigidity. For the contouring strips and smaller fins, single-wall or even cereal box cardboard works well because it’s easier to bend and shape.
How can I make my cardboard whale shark more durable or waterproof?
After painting and sealing with a clear spray, you can apply additional layers of outdoor-grade clear varnish or a marine sealant. This will provide a harder, more protective shell and offer some resistance against moisture, though it won’t make it fully waterproof for outdoor exposure.
Can children help with this project?
Absolutely, with proper supervision! Younger children can assist with tracing, painting large areas, or applying glue under adult guidance. Older children and teens can take on more complex tasks like cutting and assembly, fostering valuable crafting skills and patience.
How do I make the whale shark look like it’s swimming?
The key is a well-placed hanging mechanism. Use clear fishing line and attach it at two points on the top of the whale shark’s back. Adjusting the length of the lines will allow you to control the tilt and angle, creating the illusion of movement as it hangs.
Dive Into Your Next Creative Adventure
Completing this whale shark model is a testament to your patience, precision, and creative spirit.
Imagine it hanging proudly in your room, a magnificent symbol of the ocean’s gentle giants, crafted entirely by your hands.
Now that you’ve mastered this impressive project, why not consider other ocean creatures? A majestic manta ray or a playful dolphin could be your next cardboard challenge.
Don’t wait—gather your materials and start building your own piece of the ocean today. The satisfaction of seeing your vision come to life is truly unparalleled.
Our Top Recommended Finds
- Heavy-Duty Craft Knife Set: A good knife with various blade types and safety features is essential for clean, precise cuts and ensures your safety during the process.
- High-Temperature Hot Glue Gun with Bulk Glue Sticks: Hot glue is the backbone of cardboard crafting. A reliable gun that heats quickly and a large supply of glue sticks will keep your project moving forward without interruption.
- Acrylic Paint Starter Set: A versatile set of acrylic paints provides a wide range of colors for your whale shark, is easy to work with, and dries quickly, perfect for layered detailing.
Beginner-friendly templates, step-by-step guides,
and weekly project ideas in your inbox.