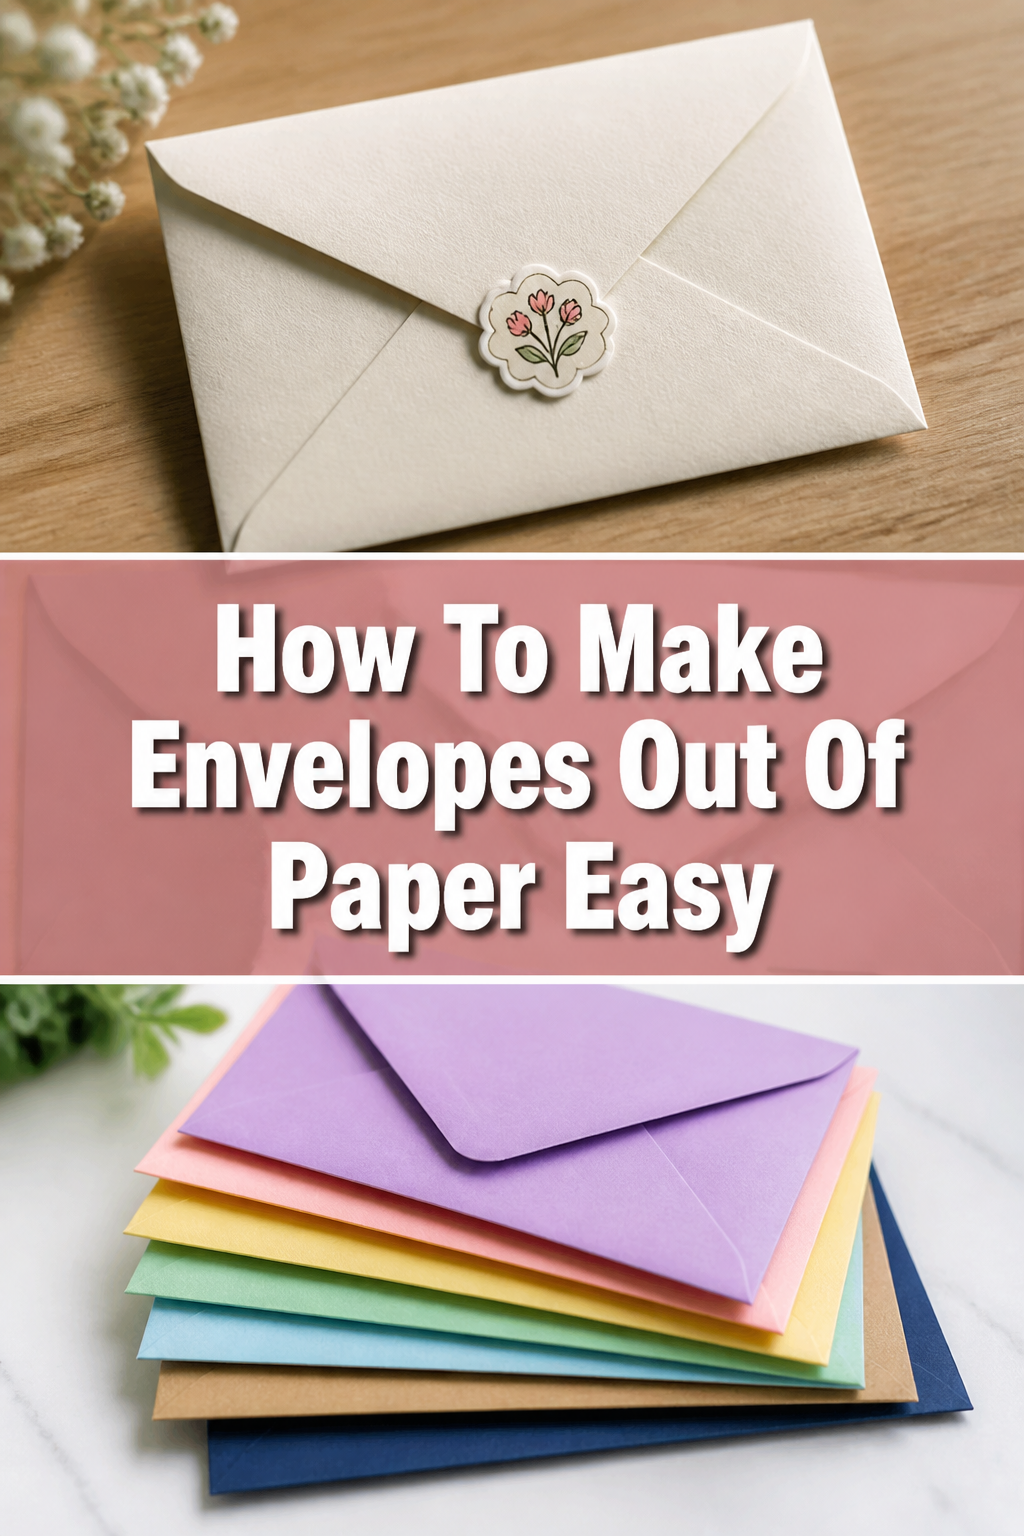
✉️ How To Make Envelopes Out Of Paper Easy

Beginner-friendly templates, step-by-step guides,
and weekly project ideas in your inbox.
I remember countless times needing an envelope for a last-minute card or a forgotten bill. Store-bought options aren’t always available, or perhaps you just want something more personal.
Having crafted many custom envelopes over the years, I’ve developed a simple, reliable method. This guide will show you exactly how to make a perfect paper envelope with ease, step by step.
Quick Overview
Making your own envelopes is a fantastic skill, allowing for personalization and practicality. You’ll finish this project with a custom envelope ready for any occasion.
- Time needed: 10-15 minutes
- Difficulty: Beginner
- What you’ll need: Paper, scissors, ruler, pencil, glue stick or tape
Step-by-Step Instructions
Step 1: Choose and Prepare Your Paper
The foundation of a great envelope is the right paper. You can use standard printer paper, decorative craft paper, or even old magazine pages for a unique look. Aim for a square or rectangular sheet, depending on your desired envelope size.
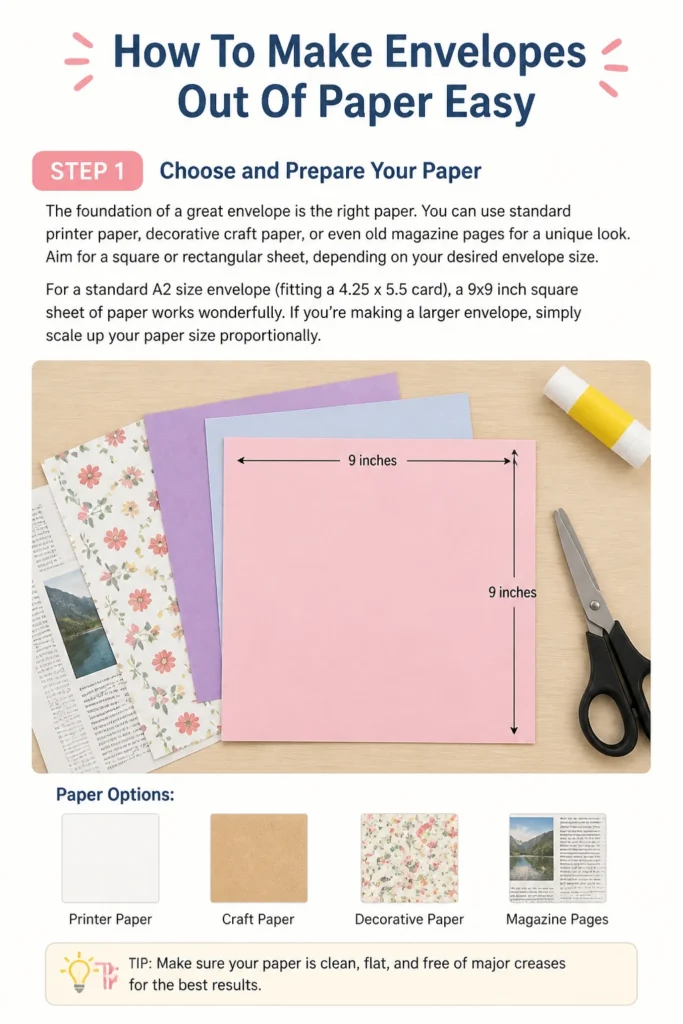
For a standard A2 size envelope (fitting a 4.25″ x 5.5″ card), a 9×9 inch square sheet of paper works wonderfully. If you’re making a larger envelope, simply scale up your paper size proportionally.
Step 2: Find the Center and Mark Your Starting Point
Lay your chosen paper flat on a clean, hard surface. Use your ruler and pencil to gently draw diagonal lines from each corner to the opposite corner. The point where these two lines intersect is the exact center of your paper.
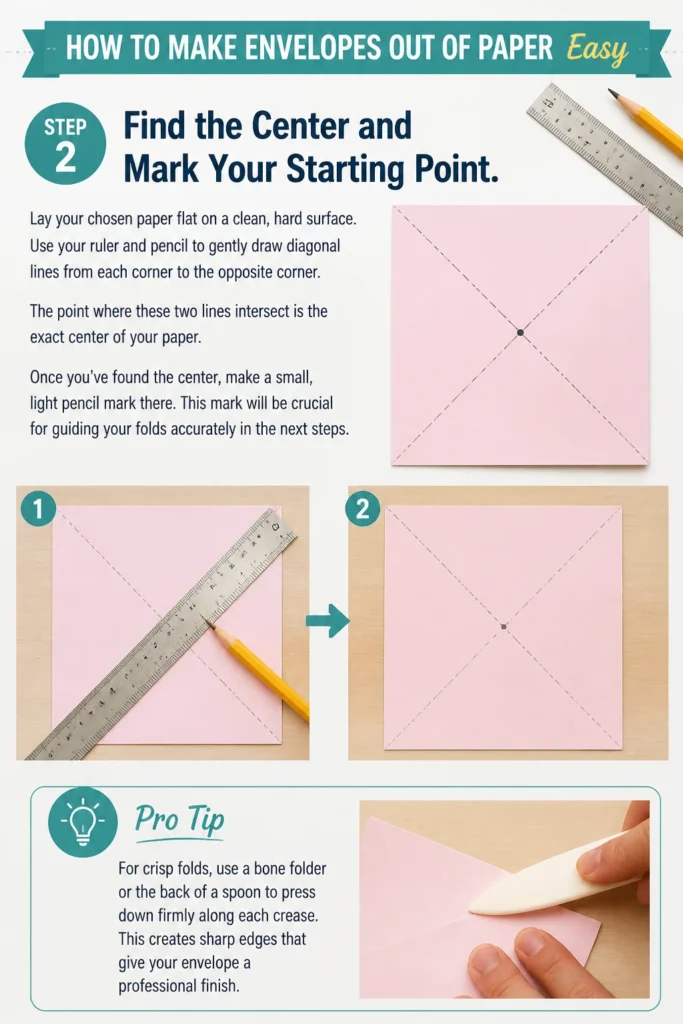
Once you’ve found the center, make a small, light pencil mark there. This mark will be crucial for guiding your folds accurately in the next steps.
Pro Tip: For crisp folds, use a bone folder or the back of a spoon to press down firmly along each crease. This creates sharp edges that give your envelope a professional finish.
Step 3: Fold the Bottom Corner Up
Take the bottom corner of your paper and fold it upwards. The tip of this corner should meet the center mark you made in Step 2. Ensure the fold is straight and even.
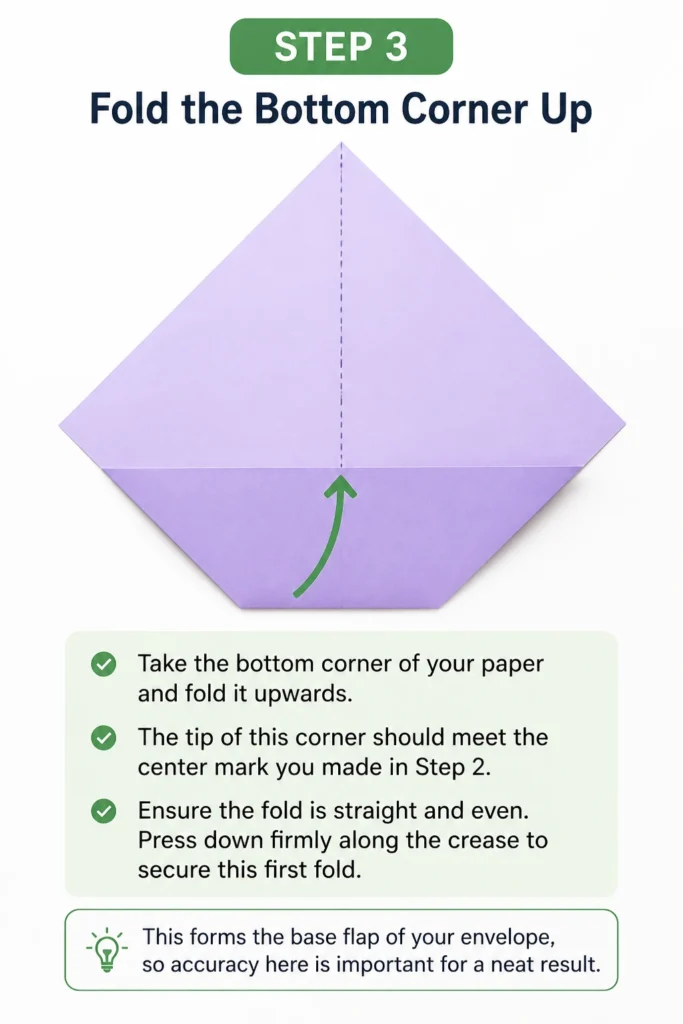
Press down firmly along the crease to secure this first fold. This forms the base flap of your envelope, so accuracy here is important for a neat result.
Step 4: Fold the Side Corners In
Now, take the left corner of your paper and fold it towards the center. The edge of this fold should align with the center point and slightly overlap the bottom flap you just created. Make sure the side edge is straight.
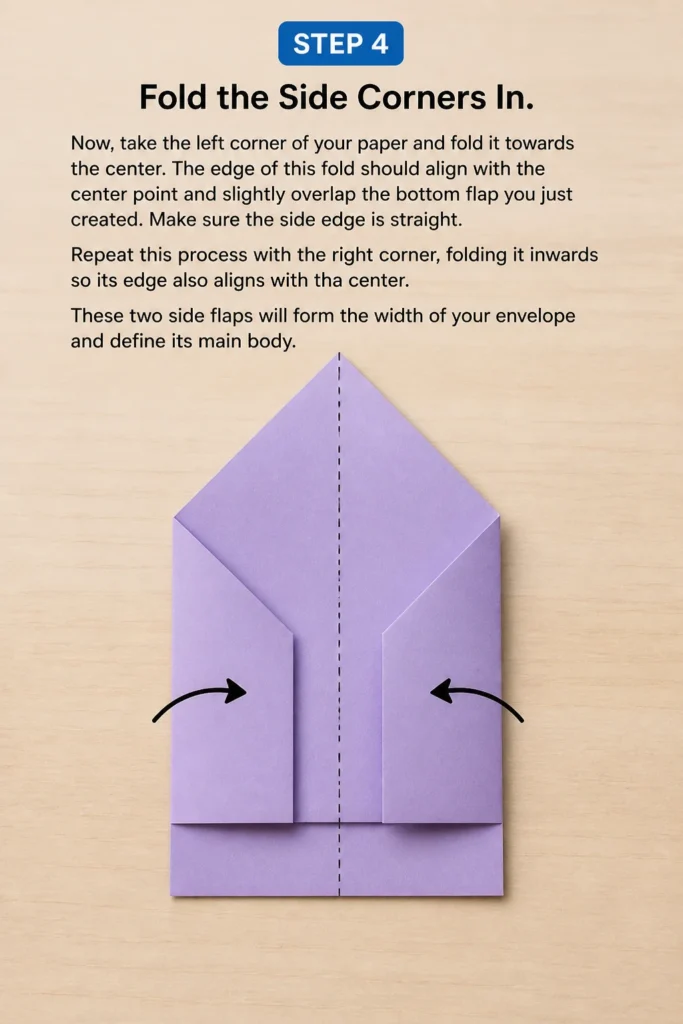
Repeat this process with the right corner, folding it inwards so its edge also aligns with the center. These two side flaps will form the width of your envelope and define its main body.
Step 5: Create the Top Flap
With the bottom and side flaps folded in, you’ll have one remaining corner pointing upwards. This will become the sealing flap of your envelope. Fold this top corner downwards.
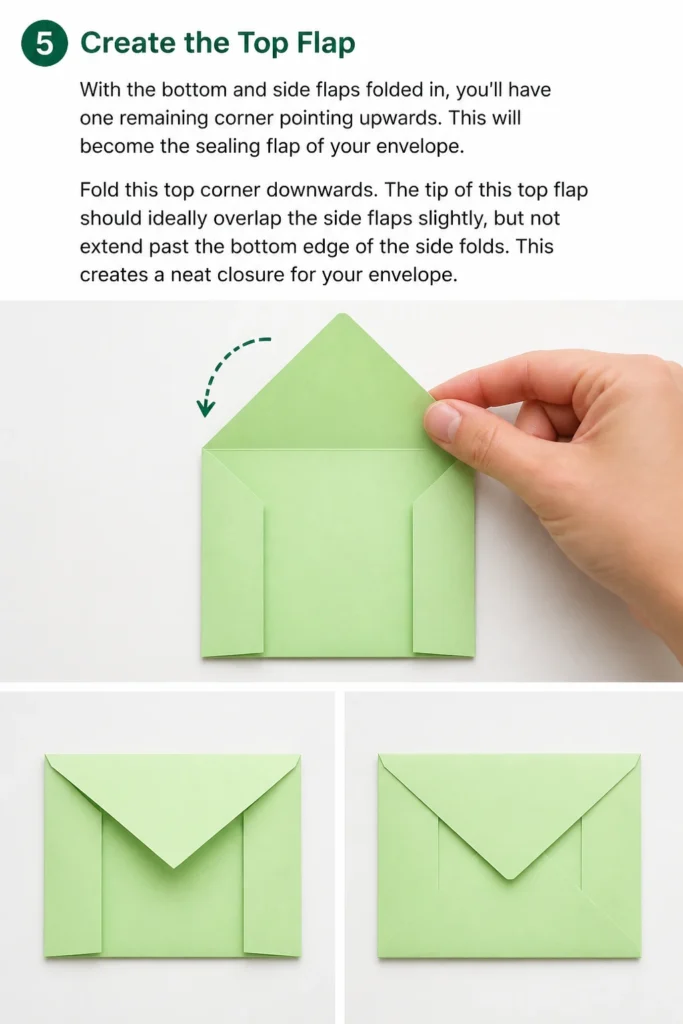
The tip of this top flap should ideally overlap the side flaps slightly, but not extend past the bottom edge of the side folds. This creates a neat closure for your envelope.
Step 6: Refine the Folds and Trim if Necessary
At this point, you have the basic shape of your envelope. Take a moment to check all your folds for straightness and symmetry. If any edges look uneven, you can gently unfold and refold them.
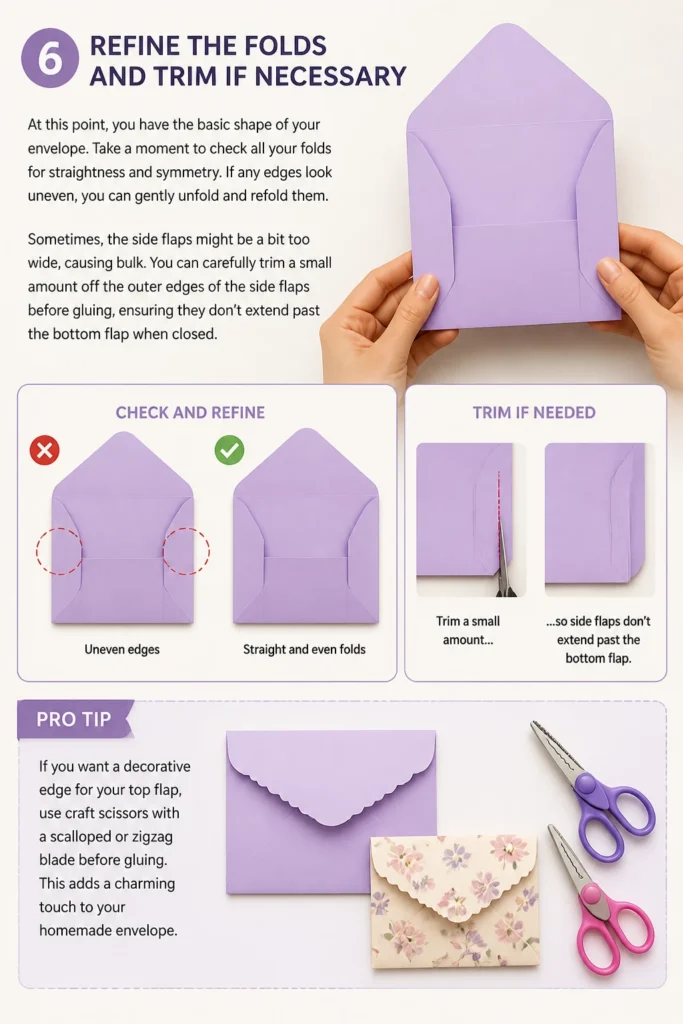
Sometimes, the side flaps might be a bit too wide, causing bulk. You can carefully trim a small amount off the outer edges of the side flaps before gluing, ensuring they don’t extend past the bottom flap when closed.
Pro Tip: If you want a decorative edge for your top flap, use craft scissors with a scalloped or zigzag blade before gluing. This adds a charming touch to your homemade envelope.
Step 7: Secure the Envelope with Glue or Tape
Now it’s time to make your envelope permanent. Gently unfold the top flap so you can access the side flaps underneath. Apply a thin line of glue stick or double-sided tape along the outer edges of the side flaps.
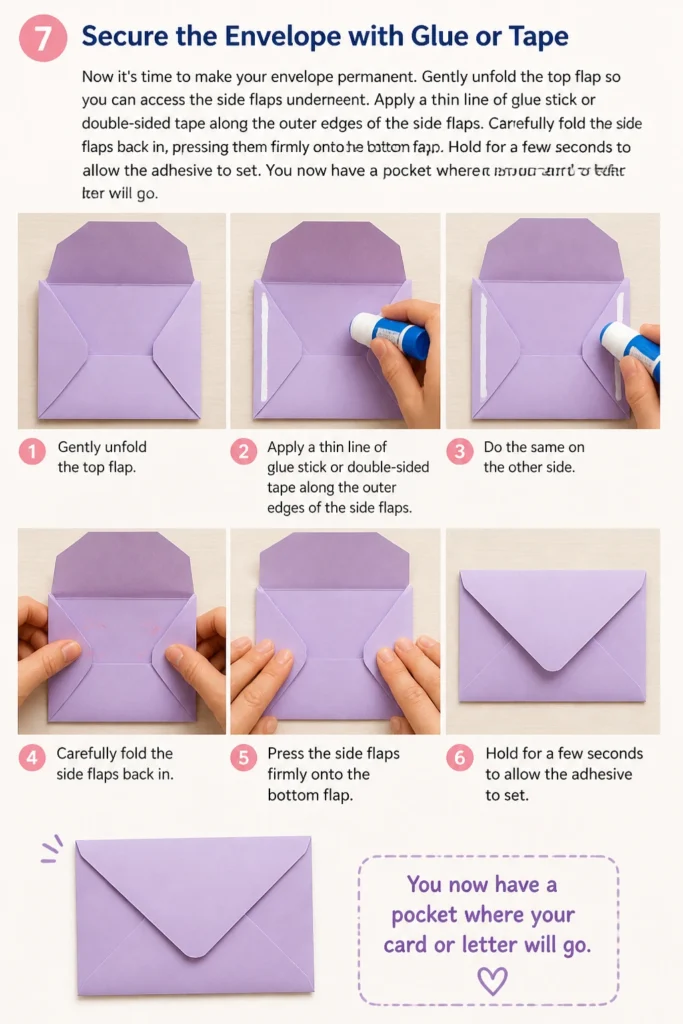
Carefully fold the side flaps back in, pressing them firmly onto the bottom flap. Hold for a few seconds to allow the adhesive to set. You now have a pocket where your card or letter will go.
Step 8: Seal the Top Flap
Once the body of your envelope is secure, your envelope is almost complete. The top flap, which you folded down in Step 5, is now ready to be sealed.
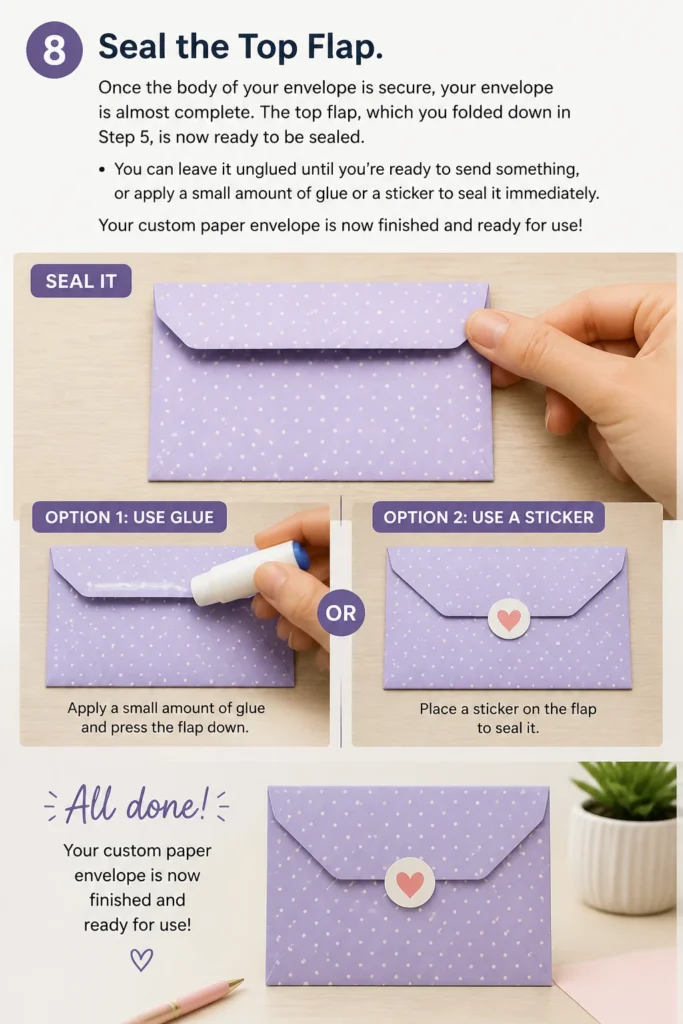
You can leave it unglued until you’re ready to send something, or apply a small amount of glue or a sticker to seal it immediately. Your custom paper envelope is now finished and ready for use!
Common Mistakes to Avoid
Using Too Much Glue
A common pitfall is applying an excessive amount of glue. This can lead to your envelope looking messy, wrinkling the paper, or even accidentally gluing the inner pocket shut. Instead, use a thin, even line of glue stick or double-sided tape along the edges. Less is often more when it comes to adhesives.
Inaccurate Initial Folds
The very first folds, especially the bottom corner meeting the center, set the stage for the entire envelope. If these initial folds are crooked or misaligned, the subsequent flaps will also be off-kilter, resulting in a lopsided envelope. Take your time with the first few folds and ensure they are as precise as possible.
Not Pressing Creases Firmly
Flimsy, soft folds can make an envelope look amateurish and less durable. Failing to press down firmly along each crease means your envelope won’t hold its shape well. Always take an extra moment to run your finger, a ruler, or a bone folder along each fold to create sharp, defined edges. This greatly improves the overall appearance and integrity.
Overlapping Flaps Incorrectly
When folding the side flaps, it’s easy to overlap them too much or too little. If they overlap excessively, the envelope becomes bulky and difficult to seal. If they don’t overlap enough, the internal contents might not be fully secure. Aim for a slight overlap that creates a neat, snug pocket without adding unnecessary thickness.
Troubleshooting
Envelope Doesn’t Close Properly
If your top flap doesn’t align neatly or the envelope feels too tight to close, the side flaps might be too wide or folded incorrectly. Gently unfold the top and side flaps. Re-evaluate the width of your side flaps; you might need to trim a small amount from their outer edges to allow the top flap to sit flush. Ensure the initial bottom fold was also straight.
Paper Wrinkles After Gluing
Wrinkling often occurs when too much liquid glue is used, soaking into the paper. Switch to a glue stick or double-sided tape for a drier application. If you must use liquid glue, apply it very sparingly and allow it to dry completely under a flat, heavy object to prevent buckling.
Envelope is Lopsided or Crooked
A crooked envelope usually stems from inaccurate initial measurements or folds. Start by ensuring your paper is perfectly square or rectangular. When finding the center, use a ruler to draw precise diagonal lines. Revisit Step 3 and 4, ensuring each corner fold is perfectly aligned with the center point and that the edges are straight before pressing down. Precision in the early steps is key.
Key Takeaways
- Always start with a clean, flat surface and precise measurements for the best results.
- Folding the bottom corner to the center first establishes the critical baseline for symmetry.
- Use light pencil marks that can be erased later, especially for the center point.
- Press firmly on all creases to achieve sharp, professional-looking folds.
- Apply glue sparingly to avoid wrinkles and accidental sealing of the inner pocket.
- Personalize your envelopes with different papers, decorative scissors, or stamps.
Frequently Asked Questions
Can I make an envelope without a ruler?
While a ruler makes the process much easier and more accurate, you can certainly make an envelope without one. You’ll need to rely on careful visual estimation and creasing the paper to find the center and ensure straight folds. For instance, fold the paper in half lengthwise, then widthwise, to find the center point.
What kind of paper is best for making envelopes?
Standard printer paper (20-24 lb bond) works well for basic envelopes. For more durability or a premium feel, opt for heavier cardstock (65-80 lb cover) or specialty craft papers. Thicker paper is more forgiving with glue and less prone to wrinkling.
How do I make a custom-sized envelope for a specific card?
To make a custom-sized envelope, first measure your card’s length and width. Add about 1/4 to 1/2 inch to each dimension for wiggle room. Then, calculate the size of your square paper. A good rule of thumb is that the square paper should be roughly 2.5 to 3 times the width of your finished card. For example, a 5×7 inch card might need a 12×12 inch square paper.
Can I reuse old calendars or posters for envelopes?
Absolutely! Reusing old calendars, posters, or even maps is a fantastic way to create unique, eco-friendly envelopes. Just make sure the paper isn’t too thick or glossy, as very thick paper can be hard to fold, and glossy paper might not hold glue well. Test a small piece first if unsure.
Our Top Recommended Finds
- Craft Paper Assortment: A pack of varied colors and patterns allows you to create envelopes for any occasion or mood.
- Precision Scissors: A sharp pair of scissors ensures clean, straight cuts, which are crucial for a professional-looking envelope.
- Glue Stick: Easy to apply, mess-free, and less likely to wrinkle paper compared to liquid glues.
Unfold Your Creativity Today
Crafting your own envelopes is more than just a practical skill; it’s an opportunity for personal expression. Imagine the delight on someone’s face receiving a letter in an envelope you made yourself, perfectly matching the occasion or their personality.
Now that you’ve mastered this easy method, why not experiment with different papers or even try adding a wax seal? Grab your supplies and start folding. Your next message deserves a unique presentation!
Beginner-friendly templates, step-by-step guides,
and weekly project ideas in your inbox.