🛍️ How To Make A Paper Bag Step By Step

Beginner-friendly templates, step-by-step guides,
and weekly project ideas in your inbox.
I remember the first time I tried to wrap a strangely shaped gift and realized a standard box just wouldn’t work.
After a few failed attempts with tape and messy corners, I decided to learn how to construct a proper paper bag from scratch.
This guide comes from years of trial and error in my own craft room, ensuring you get a sturdy, professional result every single time.

Quick Overview
Making your own paper bag is a rewarding project that combines geometry with creativity.
You will learn how to transform a flat sheet of paper into a three-dimensional container that can hold gifts, snacks, or party favors.
- Time needed: 10 to 15 minutes
- Difficulty: Beginner
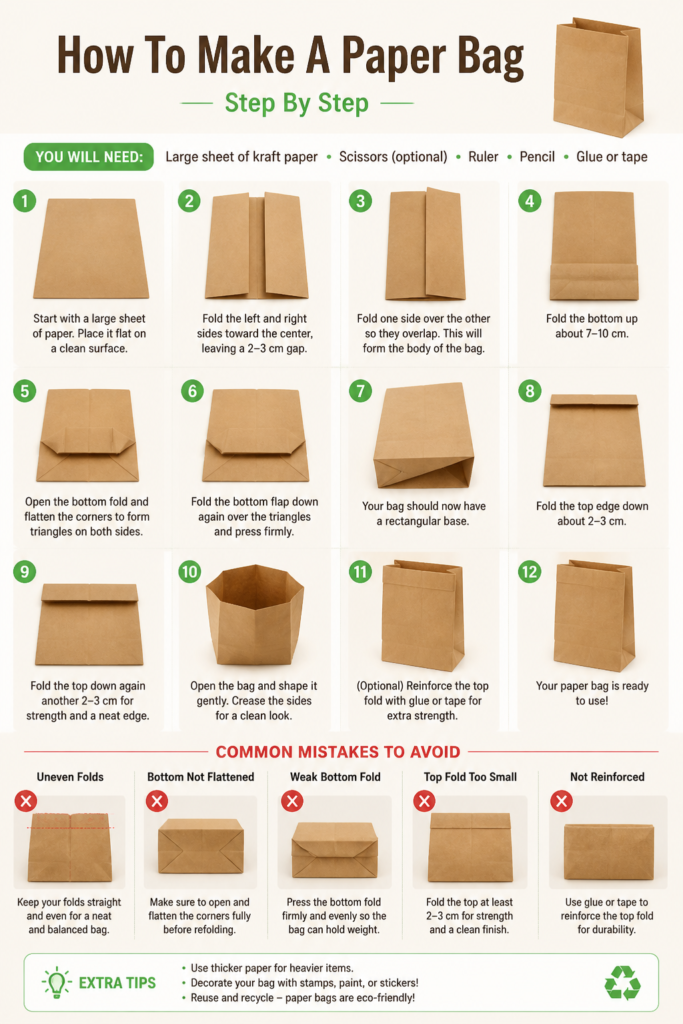
- What you’ll need: Rectangular paper, glue or double-sided tape, scissors, a ruler, and a pencil.
Step-by-Step Instructions
Step 1: Select Your Paper Material
Choose a piece of paper that fits the purpose of your bag.
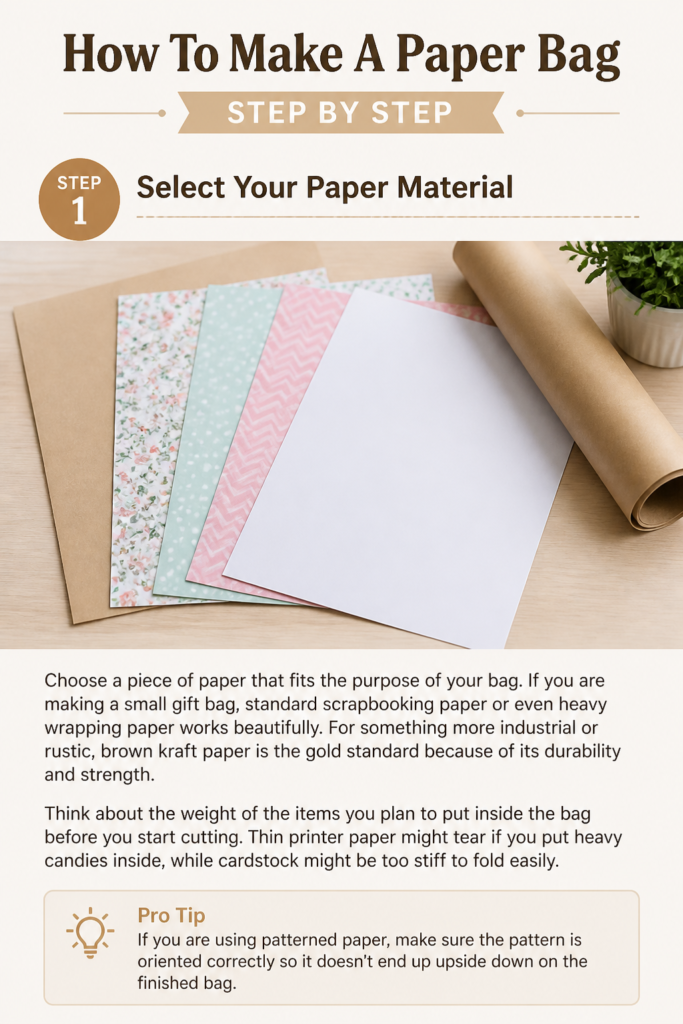
If you are making a small gift bag, standard scrapbooking paper or even heavy wrapping paper works beautifully.
For something more industrial or rustic, brown kraft paper is the gold standard because of its durability and strength.
Think about the weight of the items you plan to put inside the bag before you start cutting.
Thin printer paper might tear if you put heavy candies inside, while cardstock might be too stiff to fold easily.
Pro Tip: If you are using patterned paper, make sure the pattern is oriented correctly so it doesn’t end up upside down on the finished bag.
Step 2: Measure and Prepare the Rectangle
Lay your paper flat on a clean, hard work surface like a desk or a cutting mat.
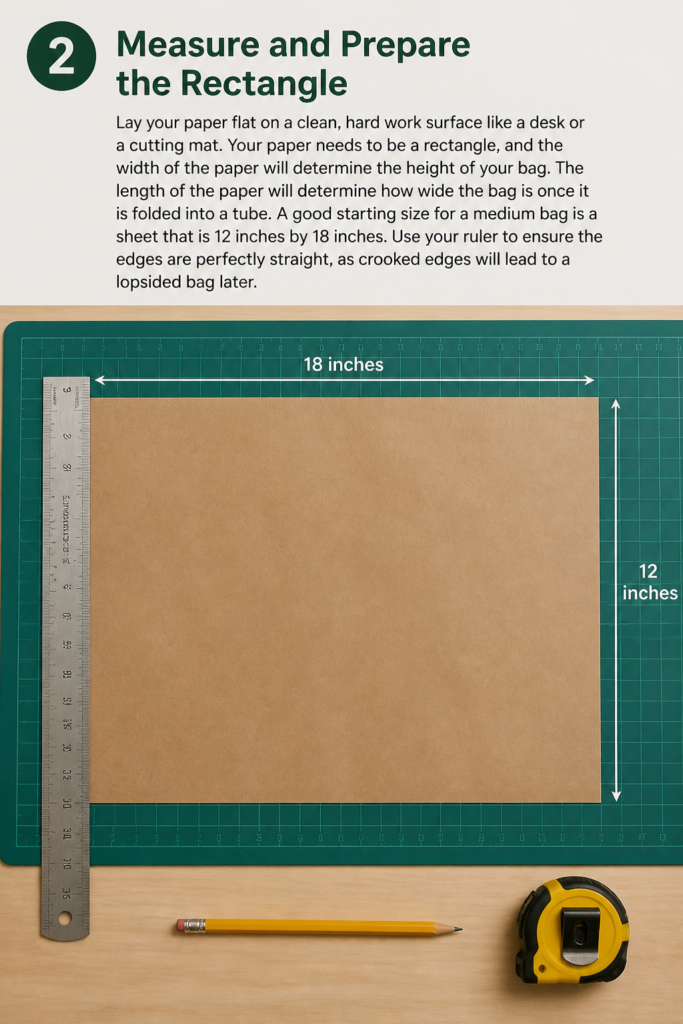
Your paper needs to be a rectangle, and the width of the paper will determine the height of your bag.
The length of the paper will determine how wide the bag is once it is folded into a tube.
A good starting size for a medium bag is a sheet that is 12 inches by 18 inches.
Use your ruler to ensure the edges are perfectly straight, as crooked edges will lead to a lopsided bag later.
Step 3: Create the Main Body Fold
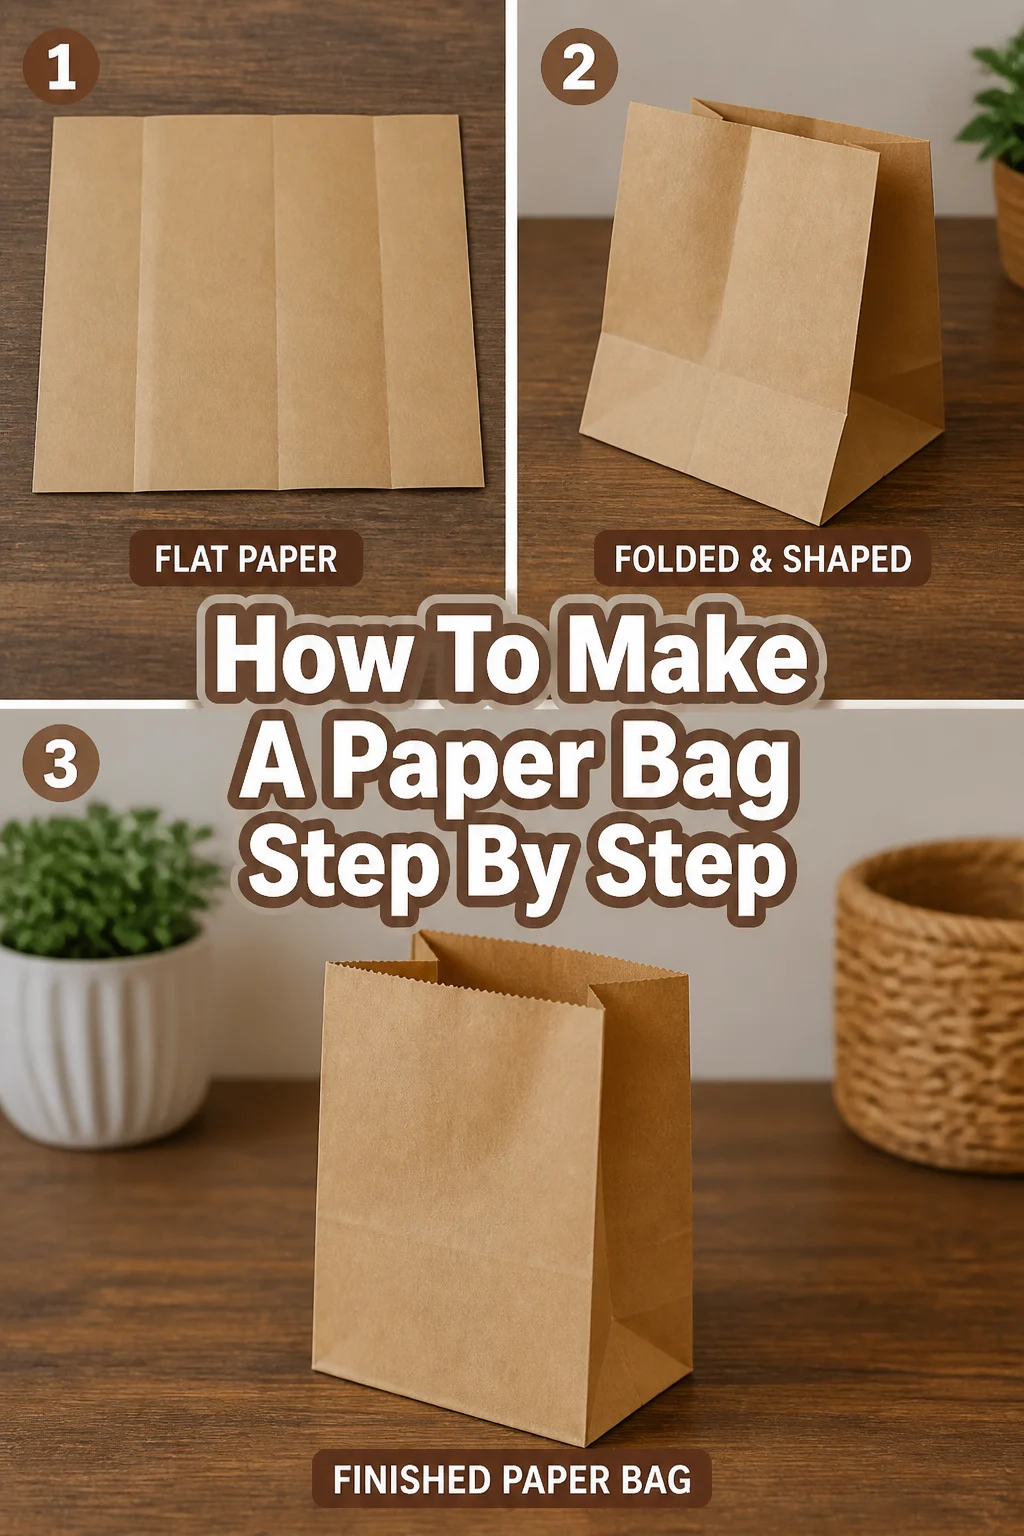
Place the paper in front of you in a landscape orientation, meaning the long sides are at the top and bottom.
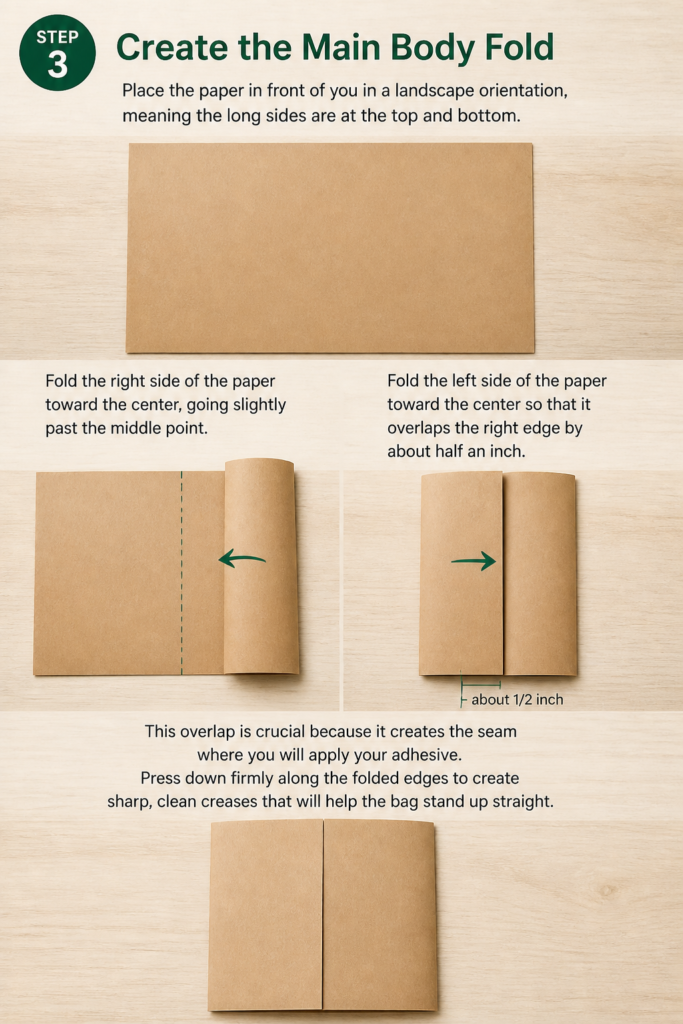
Fold the right side of the paper toward the center, going slightly past the middle point.
Fold the left side of the paper toward the center so that it overlaps the right edge by about half an inch.
This overlap is crucial because it creates the “seam” where you will apply your adhesive.
Press down firmly along the folded edges to create sharp, clean creases that will help the bag stand up straight.
Step 4: Seal the Vertical Seam
Apply a thin, even line of glue or a strip of double-sided tape along the overlapping edge.
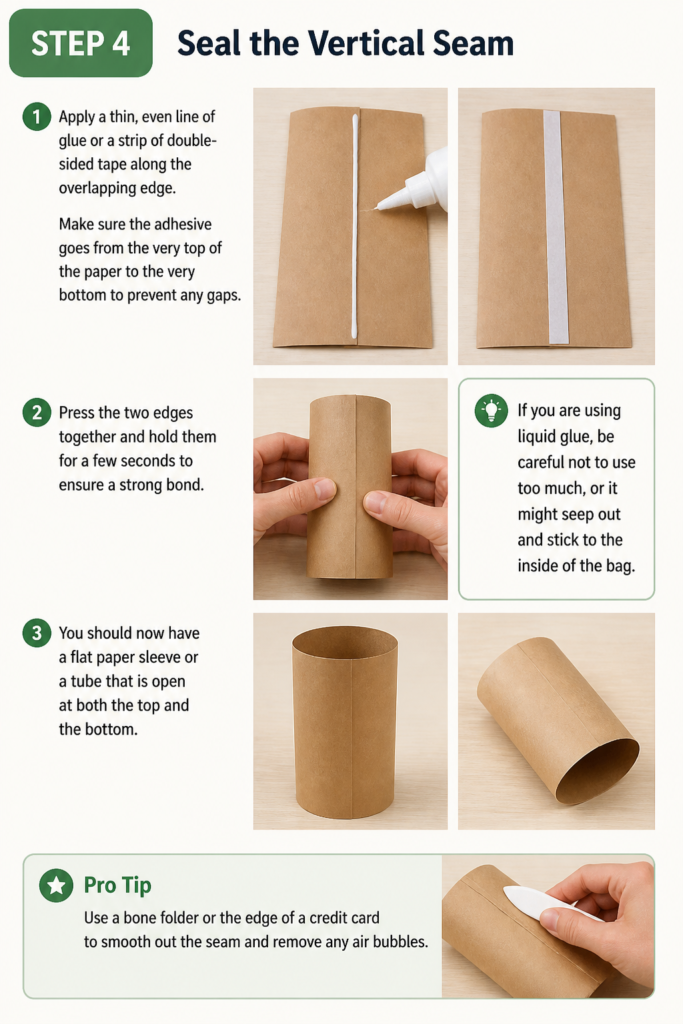
Make sure the adhesive goes from the very top of the paper to the very bottom to prevent any gaps.
Press the two edges together and hold them for a few seconds to ensure a strong bond.
If you are using liquid glue, be careful not to use too much, or it might seep out and stick to the inside of the bag.
You should now have a flat paper sleeve or a tube that is open at both the top and the bottom.
Pro Tip: Use a bone folder or the edge of a credit card to smooth out the seam and remove any air bubbles.
Step 5: Form the Bottom Base
Decide which end will be the bottom of your bag and fold it up about two to three inches.
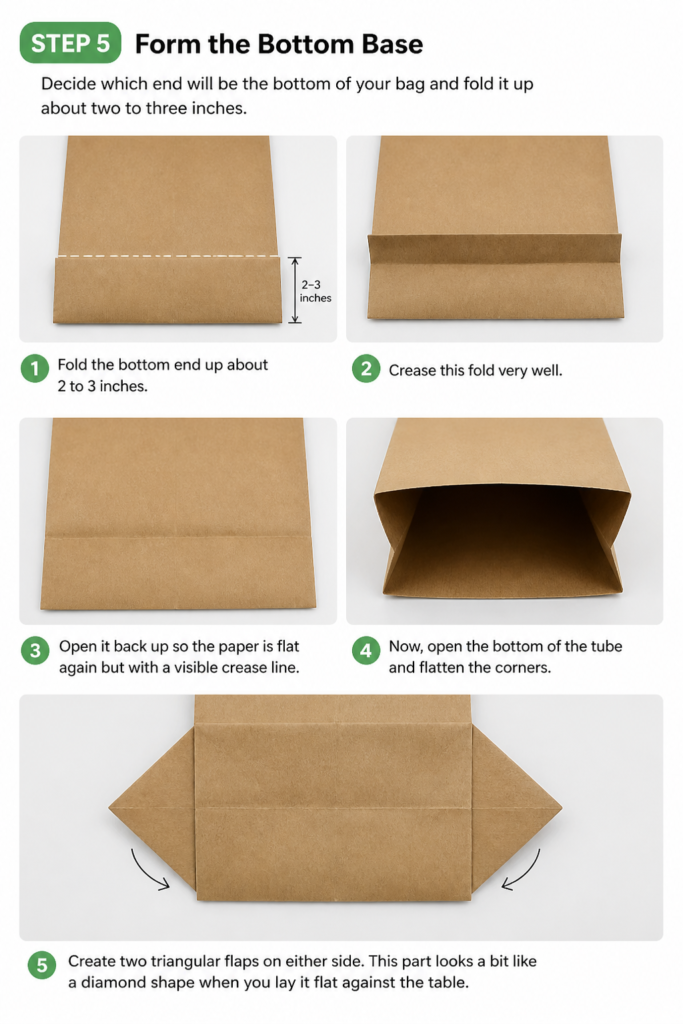
The height of this fold determines the depth of your bag’s bottom, so a larger fold creates a wider base.
Crease this fold very well, then open it back up so the paper is flat again but with a visible line.
Now, open the bottom of the tube and flatten the corners to create two triangular flaps on either side.
This part looks a bit like a diamond shape when you lay it flat against the table.
Step 6: Fold and Secure the Bottom Flaps
Fold the top edge of the diamond shape down toward the center line, going slightly past the middle.
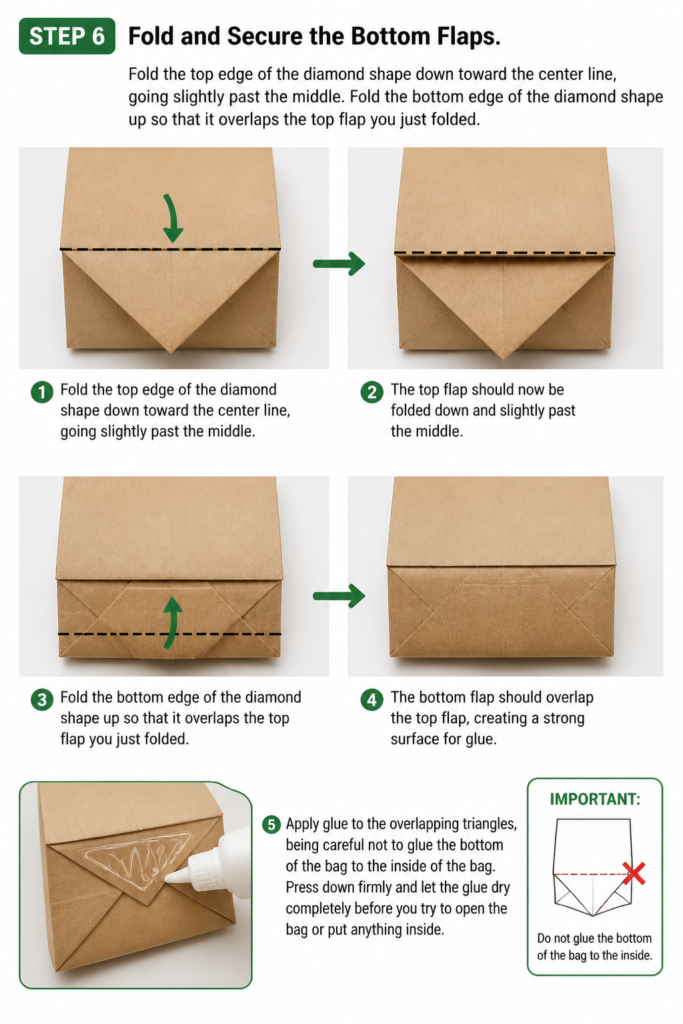
Fold the bottom edge of the diamond shape up so that it overlaps the top flap you just folded.
Just like the side seam, this overlap provides a surface for the glue to hold the bottom together.
Apply glue to the overlapping triangles, being careful not to glue the bottom of the bag to the inside of the bag.
Press down firmly and let the glue dry completely before you try to open the bag or put anything inside.
Step 7: Create the Side Gussets
Push the sides of the bag inward to create the classic “accordion” look found on grocery bags.
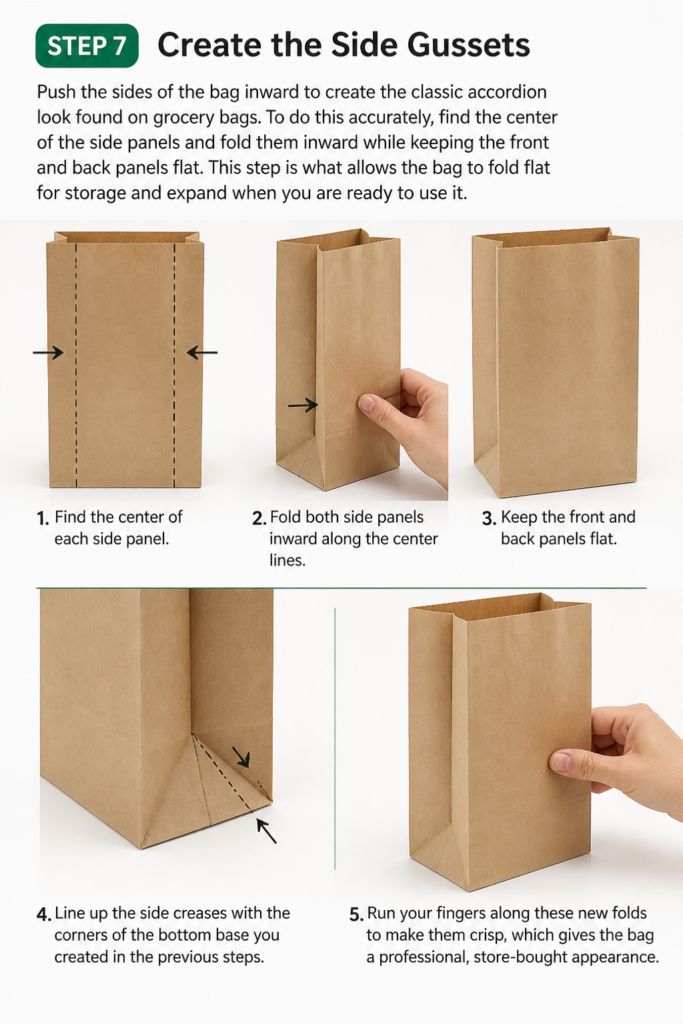
To do this accurately, find the center of the side panels and fold them inward while keeping the front and back panels flat.
This step is what allows the bag to fold flat for storage and expand when you are ready to use it.
Line up the side creases with the corners of the bottom base you created in the previous steps.
Run your fingers along these new folds to make them crisp, which gives the bag a professional, store-bought appearance.
Step 8: Reinforce the Top Rim
Fold the top opening of the bag inward by about one inch to create a reinforced rim.
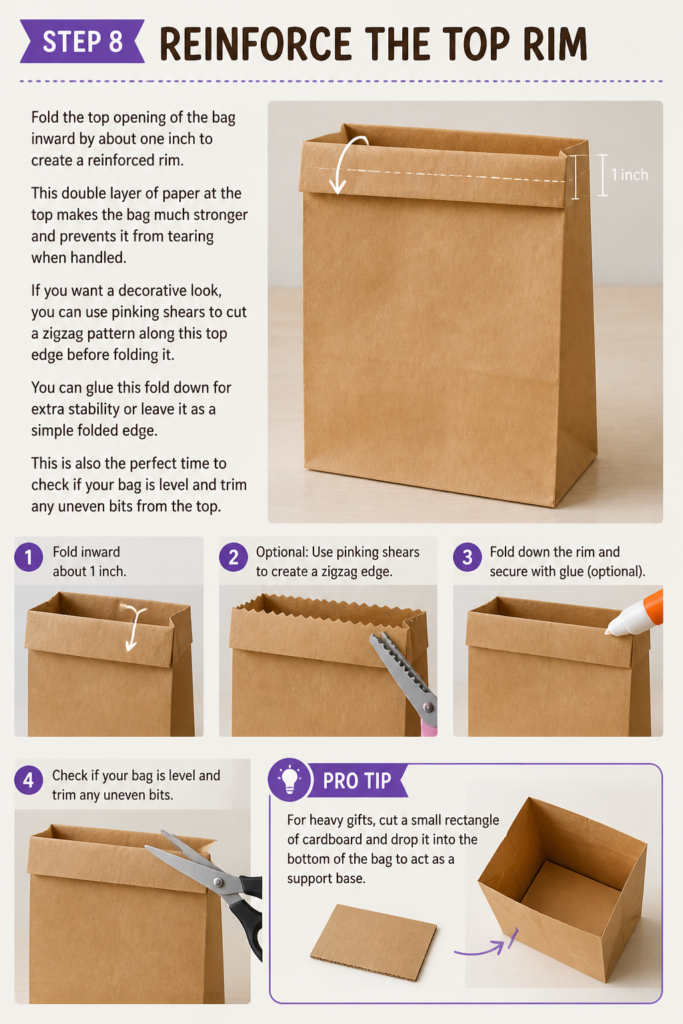
This double layer of paper at the top makes the bag much stronger and prevents it from tearing when handled.
If you want a decorative look, you can use pinking shears to cut a zigzag pattern along this top edge before folding it.
You can glue this fold down for extra stability or leave it as a simple folded edge.
This is also the perfect time to check if your bag is level and trim any uneven bits from the top.
Pro Tip: For heavy gifts, cut a small rectangle of cardboard and drop it into the bottom of the bag to act as a support base.
Step 9: Attach Handles and Decorations
Punch two holes through the reinforced top rim on both the front and back panels of the bag.
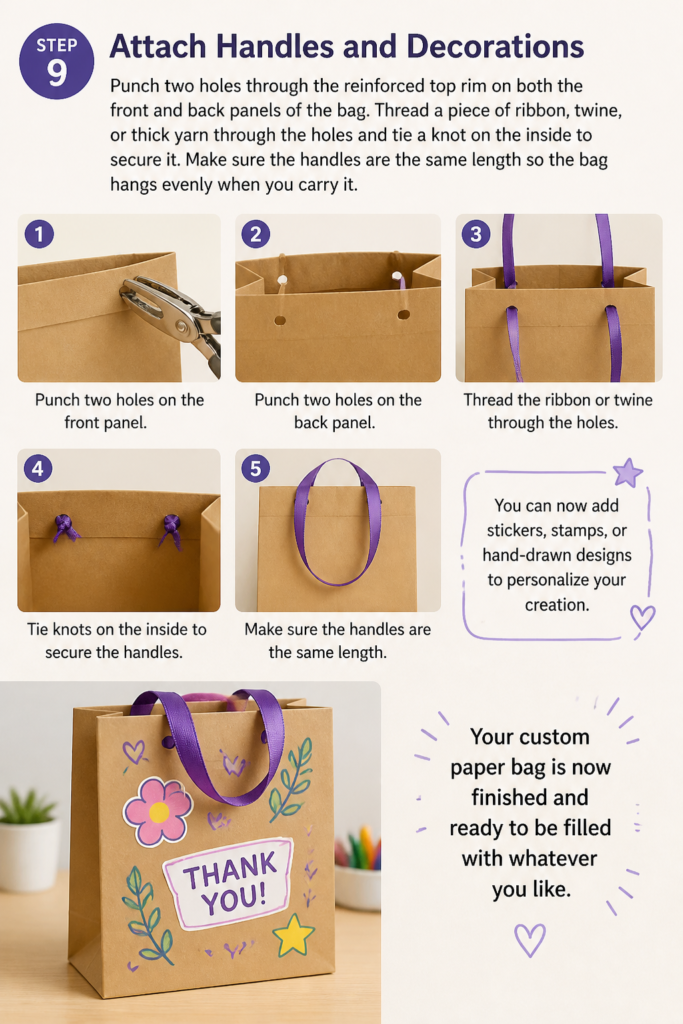
Thread a piece of ribbon, twine, or thick yarn through the holes and tie a knot on the inside to secure it.
Make sure the handles are the same length so the bag hangs evenly when you carry it.
You can now add stickers, stamps, or hand-drawn designs to personalize your creation.
Your custom paper bag is now finished and ready to be filled with whatever you like.
Common Mistakes to Avoid
Using Too Much Liquid Glue
When you apply thick beads of liquid glue, the moisture can saturate the paper fibers and cause them to wrinkle or warp. This often leads to a messy finish where the seams look “bubbly” instead of flat. Always use a thin layer or switch to a glue stick or double-sided tape for a much cleaner look.
Ignoring the Grain of the Paper
Paper actually has a grain, similar to wood, which makes it easier to fold in one direction than the other. If you try to force a fold against the grain on thick paper, the fibers might crack and leave a jagged, white line along your seam. Try gently bending the paper in both directions to see which way offers less resistance before you start your project.
Misaligning the Bottom Diamond Fold
The diamond fold in Step 5 is the most technical part of the process and requires precision. If the triangles are not symmetrical, the bag will sit at an angle and might tip over when you set it on a table. Take your time to ensure the center creases line up perfectly with the side seams of the bag tube.
Troubleshooting
The Bag Bottom Keeps Opening
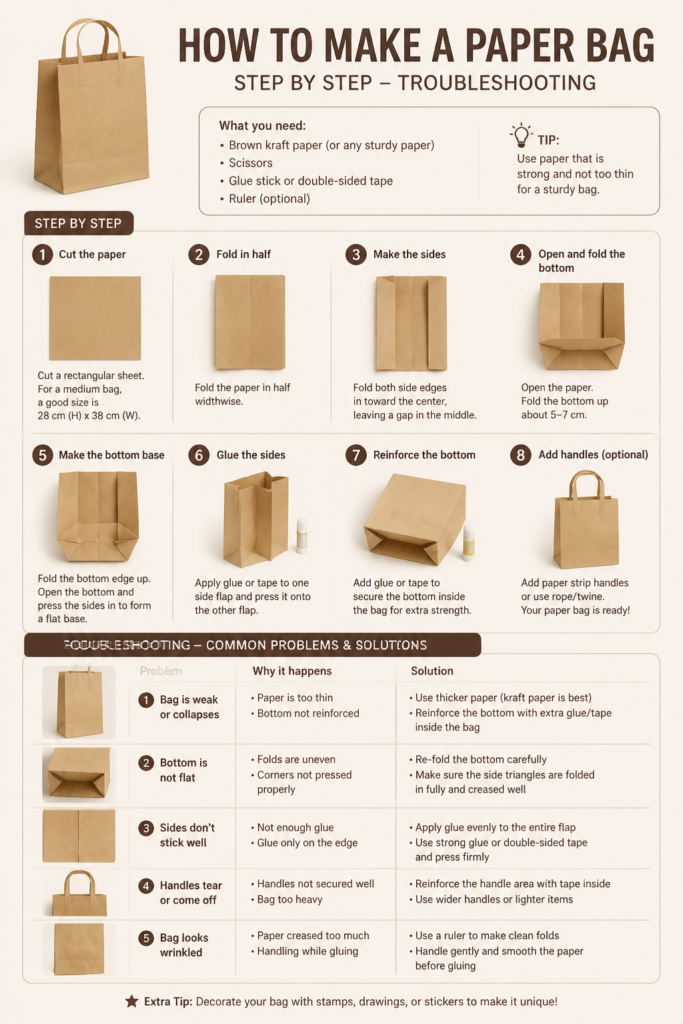
This usually happens because the adhesive didn’t have enough surface area to grab onto or the paper is too oily for the glue. Try increasing the overlap of your bottom flaps to at least half an inch to give the glue more room to work. If you are using glossy wrapping paper, you may need a stronger craft glue or a high-tack adhesive tape.
The Sides Are Tearing When Expanded
If your paper is very stiff or brittle, the gusset folds can put too much stress on the corners. You can prevent this by “scoring” your lines first with a ruler and a blunt object like a dried-out ballpoint pen. Scoring creates a path for the fold to follow, which guides the paper fibers and prevents them from snapping.
The Handles Pull Through the Paper
Thin paper cannot support the weight of a heavy gift if the handles are just threaded through a single hole. To fix this, glue a small strip of cardstock to the inside of the rim before you punch your holes. This creates a “sandwich” of material that is much harder for the ribbon knots to pull through.
Key Takeaways
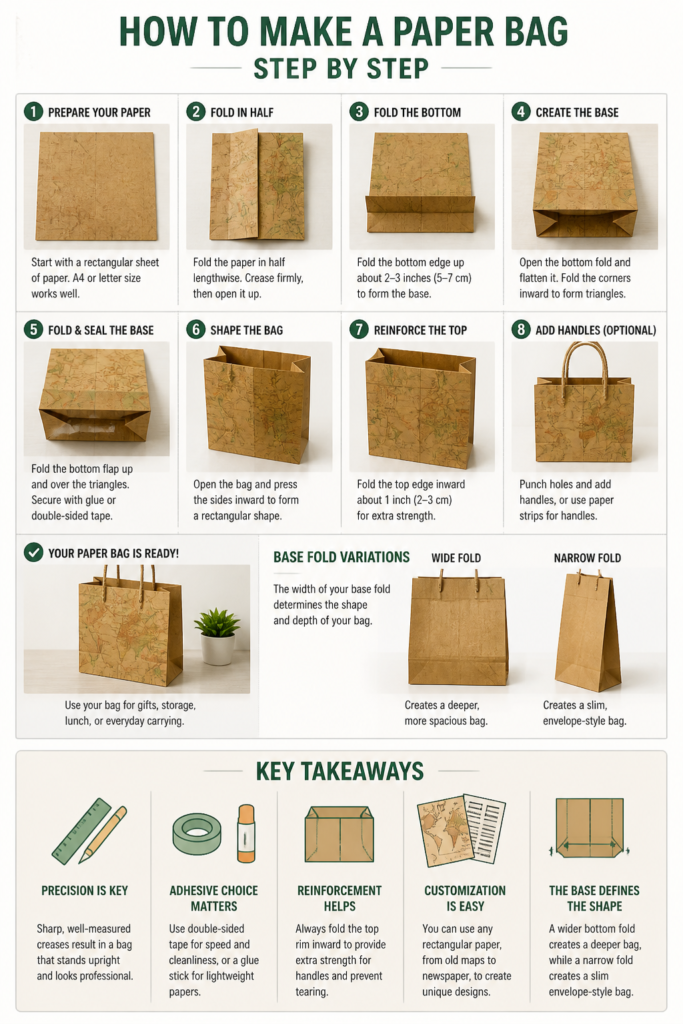
- Precision is key: Sharp, well-measured creases result in a bag that stands upright and looks professional.
- Adhesive choice matters: Use double-sided tape for speed and cleanliness, or a glue stick for lightweight papers.
- Reinforcement helps: Always fold the top rim inward to provide extra strength for handles and prevent tearing.
- Customization is easy: You can use any rectangular paper, from old maps to newspaper, to create unique designs.
- The base defines the shape: A wider bottom fold creates a deeper bag, while a narrow fold creates a slim envelope-style bag.
Frequently Asked Questions
What is the best type of paper for a sturdy bag?
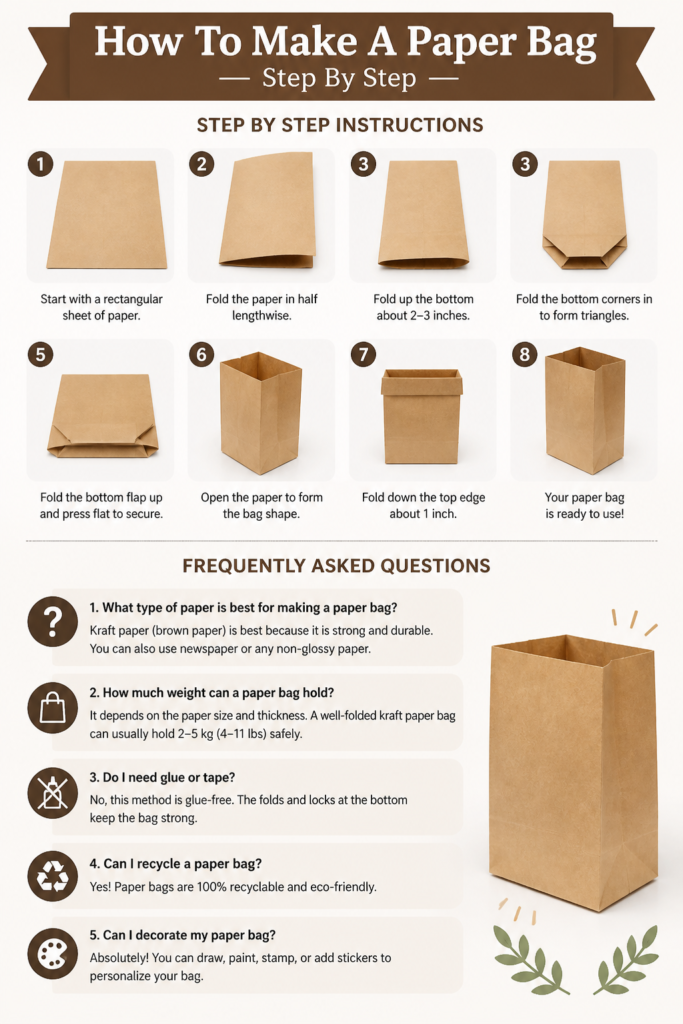
Kraft paper is generally the best choice for a bag that needs to hold weight. It is made using a process that keeps the wood fibers intact, making it much more resistant to tearing than standard bleached paper. If you want something more decorative, look for cardstock with a weight of around 65lb or 176gsm.
Can I make a paper bag without glue?
It is possible to use staples or even a sewing machine to close the seams of a paper bag. Sewing a paper bag with a long stitch length can create a very trendy, artisanal look. However, for a traditional flat-bottom bag, some form of adhesive is usually necessary to keep the bottom flaps secure and leak-proof.
How do I make a bag for a very tall item?
To make a tall bag, you simply need to change the orientation of your starting rectangle. Use the long side of the paper as the height of the bag and the short side to wrap around the item. You may need to tape two pieces of paper together to get enough length to wrap around the circumference of your object.
How much weight can a homemade paper bag hold?
A standard bag made from kraft paper with a reinforced bottom can easily hold two to three pounds. If you add a cardboard insert to the base and use thick ribbon handles, you can increase that capacity significantly. Always test the bag over a soft surface first to make sure your glue joints are holding strong.
Our Top Recommended Finds
- Bone Folder Tool: This simple plastic or bone tool helps you create the sharpest possible creases without damaging the paper surface.
- Extra-Strength Double Sided Tape: This is much easier to apply than liquid glue and provides an instant, permanent bond that won’t wrinkle your paper.
- Heavyweight Kraft Paper Roll: Buying paper in a roll allows you to custom-cut the exact size you need for extra-large or uniquely shaped bags.
Taking Your Craft To The Next Level
Now that you have mastered the basic construction of a paper bag, you can begin experimenting with different sizes and textures.
Try using translucent vellum for a sophisticated look or upcycling old calendars to create eco-friendly gift packaging.
Once you get the hang of the folding pattern, you will never have to run to the store for a last-minute gift bag again.
Start with a simple piece of scrap paper today and see how quickly you can turn it into something functional.
Beginner-friendly templates, step-by-step guides,
and weekly project ideas in your inbox.