✉️ How To Make A Envelope Out Of Paper Easy

Beginner-friendly templates, step-by-step guides,
and weekly project ideas in your inbox.
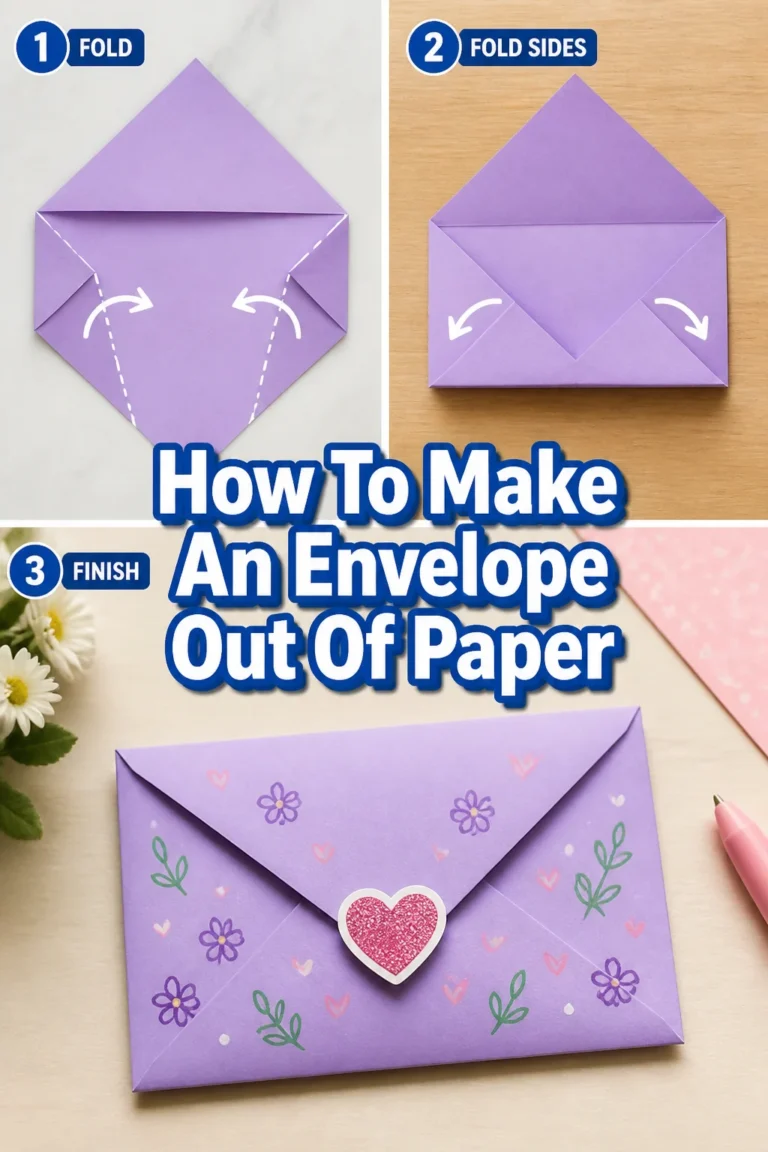
Making your own envelopes is a surprisingly simple skill. I’ve personally found it incredibly useful for last-minute gifts, handmade cards, or just adding a personal touch to a note. This guide will show you exactly how to do it with ease.
You’ll be able to create custom envelopes in minutes, proving that practicality and creativity can go hand-in-hand.

Quick Overview
This guide will walk you through the process of transforming a simple piece of paper into a functional and charming envelope. You will learn the basic folds and techniques to create a secure pocket for your notes or cards.
- Time needed: 10-15 minutes
- Difficulty: Beginner
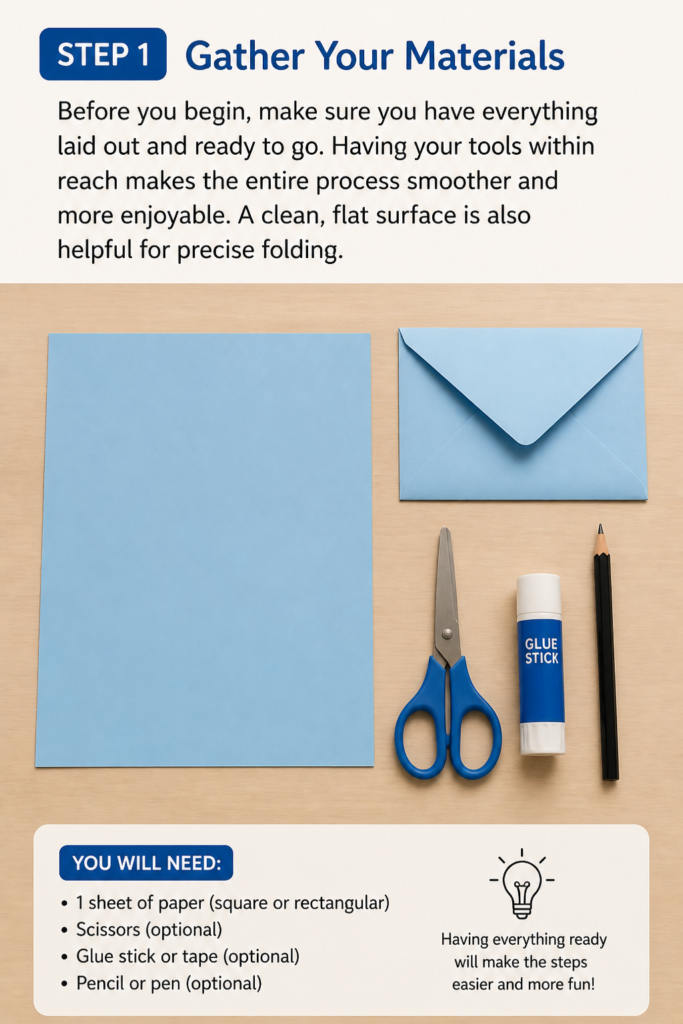
- What you’ll need: Paper (any size), scissors, a ruler, and a glue stick or double-sided tape.
Step-by-Step Instructions
Step 1: Gather Your Materials
Before you begin, make sure you have everything laid out and ready to go. Having your tools within reach makes the entire process smoother and more enjoyable. A clean, flat surface is also helpful for precise folding.
Step 2: Choose and Prepare Your Paper
The type and size of paper you select will determine the final look and size of your envelope. Standard printer paper works well for practice, but craft paper or scrapbook paper adds a lovely touch. The key to this method is starting with a perfect square.
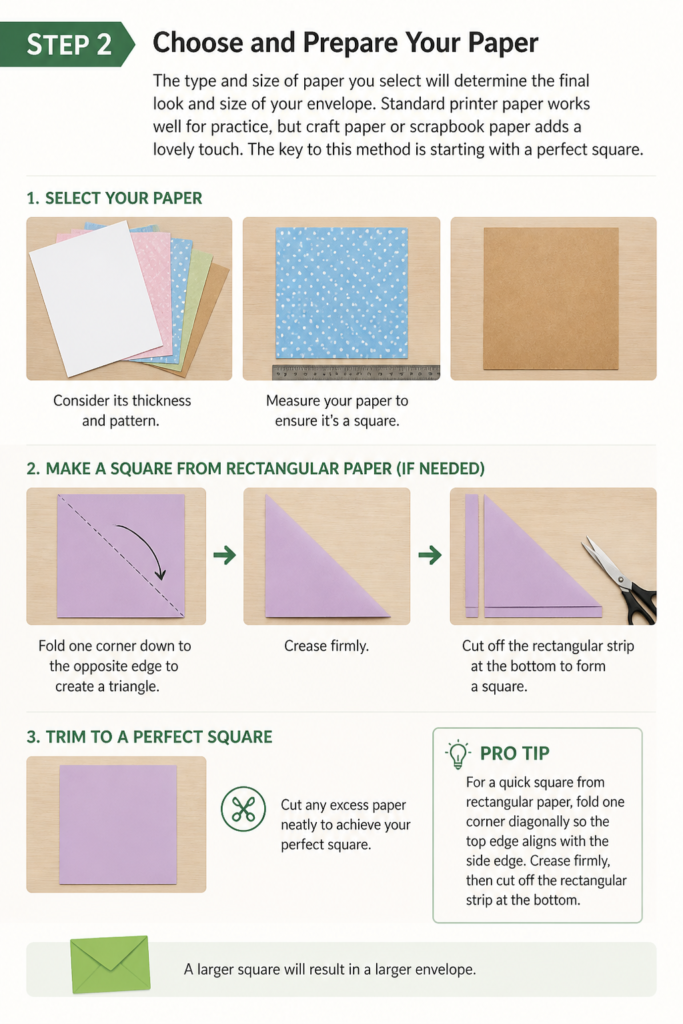
- Select your paper. Consider its thickness and pattern.
- Measure your paper to ensure it’s a square. If you’re using rectangular paper, fold one corner down to the opposite edge to create a triangle, then trim the excess rectangle to form a square.
- Cut any excess paper neatly to achieve your perfect square. A larger square will result in a larger envelope.
Pro Tip: For a quick square from rectangular paper, fold one corner diagonally so the top edge aligns with the side edge. Crease firmly, then cut off the rectangular strip at the bottom. Unfold, and you have a perfect square.
Step 3: Fold into a Diamond Shape
This initial fold sets the foundation for your envelope. It’s crucial for achieving the symmetrical shape needed for the remaining steps. Take your time to align the corners precisely.
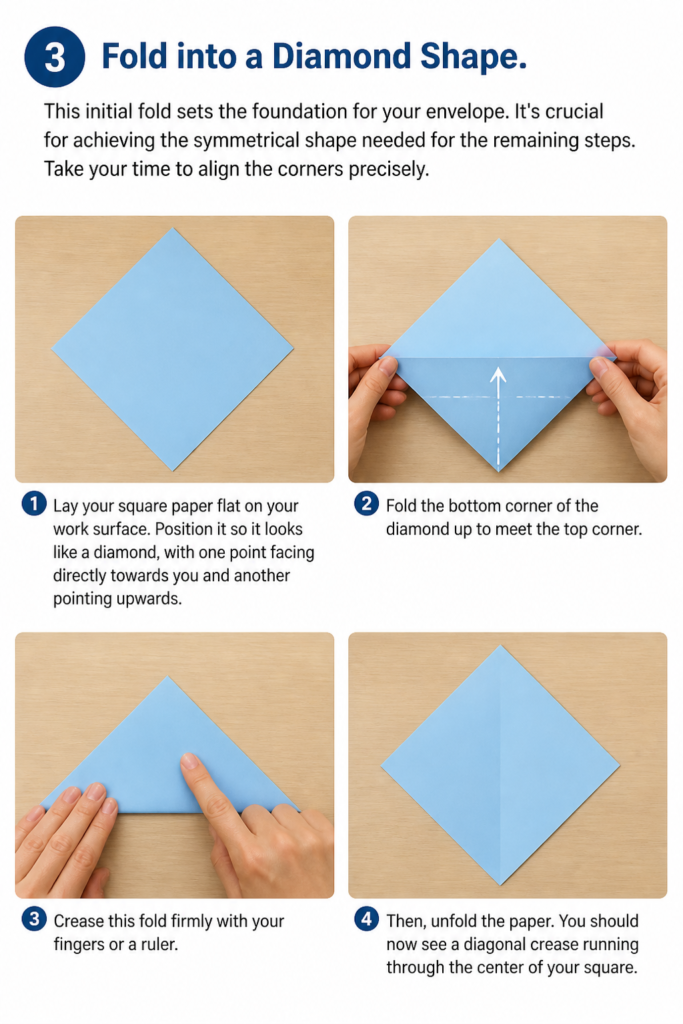
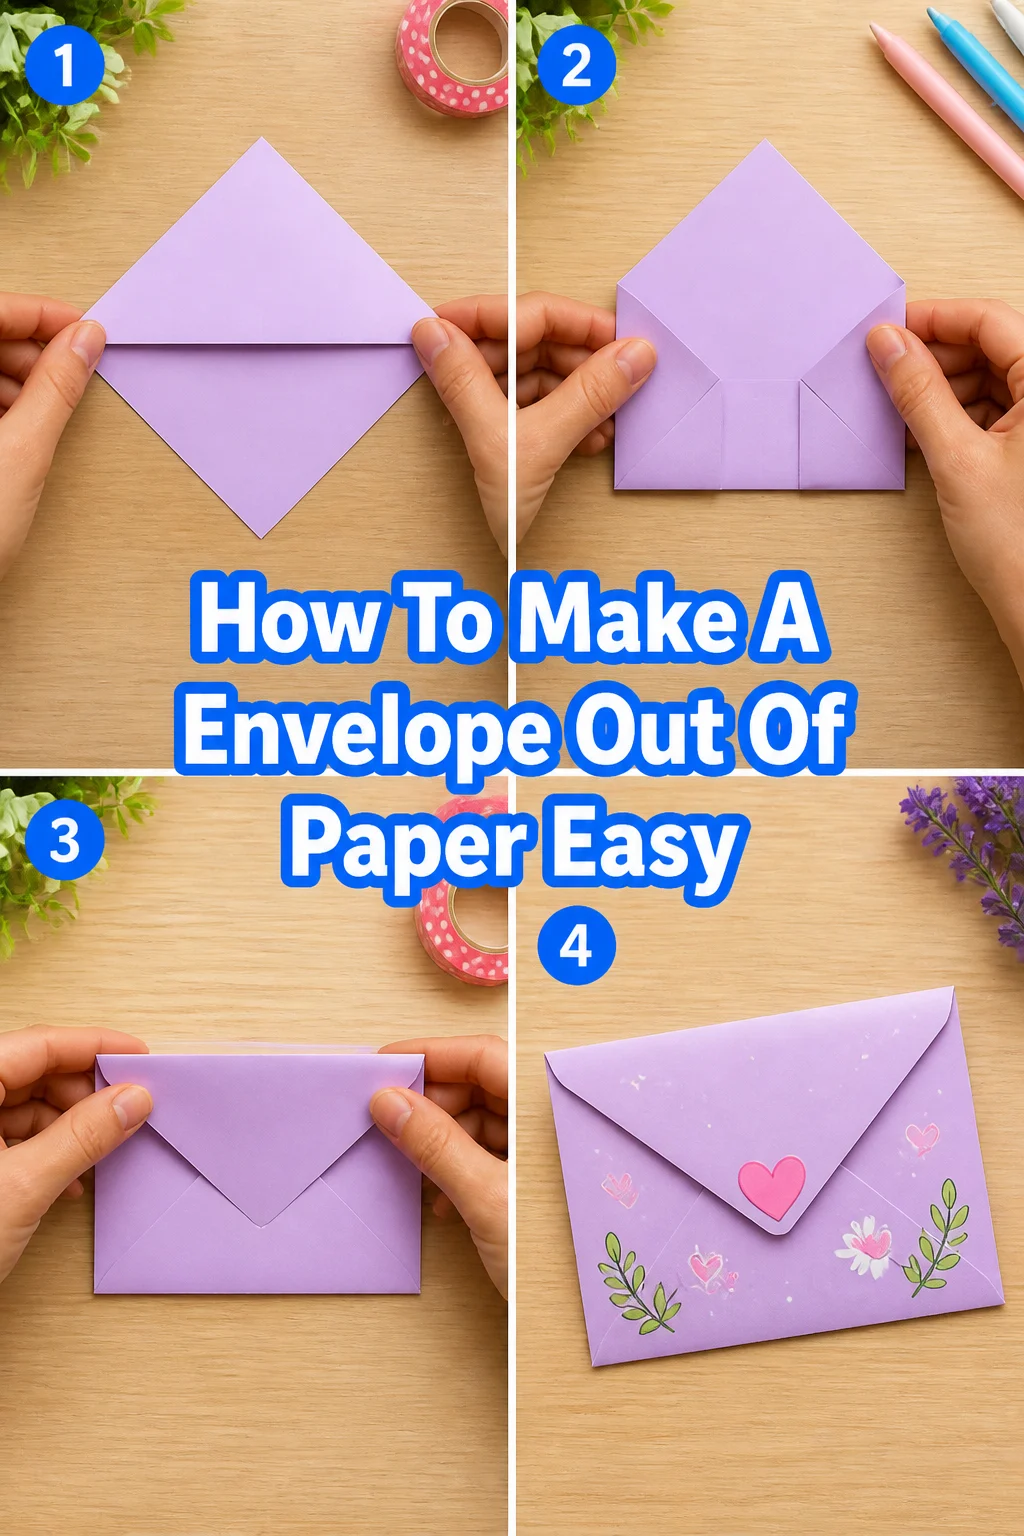
- Lay your square paper flat on your work surface. Position it so it looks like a diamond, with one point facing directly towards you and another pointing upwards.
- Fold the bottom corner of the diamond up to meet the top corner.
- Crease this fold firmly with your fingers or a ruler. Then, unfold the paper. You should now see a diagonal crease running through the center of your square.
Step 4: Bring in the Side Flaps
This step begins to form the sides of your envelope, creating the structure that will hold your contents. Accuracy here ensures a neat and symmetrical final product. These folds will determine the width of your envelope.
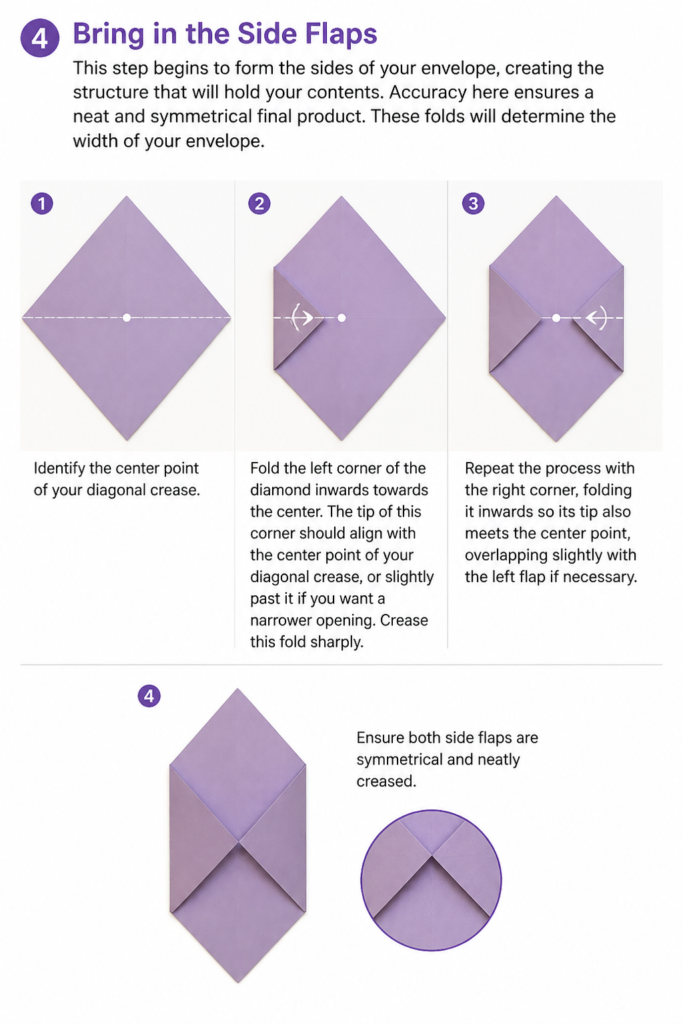
- Identify the center point of your diagonal crease.
- Fold the left corner of the diamond inwards towards the center. The tip of this corner should align with the center point of your diagonal crease, or slightly past it if you want a narrower opening.
- Crease this fold sharply.
- Repeat the process with the right corner, folding it inwards so its tip also meets the center point, overlapping slightly with the left flap if necessary.
- Ensure both side flaps are symmetrical and neatly creased.
Step 5: Create the Bottom Pocket
The bottom flap will form the main pocket of your envelope, where your card or letter will sit. This fold needs to be high enough to create a secure pocket but low enough to allow the top flap to close. You can adjust the height based on what you plan to put inside.
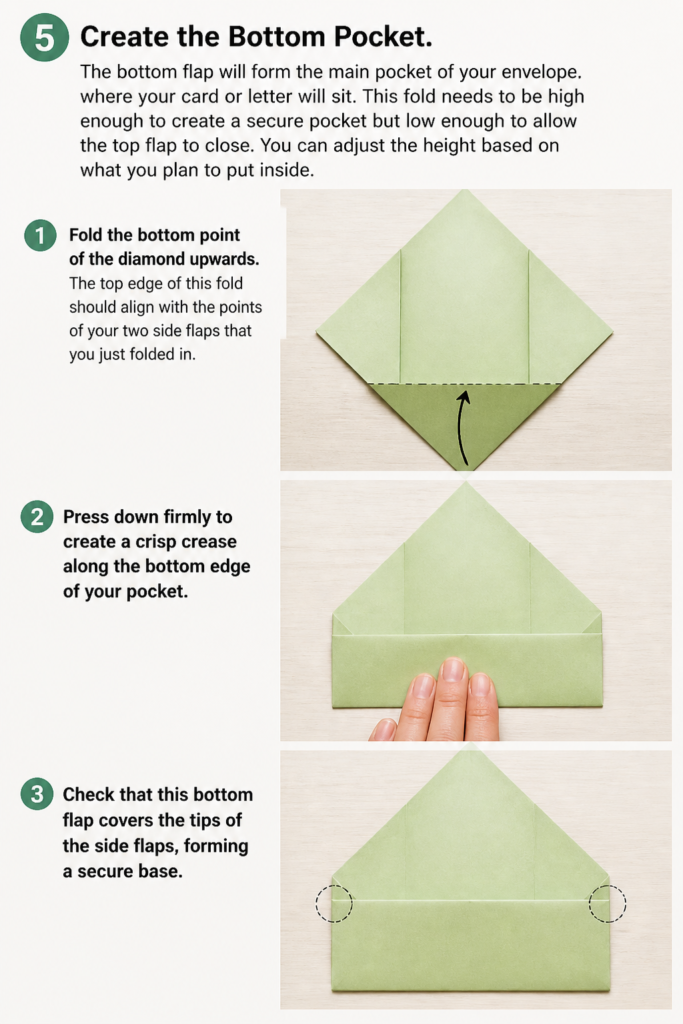
- Fold the bottom point of the diamond upwards. The top edge of this fold should align with the points of your two side flaps that you just folded in.
- Press down firmly to create a crisp crease along the bottom edge of your pocket.
- Check that this bottom flap covers the tips of the side flaps, forming a secure base.
Step 6: Secure the Sides of the Pocket
Now it’s time to make your envelope functional by gluing the sides of the pocket together. This prevents your contents from falling out. A small amount of adhesive is all you need for a strong bond.
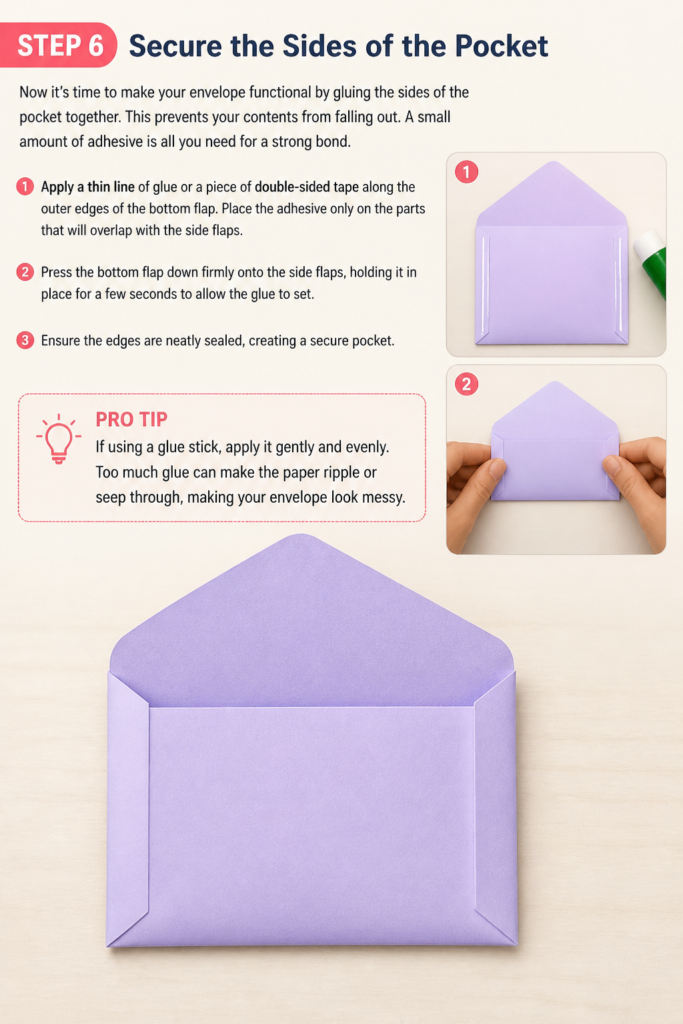
- Apply a thin line of glue or a piece of double-sided tape along the outer edges of the bottom flap. Place the adhesive only on the parts that will overlap with the side flaps.
- Press the bottom flap down firmly onto the side flaps, holding it in place for a few seconds to allow the glue to set.
- Ensure the edges are neatly sealed, creating a secure pocket.
Pro Tip: If using a glue stick, apply it gently and evenly. Too much glue can make the paper ripple or seep through, making your envelope look messy.
Step 7: Form the Top Flap
The final fold creates the closing flap of your envelope. This top point will tuck in or be sealed to secure the envelope’s contents. You can leave it pointed or round the corners for a different look.
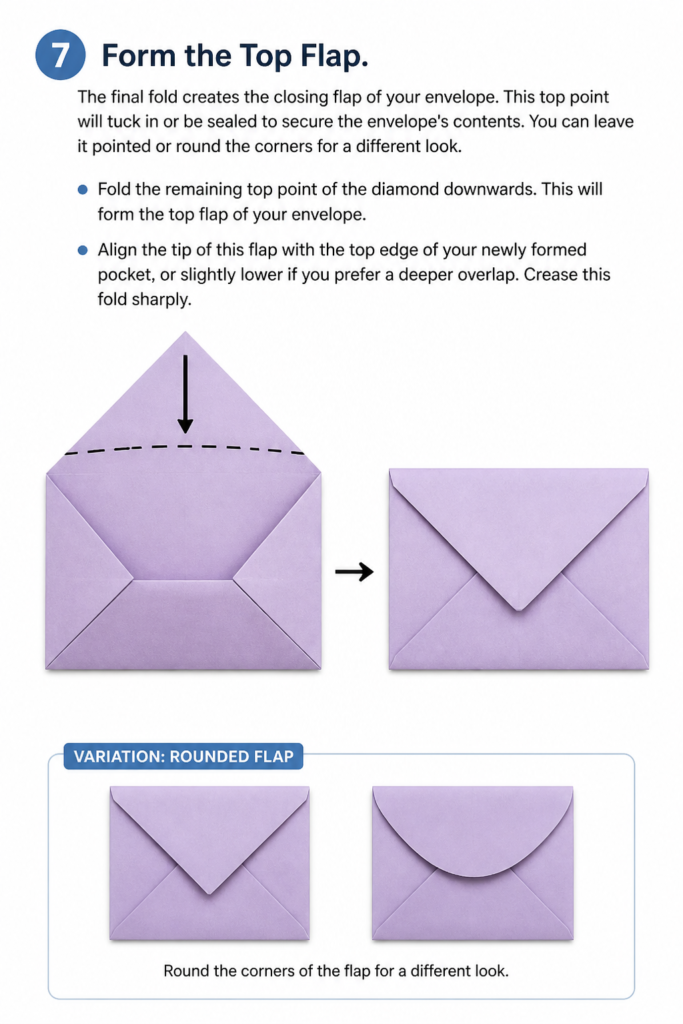
- Fold the remaining top point of the diamond downwards. This will form the top flap of your envelope.
- Align the tip of this flap with the top edge of your newly formed pocket, or slightly lower if you prefer a deeper overlap.
- Crease this fold sharply.
Step 8: Finish and Personalize
Your basic envelope is now complete! This is the perfect stage to add any personal touches, such as decorations, labels, or a personalized seal. You can also decide how you want to seal the envelope when it’s ready to be used.
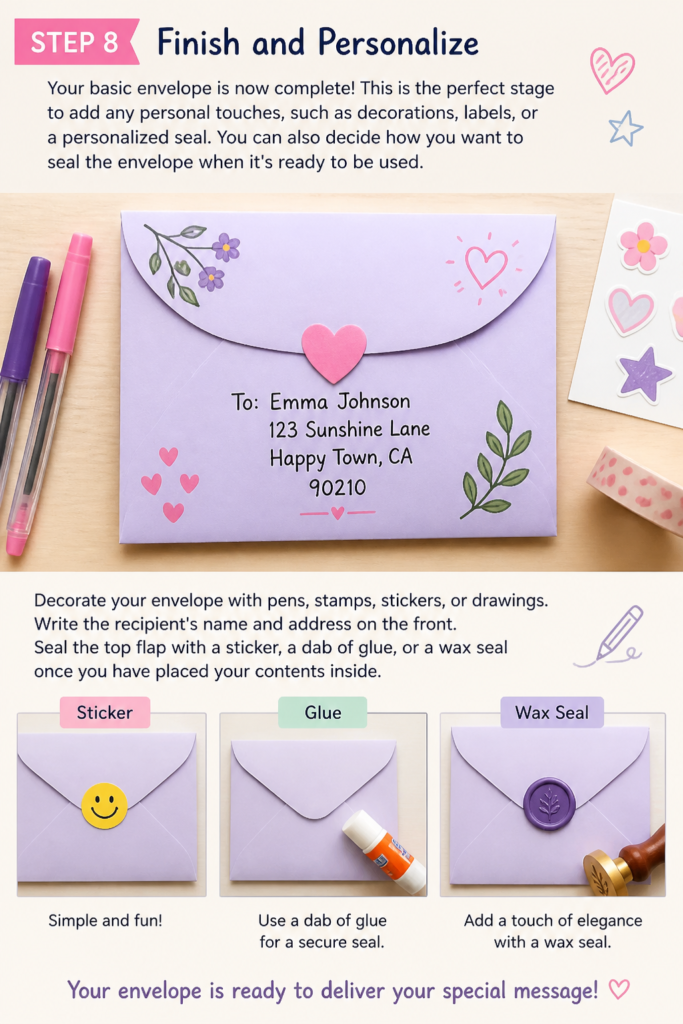
- Decorate your envelope with pens, stamps, stickers, or drawings.
- Write the recipient’s name and address on the front.
- Seal the top flap with a sticker, a dab of glue, or a wax seal once you have placed your contents inside.
Common Mistakes to Avoid
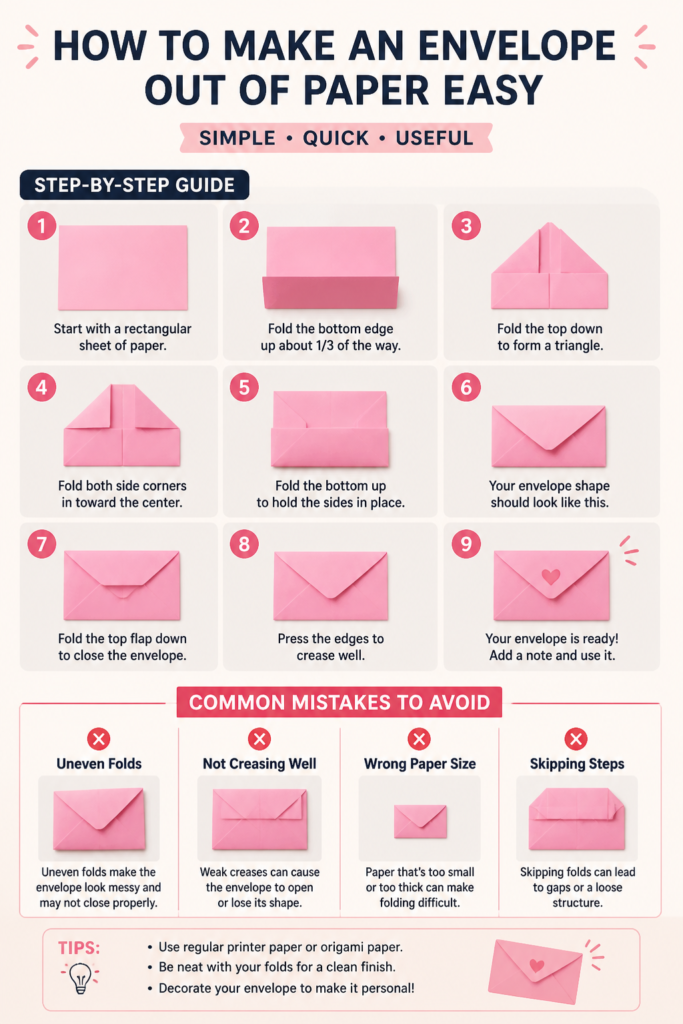
Using Non-Square Paper
Starting with a piece of paper that isn’t perfectly square is the most common pitfall. This will lead to uneven folds, misaligned flaps, and an envelope that looks lopsided or won’t close properly. Always take the time to measure and trim your paper accurately at the beginning.
Not Creasing Sharply Enough
Faint or rounded creases can make your envelope look sloppy and less defined. Sharp creases are essential for a professional and crisp finish. Use your fingernail, a ruler, or a bone folder to press down firmly along each fold line.
Applying Too Much Glue
Over-gluing can cause the paper to warp, wrinkle, or even tear, especially with thinner paper types. It can also lead to sticky residue on the outside of your envelope. Use a thin, even layer of glue stick or small pieces of double-sided tape only where necessary for a clean bond.
Rushing the Folds
Impatience can lead to misalignments and errors in your folds. Each step builds on the previous one, so accuracy at every stage is important. Take your time, align edges carefully, and make sure each fold is precise before moving on.
Troubleshooting
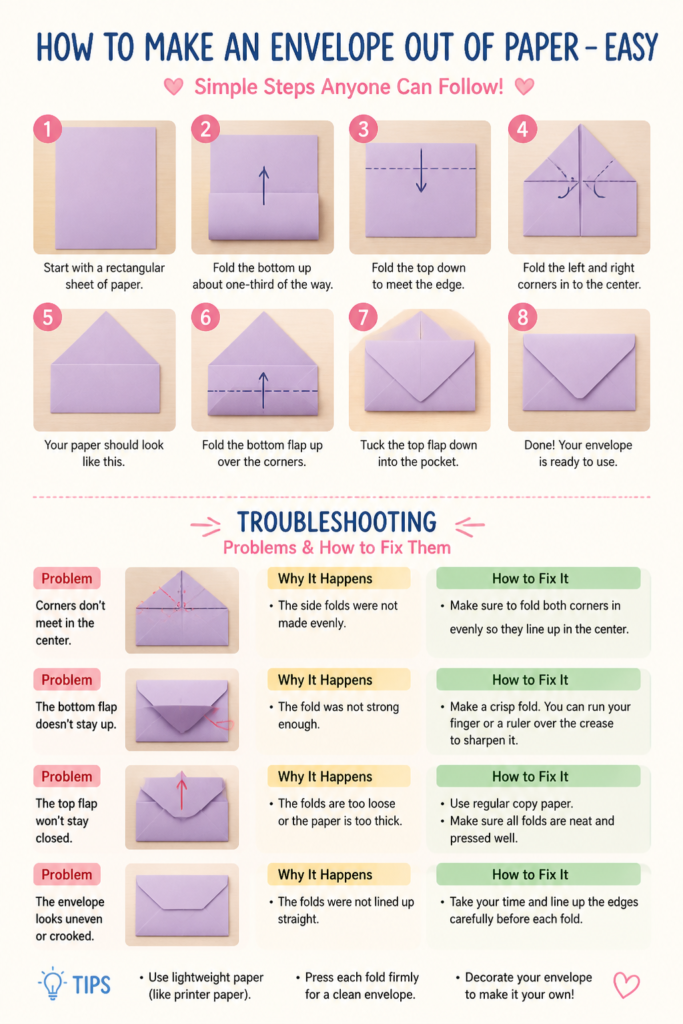
Envelope Won’t Close Neatly
If your top flap doesn’t align well or the envelope bulges, it often means the initial folds for the side or bottom flaps were not precise. Double-check that your starting paper was a perfect square. Ensure the side flaps meet symmetrically in the middle and the bottom flap covers them sufficiently without being too high.
Sides Don’t Align Perfectly
Uneven side flaps are usually a sign that your initial diamond fold was not centered or that the left and right corners were not folded in at the exact same angle. Unfold the side flaps and carefully re-align them, ensuring they meet at the central point you established, or overlap evenly. A ruler can help guide your folds for better precision.
Paper Rips During Folding
If your paper tears, it might be too thin or you might be creasing too forcefully, especially with repeated folds in the same area. Try using a slightly thicker paper for better durability. When creasing, use firm but gentle pressure, and avoid dragging sharp objects along the fold too aggressively.
Key Takeaways
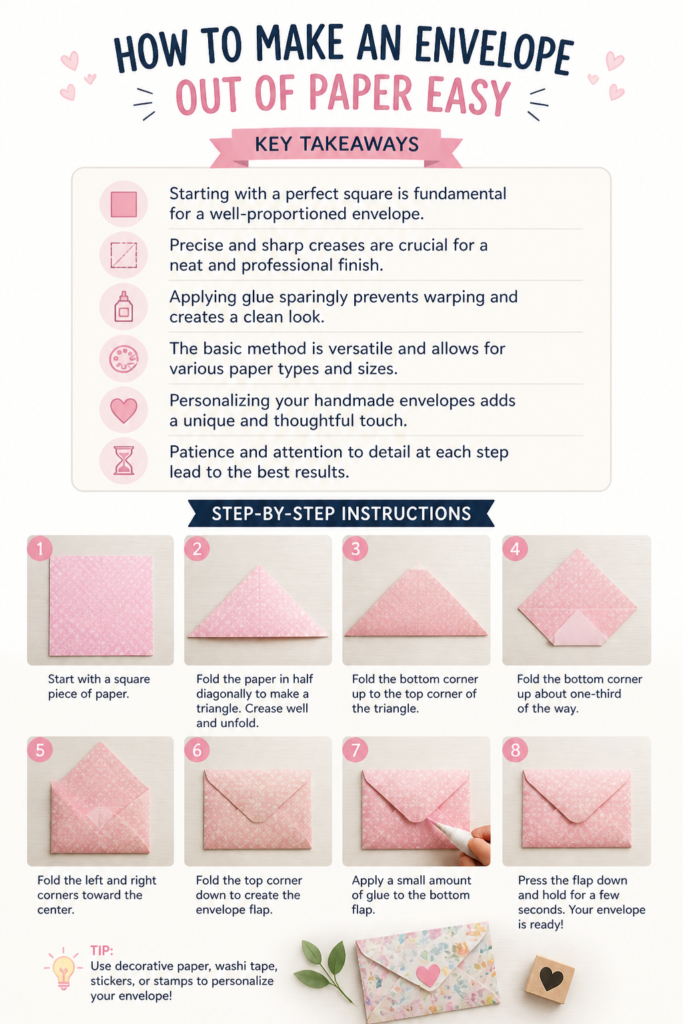
- Starting with a perfect square is fundamental for a well-proportioned envelope.
- Precise and sharp creases are crucial for a neat and professional finish.
- Applying glue sparingly prevents warping and creates a clean look.
- The basic method is versatile and allows for various paper types and sizes.
- Personalizing your handmade envelopes adds a unique and thoughtful touch.
- Patience and attention to detail at each step lead to the best results.
Frequently Asked Questions
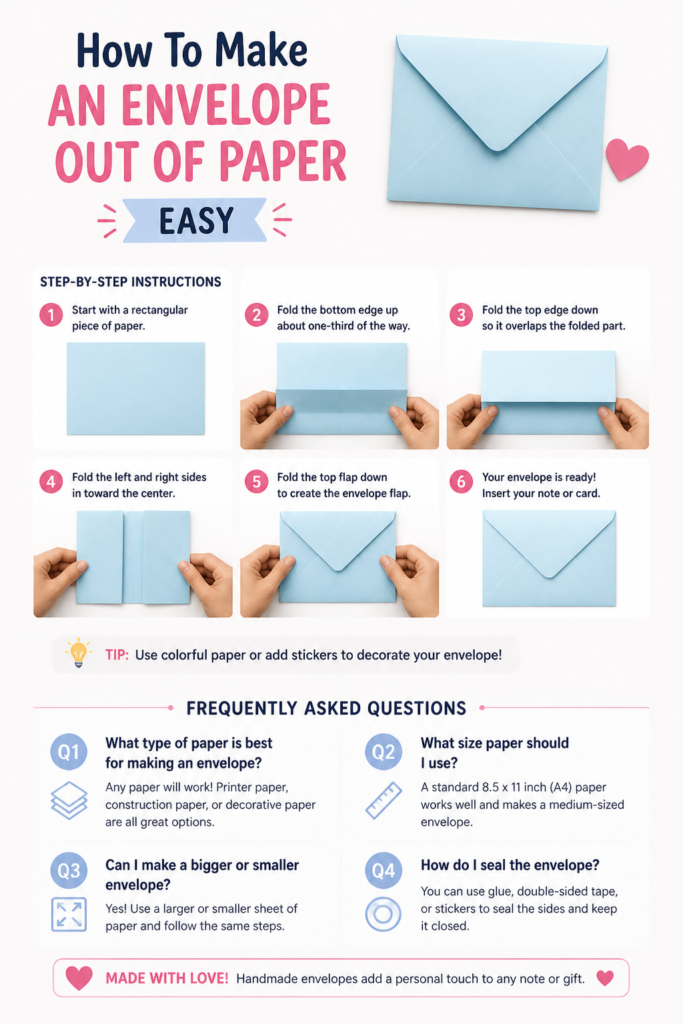
What paper size should I use to make an envelope?
You can use any square piece of paper to make an envelope. A common starting point is an 8.5 x 8.5 inch square, which will yield an envelope suitable for a standard A2 size card (4.25 x 5.5 inches) or smaller. For larger cards, simply start with a larger square.
Can I use tape instead of glue for sealing?
Absolutely! Double-sided tape is an excellent alternative to glue sticks. It offers a clean, instant bond without the risk of paper warping from moisture. Regular clear tape can also be used, especially for securing the final top flap.
How can I decorate my handmade envelope?
The possibilities are endless! You can use colored pens, markers, stamps, stickers, glitter, or even small cut-outs. Consider lining the inside with a contrasting paper for an extra touch of elegance. Washi tape is also great for adding decorative borders.
Can I make a custom size envelope for an odd-shaped item?
Yes, this method is highly adaptable. The size of your starting square determines the final envelope size. If you have an item you want to enclose, measure its dimensions and then experiment with different square sizes until you find one that creates an envelope with enough room.
Our Top Recommended Finds
- Quality Craft Paper Pack: A varied pack of sturdy, colorful paper will allow you to experiment with different textures and designs, making your envelopes truly unique.
- Precision Craft Scissors: Sharp, comfortable scissors make cutting perfect squares and trimming excess paper much easier and more accurate.
- Acid-Free Glue Stick: A reliable glue stick ensures clean, strong bonds without damaging your paper or leaving sticky residue. Look for acid-free options if you want your creations to last.
Start Crafting Your Envelopes Today
You now have all the knowledge and steps to create beautiful, custom envelopes right from your own home. This simple craft is not only practical but also a wonderful way to add a personal flair to your correspondence or gifts. Imagine the delight of someone receiving a handmade card in an equally handmade envelope.
Take out some paper and your tools, and begin your first easy envelope project. You might find a new favorite hobby, or at least a handy skill for those times you need an envelope in a pinch. Why wait? Start crafting something wonderful today!
Beginner-friendly templates, step-by-step guides,
and weekly project ideas in your inbox.