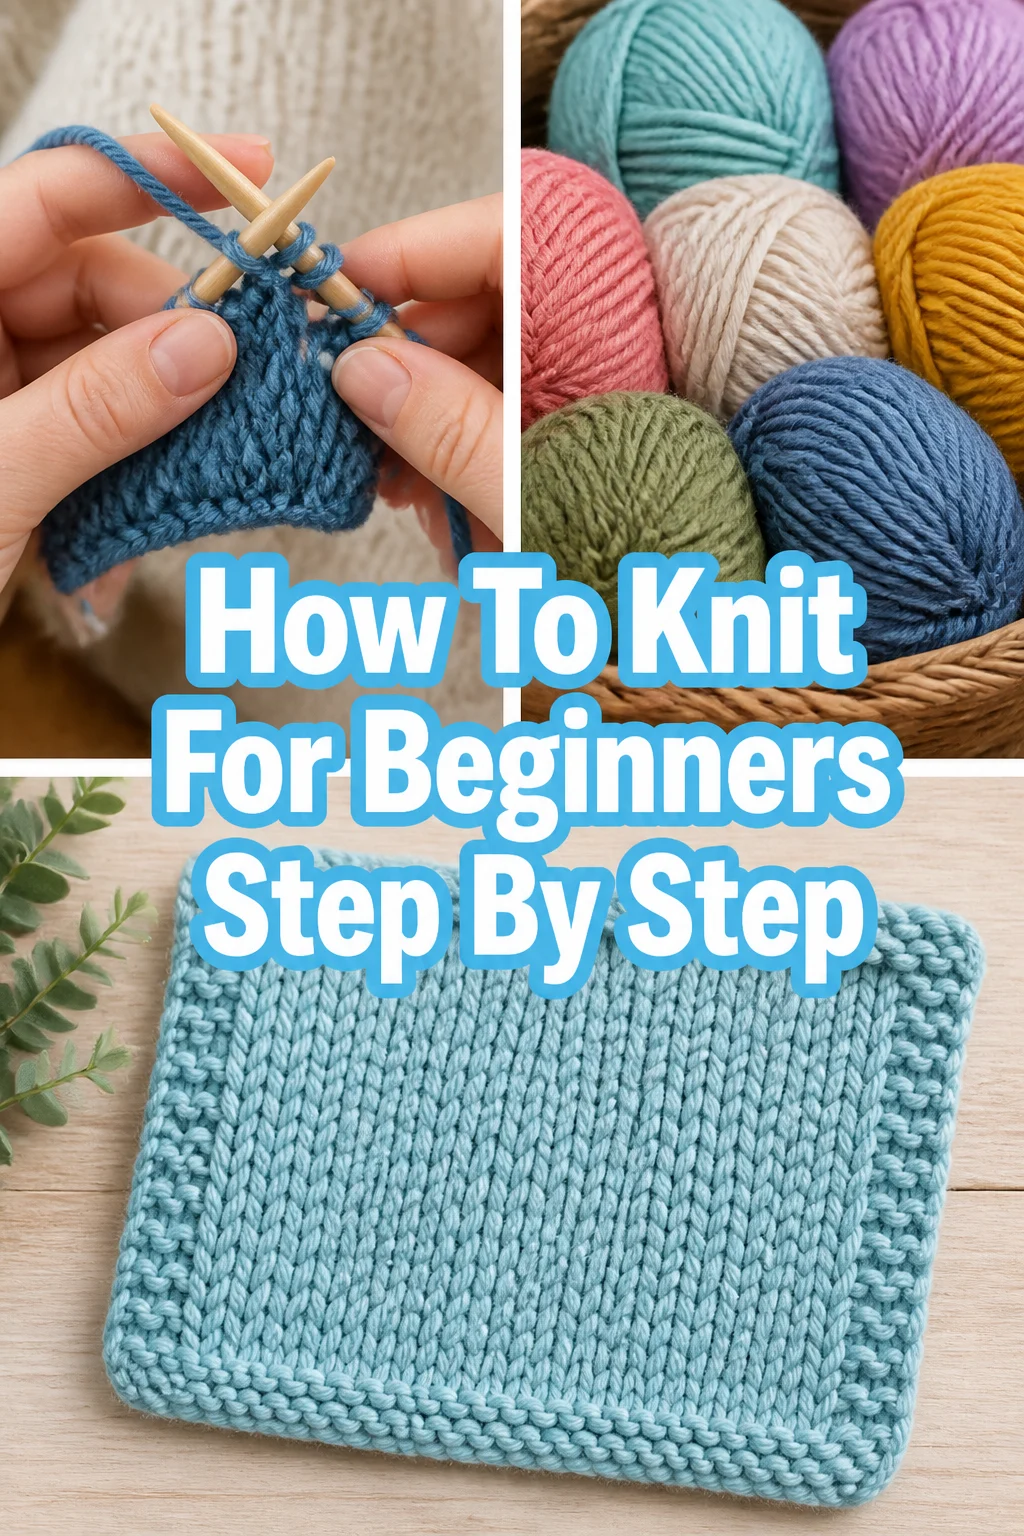
🧶 How To Knit For Beginners Step By Step

Beginner-friendly templates, step-by-step guides,
and weekly project ideas in your inbox.
Ever wanted to create cozy scarves or stylish blankets with your own hands? Learning to knit can be incredibly rewarding, a skill I picked up years ago that has brought me countless hours of calm and creativity.
This guide will walk you through everything you need to start your knitting journey today.
You’ll soon discover the joy of transforming simple yarn into beautiful, handmade items.

Quick Overview
This guide will teach you the fundamental techniques to start your first knitting project, like a simple scarf or washcloth.
You’ll learn how to cast on, master the basic knit and purl stitches, and bind off your work.
- Time needed: 2-4 hours for initial learning and practice, ongoing for projects
- Difficulty: Beginner
- What you’ll need: Knitting needles, yarn, scissors, tapestry needle
Step-by-Step Instructions
Step 1: Gather Your Essential Supplies
Before you begin, gathering the right tools makes a huge difference. You don’t need much to start, just a few key items.
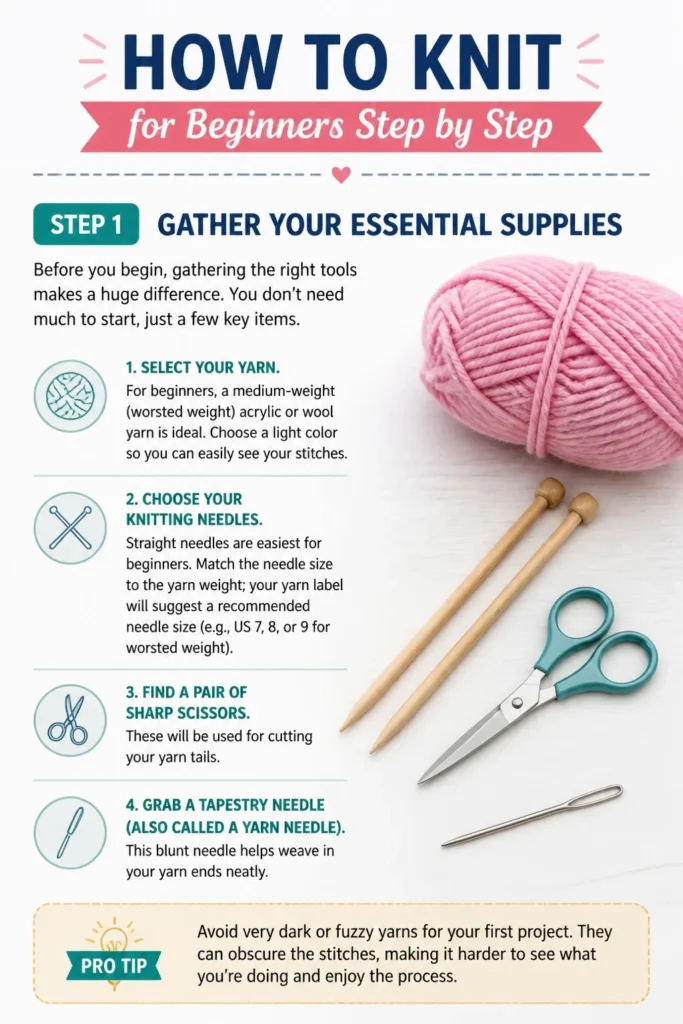
Select your yarn. For beginners, a medium-weight (worsted weight) acrylic or wool yarn is ideal. Choose a light color so you can easily see your stitches.
Choose your knitting needles. Straight needles are easiest for beginners. Match the needle size to the yarn weight; your yarn label will suggest a recommended needle size (e.g., US 7, 8, or 9 for worsted weight).
Find a pair of sharp scissors. These will be used for cutting your yarn tails.
Grab a tapestry needle (also called a yarn needle). This blunt needle helps weave in your yarn ends neatly.
Pro Tip: Avoid very dark or “fuzzy” yarns for your first project. They can obscure the stitches, making it harder to see what you’re doing. Smooth, light-colored yarn is your best friend.
Step 2: Learn How to Hold Your Needles and Yarn
Proper hand position is crucial for comfort and control. Experiment to find what feels natural for you.
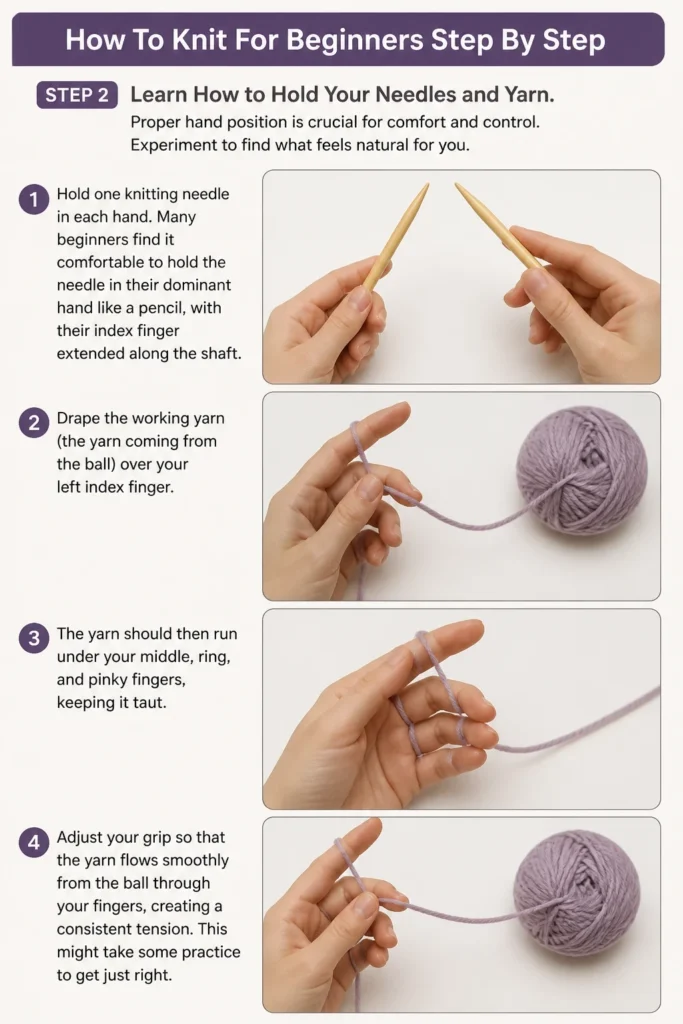
Hold one knitting needle in each hand. Many beginners find it comfortable to hold the needle in their dominant hand like a pencil, with their index finger extended along the shaft.
Drape the working yarn (the yarn coming from the ball) over your left index finger. The yarn should then run under your middle, ring, and pinky fingers, keeping it taut.
Adjust your grip so that the yarn flows smoothly from the ball through your fingers, creating a consistent tension. This might take some practice to get just right.
Step 3: Cast On Your First Stitches (Long-Tail Method)
Casting on creates the foundational row of stitches on your needle. The long-tail cast-on is popular for its elasticity and clean edge.
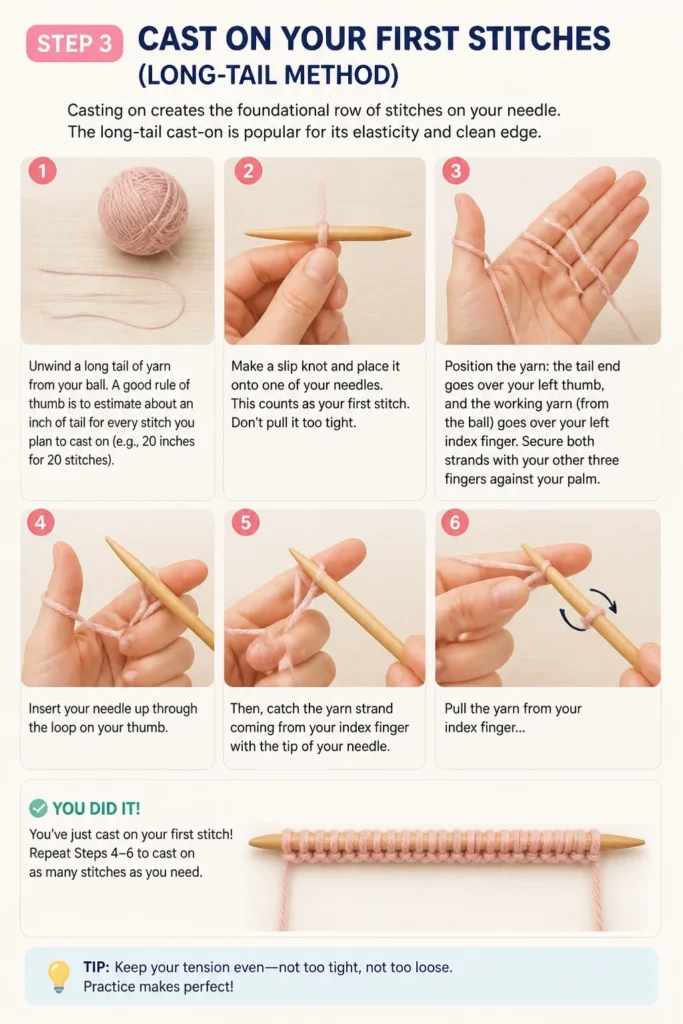
Unwind a long tail of yarn from your ball. A good rule of thumb is to estimate about an inch of tail for every stitch you plan to cast on (e.g., 20 inches for 20 stitches).
Make a slip knot and place it onto one of your needles. This counts as your first stitch. Don’t pull it too tight.
Position the yarn: the tail end goes over your left thumb, and the working yarn (from the ball) goes over your left index finger. Secure both strands with your other three fingers against your palm.
Insert your needle up through the loop on your thumb. Then, catch the yarn strand coming from your index finger with the tip of your needle.
Pull the yarn from your index finger back through the thumb loop. Gently slide your thumb out of its loop, then pull the working yarn to tighten the new stitch on your needle.
Repeat this motion for the desired number of stitches. For a practice swatch or small scarf, 15-25 stitches is a good starting point.
Pro Tip: Don’t cast on too tightly. If your cast-on edge is too firm, it will be difficult to work your first row of stitches. Aim for a relaxed, even tension.
Step 4: Master the Knit Stitch (Garter Stitch)
The knit stitch is one of the two fundamental stitches in knitting. When every row is knit, it creates a texture called garter stitch.
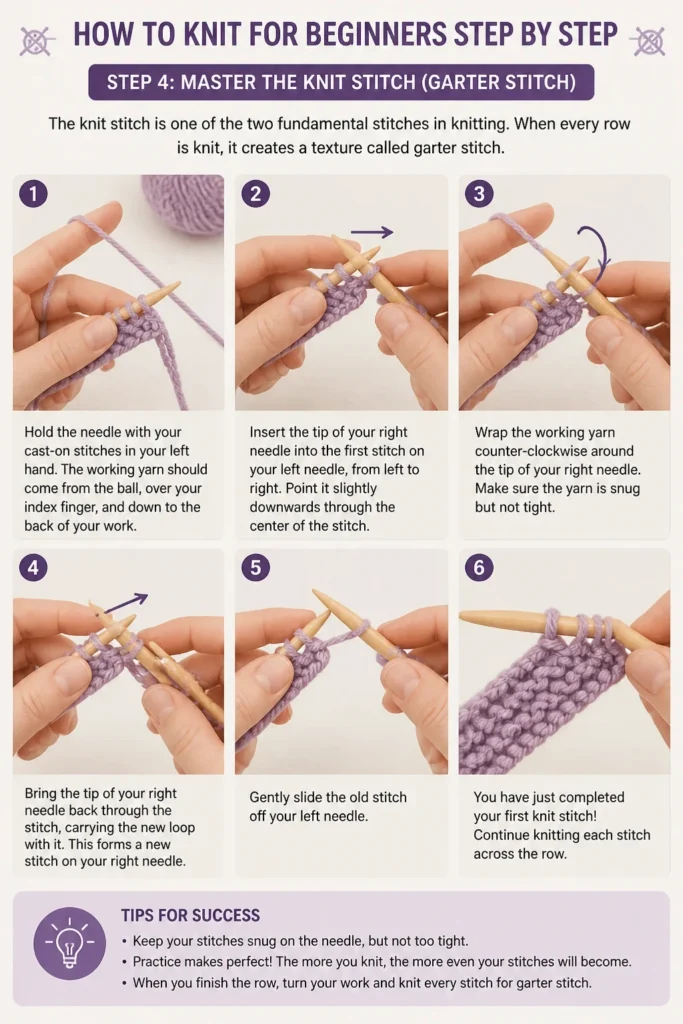
Hold the needle with your cast-on stitches in your left hand. The working yarn should come from the ball, over your index finger, and down to the back of your work.
Insert the tip of your right needle into the first stitch on your left needle, from left to right. Point it slightly downwards through the center of the stitch.
Wrap the working yarn counter-clockwise around the tip of your right needle. Make sure the yarn is snug but not tight.
Bring the tip of your right needle back through the stitch, carrying the new loop with it. This forms a new stitch on your right needle.
Gently slide the old stitch off your left needle. You have just completed your first knit stitch!
Continue knitting each stitch across the row until all stitches have been transferred to your right needle. Then, switch the needle with the stitches to your left hand and begin knitting the next row.
Step 5: Learn the Purl Stitch
The purl stitch is the other fundamental stitch. When knit stitches look like “V”s, purl stitches look like horizontal “bumps.”
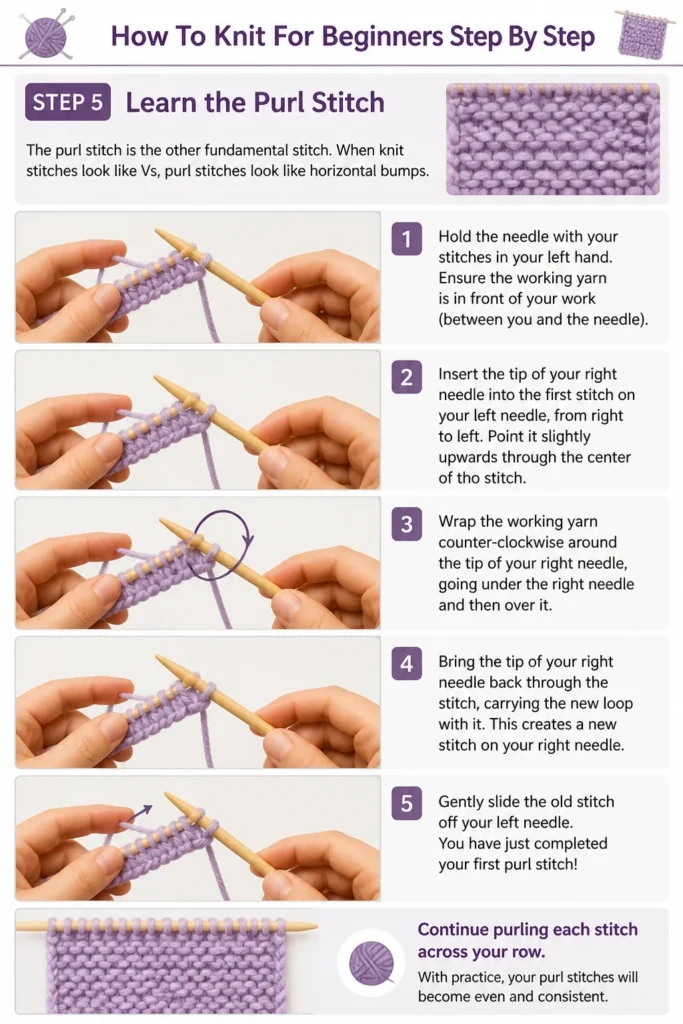
Hold the needle with your stitches in your left hand. Ensure the working yarn is in front of your work (between you and the needle).
Insert the tip of your right needle into the first stitch on your left needle, from right to left. Point it slightly upwards through the center of the stitch.
Wrap the working yarn counter-clockwise around the tip of your right needle, going under the right needle and then over it.
Bring the tip of your right needle back through the stitch, carrying the new loop with it. This creates a new stitch on your right needle.
Gently slide the old stitch off your left needle. You have just completed your first purl stitch!
Continue purling each stitch across the row. If you alternate knit and purl rows, you create stockinette stitch, which has a smooth V-pattern on one side and bumpy purl stitches on the other.
Pro Tip: The main difference between knit and purl is where your working yarn starts. For knit, yarn is in the back. For purl, yarn is in the front. Always check this before starting a stitch.
Step 6: Binding Off Your Work
Binding off (also called casting off) secures your stitches, preventing your knitting from unraveling. This creates a finished edge.
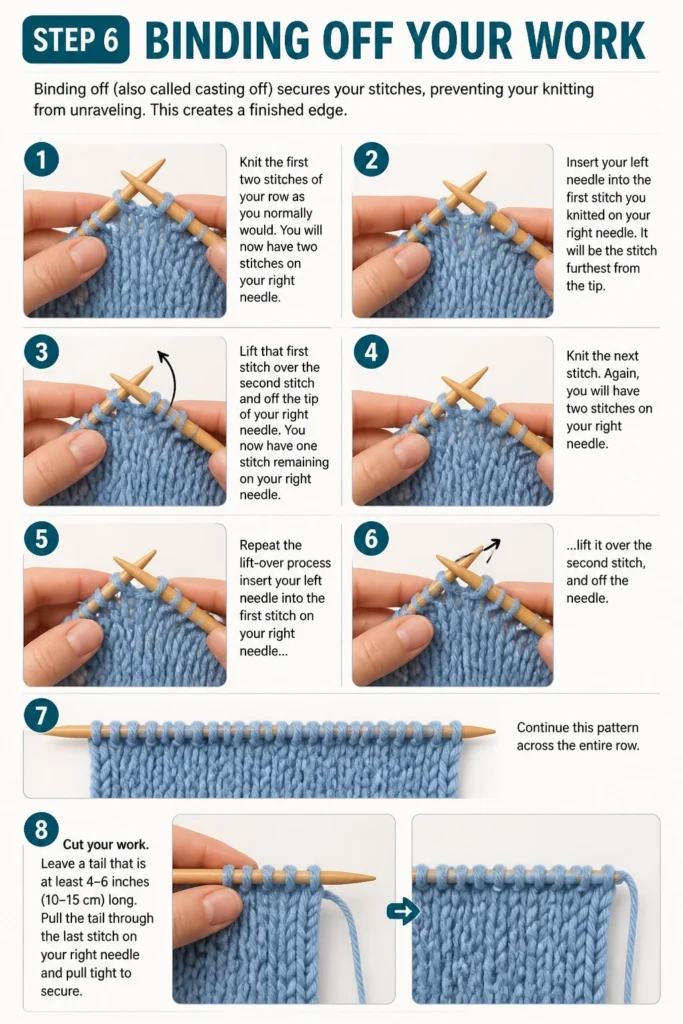
Knit the first two stitches of your row as you normally would. You will now have two stitches on your right needle.
Insert your left needle into the first stitch you knitted on your right needle. It will be the stitch furthest from the tip.
Lift that first stitch over the second stitch and off the tip of your right needle. You now have one stitch remaining on your right needle.
Knit the next stitch. Again, you will have two stitches on your right needle.
Repeat the lift-over process: insert your left needle into the first stitch on your right needle, lift it over the second stitch, and off the needle. Continue this pattern across the entire row.
Cut your working yarn, leaving a tail of about 6 inches. Pass this tail through the last remaining loop on your right needle and pull it tight to secure it.
Step 7: Weave in Your Ends
Finishing your project neatly makes all the difference. Weaving in ends hides any loose yarn tails.
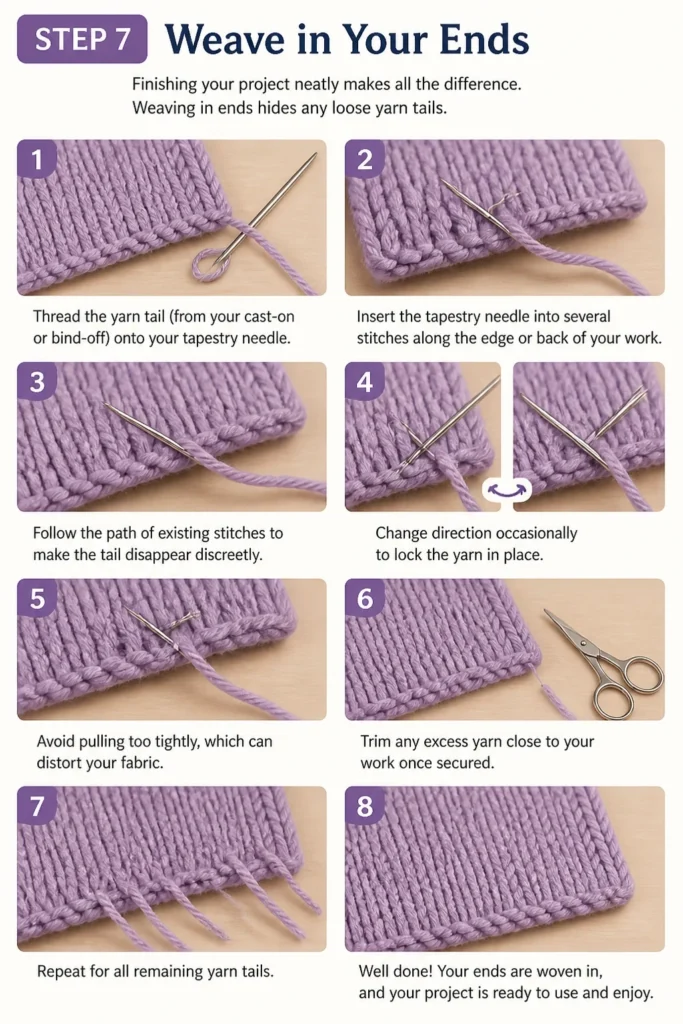
Thread the yarn tail (from your cast-on or bind-off) onto your tapestry needle.
Insert the tapestry needle into several stitches along the edge or back of your work. Follow the path of existing stitches to make the tail disappear discreetly.
Change direction occasionally to lock the yarn in place. Avoid pulling too tightly, which can distort your fabric.
Trim any excess yarn close to your work once secured. Repeat for all remaining yarn tails.
Common Mistakes to Avoid
Uneven Tension
Many beginners struggle with consistent tension, leading to some stitches being loose and others tight. This makes your fabric look bumpy and uneven.
Try to relax your hands and fingers. Practice wrapping the yarn around your fingers consistently for each stitch. Don’t grip your needles too tightly. With practice, your tension will naturally even out.
Dropped Stitches
A dropped stitch occurs when a loop slips off your needle and begins to unravel down your work. It creates a vertical ladder-like gap in your knitting.
If you catch it quickly, you can use a crochet hook or even your knitting needle to pick up the laddered loops. Insert the hook into the dropped stitch, then use it to pull each rung of the ladder up through the stitch, recreating the stitch on your needle.
Twisted Stitches
Twisted stitches happen when you insert your needle into the stitch incorrectly, or wrap the yarn the wrong way. They appear as small, tight knots instead of clear “V”s or “bumps.”
Always insert your needle into the front leg of the stitch for standard knitting, and wrap the yarn counter-clockwise. Pay close attention to the mechanics of the knit and purl stitches described in the steps above to avoid twisting.
Forgetting to Check Your Stitch Count
It’s easy to accidentally add or lose a stitch, especially when you’re just starting. This can make your fabric wider or narrower than intended.
Periodically count the stitches on your needle, especially after completing a few rows. If your count changes, you can often spot where a stitch was dropped or accidentally created, allowing you to fix it before you get too far.
Troubleshooting
My Knitting Is Curling
This is a very common issue, especially if you’re doing stockinette stitch (alternating knit and purl rows) for your entire project. Stockinette stitch naturally curls at the edges.
To prevent curling, incorporate a border pattern that lies flat, such as garter stitch (all knit rows), seed stitch, or ribbing (alternating knit and purl stitches within a row). These patterns add texture and stability to the edges.
I Have a Hole in My Work
Holes usually indicate that you’ve either accidentally created an extra stitch by wrapping the yarn incorrectly, or you’ve skipped a stitch in a previous row.
Carefully examine the area around the hole. If it’s a skipped stitch, you might be able to pick up the bar between stitches to close the gap. If it’s an extra stitch, you might need to “un-knit” back to that point to correct it.
My Edges Are Uneven
Ragged or messy edges are common for beginners. This is often due to inconsistent tension on the first and last few stitches of each row.
Try to maintain an even tension as you work the first and last stitches. Some knitters find it helpful to slip the first stitch of every row (without knitting it) to create a neater selvedge (edge). Practice will also greatly improve your edge consistency.
Key Takeaways
- Start Simple: Begin with basic tools and a light-colored, smooth yarn to make learning easier.
- Practice Makes Perfect: Consistent tension and smooth movements come with repeated practice of the knit and purl stitches.
- Don’t Cast On Too Tight: A relaxed cast-on row is essential for easily working your first stitches.
- Understand Yarn Position: Remember, yarn in back for knit, yarn in front for purl, to avoid twisted stitches.
- Count Your Stitches: Regularly check your stitch count to catch mistakes early and maintain project dimensions.
- Experiment with Edges: Use garter stitch or ribbing for borders to prevent stockinette from curling.
Frequently Asked Questions
What’s the best yarn for beginners?
Worsted weight (medium) acrylic or wool yarn is generally recommended. It’s easy to see your stitches, doesn’t split easily, and is readily available. Avoid novelty or very thin yarns for your first projects.
How do I know what needle size to use?
Your yarn label will suggest a range of needle sizes. For beginners, it’s often good to start with a needle size in the middle of that range, or slightly larger if you tend to knit tightly. The goal is to create a fabric that isn’t too stiff or too loose.
Can I fix a mistake without unraveling everything?
Yes, often! For dropped stitches, a crochet hook is invaluable. For mistakes a few rows back, you can “tink” (knit backwards, or un-knit) stitch by stitch. For bigger errors, you might need to “frog” (unravel) back to a certain point, but you don’t always have to start over completely.
What does “gauge” mean?
Gauge refers to the number of stitches and rows per inch (or 10cm) in your knitted fabric. It’s crucial for projects where size matters, like garments. Beginners often don’t need to worry about gauge, but it becomes important as you advance.
Our Top Recommended Finds
- Acrylic Worsted Weight Yarn: Affordable, easy to care for, and comes in a wide range of colors. Perfect for learning and practice.
- Straight Knitting Needles (Bamboo or Wood): These materials offer a bit more grip than metal, which helps prevent stitches from slipping off too easily for beginners.
- Stitch Markers: Small rings or clips that you place on your needles to mark specific stitches or sections. They are incredibly helpful for keeping track of your work, especially when learning new patterns.
Your Knitting Journey Starts Now
You now have the foundational knowledge and steps to begin your exciting knitting adventure. Don’t be discouraged if your first attempts aren’t perfect; every knitter started exactly where you are now.
Embrace the process, enjoy the rhythm of the needles, and celebrate each new stitch you create.
Pick up your needles and yarn today, and discover the satisfying craft of knitting for yourself!
Beginner-friendly templates, step-by-step guides,
and weekly project ideas in your inbox.