👖 How To Make Jeans Bigger In The Waist

Beginner-friendly templates, step-by-step guides,
and weekly project ideas in your inbox.
Ever experienced that frustrating moment when your favorite jeans just don’t fit anymore? It’s a common issue, and one I’ve personally tackled many times. This guide shares proven, practical methods to comfortably expand your denim.
You don’t have to give up on those beloved jeans. With a few simple techniques, you can make them fit perfectly again. We’ll walk through everything you need to know, from basic stretching to more involved sewing adjustments.

Quick Overview
This guide will equip you with the knowledge to comfortably increase the waist size of your jeans. You’ll learn various methods, from simple stretching to minor alterations, allowing you to reclaim your favorite denim.
- Time needed: 30 minutes to 2 hours (depending on method)
- Difficulty: Beginner to Intermediate
- What you’ll need: Spray bottle, warm water, fabric softener, measuring tape, seam ripper, sewing machine (optional), denim scraps, button extenders
Step-by-Step Instructions
Step 1: Assess Your Jeans and Your Needs
Before starting any modification, take a moment to understand the current fit. Try on your jeans and identify exactly where they feel too tight. Is it just the waistband, or do you need more room in the hips as well?
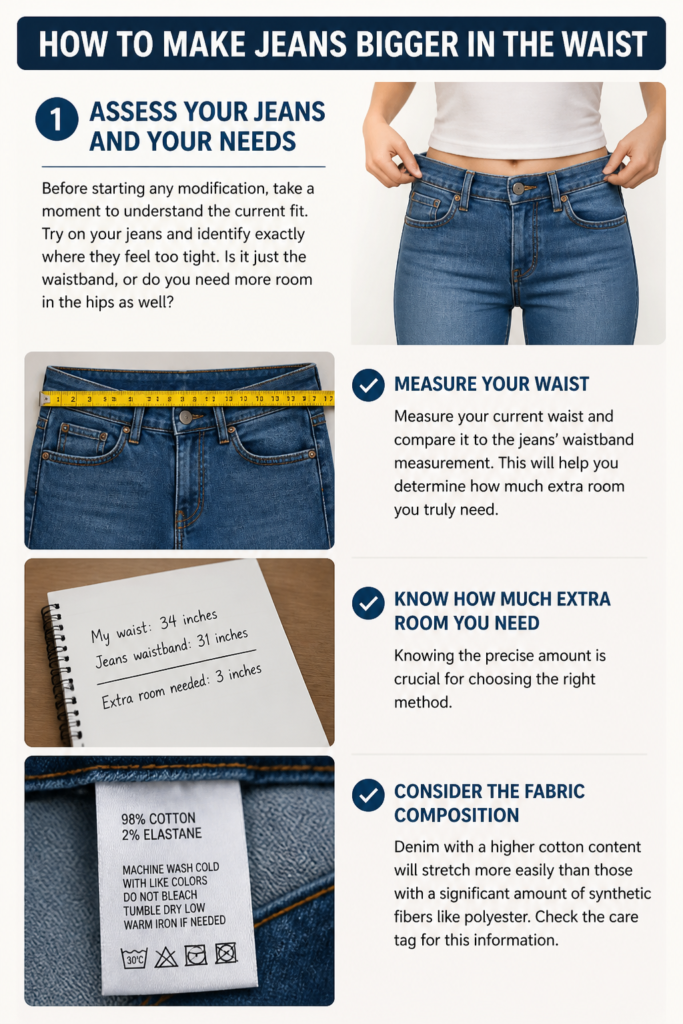
Measure your current waist and compare it to the jeans’ waistband measurement. This will help you determine how much extra room you truly need. Knowing the precise amount is crucial for choosing the right method.
Consider the fabric composition of your jeans. Denim with a higher cotton content will stretch more easily than those with a significant amount of synthetic fibers like polyester. Check the care tag for this information.
Step 2: Prepare Your Work Area and Materials
Gather all necessary tools and materials before you begin. Having everything at hand will make the process smoother and more efficient. A clean, well-lit surface is ideal for working on your jeans.
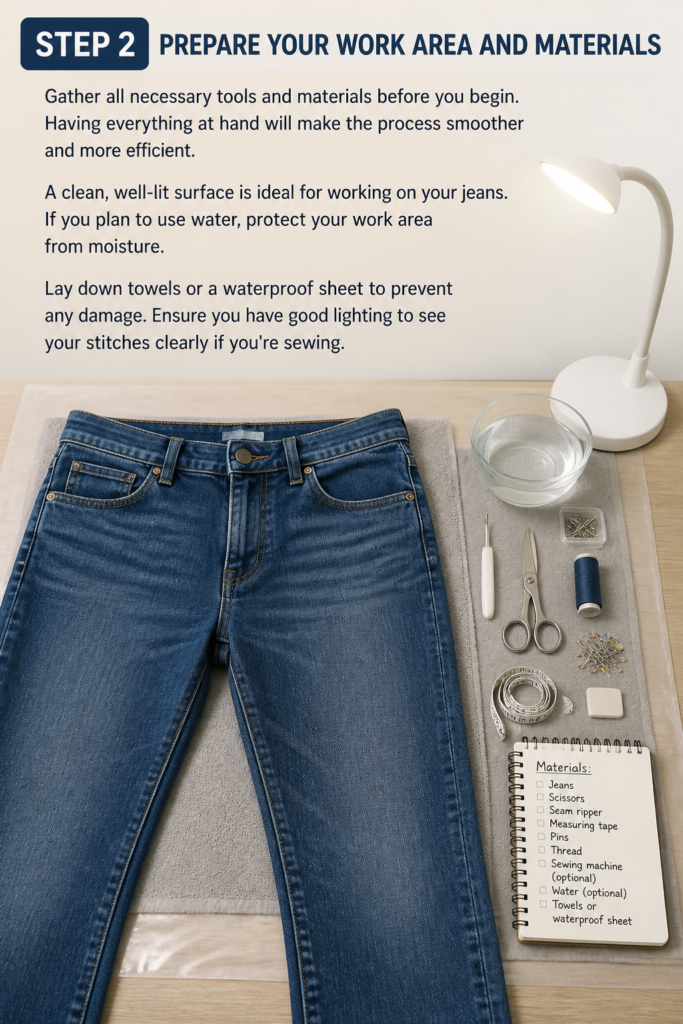
If you plan to use water, protect your work area from moisture. Lay down towels or a waterproof sheet to prevent any damage. Ensure you have good lighting to see your stitches clearly if you’re sewing.
Step 3: The Wet Stretch Method (No-Sew)
This is often the easiest and quickest way to gain a little extra room. It works best for jeans that are just slightly snug. You’ll need a spray bottle, warm water, and optionally, a fabric softener.
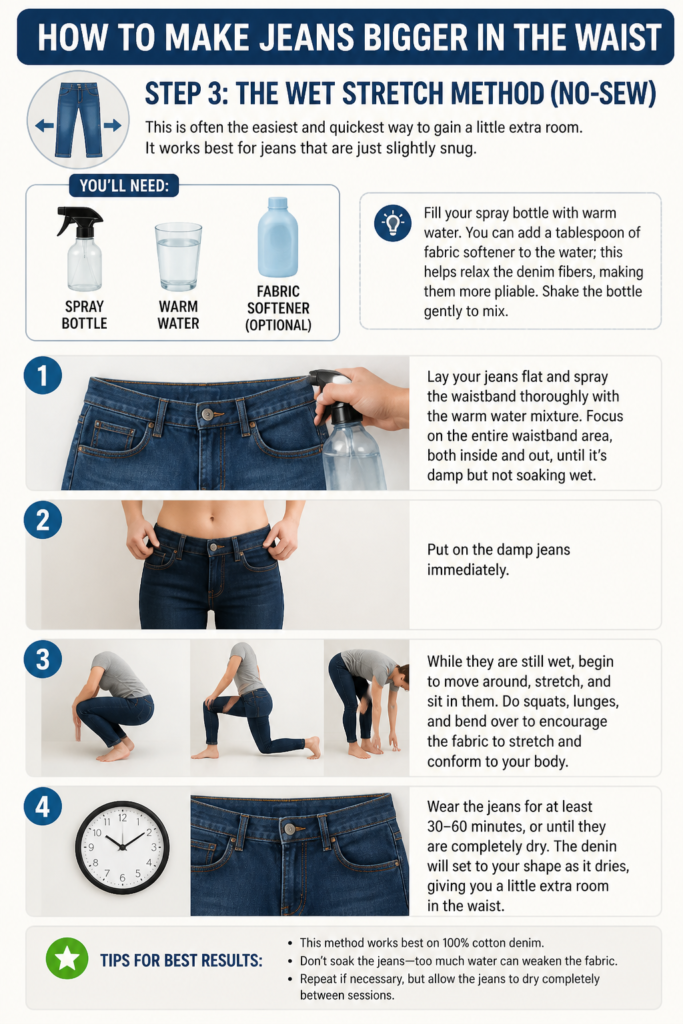
Fill your spray bottle with warm water. You can add a tablespoon of fabric softener to the water; this helps relax the denim fibers, making them more pliable. Shake the bottle gently to mix.
Lay your jeans flat and spray the waistband thoroughly with the warm water mixture. Focus on the entire waistband area, both inside and out, until it’s damp but not soaking wet.
Put on the damp jeans immediately. While they are still wet, begin to move around, stretch, and sit in them. Do squats, lunges, and bend over to encourage the fabric to stretch and conform to your body.
Wear the jeans for at least 30 minutes to an hour while they dry. The heat from your body will help the denim stretch and set in its new, slightly larger shape. Repeat this process if you need a bit more stretch.
Pro Tip: For stubborn areas, you can use a waistband stretcher tool. Insert it into the damp waistband and expand it gradually, letting the jeans dry completely on the stretcher. This provides a consistent, targeted stretch.
Step 4: The Ironing and Stretching Method (No-Sew)
This method uses heat to relax the denim fibers, making them easier to stretch. You’ll need an iron, a spray bottle with water, and a sturdy surface. This is good for small adjustments.
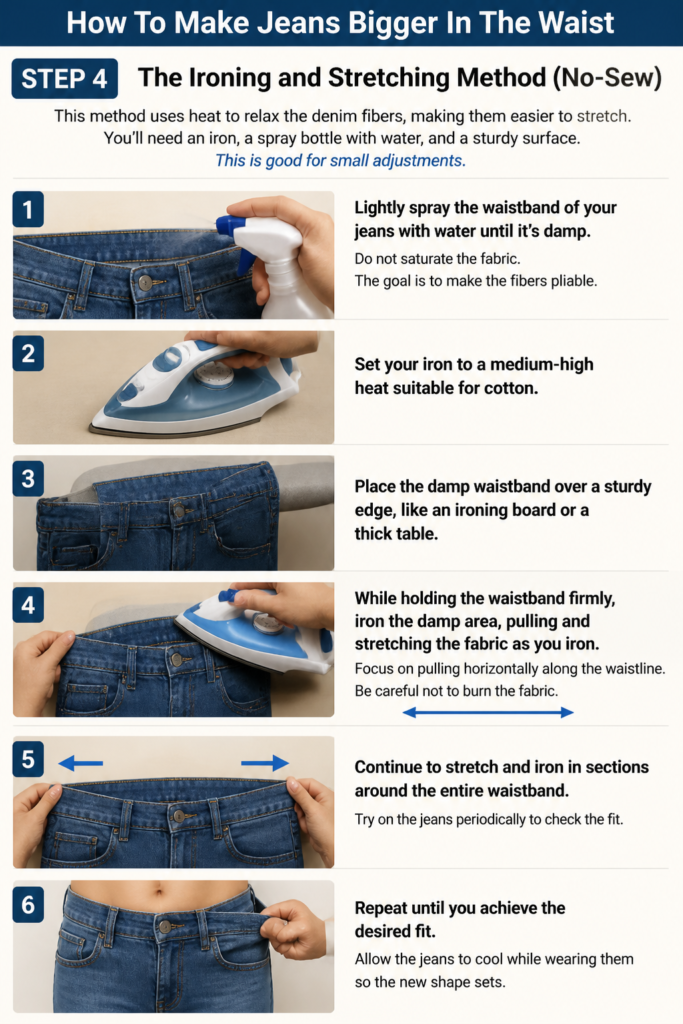
Lightly spray the waistband of your jeans with water until it’s damp. Do not saturate the fabric. The goal is to make the fibers pliable.
Set your iron to a medium-high heat suitable for cotton. Place the damp waistband over a sturdy edge, like an ironing board or a thick table.
While holding the waistband firmly, iron the damp area, pulling and stretching the fabric as you iron. Focus on pulling horizontally along the waistline. Be careful not to burn the fabric.
Continue to stretch and iron in sections around the entire waistband. Try on the jeans periodically to check the fit. Repeat until you achieve the desired comfort level.
Step 5: Using a Button Extender (Temporary Solution)
A button extender is a simple, non-sewing solution for a quick fix. These small devices add an extra half-inch to an inch of room at the waist. They are discreet and easy to use.
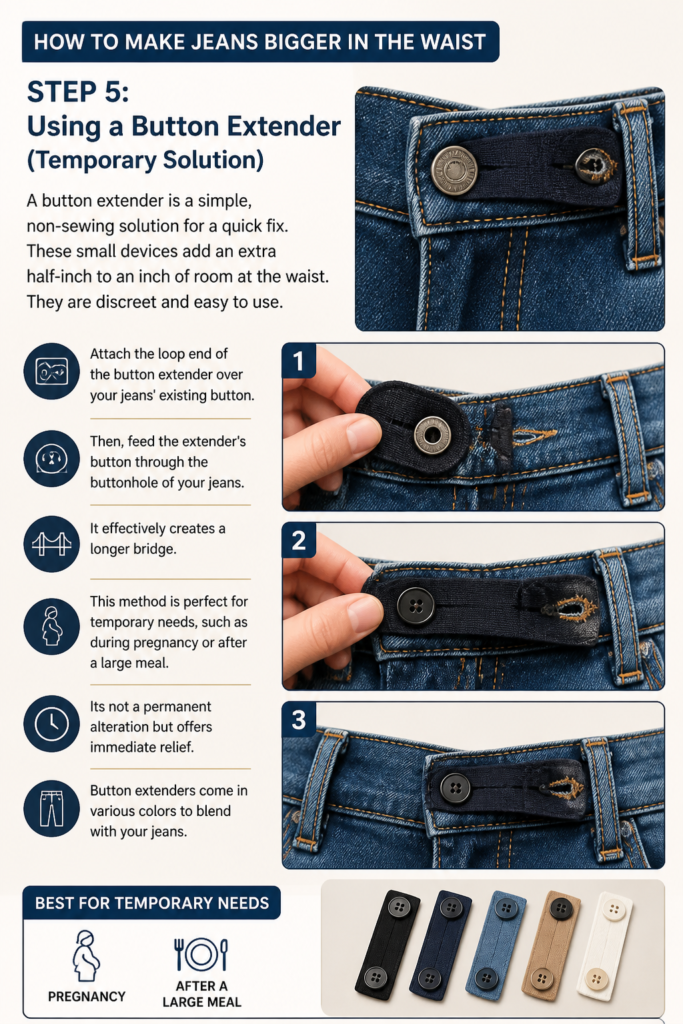
Attach the loop end of the button extender over your jeans’ existing button. Then, feed the extender’s button through the buttonhole of your jeans. It effectively creates a longer bridge.
This method is perfect for temporary needs, such as during pregnancy or after a large meal. It’s not a permanent alteration but offers immediate relief. Button extenders come in various colors to blend with your jeans.
Step 6: The Waistband Slit and Patch Method (Sewing)
This method involves a minor alteration to the back of the waistband. It’s suitable for gaining 1-2 inches of permanent room. You’ll need a seam ripper, denim scraps, pins, thread, and a sewing machine or needle.
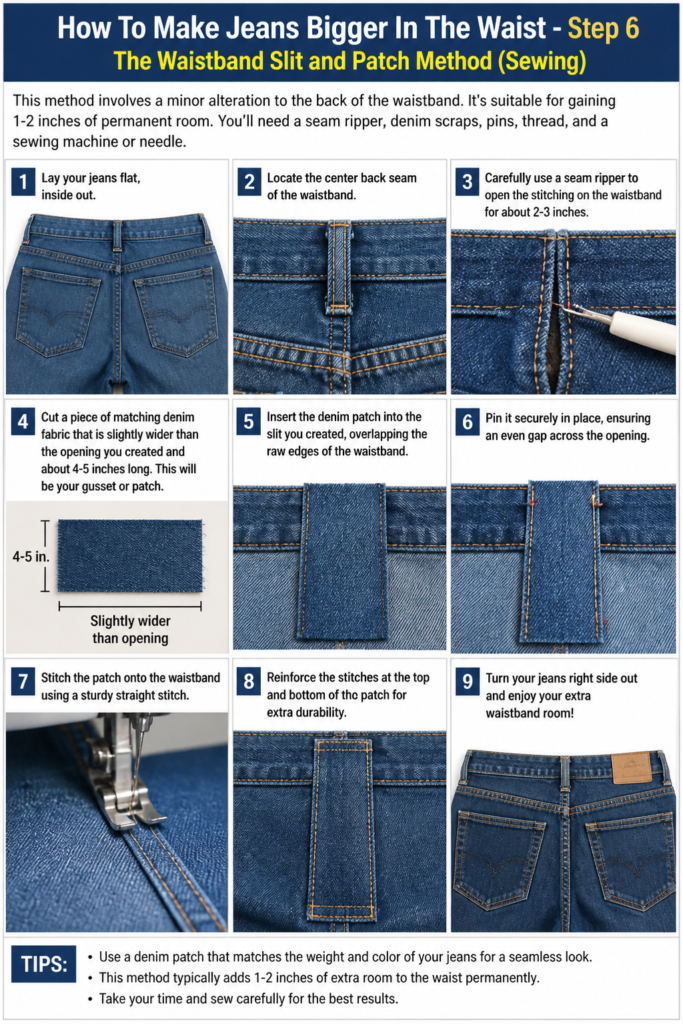
Lay your jeans flat, inside out. Locate the center back seam of the waistband. Carefully use a seam ripper to open the stitching on the waistband for about 2-3 inches.
Cut a piece of matching denim fabric that is slightly wider than the opening you created and about 4-5 inches long. This will be your gusset or patch.
Insert the denim patch into the slit you created, overlapping the raw edges of the waistband. Pin it securely in place, ensuring an even gap across the opening.
Stitch the patch onto the waistband using a sturdy straight stitch. Reinforce the stitches at the top and bottom of the opening for durability. Trim any excess fabric from the patch on the inside.
Pro Tip: For a more discreet look, try to find a denim scrap that closely matches the color and weight of your jeans. You can also use a contrasting fabric for a deliberate design choice.
Step 7: Adding Elastic to the Waistband (Sewing)
This method provides flexibility and comfort, especially for jeans that are too tight all around the waist. It requires a bit more sewing but offers excellent results. You’ll need elastic (1-inch wide, non-roll), a seam ripper, thread, and a sewing machine.
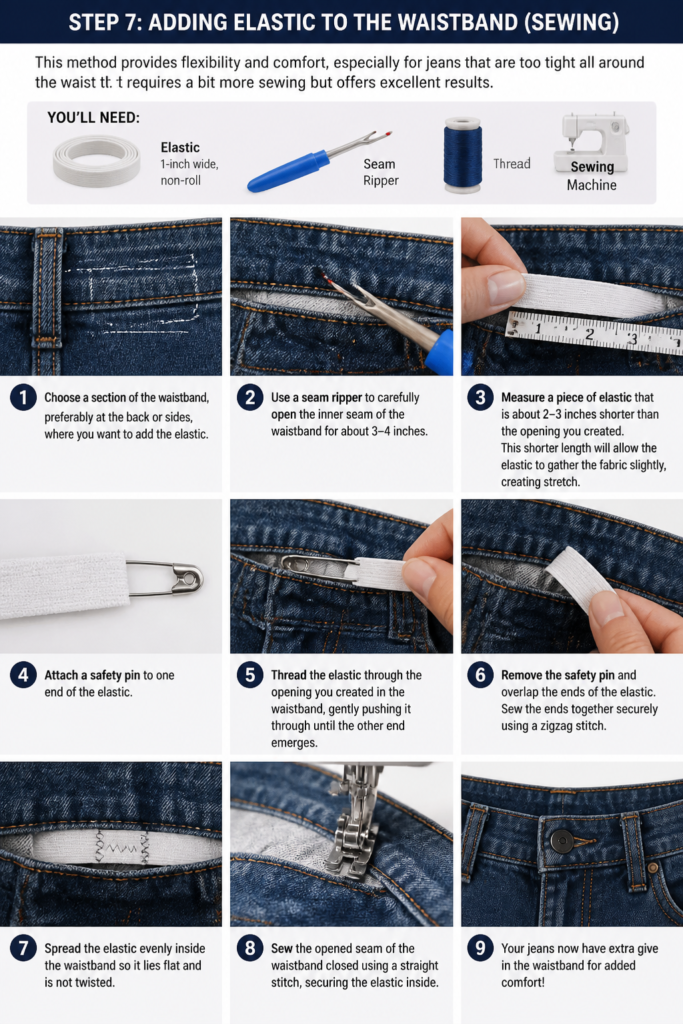
Choose a section of the waistband, preferably at the back or sides, where you want to add the elastic. Use a seam ripper to carefully open the inner seam of the waistband for about 3-4 inches.
Measure a piece of elastic that is about 2-3 inches shorter than the opening you created. This shorter length will allow the elastic to gather the fabric slightly, creating stretch.
Attach a safety pin to one end of the elastic. Thread the elastic through the opening you created in the waistband, gently pushing it through until the other end emerges. Ensure the elastic lays flat and doesn’t twist.
Stitch down both ends of the elastic securely to the waistband fabric, inside the opening. Then, stitch the opening in the waistband closed, encasing the elastic. The elastic will now provide a comfortable stretch.
Step 8: Replacing the Zipper with a Longer One (Advanced Sewing)
If the tightness is primarily around the fly area, replacing the zipper can sometimes provide a marginal increase in comfort. This is an advanced technique and may not add significant width, but it can ease pressure.
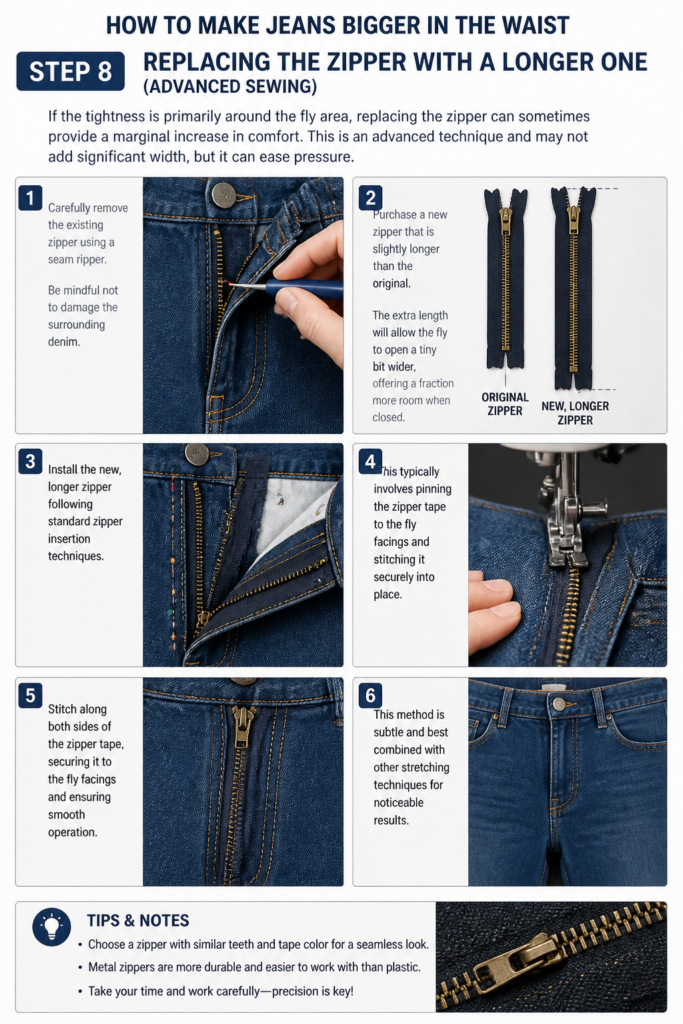
Carefully remove the existing zipper using a seam ripper. Be mindful not to damage the surrounding denim. This step requires patience and precision.
Purchase a new zipper that is slightly longer than the original. The extra length will allow the fly to open a tiny bit wider, offering a fraction more room when closed.
Install the new, longer zipper following standard zipper insertion techniques. This typically involves pinning the zipper tape to the fly facings and stitching it securely into place.
This method is subtle and best combined with other stretching techniques for noticeable results. It primarily alleviates pressure at the front closure rather than adding substantial width.
Common Mistakes to Avoid
Overstretching Dry Denim
Trying to forcefully stretch dry denim can lead to permanent damage. The fibers are rigid when dry and can snap or weaken, causing tears or thinning spots. Always dampen the denim before attempting to stretch it.
Cutting Too Much Fabric
When making sewing alterations, be conservative with your cuts. You can always remove more fabric, but you cannot easily add it back. Measure twice, cut once, and start with smaller adjustments.
Using Incorrect Thread or Stitching
For denim, you need strong, durable thread, often referred to as “denim thread” or “heavy-duty thread.” Using regular all-purpose thread can result in weak seams that quickly unravel, especially under stress. Ensure your stitches are reinforced at stress points.
Ignoring Fabric Composition
Not all denim stretches equally. High-cotton denim is very cooperative, while blends with significant synthetic content (like polyester or spandex) have less natural give. Understanding your fabric helps you choose the most effective and safest stretching method.
Troubleshooting
Jeans Still Feel Tight After Stretching
If your jeans remain snug after a wet stretch, it might mean you need more than a simple stretch can provide. Consider repeating the wet stretch process, wearing the jeans for a longer period while damp.
Alternatively, you may need to move to a more permanent sewing solution, such as the waistband slit and patch method. A button extender could also offer immediate, temporary relief.
Sewn Patch Looks Uneven or Bulky
An uneven patch can make the jeans uncomfortable or visually unappealing. This often happens if the patch fabric is too thick or not trimmed properly.
Carefully trim the seam allowances on the inside of the patch to reduce bulk. You might also try pressing the seams flat with an iron after stitching. For future attempts, ensure your patch fabric is similar in weight to the original denim.
Elastic Waistband Gathers Too Much or Not Enough
If your elastic waistband isn’t providing the desired effect, the length of the elastic might be off. If it gathers too much, the elastic is too short; if not enough, it’s too long.
Carefully open one end of the waistband seam where the elastic is secured. Adjust the elastic length by either trimming a bit off or replacing it with a longer piece. Re-stitch to secure.
Key Takeaways
- Always assess your jeans’ current fit and desired increase before starting any method.
- Dampening denim with warm water is key for effective and safe stretching.
- Button extenders offer an instant, temporary solution for minor waist tightness.
- Sewing alterations like a waistband patch provide a permanent increase of 1-2 inches.
- Using the correct thread and reinforced stitching is crucial for durable sewn adjustments.
- Not all denim stretches the same; consider your jeans’ fabric composition.
Frequently Asked Questions
Can I stretch jeans without water?
While some minor stretching can occur by simply wearing jeans that are slightly snug, using water significantly enhances the process. Water relaxes the denim fibers, allowing them to expand more easily and set into a new shape. Dry stretching is less effective and carries a higher risk of damaging the fabric.
Will stretching permanently damage my jeans?
When done correctly, stretching your jeans will not permanently damage them. However, aggressive or dry stretching can weaken fibers or cause tears. Following the methods outlined, especially using warm water, minimizes the risk and helps maintain the integrity of the denim.
How much can I realistically stretch my jeans?
For no-sew methods like wet stretching, you can typically gain about 0.5 to 1 inch of extra room in the waist. Sewing alterations, such as adding a patch or elastic, can comfortably add 1 to 2 inches, depending on the specific technique and how much fabric you’re willing to alter.
Can these methods be used for other parts of the jeans?
Yes, the wet stretch and ironing methods can be adapted to stretch other areas like the hips, thighs, or calves. Simply focus the dampening and stretching efforts on the specific areas where you need more room. Sewing methods are more specific to waist adjustments but can inspire similar custom alterations elsewhere.
Our Top Recommended Finds
- Waistband Stretcher Tool: This specialized tool provides consistent, even pressure to stretch waistbands while they dry, preventing uneven stretching.
- Heavy-Duty Denim Thread: Essential for any sewing alterations, this strong thread ensures your stitches hold up to the wear and tear of denim.
- Seam Ripper Set: A good quality seam ripper with a comfortable grip makes opening seams precise and less frustrating, crucial for alterations.
Embrace Your Perfect Fit
Don’t let a tight waistband keep you from enjoying your favorite denim. With these practical, step-by-step methods, you now have the power to tailor your jeans for a perfect, comfortable fit. Each technique offers a unique solution, ensuring there’s an option for every level of snugness.
Why wait? Pick a method that suits your needs and reclaim those beloved jeans today. You might also explore more advanced tailoring techniques to fully customize your wardrobe, or delve into upcycling old denim into new, fashionable items. The journey to a perfectly fitting wardrobe starts now.
Beginner-friendly templates, step-by-step guides,
and weekly project ideas in your inbox.