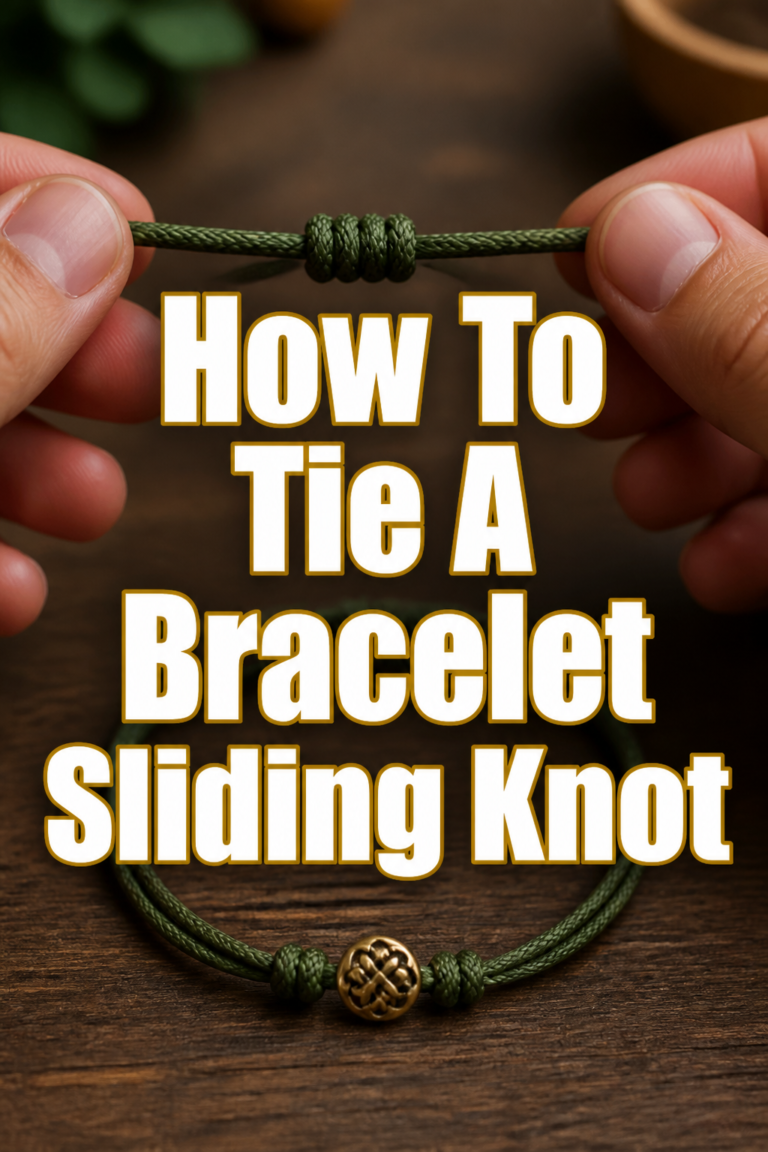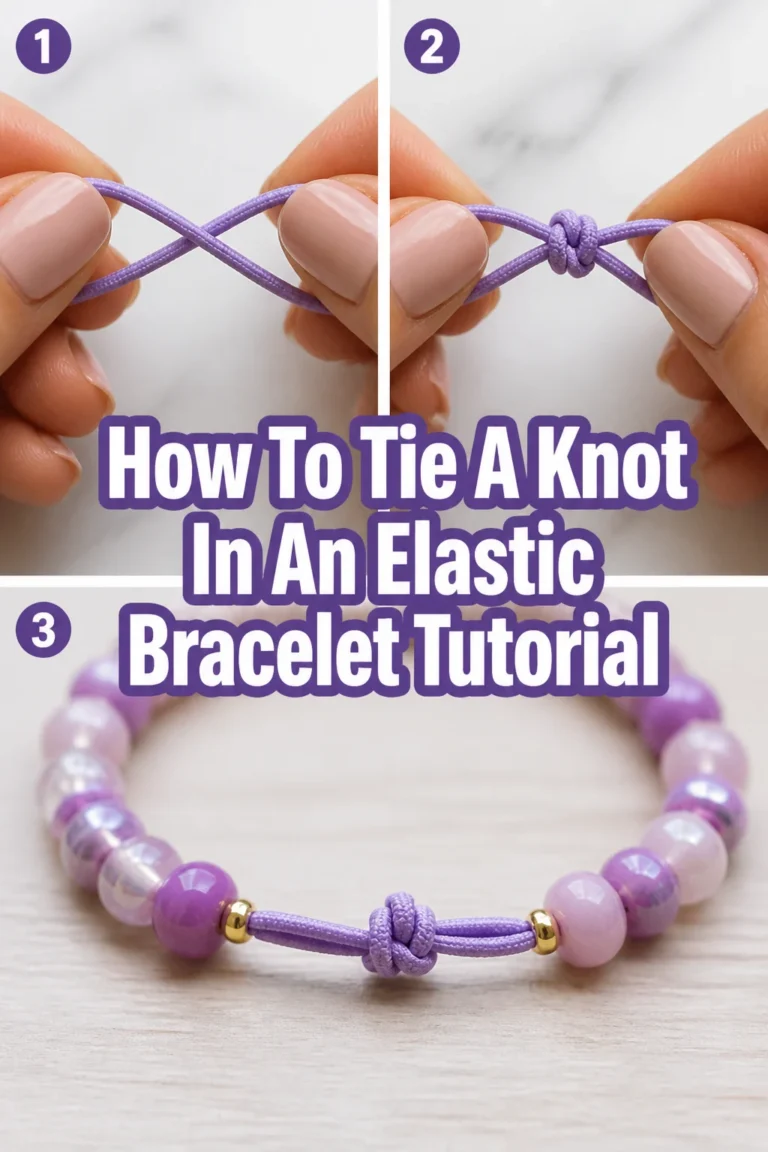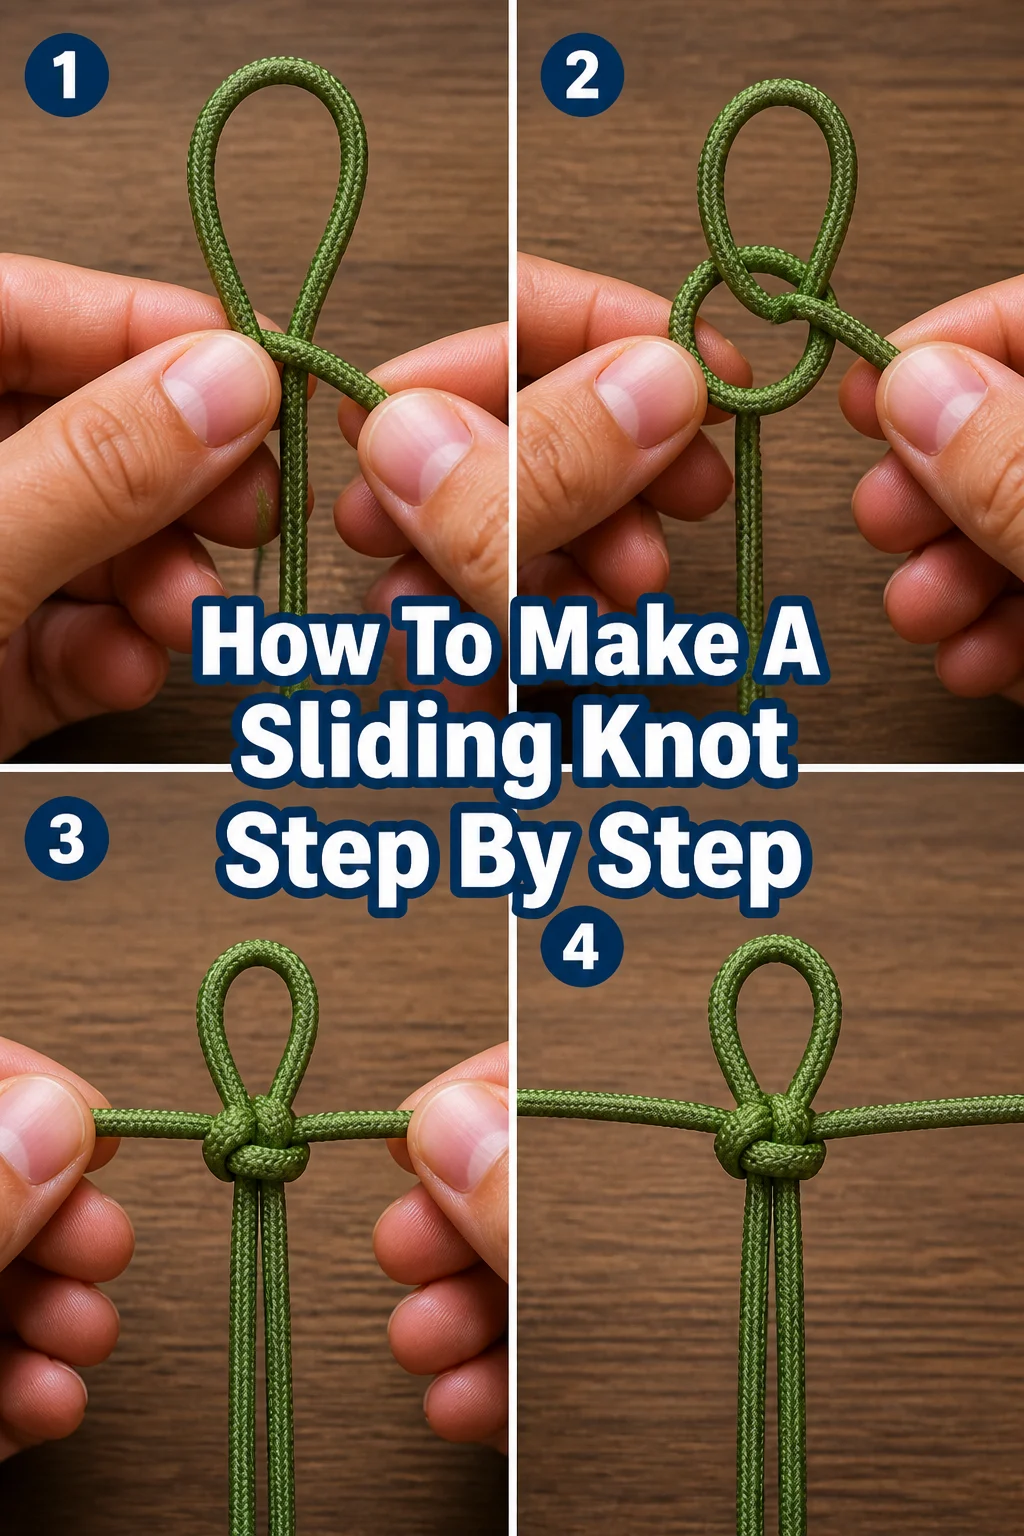
🧵 How To Make A Sliding Knot Step By Step

Beginner-friendly templates, step-by-step guides,
and weekly project ideas in your inbox.
I remember my first time trying to tie a sliding knot; it felt like a mysterious puzzle. But with a bit of patience and clear instructions, it quickly clicked.
This guide distills years of practical experience into simple, actionable steps, ensuring you master this versatile knot with ease.
You’ll soon be adding adjustable closures to bracelets, necklaces, and more, all by yourself.

Quick Overview
You’re about to learn how to create a functional and aesthetically pleasing sliding knot. This skill is incredibly useful for jewelry making, crafting, and even practical applications where adjustability is key.
- Time needed: 5-15 minutes (first attempt), 1-2 minutes (once practiced)
- Difficulty: Beginner
- What you’ll need: Cord or string (approx. 24-36 inches), a pair of scissors
Step-by-Step Instructions
Step 1: Prepare Your Cord
Begin by setting up your workspace and materials. A neat start makes the entire process smoother and less confusing.
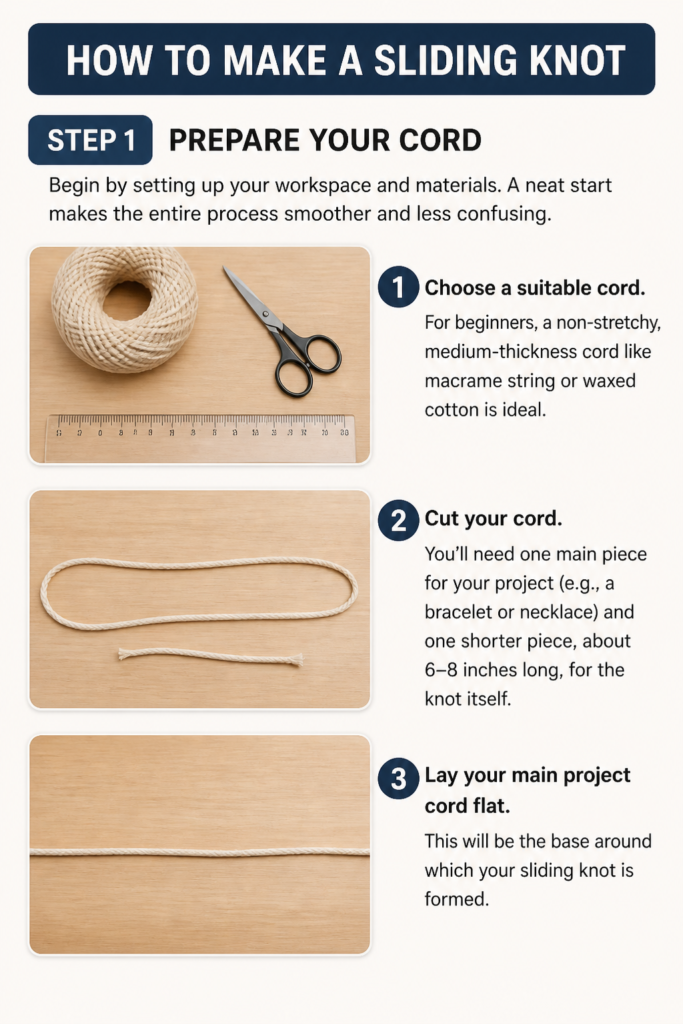
Choose a suitable cord. For beginners, a non-stretchy, medium-thickness cord like macrame string or waxed cotton is ideal.
Cut your cord. You’ll need one main piece for your project (e.g., a bracelet or necklace) and one shorter piece, about 6-8 inches long, for the knot itself.
Lay your main project cord flat. This will be the base around which your sliding knot is formed.
Step 2: Position the Knotting Cord
This step establishes the foundation for your adjustable knot. Proper placement is crucial for a symmetrical finish.
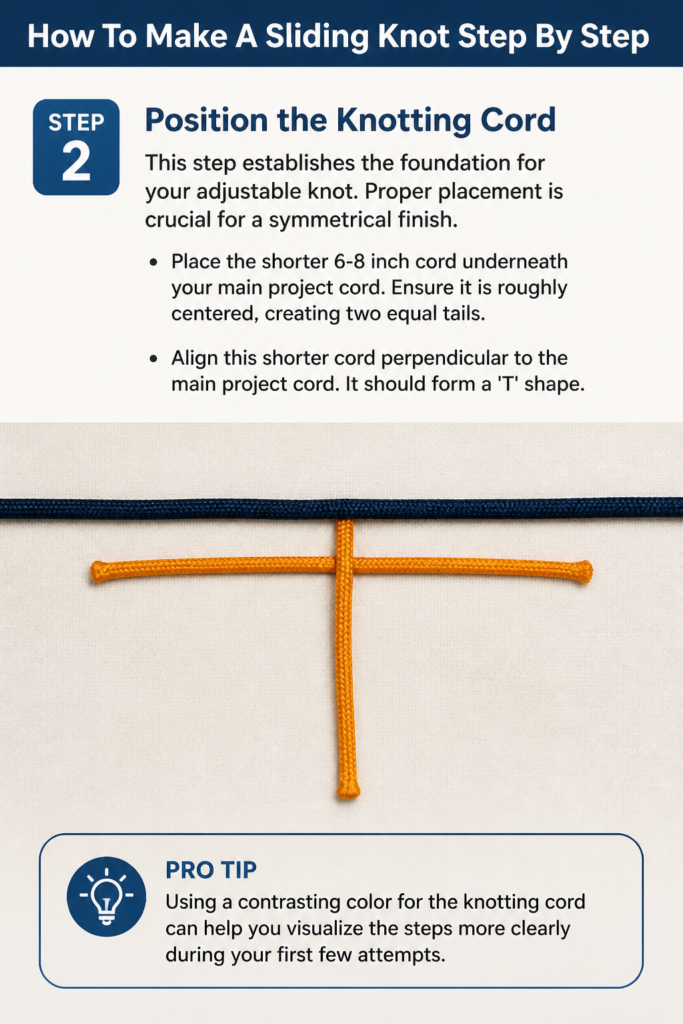
Place the shorter 6-8 inch cord underneath your main project cord. Ensure it is roughly centered, creating two equal tails.
Align this shorter cord perpendicular to the main project cord. It should form a ‘T’ shape.
Pro Tip: Using a contrasting color for the knotting cord can help you visualize the steps more clearly during your first few attempts.
Step 3: Create the First Loop
Now, we start forming the actual knot. This initial loop sets the direction for the rest of the knot’s construction.
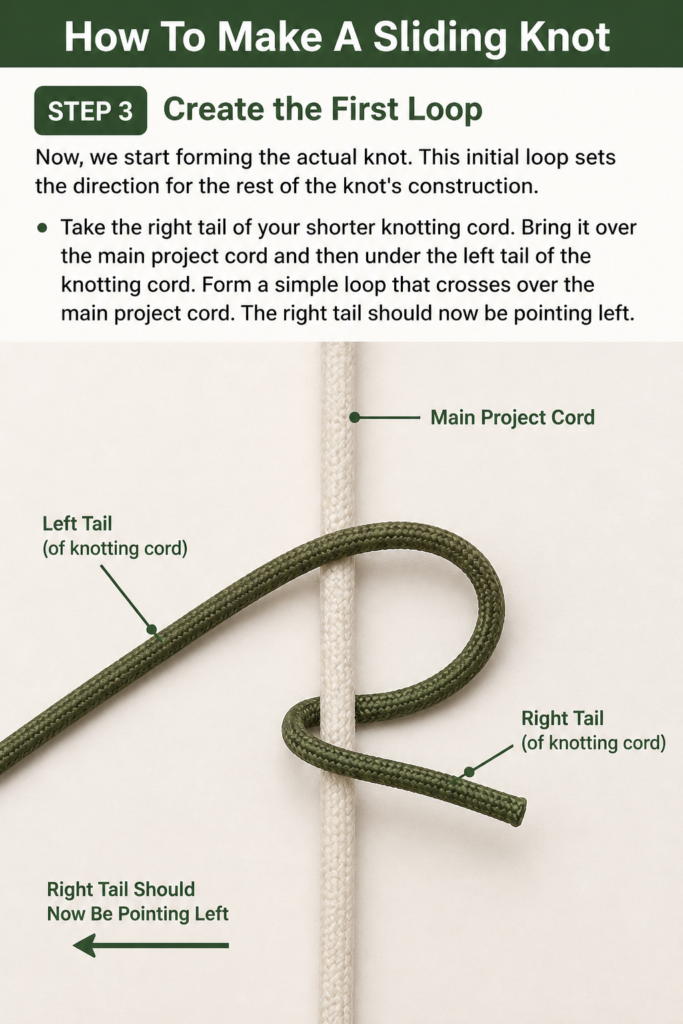
Take the right tail of your shorter knotting cord.
Bring it over the main project cord and then under the left tail of the knotting cord.
Form a simple loop that crosses over the main project cord. The right tail should now be pointing left.
Step 4: Wrap the First Side
This is where the knot begins to take shape. Consistent wraps create a strong, clean finish.
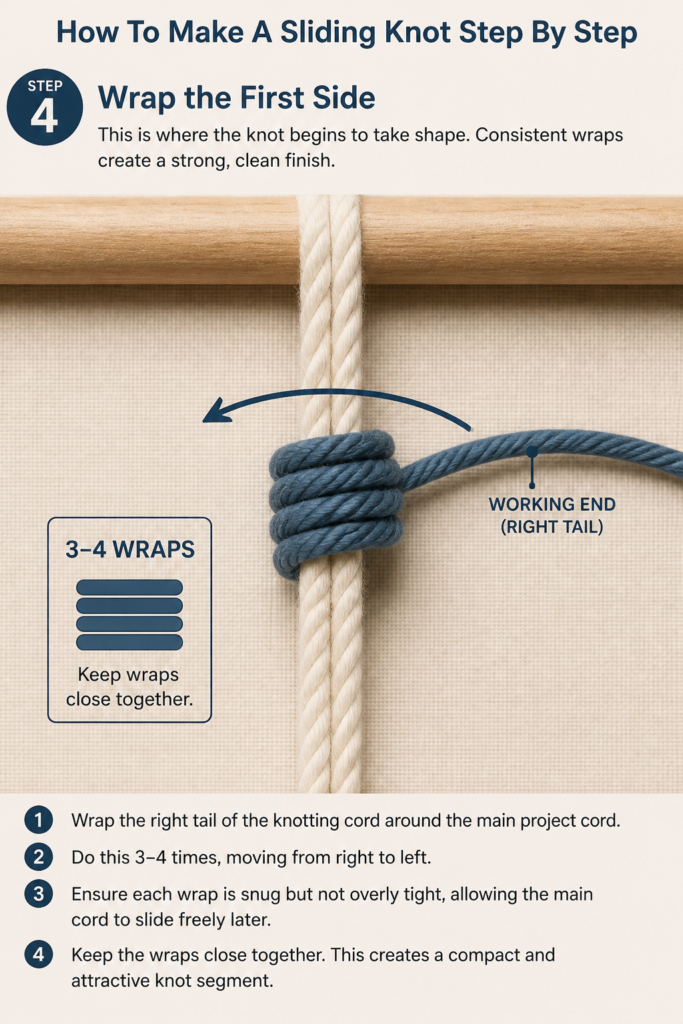
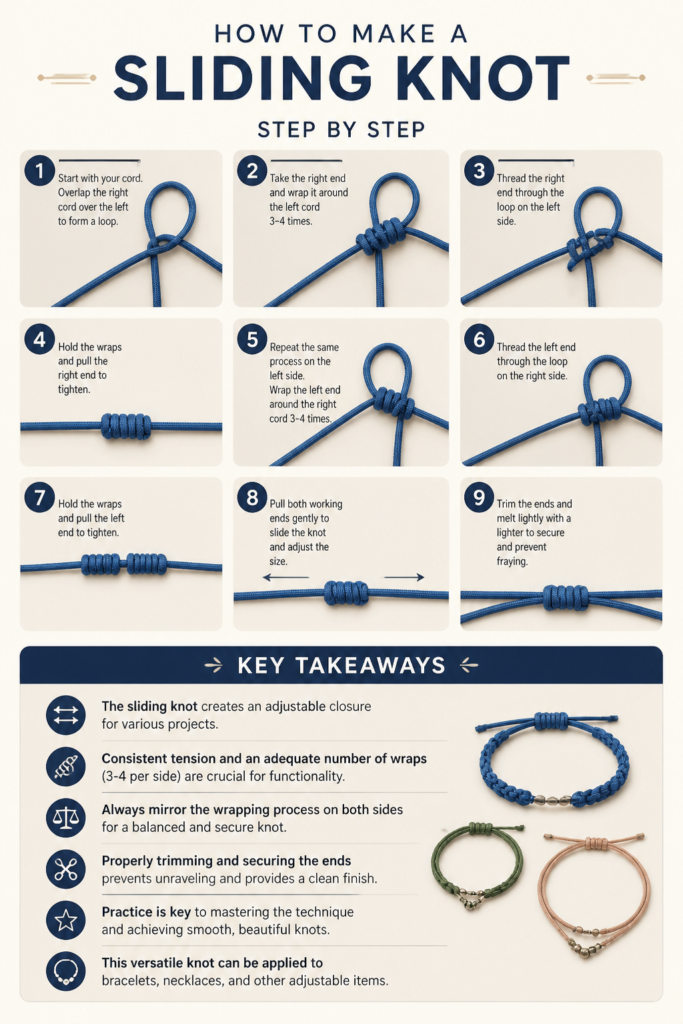
Wrap the right tail of the knotting cord around the main project cord. Do this 3-4 times, moving from right to left.
Ensure each wrap is snug but not overly tight, allowing the main cord to slide freely later.
Keep the wraps close together. This creates a compact and attractive knot segment.
Step 5: Pass Through the Loop
Completing the first half of the knot involves securing these wraps. This step locks them into place.
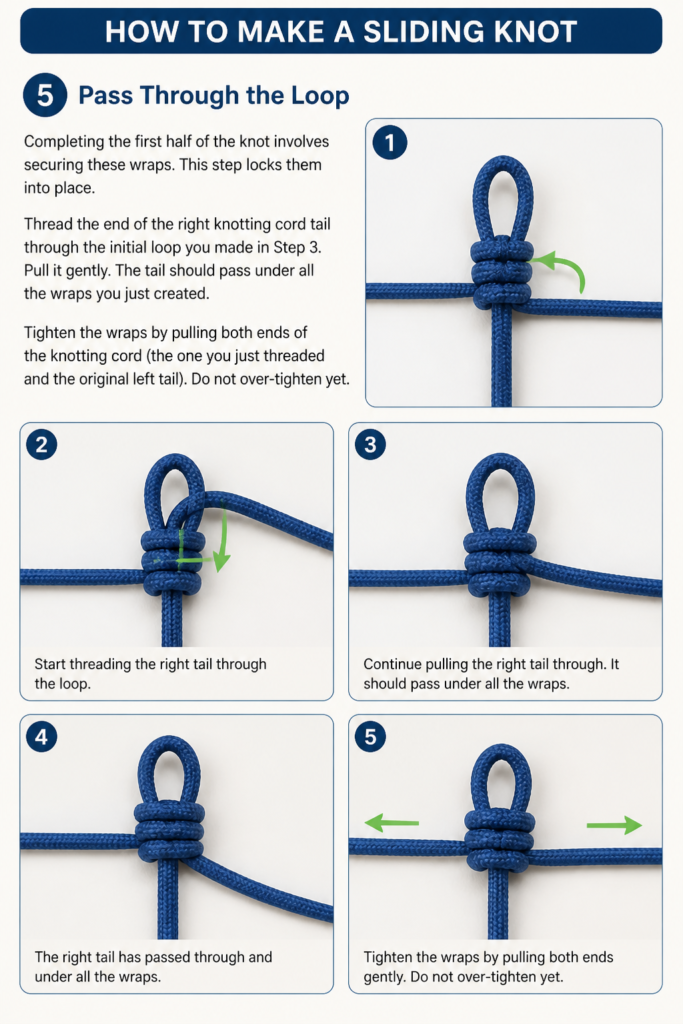
Thread the end of the right knotting cord tail through the initial loop you made in Step 3.
Pull it gently. The tail should pass under all the wraps you just created.
Tighten the wraps by pulling both ends of the knotting cord (the one you just threaded and the original left tail). Do not over-tighten yet.
Step 6: Repeat on the Other Side
To create a balanced and functional sliding knot, you must mirror the process on the opposite side.
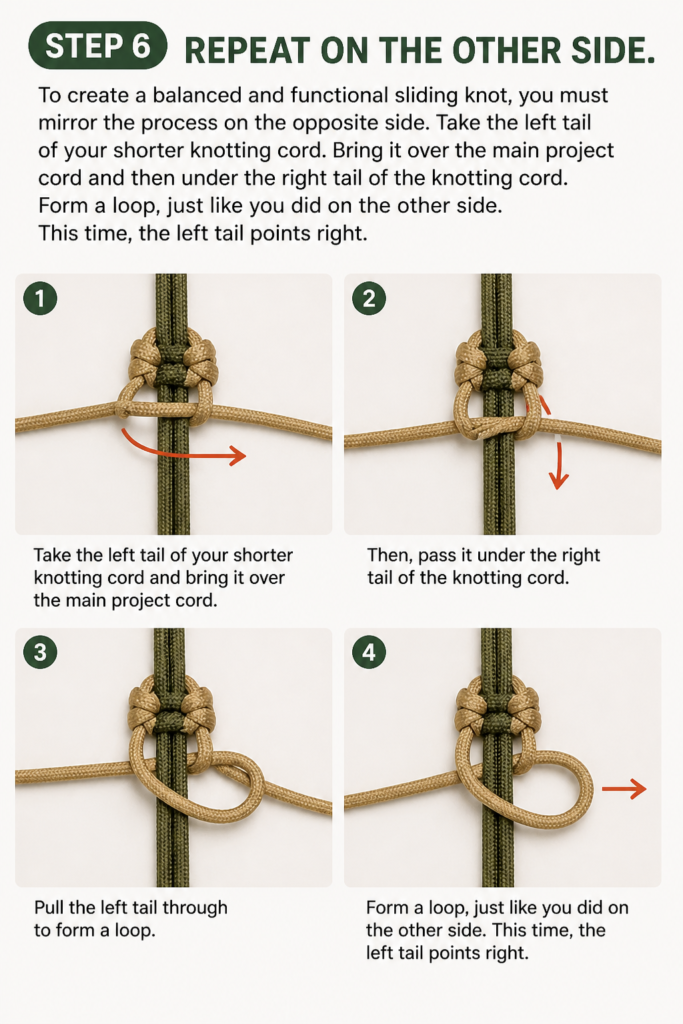
Take the left tail of your shorter knotting cord.
Bring it over the main project cord and then under the right tail of the knotting cord.
Form a loop, just like you did on the other side. This time, the left tail points right.
Step 7: Wrap and Thread the Second Side
Just like before, wrap the cord and secure it by passing the end through the loop.
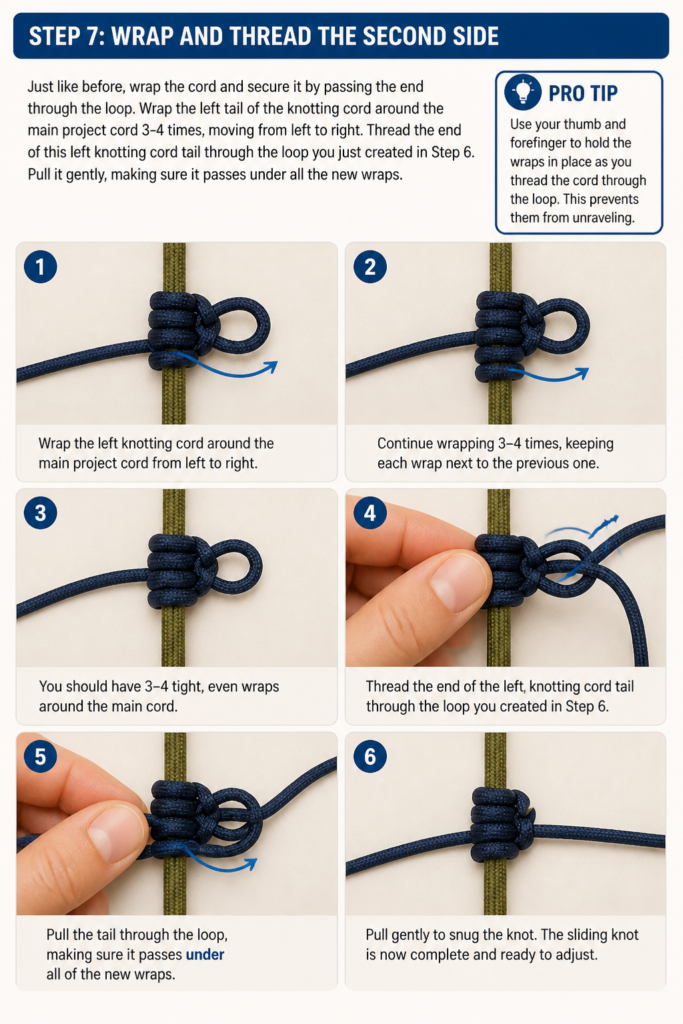
Wrap the left tail of the knotting cord around the main project cord 3-4 times, moving from left to right.
Thread the end of this left knotting cord tail through the loop you just created in Step 6.
Pull it gently, making sure it passes under all the new wraps.
Pro Tip: Use your thumb and forefinger to hold the wraps in place as you thread the cord through the loop. This prevents them from unraveling.
Step 8: Tighten and Trim
The final steps involve securing your knot and giving it a clean finish. This makes it both functional and attractive.
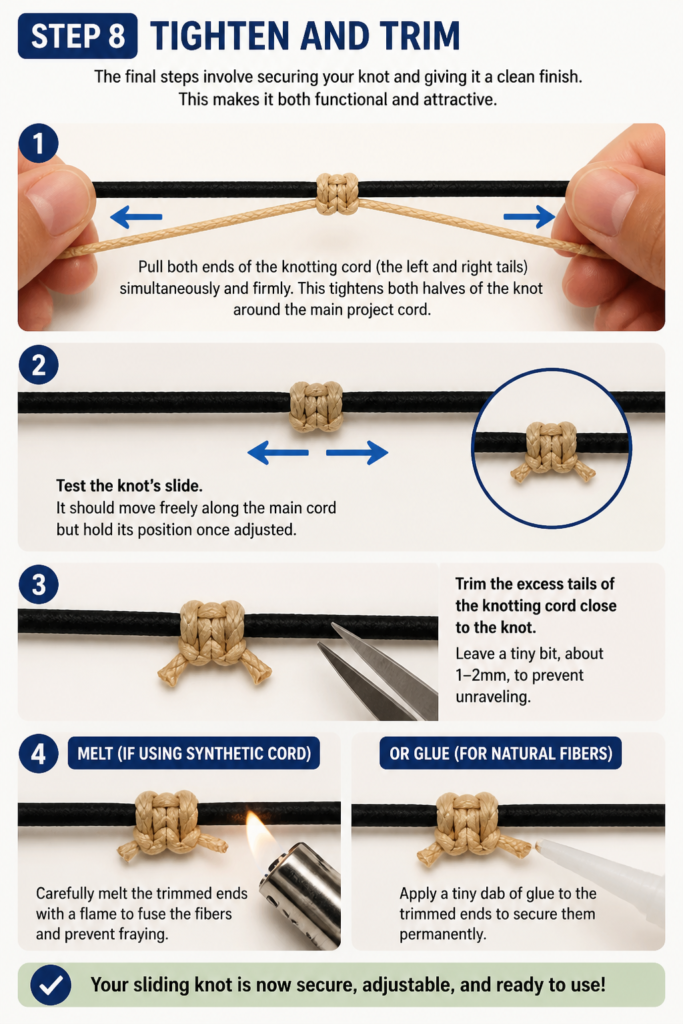
Pull both ends of the knotting cord (the left and right tails) simultaneously and firmly. This tightens both halves of the knot around the main project cord.
Test the knot’s slide. It should move freely along the main cord but hold its position once adjusted.
Trim the excess tails of the knotting cord close to the knot. Leave a tiny bit, about 1-2mm, to prevent unraveling.
Melt (if using synthetic cord) or apply a tiny dab of glue (for natural fibers) to the trimmed ends to secure them permanently.
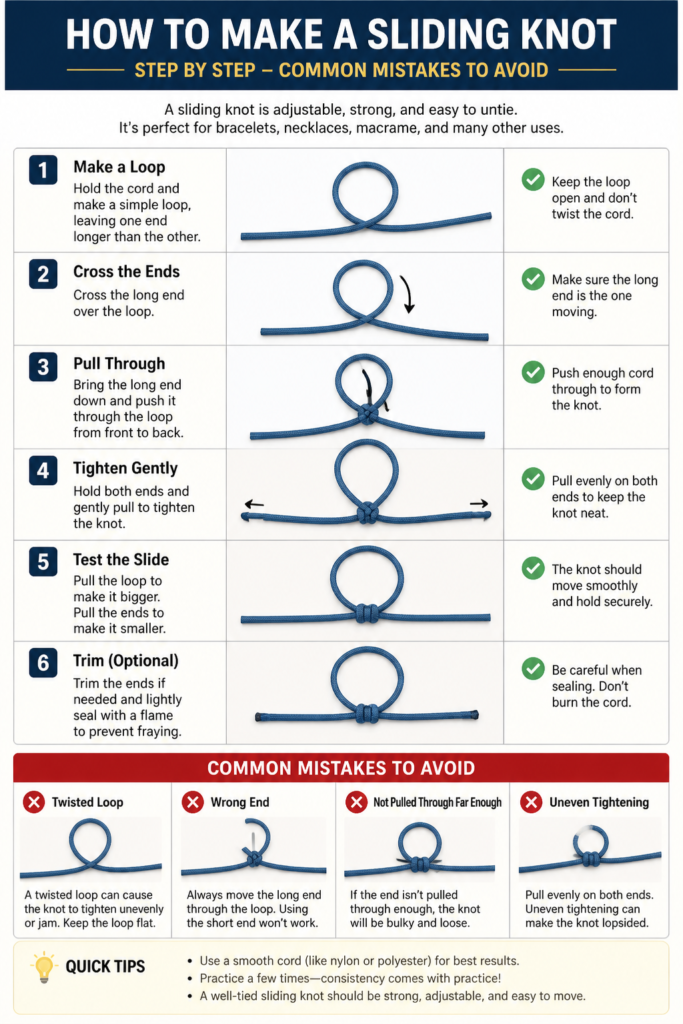
Common Mistakes to Avoid
Not Enough Wraps
One common issue is not making enough wraps around the main cord. If you only do one or two wraps, the knot will be loose and won’t hold its position effectively.
Aim for 3-4 wraps on each side for most cord types. This provides enough friction for the knot to grip and slide smoothly without slipping too much.
Over-Tightening Too Early
It’s tempting to pull each wrap extremely tight as you go. However, this can make it very difficult to thread the cord through the final loop, leading to frustration and a messy knot.
Keep your wraps snug but allow enough space for the cord end to pass through easily. The final tightening comes once both sides are complete.
Uneven Tension
If one side of your knot looks bulkier or looser than the other, it’s likely due to uneven tension during wrapping. This can lead to a lopsided knot that doesn’t slide well.
Try to maintain consistent tension as you wrap each side. Practice helps immensely in developing a feel for the right amount of tightness.
Trimming Too Close
Trimming the excess tails of the knotting cord too close to the knot can cause it to unravel, especially if you’re not sealing the ends. This is a quick way to ruin an otherwise perfect knot.
Always leave a tiny bit of cord (1-2mm) at the ends. If your cord is synthetic, carefully melt the ends with a lighter. For natural fibers, a small drop of fabric glue or clear nail polish works wonders.
Troubleshooting
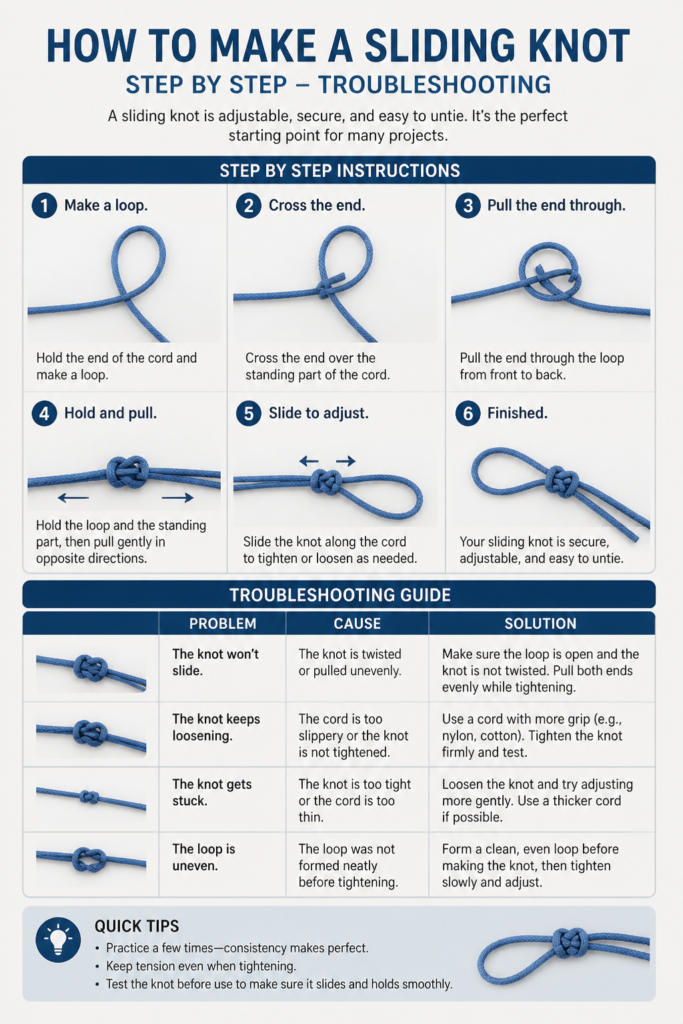
Knot Doesn’t Slide
If your knot feels stuck and won’t slide along the main cord, it’s usually because the wraps were pulled too tight during construction. The friction is too high.
Try to gently loosen the knot by wiggling it. If it’s still rigid, you might need to undo it and retie with slightly less tension on the wraps. Ensure the main cord isn’t caught within the wraps themselves.
Knot Slips Too Easily
Conversely, if your knot slides too freely and doesn’t hold its adjusted position, it means there isn’t enough friction. This often happens if you didn’t do enough wraps or if the cord material is very slippery.
Add more wraps (4-5 instead of 3) on each side to increase friction. For very slippery cords, consider using a slightly thicker knotting cord or one with a bit more texture.
Knot Looks Messy/Asymmetrical
A messy or lopsided knot is a common issue for beginners. It typically stems from inconsistent wrapping, uneven tension, or loops that aren’t quite uniform.
Practice makes perfect. Focus on keeping your wraps even and close together. Ensure your initial loops on both sides are symmetrical before you start wrapping. Don’t be afraid to untie and restart; it’s part of the learning process.
Key Takeaways
- The sliding knot creates an adjustable closure for various projects.
- Consistent tension and an adequate number of wraps (3-4 per side) are crucial for functionality.
- Always mirror the wrapping process on both sides for a balanced and secure knot.
- Properly trimming and securing the ends prevents unraveling and provides a clean finish.
- Practice is key to mastering the technique and achieving smooth, beautiful knots.
- This versatile knot can be applied to bracelets, necklaces, and other adjustable items.
Frequently Asked Questions
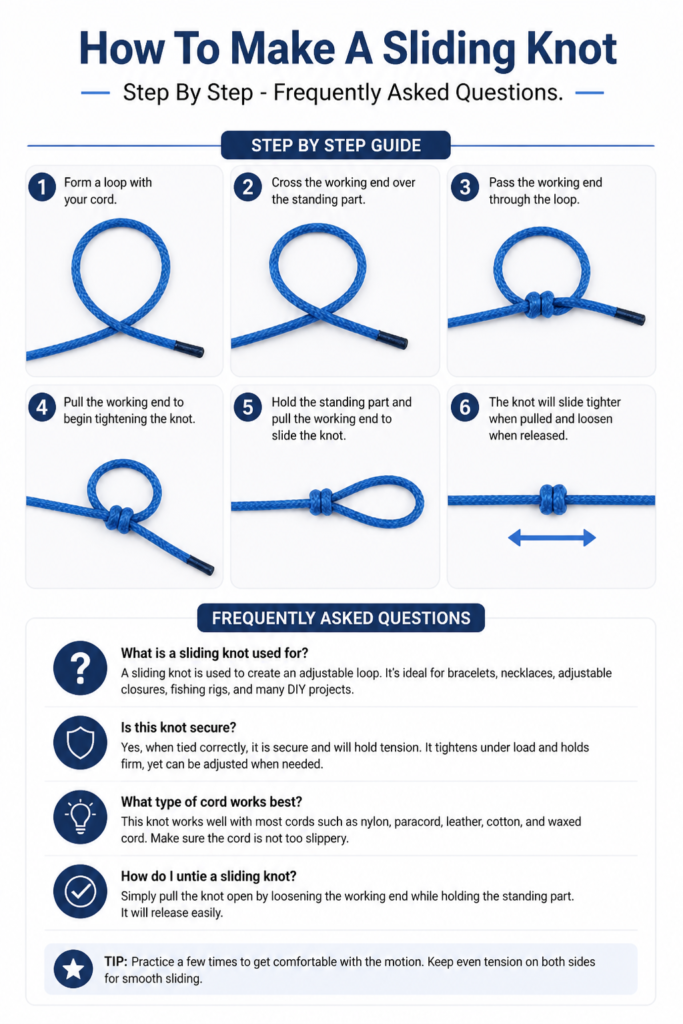
What types of cord are best for a sliding knot?
Waxed cotton, nylon, macrame cord, and paracord are excellent choices. They offer good grip and are durable. Avoid very thin, slippery, or overly stretchy materials for your first attempts, as they can be challenging to work with.
Can I make a sliding knot with two separate cords?
Yes, absolutely! The method described works perfectly for joining the ends of two separate cords to create an adjustable closure. Simply treat the two ends as your “main project cord” in the center.
How many wraps should I really do?
For most standard cords, 3-4 wraps on each side are sufficient. If your cord is very thin or particularly slippery, you might increase it to 5 wraps. Experiment to find what works best for your specific materials.
Is there a different type of sliding knot?
While this guide focuses on the most common and versatile sliding knot (often called a “macrame square knot slider”), there are variations like the adjustable fisherman’s bend or stopper knots used in conjunction with loops. This method is the most widely applicable for jewelry and crafts.
Our Top Recommended Finds
- Waxed Cotton Cord: Excellent for beginners, available in various colors and thicknesses, provides good grip for knotting.
- Macrame Board: Helps hold your cords taut and organized while you’re knotting, making the process much easier.
- Sharp Craft Scissors: Essential for clean cuts, preventing frayed ends that are difficult to work with.
Embrace Your Knotting Journey
You’ve now got the detailed roadmap to creating your very own sliding knots. This skill is more than just tying; it’s about adding a professional and adaptable touch to your creations.
Don’t just read these steps; grab some cord and start practicing right now. The more you do it, the more intuitive it becomes.
Consider trying different cord materials or incorporating this knot into a simple bracelet or necklace next. The possibilities are endless once you’ve mastered this fundamental technique!
Beginner-friendly templates, step-by-step guides,
and weekly project ideas in your inbox.