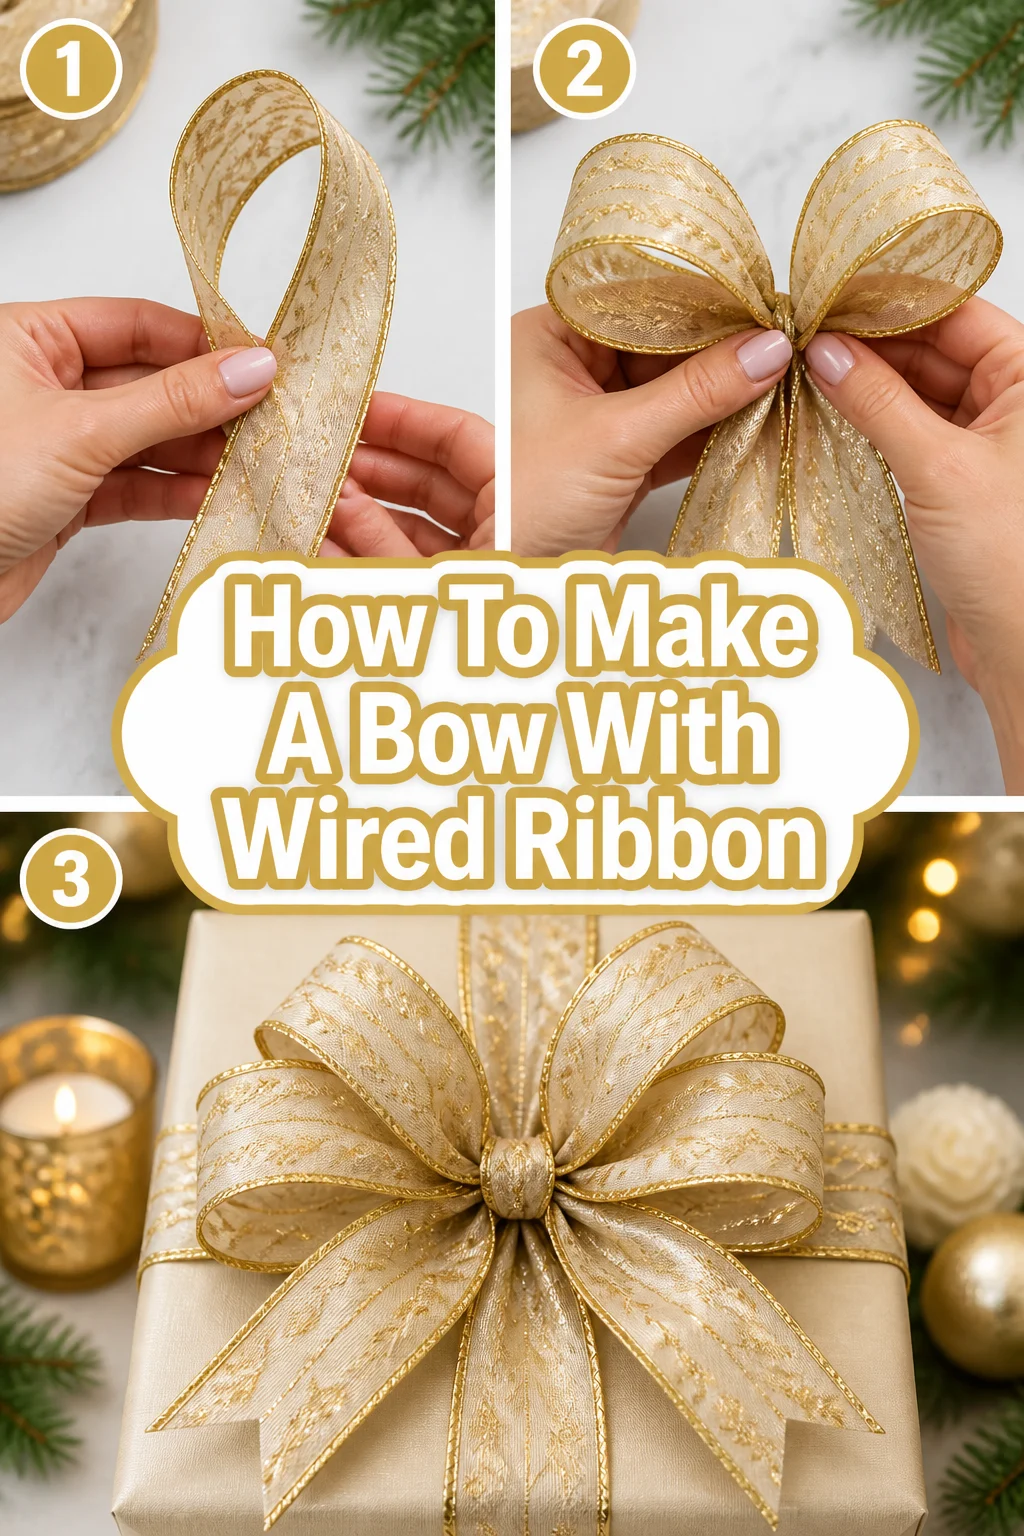
🎀 How To Make A Bow With Wired Ribbon

Beginner-friendly templates, step-by-step guides,
and weekly project ideas in your inbox.
Making beautiful bows adds a special touch to any gift, decoration, or craft project. A wired ribbon is a game-changer for bow making, allowing you to shape and hold loops perfectly. I’ve personally crafted countless bows for wreaths, presents, and holiday decor over the years. This guide draws from that hands-on experience to show you exactly how to achieve stunning results every time.

Quick Overview
This guide will walk you through creating a classic, full bow with wired ribbon, perfect for various uses. You’ll learn the techniques to make neat loops and a sturdy center.
- Time needed: 20-40 minutes (depending on practice and bow size)
- Difficulty: Beginner to Intermediate
- What you’ll need: Wired ribbon, scissors, floral wire or zip tie, ruler/measuring tape
Step-by-Step Instructions
Step 1: Gather Your Materials
Before you start, make sure all your supplies are within reach. Having everything organized makes the process smoother and more enjoyable. Choose a ribbon width and pattern that suits your project.
Select a high-quality wired ribbon. Wider ribbons (1.5 inches to 4 inches) generally make more dramatic bows. Prepare your scissors, floral wire (22-26 gauge is ideal), and a ruler.
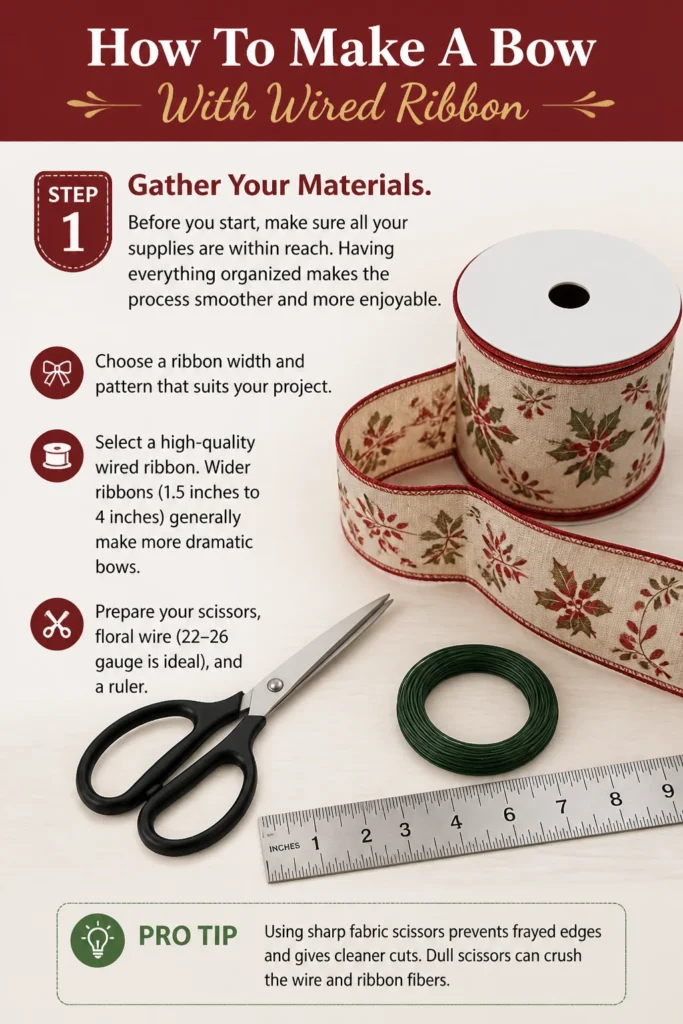
Pro Tip: Using sharp fabric scissors prevents frayed edges and gives cleaner cuts. Dull scissors can crush the wire and ribbon fibers.
Step 2: Measure and Cut Your Tails
The “tails” are the decorative ends of your bow that hang down. Their length can significantly impact the bow’s overall look. Decide how long you want them to be.
Unroll your ribbon and measure two lengths for the tails. A good starting point is 12-18 inches each, but adjust based on your project. Cut these two pieces from the main roll, setting them aside for later.
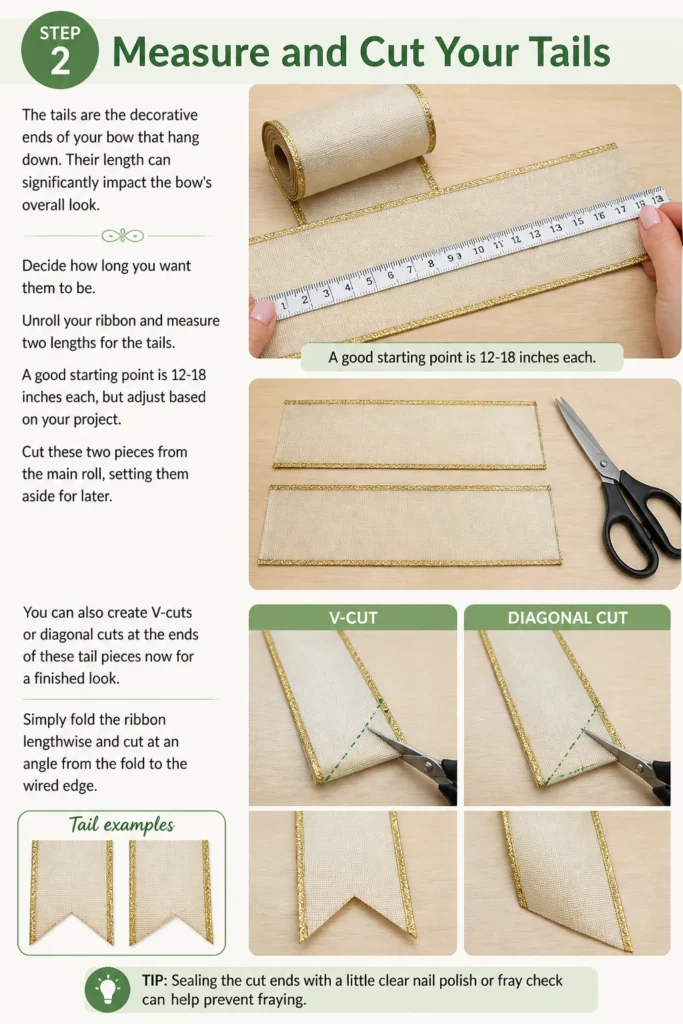
You can also create V-cuts or diagonal cuts at the ends of these tail pieces now for a finished look. Simply fold the ribbon lengthwise and cut at an angle from the fold to the wired edge.
Step 3: Create the First Loop and Center
Now you’ll begin forming the main body of the bow. The first loop sets the stage for the rest of your bow’s structure. This step also establishes the bow’s center.
Take the main roll of ribbon. Measure out a length for your first loop, usually 6-8 inches, but again, adjust for desired bow size. Fold the ribbon back on itself to form a loop, keeping the pattern facing outwards.
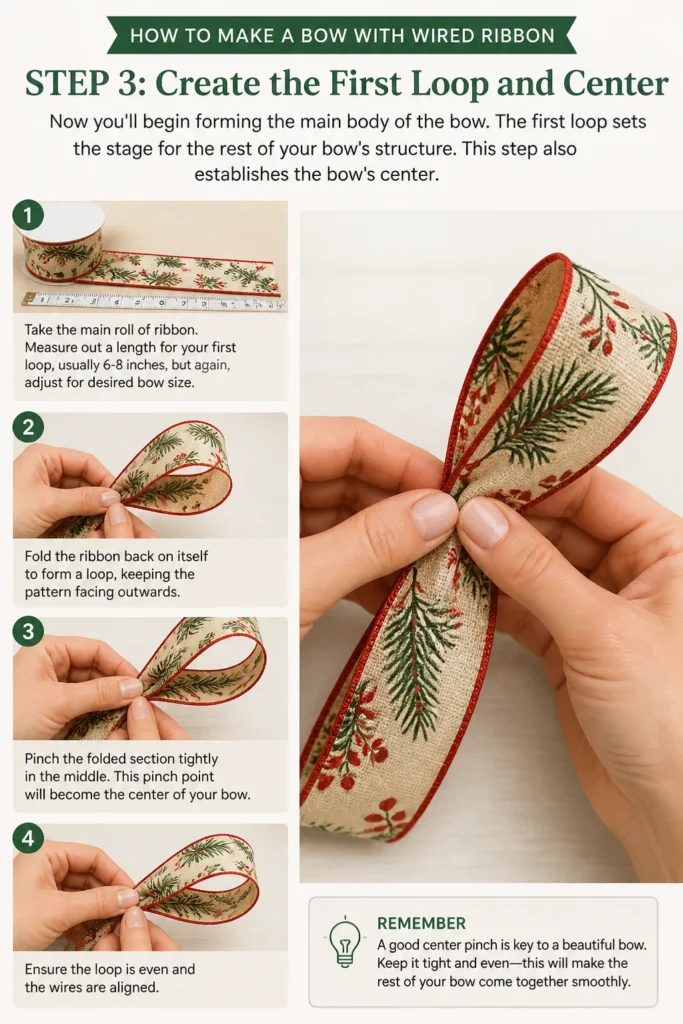
Pinch the folded section tightly in the middle. This pinch point will become the center of your bow. Ensure the loop is even and the wires are aligned.
Step 4: Form Consecutive Loops
Building out the loops is where your bow starts to take shape and gain volume. Each loop should be roughly the same size for a balanced appearance. You will continue to pinch each loop at the center.
Twist the ribbon at the center pinch point so the “right” side of the ribbon faces out for the next loop. Create another loop on the opposite side, matching the size of the first. Pinch it firmly at the center.
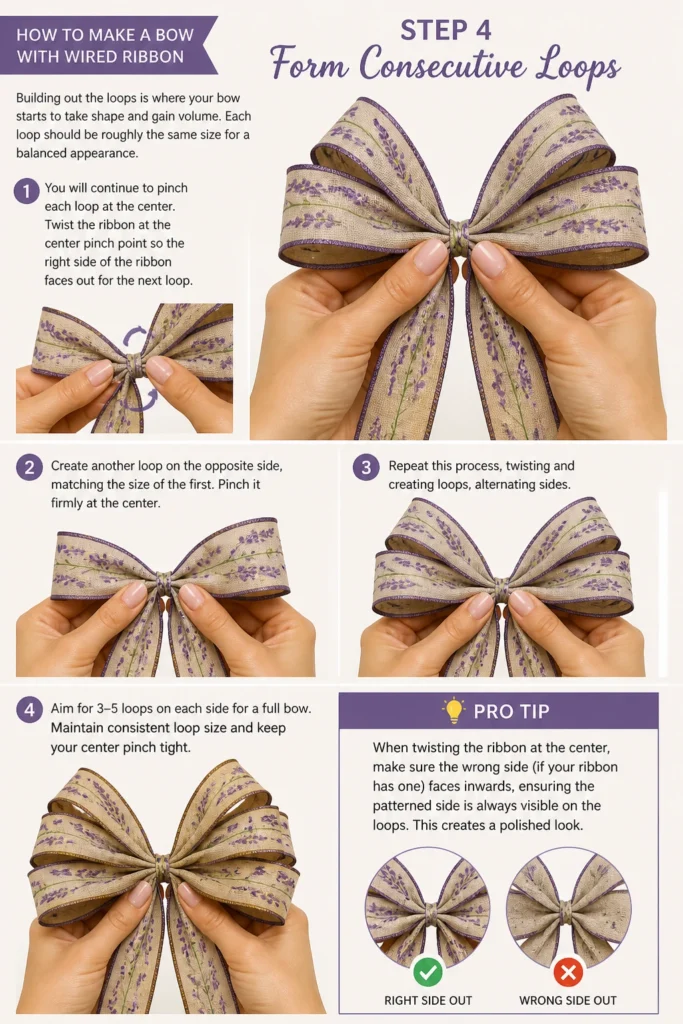
Repeat this process, twisting and creating loops, alternating sides. Aim for 3-5 loops on each side for a full bow. Maintain consistent loop size and keep your center pinch tight.
Pro Tip: When twisting the ribbon at the center, make sure the “wrong” side (if your ribbon has one) faces inwards, ensuring the patterned side is always visible on the loops. This creates a polished look.
Step 5: Secure the Bow Center
Once you have all your loops formed, it’s crucial to secure them tightly. This prevents the bow from unraveling and gives it stability. This step is critical for a lasting bow.
Hold all the pinched loops firmly with one hand. Take a piece of floral wire (about 8-10 inches long). Wrap the wire tightly around the center pinch point, going between your thumb and fingers.
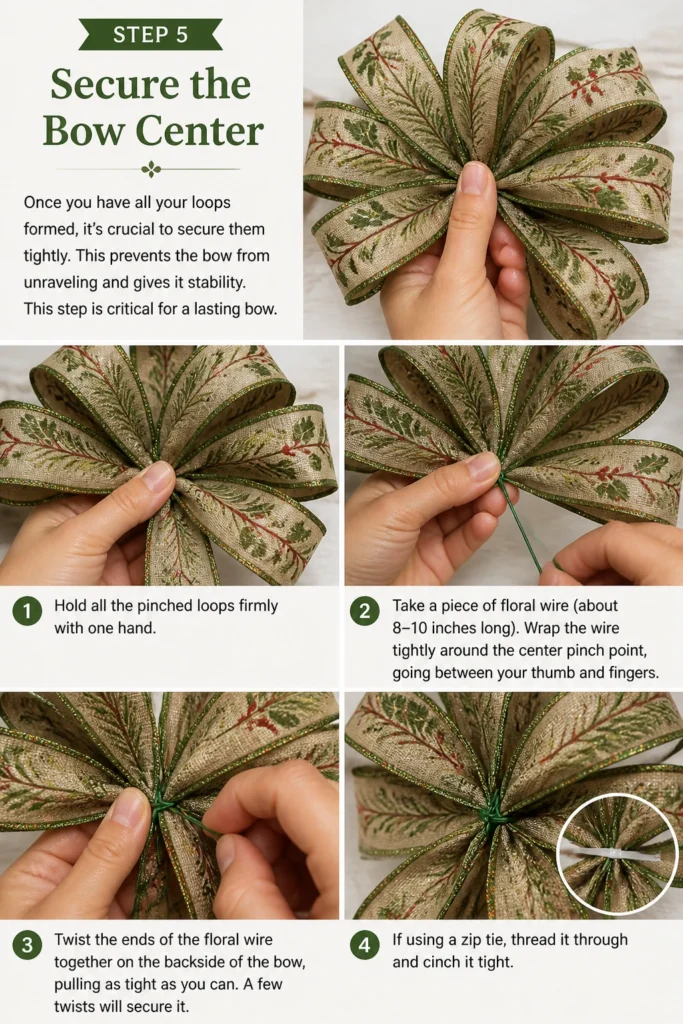
Twist the ends of the floral wire together on the backside of the bow, pulling as tight as you can. A few twists will secure it. If using a zip tie, thread it through and cinch it tight.
Step 6: Attach the Tails
Now it’s time to add those pre-cut tail pieces you prepared earlier. Attaching them correctly ensures they hang nicely from the bow. This step completes the basic structure.
Position the two tail pieces you cut in Step 2 behind the bow, centered with the floral wire. Wrap the floral wire ends around the center of the tails as well, twisting them tightly to secure.
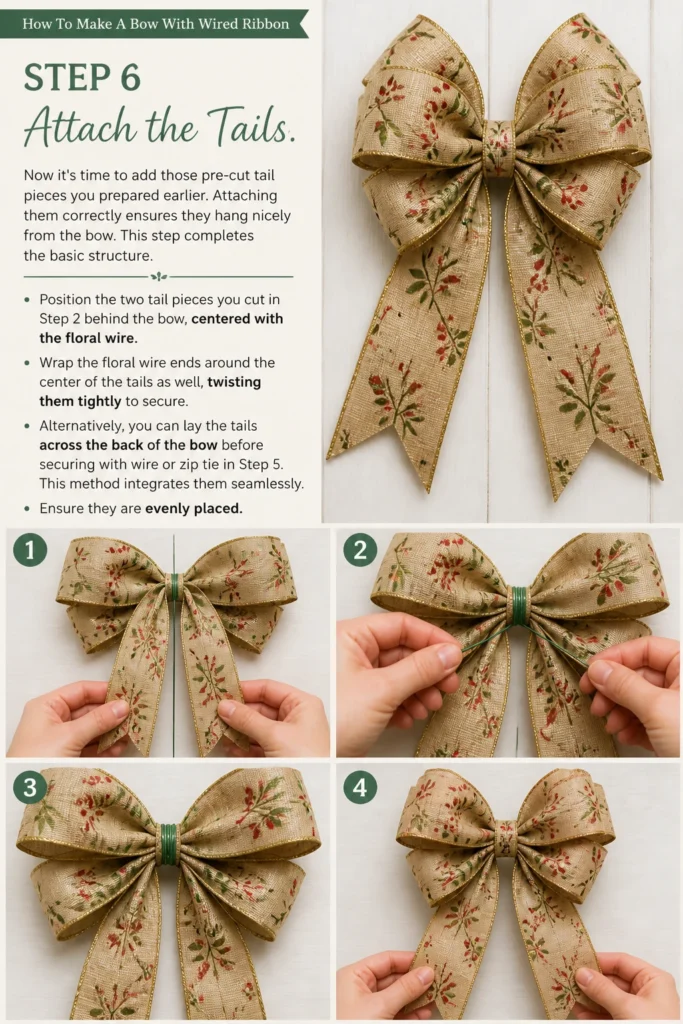
Alternatively, you can lay the tails across the back of the bow before securing with wire or zip tie in Step 5. This method integrates them seamlessly. Ensure they are evenly placed.
Step 7: Create the Center Knot or Loop (Optional)
For an even more finished look, you can add a small center knot or loop to cover the floral wire. This detail elevates the bow’s appearance. It provides a clean focal point.
Cut a small piece of ribbon, about 4-6 inches long. Wrap it around the center of the bow, covering the wire. Secure it at the back with a dab of hot glue or by tucking it under the floral wire.
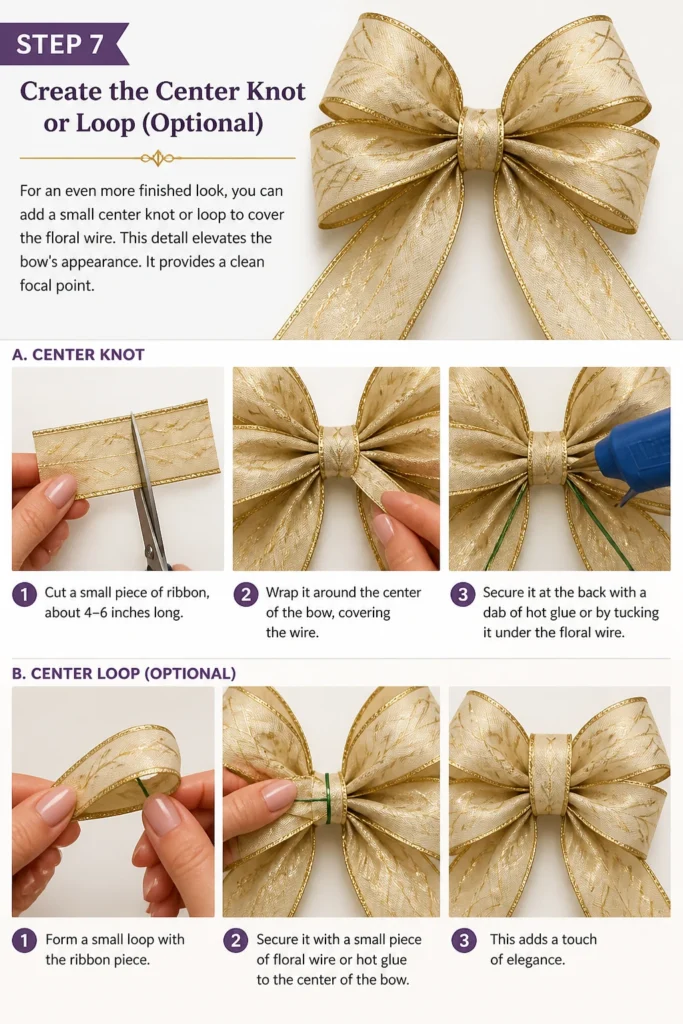
For a center loop, form a small loop with the ribbon piece. Secure it with a small piece of floral wire or hot glue to the center of the bow. This adds a touch of elegance.
Step 8: Fluff and Shape Your Bow
This is where the magic happens! Wired ribbon truly shines in this step, allowing you to manipulate the loops. Proper fluffing makes your bow look full and professional.
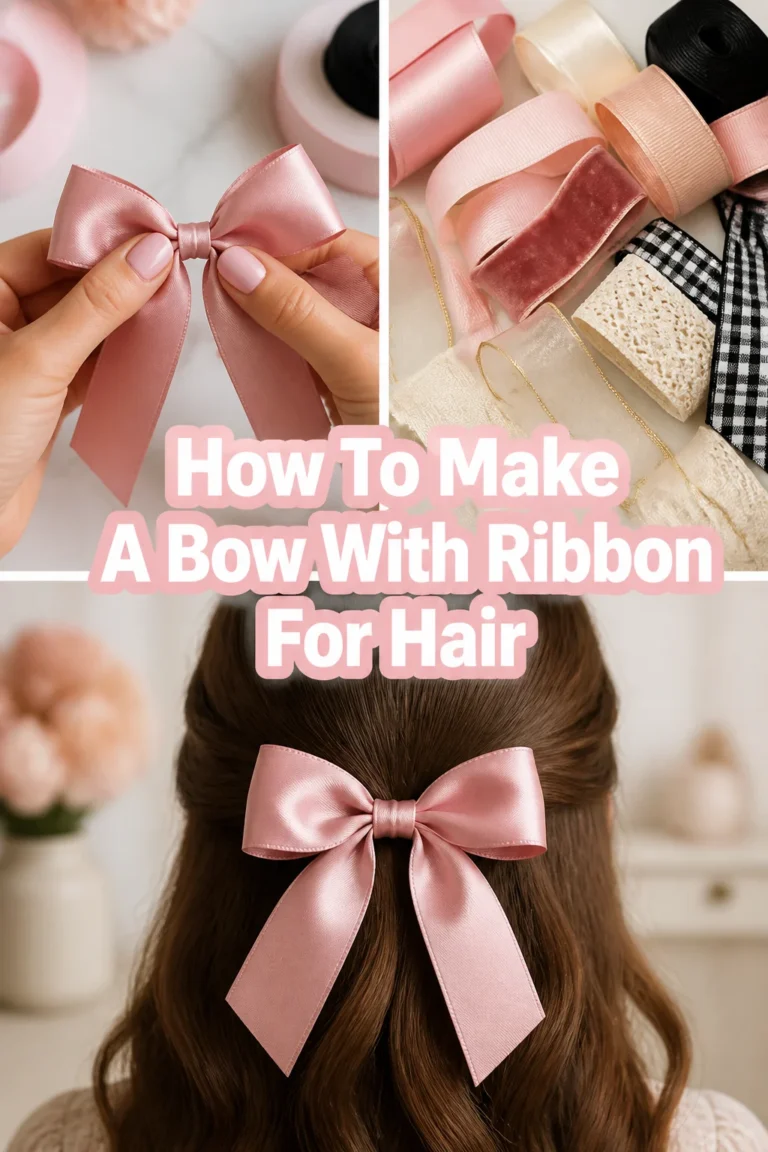
Gently pull and separate each loop, working from the center outwards. Twist the loops slightly to face different directions, creating dimension. Bend and shape the wires within the ribbon to achieve your desired fullness.
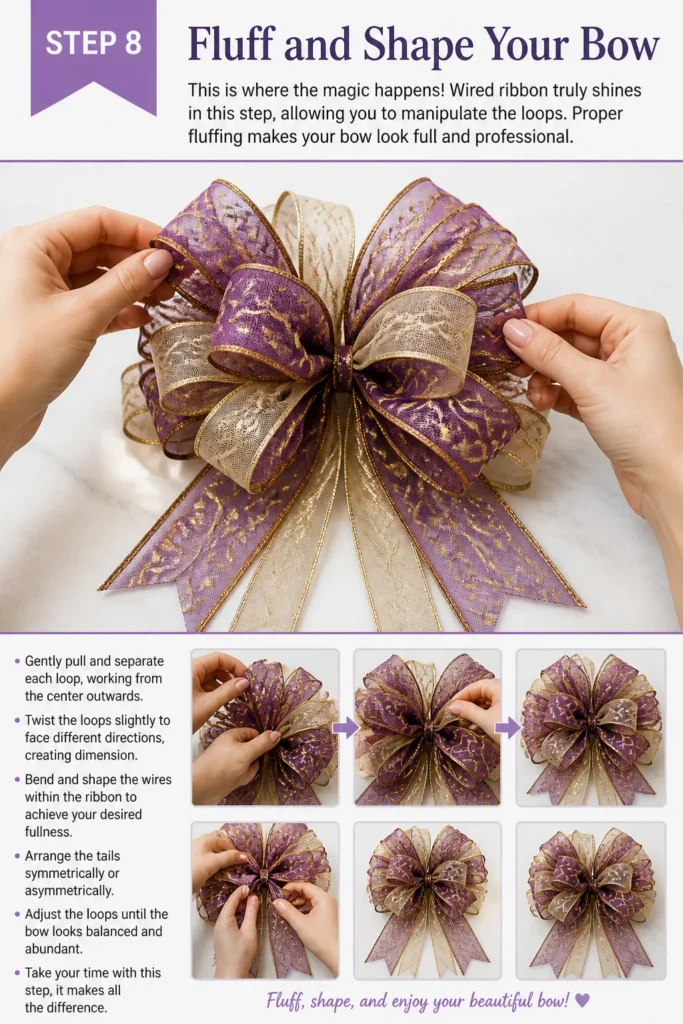
Arrange the tails symmetrically or asymmetrically. Adjust the loops until the bow looks balanced and abundant. Take your time with this step; it makes all the difference.
Common Mistakes to Avoid
Not Pinching Tightly Enough
A loose pinch at the center of your bow will result in a floppy, unstable structure. The loops won’t hold their shape, and the bow will look messy. Ensure you maintain a very firm grip on the ribbon at the center point throughout the loop-making process. This provides a solid foundation for securing the bow.
Inconsistent Loop Sizes
When loops are uneven, the bow appears unbalanced and less professional. It creates a lopsided look that detracts from its beauty. Try to make each loop the same length as you form them, using the first loop as your guide. Practice helps develop an eye for consistent sizing.
Forgetting to Twist the Ribbon
If your ribbon has a distinct “right” and “wrong” side, forgetting to twist it at the center between loops will expose the wrong side. This makes the bow look unfinished and less vibrant. Always twist the ribbon at the center pinch point before forming the next loop, ensuring the patterned side faces outward for every loop.
Using Dull Scissors
Dull scissors will fray the edges of your ribbon and can damage the internal wire, leading to an untidy finish. Clean cuts are essential for a professional look. Always use sharp fabric scissors dedicated to crafting to get crisp, clean edges on your ribbon.
Troubleshooting
My Bow Looks Flat and Lifeless
If your bow lacks volume, it’s likely due to insufficient fluffing or too few loops. Wired ribbon needs active shaping to achieve its full potential. Go back to Step 8: Fluff and Shape. Gently pull each loop upwards and outwards, twisting them to face different directions. Bend the internal wires to create maximum volume. Consider adding more loops next time for a fuller appearance.
The Loops Keep Unraveling from the Center
This issue points to an insecure central tie. The floral wire or zip tie was not pulled tight enough, or it wasn’t twisted sufficiently. Ensure you pull the floral wire as taut as possible around the pinched center, twisting the ends multiple times until they are very secure. If using a zip tie, ensure it’s cinched down tightly against the ribbon.
The Ribbon Edges Are Fraying
Fraying often occurs if your scissors aren’t sharp enough or if the ribbon quality is low. It can also happen with excessive handling of certain ribbon types. Try using very sharp fabric scissors for all cuts. If the ribbon continues to fray, a tiny dab of clear fabric glue or fray check applied to the cut edges can prevent further unraveling.
Key Takeaways
- Always use wired ribbon for durable, shapable bows that hold their form.
- A firm, consistent pinch at the center is vital for a stable bow.
- Twist the ribbon between loops to ensure the decorative side always faces out.
- Secure the center tightly with floral wire or a zip tie for longevity.
- Take your time fluffing and shaping each loop to achieve maximum fullness and dimension.
- Practicing different loop sizes and tail lengths helps customize your bows for any occasion.
Frequently Asked Questions
What’s the best type of wired ribbon for beginners?
For beginners, a medium-width wired ribbon (around 2.5 inches) made of a sturdy material like burlap, linen, or a thick satin is excellent. These materials are forgiving, easy to shape, and hold their form well. Avoid very thin or very stiff ribbons initially.
How do I make a bow with multiple colors of ribbon?
To use multiple ribbons, simply layer them together before you start forming your loops. Treat the combined ribbons as one piece. Ensure they are aligned at the center pinch point. You can also make separate bows and then layer and secure them together with floral wire.
Can I reuse wired ribbon bows?
Yes, absolutely! One of the great advantages of wired ribbon is its reusability. Gently un-fluff and store your bows carefully after use. When you’re ready to use them again, simply re-fluff and reshape the loops as needed. This makes them very economical for seasonal decor.
How do I attach my finished bow to a gift or wreath?
The floral wire you used to secure the bow’s center can also be used for attachment. Leave the ends long enough after securing the bow. For a gift, simply wrap the wire around the package and twist it at the back. For a wreath, thread the wire through the wreath’s branches and twist it tightly to secure the bow in place.
Our Top Recommended Finds
- High-Quality Wired Ribbon Assortment: Having a variety of widths and colors allows for creative flexibility and ensures you always have the right ribbon on hand.
- Sharp Fabric Scissors: Essential for clean cuts that prevent fraying and give your bows a professional finish.
- 22-Gauge Floral Wire: This gauge is strong enough to hold heavy bows securely but flexible enough to twist easily.
Craft Your Own Masterpiece
You now have the steps and insights to create beautiful, professional-looking bows with wired ribbon. This skill is incredibly versatile, adding a personal touch to gifts, home decor, and special occasions. Don’t be afraid to experiment with different ribbon types and loop sizes. Grab your supplies today and start crafting; your next project is waiting for that perfect finishing flourish.
Beginner-friendly templates, step-by-step guides,
and weekly project ideas in your inbox.