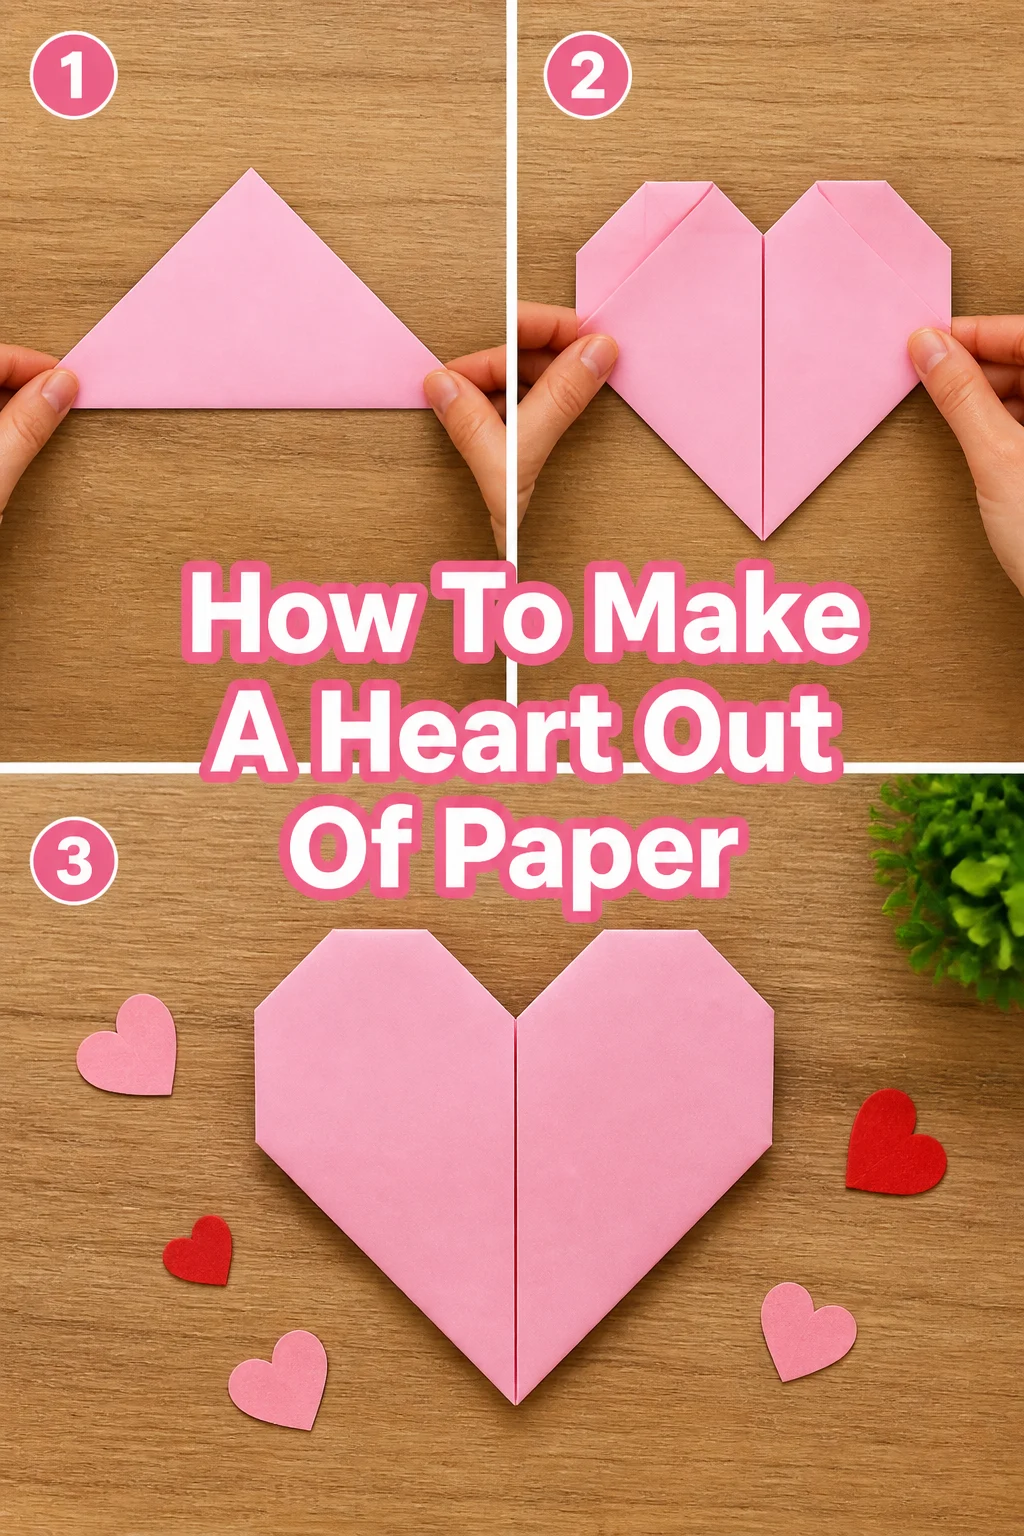
How To Make A Heart Out Of Paper

Beginner-friendly templates, step-by-step guides,
and weekly project ideas in your inbox.
❤️ How To Make A Heart Out Of Paper
Making a paper heart is a simple, charming craft that brings a smile to anyone’s face. I remember folding my first one for a friend in elementary school; it felt like magic to transform a flat sheet into something so meaningful. This guide will walk you through creating your own perfect paper heart, sharing all the little tricks I’ve learned along the way.
You’ll be surprised how quickly you can master this delightful piece of origami.

Quick Overview
This guide will empower you to create a beautiful paper heart, perfect for gifts, decorations, or just a fun personal project. You’ll learn the fundamental folds and techniques to achieve a crisp, symmetrical design every time.
- Time needed: 5-10 minutes
- Difficulty: Beginner
- What you’ll need: A single sheet of square paper, a flat surface
Step-by-Step Instructions
Step 1: Prepare Your Paper
Start with a square piece of paper. Standard origami paper works best, typically 6×6 inches (15×15 cm), as it’s thin and easy to fold. However, any square paper will do, even a piece of printer paper cut to size.
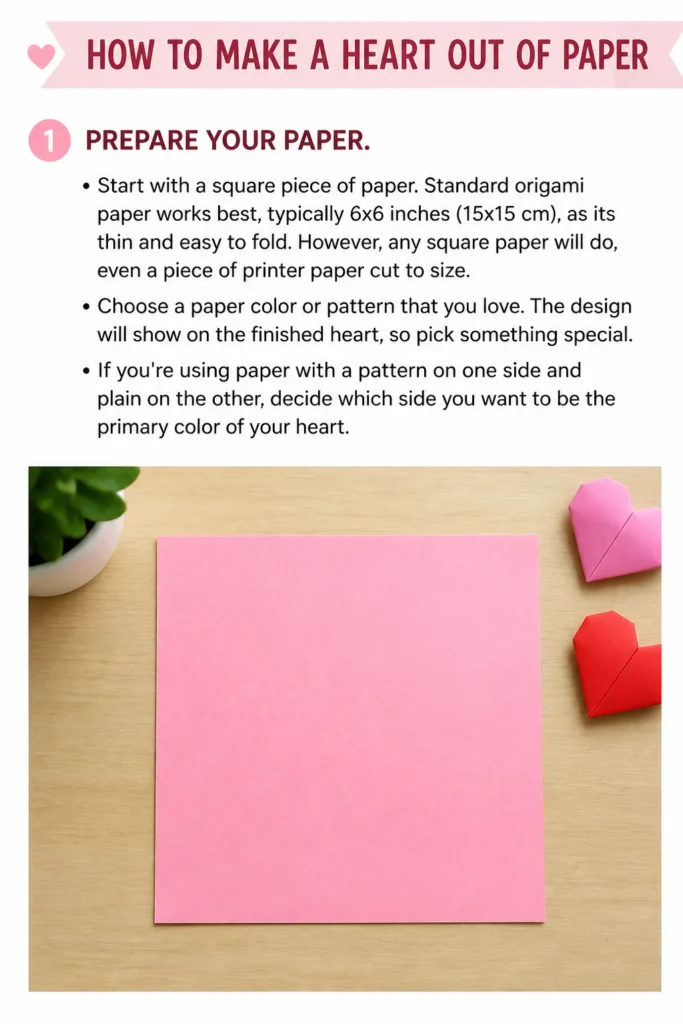
Choose a paper color or pattern that you love. The design will show on the finished heart, so pick something special. If you’re using paper with a pattern on one side and plain on the other, decide which side you want to be the primary color of your heart.
Step 2: Fold Diagonally
Place your square paper in front of you with one corner pointing towards you, like a diamond. Take the bottom corner and fold it up to meet the top corner, creating a large triangle. Press firmly along the fold to make a crisp crease.
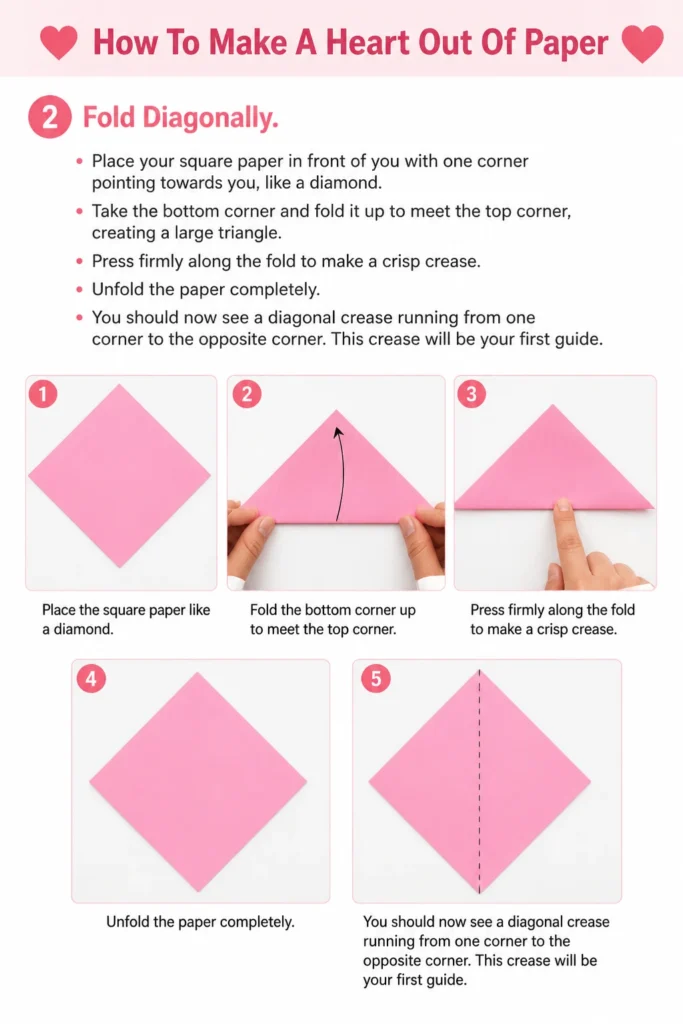
Unfold the paper completely. You should now see a diagonal crease running from one corner to the opposite corner. This crease will be your first guide.
Step 3: Create the Second Diagonal
Now, take the left corner of your square paper and fold it to meet the right corner. This will create another large triangle, perpendicular to your first fold. Smooth out the crease with your finger or a bone folder.
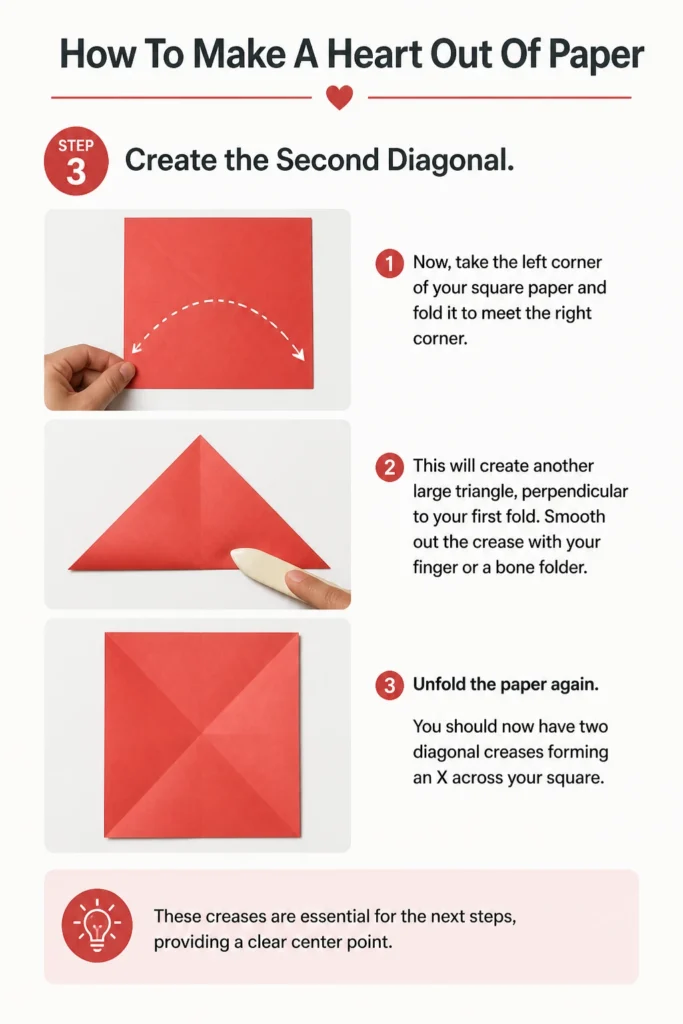
Unfold the paper again. You should now have two diagonal creases forming an “X” across your square. These creases are essential for the next steps, providing a clear center point.
Step 4: Fold the Bottom Corner to the Center
Lay your paper flat with the patterned side (if any) facing down. Identify the bottom corner of your square. Fold this bottom corner upwards so its tip meets the exact center point where your two diagonal creases intersect.
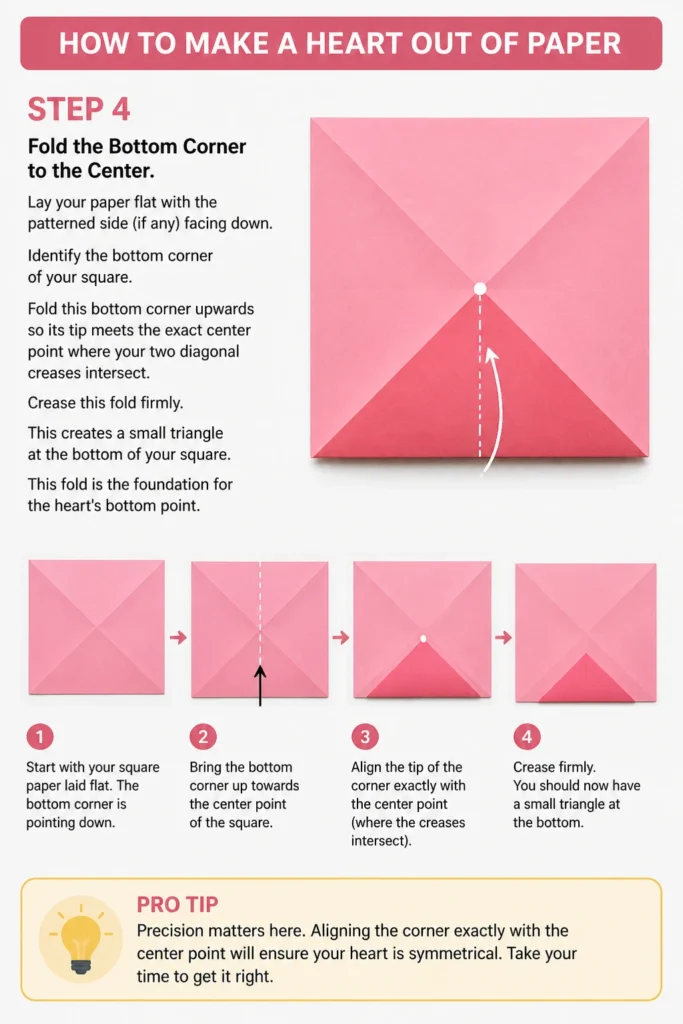
Crease this fold firmly. This creates a small triangle at the bottom of your square. This fold is the foundation for the heart’s bottom point.
Pro Tip: Precision matters here. Aligning the corner exactly with the center point will ensure your heart is symmetrical. Take your time to get it right.
Step 5: Fold the Top Edge Down
Turn your paper over so the side you just folded (the small triangle) is now facing down. The bottom edge of this small triangle should be facing you. Now, take the top edge of the entire square and fold it downwards.
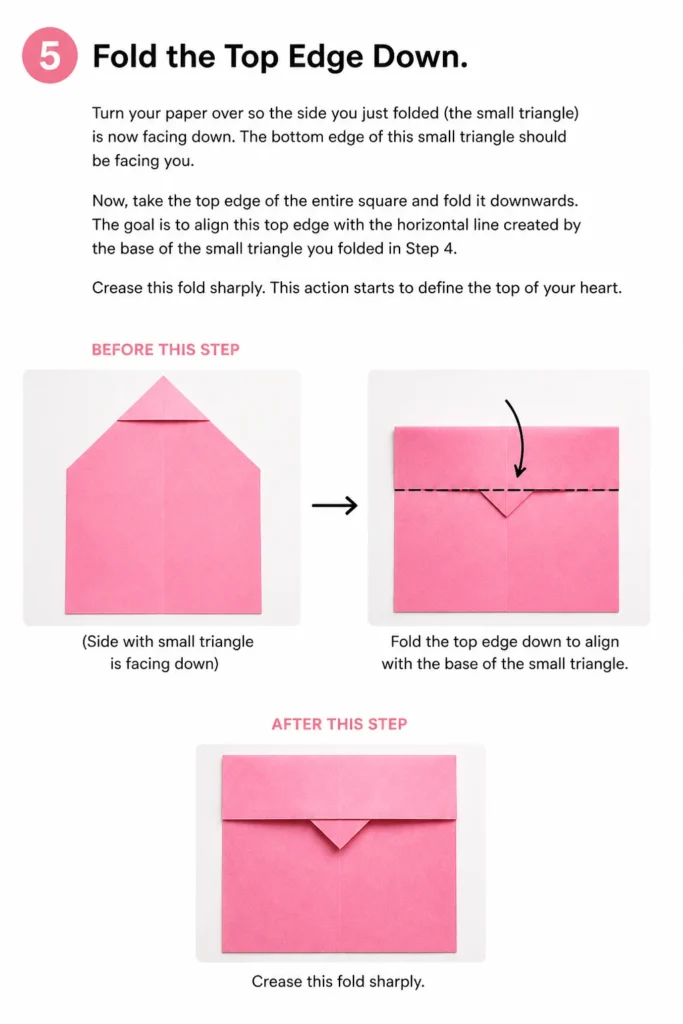
The goal is to align this top edge with the horizontal line created by the base of the small triangle you folded in Step 4. Crease this fold sharply. This action starts to define the top of your heart.
Step 6: Fold the Sides to the Center
With the paper still in its current orientation, you will see a central vertical line (if you were to fold the paper in half vertically). Take the right edge of your paper and fold it inwards, aligning it with this imaginary central vertical line.
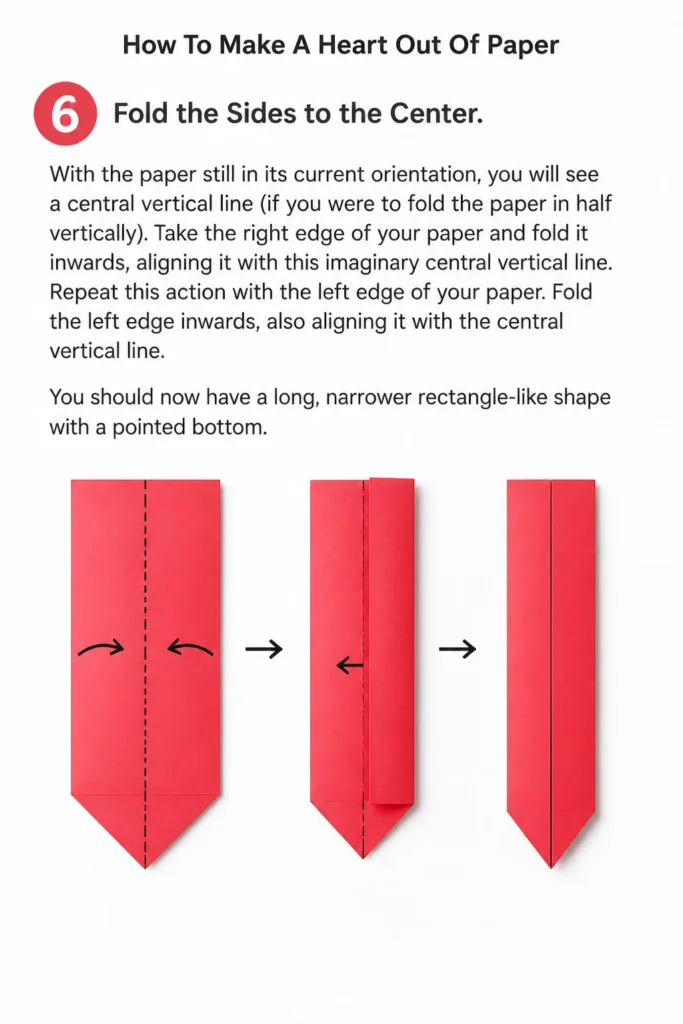
Repeat this action with the left edge of your paper. Fold the left edge inwards, also aligning it with the central vertical line. You should now have a long, narrower rectangle-like shape with a pointed bottom.
Step 7: Flatten the Top Corners
Now, look at the top corners of your folded paper. You’ll notice two small triangular flaps sticking out on either side. These will form the rounded top of your heart. Fold the top right corner downwards and inwards.
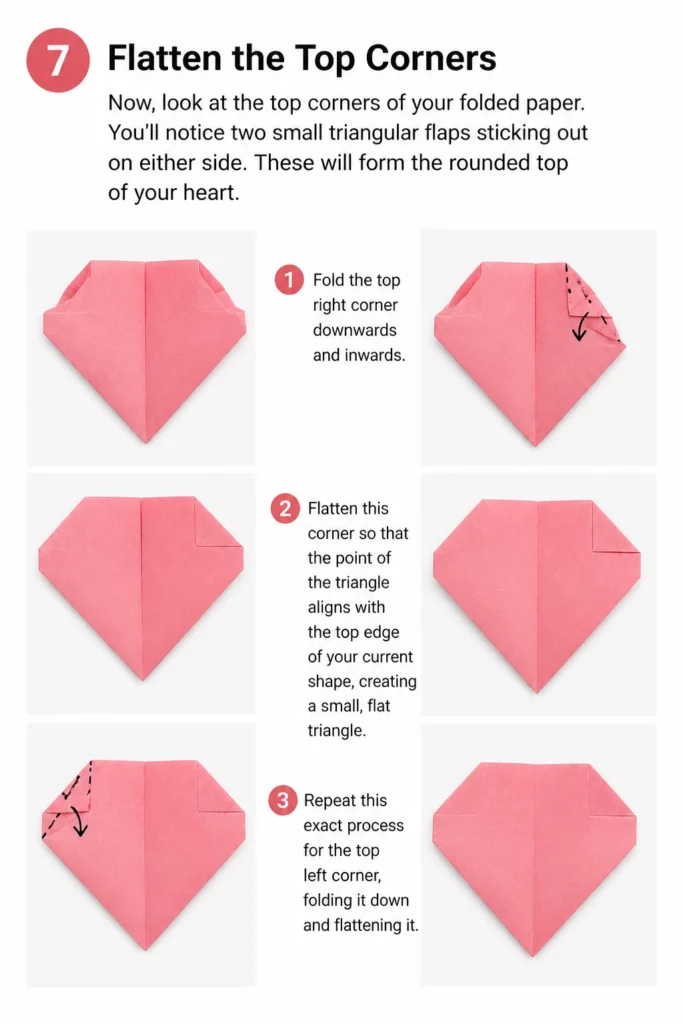
Flatten this corner so that the point of the triangle aligns with the top edge of your current shape, creating a small, flat triangle. Repeat this exact process for the top left corner, folding it down and flattening it.
Step 8: Turn Over and Refine
Carefully turn your paper over to the other side. You should now see a shape that strongly resembles a heart, but with some sharp corners at the top. These need to be softened.
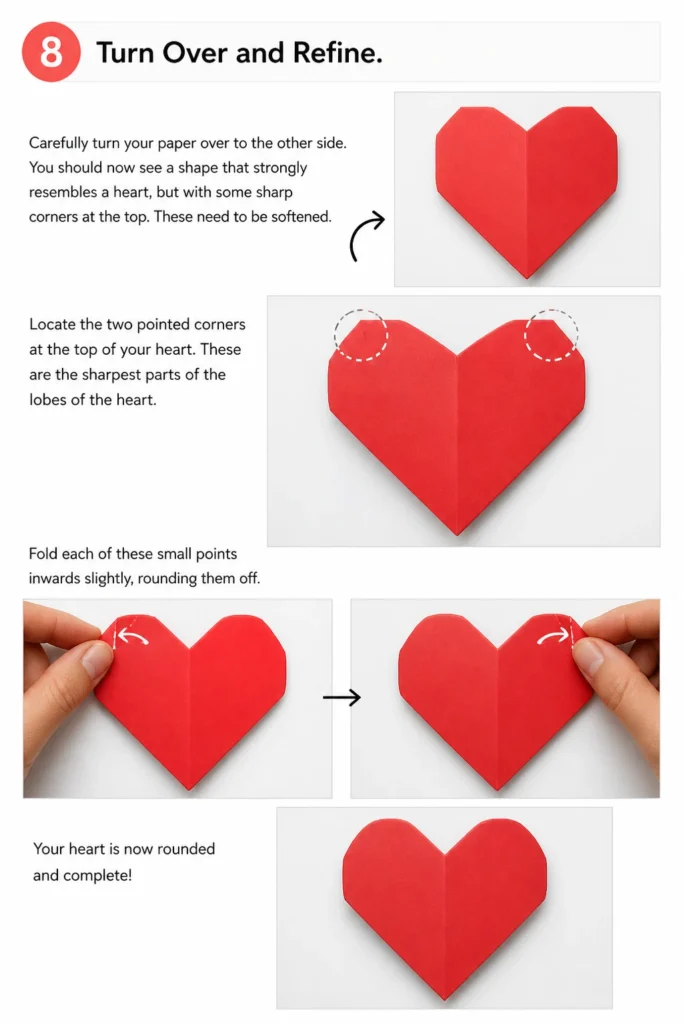
Locate the two pointed corners at the top of your heart. These are the sharpest parts of the “lobes” of the heart. Fold each of these small points inwards slightly, rounding them off.
Step 9: Round the Side Edges
Now, look at the two outer side edges of your heart. These might still appear a bit sharp or angled. To make your heart look more organic and rounded, fold the outer corners of these side edges inwards just a little bit.
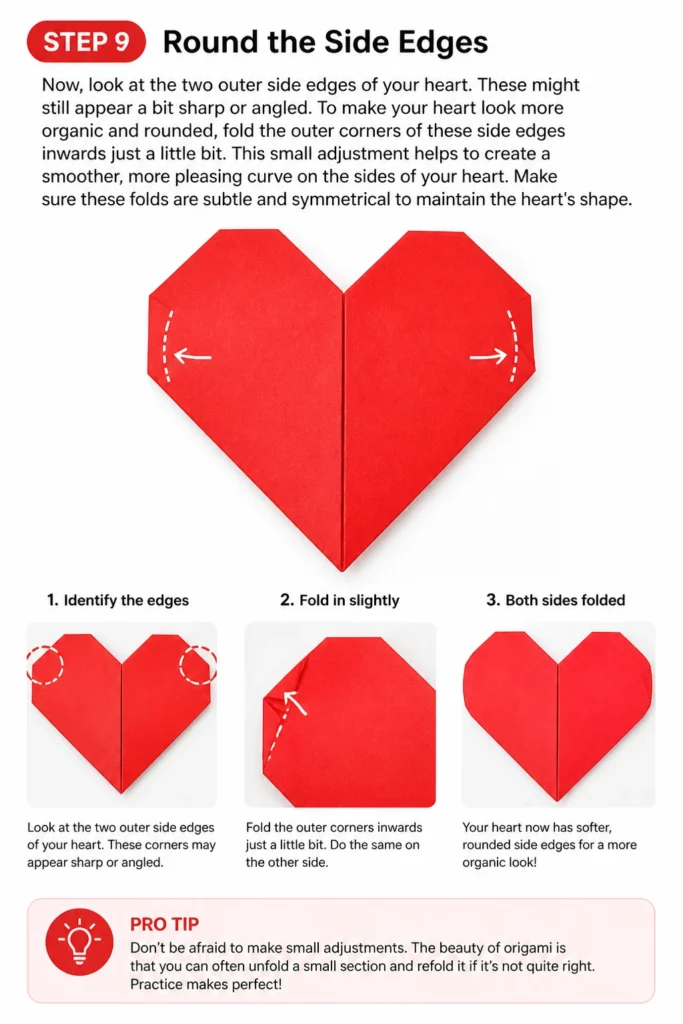
This small adjustment helps to create a smoother, more pleasing curve on the sides of your heart. Make sure these folds are subtle and symmetrical to maintain the heart’s shape.
Pro Tip: Don’t be afraid to make small adjustments. The beauty of origami is that you can often unfold a small section and refold it if it’s not quite right. Practice makes perfect!
Step 10: Final Creases and Enjoy
Once you are happy with the shape, press all the creases firmly one last time. This helps the heart hold its form and gives it a finished, polished look. Your paper heart is now complete!
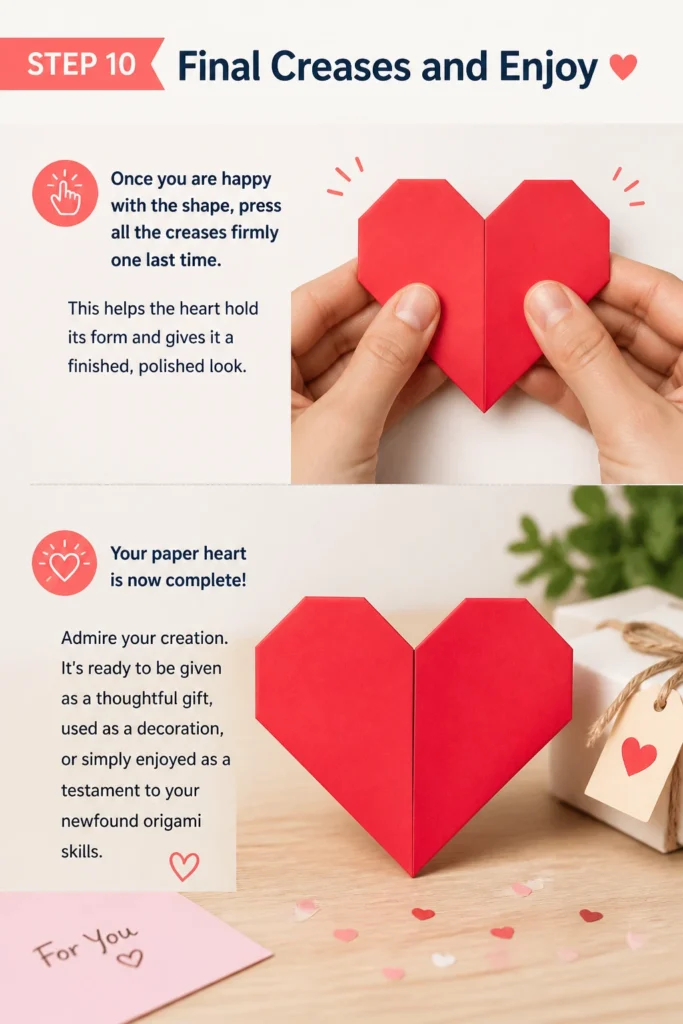
Admire your creation. It’s ready to be given as a thoughtful gift, used as a decoration, or simply enjoyed as a testament to your newfound origami skills.
Common Mistakes to Avoid
Not Creasing Firmly Enough
One of the most common issues beginners face is not pressing their folds sharply. Loose creases result in a floppy, undefined heart that doesn’t hold its shape well. Always use your fingernail or a bone folder to create crisp, defined lines, which are crucial for structural integrity.
Inaccurate Alignment
When folding, it’s tempting to rush and just eyeball the alignment of corners and edges. However, even slight inaccuracies can lead to a lopsided or asymmetrical heart. Take your time to carefully align edges and corners before creasing, especially in the initial diagonal and center folds.
Using Overly Thick Paper
While you can use various papers, very thick cardstock or construction paper can be challenging to fold, especially for the smaller, more intricate adjustments. This can lead to bulky folds that don’t lie flat and a heart that looks less refined. Opt for thinner papers designed for origami or standard printer paper for best results.
Forgetting to Unfold
Some steps require you to fold and then immediately unfold to create a crease line. Beginners sometimes forget this “unfold” step and continue folding, leading to confusion and an incorrect base shape. Always pay attention to whether a fold should be permanent or just for creating a guide crease.
Troubleshooting
My Heart Looks Lopsided
If your heart appears uneven, it’s usually due to inaccurate alignment in the earlier steps. Carefully go back to the beginning folds, especially the diagonal and center folds. Ensure all corners meet precisely and edges align perfectly before creasing. Sometimes, gently unfolding and refolding a specific section can correct the imbalance.
The Top Curves Aren’t Smooth
Sharp, unrounded top curves often mean you haven’t adequately folded in the small corner points in Step 8 and 9. Gently unfold those specific top and side corner sections. Make smaller, more deliberate inward folds to create a softer, more gradual curve. Experiment with the size of these small folds until you achieve the desired smoothness.
My Heart Doesn’t Lie Flat
A heart that doesn’t lie flat typically indicates that some creases aren’t firm enough, or the paper is too thick for the number of layers. Go back and re-crease all folds, applying more pressure. If using thick paper, try a thinner sheet for your next attempt. Also, ensure all layers are pressed down flat as you fold, preventing any hidden bulges.
Key Takeaways
- Always start with a perfectly square piece of paper for the best results.
- Precision in your folds, especially the initial diagonal and center alignments, is crucial for symmetry.
- Use firm, crisp creases throughout the process to ensure your heart holds its shape.
- Don’t be afraid to make small, subtle adjustments to the corners and edges for a more rounded, organic look.
- Practice makes perfect; your first heart might not be flawless, but each attempt improves your skill.
- This simple craft is a wonderful way to create a thoughtful, handmade gift or decoration.
Frequently Asked Questions
Can I use any size paper?
Yes, you can use any size square paper. The folding technique remains the same regardless of the dimensions. Smaller squares will produce smaller hearts, and larger squares will create larger hearts. Just ensure it’s perfectly square.
What kind of paper is best for making a heart?
Origami paper is ideal because it’s thin, durable, and comes in various colors and patterns. Standard printer paper (8.5×11 inches) cut into a square also works well. Avoid very thick cardstock as it can be difficult to fold neatly.
How can I make my paper heart more durable?
To make your paper heart more durable, you can use slightly heavier craft paper (but not too thick to fold). Once finished, you could also carefully spray it with a clear, matte sealant or a light coat of Mod Podge to protect it, though this might slightly alter its texture.
Can children make these paper hearts?
Absolutely! This is a fantastic beginner-friendly origami project for children, especially those aged 6 and up, with some supervision. It helps develop fine motor skills and patience. Guide them through each step, emphasizing careful alignment.
Our Top Recommended Finds
- Origami Paper Pack: A varied pack offers different colors and patterns, perfect for experimenting and making many unique hearts.
- Bone Folder: This tool helps create incredibly sharp, crisp creases, making your finished heart look more professional and polished.
- Craft Mat and Ruler: Essential for precisely cutting square paper from larger sheets, ensuring your starting material is perfect every time.
Fold Your Way to Joy
You’ve just learned how to transform a simple piece of paper into a symbol of affection and creativity. This isn’t just about making a heart; it’s about the satisfaction of creating something beautiful with your own hands. This skill opens the door to countless other paper crafts and origami projects.
Now that you have the basic technique down, why not explore different paper types, sizes, or even try adding a personal message to your heart? The possibilities are endless. Pick up some paper today and start folding your next masterpiece.
Beginner-friendly templates, step-by-step guides,
and weekly project ideas in your inbox.