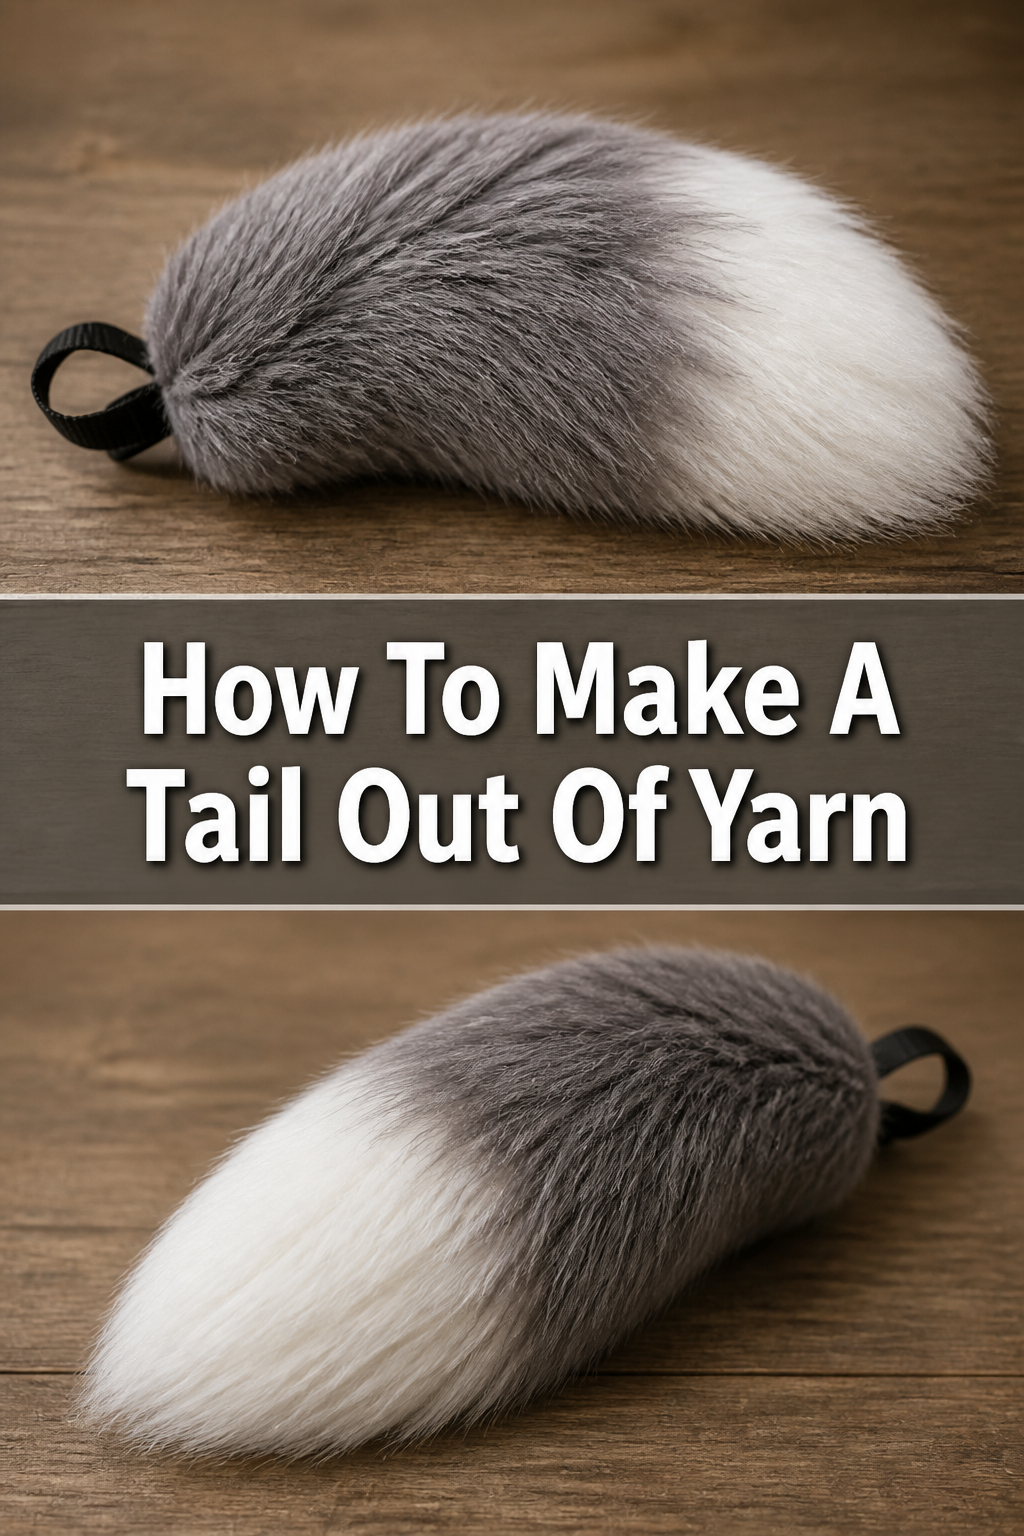
🧶 How To Make A Tail Out Of Yarn

Beginner-friendly templates, step-by-step guides,
and weekly project ideas in your inbox.
Creating a realistic animal tail doesn’t require expensive faux fur or professional sewing skills.
I started making these yarn tails for local theater groups years ago and perfected a method that looks surprisingly lifelike.
All you need is a bit of patience and some basic craft supplies to transform a ball of string into a fluffy masterpiece.
Quick Overview
Before you begin, it helps to understand the scope of this project.
- Time needed: 4 to 6 hours (depending on the desired length and fluffiness)
- Difficulty: Beginner
- What you’ll need: 100% acrylic yarn, a pet slicker brush, a hair straightener, sharp scissors, and a sturdy belt or cord.
Step-by-Step Instructions
Step 1: Choose Your Materials Wisely
Select 100% acrylic yarn for the best results in this project.
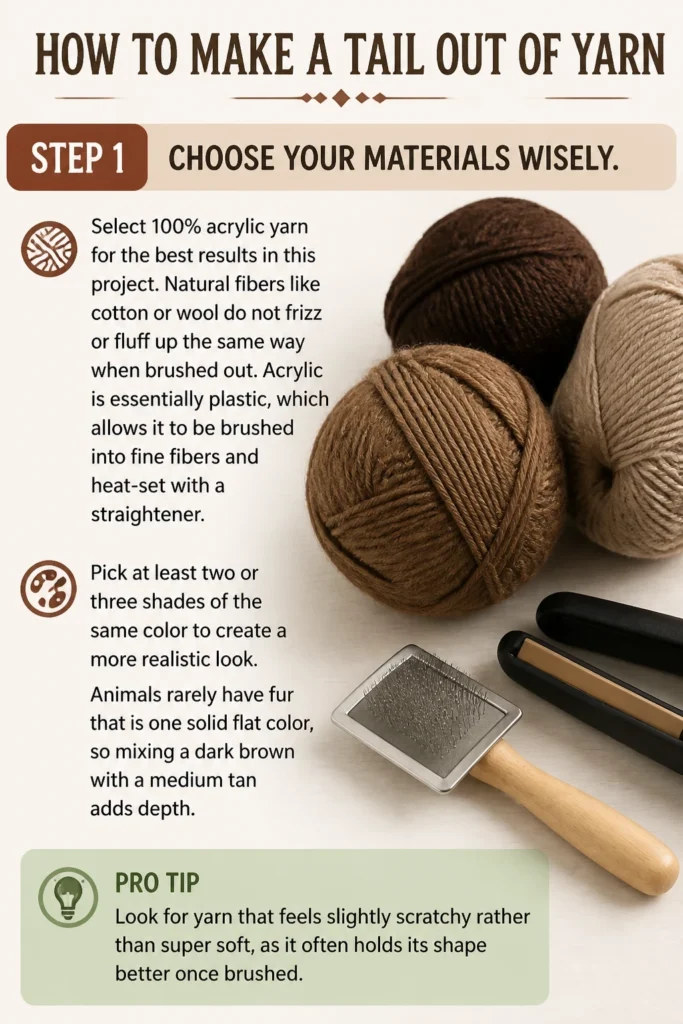
Natural fibers like cotton or wool do not “frizz” or fluff up the same way when brushed out.
Acrylic is essentially plastic, which allows it to be brushed into fine fibers and heat-set with a straightener.
Pick at least two or three shades of the same color to create a more realistic look.
Animals rarely have fur that is one solid flat color, so mixing a dark brown with a medium tan adds depth.
Pro Tip: Look for yarn that feels slightly “scratchy” rather than super soft, as it often holds its shape better once brushed.
Step 2: Create the Tail Foundation
Measure the length you want your tail to be and double that measurement for your base cord.
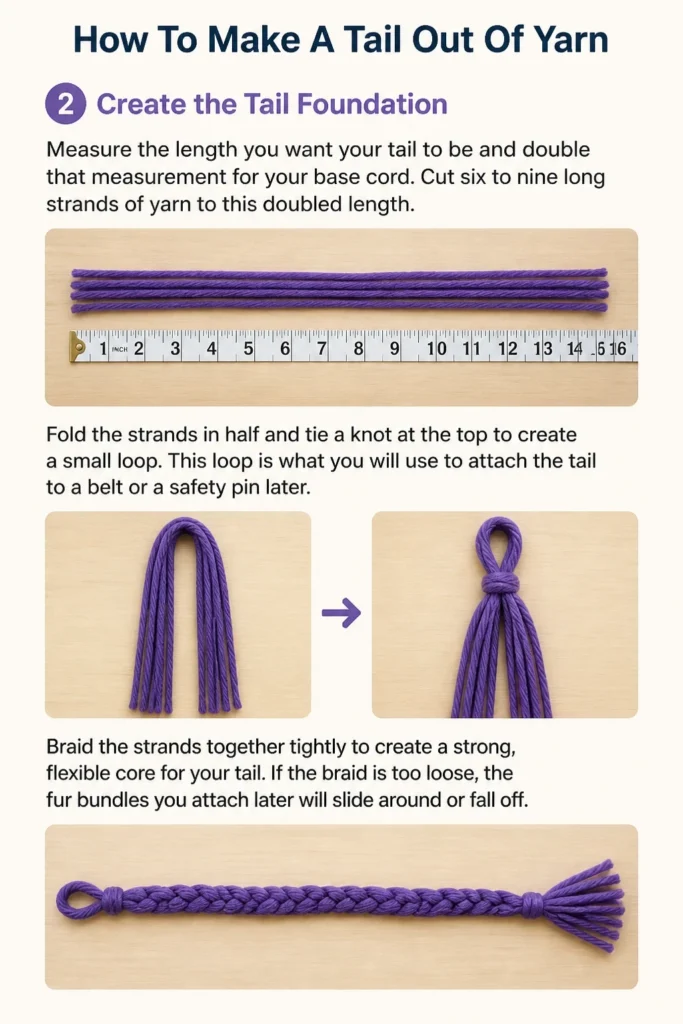
Cut six to nine long strands of yarn to this doubled length.
Fold the strands in half and tie a knot at the top to create a small loop.
This loop is what you will use to attach the tail to a belt or a safety pin later.
Braid the strands together tightly to create a strong, flexible core for your tail.
If the braid is too loose, the “fur” bundles you attach later will slide around or fall off.
Step 3: Prepare the Fur Bundles
Wrap your yarn around a piece of cardboard or your hand about 10 to 15 times.
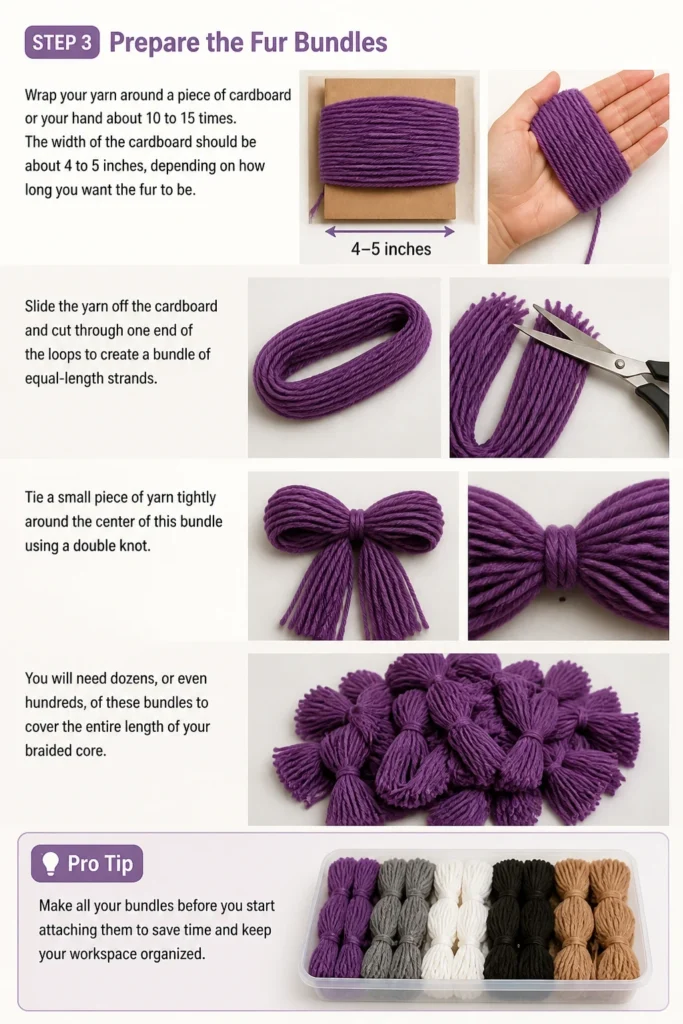
The width of the cardboard should be about 4 to 5 inches, depending on how long you want the fur to be.
Slide the yarn off the cardboard and cut through one end of the loops to create a bundle of equal-length strands.
Tie a small piece of yarn tightly around the center of this bundle using a double knot.
You will need dozens, or even hundreds, of these bundles to cover the entire length of your braided core.
Pro Tip: Make all your bundles before you start attaching them to save time and keep your workspace organized.
Step 4: Attach the Bundles to the Core
Start at the very bottom (the tip) of your braided core and work your way up toward the loop.
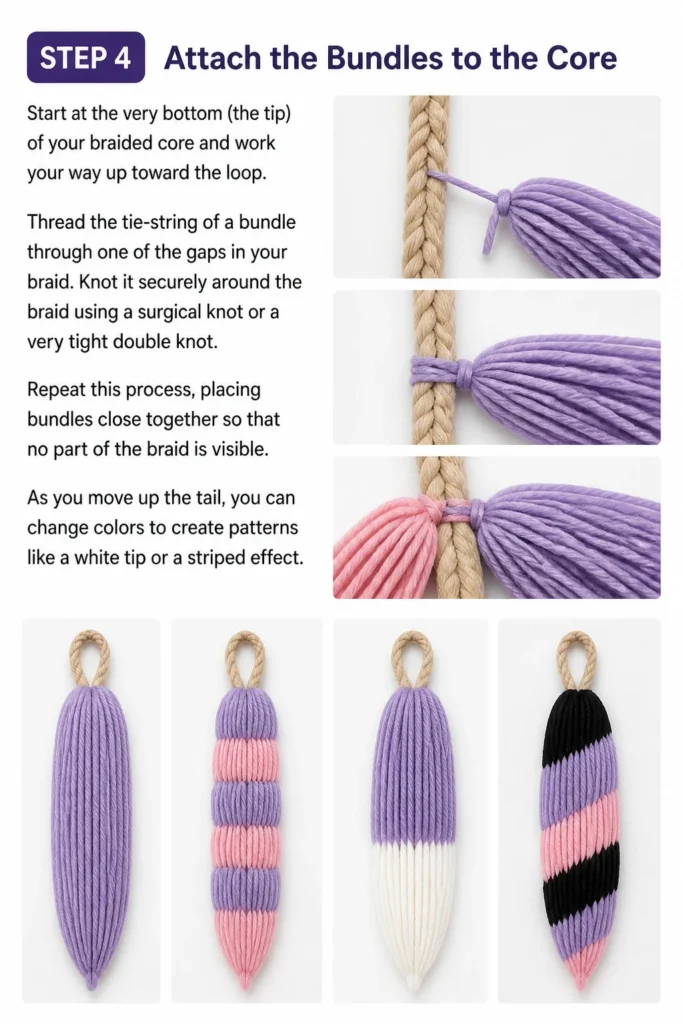
Thread the tie-string of a bundle through one of the gaps in your braid.
Knot it securely around the braid using a surgical knot or a very tight double knot.
Repeat this process, placing bundles close together so that no part of the braid is visible.
As you move up the tail, you can change colors to create patterns like a white tip or a striped effect.
Step 5: Brush Out the Yarn
Hold the tail firmly at the base and start brushing the yarn bundles with a metal pet slicker brush.
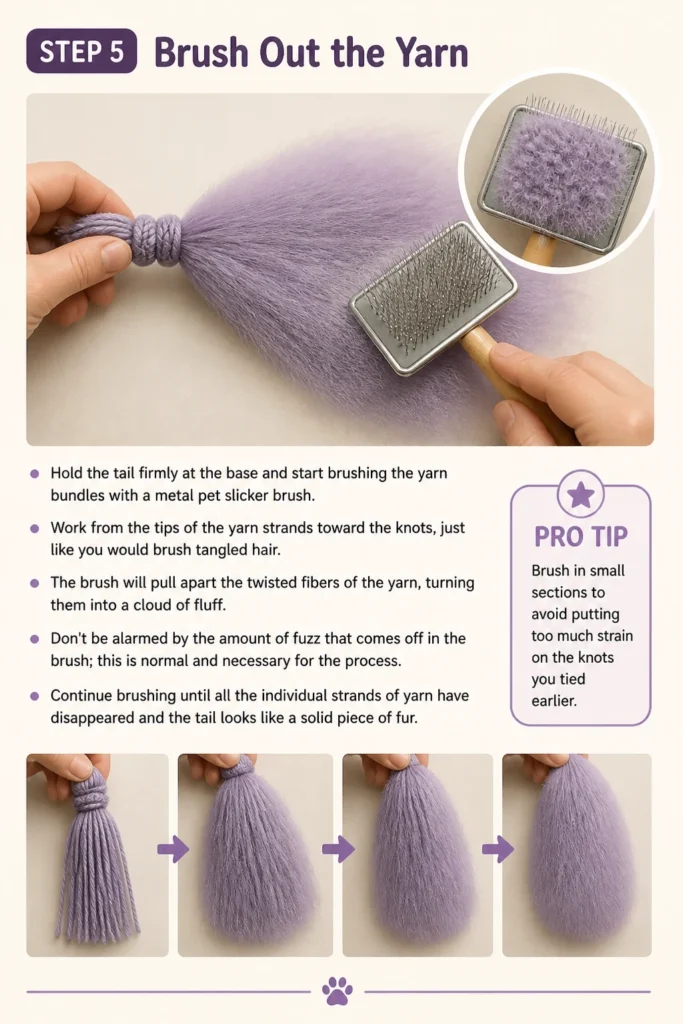
Work from the tips of the yarn strands toward the knots, just like you would brush tangled hair.
The brush will pull apart the twisted fibers of the yarn, turning them into a cloud of fluff.
Don’t be alarmed by the amount of “fuzz” that comes off in the brush; this is normal and necessary for the process.
Continue brushing until all the individual strands of yarn have disappeared and the tail looks like a solid piece of fur.
Pro Tip: Brush in small sections to avoid putting too much strain on the knots you tied earlier.
Step 6: Heat-Set the Fibers
Plug in a hair straightener and set it to a low or medium heat setting.
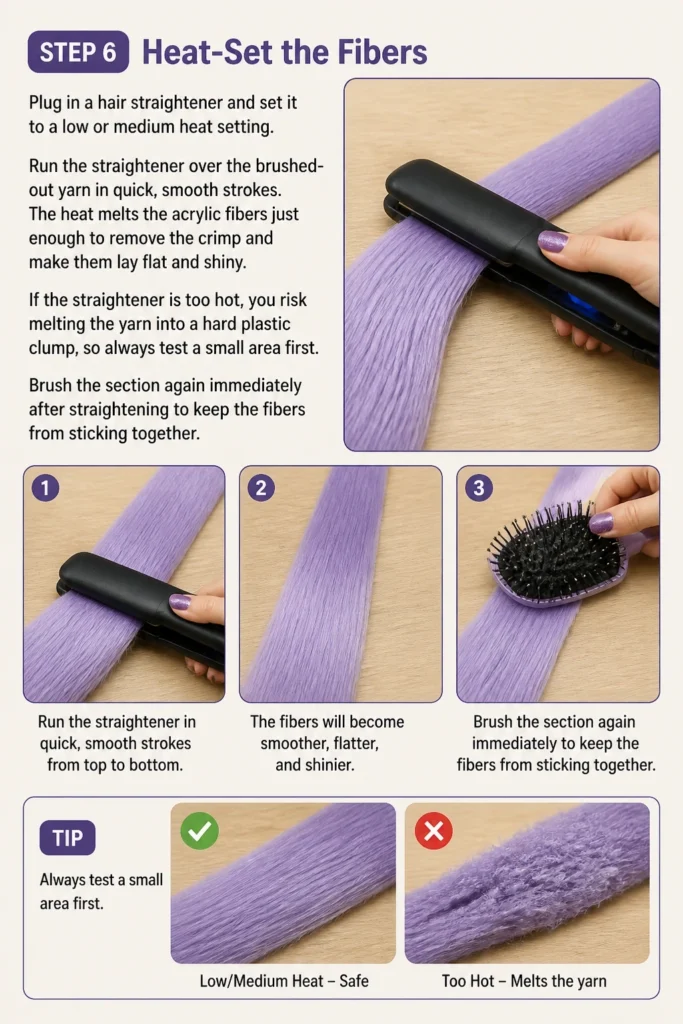
Run the straightener over the brushed-out yarn in quick, smooth strokes.
The heat “melts” the acrylic fibers just enough to remove the crimp and make them lay flat and shiny.
If the straightener is too hot, you risk melting the yarn into a hard plastic clump, so always test a small area first.
Brush the section again immediately after straightening to keep the fibers from sticking together.
Step 7: Trim and Shape
Shake the tail vigorously to let the fibers fall naturally.
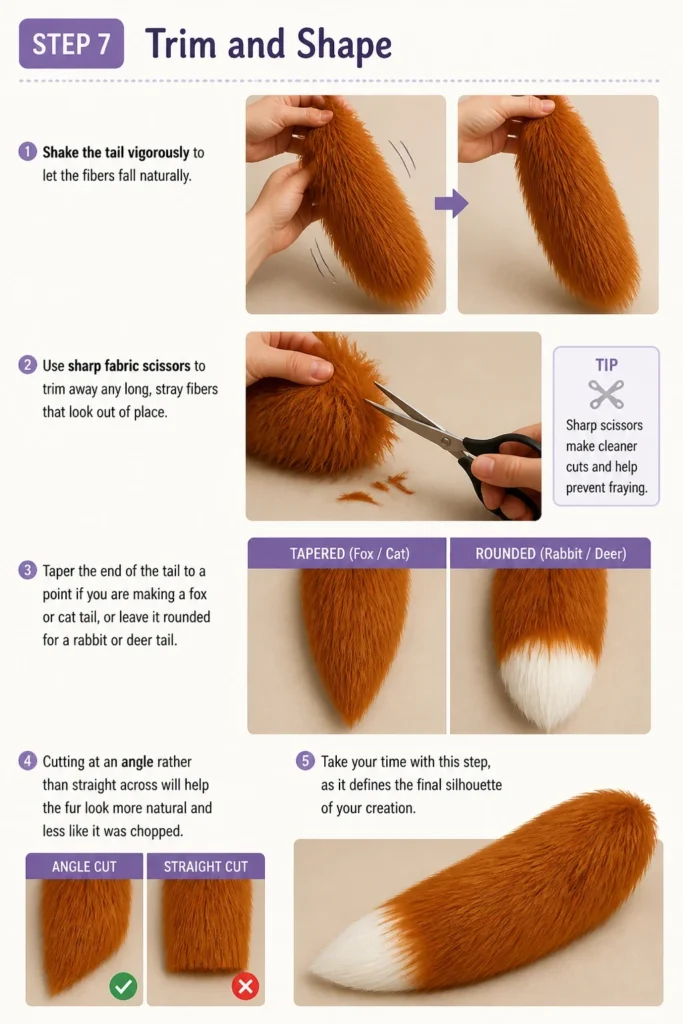
Use sharp fabric scissors to trim away any long, stray fibers that look out of place.
Taper the end of the tail to a point if you are making a fox or cat tail, or leave it rounded for a rabbit or deer tail.
Cutting at an angle rather than straight across will help the fur look more natural and less like it was chopped.
Take your time with this step, as it defines the final silhouette of your creation.
Common Mistakes to Avoid
Using Natural Fiber Yarn
Many beginners try to use cotton or wool because they like the feel of the material. This is a mistake because natural fibers do not have the same structural properties as plastic-based acrylic. When you brush cotton, it tends to break or stay clumped rather than turning into fine, hair-like strands. Stick to the cheapest acrylic yarn you can find, as it often produces the best fur-like results.
Tying Loose Knots
If the knots holding your bundles to the core are not extremely tight, the weight of the brushed yarn will cause them to sag. Over time, the bundles may even slide down the braid and bunch up at the bottom. Make sure every single knot is cinched down as hard as possible before you move on to the brushing phase. You can even add a small drop of fabric glue to each knot for extra security.
Applying Too Much Heat
It is tempting to use the highest setting on your hair straightener to get the job done faster. However, acrylic yarn has a low melting point. High heat will turn your fluffy tail into a frizzy, singed mess that feels like sandpaper. Always start with the lowest heat setting and only increase it if the fibers aren’t straightening. Keep the straightener moving constantly to avoid burning any one spot.
Troubleshooting
The Tail Is Too Stiff
If your tail feels more like a club than a flexible animal appendage, you likely attached the bundles too close together. While you want the tail to be full, over-packing the core restricts its movement. To fix this, you can carefully trim away a few bundles from the middle of the tail. Brushing the fibers more thoroughly can also help soften the overall structure.
The Core Is Showing Through
This happens when the bundles are too far apart or if you didn’t use enough yarn in each bundle. You can fix this by creating “patch” bundles. Simply tie a new bundle of yarn directly onto the visible part of the braid and brush it out to blend with the surrounding fur. Make sure to brush it well so the new fibers integrate seamlessly with the old ones.
Excessive Shedding
All yarn tails will shed a little bit during the initial brushing, but if it continues, your knots might be coming undone. Check the base of the shedding area to see if the tie-strings are loose. If the fibers are just breaking off, you might be brushing too aggressively. Use a lighter touch and ensure you are always brushing from the ends toward the center.
Key Takeaways
- Acrylic is essential: Only use 100% acrylic yarn to ensure the fibers can be brushed and heat-set properly.
- The core matters: A tight braid provides the necessary foundation to hold the weight of the yarn bundles.
- Brush in stages: Work in small sections from the tips to the knots to prevent pulling the bundles off the core.
- Heat adds realism: Using a hair straightener removes the yarn’s “kink” and gives it the shine of real animal fur.
- Layer your colors: Mixing different shades of yarn within your bundles creates a professional, multi-dimensional look.
- Patience is key: This is a time-consuming process, but the results are much higher quality than store-bought options.
Frequently Asked Questions
Can I wash a yarn tail?
You can gently hand wash a yarn tail in cool water with a small amount of mild detergent. Do not put it in a washing machine or dryer, as the agitation will ruin the brushed fibers. After washing, you will need to re-brush and potentially re-straighten the tail once it is completely air-dried. It is usually better to spot-clean the tail whenever possible to maintain its fluffiness.
How do I attach the tail to my clothes?
The easiest way is to thread a sturdy belt through the loop you created at the top of the braid. This allows the tail to sit naturally against your lower back. If you aren’t wearing a belt, you can use a large, heavy-duty safety pin to attach the loop to the waistband of your pants. For a more permanent solution, some people sew the loop directly onto the back of a costume.
How much yarn do I need for a large tail?
For a standard fox-sized tail (about 20-24 inches), you will typically need two large skeins of acrylic yarn. If you want a very thick, “super-fluff” tail, you might need a third skein. It is always better to have too much yarn than to run out halfway through the project. Different brands have different thicknesses, so try to stick to the same brand for the entire tail.
How do I make the tail wag?
Because yarn tails are made of a flexible braid, they have a natural “sway” when you walk. If you want more control, you can insert a thick gauge of copper wire or a plastic “spine” into the center of the braid. This allows you to pose the tail in different positions. However, be careful with wire, as repeated bending can cause it to snap over time.
Our Top Recommended Finds
- Metal Slicker Brush: A standard pet grooming brush with fine metal bristles is the only tool that effectively separates yarn fibers.
- Low-Heat Hair Straightener: Look for one with adjustable temperature settings so you don’t accidentally melt your project.
- Fabric Scissors: Sharp, dedicated fabric shears make trimming and shaping the tail much easier and prevent “chewed” looking edges.
Bring Your Character To Life
Now that you have the foundation for creating a professional-grade yarn tail, you can experiment with different lengths and textures. Try making a short, stubby deer tail or a long, elegant lion tail with a tufted end.
The techniques you learned here can also be applied to making matching ears or even fur tufts for a full costume. Take your supplies and start on your first bundle today to see how quickly your creation takes shape.
Beginner-friendly templates, step-by-step guides,
and weekly project ideas in your inbox.