✨ How To Make Dream Catchers Step By Step

Beginner-friendly templates, step-by-step guides,
and weekly project ideas in your inbox.
Have you ever wanted to create something both beautiful and meaningful with your own hands?
Making a dream catcher is a wonderfully rewarding craft that connects you to ancient traditions and your creative spirit.
Having crafted many of these over the years for friends and family, I can guide you through each step with practical advice, ensuring your project is a success.

Quick Overview
This guide will help you craft a charming dream catcher, perfect for personal decor or a thoughtful gift. You’ll learn the essential techniques for weaving and embellishing.
- Time needed: 2-4 hours (depending on complexity and drying time)
- Difficulty: Beginner
- What you’ll need: A hoop, yarn/cord, beads, feathers, scissors, and optional craft glue.
Step-by-Step Instructions
Step 1: Choose and Prepare Your Hoop
Select a sturdy hoop for your dream catcher’s foundation. Metal hoops are durable and readily available, while wooden hoops offer a more natural, rustic feel.
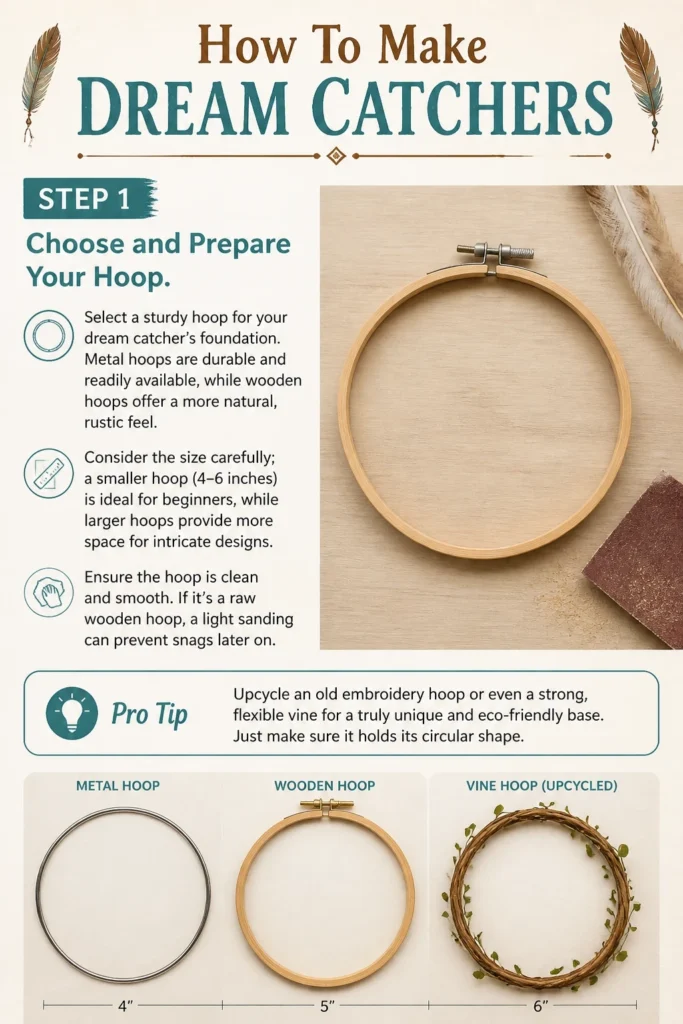
Consider the size carefully; a smaller hoop (4-6 inches) is ideal for beginners, while larger hoops provide more space for intricate designs.
Ensure the hoop is clean and smooth. If it’s a raw wooden hoop, a light sanding can prevent snags later on.
Pro Tip: Upcycle an old embroidery hoop or even a strong, flexible vine for a truly unique and eco-friendly base. Just make sure it holds its circular shape.
Step 2: Wrap the Hoop with Cord or Yarn
Begin wrapping your chosen cord or yarn tightly around the hoop. Start by tying one end securely to the hoop with a knot.
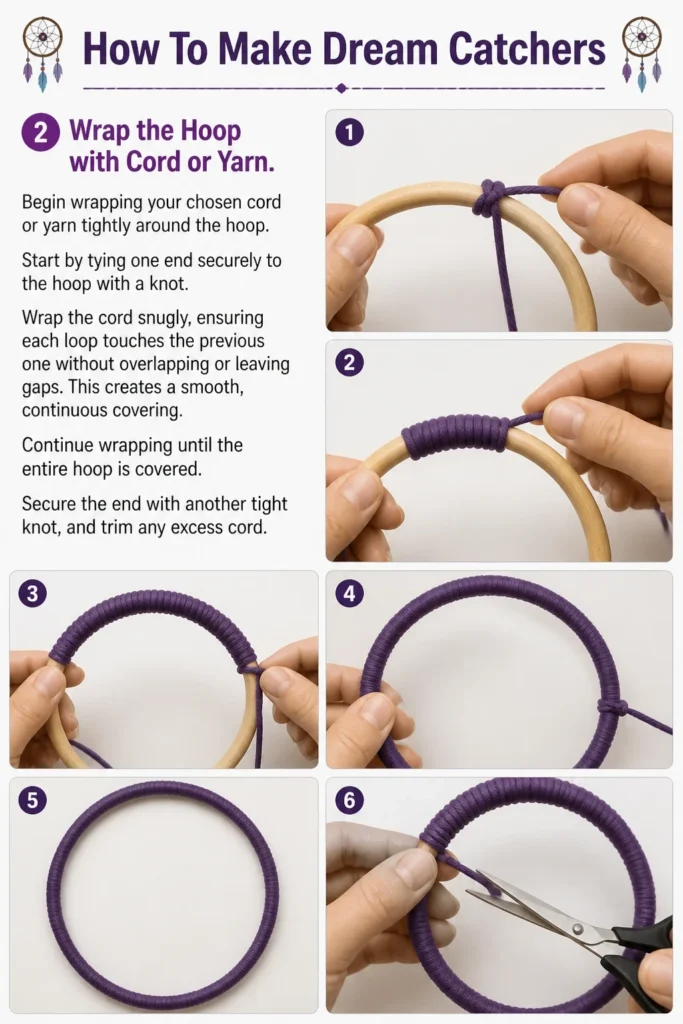
Wrap the cord snugly, ensuring each loop touches the previous one without overlapping or leaving gaps. This creates a smooth, continuous covering.
Continue wrapping until the entire hoop is covered. Secure the end with another tight knot, and trim any excess cord.
Step 3: Weave the Inner Web Foundation
Create the initial loops for your web. Tie one end of your web-weaving cord securely to the wrapped hoop.
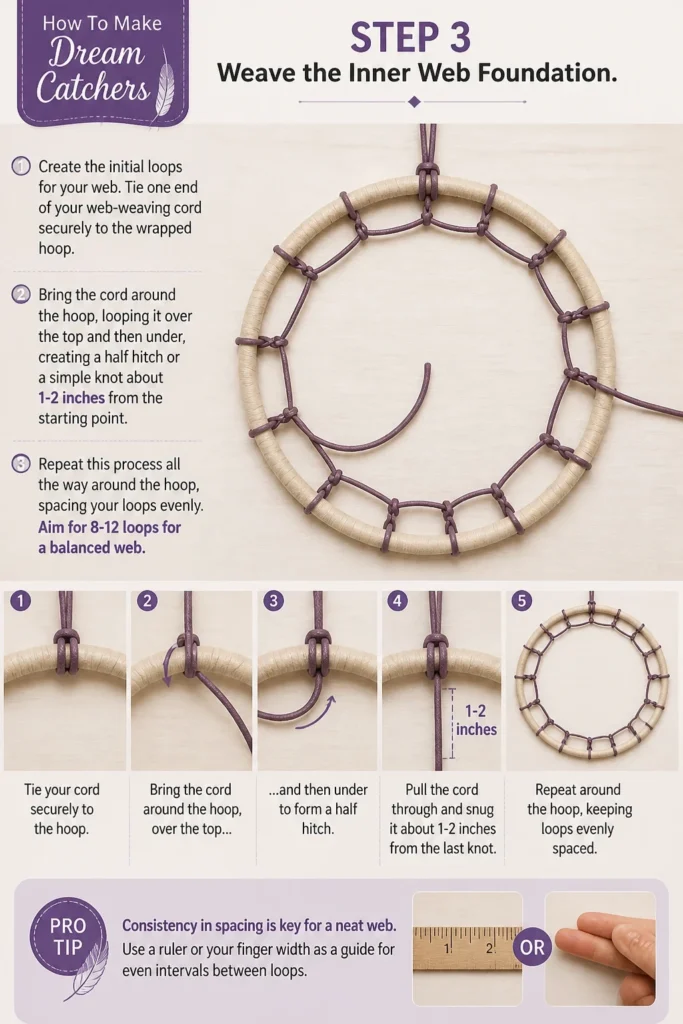
Bring the cord around the hoop, looping it over the top and then under, creating a half hitch or a simple knot about 1-2 inches from the starting point.
Repeat this process all the way around the hoop, spacing your loops evenly. Aim for 8-12 loops for a balanced web.
Pro Tip: Consistency in spacing is key for a neat web. Use a ruler or your finger width as a guide for even intervals between loops.
Step 4: Continue Weaving the Web
Start the second row of your web by looping the cord through the center of the first row’s loops. Instead of going around the hoop, you’ll now loop into the middle of the cord segments you just created.
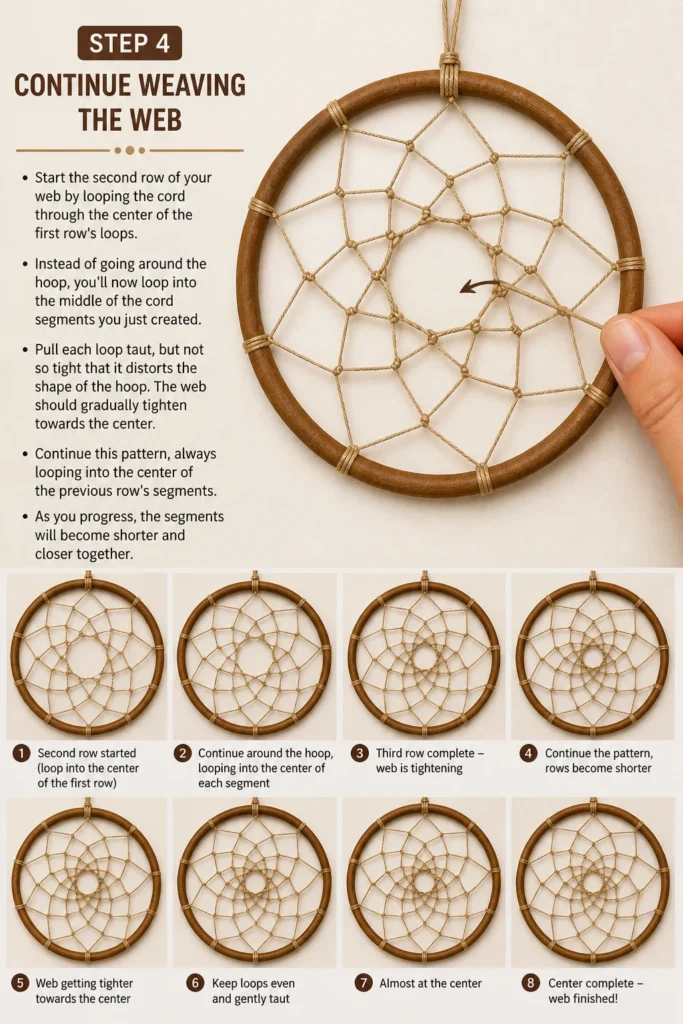
Pull each loop taut, but not so tight that it distorts the shape of the hoop. The web should gradually tighten towards the center.
Continue this pattern, always looping into the center of the previous row’s segments. As you progress, the segments will become shorter and closer together.
Step 5: Incorporate Beads into the Web
Add beads as you weave for extra visual appeal. When you’re ready to add a bead, simply thread it onto your weaving cord before making your next loop.
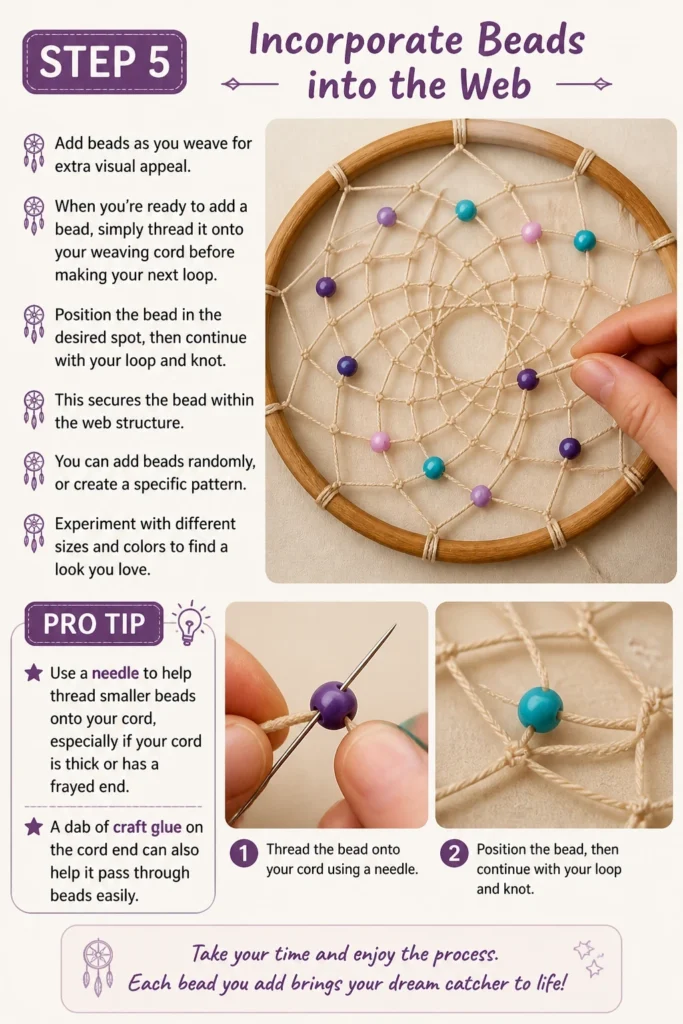
Position the bead in the desired spot, then continue with your loop and knot. This secures the bead within the web structure.
You can add beads randomly, or create a specific pattern. Experiment with different sizes and colors to find a look you love.
Pro Tip: Use a needle to help thread smaller beads onto your cord, especially if your cord is thick or has a frayed end. A dab of craft glue on the cord end can also help it pass through beads easily.
Step 6: Finish the Web and Create a Hanging Loop
Complete your web when it reaches a small opening in the center. Secure the final loop with a tight knot, perhaps a double knot, to prevent unraveling.
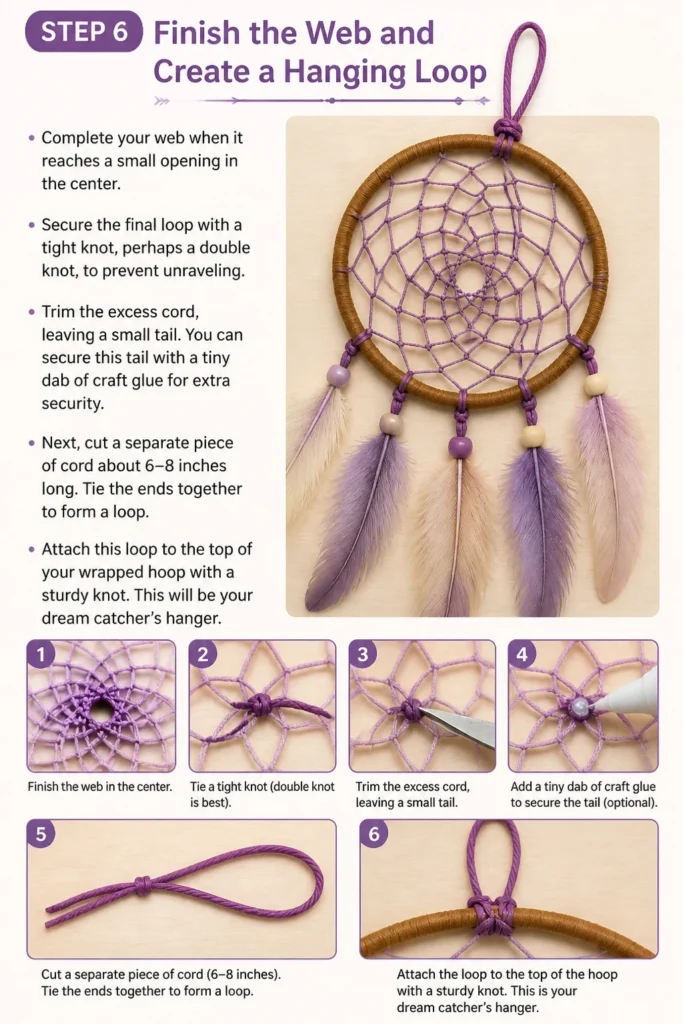
Trim the excess cord, leaving a small tail. You can secure this tail with a tiny dab of craft glue for extra security.
Next, cut a separate piece of cord about 6-8 inches long. Tie the ends together to form a loop, then attach this loop to the top of your wrapped hoop with a sturdy knot. This will be your dream catcher’s hanger.
Step 7: Attach Feathers and Dangling Embellishments
Prepare your dangling strands. Cut several pieces of cord or yarn to varying lengths for the bottom of your dream catcher.
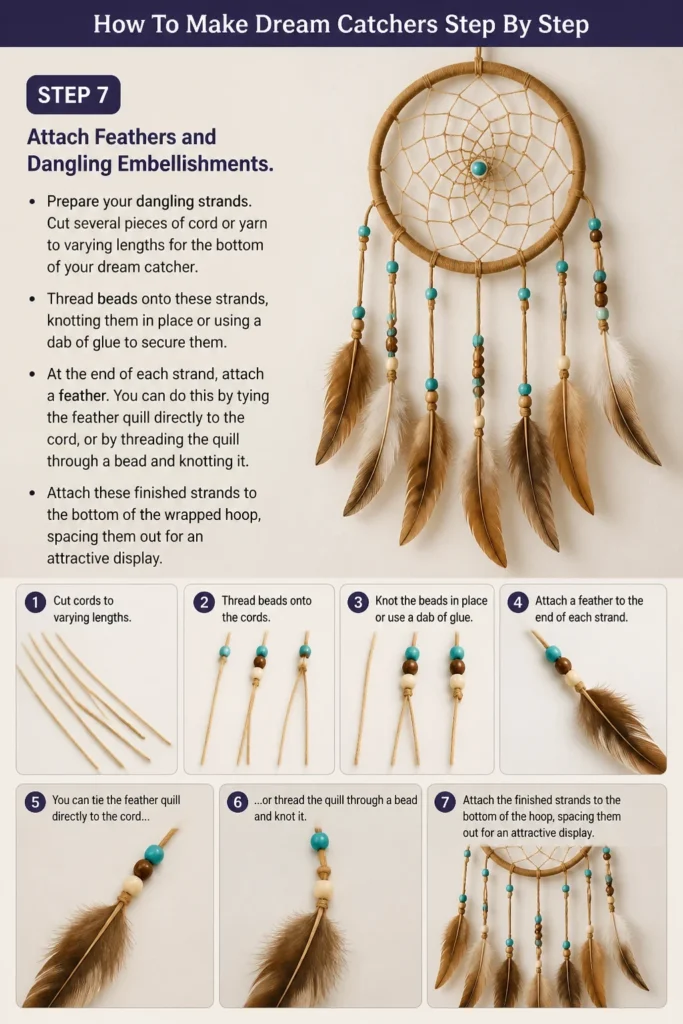
Thread beads onto these strands, knotting them in place or using a dab of glue to secure them. At the end of each strand, attach a feather.
You can do this by tying the feather quill directly to the cord, or by threading the quill through a bead and knotting it. Attach these finished strands to the bottom of the wrapped hoop, spacing them out for an attractive display.
Common Mistakes to Avoid
Wrapping the Hoop Too Loosely
A common error is not wrapping the hoop tightly enough. Loose wrapping can lead to gaps appearing over time, exposing the hoop underneath.
Ensure each wrap is snug against the last, creating a solid, uniform surface. If you notice a loose section, carefully unwrap and re-wrap that portion.
Uneven Web Spacing
Inconsistent spacing in the web can make the finished dream catcher look lopsided or messy. It’s easy to rush through the initial loops.
Take your time with the first few rows, measuring or eyeballing carefully to maintain even distances. A well-spaced foundation leads to a beautiful, symmetrical web.
Over-Tightening the Web
Pulling the web-weaving cord too tightly can distort the shape of your hoop, making it oval instead of circular. This is a common beginner’s mistake.
Apply gentle, consistent tension as you weave. The web should be taut but not stressed, allowing the hoop to maintain its perfect roundness.
Using Fragile Embellishments
Choosing very delicate beads or feathers can result in them breaking easily, especially if the dream catcher is handled often. Think about where it will be displayed.
Opt for durable craft feathers and sturdy beads that can withstand a bit of movement. If you use natural elements, ensure they are properly dried and sealed if necessary.
Troubleshooting
Web Looks Uneven or Sagging
If your web appears uneven or has loose sections, it often means the tension was inconsistent during weaving. The best solution is to carefully unweave the problematic section back to where the tension was good.
Re-weave with a more consistent pull on the cord. Remember to pull each loop just enough to be taut, but not so much that it causes distortion.
Cord Keeps Fraying When Adding Beads
A fraying cord makes threading beads incredibly frustrating. This typically happens with softer yarns or when the cord end isn’t neat.
Trim the end of your cord cleanly with sharp scissors. For extra help, apply a tiny drop of craft glue to the tip and let it dry, or use a needle with a large eye to guide the cord through the beads.
Feathers Won’t Stay Attached
If your feathers are falling off, the knot securing them might not be tight enough or the quill is too smooth. This is easily fixed with a bit of reinforcement.
Ensure your knot is very secure, perhaps a double or triple knot. A tiny dab of craft glue applied directly to the knot where it meets the feather quill will provide a strong, lasting hold.
Key Takeaways
- Choose a sturdy hoop and wrap it tightly for a professional finish.
- Maintain even tension and spacing throughout the web weaving process.
- Incorporate beads and feathers thoughtfully to enhance your design.
- Secure all knots firmly, using craft glue for added durability where needed.
- Take your time and enjoy the creative journey of bringing your dream catcher to life.
Frequently Asked Questions
What kind of cord is best for wrapping the hoop?
Suede cord, cotton yarn, or hemp twine are excellent choices. Suede provides a soft, natural look, while cotton yarns offer a wide range of colors and textures. Choose a material that complements your overall design vision and is easy to handle.
Can I use real feathers?
Yes, you can use real feathers, provided they are ethically sourced. Ensure they are clean and free of parasites before incorporating them into your dream catcher. Craft feathers are a safe and readily available alternative.
How do I make a larger dream catcher?
The process is the same for larger dream catchers, but they will require more material and more time. You’ll need a larger hoop, longer lengths of cord for both wrapping and weaving, and more embellishments. Be prepared for a more extensive project.
Is there a specific number of points for the web?
Traditionally, dream catchers often have 8 points in the first row of the web, symbolizing the spider’s eight legs, a sacred creature in some Native American cultures. However, for a beginner, any even number of loops (6, 8, 10, 12) will create a symmetrical and pleasing web.
Your Creative Journey Begins Now
Congratulations on taking the first step towards crafting your own beautiful dream catcher! This project is more than just a craft; it’s a chance to infuse your space with personal meaning and artistic flair.
Once you’ve mastered the basics, consider experimenting with different hoop shapes, weaving patterns, or unique natural materials like shells and dried flowers.
Don’t wait another moment to start creating. Gather your materials, follow these steps, and bring a touch of handmade magic into your home today!
Beginner-friendly templates, step-by-step guides,
and weekly project ideas in your inbox.