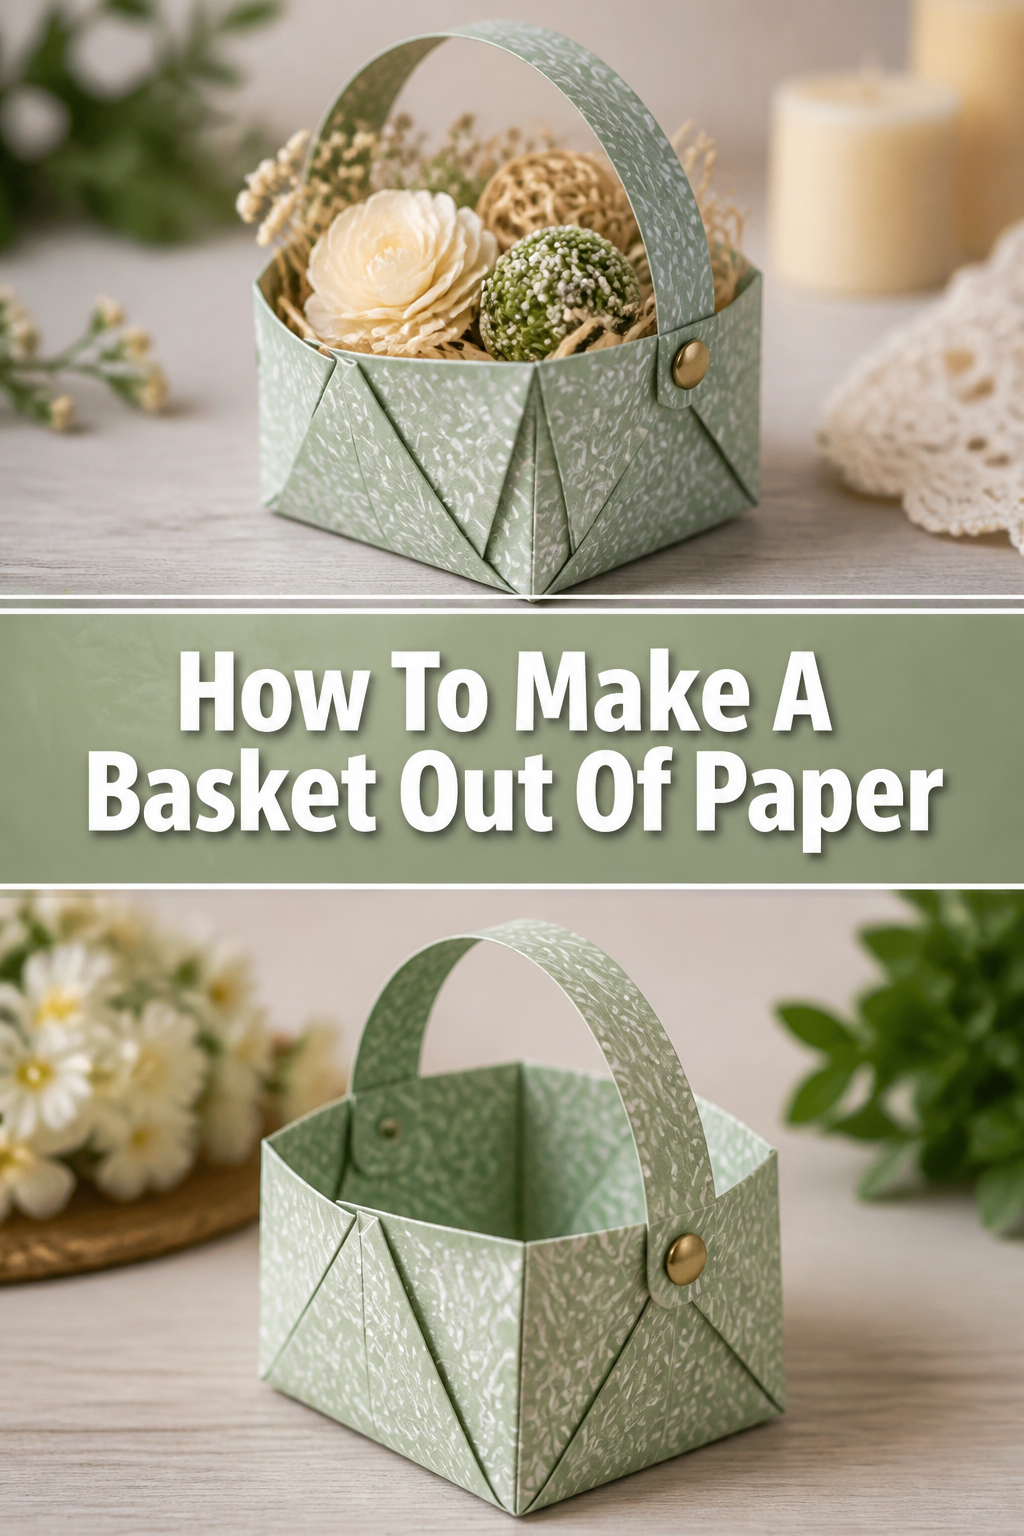
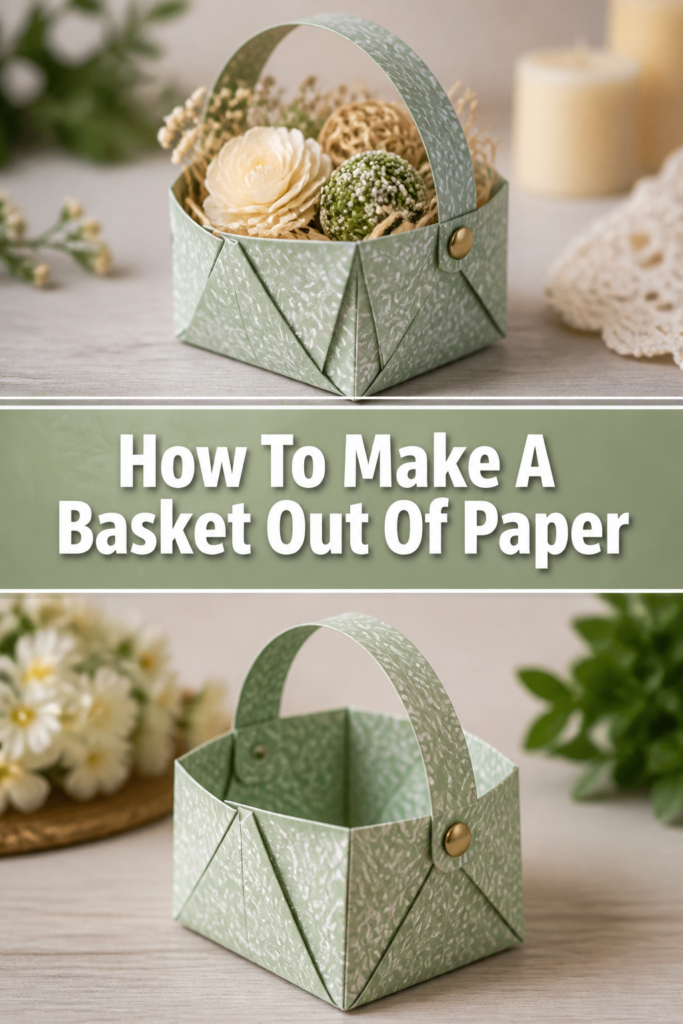
🧺 How To Make A Basket Out Of Paper

Beginner-friendly templates, step-by-step guides,
and weekly project ideas in your inbox.
There’s something truly satisfying about crafting something beautiful and functional with your own hands.
I remember the first paper basket I made; it was a simple design, but the joy of seeing flat sheets of paper transform into a sturdy container was immense.
This guide will walk you through creating your own paper basket, sharing all the practical tips I’ve learned along the way, ensuring your project is a success.
Quick Overview
You’re about to embark on a creative journey, turning ordinary paper into a charming and useful basket.
This project is perfect for adding a personal touch to your home decor or gifting a unique, handmade item.
- Time needed: 2-4 hours (depending on drying time and basket size)
- Difficulty: Beginner to Intermediate
- What you’ll need: Paper, ruler, pencil, scissors, glue, clips
Step-by-Step Instructions
Step 1: Gather Your Materials
Collect all your supplies before you begin. Having everything at hand makes the process smooth and enjoyable.
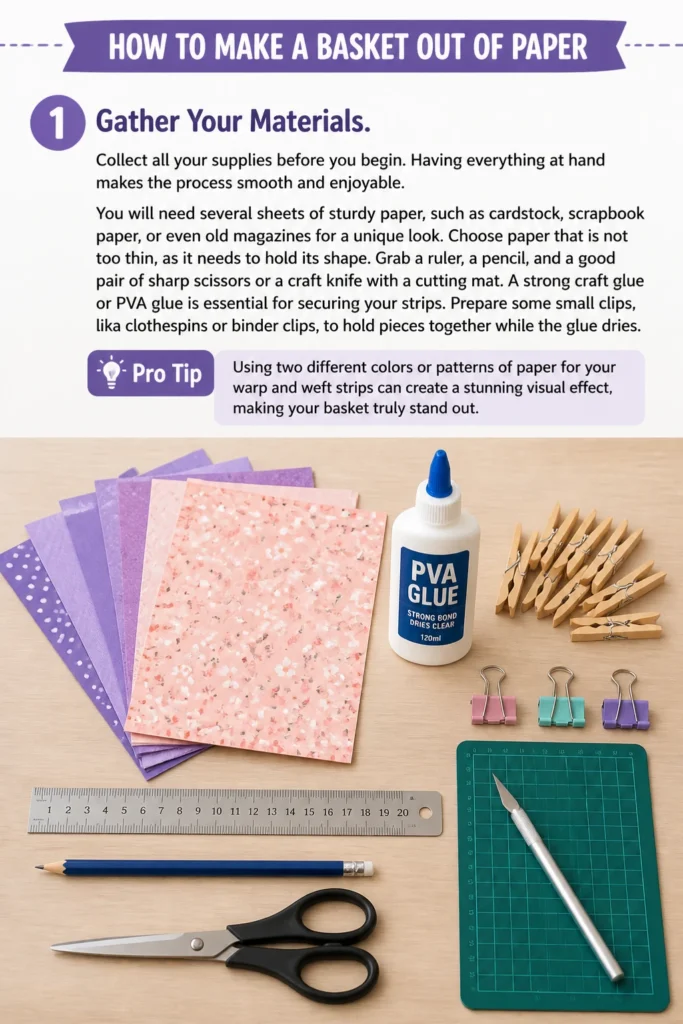
You will need several sheets of sturdy paper, such as cardstock, scrapbook paper, or even old magazines for a unique look. Choose paper that is not too thin, as it needs to hold its shape.
Grab a ruler, a pencil, and a good pair of sharp scissors or a craft knife with a cutting mat. A strong craft glue or PVA glue is essential for securing your strips.
Prepare some small clips, like clothespins or binder clips, to hold pieces together while the glue dries.
Pro Tip: Using two different colors or patterns of paper for your warp and weft strips can create a stunning visual effect, making your basket truly stand out.
Step 2: Prepare Your Paper Strips
Measure and mark your paper sheets. For a medium-sized basket, strips that are 1 inch (2.5 cm) wide work well.
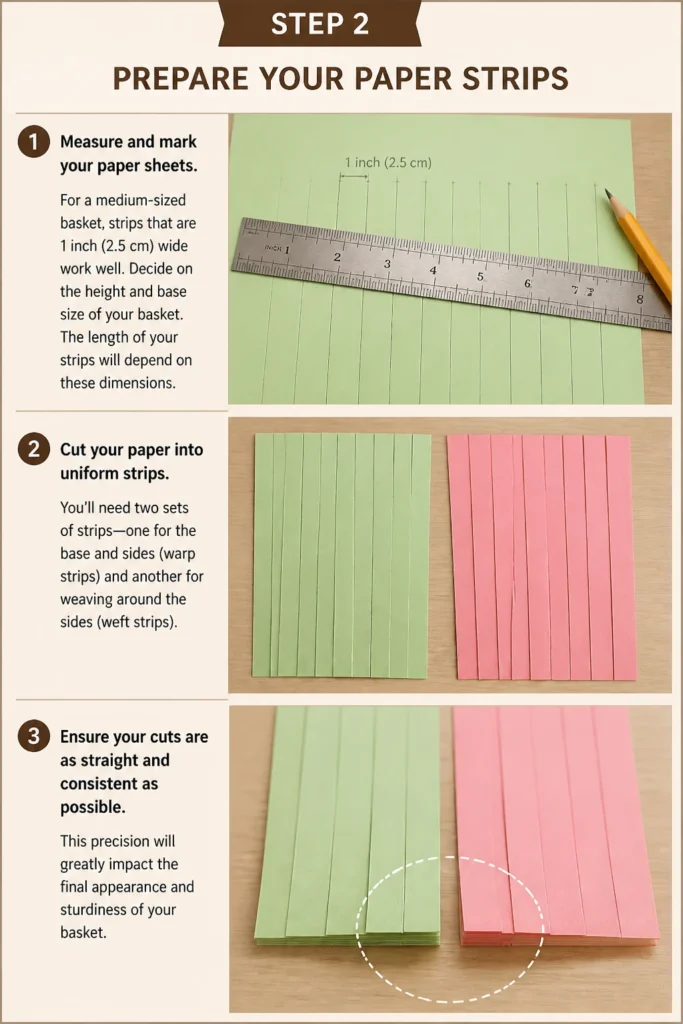
Decide on the height and base size of your basket. The length of your strips will depend on these dimensions.
Cut your paper into uniform strips. You’ll need two sets of strips: one for the base and sides (warp strips) and another for weaving around the sides (weft strips).
Ensure your cuts are as straight and consistent as possible. This precision will greatly impact the final appearance and sturdiness of your basket.
Step 3: Create the Basket Base
Lay out your first set of strips (warp strips) for the base. Place several strips parallel to each other on your work surface.
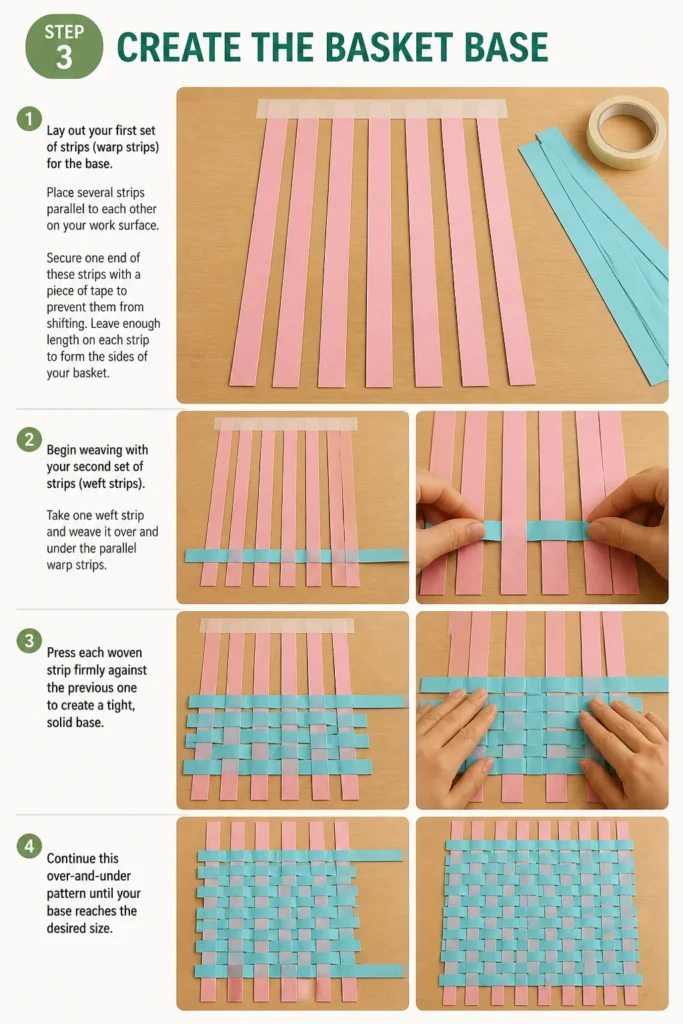
Secure one end of these strips with a piece of tape to prevent them from shifting. Leave enough length on each strip to form the sides of your basket.
Begin weaving with your second set of strips (weft strips). Take one weft strip and weave it over and under the parallel warp strips.
Press each woven strip firmly against the previous one to create a tight, solid base. Continue this over-and-under pattern until your base reaches the desired size.
Step 4: Secure the Base Edges
Apply a thin line of glue along the edges of your woven base. This helps to lock the strips in place and prevents them from unraveling.
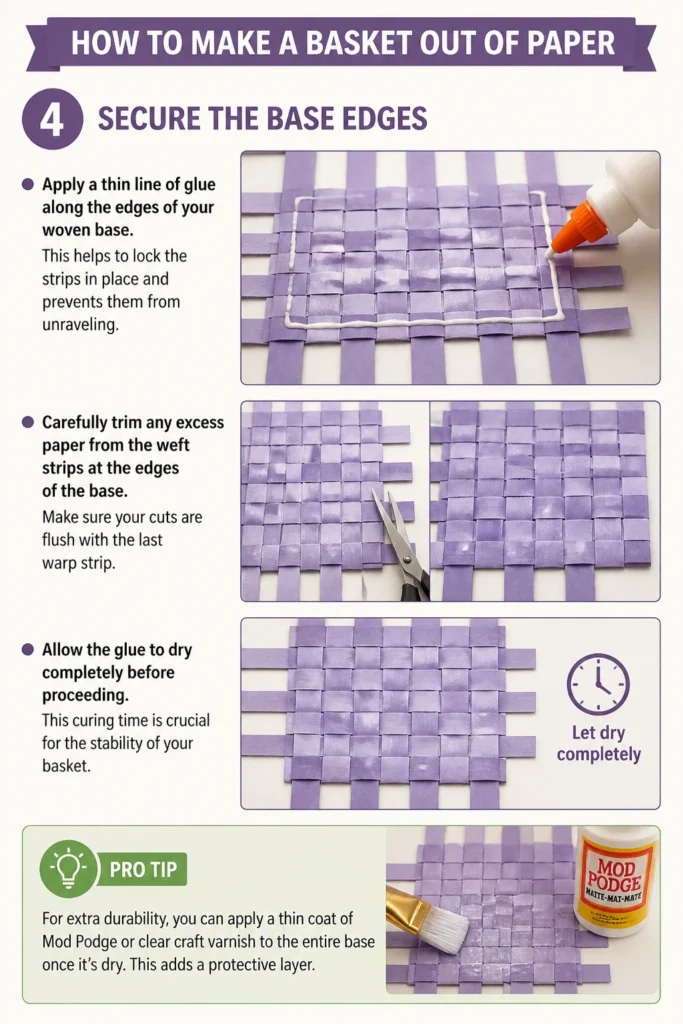
Carefully trim any excess paper from the weft strips at the edges of the base. Make sure your cuts are flush with the last warp strip.
Allow the glue to dry completely before proceeding. This curing time is crucial for the stability of your basket.
Pro Tip: For extra durability, you can apply a thin coat of Mod Podge or clear craft varnish to the entire base once it’s dry. This adds a protective layer.
Step 5: Turn Up the Warp Strips
Gently bend the remaining lengths of your warp strips upwards. These will form the vertical sides of your basket.
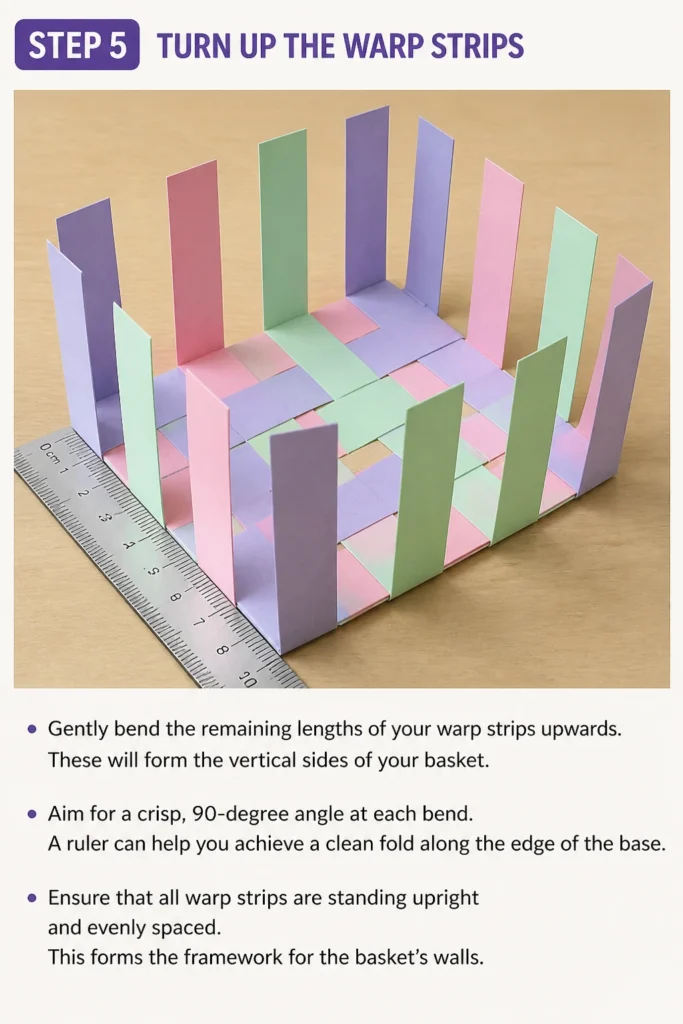
Aim for a crisp, 90-degree angle at each bend. A ruler can help you achieve a clean fold along the edge of the base.
Ensure that all warp strips are standing upright and evenly spaced. This forms the framework for the basket’s walls.
Step 6: Weave the Basket Sides
Take a new weft strip. Begin weaving it around the upright warp strips, using the same over-and-under pattern you used for the base.
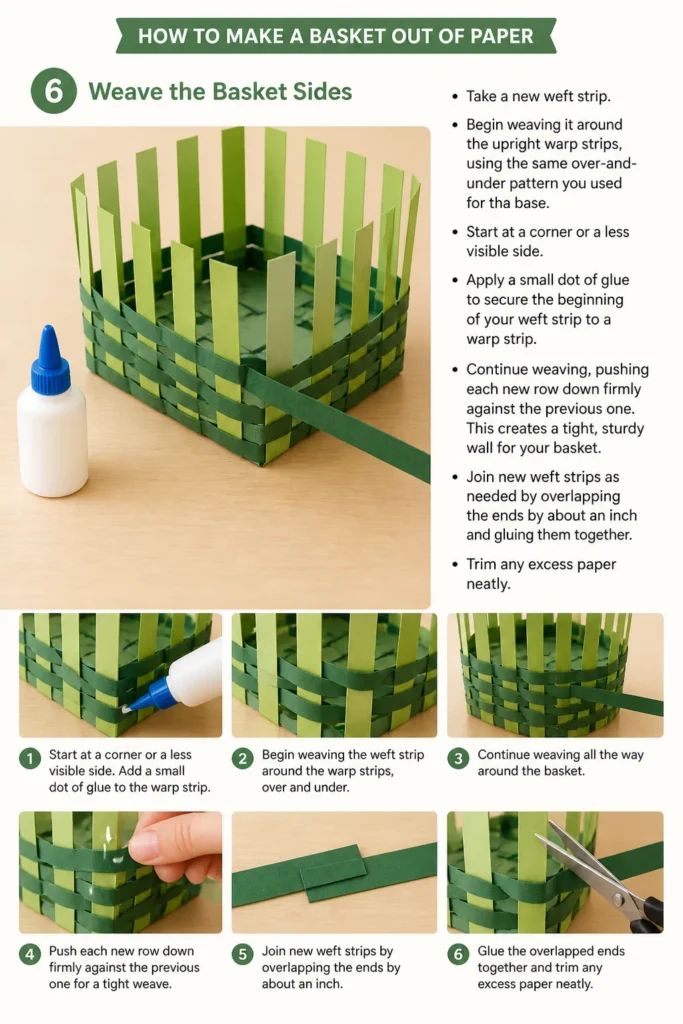
Start at a corner or a less visible side. Apply a small dot of glue to secure the beginning of your weft strip to a warp strip.
Continue weaving, pushing each new row down firmly against the previous one. This creates a tight, sturdy wall for your basket.
Join new weft strips as needed by overlapping the ends by about an inch and gluing them together. Trim any excess paper neatly.
Step 7: Finish the Top Edge
Weave the sides until your basket reaches the desired height. Once you have your final row of weaving, it’s time to finish the top.
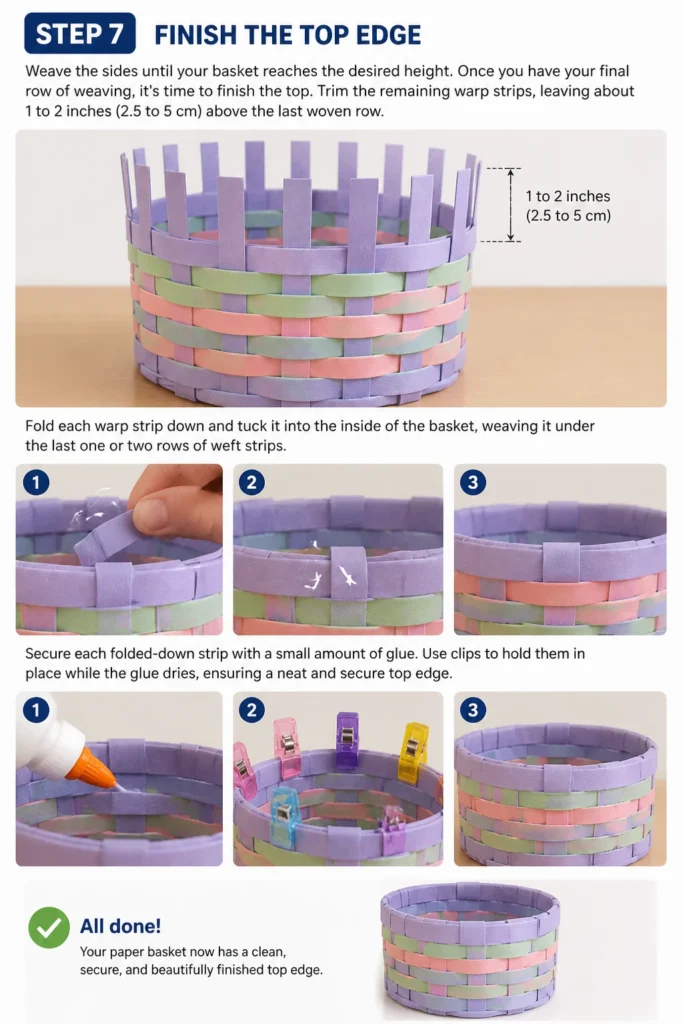
Trim the remaining warp strips, leaving about 1 to 2 inches (2.5 to 5 cm) above the last woven row.
Fold each warp strip down and tuck it into the inside of the basket, weaving it under the last one or two rows of weft strips.
Secure each folded-down strip with a small amount of glue. Use clips to hold them in place while the glue dries, ensuring a neat and secure top edge.
Step 8: Add a Handle (Optional)
Cut two longer, slightly wider strips of paper for the handle. You can reinforce these by gluing them together or folding them lengthwise.
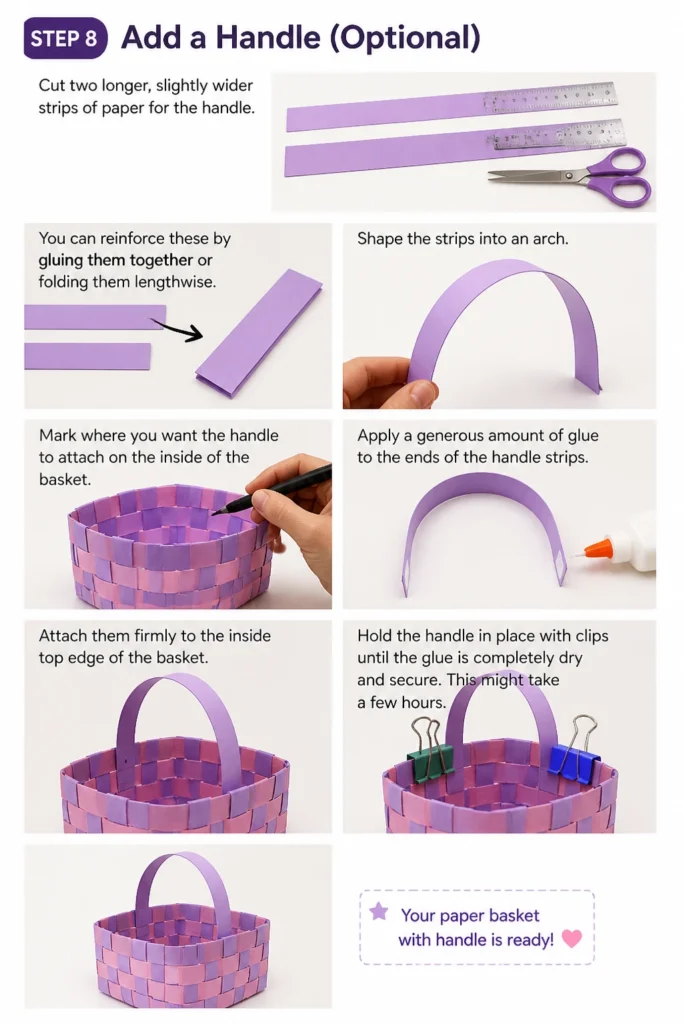
Shape the strips into an arch. Mark where you want the handle to attach on the inside of the basket.
Apply a generous amount of glue to the ends of the handle strips. Attach them firmly to the inside top edge of the basket.
Hold the handle in place with clips until the glue is completely dry and secure. This might take a few hours.
Step 9: Decorate and Seal
Personalize your finished paper basket. You can paint it, draw on it, or glue on embellishments like ribbons or beads.
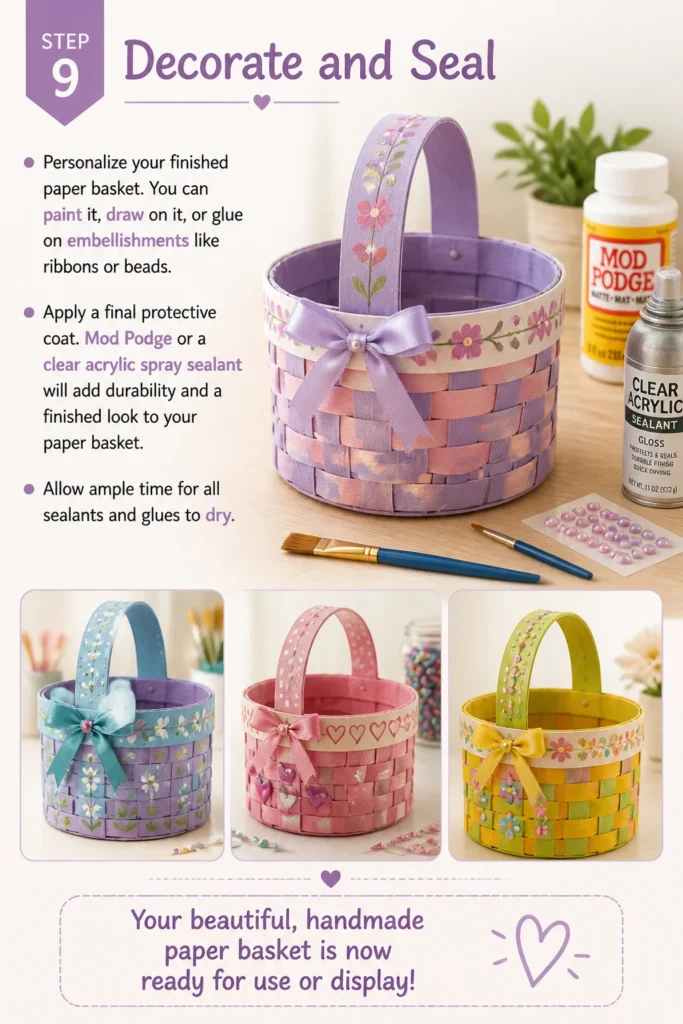
Apply a final protective coat. Mod Podge or a clear acrylic spray sealant will add durability and a finished look to your paper basket.
Allow ample time for all sealants and glues to dry. Your beautiful, handmade paper basket is now ready for use or display!
Common Mistakes to Avoid
Using Too Thin Paper
Attempting to make a basket with flimsy paper, like standard printer paper, will result in a weak and unstable structure. The basket will sag and lose its shape quickly, making it impractical for holding anything.
Always opt for cardstock, heavy scrapbook paper, or even sturdy magazine covers. Thicker paper provides the necessary rigidity and durability for a functional basket that holds its form.
Uneven Strip Cutting
Cutting your paper strips inconsistently, with varying widths, will lead to an uneven and messy weave. The gaps will be irregular, and the overall basket will look lopsided and unprofessional.
Take your time to measure and cut all strips to the exact same width. Use a ruler and a craft knife for precision, or a paper trimmer if available, to ensure perfect uniformity.
Not Securing Joins Properly
If you don’t use enough glue or don’t allow sufficient drying time at critical points, especially where new strips are joined or at the base edges, the basket can fall apart. Loose joins compromise the entire structure.
Be generous but tidy with your glue. Apply it to every strip overlap and junction, and use clips or clothespins to hold them firmly while the glue sets completely. Patience here prevents future frustration.
Rushing the Drying Process
Trying to speed up the drying time of glue or sealant by forcing it can lead to problems. The paper might warp, the glue might not bond properly, or the finish could become cloudy or uneven.
Always allow glues and sealants to air dry naturally and completely, following the product’s recommended drying times. This ensures a strong bond and a smooth, durable finish for your basket.
Troubleshooting
Basket Walls Are Not Straight
If your basket walls appear to be leaning or bulging, it often means the warp strips were not kept consistently upright during the weaving of the sides. Pressure might have been unevenly applied.
To fix this, gently push the weft rows down firmly after each complete circuit, ensuring they are snug against the previous row. Use a flat object or your fingers to press them evenly. Periodically check the vertical alignment of your warp strips and adjust them as you weave.
Weft Strips Keep Slipping
When weaving the sides, sometimes the weft strips can slide down, creating gaps or an uneven top edge. This is common if the paper is very smooth or if you’re not applying enough tension.
Try applying a tiny dot of glue to the weft strip where it meets a warp strip every few inches, especially for the initial rows of the sides. This helps anchor the weft in place. Alternatively, use clips to hold the weft strip in position as you weave around the basket.
Basket Feels Flimsy
A basket that feels weak even after assembly might be due to using lightweight paper, insufficient glue, or not enough rows of weaving. It lacks structural integrity.
For a sturdier basket, ensure you are using at least 65lb cardstock or heavier. Apply a thin but consistent layer of glue to all overlapping strips, not just the ends. Consider adding an extra layer of sealant like Mod Podge both inside and outside the finished basket to stiffen the paper and provide additional rigidity.
Key Takeaways
- Material Choice Matters: Always use sturdy paper like cardstock for a durable basket that holds its shape.
- Precision in Cutting: Uniformly cut strips are crucial for a neat, professional-looking weave and a strong structure.
- Secure Every Join: Generous, well-applied glue at all overlaps and edges prevents unraveling and ensures stability.
- Patience with Drying: Allow ample drying time for glue and sealants to achieve maximum strength and a smooth finish.
- Consistent Weaving: Keep tension even and press rows tightly for straight walls and a robust basket.
- Personalize Your Craft: Don’t forget to add your unique touch with decorations or a protective sealant for longevity.
Frequently Asked Questions
Can I use newspaper for this project?
While you technically can use newspaper, it’s generally too thin and flimsy for a sturdy basket. The resulting basket would likely be very weak and unable to hold much. If you do use newspaper, consider rolling the strips tightly into tubes before weaving, or laminating several layers together for added strength, but cardstock is always recommended for a more robust outcome.
How can I make my paper basket waterproof?
Paper baskets are not inherently waterproof, but you can add a significant level of water resistance. After completing your basket, apply multiple coats of a waterproof sealant like Mod Podge Outdoor or a clear acrylic spray sealant. Ensure each coat dries completely before applying the next. This won’t make it fully submersible, but it will protect it from splashes and moisture.
What if my strips are not long enough for the sides?
This is a common issue, especially for larger baskets. When a weft strip runs out, simply overlap the end of the old strip with the beginning of a new strip by about an inch. Apply a strong craft glue to the overlap and press them together firmly. Continue weaving once the glue has set. For warp strips, you can also extend them by gluing new strips to their ends, ensuring the join is strong.
Can I make different shapes of baskets?
Absolutely! The basic weaving technique can be adapted to various shapes. For a square or rectangular basket, start with a square or rectangular base. For a round basket, you would need to cut your base strips differently and gradually curve your warp strips as you weave the sides, similar to traditional coiled basketry, or start with a circular cardboard base and attach warp strips around it.
Our Top Recommended Finds
- Heavy Cardstock Assortment: A pack of varied colors and patterns provides creative freedom and ensures your basket is sturdy.
- Precision Craft Knife and Mat Set: For perfectly straight and consistent strip cutting, which is key to a professional-looking weave.
- Strong Craft Glue (PVA): Essential for secure joins that hold up over time, ensuring your basket doesn’t fall apart.
Your Next Crafting Adventure Awaits
You’ve just transformed simple sheets of paper into a charming and practical basket.
Feel proud of your accomplishment and the tangible result of your creativity.
Now that you’ve mastered the basics, why not experiment with different paper types, strip widths, or even try a new weaving pattern?
The world of paper crafting is vast and full of possibilities; go ahead and create something wonderful today!
Beginner-friendly templates, step-by-step guides,
and weekly project ideas in your inbox.