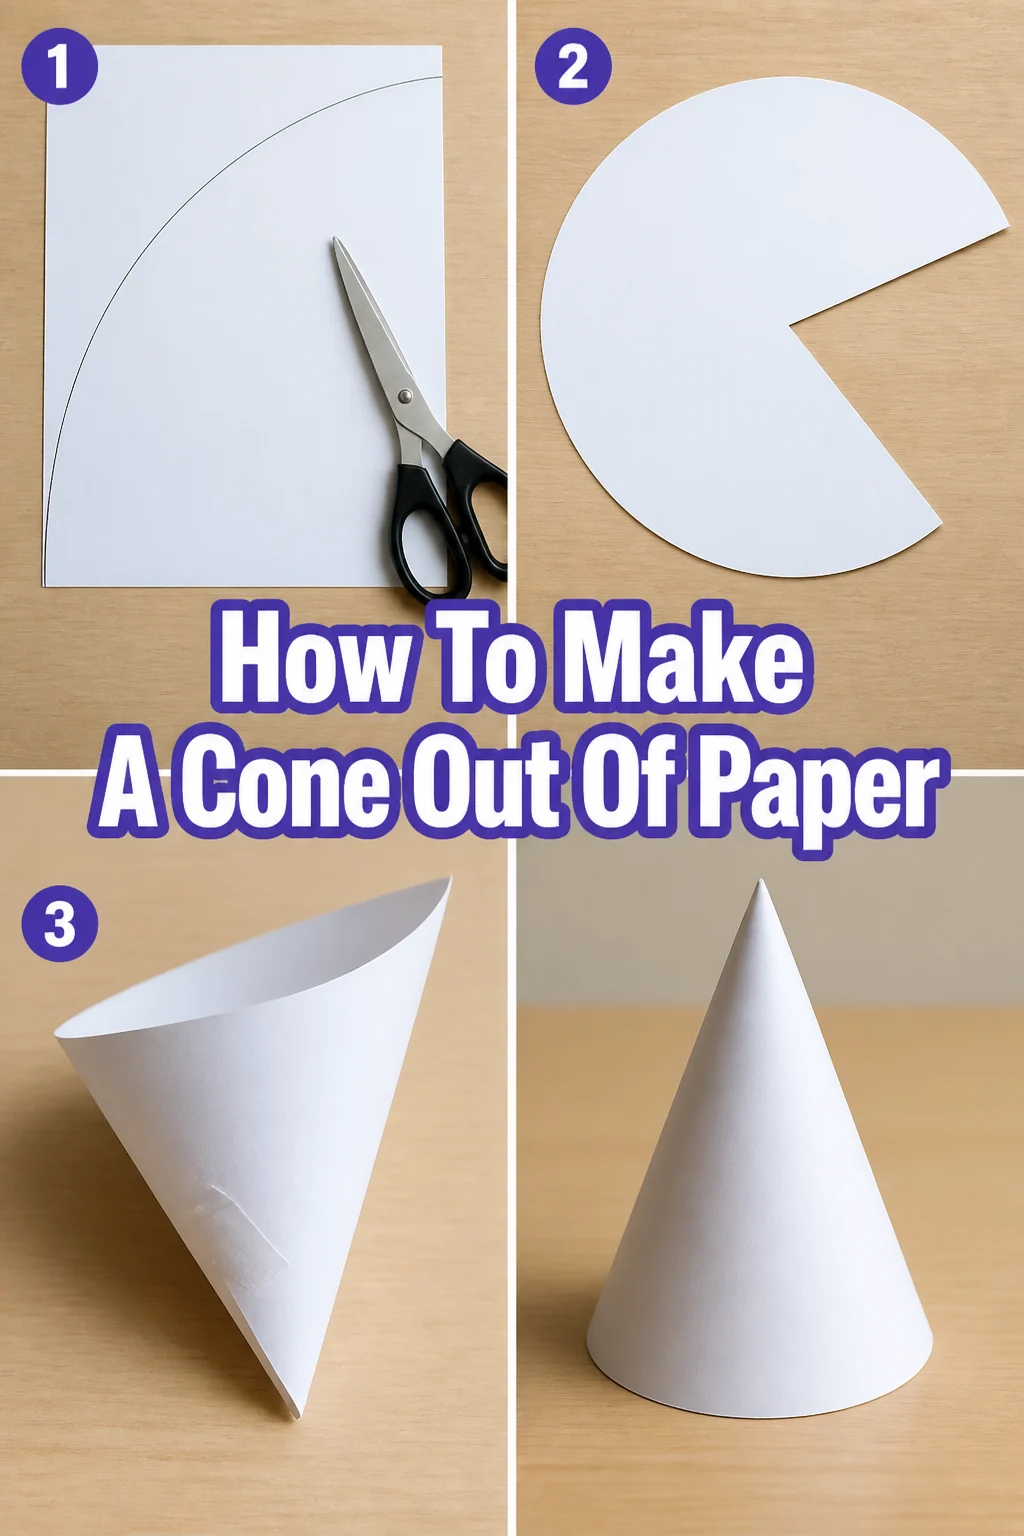
✂️ How To Make A Cone Out Of Paper

Beginner-friendly templates, step-by-step guides,
and weekly project ideas in your inbox.
Crafting a paper cone might seem simple, but mastering the technique opens up a world of creative possibilities.
I’ve personally folded countless cones for everything from party hats to intricate school projects, learning the nuances along the way.
This guide shares those practical insights, ensuring your cones are perfectly shaped and sturdy every time.

Quick Overview
You’re about to create a versatile paper cone, perfect for crafts, decorations, or practical uses.
- Time needed: 10-15 minutes
- Difficulty: Beginner
- What you’ll need: Paper, scissors, adhesive
Step-by-Step Instructions
Step 1: Gather Your Materials
Gather all the necessary items before you begin your cone-making adventure. Having everything within reach makes the process much smoother and more enjoyable.
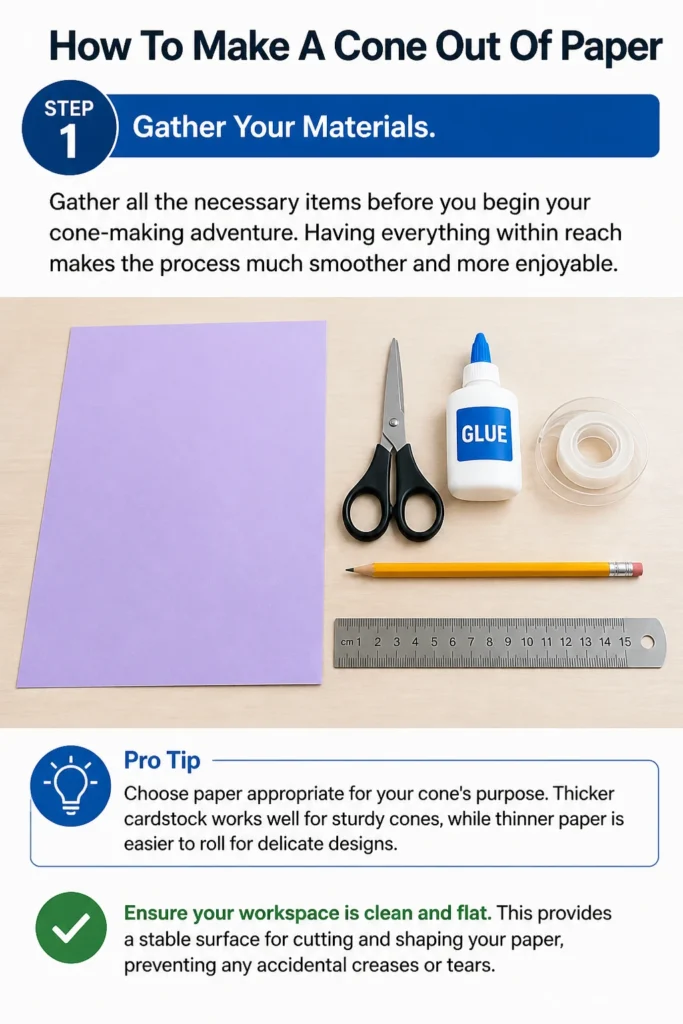
You will primarily need a sheet of paper, a sharp pair of scissors, and a reliable adhesive like glue or tape. A pencil and a ruler can also be incredibly useful for achieving precise cuts and measurements.
Pro Tip: Choose paper appropriate for your cone’s purpose. Thicker cardstock works well for sturdy cones, while thinner paper is easier to roll for delicate designs.
Ensure your workspace is clean and flat. This provides a stable surface for cutting and shaping your paper, preventing any accidental creases or tears.
Step 2: Prepare Your Paper
Prepare your chosen sheet of paper for its transformation into a cone. The initial shape of your paper significantly impacts the final cone.
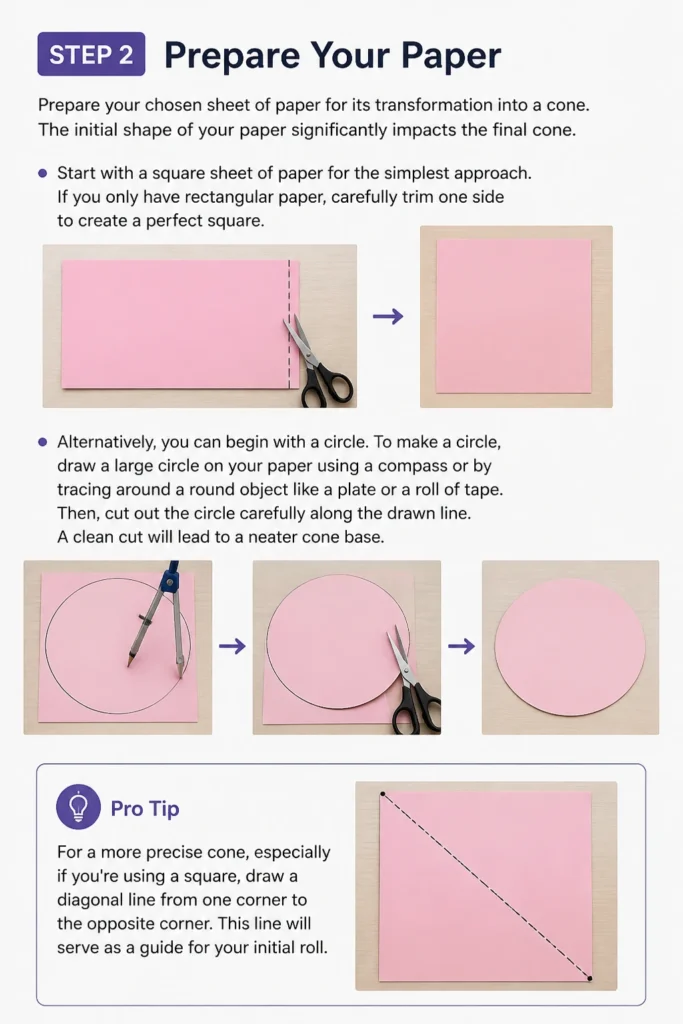
Start with a square sheet of paper for the simplest approach. If you only have rectangular paper, carefully trim one side to create a perfect square.
Alternatively, you can begin with a circle. To make a circle, draw a large circle on your paper using a compass or by tracing around a round object like a plate or a roll of tape.
Then, cut out the circle carefully along the drawn line. A clean cut will lead to a neater cone base.
Pro Tip: For a more precise cone, especially if you’re using a square, draw a diagonal line from one corner to the opposite corner. This line will serve as a guide for your initial roll.
Step 3: Form the Initial Curl
Begin the fundamental shaping process by forming the initial curl of your paper. This is where the cone truly starts to take shape.
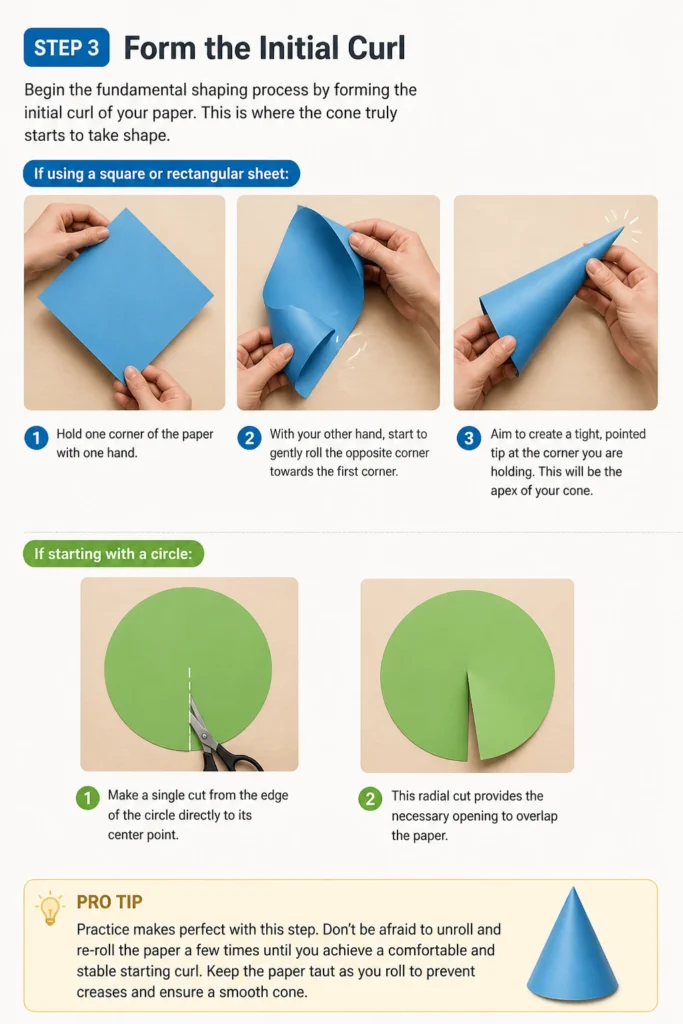
If you’re using a square or rectangular sheet, hold one corner of the paper with one hand. With your other hand, start to gently roll the opposite corner towards the first corner.
Aim to create a tight, pointed tip at the corner you are holding. This will be the apex of your cone.
If you’re starting with a circle, make a single cut from the edge of the circle directly to its center point. This radial cut provides the necessary opening to overlap the paper.
Pro Tip: Practice makes perfect with this step. Don’t be afraid to unroll and re-roll the paper a few times until you achieve a comfortable and stable starting curl.
Keep the paper taut as you roll to prevent unwanted wrinkles. A smooth curl will result in a more attractive cone.
Step 4: Adjust and Shape the Cone
Refine the initial curl to achieve the desired cone shape and size. This step involves careful manipulation of the paper.
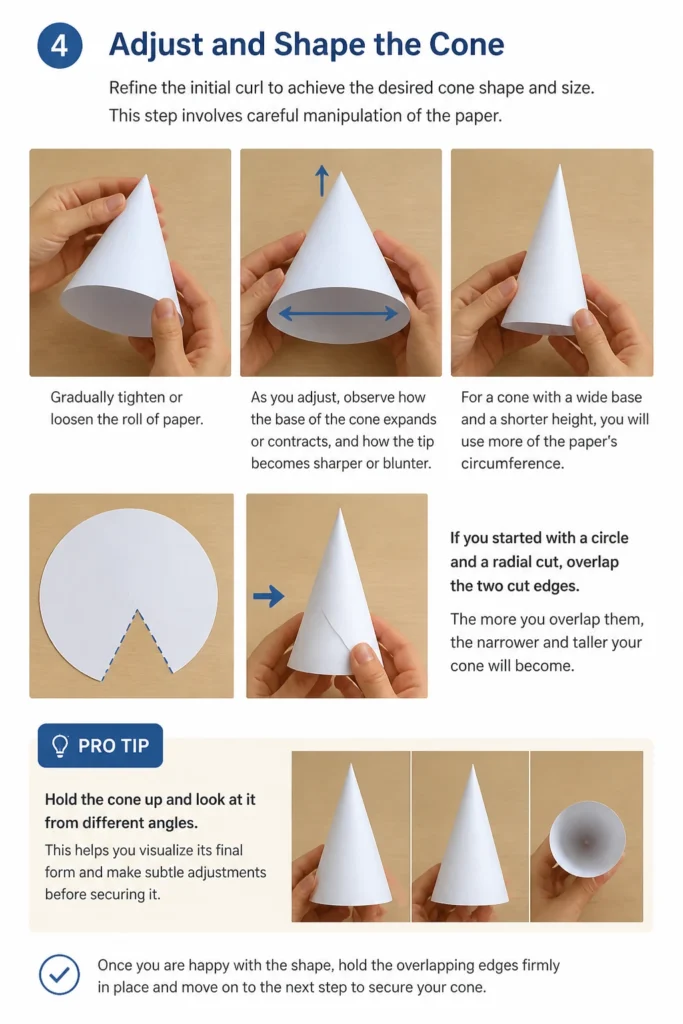
Gradually tighten or loosen the roll of paper. As you adjust, observe how the base of the cone expands or contracts, and how the tip becomes sharper or blunter.
For a cone with a wide base and a shorter height, you will use more of the paper’s circumference. Conversely, a narrower, taller cone uses less overlap.
If you started with a circle and a radial cut, overlap the two cut edges. The more you overlap them, the narrower and taller your cone will become.
Pro Tip: Hold the cone up and look at it from different angles. This helps you visualize its final form and make subtle adjustments before securing it.
Once you are happy with the shape, hold the overlapping edges firmly in place. This prevents the cone from unraveling as you prepare to secure it.
Step 5: Secure the Seam
Lock your cone’s shape into place by securing the overlapping paper edges. A strong seam is crucial for a durable cone.
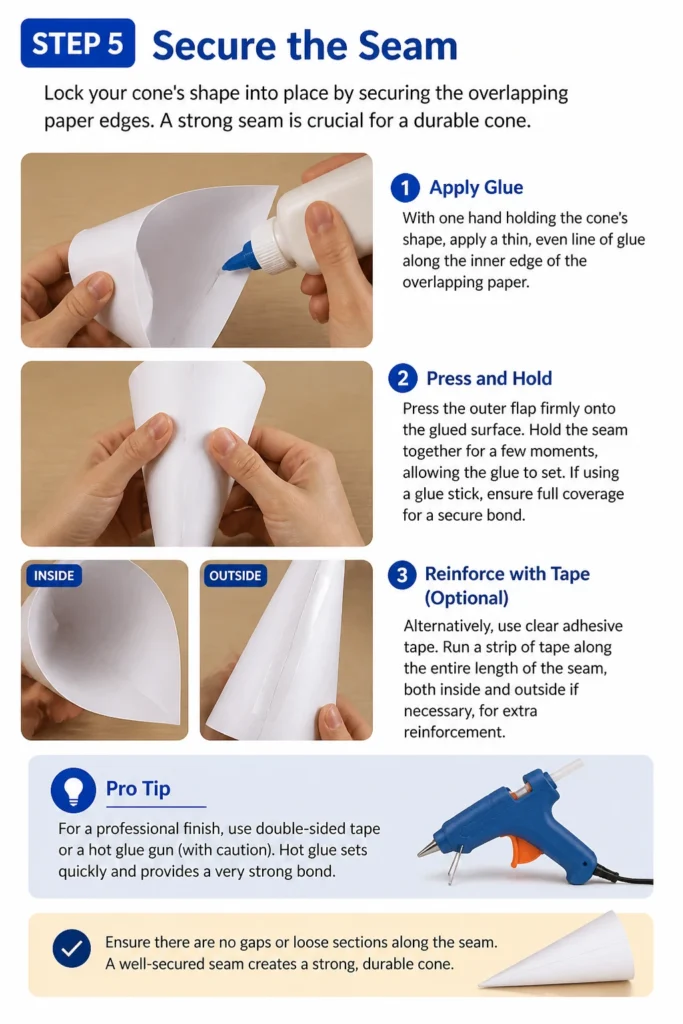
With one hand holding the cone’s shape, apply a thin, even line of glue along the inner edge of the overlapping paper. Press the outer flap firmly onto the glued surface.
Hold the seam together for a few moments, allowing the glue to set. If using a glue stick, ensure full coverage for a secure bond.
Alternatively, use clear adhesive tape. Run a strip of tape along the entire length of the seam, both inside and outside if necessary, for extra reinforcement.
Pro Tip: For a professional finish, use double-sided tape or a hot glue gun (with caution). Hot glue sets quickly and provides a very strong bond.
Ensure there are no gaps or loose sections along the seam. A well-secured seam prevents the cone from coming apart during use.
Step 6: Trim the Base (Optional)
Create a perfectly flat and stable base for your cone, if desired. This step is optional but highly recommended for cones that need to stand upright.
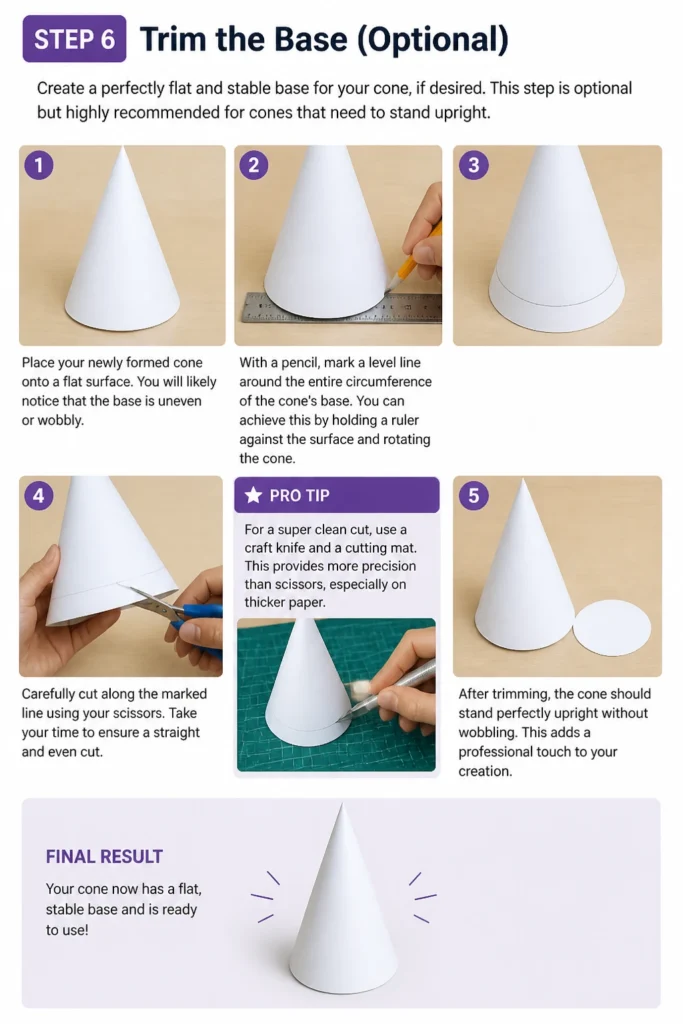
Place your newly formed cone onto a flat surface. You will likely notice that the base is uneven or wobbly.
With a pencil, mark a level line around the entire circumference of the cone’s base. You can achieve this by holding a ruler against the surface and rotating the cone.
Carefully cut along the marked line using your scissors. Take your time to ensure a straight and even cut.
Pro Tip: For a super clean cut, use a craft knife and a cutting mat. This provides more precision than scissors, especially on thicker paper.
After trimming, the cone should stand perfectly upright without wobbling. This adds a professional touch to your creation.
Step 7: Refine the Opening (Optional)
Smooth and even out the cone’s opening for a polished look. This step focuses on the wider end of your cone.
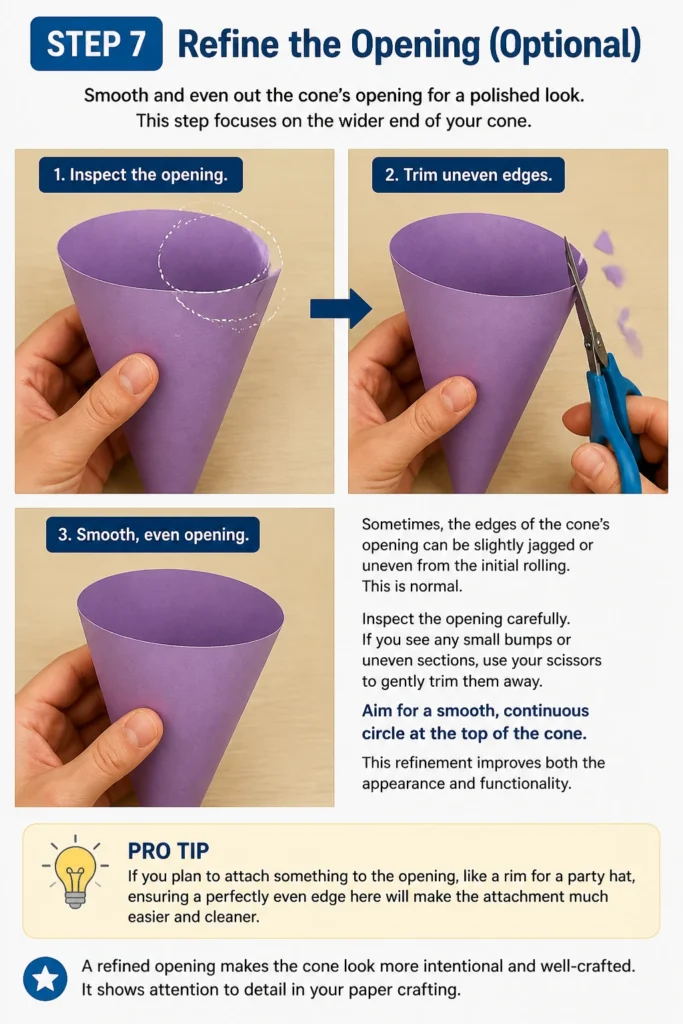
Sometimes, the edges of the cone’s opening can be slightly jagged or uneven from the initial rolling. This is normal.
Inspect the opening carefully. If you see any small bumps or uneven sections, use your scissors to gently trim them away.
Aim for a smooth, continuous circle at the top of the cone. This refinement improves both the appearance and functionality.
Pro Tip: If you plan to attach something to the opening, like a rim for a party hat, ensuring a perfectly even edge here will make the attachment much easier and cleaner.
A refined opening makes the cone look more intentional and well-crafted. It shows attention to detail in your paper crafting.
Step 8: Decorate Your Cone (Optional)
Personalize your paper cone to suit its purpose or your creative vision. Decoration adds character and flair.
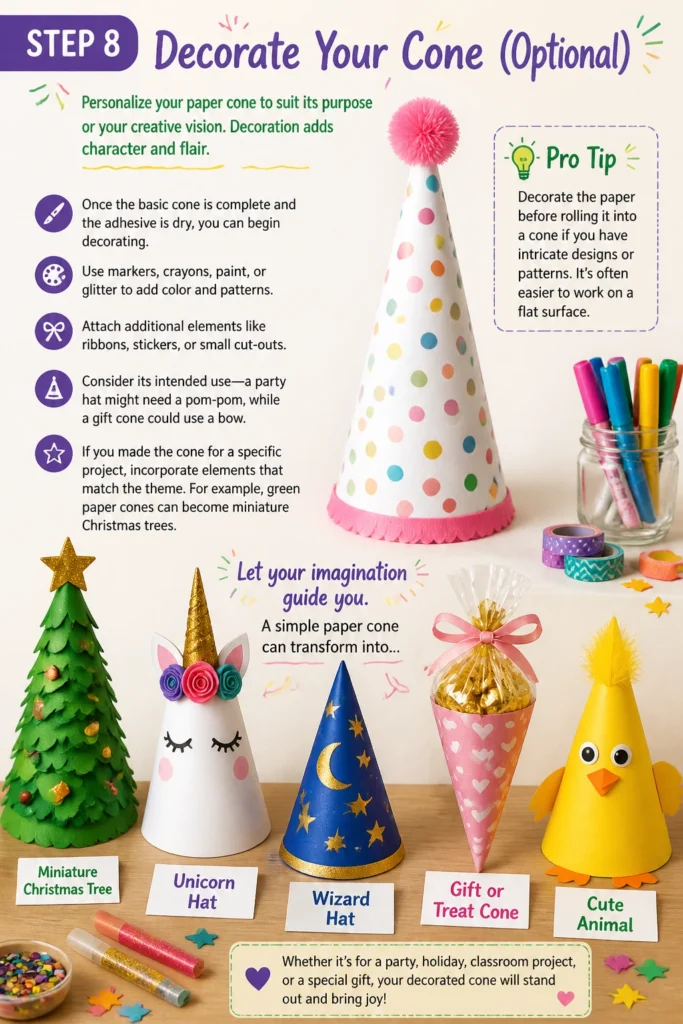
Once the basic cone is complete and the adhesive is dry, you can begin decorating. Use markers, crayons, paint, or glitter to add color and patterns.
Attach additional elements like ribbons, stickers, or small cut-outs. Consider its intended use—a party hat might need a pom-pom, while a gift cone could use a bow.
If you made the cone for a specific project, incorporate elements that match the theme. For example, green paper cones can become miniature Christmas trees.
Pro Tip: Decorate the paper before rolling it into a cone if you have intricate designs or patterns. It’s often easier to work on a flat surface.
Let your imagination guide you. A simple paper cone can transform into something truly unique and special with a little creative embellishment.
Common Mistakes to Avoid
Uneven Seams
An uneven seam is a common issue that can compromise both the look and stability of your cone. This often happens when the paper isn’t held firmly during the gluing process, or if the adhesive is applied inconsistently.
To avoid this, always press the overlapping edges together firmly and evenly along the entire length of the seam. Apply a consistent amount of glue or tape to ensure a strong, uniform bond from top to bottom.
Too Loose or Too Tight
Rolling the cone either too loosely or too tightly can lead to problems. A cone that is too loose will be flimsy and might not hold its shape, while one that is too tight can be difficult to secure and may wrinkle the paper.
Experiment with the overlap in Step 4 to find the right balance. You want the paper to be snug enough to hold its form but not so tight that it creases or resists being glued. Adjust until it feels stable yet flexible.
Ripped Paper
Ripping the paper, especially around the tip or along the seam, is frustrating. This usually occurs from pulling too hard, using dull scissors, or working with very thin, delicate paper.
Always use sharp scissors for clean cuts. When rolling and adjusting, apply gentle, even pressure. If using thin paper, consider reinforcing the seam with extra tape or a stronger glue to prevent tears.
Incorrect Paper Choice
Using the wrong type of paper can hinder your cone’s success. Paper that is too flimsy won’t hold its shape, and paper that is too thick can be challenging to roll and secure.
Match your paper to your project. Standard printer paper works for simple, temporary cones. For sturdier applications, opt for cardstock or construction paper. Test a small piece first if you are unsure.
Troubleshooting
Cone Won’t Hold Its Shape
If your cone keeps unraveling or losing its form, the seam might not be secure enough. The adhesive might not have fully dried, or there might be insufficient glue or tape applied.
Reapply adhesive along the entire seam, ensuring full coverage. Hold the seam firmly together for a longer period to allow the glue to cure completely. You can also add extra strips of tape on the inside for hidden reinforcement.
Base is Wobbly
A wobbly base means your cone won’t stand upright stably. This is almost always due to an uneven trim at the bottom of the cone, or an initial roll that created an imperfect base.
Place the cone on a flat surface and use a pencil to mark a new, level line around the base while the cone is standing. Carefully re-trim along this new line. Ensure your cutting surface is flat and stable during this process.
Seam Comes Undone
If the seam separates after some time, the adhesive might have been too weak or applied too sparsely. Humidity or stress on the cone can also contribute to this problem.
Peel back the loose section of the seam. Apply a stronger, more generous layer of adhesive, such as craft glue or a hot glue gun if available. Press firmly and hold until the bond is completely dry. Consider adding decorative tape over the seam for both strength and style.
Key Takeaways
- Preparation is key: Gather all tools and choose the right paper before starting.
- Start with a good base: Square or circular paper provides the best foundation for rolling.
- Gentle rolling: Form the initial curl with patience, adjusting for your desired shape.
- Secure the seam: A strong, well-adhered seam ensures your cone’s durability.
- Trim for stability: Level the base for a cone that stands perfectly upright.
- Personalize your creation: Decorate your cone to match its purpose or your creativity.
Frequently Asked Questions
What kind of paper is best for making cones?
The best paper depends on your cone’s intended use. For general crafts, construction paper or cardstock works well, offering good stability. Thinner paper like printer paper is easier to roll for smaller, delicate cones, while thicker cardstock is ideal for sturdy, long-lasting structures.
Can I make different size cones using this method?
Absolutely! The beauty of this method is its adaptability. To make a larger cone, simply start with a larger piece of paper. For a smaller cone, use a smaller piece. The degree of overlap when you roll the paper also dictates the cone’s height and base diameter, allowing for infinite variations.
How can I make the cone waterproof?
To make your paper cone water-resistant, you can coat it with a sealant. Once the cone is fully assembled and dry, apply a layer of clear craft sealant, Mod Podge, or even clear nail polish to the entire surface. Allow it to dry completely between coats for best results.
What are some practical uses for paper cones?
Paper cones are incredibly versatile! They can be used as party hats, small gift containers, funnels, decorative elements for wreaths, or even as parts of larger paper sculptures. In the garden, they can protect small seedlings from frost. Their uses are limited only by your imagination.
Our Top Recommended Finds
- Craft Paper Variety Pack: Offers a range of colors and thicknesses, perfect for diverse projects.
- Precision Craft Scissors: Ensures clean, accurate cuts for a professional finish on any paper.
- Strong Craft Glue Stick: Provides a reliable, mess-free bond for secure seams without excessive drying time.
Your Next Creative Project Awaits
You now possess the practical skills to craft a perfect paper cone. This simple technique is a gateway to countless creative endeavors, from whimsical decorations to functional tools.
Don’t let your newfound expertise go to waste. Grab some paper and start experimenting with different sizes, colors, and decorations today.
Imagine the possibilities: a festive party hat, a charming gift holder, or even a unique centerpiece. Your next paper crafting adventure begins with a simple cone.
Beginner-friendly templates, step-by-step guides,
and weekly project ideas in your inbox.