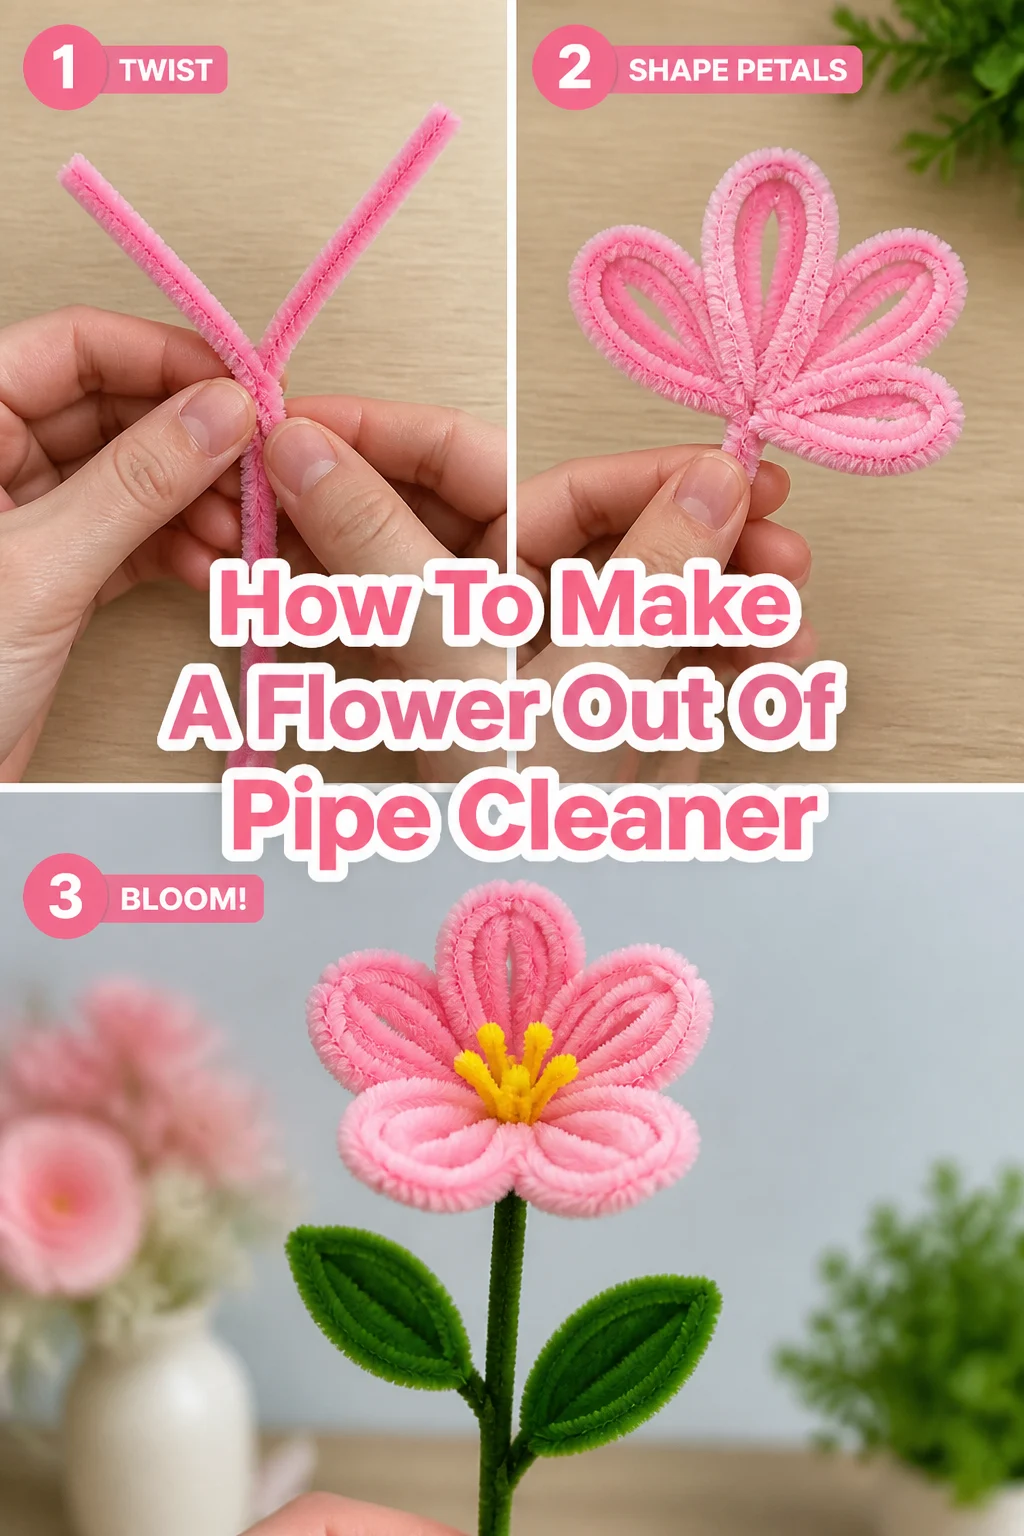
🌸 How To Make A Flower Out Of Pipe Cleaner

Beginner-friendly templates, step-by-step guides,
and weekly project ideas in your inbox.
I remember sitting at my kitchen table for hours as a child, twisting fuzzy wires into colorful bouquets for my mother.
After years of teaching craft workshops, I have refined the best method to ensure your petals stay firm and your stems never wobble.
This guide shares the exact techniques I use to create professional-looking chenille blooms that last forever.

Quick Overview
Creating a pipe cleaner flower is a rewarding way to spend a quiet afternoon or bond with your family.
- Time needed: 15 to 20 minutes
- Difficulty: Beginner
- What you’ll need: Colorful pipe cleaners, scissors, and a little bit of patience.
Step-by-Step Instructions
Step 1: Select Your Color Palette
Choose three different colors of pipe cleaners to give your flower depth and a realistic appearance.
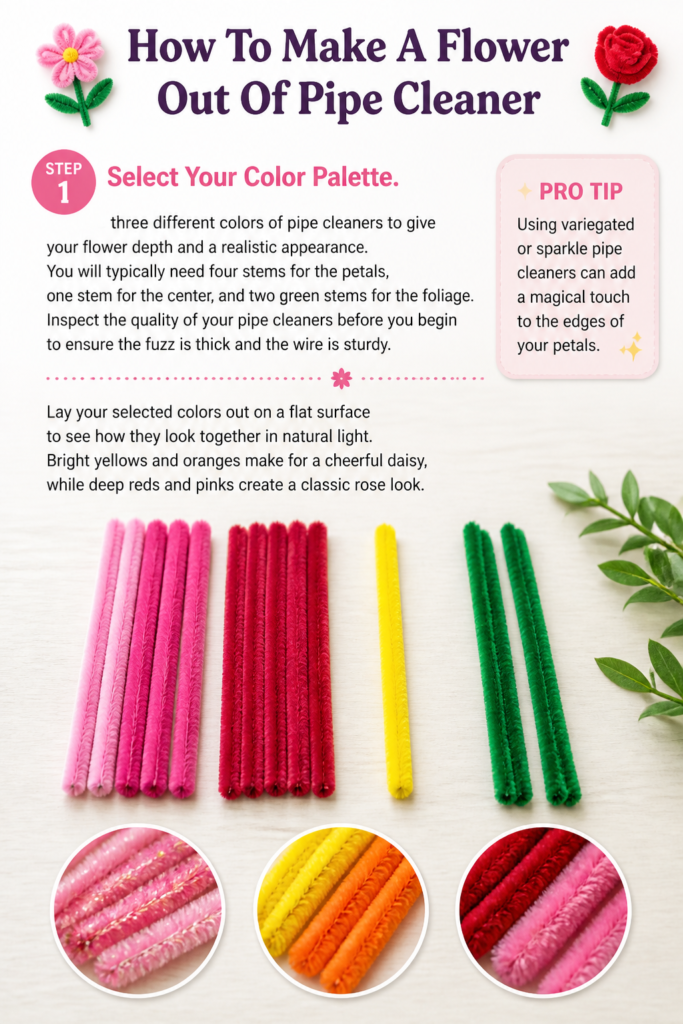
You will typically need four stems for the petals, one stem for the center, and two green stems for the foliage.
Inspect the quality of your pipe cleaners before you begin to ensure the fuzz is thick and the wire is sturdy.
Pro Tip: Using variegated or “sparkle” pipe cleaners can add a magical touch to the edges of your petals.
Lay your selected colors out on a flat surface to see how they look together in natural light.
Bright yellows and oranges make for a cheerful daisy, while deep reds and pinks create a classic rose look.
Step 2: Create the Petal Loops
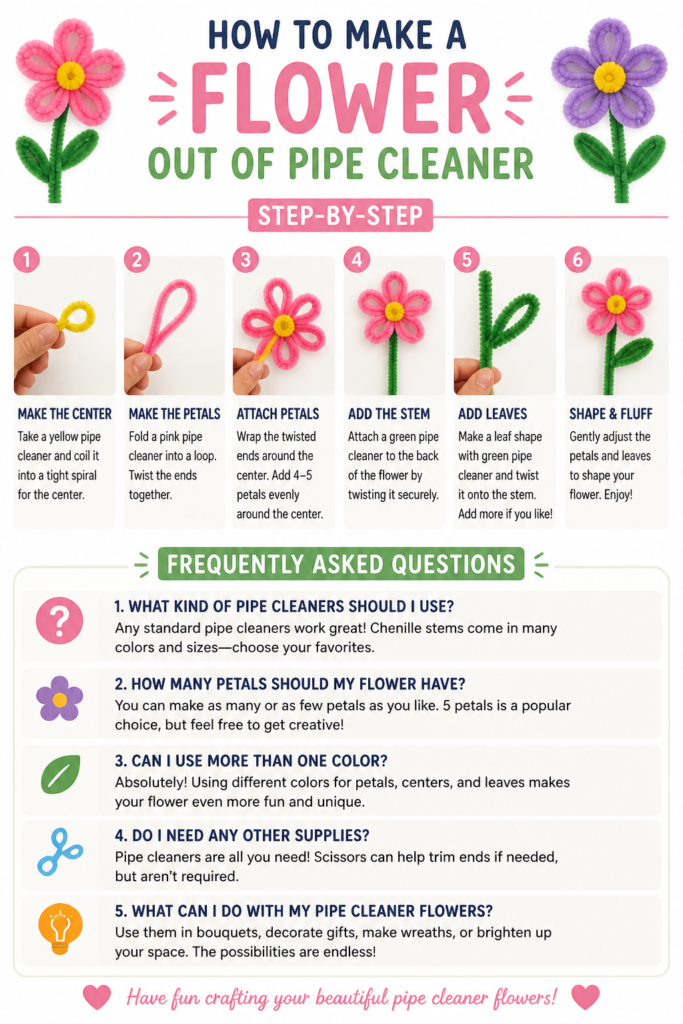
Take your first petal-colored pipe cleaner and fold it in half to find the exact center point.
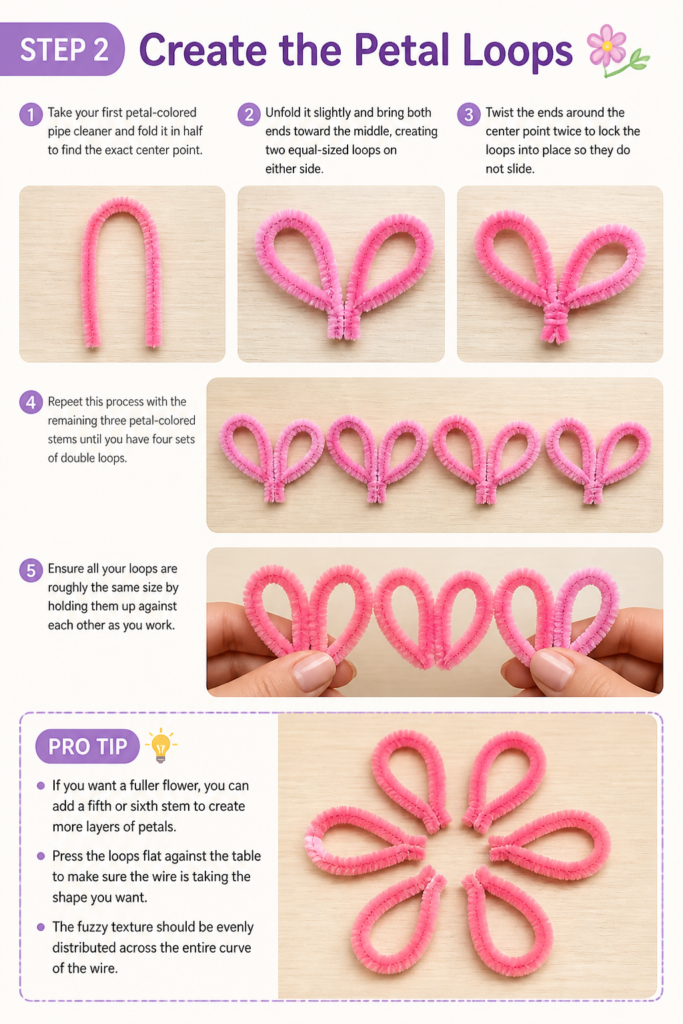
Unfold it slightly and bring both ends toward the middle, creating two equal-sized loops on either side.
Twist the ends around the center point twice to lock the loops into place so they do not slide.
Repeat this process with the remaining three petal-colored stems until you have four sets of double loops.
Ensure all your loops are roughly the same size by holding them up against each other as you work.
Pro Tip: If you want a fuller flower, you can add a fifth or sixth stem to create more layers of petals.
Press the loops flat against the table to make sure the wire is taking the shape you want.
The fuzzy texture should be evenly distributed across the entire curve of the wire.
Step 3: Stack and Secure the Petals
Stack your four double-loop pieces on top of each other in a starburst pattern.
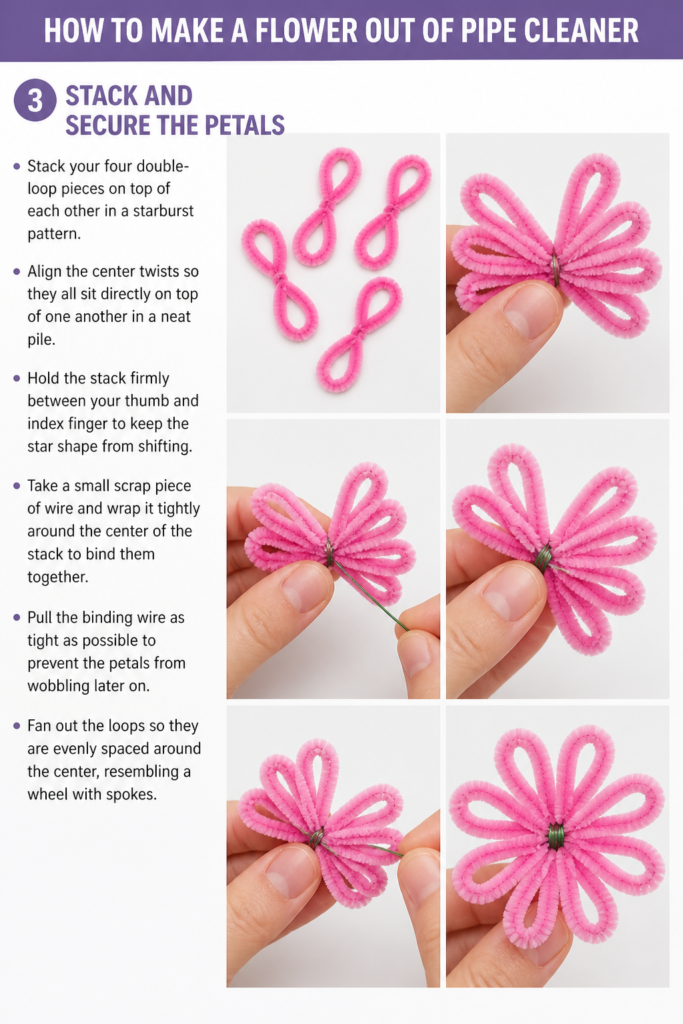
Align the center twists so they all sit directly on top of one another in a neat pile.
Hold the stack firmly between your thumb and index finger to keep the “star” shape from shifting.
Take a small scrap piece of wire and wrap it tightly around the center of the stack to bind them together.
Pull the binding wire as tight as possible to prevent the petals from wobbling later on.
Fan out the loops so they are evenly spaced around the center, resembling a wheel with spokes.
Step 4: Form the Flower Center
Pick up the pipe cleaner you chose for the center of the flower, often a bright yellow or brown.
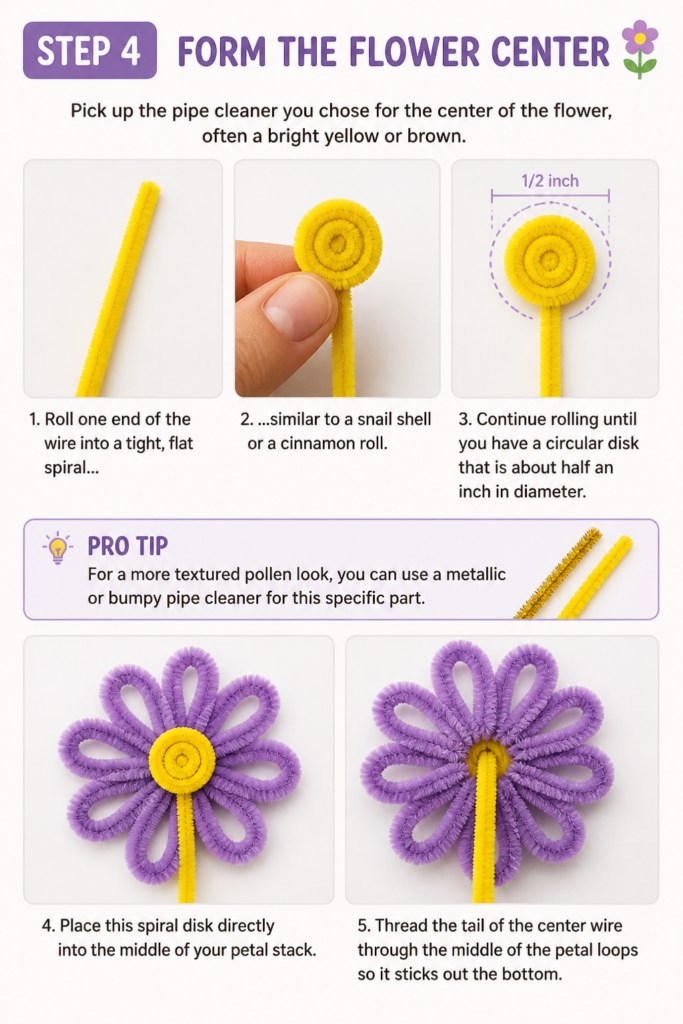
Roll one end of the wire into a tight, flat spiral, similar to a snail shell or a cinnamon roll.
Continue rolling until you have a circular disk that is about half an inch in diameter.
Leave the remaining length of the wire pointing straight down from the back of the spiral.
Pro Tip: For a more textured “pollen” look, you can use a metallic or bumpy pipe cleaner for this specific part.
Place this spiral disk directly into the middle of your petal stack.
Thread the tail of the center wire through the middle of the petal loops so it sticks out the bottom.
Step 5: Attach the Main Stem
Grab your long green pipe cleaner and line it up with the tail of the center wire you just threaded through.
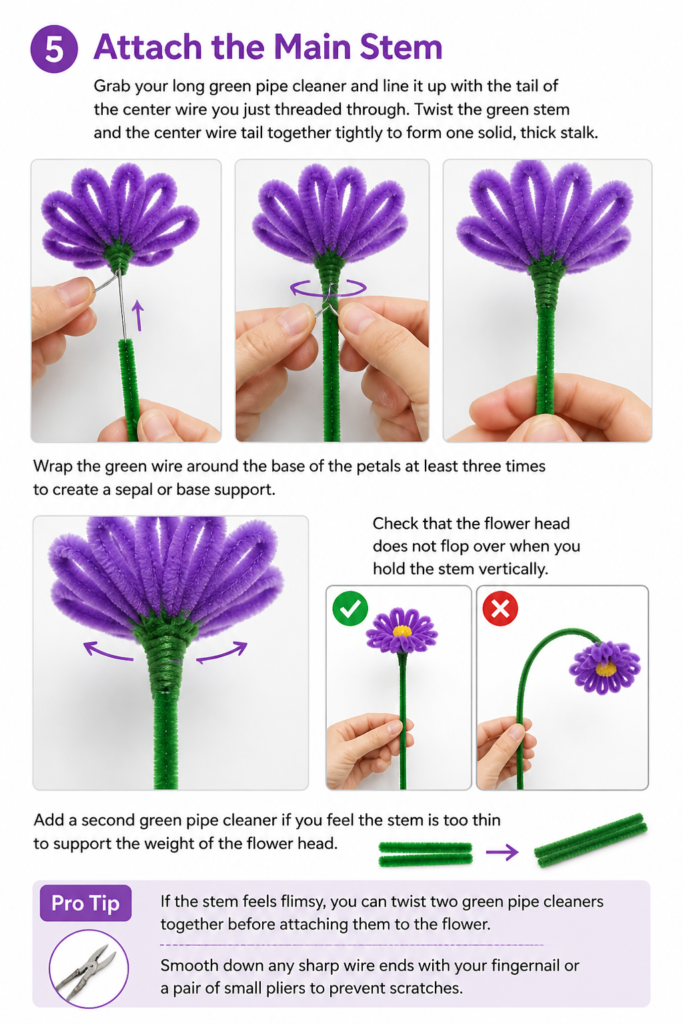
Twist the green stem and the center wire tail together tightly to form one solid, thick stalk.
Wrap the green wire around the base of the petals at least three times to create a “sepal” or base support.
Check that the flower head does not flop over when you hold the stem vertically.
Add a second green pipe cleaner if you feel the stem is too thin to support the weight of the flower head.
Pro Tip: If the stem feels flimsy, you can twist two green pipe cleaners together before attaching them to the flower.
Smooth down any sharp wire ends with your fingernail or a pair of small pliers to prevent scratches.
Step 6: Shape the Leaves
Identify a spot about halfway down the green stem where you want your first leaf to grow.
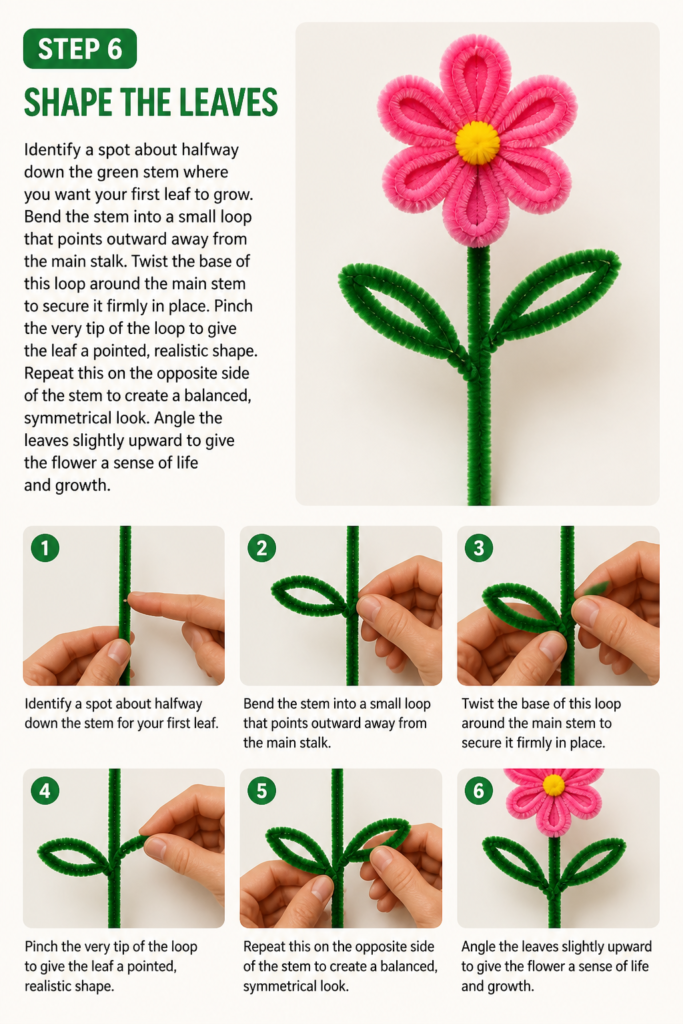
Bend the stem into a small loop that points outward away from the main stalk.
Twist the base of this loop around the main stem to secure it firmly in place.
Pinch the very tip of the loop to give the leaf a pointed, realistic shape.
Repeat this on the opposite side of the stem to create a balanced, symmetrical look.
Angle the leaves slightly upward to give the flower a sense of life and growth.
Step 7: Final Shaping and Fluffing
Go back to the petals and gently pull them upward to give the flower a cup-like appearance.
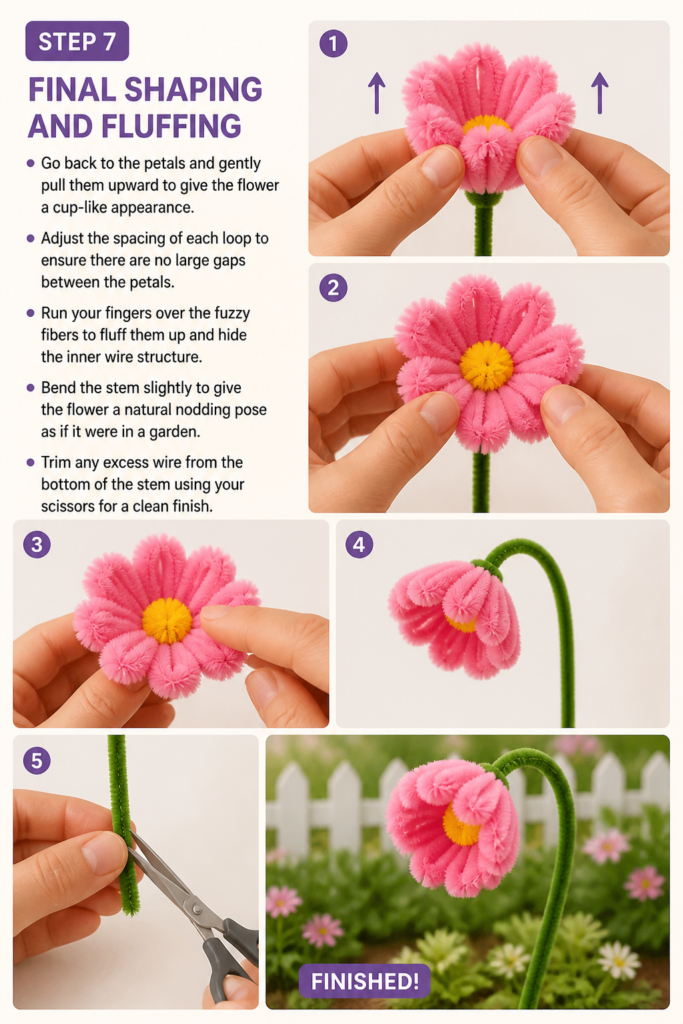
Adjust the spacing of each loop to ensure there are no large gaps between the petals.
Run your fingers over the fuzzy fibers to fluff them up and hide the inner wire structure.
Bend the stem slightly to give the flower a natural “nodding” pose as if it were in a garden.
Trim any excess wire from the bottom of the stem using your scissors for a clean finish.
Common Mistakes to Avoid
Over-Twisting the Wire
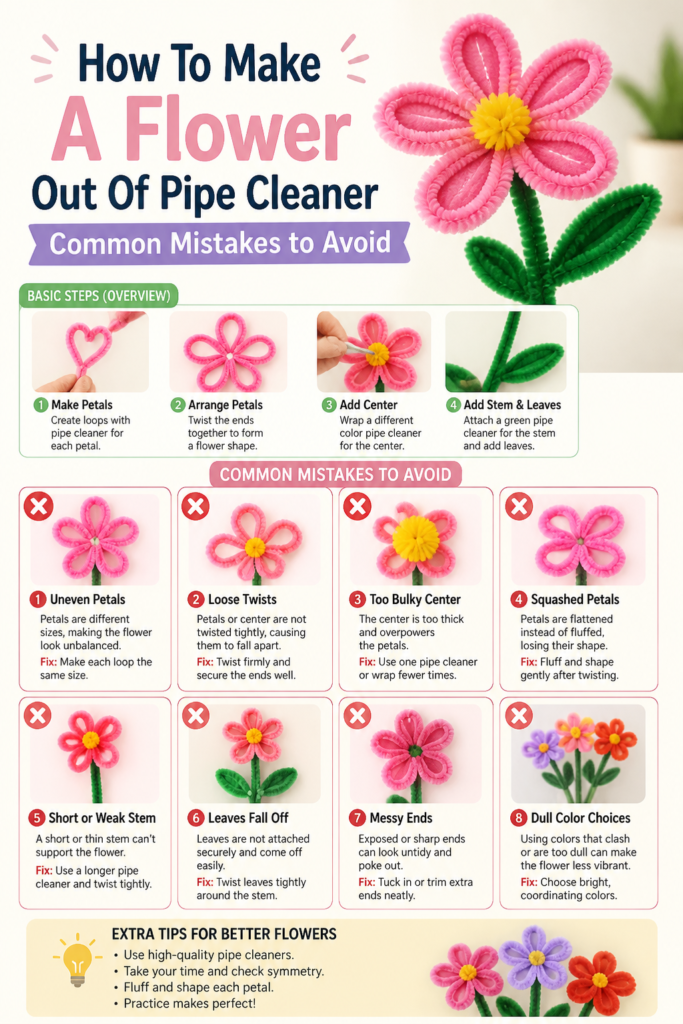
If you twist the pipe cleaner too many times in the same spot, the metal wire inside will become brittle and snap. This often happens at the base of the petals where the tension is highest. Aim for two or three firm twists rather than a long, tight spiral that weakens the core.
The fuzz can also get caught in the twists, making the joint look messy and thin. Keep your movements deliberate and stop once the piece feels secure. If a wire does snap, it is usually better to start that section over than to try and patch it together.
Inconsistent Petal Sizes
Making one petal much larger than the others will cause the flower to look lopsided and unbalanced. This usually happens when you don’t measure the loops against each other before twisting them down. It can make the flower head lean to one side, putting stress on the stem.
To avoid this, use a small object like a pill bottle or a large marker as a mandrel to wrap the wire around. This ensures every single loop has the exact same circumference. A uniform set of petals gives the finished project a much more polished and professional appearance.
Loose Stem Attachment
A common error is failing to wrap the green stem tightly enough around the base of the flower head. This results in a “floppy” flower that hangs its head in a way that looks broken rather than natural. The connection point is the most important structural part of the entire craft.
Always ensure the green wire makes several tight revolutions around the gathered petal wires. This creates a solid foundation that can support the weight of the bloom. You should be able to shake the stem gently without the flower head shifting or sliding down.
Troubleshooting
The Flower Head Is Drooping
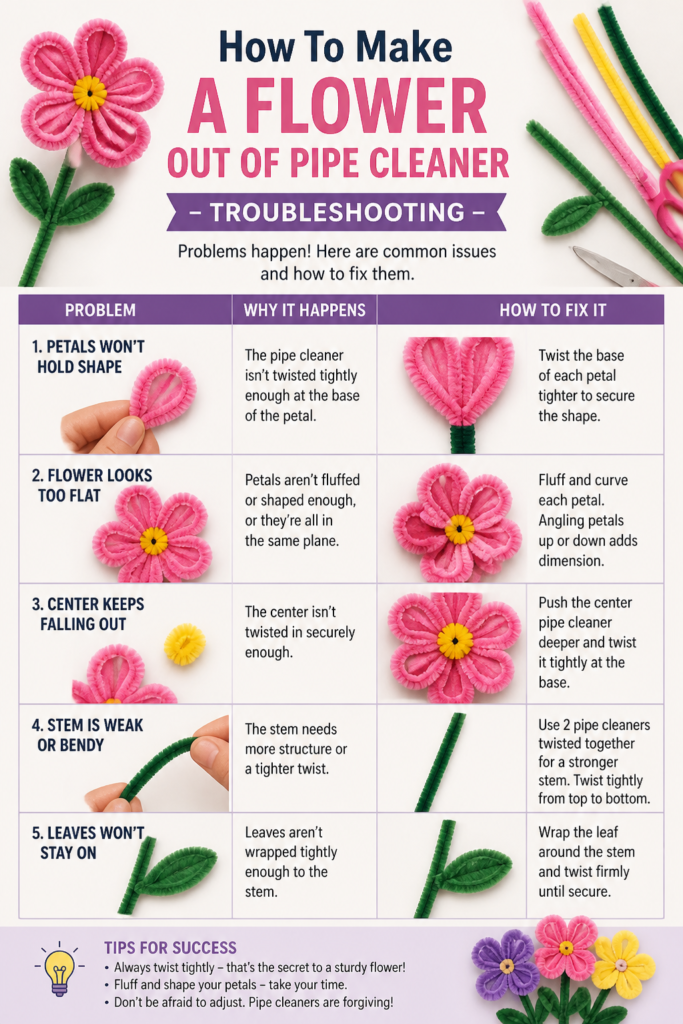
If your flower head won’t stay upright, the stem wire is likely too thin for the size of the bloom you created. This happens frequently with larger flowers or when using lower-quality, thinner pipe cleaners. You can fix this easily without taking the whole flower apart.
Take another green pipe cleaner and wrap it tightly around the existing stem, starting from the very top. Spiral it all the way down to the bottom to double the thickness and strength. This added reinforcement provides the vertical tension needed to keep the flower looking fresh and upright.
The Wire Ends Are Prickly
Sometimes the sharp metal tips of the pipe cleaners stick out at the center or the leaves, which can be uncomfortable to touch. This is especially common if you have trimmed the wires with scissors. These sharp points can also snag on clothing or skin.
Use a pair of needle-nose pliers to tuck the sharp ends back into the fuzzy part of the pipe cleaner. You can also apply a tiny dot of clear craft glue or even clear nail polish to the tip of the wire. This creates a smooth cap that prevents the wire from scratching anyone who handles the bouquet.
Petals Are Looking Flat and Lifeless
After handling the pipe cleaners during the assembly process, the fibers often get matted down or compressed. This makes the flower look thin and reveals the silver wire underneath. It loses the vibrant, soft look that makes chenille crafts so appealing.
Take a clean, dry toothbrush and gently brush the petals from the center outward. This action lifts the tiny fibers and restores the “bloom” to the material. You can also use your fingers to “massage” the wire loops into a more rounded, 3D shape rather than leaving them as flat circles.
Key Takeaways
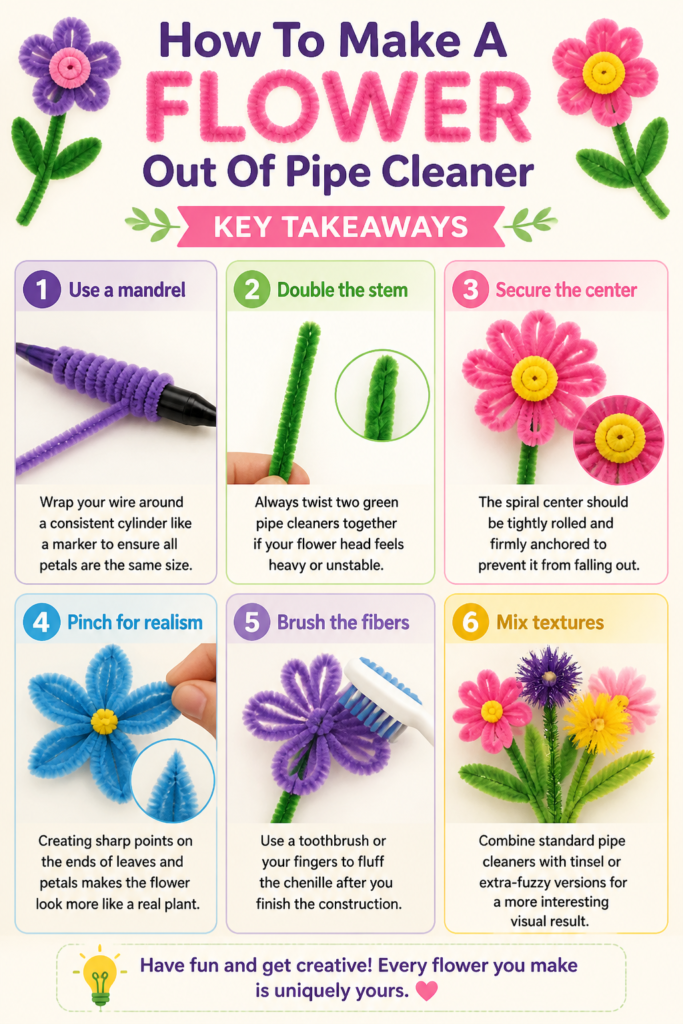
- Use a mandrel: Wrap your wire around a consistent cylinder like a marker to ensure all petals are the same size.
- Double the stem: Always twist two green pipe cleaners together if your flower head feels heavy or unstable.
- Secure the center: The spiral center should be tightly rolled and firmly anchored to prevent it from falling out.
- Pinch for realism: Creating sharp points on the ends of leaves and petals makes the flower look more like a real plant.
- Brush the fibers: Use a toothbrush or your fingers to fluff the chenille after you finish the construction.
- Mix textures: Combine standard pipe cleaners with tinsel or extra-fuzzy versions for a more interesting visual result.
Frequently Asked Questions
Can I wash pipe cleaner flowers?
It is generally not recommended to wash these flowers because the inner wire is usually made of steel and can rust if it gets wet. The fuzz is also prone to matting and losing its shape when saturated with water. If they get dusty, use a canned air duster or a soft-bristled brush to gently clean them without using liquids.
How many pipe cleaners do I need for one flower?
A standard flower usually requires about six to seven pipe cleaners in total. This includes four for the petals, one for the center, and one or two for the stem and leaves. If you are making a very large or multi-layered bloom like a peony, you might need up to twelve stems to get the desired fullness.
What is the best way to display these flowers?
Pipe cleaner flowers look best when grouped together in a small bud vase or a decorated mason jar. Because the stems are flexible, you can also wrap them around bedposts, curtain rods, or even the handles of a gift bag. They are excellent for adding a pop of color to areas where real plants might not survive, like a dark shelf.
Are pipe cleaners safe for young children to use?
While pipe cleaners are a staple of childhood crafting, they do have sharp wire ends that can poke small fingers. It is always best to supervise young children and help them with the final step of tucking in the wire ends. For very young kids, you can pre-cut the pieces and help with the twisting parts to ensure a safe and fun experience.
Our Top Recommended Finds
- Bulk Chenille Stem Assortment: Look for packs that offer at least 20 different colors so you have plenty of variety for your petals and centers.
- Precision Craft Pliers: A small pair of needle-nose pliers makes tucking in sharp wire ends much easier than using your fingers.
- Floral Tape: While not strictly necessary, wrapping your pipe cleaner stems in green floral tape can give them a more realistic, smooth finish.
Bring Your Garden To Life
Now that you have mastered the basic loop-and-twist technique, the possibilities for your wire garden are endless.
You can experiment with different petal shapes, such as folding the loops into triangles for a star-shaped lily or using multiple colors in a single petal.
Try making a whole bouquet to brighten up your workspace or to give as a handmade gift to a friend.
Start with one simple daisy today and see how quickly your collection grows.
Beginner-friendly templates, step-by-step guides,
and weekly project ideas in your inbox.