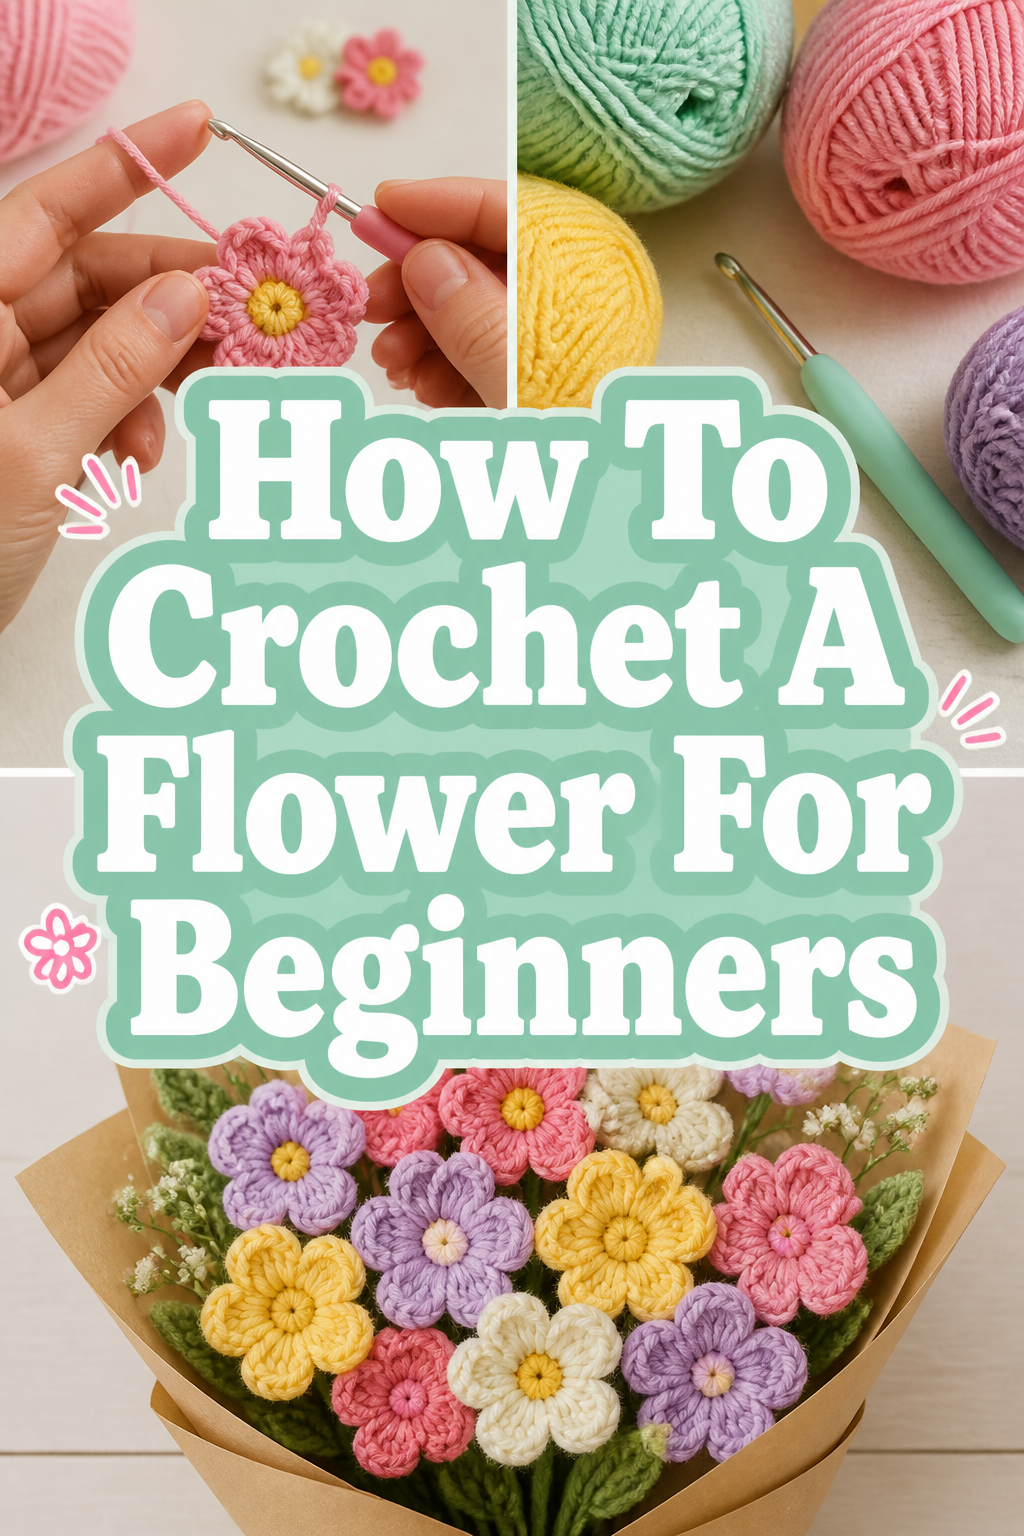
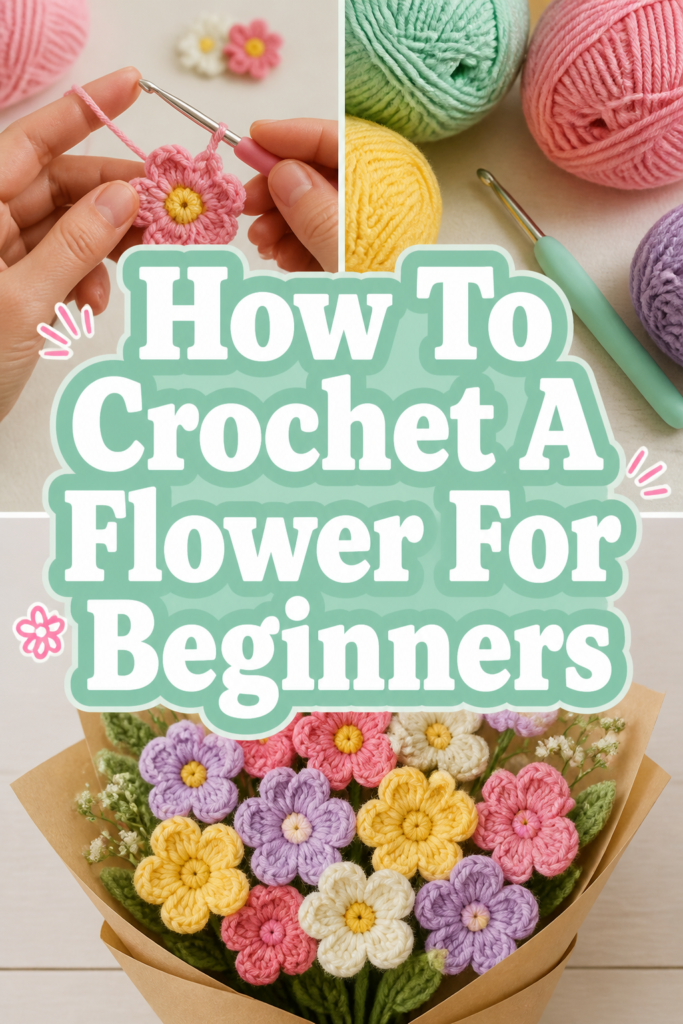
🌸 How To Crochet A Flower For Beginners
I remember the first time I crocheted a flower. It felt like magic, transforming a simple strand of yarn into something beautiful and tangible. That little bloom instantly brightened my day and ignited a passion for creating.
This guide comes from countless hours of yarn, hooks, and a deep love for sharing the joy of crochet. You’re about to discover how simple and rewarding it is to make your very own charming flower.
Quick Overview
Get ready to create a lovely crocheted flower, perfect for decorating, gifting, or just admiring. This project introduces fundamental crochet stitches in a fun, achievable way.
- Time needed: 1-2 hours (including learning stitches)
- Difficulty: Beginner
- What you’ll need: Yarn, crochet hook, scissors, yarn needle
Step-by-Step Instructions
Step 1: Gather Your Supplies
Before we begin, collect everything you’ll need for your first crochet flower. Having your tools ready makes the process smooth and enjoyable.
Choose a medium-weight yarn (like worsted weight, also known as Aran or 10-ply). Cotton or acrylic yarn works wonderfully for beginners.
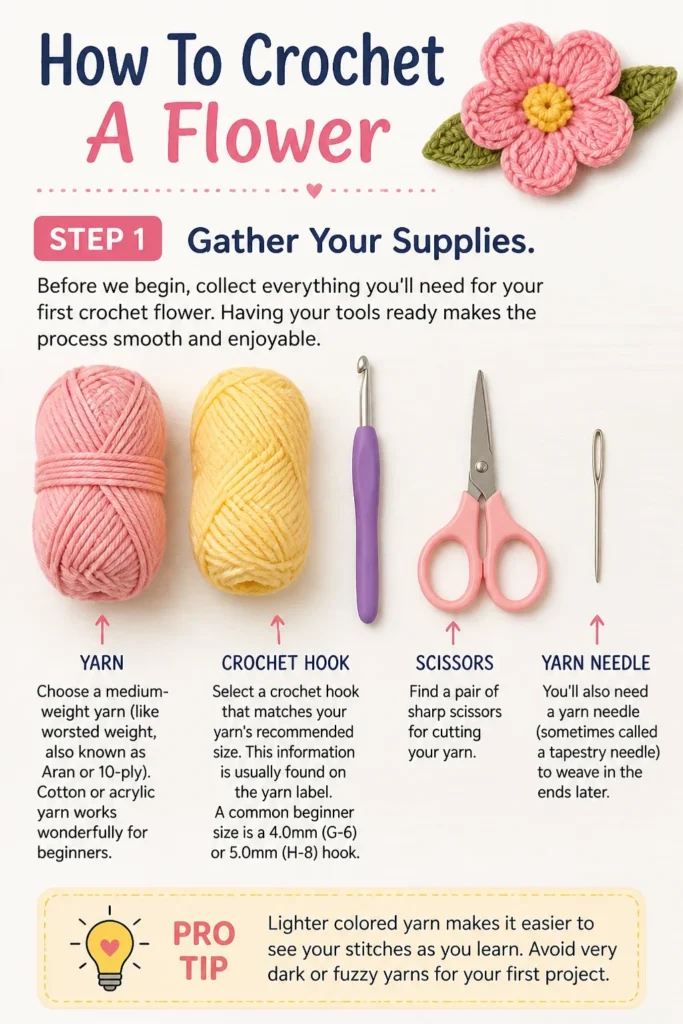
Select a crochet hook that matches your yarn’s recommended size. This information is usually found on the yarn label. A common beginner size is a 4.0mm (G-6) or 5.0mm (H-8) hook.
Find a pair of sharp scissors for cutting your yarn. You’ll also need a yarn needle (sometimes called a tapestry needle) to weave in the ends later.
Pro Tip: Lighter colored yarn makes it easier to see your stitches as you learn. Avoid very dark or “fuzzy” yarns for your first project.
Step 2: Master the Slip Knot
Every crochet project begins with a slip knot. This creates the first loop on your hook and is surprisingly simple once you get the hang of it.
Hold the yarn tail in your left hand, leaving about 6 inches hanging free.
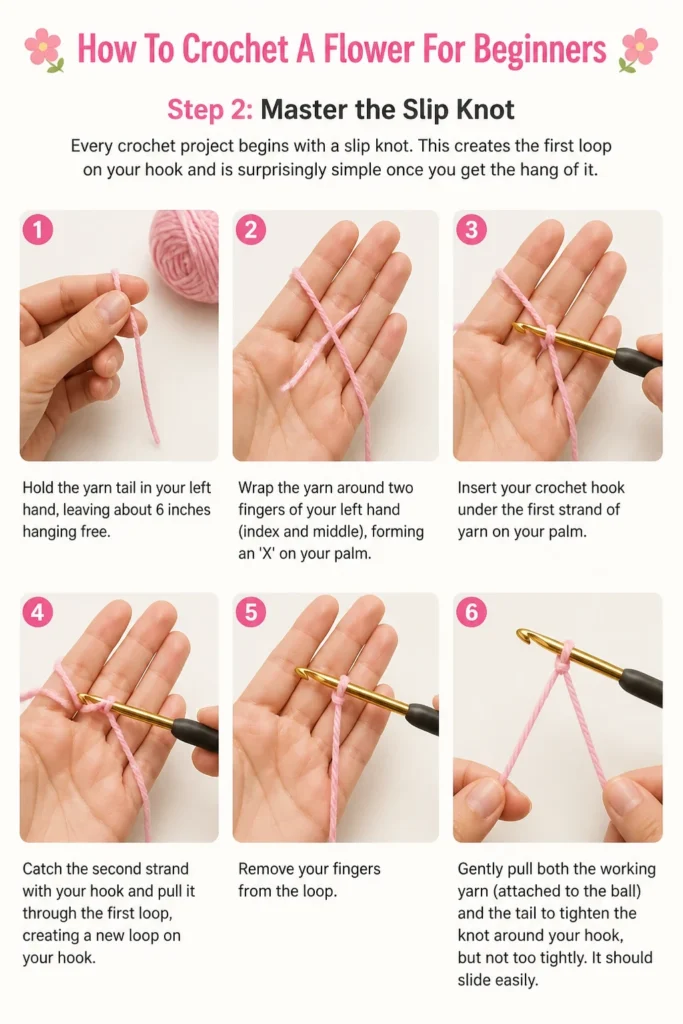
Wrap the yarn around two fingers of your left hand (index and middle), forming an ‘X’ on your palm.
Insert your crochet hook under the first strand of yarn on your palm.
Catch the second strand with your hook and pull it through the first loop, creating a new loop on your hook.
Remove your fingers from the loop. Gently pull both the working yarn (attached to the ball) and the tail to tighten the knot around your hook, but not too tightly. It should slide easily.
Step 3: Practice the Chain Stitch (ch)
The chain stitch is the absolute foundation of most crochet projects. It forms the starting row or ring for your flower.
Yarn over (YO) your hook. This means wrapping the yarn from back to front over your hook.
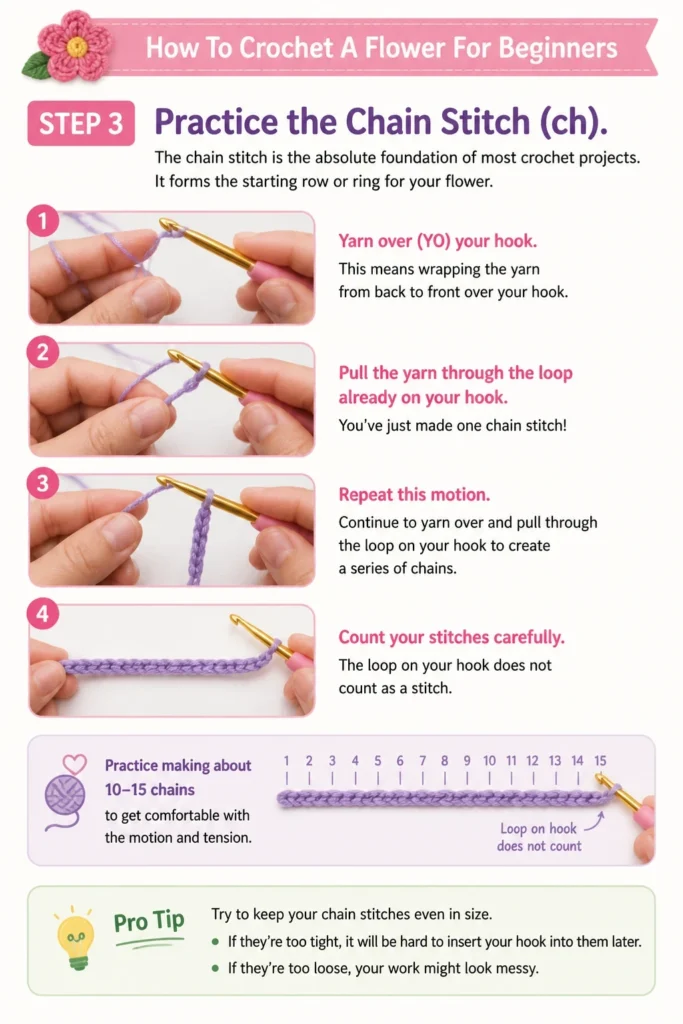
Pull the yarn through the loop already on your hook. You’ve just made one chain stitch!
Repeat this motion. Continue to yarn over and pull through the loop on your hook to create a series of chains.
Count your stitches carefully. The loop on your hook does not count as a stitch. Practice making about 10-15 chains to get comfortable with the motion and tension.
Pro Tip: Try to keep your chain stitches even in size. If they’re too tight, it will be hard to insert your hook into them later. If they’re too loose, your work might look messy.
Step 4: Form the Foundation Ring
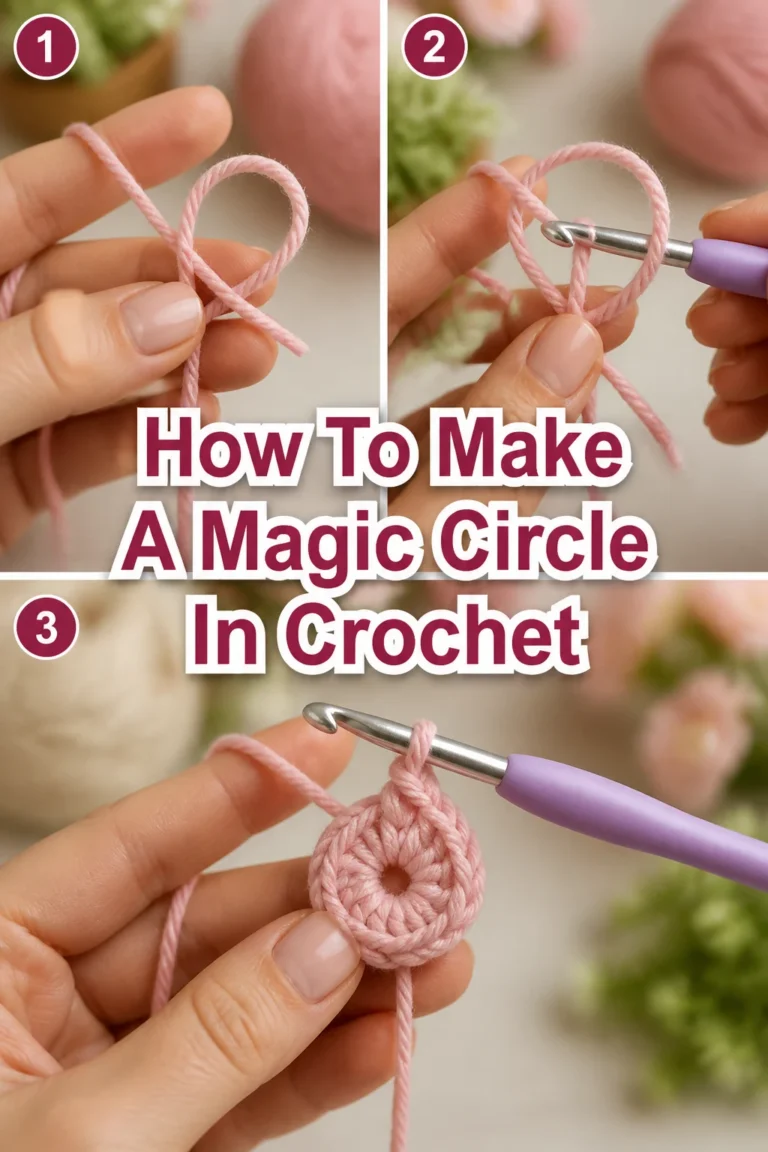
Our flower will start from a central ring. For beginners, a simple chain ring is often easier than a magic ring.
Chain 4 stitches. You’ve just practiced this, so it should feel familiar.
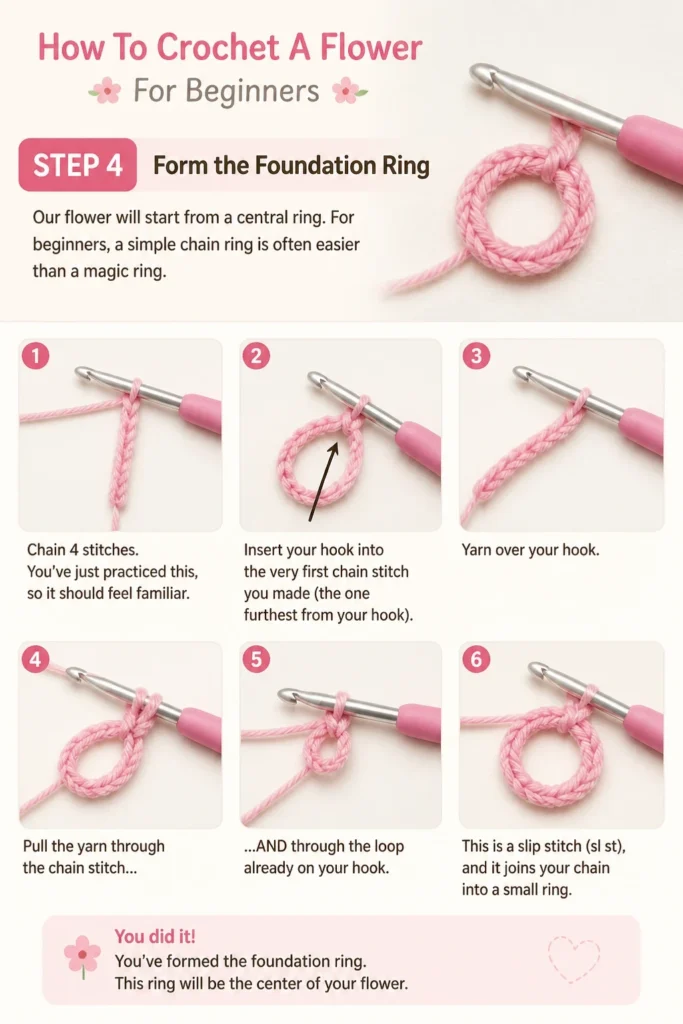
Insert your hook into the very first chain stitch you made (the one furthest from your hook).
Yarn over your hook.
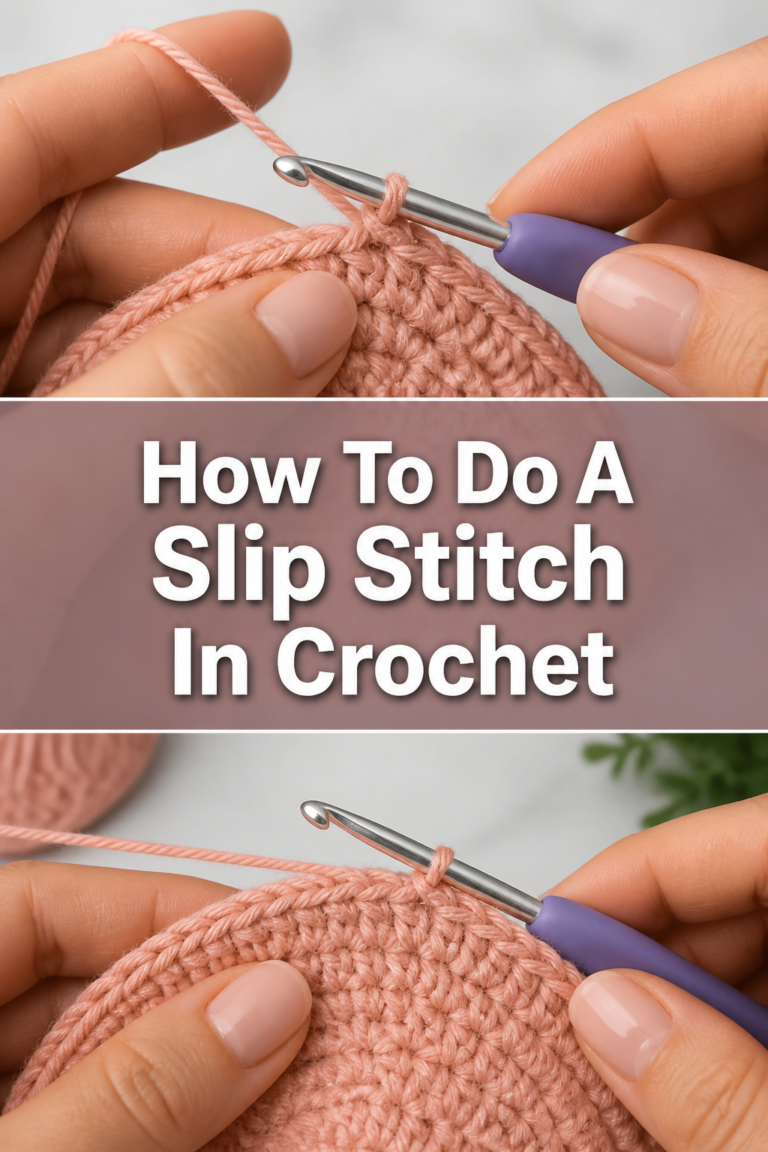
Pull the yarn through the chain stitch AND through the loop already on your hook. This is a slip stitch (sl st), and it joins your chain into a small ring.
Step 5: Learn the Single Crochet (sc)
The single crochet is a fundamental stitch that creates a dense, sturdy fabric. We’ll use it to begin forming the base of our petals.
Chain 1. This “chain 1” does not count as a stitch; it just gives height to your row.
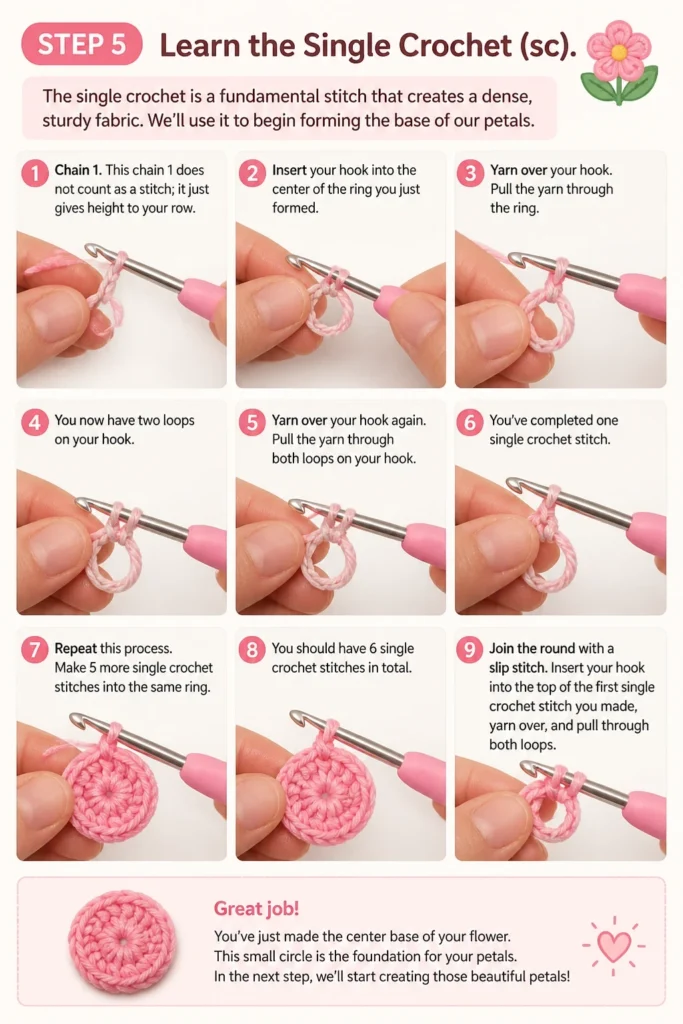
Insert your hook into the center of the ring you just formed.
Yarn over your hook.
Pull the yarn through the ring. You now have two loops on your hook.
Yarn over your hook again.
Pull the yarn through both loops on your hook. You’ve completed one single crochet stitch.
Repeat this process. Make 5 more single crochet stitches into the same ring. You should have 6 single crochet stitches in total.
Join the round with a slip stitch. Insert your hook into the top of the first single crochet stitch you made, yarn over, and pull through both loops.
Step 6: Introduce the Double Crochet (dc) for Petals
Now for the fun part – creating the petals! The double crochet stitch is taller than the single crochet, perfect for giving our flower volume.
Chain 2. This chain 2 will count as the first part of your first double crochet stitch for this round.
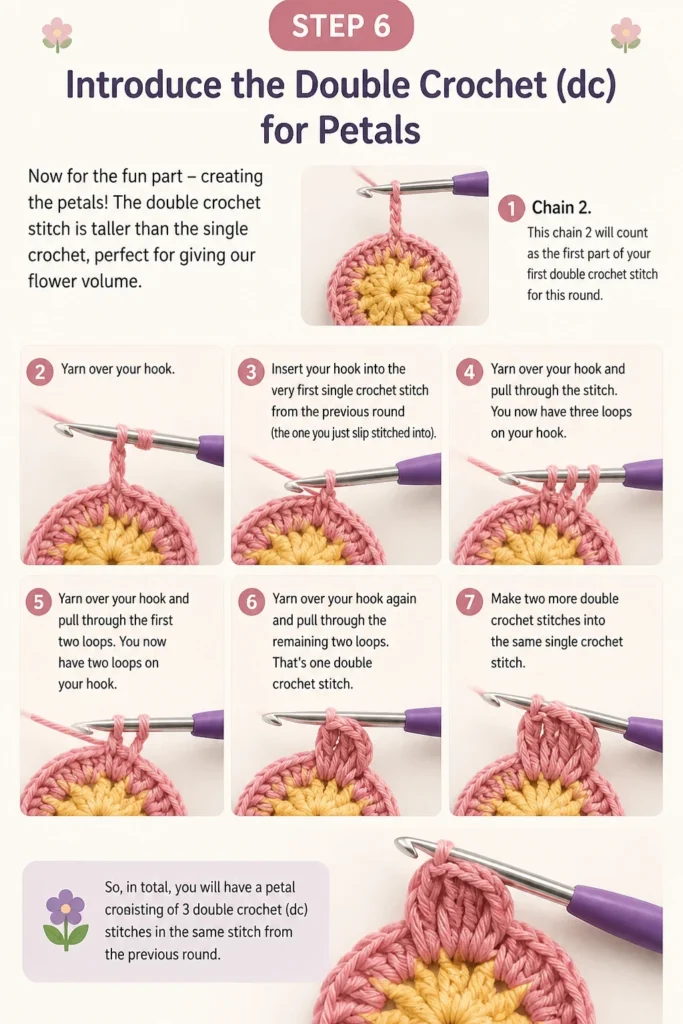
Yarn over your hook.
Insert your hook into the very first single crochet stitch from the previous round (the one you just slip stitched into).
Yarn over your hook and pull through the stitch. You now have three loops on your hook.
Yarn over your hook and pull through the first two loops. You now have two loops on your hook.
Yarn over your hook again and pull through the remaining two loops. That’s one double crochet stitch.
Make two more double crochet stitches into the same single crochet stitch. So, in total, you will have a “petal” consisting of chain 2 (counts as 1 dc) and 2 dc stitches in that first single crochet stitch.
Slip stitch into the next single crochet stitch from the previous round. This secures your first petal.
Pro Tip: Don’t worry if your first few petals look a bit wonky. Crochet takes practice, and consistency comes with time. Just keep going!
Step 7: Complete Your Petals
You’re well on your way to a beautiful flower! Now, simply repeat the petal sequence around your foundation ring.
Repeat the following sequence for each of the remaining 4 single crochet stitches from the previous round:
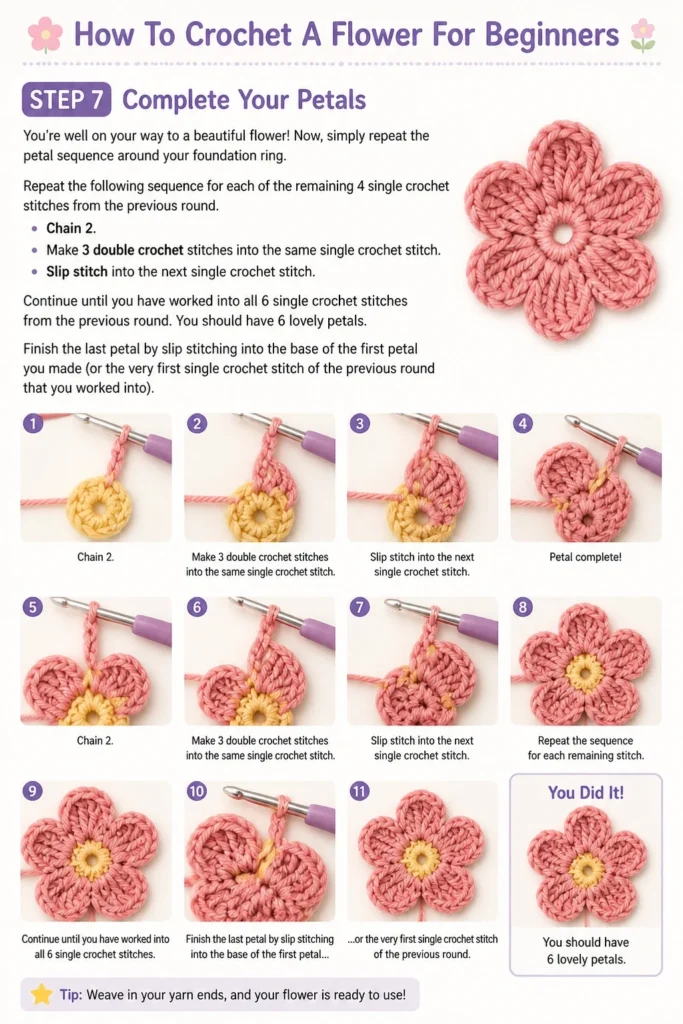
- Chain 2.
- Make 3 double crochet stitches into the same single crochet stitch.
- Slip stitch into the next single crochet stitch.
Continue until you have worked into all 6 single crochet stitches from the previous round. You should have 6 lovely petals.
Finish the last petal by slip stitching into the base of the first petal you made (or the very first single crochet stitch of the previous round that you worked into).
Step 8: Fasten Off and Finish
Almost done! Fastening off securely prevents your work from unraveling, and weaving in ends creates a clean, professional look.
Cut your yarn, leaving a tail about 6-8 inches long.
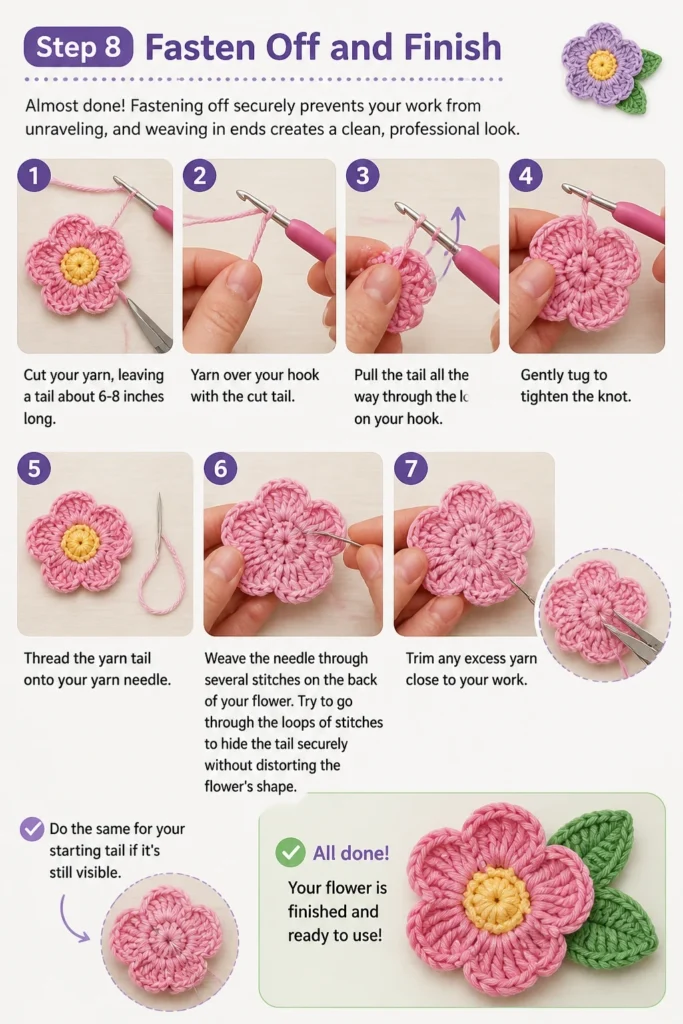
Yarn over your hook with the cut tail.
Pull the tail all the way through the loop on your hook. Gently tug to tighten the knot.
Thread the yarn tail onto your yarn needle.
Weave the needle through several stitches on the back of your flower. Try to go through the loops of stitches to hide the tail securely without distorting the flower’s shape.
Trim any excess yarn close to your work. Do the same for your starting tail if it’s still visible.
Common Mistakes to Avoid
Too Tight or Too Loose Tension
Beginning crocheters often struggle with tension. If your stitches are too tight, your flower will curl up and be difficult to work into. If they’re too loose, your flower might look gappy or misshapen. Practice is key here; try to find a comfortable grip where the yarn flows smoothly without being pulled too taut or left too slack. Relax your hands and wrists.
Forgetting to Count Stitches
It’s easy to lose track, especially when you’re learning new stitches. Missing a stitch or adding an extra one will throw off your petal count and the overall symmetry of your flower. Get into the habit of counting your stitches at the end of each round, especially the foundation ring and the single crochet round.
Not Weaving in Ends Properly
A beautifully crocheted flower can look unfinished if the yarn tails are left dangling or not secured well. If tails aren’t woven in through enough stitches, they can unravel, causing your hard work to come undone. Take the time to thread your yarn needle through several stitches, changing direction once or twice, to ensure the ends are hidden and secure.
Troubleshooting
My Flower Is Curling Up
If your flower is curling, your tension might be too tight, or you might be making too many stitches in a round relative to the previous one, causing it to cup. Try using a slightly larger hook, or consciously loosen your grip on the yarn. Gently blocking your finished flower by misting it with water and flattening it can also help.
My Stitches Look Uneven
Uneven stitches are very common for beginners. This usually means your tension is inconsistent. One stitch might be loose, the next tight. The best solution is simply practice. The more you crochet, the more consistent your hand movements and tension will become. Don’t be afraid to unravel (frog) a few stitches and try again if they look very different.
There Are Gaps in My Flower
Gaps can appear if your stitches are too loose, or if you’re accidentally skipping stitches in the previous round. Double-check your stitch count for each round. Ensure you are inserting your hook fully into the correct stitch, not just a part of it. Using a slightly smaller hook can also help create a denser fabric with fewer gaps.
Key Takeaways
- Start Simple: Begin with basic stitches like the slip knot, chain, single crochet, and double crochet.
- Practice Makes Perfect: Consistency in tension and stitch formation comes with repeated effort.
- Count Your Stitches: Regular counting prevents errors and ensures your flower is symmetrical.
- Finish Neatly: Properly fastening off and weaving in ends gives your project a polished look.
- Embrace the Process: Crocheting is a relaxing and rewarding craft; enjoy every stitch you make.
Frequently Asked Questions
What kind of yarn is best for a beginner flower?
Worsted weight (medium) acrylic or cotton yarn is ideal for beginners. Acrylic is affordable and easy to work with, while cotton provides good stitch definition. Avoid novelty yarns or very thin/thick yarns initially.
Can I use a different size hook?
You can, but it will affect the size and drape of your flower. A larger hook will result in a looser, larger flower, while a smaller hook will make it tighter and smaller. Always check your yarn label for the recommended hook size as a starting point.
How can I make my flower bigger or smaller?
To make it bigger, you can use a thicker yarn and a larger hook, or add more rounds of single or double crochet before starting your petals. To make it smaller, use thinner yarn and a smaller hook, or decrease the number of stitches in your foundation ring and single crochet round.
How do I attach my crocheted flower to something?
You can sew it onto hats, bags, or clothing using your yarn needle and a matching thread. Hot glue can also work for non-washable items like headbands or decorative pieces. You can even attach a safety pin to the back to make it a removable brooch.
Our Top Recommended Finds
- Ergonomic Crochet Hook Set: These hooks often have comfortable handles, reducing hand fatigue during longer crafting sessions.
- Stitch Markers: Small plastic clips that help you mark your first stitch of a round or important points, preventing counting errors.
- Yarn Starter Pack: A bundle of different colored, medium-weight acrylic yarns is perfect for experimenting with various flower designs.
Your Creative Journey Begins Now
You’ve just learned the foundational steps to create a beautiful crocheted flower. This isn’t just about making an object; it’s about discovering a new skill, finding a peaceful hobby, and opening the door to endless creative possibilities.
Don’t stop with just one! Make a whole bouquet, experiment with different colors, or even try adding a button to the center. Each flower you create will build your confidence and refine your technique. Pick up your hook and yarn today, and let your imagination bloom.