💖 How To Make A Barbie Box Photo Booth

Beginner-friendly templates, step-by-step guides,
and weekly project ideas in your inbox.
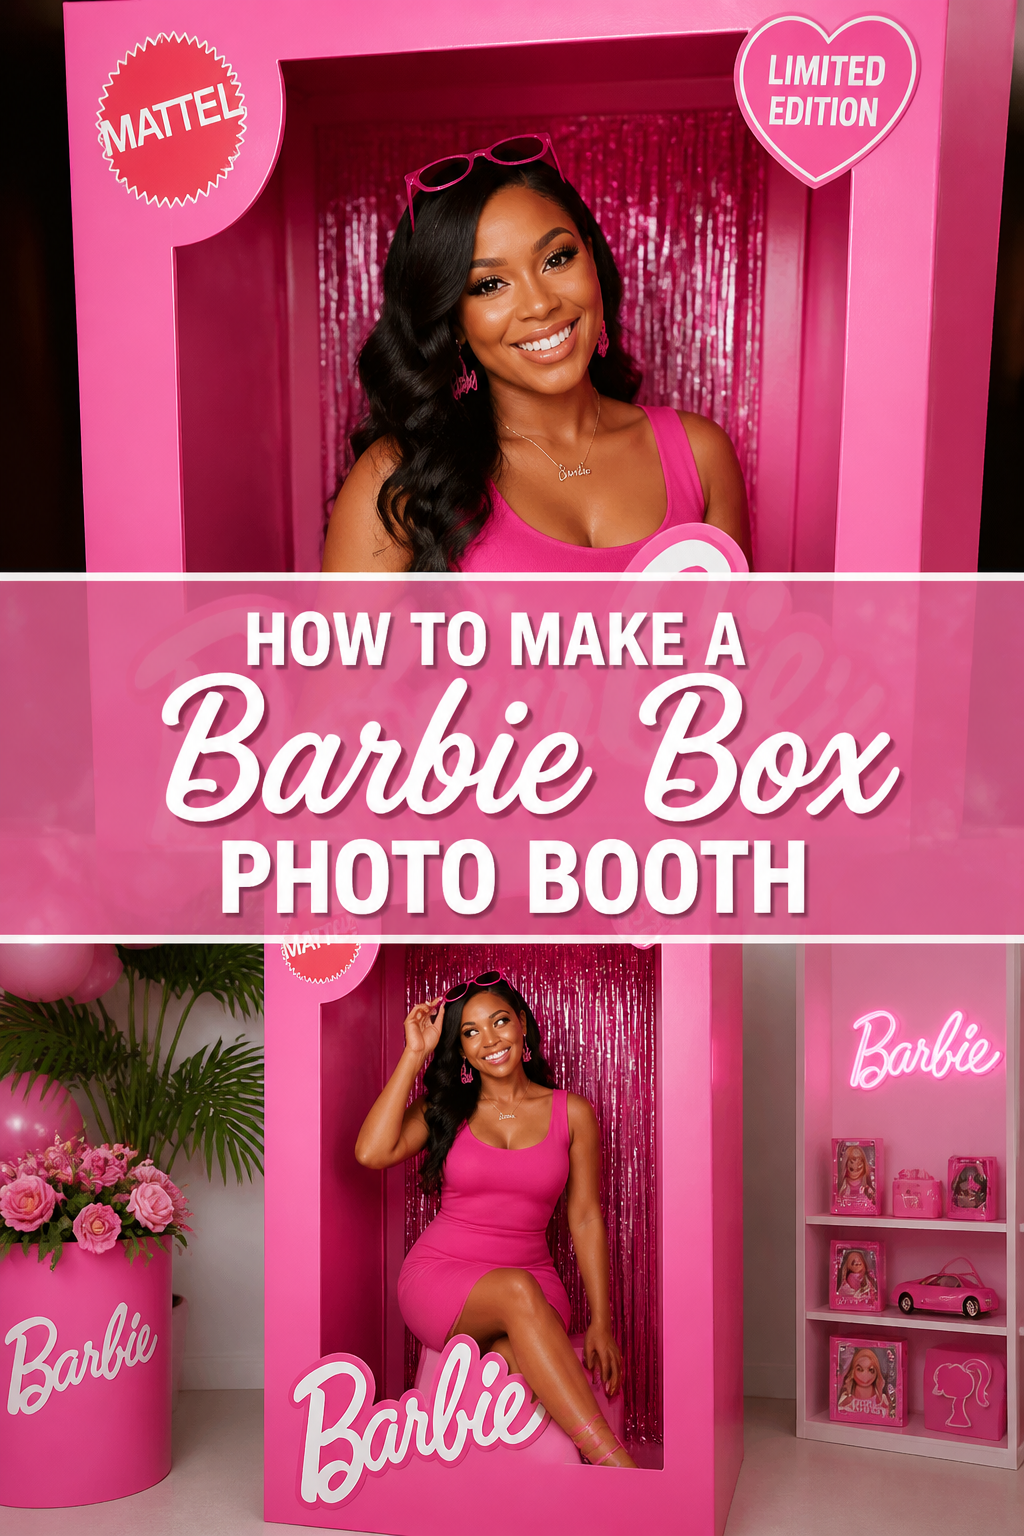
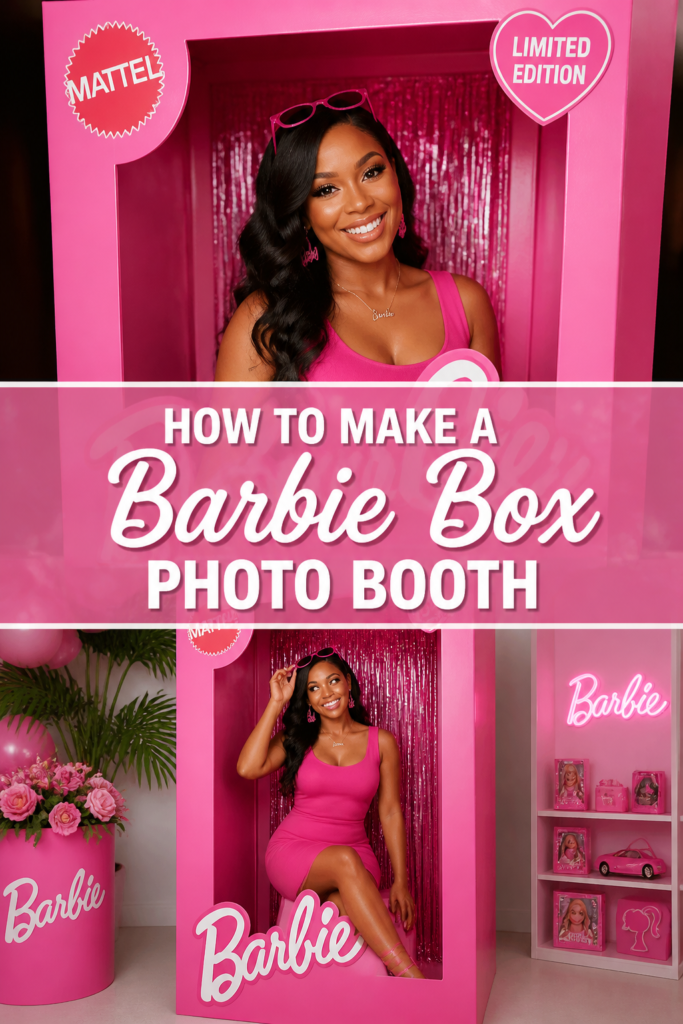
Stepping into a life-sized Barbie box feels like a dream come true for many. Imagine the joy and the endless photo opportunities. I’ve personally crafted several themed backdrops, and nothing quite captures pure delight like this iconic design.
This guide shares all my best tips and tricks, ensuring your DIY project is a smashing success. You’ll create a picture-perfect setting that everyone will adore.
Quick Overview
This guide will walk you through building your very own dazzling Barbie box photo booth. You’ll create a sturdy, eye-catching prop perfect for parties, events, or just fun photo sessions. Get ready to bring a touch of iconic glamour to your next gathering.
- Time needed: 4-7 hours (includes drying time)
- Difficulty: Intermediate
- What you’ll need: Large cardboard boxes, pink paint, white paint, craft knife, strong adhesive, measuring tape, printer.
Step-by-Step Instructions
Step 1: Gather Your Materials
Start by collecting all the necessary items before you begin. Having everything at hand streamlines the building process significantly. This prevents frustrating interruptions and keeps your momentum going.
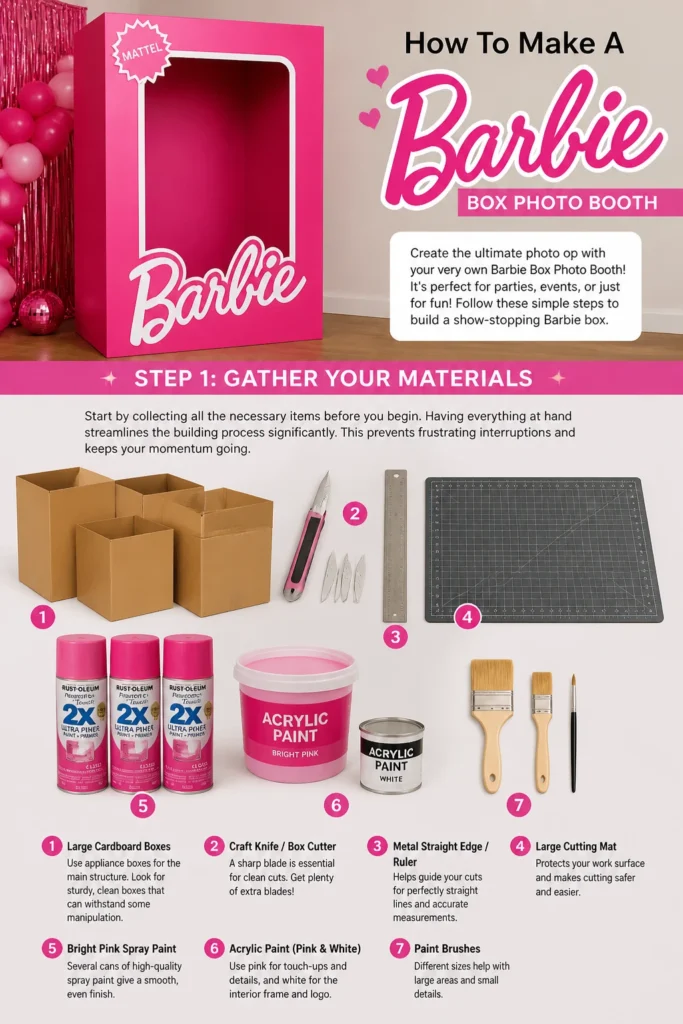
You’ll need several large cardboard boxes, ideally appliance boxes, for the main structure. Look for sturdy, clean boxes that can withstand some manipulation. Quality materials make a big difference in the final product’s durability.
Secure a good quality craft knife or box cutter with plenty of sharp blades. A metal straight edge or ruler is also essential for precise cuts. Don’t forget a large cutting mat to protect your work surface.
Pick up several cans of bright pink spray paint or a large bucket of acrylic pink paint. White paint is crucial for the iconic interior frame and logo details. Strong adhesive, like hot glue or heavy-duty construction adhesive, will hold your box together.
A measuring tape, pencil, and a large sheet of paper or a projector for the logo will round out your supplies. Consider protective gear like gloves and a mask if you’re using spray paint.
Step 2: Plan Your Dimensions
Careful planning is the foundation of any successful DIY project. Sketch out your Barbie box design before making any cuts. Decide on the overall height and width of your booth.
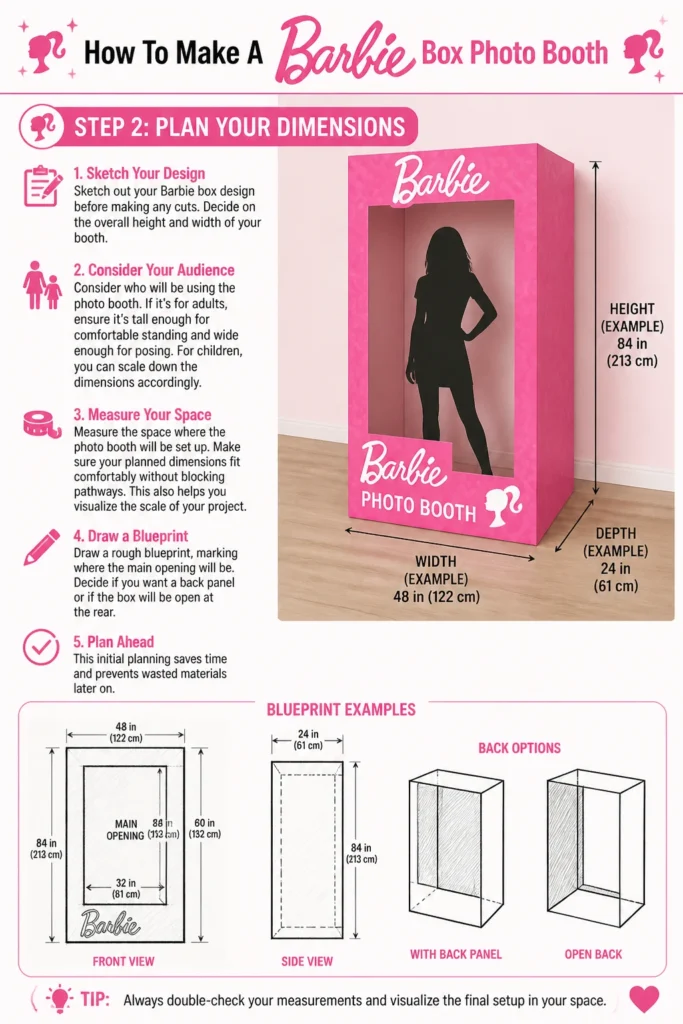
Consider who will be using the photo booth. If it’s for adults, ensure it’s tall enough for comfortable standing and wide enough for posing. For children, you can scale down the dimensions accordingly.
Measure the space where the photo booth will be set up. Make sure your planned dimensions fit comfortably without blocking pathways. This also helps you visualize the scale of your project.
Draw a rough blueprint, marking where the main opening will be. Decide if you want a back panel or if the box will be open at the rear. This initial planning saves time and prevents wasted materials later on.
Step 3: Construct the Box Frame
Begin by assembling the main panels of your box. Flatten your large cardboard boxes and carefully cut out the pieces for the front, sides, and top. Ensure all edges are clean and straight.
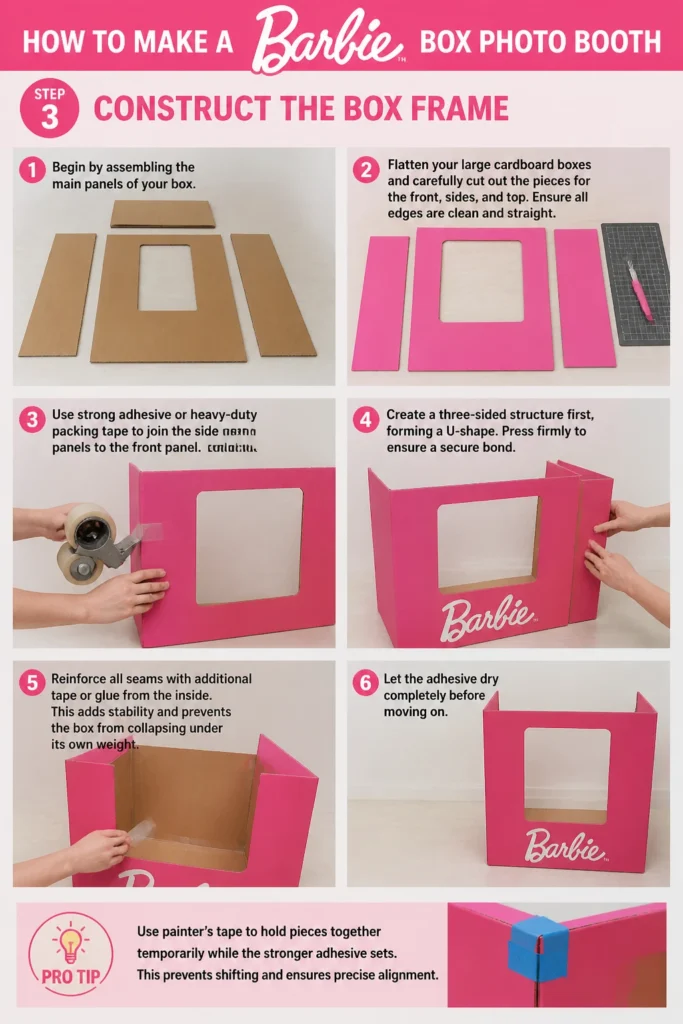
Use strong adhesive or heavy-duty packing tape to join the side panels to the front panel. Create a three-sided structure first, forming a U-shape. Press firmly to ensure a secure bond.
Reinforce all seams with additional tape or glue from the inside. This adds stability and prevents the box from collapsing under its own weight. Let the adhesive dry completely before moving on.
Pro Tip: Use painter’s tape to hold pieces together temporarily while the stronger adhesive sets. This prevents shifting and ensures precise alignment.
Step 4: Create the Iconic Opening
Now it’s time to cut out the distinctive Barbie box opening. On your main front panel, measure and mark the rectangular opening where people will stand. Leave a significant border around the edges.
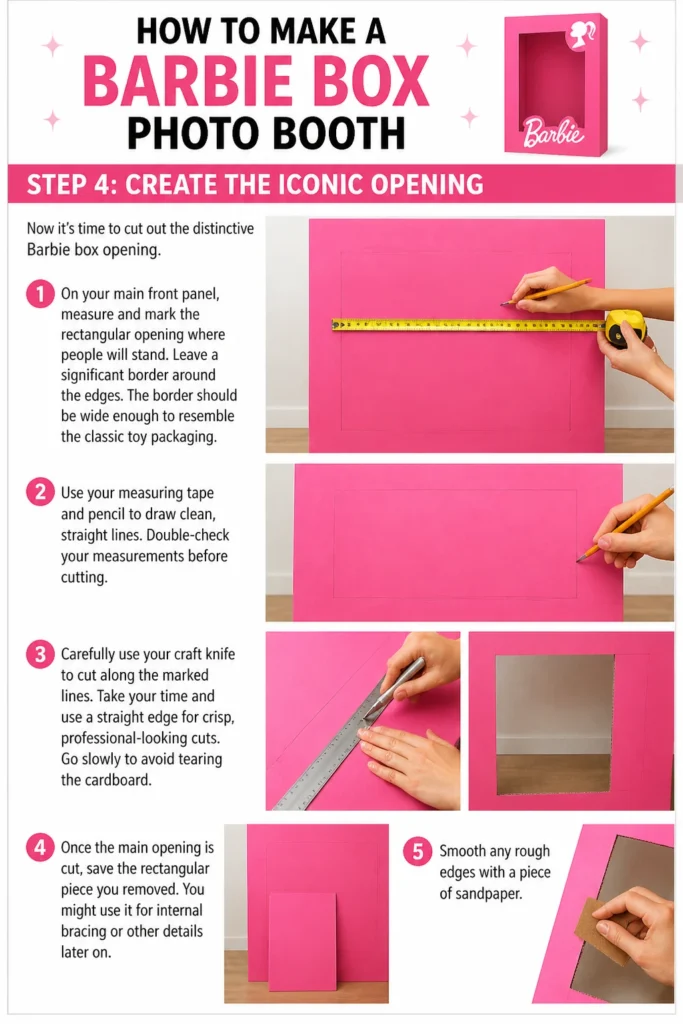
The border should be wide enough to resemble the classic toy packaging. Use your measuring tape and pencil to draw clean, straight lines. Double-check your measurements before cutting.
Carefully use your craft knife to cut along the marked lines. Take your time and use a straight edge for crisp, professional-looking cuts. Go slowly to avoid tearing the cardboard.
Once the main opening is cut, save the rectangular piece you removed. You might use it for internal bracing or other details later on. Smooth any rough edges with a piece of sandpaper.
Step 5: Prime and Paint Pink
Prepare your box for its signature pink color. If your cardboard has any printed designs, a coat of primer will help create an even base. This ensures your pink paint looks vibrant and uniform.
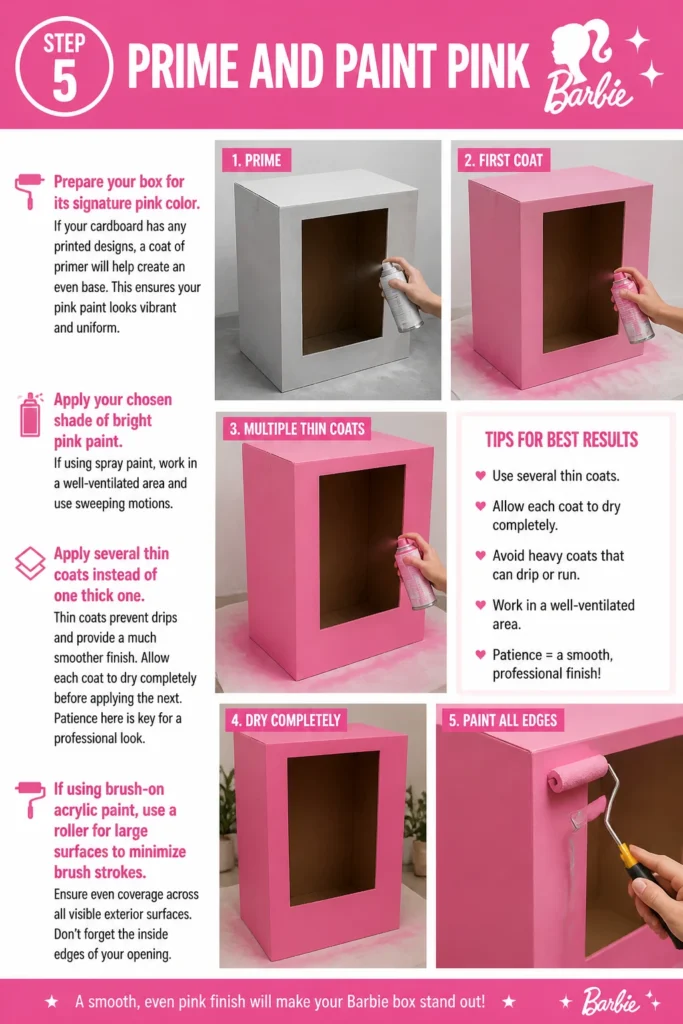
Apply your chosen shade of bright pink paint. If using spray paint, work in a well-ventilated area and use sweeping motions. Apply several thin coats instead of one thick one.
Thin coats prevent drips and provide a much smoother finish. Allow each coat to dry completely before applying the next. Patience here is key for a professional look.
If using brush-on acrylic paint, use a roller for large surfaces to minimize brush strokes. Ensure even coverage across all visible exterior surfaces. Don’t forget the inside edges of your opening.
Step 6: Add White Details
Once the pink paint is fully dry, it’s time for the iconic white accents. Measure and mark a white border around the inside edge of your opening. This creates the classic framed look.
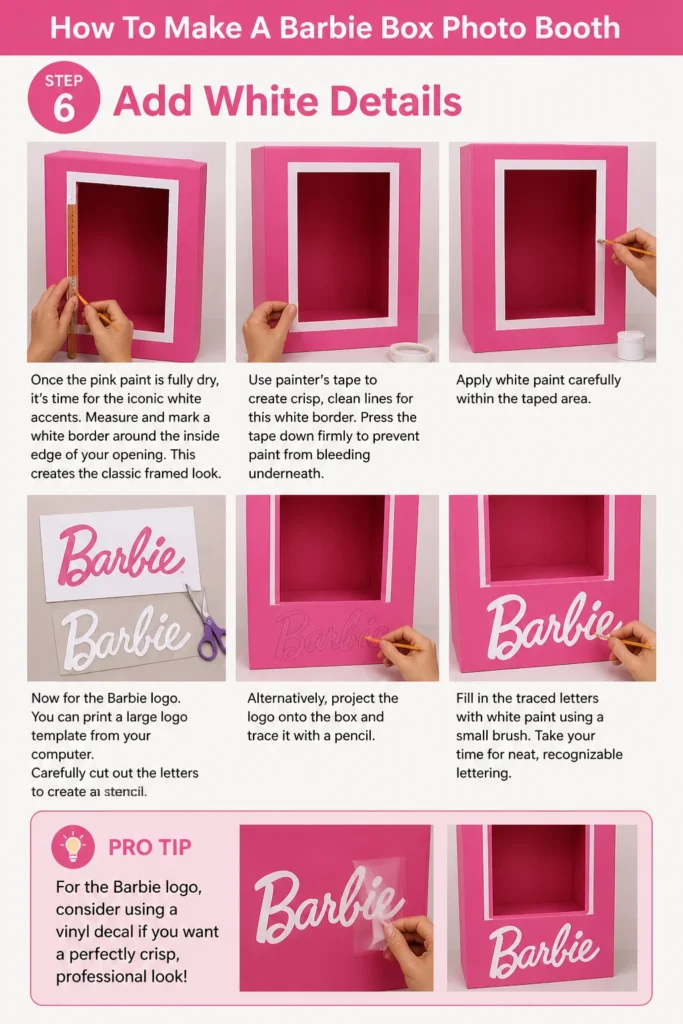
Use painter’s tape to create crisp, clean lines for this white border. Press the tape down firmly to prevent paint from bleeding underneath. Apply white paint carefully within the taped area.
Now for the “Barbie” logo. You can print a large logo template from your computer. Carefully cut out the letters to create a stencil.
Alternatively, project the logo onto the box and trace it with a pencil. Fill in the traced letters with white paint using a small brush. Take your time for neat, recognizable lettering.
Pro Tip: For the Barbie logo, consider using a vinyl decal if you want a perfectly crisp, professional finish without the hassle of painting freehand. These can be custom-ordered online.
Step 7: Attach the Back Panel
If you opted for a back panel, it’s time to attach it. This panel provides additional stability and a more finished look. It also prevents people from seeing behind the scenes.
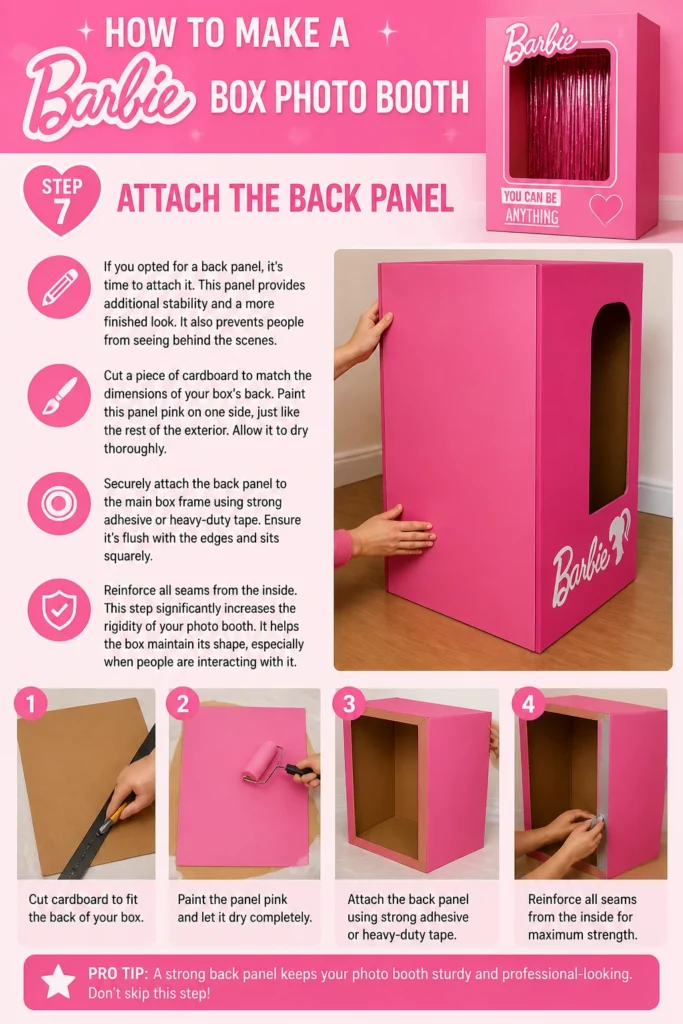
Cut a piece of cardboard to match the dimensions of your box’s back. Paint this panel pink on one side, just like the rest of the exterior. Allow it to dry thoroughly.
Securely attach the back panel to the main box frame using strong adhesive or heavy-duty tape. Ensure it’s flush with the edges and sits squarely. Reinforce all seams from the inside.
This step significantly increases the rigidity of your photo booth. It helps the box maintain its shape, especially when people are interacting with it.
Step 8: Reinforce and Stabilize
Even with a back panel, further reinforcement is a good idea. Cut strips of cardboard to create internal braces. These can be glued along the inside corners and edges.
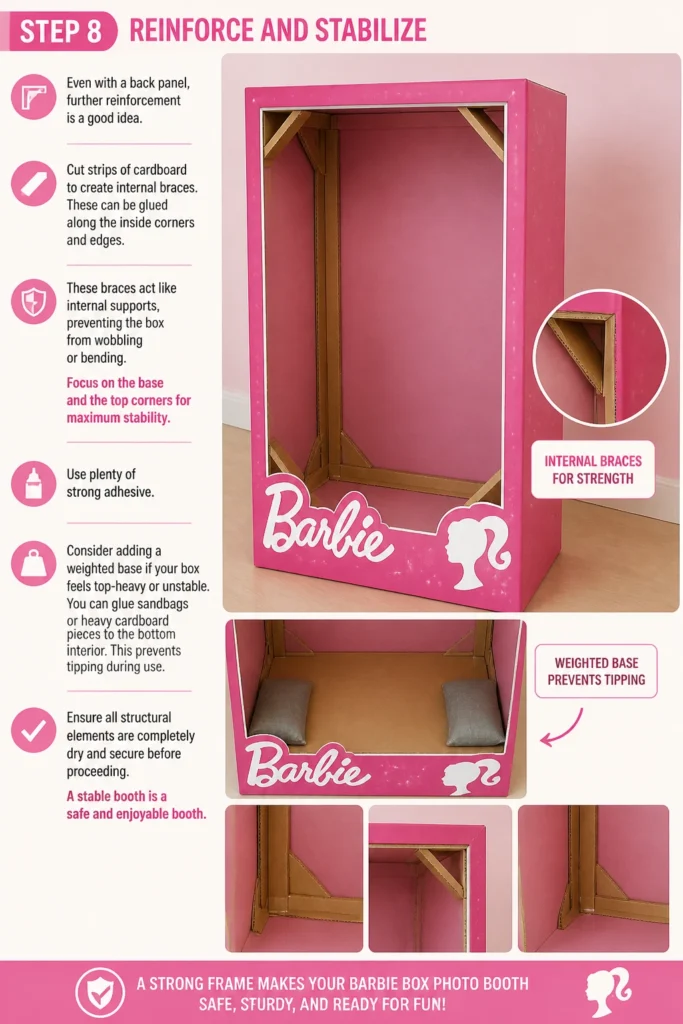
These braces act like internal supports, preventing the box from wobbling or bending. Focus on the base and the top corners for maximum stability. Use plenty of strong adhesive.
Consider adding a weighted base if your box feels top-heavy or unstable. You can glue sandbags or heavy cardboard pieces to the bottom interior. This prevents tipping during use.
Ensure all structural elements are completely dry and secure before proceeding. A stable booth is a safe and enjoyable booth.
Step 9: Accessorize Your Booth
Now for the fun part: accessorizing! Think about what will enhance the Barbie experience. A sheer pink or white curtain behind the opening adds a soft, glamorous touch.
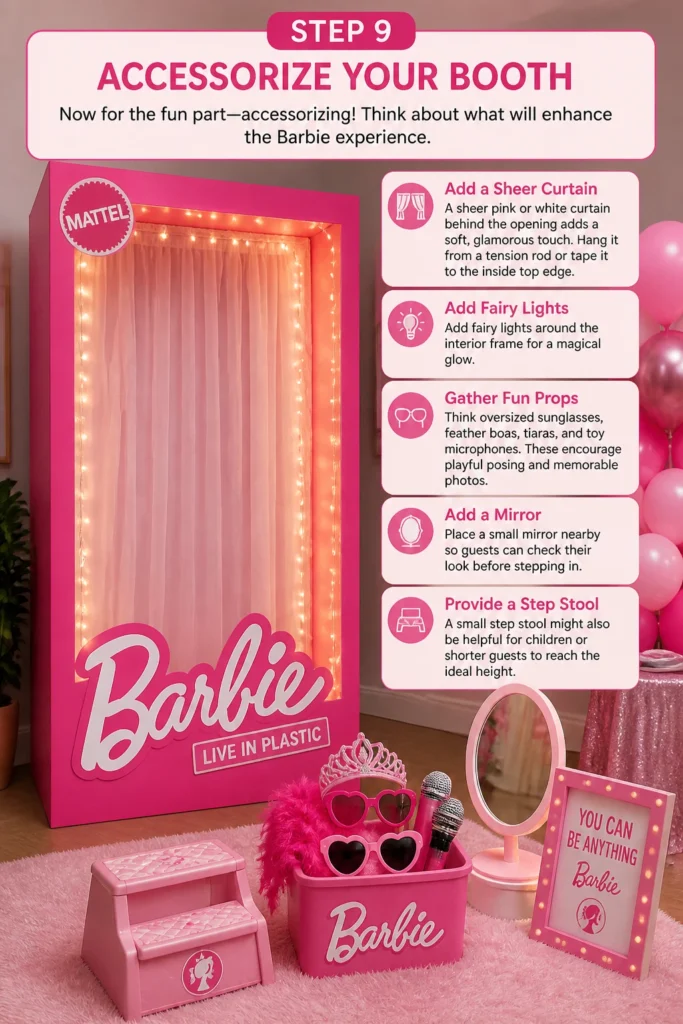
You can hang the curtain from a small tension rod or simply tape it to the inside top edge. Consider adding some fairy lights around the interior frame for a magical glow.
Gather some fun props for your guests to use. Think oversized sunglasses, feather boas, tiaras, and toy microphones. These encourage playful posing and memorable photos.
Place a small mirror nearby so guests can check their look before stepping in. A small step stool might also be helpful for children or shorter guests to reach the ideal height.
Step 10: Final Touches and Testing
Review your entire Barbie box photo booth for any imperfections. Touch up any areas where paint might have chipped or missed a spot. Ensure all edges are clean and crisp.
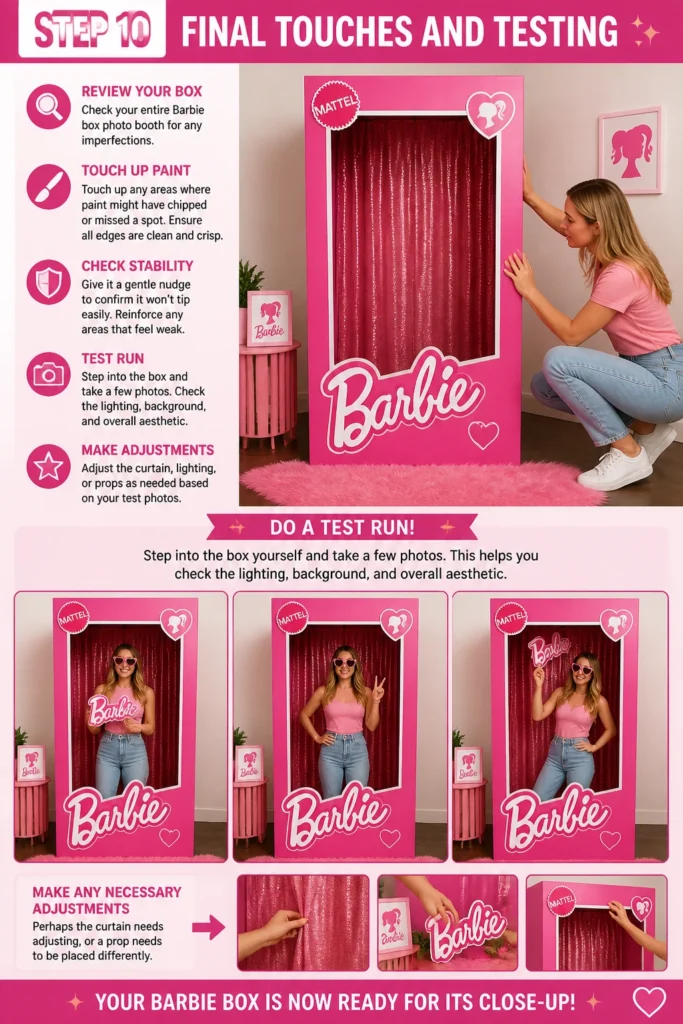
Check the stability one last time. Give it a gentle nudge to confirm it won’t tip easily. Reinforce any areas that feel weak.
Finally, do a test run! Step into the box yourself and take a few photos. This helps you check the lighting, background, and overall aesthetic.
Make any necessary adjustments based on your test photos. Perhaps the curtain needs adjusting, or a prop needs to be placed differently. Your Barbie box is now ready for its close-up!
Common Mistakes to Avoid
Underestimating Drying Time
Many DIY enthusiasts rush the painting process, leading to smudges, uneven finishes, and paint peeling. Each coat of paint needs ample time to dry completely before the next application or any handling. Rushing can ruin the smooth, professional look you’re aiming for. Always check the paint manufacturer’s recommendations for drying times between coats.
Flimsy Construction
Building a photo booth that collapses or wiggles during use is a common pitfall. Using insufficient adhesive or skipping reinforcement steps can lead to disappointment. Ensure all seams are securely glued or taped and add internal braces, especially at stress points. A sturdy structure ensures safety and longevity.
Incorrect Proportions
A Barbie box that’s too small or too large for its intended users can look awkward in photos. Failing to plan the dimensions based on who will be stepping inside is a mistake. Measure your space and consider the average height of your guests to ensure a comfortable and visually appealing fit. The goal is for people to look like they’re perfectly packaged.
Messy Paint Lines
Achieving those crisp, clean lines for the white interior frame and logo can be tricky. Freehand painting without proper masking or stenciling often results in wobbly or bleeding edges. Always use painter’s tape for straight lines and firmly press it down to prevent paint seepage. For the logo, a stencil or projector tracing offers the best precision.
Troubleshooting
Box Feels Unstable
If your finished Barbie box wobbles or feels like it might tip over, it’s a stability issue. This often happens if the base isn’t wide enough or if the vertical panels lack sufficient support. To fix this, add more internal cardboard braces, particularly along the bottom edges and corners. You can also glue heavy objects, like sandbags or bricks, to the inside base to provide a low center of gravity and prevent tipping.
Paint Looks Streaky or Uneven
Streaky paint is usually a sign of applying paint too thickly, not allowing enough drying time between coats, or using an incorrect brush/roller. To remedy this, lightly sand the affected areas once the paint is fully dry. Then, apply several thin, even coats of paint, ensuring each layer dries completely. Use a foam roller for large, flat surfaces to achieve a smoother finish.
Logo Doesn’t Look Professional
If your hand-painted Barbie logo appears jagged or inconsistent, don’t worry. This is a common challenge for intricate designs. You can carefully touch up the edges with a small, fine-tipped brush and the background pink paint. For a more polished look, consider printing a large logo, cutting it out, and gluing it onto the box, or purchasing a custom vinyl decal for a perfectly crisp finish.
Key Takeaways
- Thorough planning of dimensions and materials is crucial for a successful build.
- Reinforce all cardboard seams and corners to ensure a sturdy and safe structure.
- Patience with painting, using thin coats and allowing ample drying time, yields the best results.
- Utilize painter’s tape and stencils for crisp, professional-looking lines and logos.
- Personalize your booth with fun props and lighting to enhance the photo experience.
- Always conduct a test run to check stability, lighting, and overall aesthetic before your event.
Frequently Asked Questions
What’s the best type of cardboard to use?
Large appliance boxes, like those for refrigerators or washing machines, are ideal due to their size and rigidity. Moving boxes can also work, but you might need to combine several to get the desired dimensions. Look for double-walled cardboard for extra sturdiness.
How can I make it waterproof for outdoor use?
Cardboard isn’t naturally waterproof. For outdoor events, consider applying a clear sealant or varnish specifically designed for crafts over the painted surfaces. Alternatively, place the booth under a tent or canopy, or be prepared to move it indoors if rain is expected. A large tarp can also offer temporary protection.
Can I make it collapsible for storage?
Yes, with some modifications. Instead of permanently gluing all seams, you can use heavy-duty hinges or strong Velcro strips along the edges. This allows the box to fold flat for easier storage and transport. Just ensure the hinges are strong enough to support the structure when assembled.
What kind of lighting works best for photos?
Natural daylight is always excellent if available. For indoor or evening events, a ring light positioned in front of the box provides even, flattering illumination. Softbox lights or even strategically placed fairy lights inside the box can also create a beautiful glow, enhancing the photo quality.
Our Top Recommended Finds
- Large Appliance Cardboard Boxes: The foundational element for size and stability, often available for free from appliance stores.
- Rust-Oleum Painter’s Touch 2X Ultra Cover Spray Paint (Gloss Pink): Provides excellent coverage and a vibrant, smooth finish with fewer coats.
- X-ACTO Knife Set: Essential for precise, clean cuts through cardboard, ensuring professional-looking edges.
Ready to Strike a Pose?
Creating your own Barbie box photo booth is an incredibly rewarding project. It transforms a simple event into an unforgettable, picture-perfect celebration. Imagine the smiles, the laughter, and the iconic poses captured for years to come.
This guide has equipped you with all the knowledge and practical steps needed to bring your vision to life. Don’t let the idea of a big project intimidate you. Break it down, follow the steps, and enjoy the creative process.
Why wait to add that touch of pink magic to your next gathering? Gather your materials, clear your workspace, and start building your dream photo booth today. Your guests will thank you for the incredible photo opportunities!
Beginner-friendly templates, step-by-step guides,
and weekly project ideas in your inbox.