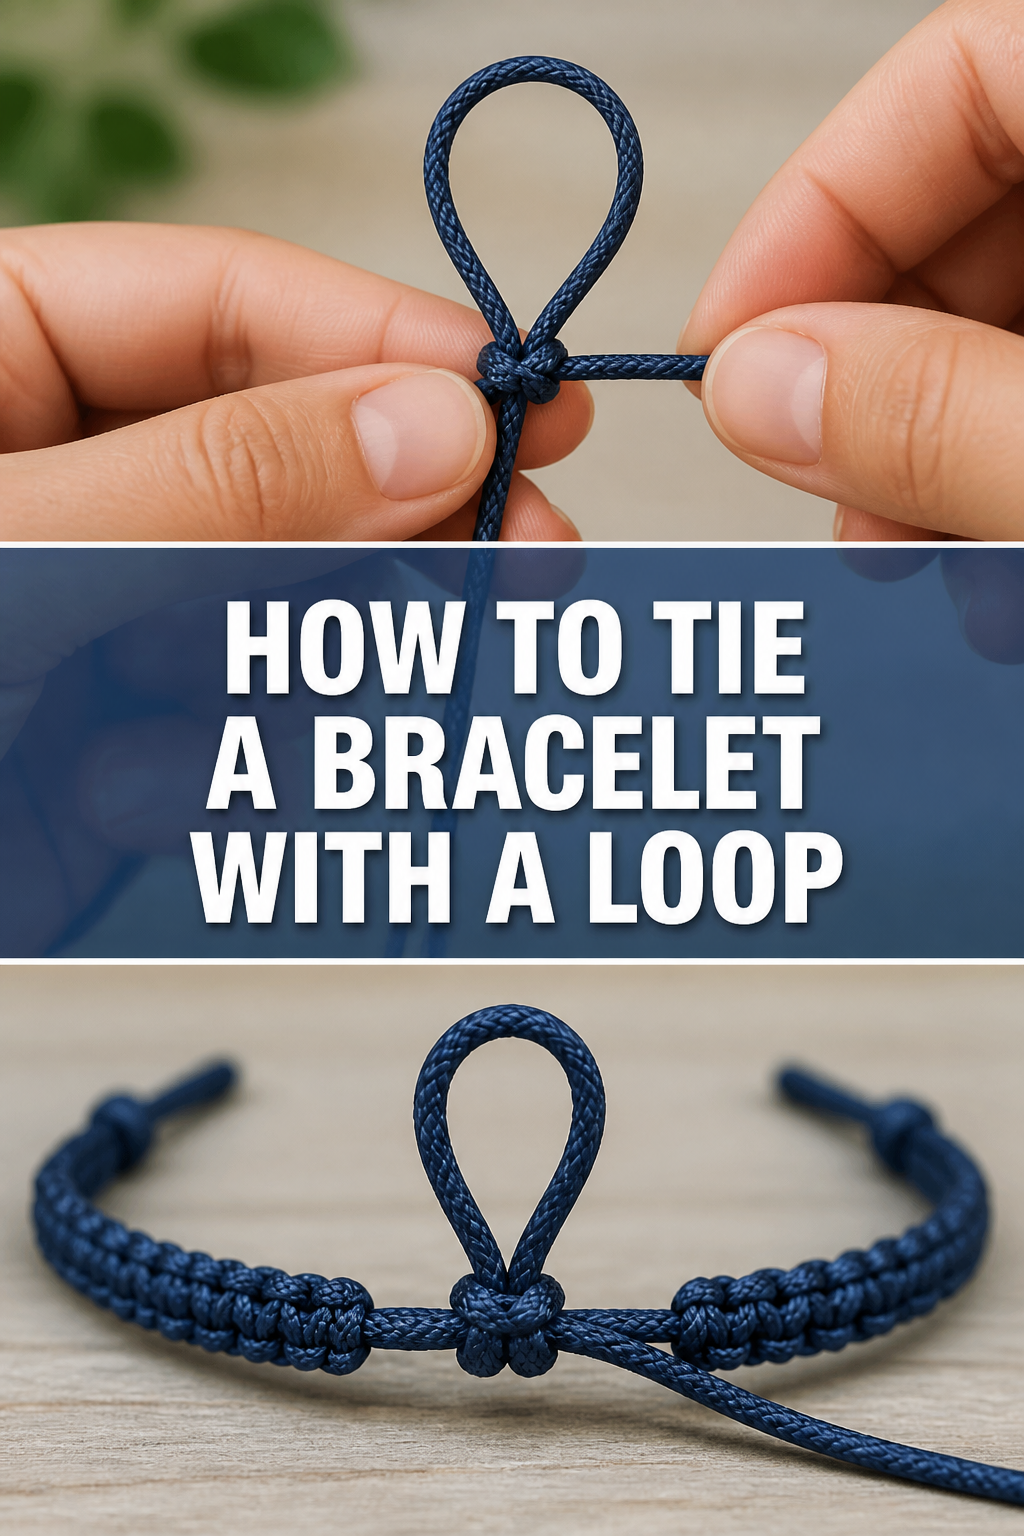
🎀 How To Tie A Bracelet With A Loop

Beginner-friendly templates, step-by-step guides,
and weekly project ideas in your inbox.
Learning to tie a bracelet with a loop can seem tricky at first glance.
I remember struggling with my first few attempts, often ending up with knots that were either too tight or too loose.
This guide draws from years of personal crafting, offering a straightforward path to perfectly securing your looped bracelets every time.
Quick Overview
This guide will walk you through creating a secure, often adjustable, closure for your loop-ended bracelet.
You’ll learn a simple, effective method that works for most common bracelet designs.
- Time needed: 10-20 minutes
- Difficulty: Beginner
- What you’ll need: Bracelet with a loop and tails, scissors, ruler (optional)
Step-by-Step Instructions
Step 1: Understand Your Bracelet Design
Before you begin, take a moment to look at your bracelet.
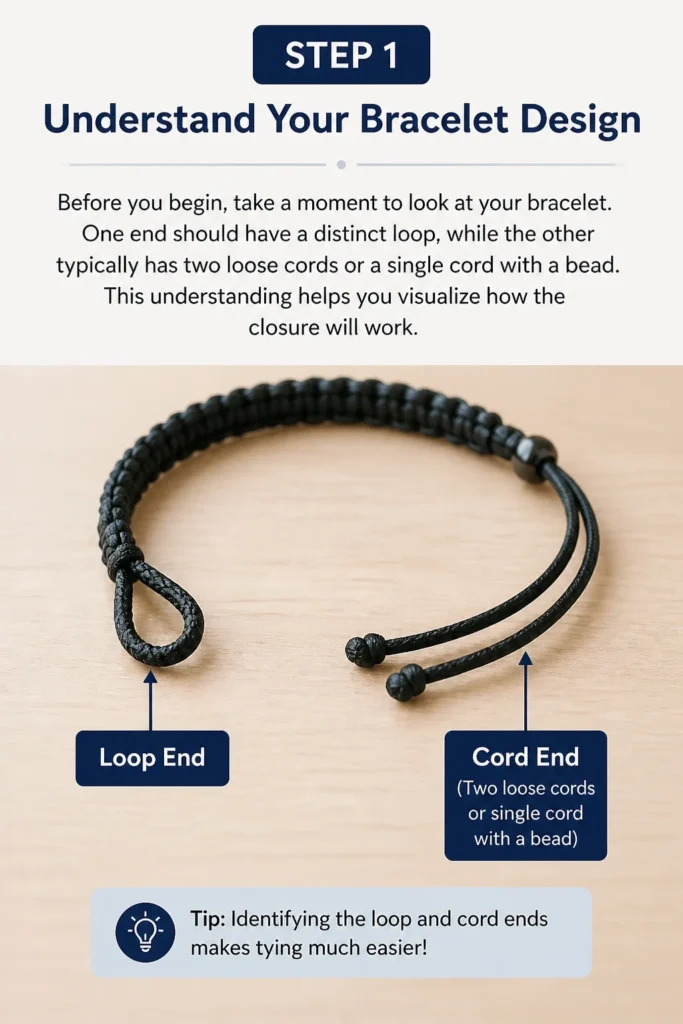
One end should have a distinct loop, while the other typically has two loose cords or a single cord with a bead.
This understanding helps you visualize how the closure will work.
Step 2: Position the Loop and Tails
Place the bracelet around your wrist to gauge the desired fit.
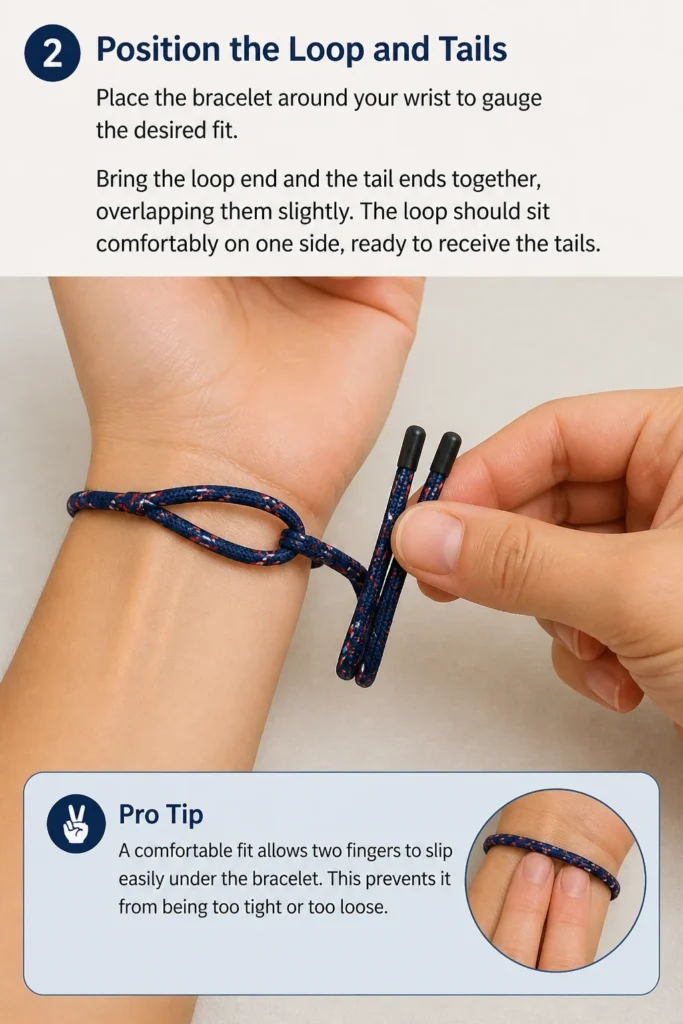
Bring the loop end and the tail ends together, overlapping them slightly.
The loop should sit comfortably on one side, ready to receive the tails.
Pro Tip: A comfortable fit allows two fingers to slip easily under the bracelet. This prevents it from being too tight or too loose.
Step 3: Feed the Tails Through the Loop
Take the two loose tails from the opposite end of the bracelet.
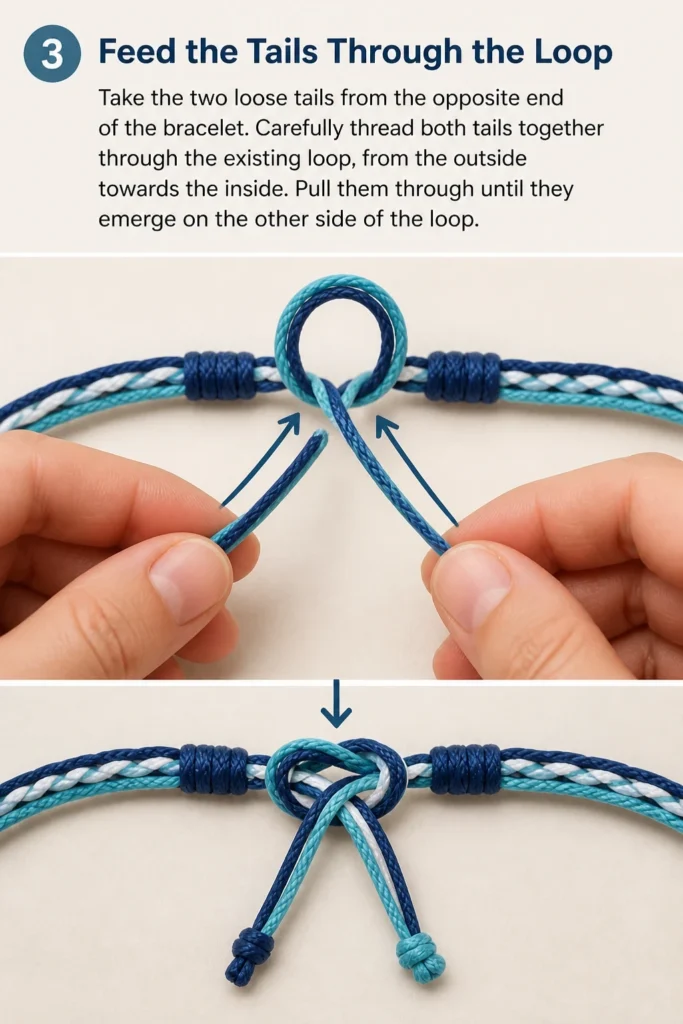
Carefully thread both tails together through the existing loop, from the outside towards the inside.
Pull them through until they emerge on the other side of the loop.
Step 4: Create the First Knot for Adjustment
Now, you will form the first half of a sliding knot, often a square knot.
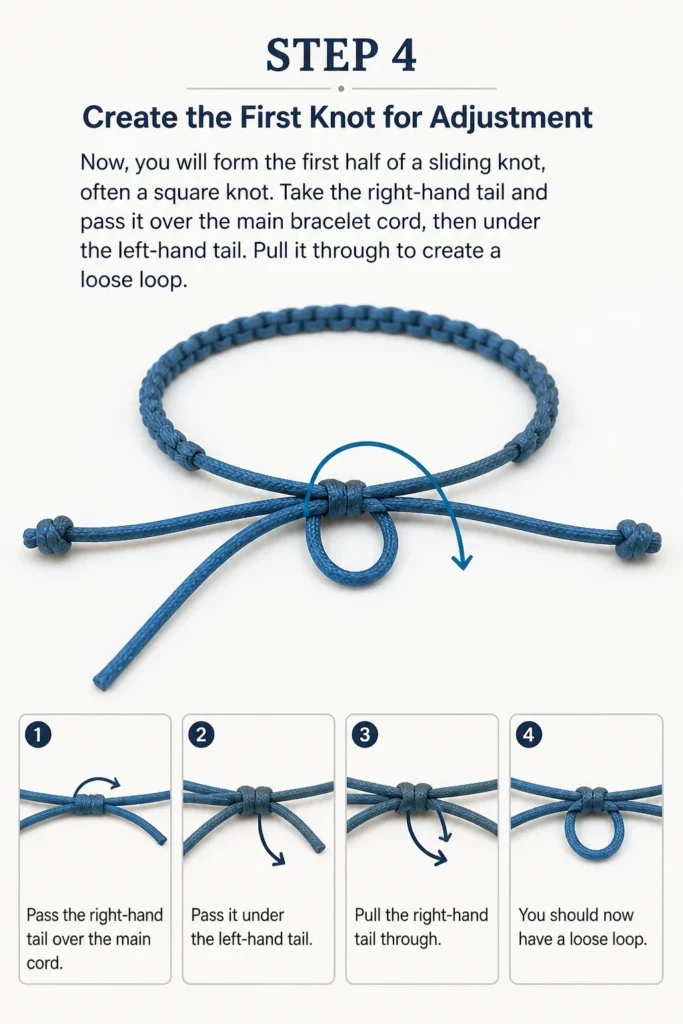
Take the right-hand tail and pass it over the main bracelet cord, then under the left-hand tail.
Pull it through to create a loose loop.
Step 5: Complete the Sliding Knot
Next, take the left-hand tail.
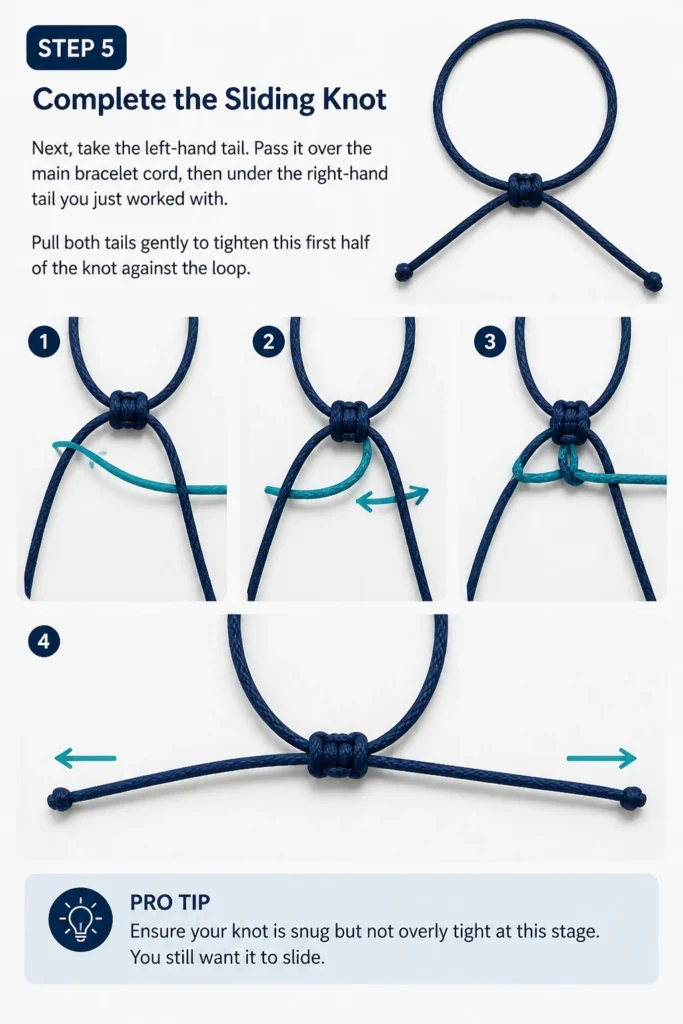
Pass it over the main bracelet cord, then under the right-hand tail you just worked with.
Pull both tails gently to tighten this first half of the knot against the loop.
Pro Tip: Ensure your knot is snug but not overly tight at this stage. You still want it to slide.
Step 6: Form the Second Half of the Sliding Knot
To complete the sliding knot, repeat the process but reverse the starting side.
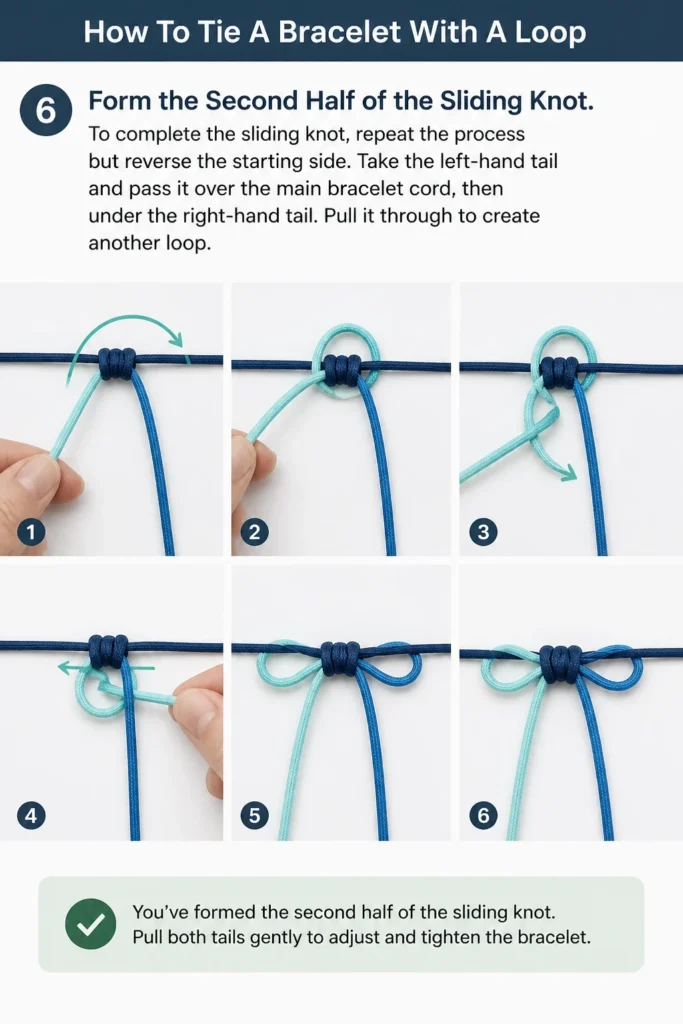
Take the left-hand tail and pass it over the main bracelet cord, then under the right-hand tail.
Pull it through to create another loop.
Step 7: Finish the Knot and Test
Now, take the right-hand tail.
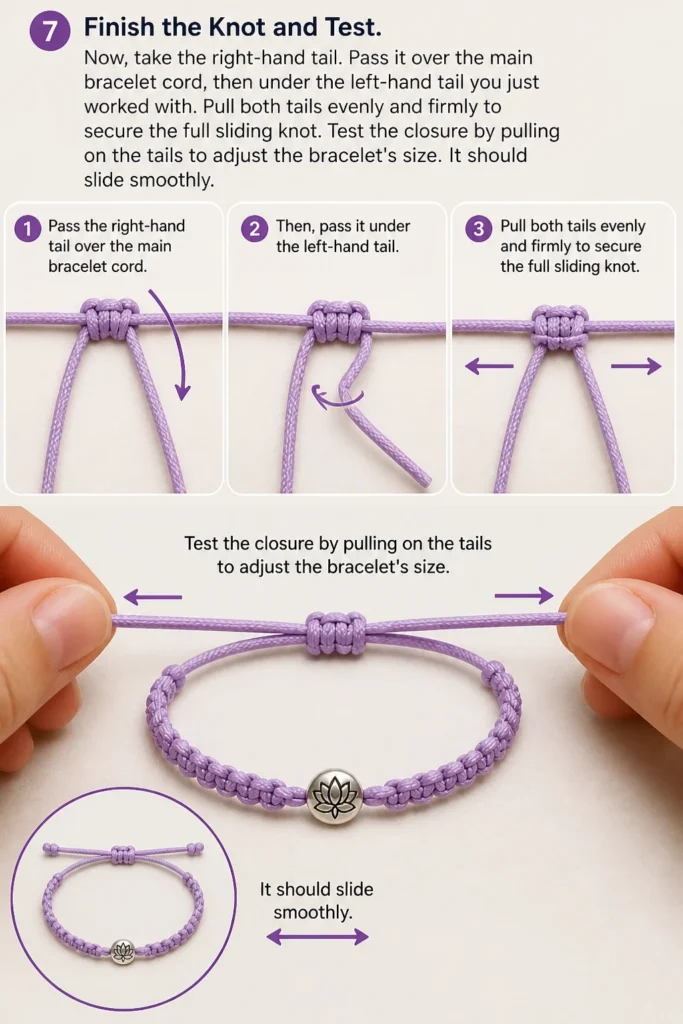
Pass it over the main bracelet cord, then under the left-hand tail you just worked with.
Pull both tails evenly and firmly to secure the full sliding knot.
Test the closure by pulling on the tails to adjust the bracelet’s size. It should slide smoothly.
Step 8: Secure and Trim the Ends
Once you are happy with the knot’s security and adjustability, it’s time to finish the tails.
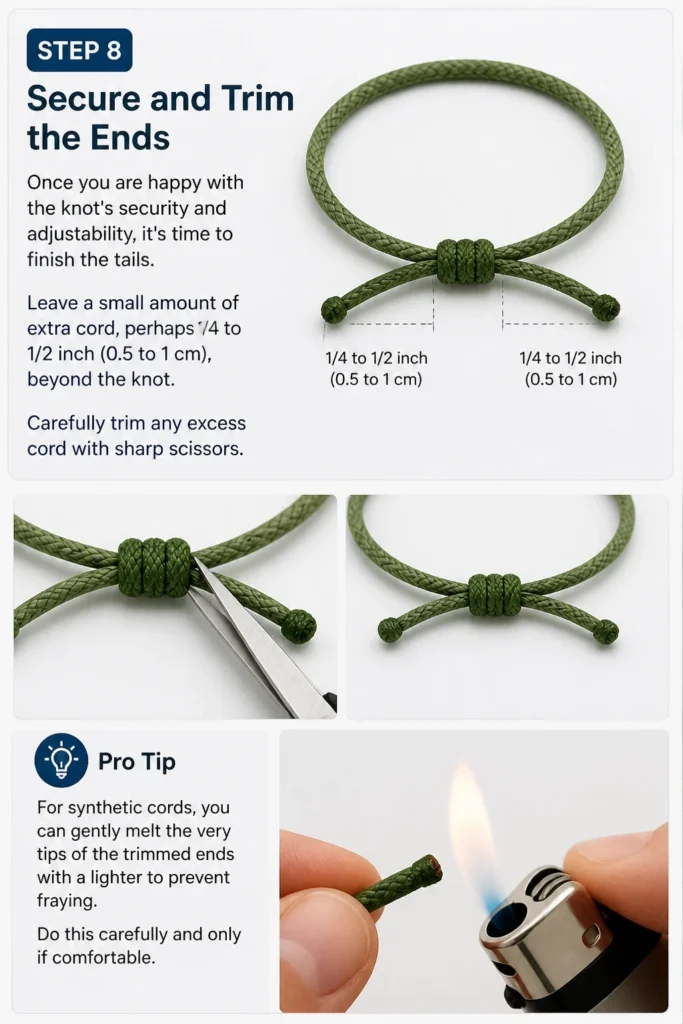
Leave a small amount of extra cord, perhaps 1/4 to 1/2 inch (0.5 to 1 cm), beyond the knot.
Carefully trim any excess cord with sharp scissors.
Pro Tip: For synthetic cords, you can gently melt the very tips of the trimmed ends with a lighter to prevent fraying. Do this carefully and only if comfortable.
Step 9: Final Check
Put the bracelet on and adjust it to your preferred fit.
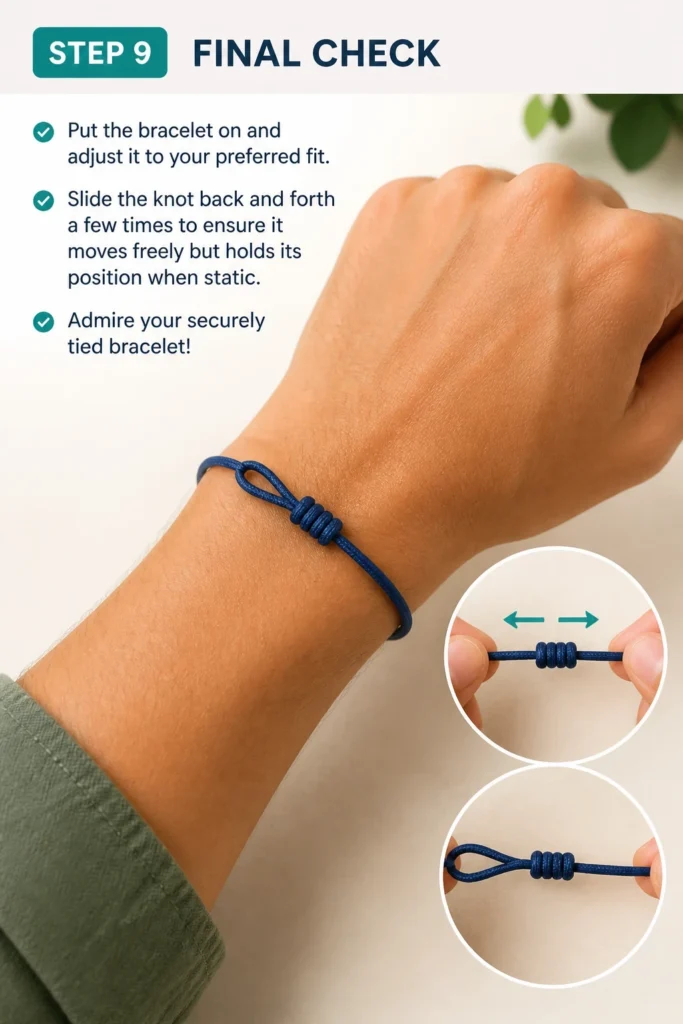
Slide the knot back and forth a few times to ensure it moves freely but holds its position when static.
Admire your securely tied bracelet!
Common Mistakes to Avoid
Tying the Knot Too Tight Initially
Many people pull the first few steps of the knot very tight right away.
This can make the knot rigid and prevent it from sliding smoothly later on, which defeats the purpose of an adjustable closure.
Keep the initial knot loose enough to manipulate, only tightening it firmly once all steps are complete and tested.
Not Using Consistent Tension
Uneven tension while forming the knot can lead to a lopsided or weak closure.
The knot might not hold its position well or could unravel over time.
Always try to pull both tails with similar force as you form each half of the knot.
Trimming the Tails Too Short
Trimming the excess cord too close to the knot is a common error.
This leaves no room for the knot to shift or for the cord ends to fray without compromising the knot’s integrity.
Always leave a small buffer, about 1/4 to 1/2 inch, to ensure longevity and prevent accidental unraveling.
Ignoring the “Handedness” of the Knot
When forming a square knot, it’s crucial to alternate which side you start from for each half of the knot (e.g., right over left, then left over right).
Failing to alternate creates a “granny knot” which is less secure, prone to slipping, and not truly adjustable.
Pay close attention to the order of your passes to ensure a proper square knot.
Troubleshooting
Knot is Too Tight to Adjust
If your knot feels stuck and won’t slide, you likely pulled it too tight during formation.
Gently work the knot by pushing and pulling on opposite sides to loosen it slightly.
You may need to carefully retrace your steps and re-tie the knot with less initial tension.
Knot Slips Too Easily or Comes Undone
This usually indicates the knot was not formed correctly, often resulting in a “granny knot” instead of a square knot.
A granny knot does not lock into place as securely.
Untie the knot completely and carefully follow the steps for creating a proper square knot, ensuring you alternate the starting side for each half.
Ends are Fraying After Trimming
Fraying is common, especially with natural fiber cords.
For synthetic cords, a quick, careful pass with a lighter flame can melt the ends to seal them.
For natural fibers, a tiny dab of clear craft glue or fray check applied to the very tip can prevent further fraying.
Bracelet Still Feels Uncomfortable
If the bracelet doesn’t feel right after adjustment, the initial placement of the loop or the overall length might be off.
Untie the knot and reposition the bracelet on your wrist before re-tying.
Consider if the bracelet itself is the right size for your wrist.
Key Takeaways
- Always identify the loop end and the tail ends of your bracelet first.
- Feed the tails through the loop as the initial step for closure.
- Use a sliding knot, like a square knot, for adjustable and secure fastening.
- Maintain consistent tension while forming your knots for best results.
- Test the knot’s adjustability before trimming any excess cord.
- Leave a small buffer when trimming tails to prevent unraveling.
Frequently Asked Questions
Can I use this method for all types of bracelets with loops?
This method is highly versatile and works for most bracelets featuring a single loop on one end and two loose cords or a single cord on the other. It’s especially common for friendship bracelets, macrame designs, and simple cord bracelets.
What if my bracelet only has one tail instead of two?
If your bracelet has only one tail, you can still use a similar principle, but the knot will be a simple overhand knot or a stopper knot. Thread the single tail through the loop, then tie a secure knot (like an overhand knot) around the main bracelet cord to create an adjustable slide. This might be less secure than a square knot, but it can work.
How do I make the knot extra secure so it never slips?
For extra security, after you’ve created and tested your sliding square knot, you can add a small drop of super glue or fabric glue directly onto the knot itself, being careful not to glue it to the main bracelet cord. This will permanently fix the knot in place, sacrificing adjustability for maximum security.
What if the loop itself is too small for the tails to pass through?
If the loop is too small, you might need to find an alternative tying method or consider if the bracelet is designed for a different type of closure (e.g., a toggle clasp, or a button). For very tight loops, you might need a needle-nose plier to gently pull the tails through, but be careful not to damage the cord.
Our Top Recommended Finds
- Sharp Craft Scissors: Essential for clean, precise cuts without fraying the cord.
- Fabric Glue / Fray Check: Perfect for sealing natural fiber ends to prevent unraveling.
- Ruler or Measuring Tape: Helpful for consistent trimming and gauging bracelet length.
Embrace Your Inner Knot-Tyer
Tying a bracelet with a loop is a fundamental skill that adds a personal touch to your accessories.
It opens up a world of comfortable, adjustable wear, ensuring your favorite pieces fit just right.
Don’t hesitate to practice these steps with an old piece of cord.
Soon, you’ll be tying and adjusting your looped bracelets with confidence and ease.
Beginner-friendly templates, step-by-step guides,
and weekly project ideas in your inbox.