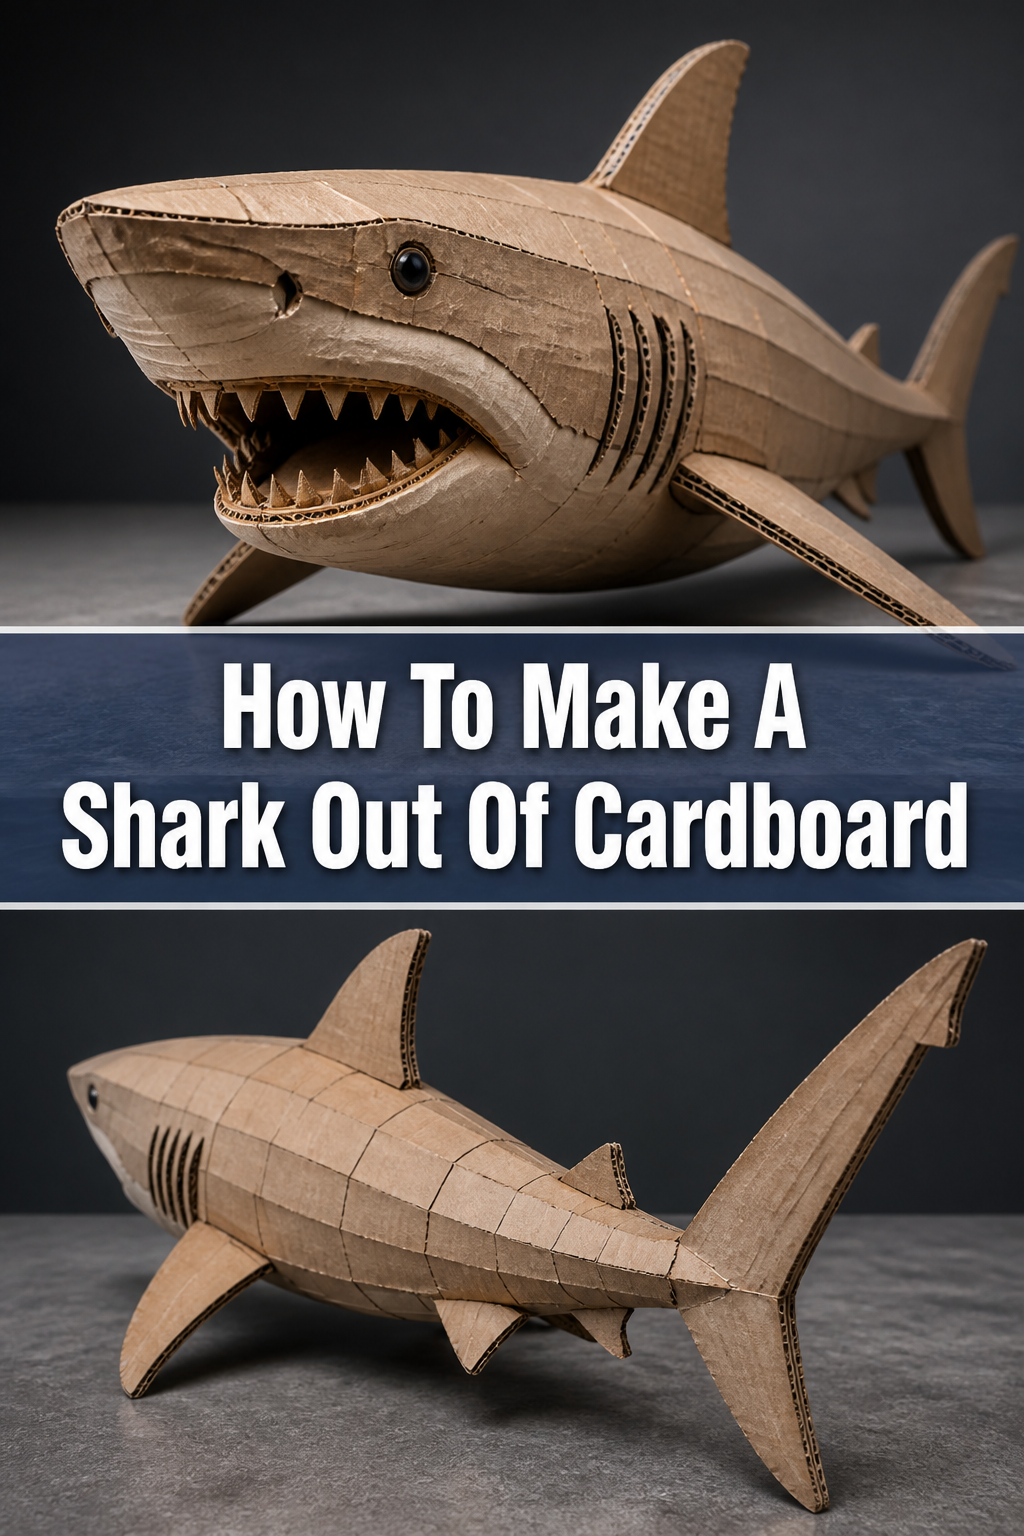
🦈 How To Make A Shark Out Of Cardboard

Beginner-friendly templates, step-by-step guides,
and weekly project ideas in your inbox.
Creating something impressive from simple cardboard is incredibly satisfying. I’ve personally guided many aspiring crafters through turning flat sheets into three-dimensional wonders, and the joy on their faces is always the best reward. This guide comes from that hands-on experience, ensuring you get practical advice that really works.
Get ready to transform humble cardboard into a magnificent shark model.
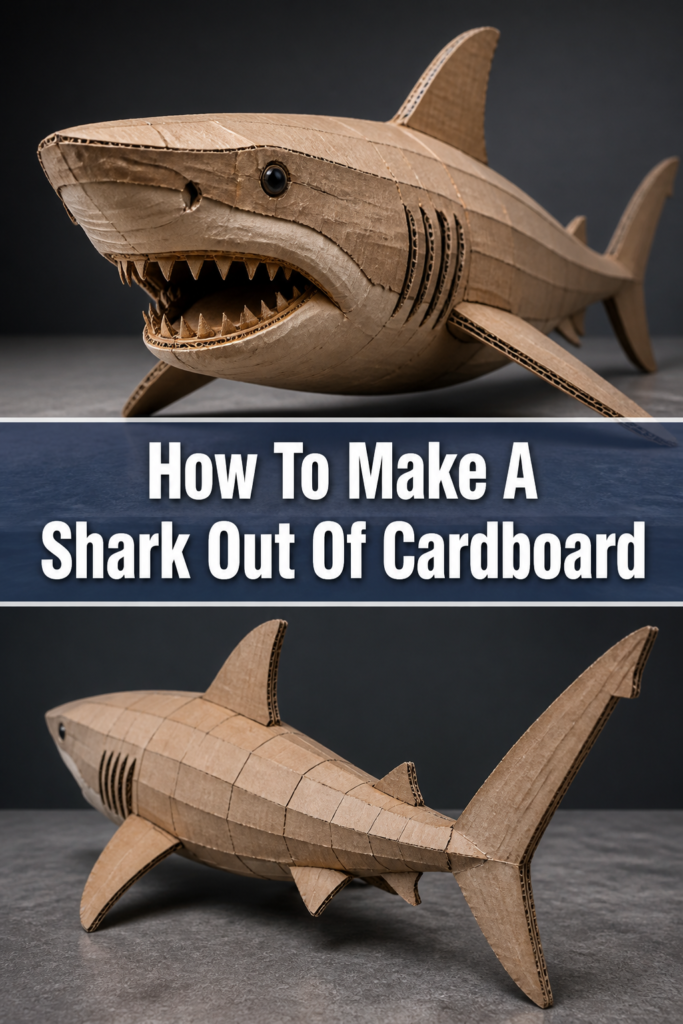
Quick Overview
You’re about to embark on a fun, creative journey. By following these steps, you’ll construct a sturdy and visually striking cardboard shark, perfect for display or imaginative play.
- Time needed: 4-7 hours (including drying time)
- Difficulty: Intermediate
- What you’ll need: Cardboard, craft knife, hot glue gun, ruler, pencil, paint
Step-by-Step Instructions
Step 1: Gather Your Materials and Prepare Your Workspace
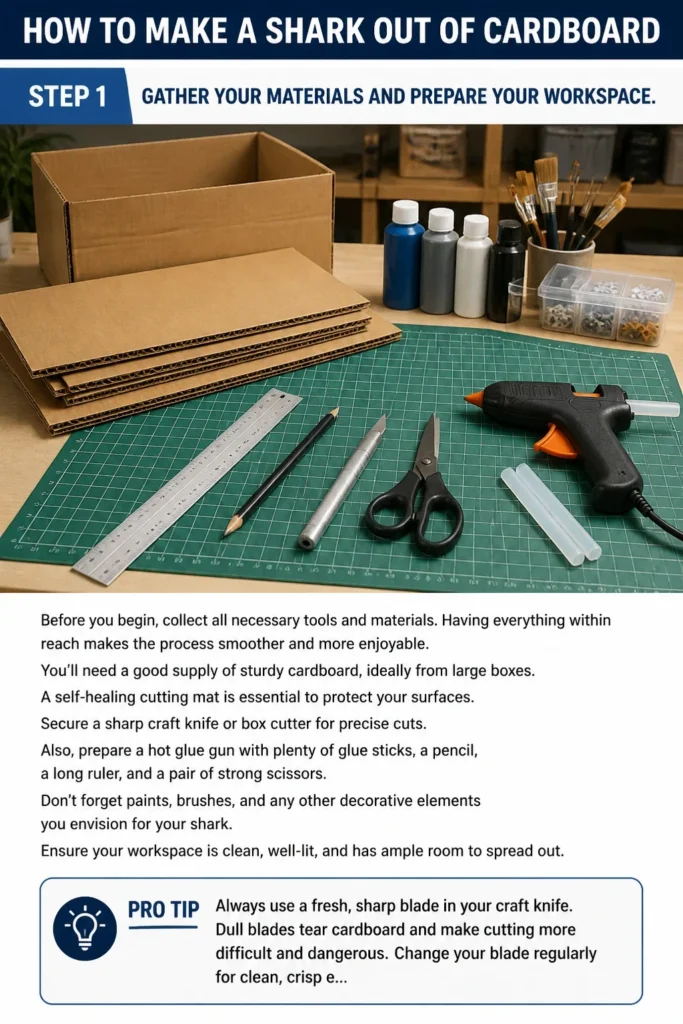
Before you begin, collect all necessary tools and materials. Having everything within reach makes the process smoother and more enjoyable.
You’ll need a good supply of sturdy cardboard, ideally from large boxes. A self-healing cutting mat is essential to protect your surfaces.
Secure a sharp craft knife or box cutter for precise cuts. Also, prepare a hot glue gun with plenty of glue sticks, a pencil, a long ruler, and a pair of strong scissors.
Don’t forget paints, brushes, and any other decorative elements you envision for your shark. Ensure your workspace is clean, well-lit, and has ample room to spread out.
Pro Tip: Always use a fresh, sharp blade in your craft knife. Dull blades tear cardboard and make cutting more difficult and dangerous. Change your blade regularly for clean, crisp edges.
Step 2: Sketch Your Shark Design
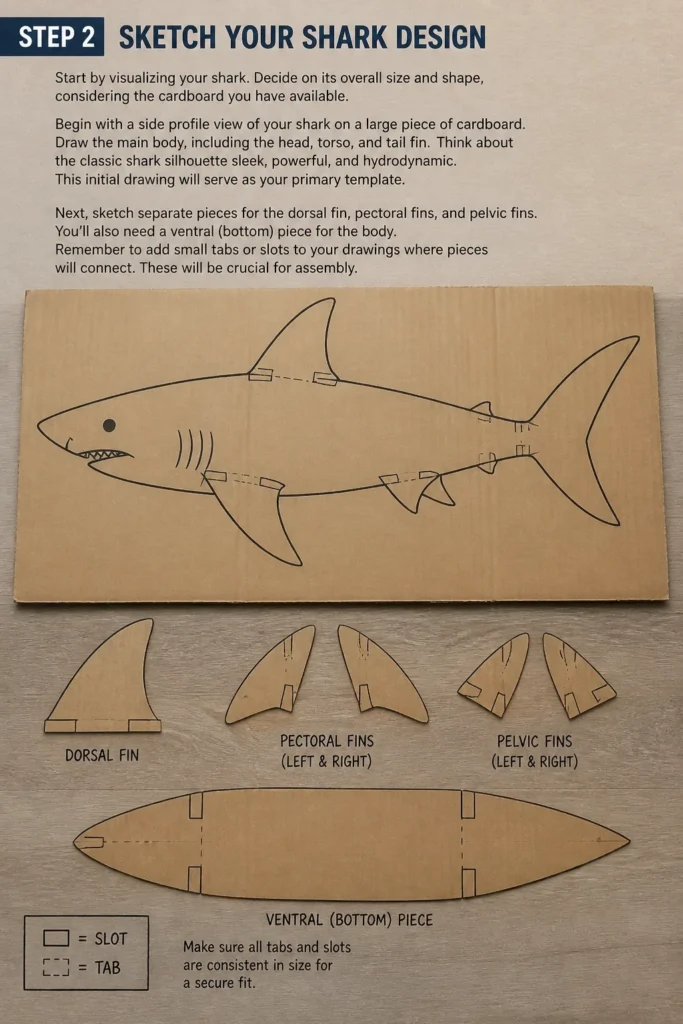
Start by visualizing your shark. Decide on its overall size and shape, considering the cardboard you have available.
Begin with a side profile view of your shark on a large piece of cardboard. Draw the main body, including the head, torso, and tail fin.
Think about the classic shark silhouette: sleek, powerful, and hydrodynamic. This initial drawing will serve as your primary template.
Next, sketch separate pieces for the dorsal fin, pectoral fins, and pelvic fins. You’ll also need a ventral (bottom) piece for the body.
Remember to add small tabs or slots to your drawings where pieces will connect. These will be crucial for assembly.
Step 3: Cut Out the Main Body Sections
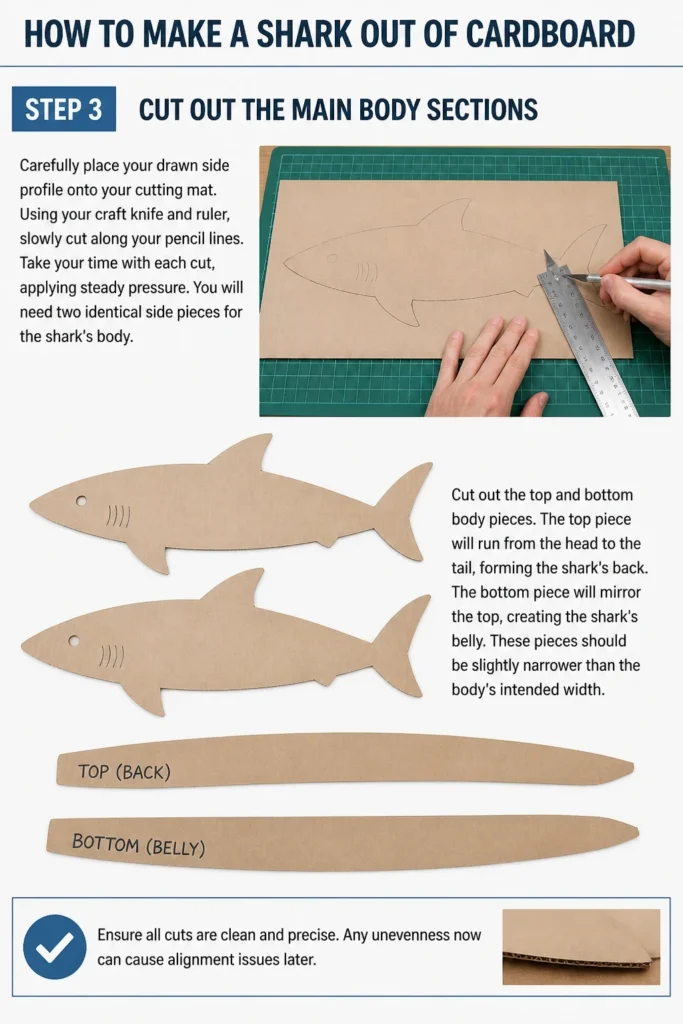
Carefully place your drawn side profile onto your cutting mat. Using your craft knife and ruler, slowly cut along your pencil lines.
Take your time with each cut, applying steady pressure. You will need two identical side pieces for the shark’s body.
Cut out the top and bottom body pieces. The top piece will run from the head to the tail, forming the shark’s back.
The bottom piece will mirror the top, creating the shark’s belly. These pieces should be slightly narrower than the body’s intended width.
Ensure all cuts are clean and precise. Any unevenness now can cause alignment issues later.
Step 4: Create Fins and Tail
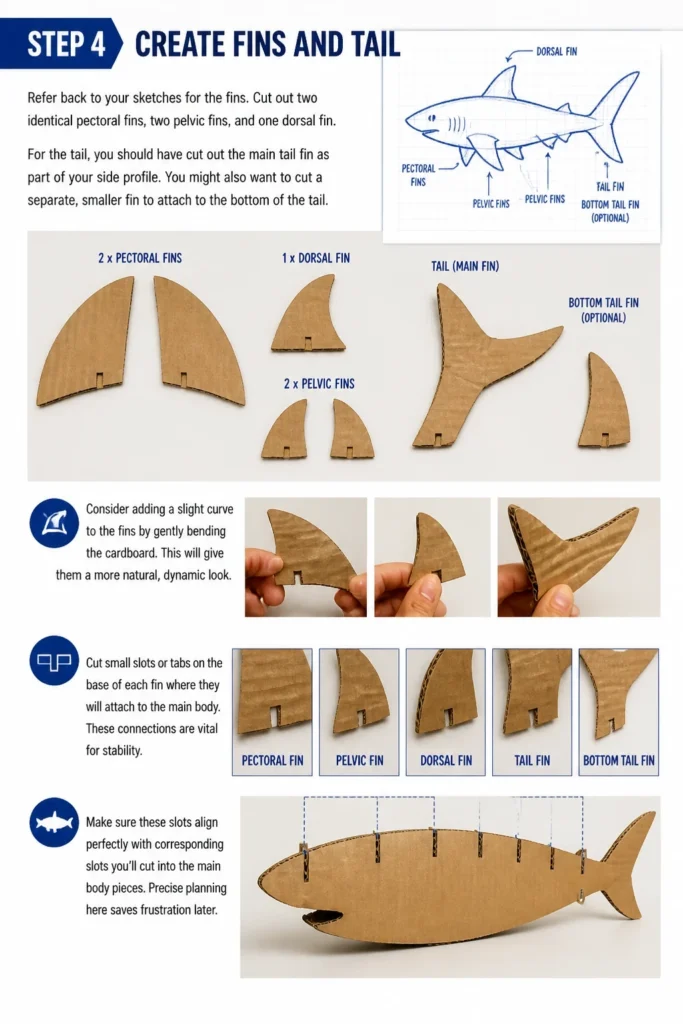
Refer back to your sketches for the fins. Cut out two identical pectoral fins, two pelvic fins, and one dorsal fin.
For the tail, you should have cut out the main tail fin as part of your side profile. You might also want to cut a separate, smaller fin to attach to the bottom of the tail.
Consider adding a slight curve to the fins by gently bending the cardboard. This will give them a more natural, dynamic look.
Cut small slots or tabs on the base of each fin where they will attach to the main body. These connections are vital for stability.
Make sure these slots align perfectly with corresponding slots you’ll cut into the main body pieces. Precise planning here saves frustration later.
Step 5: Assemble the Body Structure
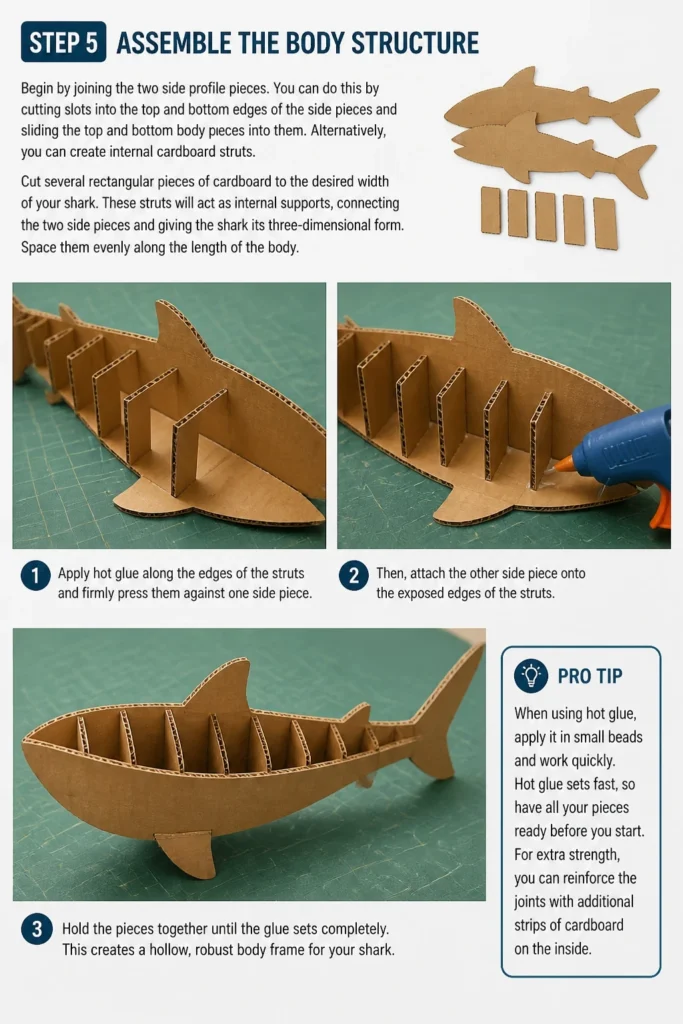
Begin by joining the two side profile pieces. You can do this by cutting slots into the top and bottom edges of the side pieces and sliding the top and bottom body pieces into them.
Alternatively, you can create internal cardboard struts. Cut several rectangular pieces of cardboard to the desired width of your shark.
These struts will act as internal supports, connecting the two side pieces and giving the shark its three-dimensional form. Space them evenly along the length of the body.
Apply hot glue along the edges of the struts and firmly press them against one side piece. Then, attach the other side piece onto the exposed edges of the struts.
Hold the pieces together until the glue sets completely. This creates a hollow, robust body frame for your shark.
Pro Tip: When using hot glue, apply it in small sections. Work quickly but carefully, as it dries fast. Press firmly for a strong bond, and watch your fingers!
Step 6: Attach Fins and Tail
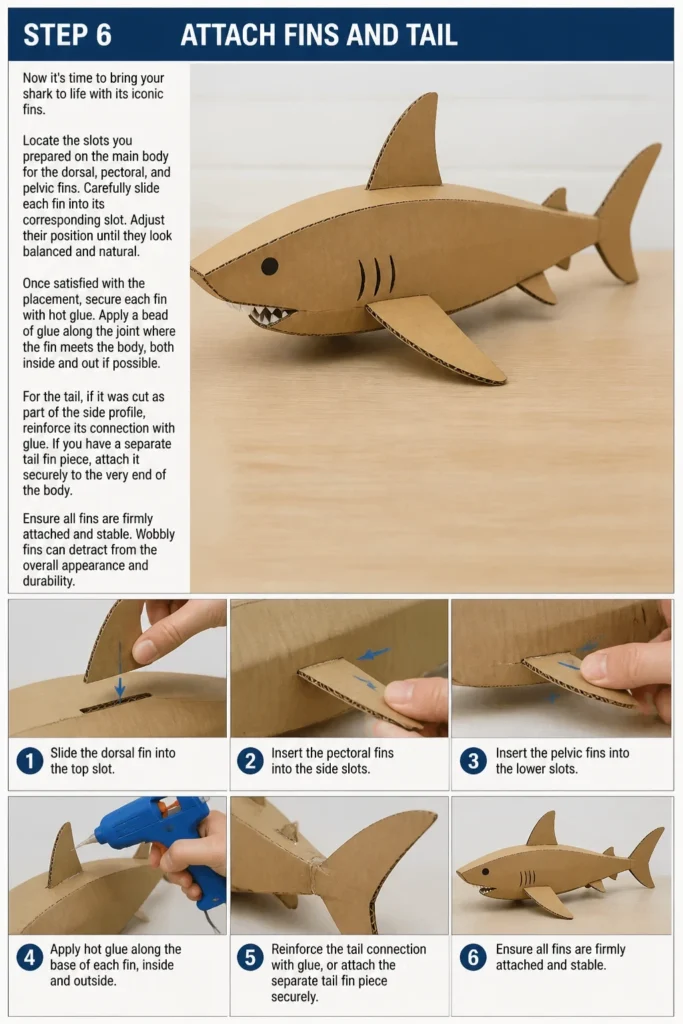
Now it’s time to bring your shark to life with its iconic fins. Locate the slots you prepared on the main body for the dorsal, pectoral, and pelvic fins.
Carefully slide each fin into its corresponding slot. Adjust their position until they look balanced and natural.
Once satisfied with the placement, secure each fin with hot glue. Apply a bead of glue along the joint where the fin meets the body, both inside and out if possible.
For the tail, if it was cut as part of the side profile, reinforce its connection with glue. If you have a separate tail fin piece, attach it securely to the very end of the body.
Ensure all fins are firmly attached and stable. Wobbly fins can detract from the overall appearance and durability.
Step 7: Add Details and Texture
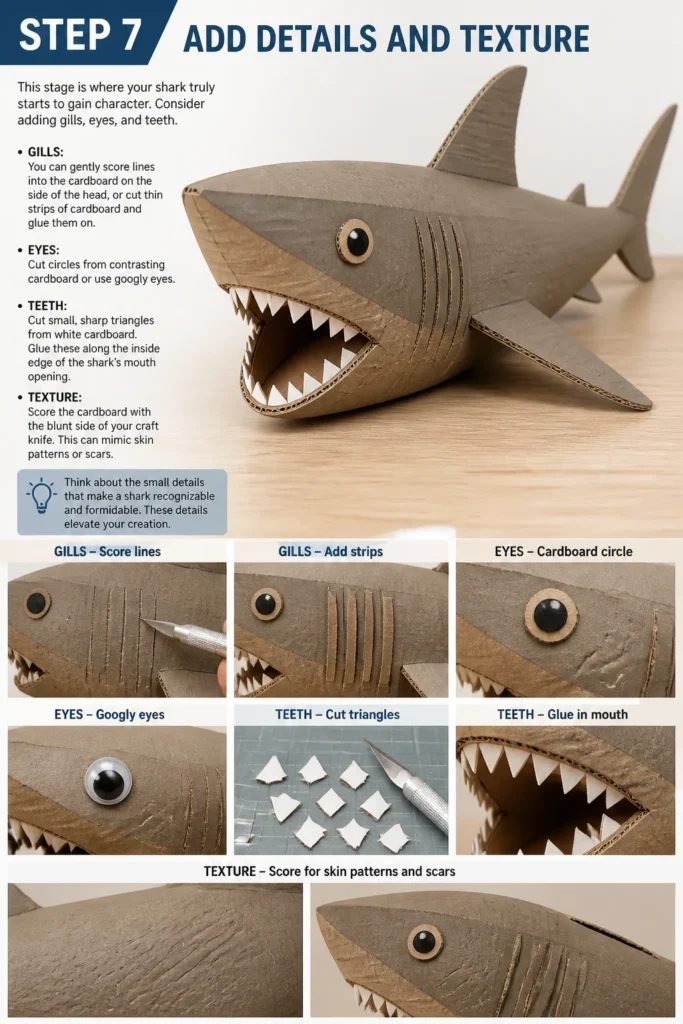
This stage is where your shark truly starts to gain character. Consider adding gills, eyes, and teeth.
For gills, you can gently score lines into the cardboard on the side of the head, or cut thin strips of cardboard and glue them on. For eyes, cut circles from contrasting cardboard or use googly eyes.
To create teeth, cut small, sharp triangles from white cardboard. Glue these along the inside edge of the shark’s mouth opening.
You can also add texture by scoring the cardboard with the blunt side of your craft knife. This can mimic skin patterns or scars.
Think about the small details that make a shark recognizable and formidable. These details elevate your creation.
Step 8: Paint and Finish Your Shark
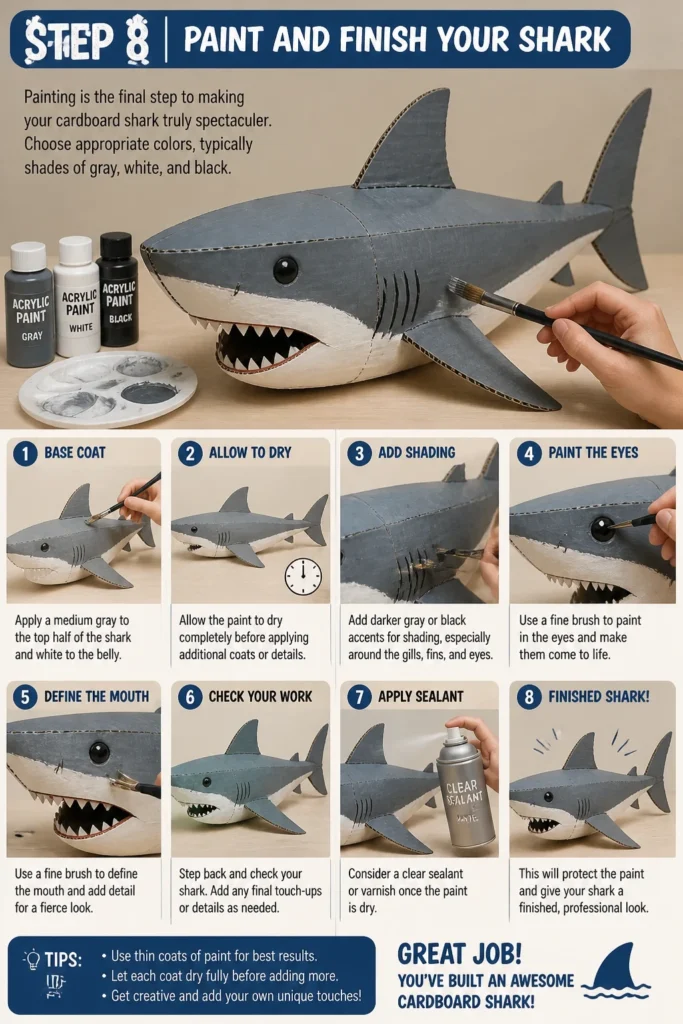
Painting is the final step to making your cardboard shark truly spectacular. Choose appropriate colors, typically shades of gray, white, and black.
Start with a base coat. Apply a medium gray to the top half of the shark and white to the belly.
Allow the paint to dry completely before applying additional coats or details. This prevents smudging and ensures vibrant colors.
Add darker gray or black accents for shading, especially around the gills, fins, and eyes. Use a fine brush to paint in the eyes and define the mouth.
Consider a clear sealant or varnish once the paint is dry. This will protect the paint and give your shark a finished, professional look.
Common Mistakes to Avoid
Using a Dull Blade
A dull craft knife blade is a recipe for frustration and potential injury. It rips and tears the cardboard instead of providing a clean cut, making your edges jagged and your project look messy. Always ensure your blade is sharp and replace it as soon as you notice it dragging.
Rushing the Gluing Process
Hot glue sets quickly, but rushing can lead to weak bonds or misaligned pieces. Take your time to position components correctly before applying the glue. Hold pieces firmly in place for a few seconds after application to ensure a strong, lasting connection.
Ignoring Cardboard Grain
Cardboard has a grain, much like wood, where it bends more easily in one direction. Trying to bend it against the grain can cause it to crease unevenly or tear. Pay attention to the direction of the fluting when cutting and shaping pieces, especially for curved sections.
Overlooking Structural Support
A cardboard shark needs internal support to maintain its shape, especially if it’s large. Simply gluing flat pieces together often results in a flimsy model that sags. Incorporate internal struts or cross-braces to give your shark robust structural integrity.
Troubleshooting
My Shark Body is Wobbly
If your assembled shark body feels unstable, it likely lacks sufficient internal support. The best solution is to add more internal cardboard struts. Carefully cut additional rectangular pieces of cardboard to act as cross-braces.
Apply hot glue to the edges of these new struts and gently wedge them inside the existing body structure. Press them firmly against the inner walls of the shark’s side pieces. Allow the glue to cure fully for improved stability.
Fins Keep Falling Off
Weak fin attachments are a common issue if not enough glue was used or if the joint wasn’t held firmly. Reattach the fin, but this time, be more generous with the hot glue. Apply a continuous bead around the entire base of the fin where it meets the body.
Hold the fin in place for a longer duration, applying gentle pressure until the glue completely cools and hardens. For extra security, you can add small cardboard gussets or triangles to brace the fin at its base. These small reinforcements significantly strengthen the joint.
Paint is Peeling or Not Sticking
If your paint isn’t adhering well, the cardboard surface might be too smooth or have a residue. Ensure the cardboard is clean and free of dust or grease before painting. Sometimes, a light sanding with fine-grit sandpaper can help create a better surface for paint adhesion.
Alternatively, you might need to apply a primer specifically designed for crafts or porous surfaces. A thin, even coat of primer will provide an excellent base for your chosen paints, ensuring a smooth, long-lasting finish that won’t peel.
Key Takeaways
- Sharp tools are essential for clean cuts and safety.
- Plan your design thoroughly with sketches and measurements.
- Use internal supports to create a strong, stable structure.
- Take your time with gluing to ensure strong, lasting bonds.
- Embrace details and painting to bring your shark to life.
- Don’t be afraid to experiment and personalize your creation.
Frequently Asked Questions
What kind of cardboard works best?
Corrugated cardboard, like that from shipping boxes, is ideal due to its strength and availability. Look for single-wall corrugated cardboard for a good balance of rigidity and workability. Thicker cardboard provides more stability but is harder to cut.
Can I use white glue instead of hot glue?
Yes, you can use strong white craft glue or wood glue. However, these glues have much longer drying times, requiring you to clamp or hold pieces in place for extended periods. Hot glue is preferred for its quick setting, speeding up assembly.
How can I make my shark waterproof?
Cardboard itself isn’t waterproof, but you can add a protective layer. After painting, apply several coats of a waterproof sealant or varnish, like clear acrylic spray or brush-on polyurethane. Ensure all surfaces are completely covered for the best protection.
Is this project suitable for kids?
With adult supervision, older children (around 10+) can certainly participate in many steps, especially design, painting, and some gluing. However, cutting with a craft knife should always be done by an adult or under very close supervision due to safety concerns.
Our Top Recommended Finds
- Heavy-Duty Craft Knife Set: A good set with various blades ensures you always have a sharp edge for precise cuts on different cardboard thicknesses.
- Large Self-Healing Cutting Mat: Protects your work surface and extends the life of your blades by providing an ideal cutting base.
- High-Temperature Hot Glue Gun: A reliable glue gun with a comfortable grip and plenty of glue sticks makes assembly fast and secure.
Your Cardboard Ocean Awaits!
You now have all the knowledge and practical steps to create an incredible cardboard shark. This project is more than just cutting and gluing; it’s about bringing an idea to life with your own hands. The satisfaction of seeing your finished shark is truly unmatched.
Imagine the pride as you display your creation, knowing every curve and fin was crafted by you. Why wait? Gather your materials today and dive into your next creative adventure. The ocean’s most magnificent predator is ready to take shape in your home!
Beginner-friendly templates, step-by-step guides,
and weekly project ideas in your inbox.