🧶 How To Do A Slip Stitch In Crochet

Beginner-friendly templates, step-by-step guides,
and weekly project ideas in your inbox.
Learning the slip stitch truly transformed my crochet journey. It’s a foundational technique, surprisingly simple yet incredibly versatile, that I’ve personally used in countless projects over the years. This guide draws from my extensive, hands-on experience to help you master it with absolute ease.
Quick Overview
By the end of this guide, you’ll confidently be able to execute a perfect slip stitch, understanding its purpose and various applications in your crochet projects. You’ll gain a crucial skill that underpins many other techniques and patterns.
- Time needed: 5-10 minutes for practice
- Difficulty: Beginner
- What you’ll need: Crochet hook, a ball of yarn
Step-by-Step Instructions
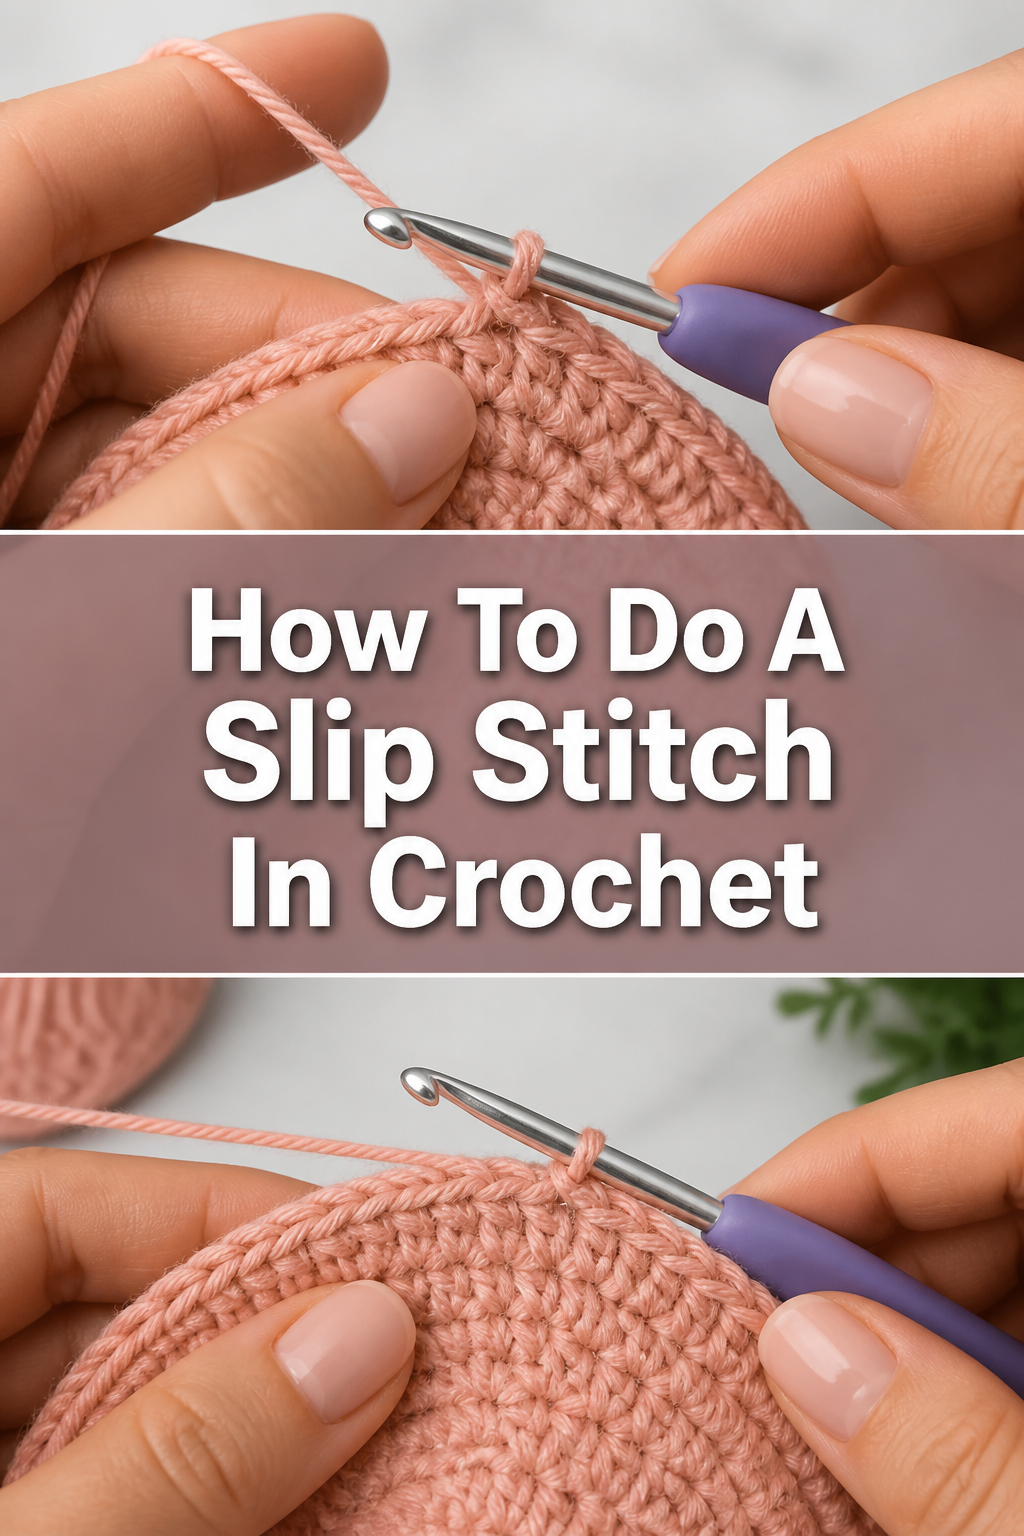
The slip stitch is the shortest of all crochet stitches, often used to join pieces, move across a row without adding height, or create neat edgings. Let’s break it down.
Step 1: Get Started with a Foundation Chain
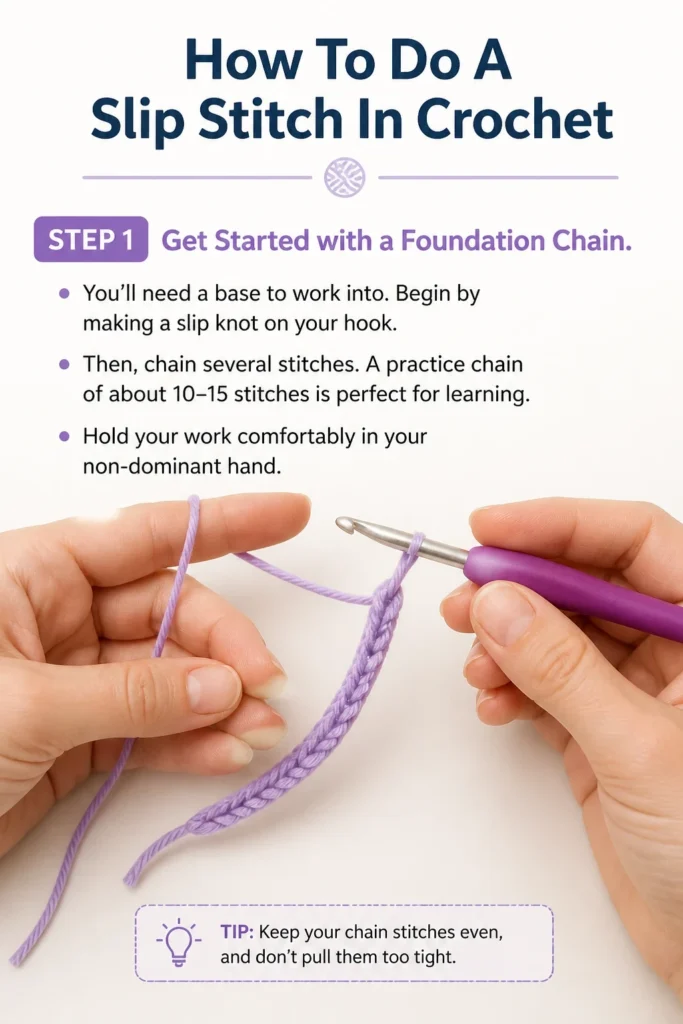
You’ll need a base to work into. Begin by making a slip knot on your hook.
Then, chain several stitches. A practice chain of about 10-15 stitches is perfect for learning.
Hold your work comfortably in your non-dominant hand.
Step 2: Identify Your First Working Stitch
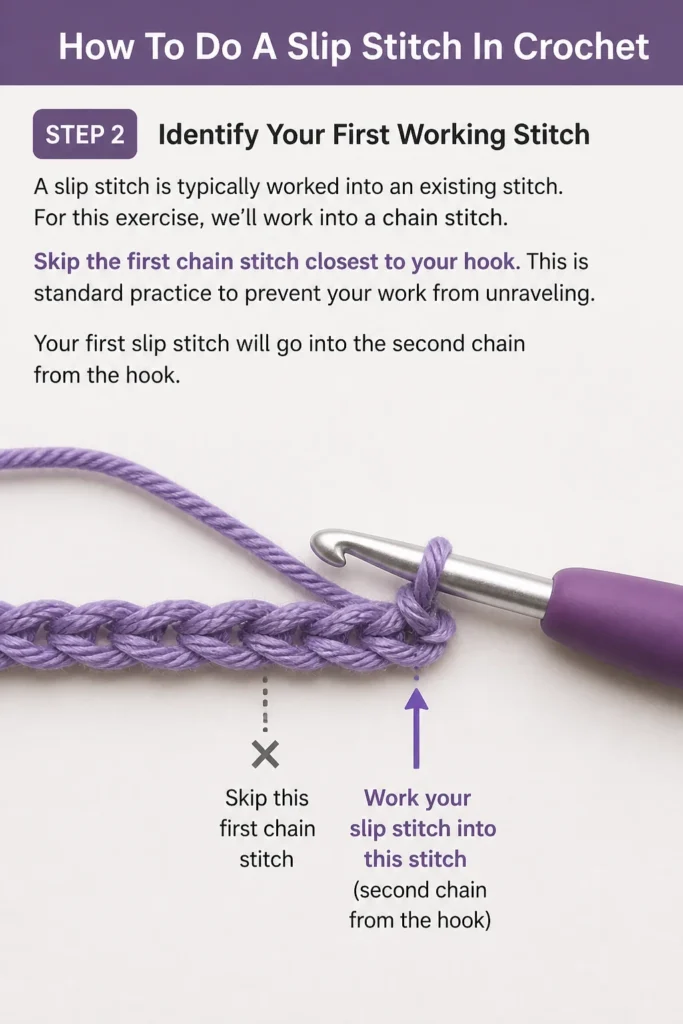
A slip stitch is typically worked into an existing stitch. For this exercise, we’ll work into a chain stitch.
Skip the first chain stitch closest to your hook. This is standard practice to prevent your work from unraveling.
Your first slip stitch will go into the second chain from the hook.
Step 3: Insert Your Hook
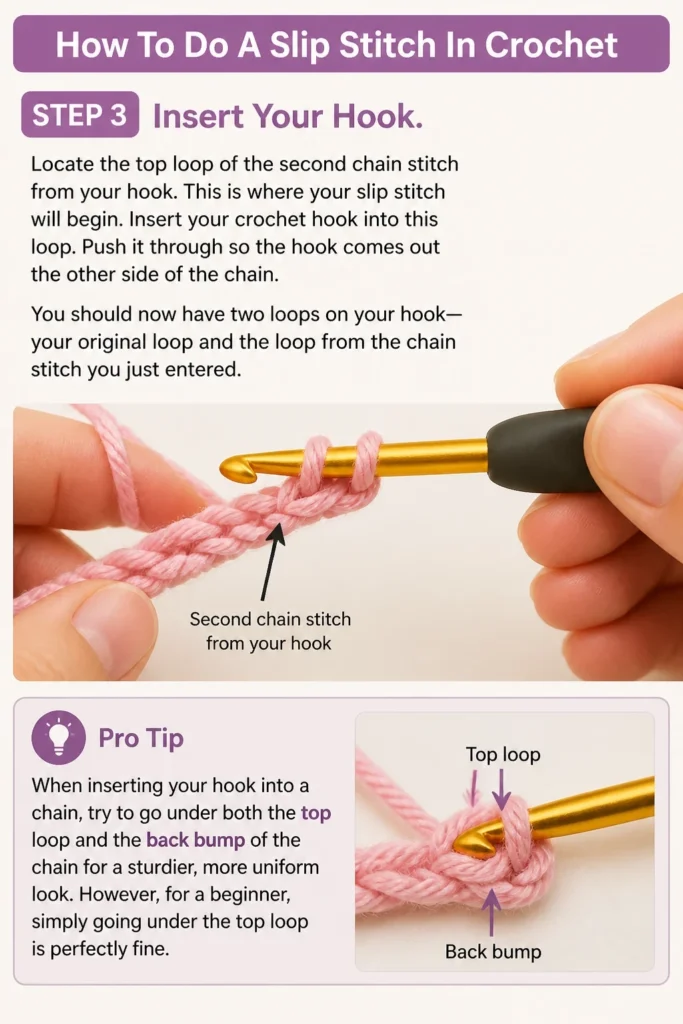
Locate the top loop of the second chain stitch from your hook. This is where your slip stitch will begin.
Insert your crochet hook into this loop. Push it through so the hook comes out the other side of the chain.
You should now have two loops on your hook: your original loop and the loop from the chain stitch you just entered.
Pro Tip: When inserting your hook into a chain, try to go under both the top loop and the back bump of the chain for a sturdier, more uniform look. However, for a beginner, simply going under the top loop is perfectly fine.
Step 4: Yarn Over
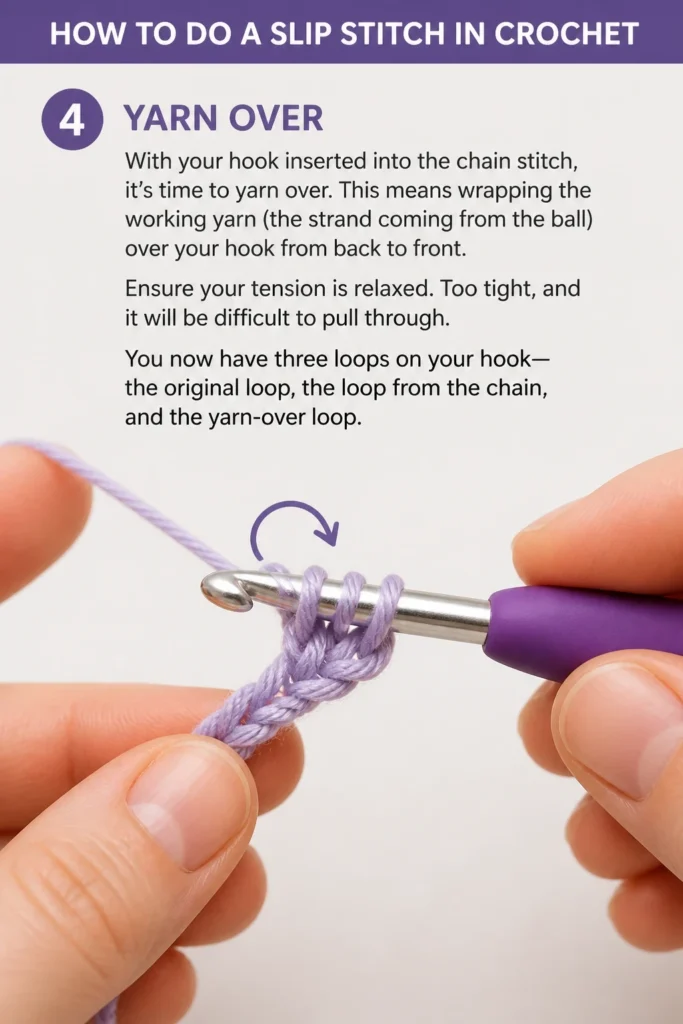
With your hook inserted into the chain stitch, it’s time to yarn over. This means wrapping the working yarn (the strand coming from the ball) over your hook from back to front.
Ensure your tension is relaxed. Too tight, and it will be difficult to pull through.
You now have three loops on your hook: the original loop, the loop from the chain, and the yarn-over loop.
Step 5: Pull Through Both Loops
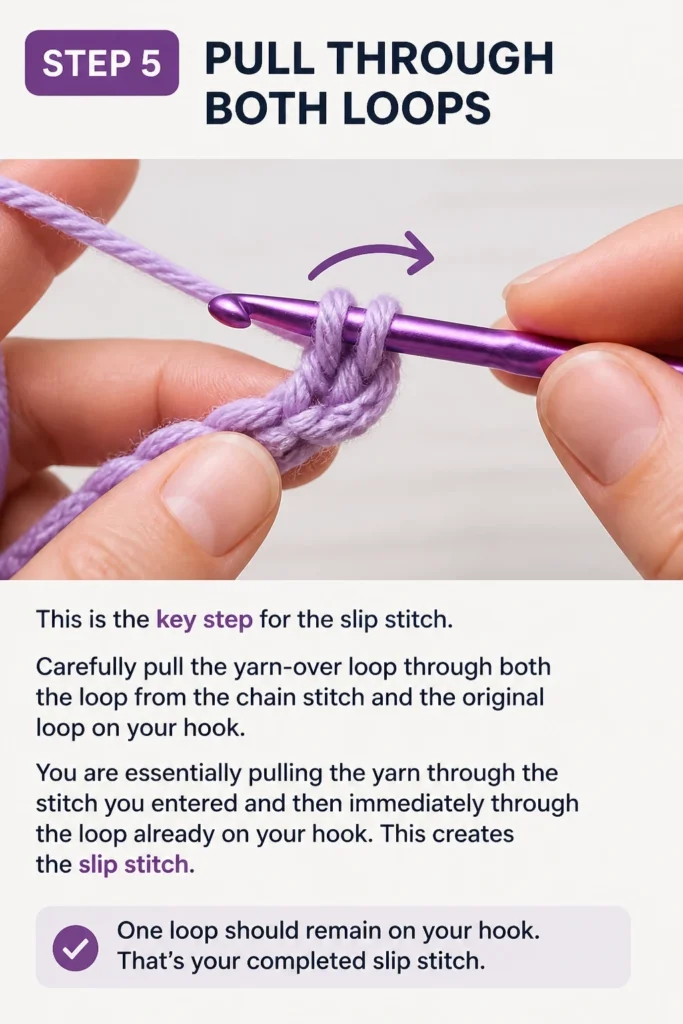
This is the key step for the slip stitch. Carefully pull the yarn-over loop through both the loop from the chain stitch and the original loop on your hook.
You are essentially pulling the yarn through the stitch you entered and then immediately through the loop already on your hook. This creates the slip stitch.
One loop should remain on your hook. That’s your completed slip stitch.
Step 6: Repeat Across the Row
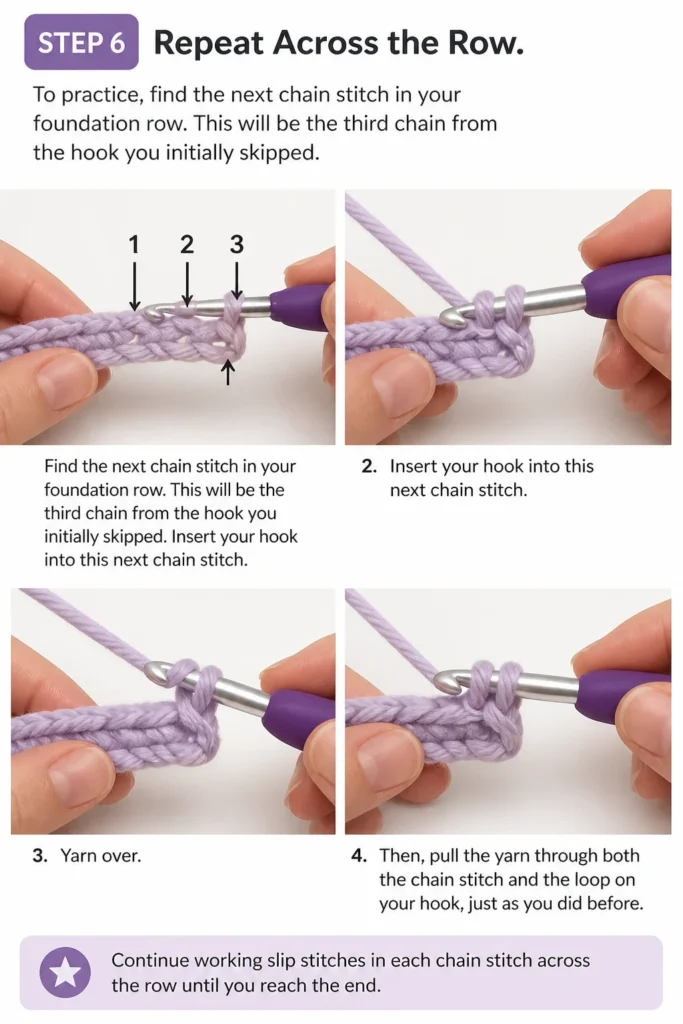
To practice, find the next chain stitch in your foundation row. This will be the third chain from the hook you initially skipped.
Insert your hook into this next chain stitch. Yarn over.
Then, pull the yarn through both the chain stitch and the loop on your hook, just as you did before.
Step 7: Continue Practicing
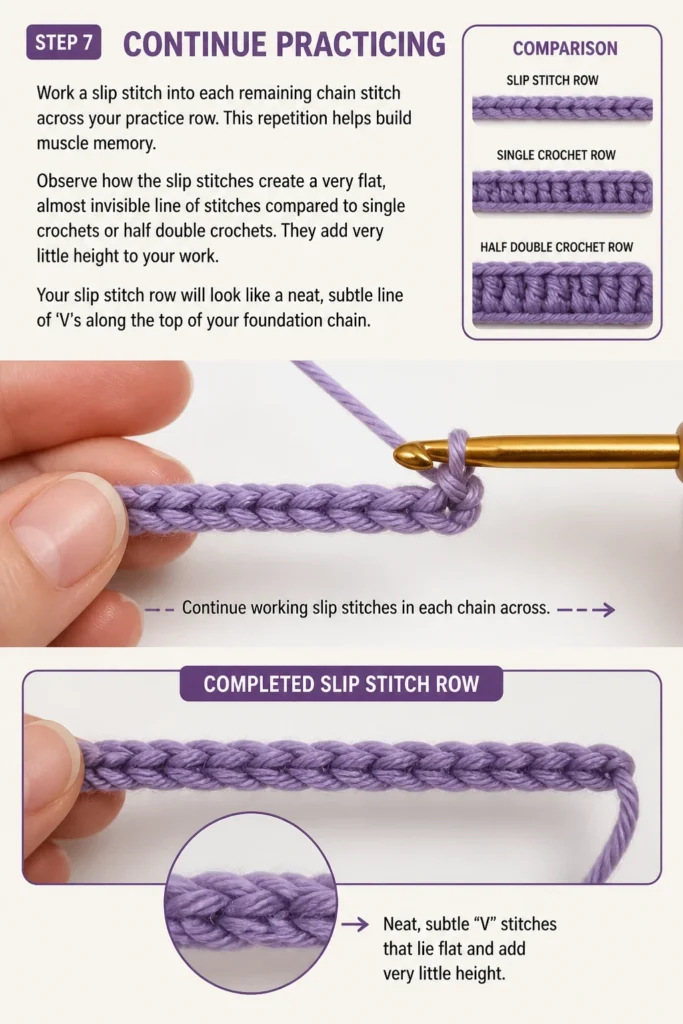
Work a slip stitch into each remaining chain stitch across your practice row. This repetition helps build muscle memory.
Observe how the slip stitches create a very flat, almost invisible line of stitches compared to single crochets or half double crochets. They add very little height to your work.
Your slip stitch row will look like a neat, subtle line of ‘V’s along the top of your foundation chain.
Step 8: Understand Tension
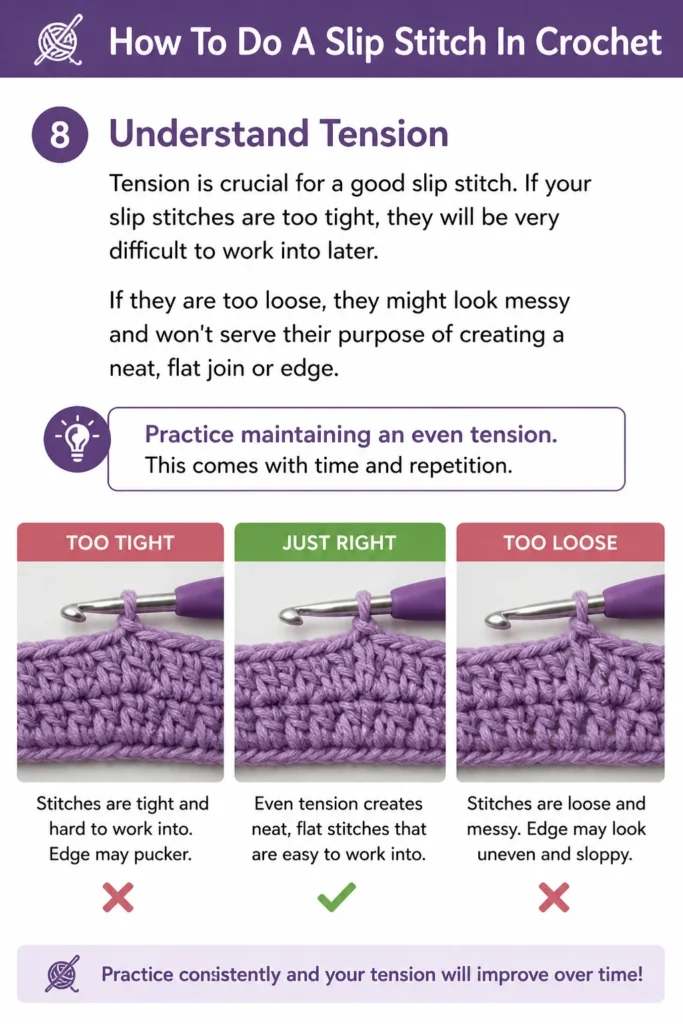
Tension is crucial for a good slip stitch. If your slip stitches are too tight, they will be very difficult to work into later.
If they are too loose, they might look messy and won’t serve their purpose of creating a neat, flat join or edge.
Practice maintaining an even tension. This comes with time and repetition.
Common Mistakes to Avoid
Even though the slip stitch seems simple, small errors can lead to big frustrations. Being aware of these common pitfalls will help you master the technique faster.
Too Tight Tension
Many beginners make their slip stitches too tight. This happens when you pull the yarn too taut after each stitch. When your slip stitches are too tight, it becomes incredibly difficult to insert your hook into them for the next row or subsequent stitches. It can also make your fabric pucker and lose its shape. The solution is to consciously relax your grip on the yarn and your hook, allowing the yarn to flow more freely.
Missing a Stitch
Sometimes, especially when working into a chain, it’s easy to accidentally skip a stitch. This results in an uneven edge or an incorrect stitch count. Always take a moment to clearly identify the next available stitch before inserting your hook. Counting your stitches periodically can help ensure you don’t miss any.
Not Pulling Through Both Loops
A common error is to pull the yarn-over loop only through the stitch you entered, leaving two loops on your hook. This is actually the first step of a single crochet stitch, not a slip stitch. Remember, for a slip stitch, you must pull the yarn-over loop through both the stitch you just entered and the loop that was already on your hook. Double-check that only one loop remains on your hook after completing the stitch.
Incorrect Hook Insertion
Inserting your hook into the wrong part of a stitch can change the look and integrity of your fabric. While practicing in a chain, ensure you’re going under the top loop (or top loop and back bump). When working into established stitches, you’ll typically insert under both loops (the ‘V’ at the top) unless the pattern specifies otherwise. Incorrect insertion can lead to holes or a less stable fabric.
Troubleshooting
Even with careful attention, you might run into a few snags. Here’s how to smooth them out.
My Slip Stitches are Too Hard to Work Into
This is almost always a tension issue. You’re likely pulling your yarn too tightly after completing each slip stitch. Try using a hook one size larger than recommended for your yarn, or consciously try to loosen your grip. Practice making your stitches a bit more relaxed, allowing the yarn to glide easily.
My Row of Slip Stitches Looks Uneven or Bumpy
Unevenness can stem from inconsistent tension or accidentally skipping stitches. Carefully re-examine your work. Ensure you are inserting your hook into the same part of each previous stitch and that your yarn-overs are uniform. Count your stitches at the end of the row to catch any skips.
I Can’t See My Slip Stitches Clearly
Slip stitches are inherently small and can be hard to spot, especially in dark yarn or if your tension is very tight. They don’t have distinct “posts” like taller stitches. Look for the small ‘V’ shapes lying flat on the top edge of your work. Using a lighter colored yarn for practice can also make them much easier to see until you get the hang of it.
Key Takeaways
- The slip stitch is the shortest crochet stitch, adding minimal height to your work.
- It’s essential for joining rounds, moving across rows, and creating neat, flat edges.
- Always skip the first chain closest to the hook when starting a row of slip stitches.
- Tension is critical; too tight stitches are difficult to work into later.
- Practice pulling the yarn-over through both the stitch entered and the loop on your hook.
- Consistent hook insertion into the correct part of the previous stitch ensures a neat finish.
Frequently Asked Questions
When should I use a slip stitch?
Slip stitches are incredibly versatile. They are primarily used to join rounds when working in the round (like for hats or amigurumi), to move your yarn to a different point in your work without adding height (e.g., to start a new row in the middle of a piece), or to create a very subtle, firm edge. They’re also often used in lacework or for intricate shaping where a very small stitch is needed.
Is a slip stitch considered a “stitch” in terms of stitch count?
Generally, no, not in the same way a single crochet or double crochet is. When a pattern tells you to “slip stitch to join,” that slip stitch usually isn’t included in the stitch count for the round. If a pattern asks you to “slip stitch across,” then those slip stitches would be counted as part of the total for that row. Always refer to your specific pattern’s instructions regarding stitch counts.
Can I make an entire fabric out of slip stitches?
Yes, you can! Making an entire fabric out of slip stitches is called “Bosnian crochet” or “slip stitch crochet.” It creates a very dense, sturdy, and often warm fabric that resembles knitting. It’s a slower process than working with taller stitches but results in a unique texture and drape. It’s a great technique for items like pot holders, bags, or even garments that need a lot of structure.
How do I make my slip stitches less tight?
To combat tight slip stitches, try a few things. First, consciously relax your grip on both the yarn and your hook. Let the yarn flow more freely. Second, consider using a crochet hook that is one or even two sizes larger than what the yarn label suggests. This will naturally create slightly larger, looser stitches. Finally, practice makes perfect; the more you crochet, the more your tension will naturally even out.
Our Top Recommended Finds
- Ergonomic Crochet Hook Set: A comfortable hook reduces hand fatigue, especially when working on projects with repetitive stitches. Look for handles designed to fit your hand.
- Light-Colored Acrylic Yarn: Ideal for beginners, light-colored yarn makes it easier to see your stitches and learn new techniques. Acrylic is also forgiving and inexpensive.
- Stitch Markers: Essential for keeping track of your first and last stitches, especially when working in the round or with tricky patterns. They prevent unraveling and confusion.
Your Next Crochet Adventure Awaits
You’ve now taken a significant step in your crochet journey by mastering the slip stitch. This small but mighty technique will open up a world of possibilities for your projects. Don’t stop here!
Now that you’re comfortable with the basics, try incorporating slip stitches into a simple project. Perhaps a small coaster, where you can join rounds, or a decorative border on a dishcloth. Keep practicing, and you’ll find your confidence growing with every stitch. Happy hooking!
Beginner-friendly templates, step-by-step guides,
and weekly project ideas in your inbox.