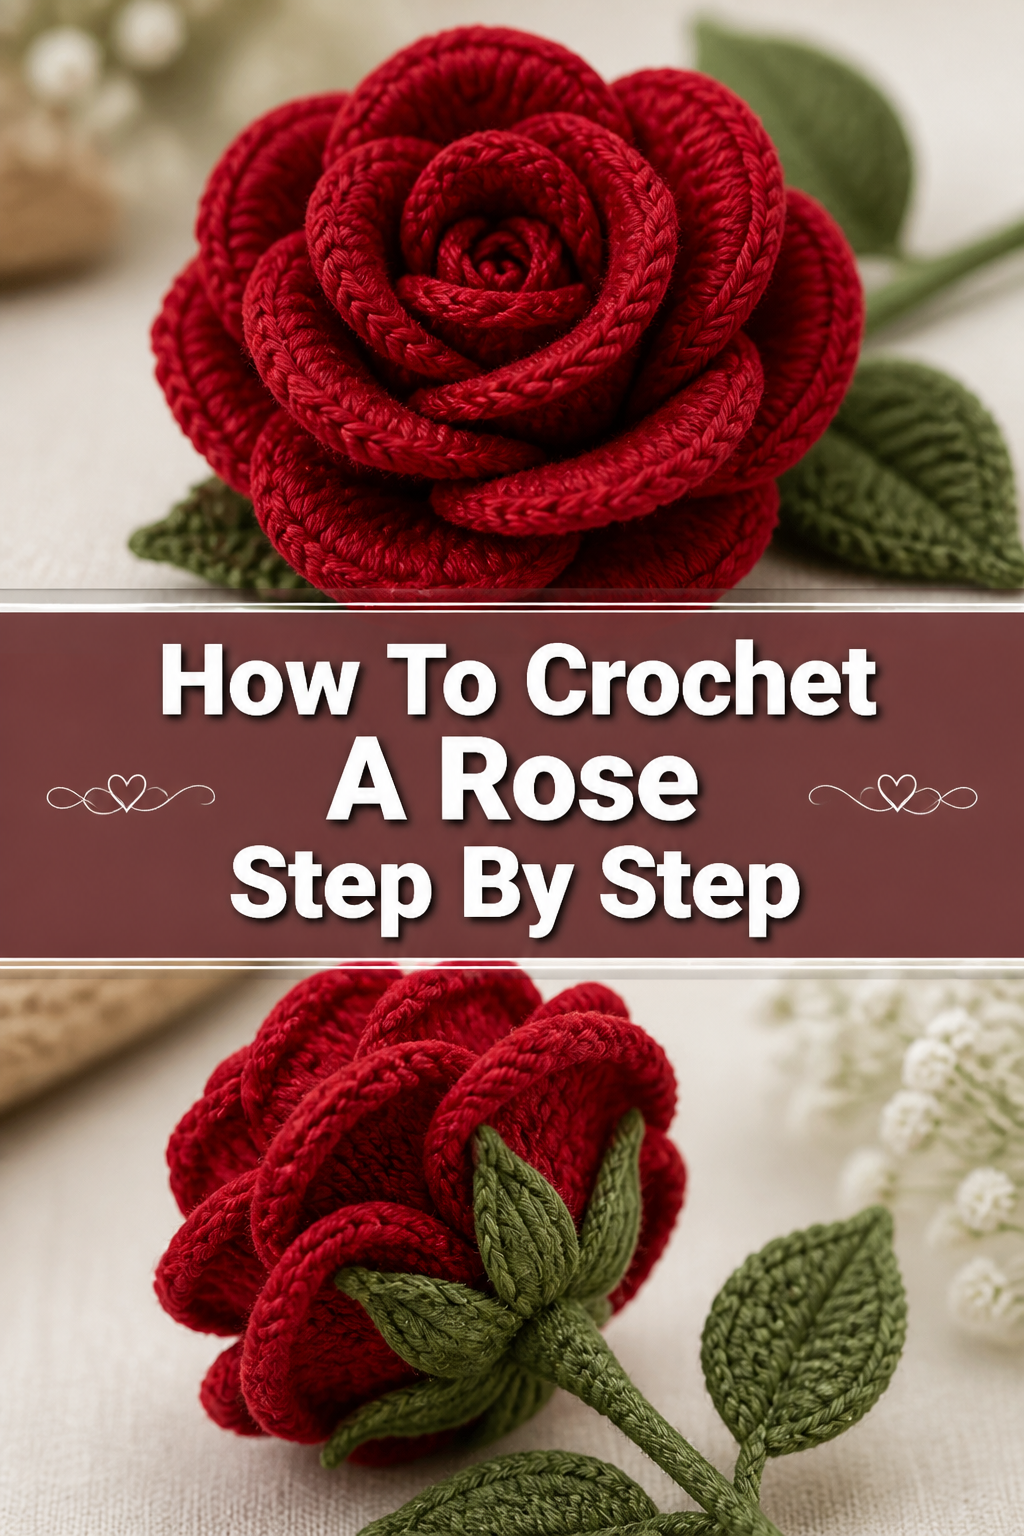
🌸 How To Crochet A Rose Step By Step

Beginner-friendly templates, step-by-step guides,
and weekly project ideas in your inbox.
I still remember the satisfaction of finishing my very first crocheted rose. It felt like magic, transforming simple yarn into something so beautiful and intricate. This guide will walk you through creating your own, sharing all the practical tips I’ve learned along the way. You’ll soon discover the joy of crafting these delightful blooms yourself.
Quick Overview
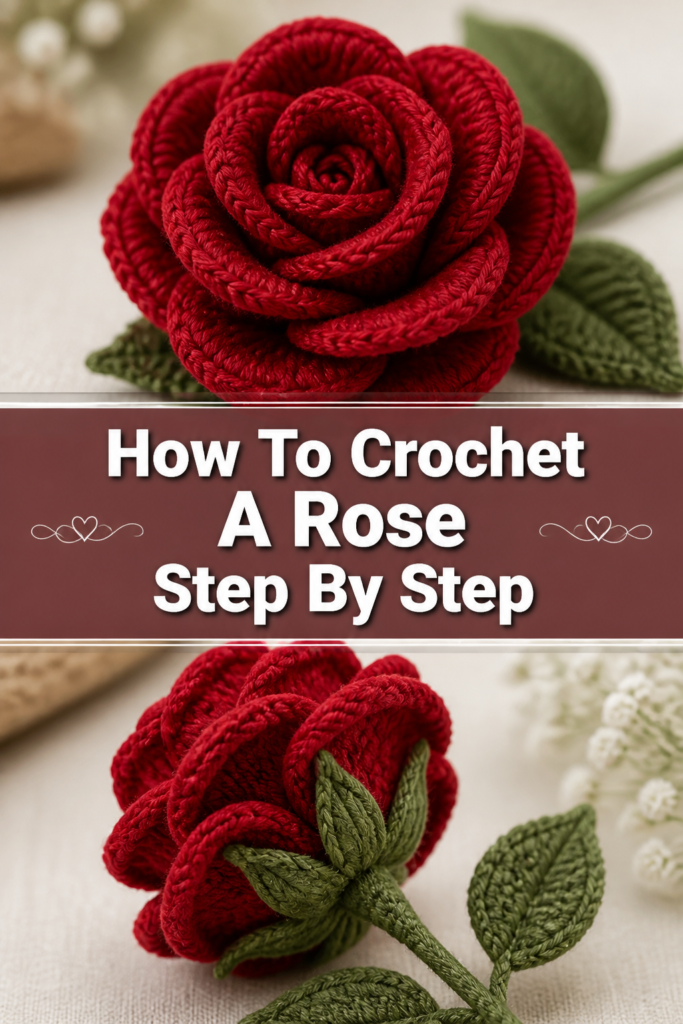
This guide will teach you how to crochet a charming, layered rose that’s perfect for embellishing projects or simply admiring. You’ll learn the essential stitches and shaping techniques to bring your floral vision to life.
- Time needed: 1-2 hours (Beginner), 30-60 minutes (Experienced)
- Difficulty: Beginner to Intermediate
- What you’ll need: Yarn, crochet hook, scissors, tapestry needle
Step-by-Step Instructions
Step 1: Gather Your Materials
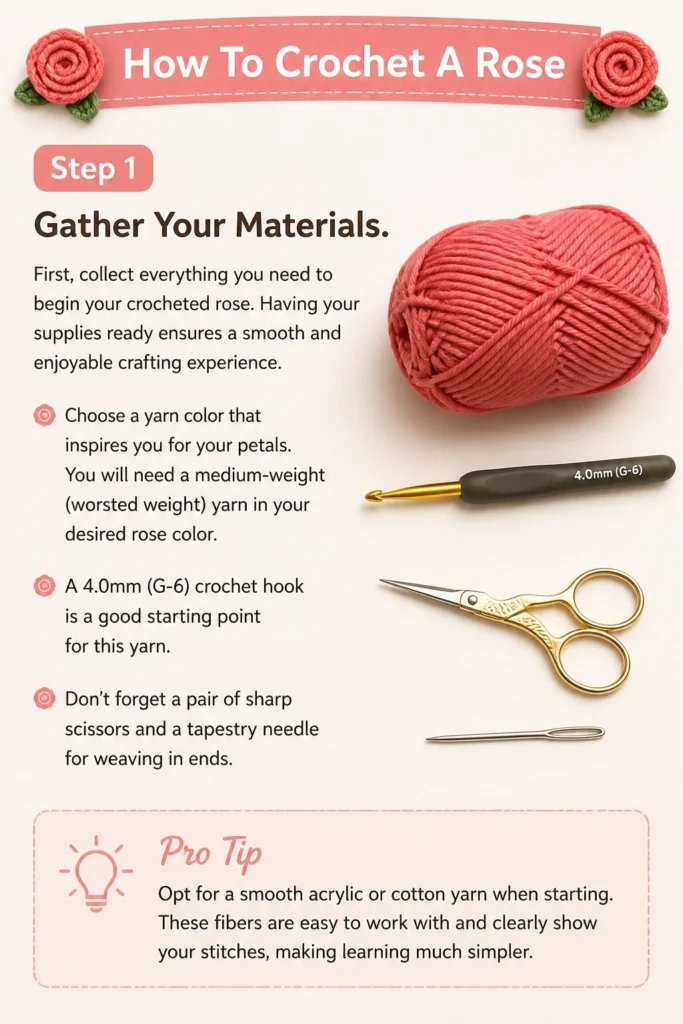
First, collect everything you need to begin your crocheted rose. Having your supplies ready ensures a smooth and enjoyable crafting experience. Choose a yarn color that inspires you for your petals.
You will need a medium-weight (worsted weight) yarn in your desired rose color. A 4.0mm (G-6) crochet hook is a good starting point for this yarn. Don’t forget a pair of sharp scissors and a tapestry needle for weaving in ends.
Pro Tip: Opt for a smooth acrylic or cotton yarn when starting. These fibers are easy to work with and clearly show your stitches, making learning much simpler.
Step 2: Create the Foundation Chain
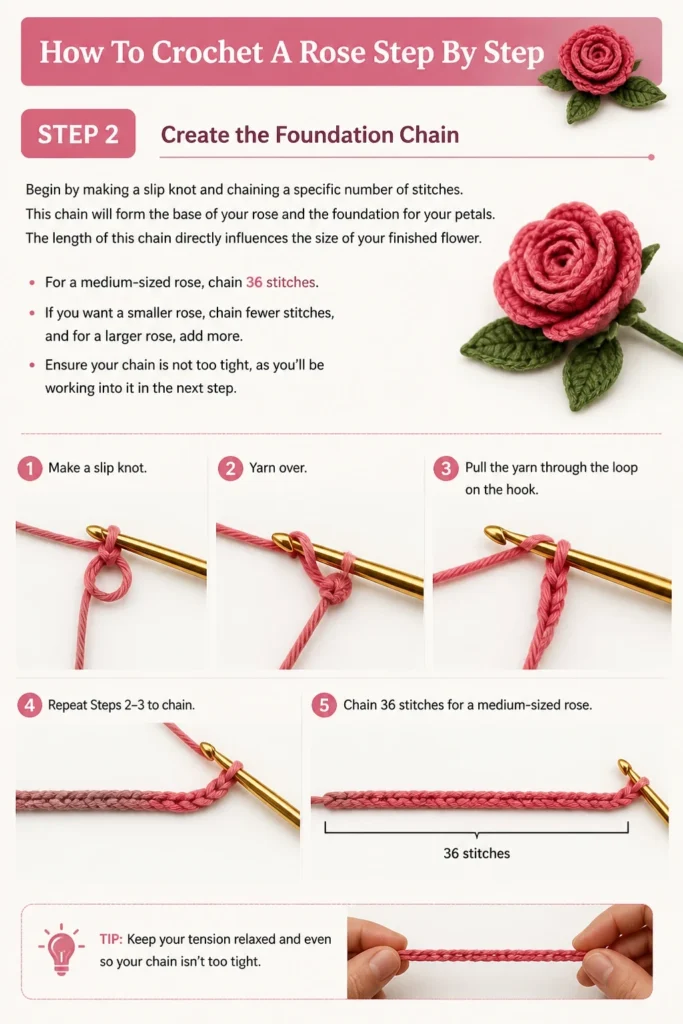
Begin by making a slip knot and chaining a specific number of stitches. This chain will form the base of your rose and the foundation for your petals. The length of this chain directly influences the size of your finished flower.
For a medium-sized rose, chain 36 stitches. If you want a smaller rose, chain fewer stitches, and for a larger rose, add more. Ensure your chain is not too tight, as you’ll be working into it in the next step.
Step 3: Work the First Row of Petals (Smallest)
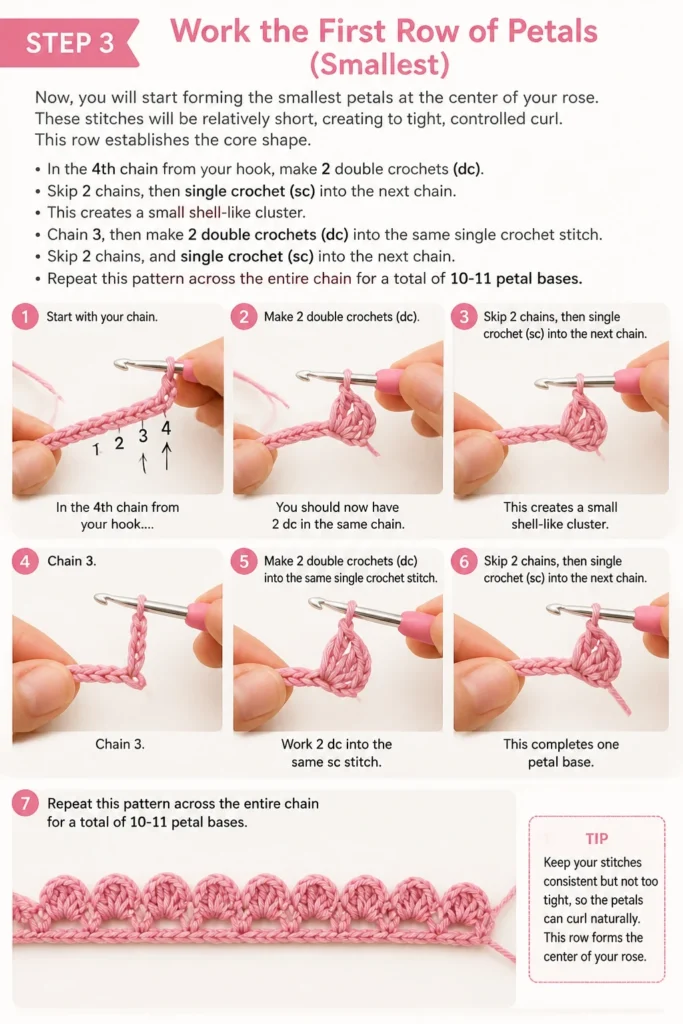
Now, you will start forming the smallest petals at the center of your rose. These stitches will be relatively short, creating a tight, controlled curl. This row establishes the core shape.
In the 4th chain from your hook, make 2 double crochets (dc). Skip 2 chains, then single crochet (sc) into the next chain. This creates a small shell-like cluster.
Chain 3, then make 2 double crochets (dc) into the same single crochet stitch. Skip 2 chains, and single crochet (sc) into the next chain. Repeat this pattern across the entire chain for a total of 10-11 petal bases.
Step 4: Form the Second Row of Petals (Medium)
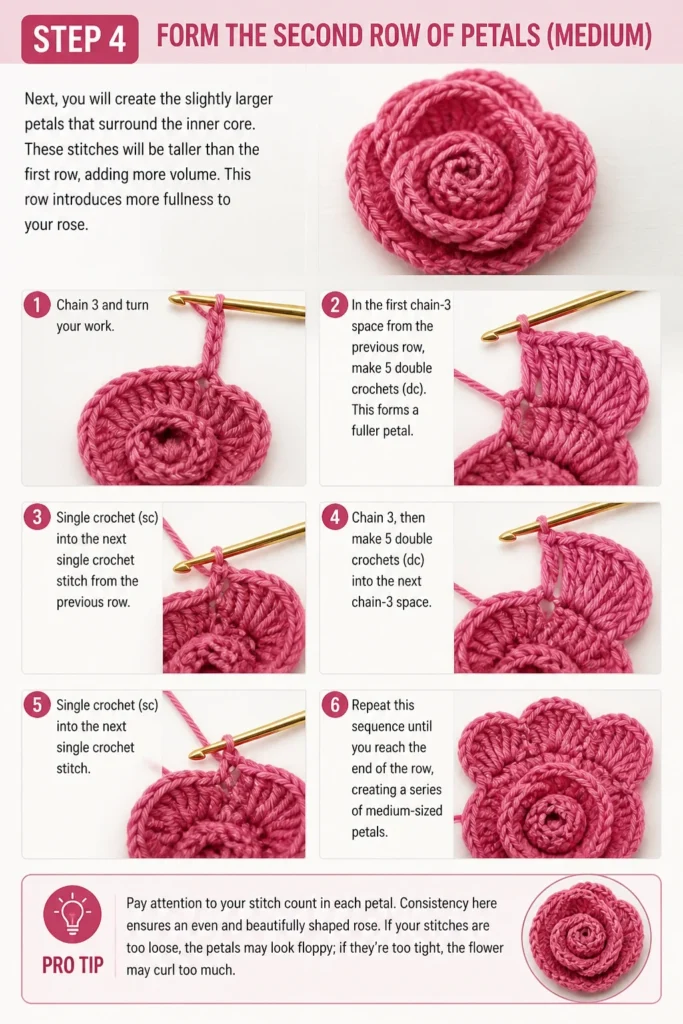
Next, you will create the slightly larger petals that surround the inner core. These stitches will be taller than the first row, adding more volume. This row introduces more fullness to your rose.
Chain 3 and turn your work. In the first chain-3 space from the previous row, make 5 double crochets (dc). This forms a fuller petal. Single crochet (sc) into the next single crochet stitch from the previous row.
Chain 3, then make 5 double crochets (dc) into the next chain-3 space. Single crochet (sc) into the next single crochet stitch. Repeat this sequence until you reach the end of the row, creating a series of medium-sized petals.
Pro Tip: Pay attention to your stitch count in each petal. Consistency here ensures an even and beautifully shaped rose. If your stitches are too loose, the petals might look floppy.
Step 5: Add the Third Row of Petals (Largest)
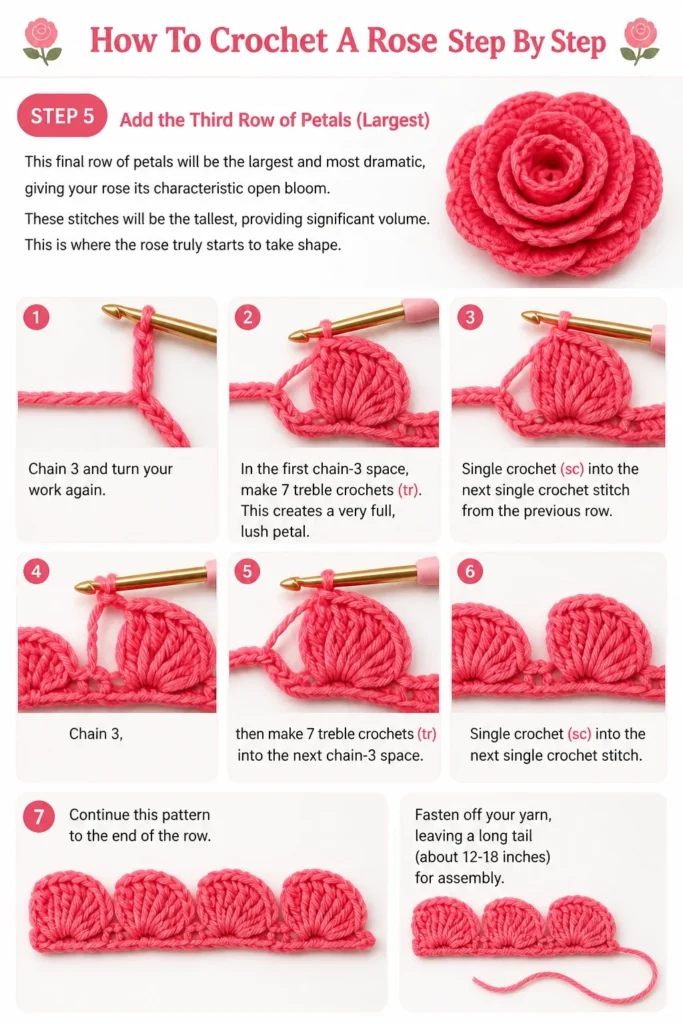
This final row of petals will be the largest and most dramatic, giving your rose its characteristic open bloom. These stitches will be the tallest, providing significant volume. This is where the rose truly starts to take shape.
Chain 3 and turn your work again. In the first chain-3 space, make 7 treble crochets (tr). This creates a very full, lush petal. Single crochet (sc) into the next single crochet stitch from the previous row.
Chain 3, then make 7 treble crochets (tr) into the next chain-3 space. Single crochet (sc) into the next single crochet stitch. Continue this pattern to the end of the row. Fasten off your yarn, leaving a long tail (about 12-18 inches) for assembly.
Step 6: Shape and Roll Your Rose
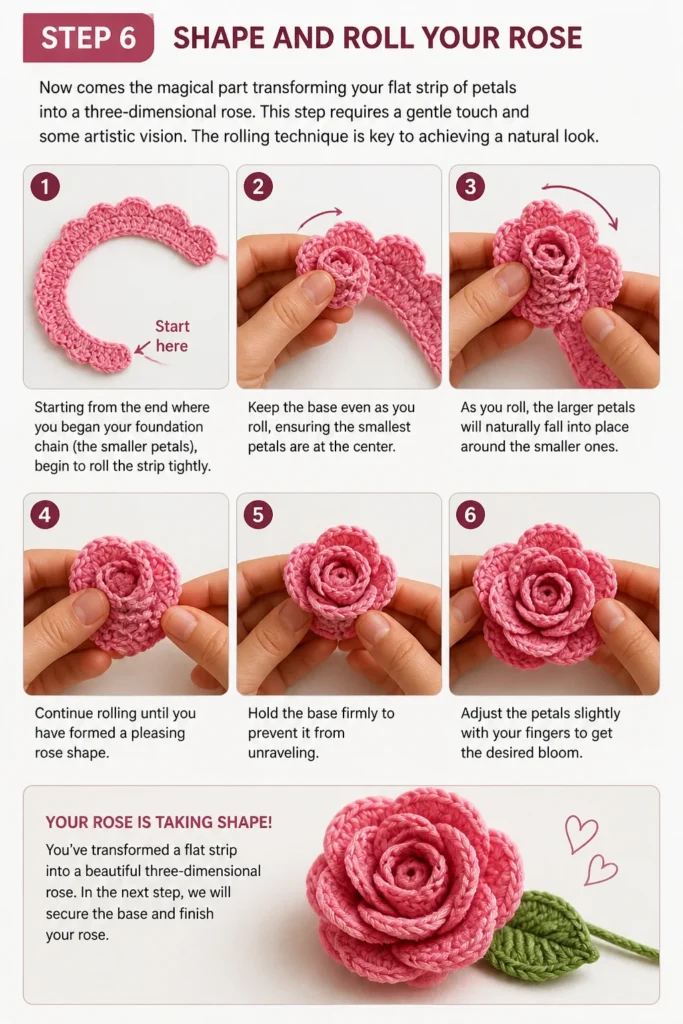
Now comes the magical part: transforming your flat strip of petals into a three-dimensional rose. This step requires a gentle touch and some artistic vision. The rolling technique is key to achieving a natural look.
Starting from the end where you began your foundation chain (the smaller petals), begin to roll the strip tightly. Keep the base even as you roll, ensuring the smallest petals are at the center. As you roll, the larger petals will naturally fall into place around the smaller ones.
Continue rolling until you have formed a pleasing rose shape. Hold the base firmly to prevent it from unraveling. Adjust the petals slightly with your fingers to get the desired bloom.
Step 7: Secure the Rose Base
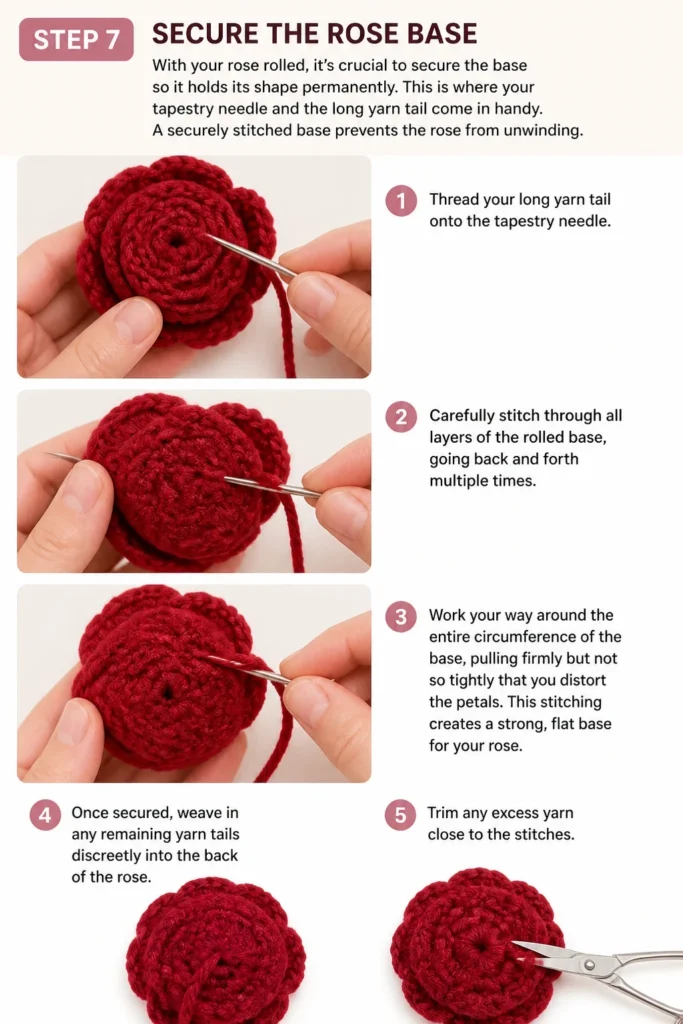
With your rose rolled, it’s crucial to secure the base so it holds its shape permanently. This is where your tapestry needle and the long yarn tail come in handy. A securely stitched base prevents the rose from unwinding.
Thread your long yarn tail onto the tapestry needle. Carefully stitch through all layers of the rolled base, going back and forth multiple times. Work your way around the entire circumference of the base, pulling firmly but not so tightly that you distort the petals.
This stitching creates a strong, flat base for your rose. Once secured, weave in any remaining yarn tails discreetly into the back of the rose. Trim any excess yarn close to the stitches.
Step 8: Add Leaves (Optional)
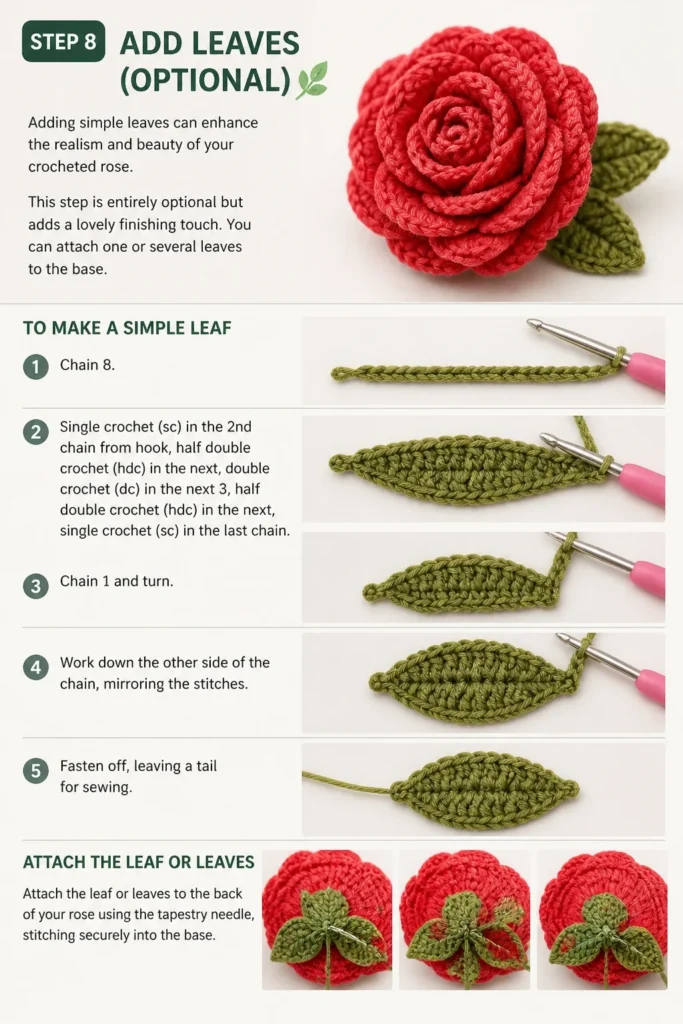
Adding simple leaves can enhance the realism and beauty of your crocheted rose. This step is entirely optional but adds a lovely finishing touch. You can attach one or several leaves to the base.
To make a simple leaf, chain 8. Single crochet (sc) in the 2nd chain from hook, half double crochet (hdc) in the next, double crochet (dc) in the next 3, half double crochet (hdc) in the next, single crochet (sc) in the last chain. Chain 1 and turn.
Work down the other side of the chain, mirroring the stitches. Fasten off, leaving a tail for sewing. Attach the leaf or leaves to the back of your rose using the tapestry needle, stitching securely into the base.
Common Mistakes to Avoid
Inconsistent Tension
Many beginners struggle with maintaining even tension throughout their work. This can lead to some petals being tighter or looser than others, making the rose look uneven. Practice your stitches and try to keep your yarn tension consistent with each pull. If your rose looks lopsided, it might be due to varying tension.
Skipping Stitches
Accidentally skipping stitches in your foundation chain or subsequent rows will throw off your stitch count. This leads to missing petals or gaps in your rose’s structure. Always count your stitches carefully, especially when starting a new row or repeating a pattern. Using stitch markers can help you keep track of your progress.
Not Shaping Properly
The rolling and securing of the rose is just as important as the crocheting itself. If you roll too loosely, your rose will look flat and unformed. If you don’t secure the base thoroughly, it may unravel over time. Take your time with shaping, gently manipulating the petals, and stitch the base firmly through all layers.
Using the Wrong Yarn/Hook Combination
The type of yarn and hook you choose greatly impacts the final look. Using a hook that’s too large for your yarn can create loose, gappy stitches, while a hook that’s too small can make your rose stiff and difficult to work. Always check the yarn label for recommended hook sizes, or experiment to find a combination that yields a fabric you like.
Troubleshooting
Rose looks flat or not full
If your crocheted rose appears flat and lacks volume, it’s often due to insufficient stitches in your petal rows or not rolling tightly enough. Ensure you’ve followed the recommended stitch counts for each petal layer, particularly the treble crochets for the largest petals. When rolling, start tightly at the center and maintain that firmness as you build outward, allowing the layers to naturally overlap and create fullness. You can also gently “fluff” the petals once secured.
Edges are curling too much
Excessive curling of the petal edges might indicate your tension is too tight or your hook size is too small for your yarn. Try using a slightly larger crochet hook to create a looser fabric. Alternatively, ensure you are not pulling the yarn too tightly as you work your stitches. A consistent, relaxed tension is key to well-formed petals that curve gently rather than curling aggressively. Blocking the finished rose with a light steam or mist can also help relax the fibers.
Stitches are too tight/loose
This is a common issue related to tension. If your stitches are too tight, your rose will be stiff and difficult to roll, and your hook might be hard to insert into stitches. If they are too loose, the rose will lack definition and structure. Practice making swatch pieces to find your ideal tension. Consciously try to relax your grip if stitches are too tight, or hold the yarn a little more firmly if they are too loose. Consistency improves with practice.
Key Takeaways
- The foundation chain length determines your rose’s overall size.
- Gradually increasing stitch height (sc, dc, tr) creates layered petals.
- Consistent tension is vital for an even and beautifully shaped rose.
- The rolling and securing of the base are critical for the rose’s final form.
- Don’t be afraid to experiment with yarn colors and types for different effects.
- Practice is key; your first rose might not be perfect, but each one gets better.
Frequently Asked Questions
Can I use different yarn weights?
Yes, you absolutely can use different yarn weights. Lighter weights like sport or fingering will produce smaller, more delicate roses, while bulkier yarns will create larger, chunkier flowers. Remember to adjust your hook size accordingly to match the yarn weight for the best results.
How do I make a larger/smaller rose?
To make a larger rose, simply start with a longer foundation chain and potentially add more stitches to each petal cluster. For a smaller rose, begin with a shorter foundation chain and use fewer stitches per petal. You can also vary the number of petal rows you create.
Can I add a stem?
Adding a stem is a great idea for making a full bouquet or individual long-stemmed roses. You can crochet a simple green tube for a stem, or wrap floral wire with green yarn. Securely attach the stem by stitching it into the tightly secured base of your rose.
How do I wash a crocheted rose?
The washing method depends on your yarn fiber. For acrylic or cotton roses, gentle hand washing with mild soap and cool water is usually safe. Gently squeeze out excess water, reshape, and lay flat to air dry. Avoid machine washing or drying unless your yarn label explicitly states it’s safe.
Our Top Recommended Finds
- Ergonomic Crochet Hook Set: Essential for comfort during longer crafting sessions, reducing hand fatigue.
- Yarn Winder: Transforms tangled skeins into neat cakes, making yarn easier to manage and preventing knots.
- Stitch Markers: Invaluable for keeping track of your stitch count and marking key points in your pattern, especially for beginners.
Unfurl Your Creativity: Start Your Rose Journey Today!
You now have all the knowledge and steps needed to crochet your very own beautiful rose. This project is a fantastic way to practice fundamental stitches and create something truly lovely. Imagine these roses adorning gifts, brightening up a room, or becoming part of a larger project.
Don’t hesitate to pick up your hook and yarn right now. Your first crocheted rose is waiting to bloom under your hands. Once you’ve mastered this, consider exploring variations like multi-colored roses or adding beaded accents. Happy crocheting!
Beginner-friendly templates, step-by-step guides,
and weekly project ideas in your inbox.