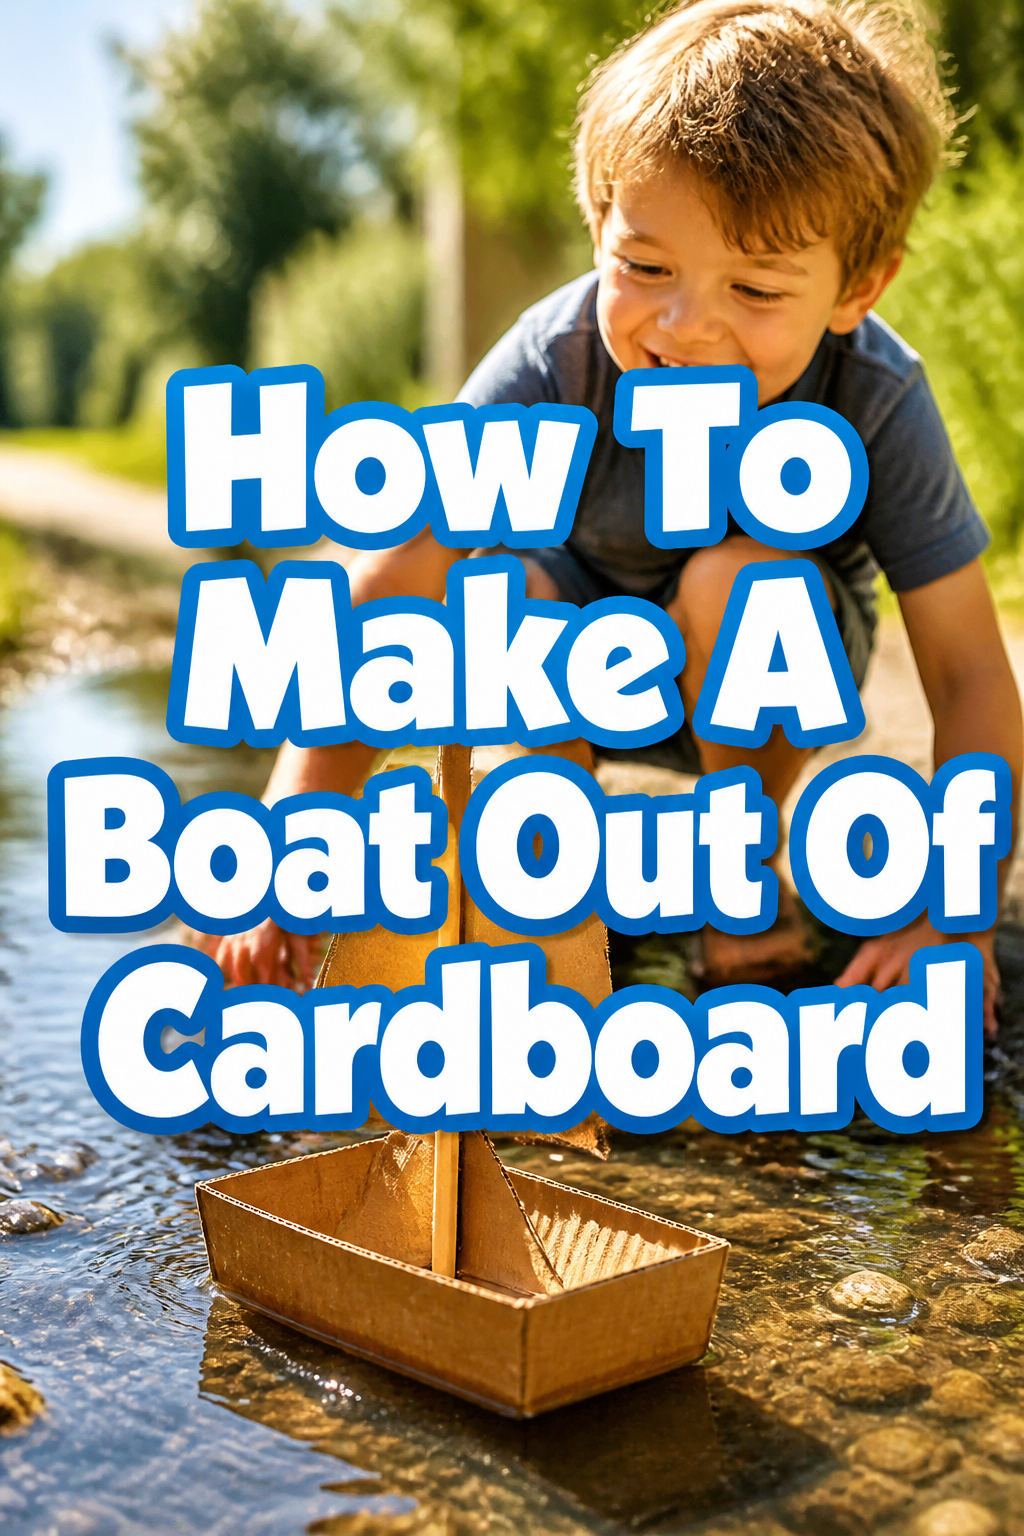
🛶 How To Make A Boat Out Of Cardboard

Beginner-friendly templates, step-by-step guides,
and weekly project ideas in your inbox.
Building a boat from cardboard might sound like a wild idea, but it’s a fantastic project. I’ve personally spent countless hours in my garage, transforming humble cardboard sheets into surprisingly buoyant vessels. This guide shares all the practical insights I’ve gathered, ensuring your own cardboard creation is a success.
You’re about to embark on a fun, rewarding challenge that tests your creativity and engineering skills. Get ready to build something truly unique.
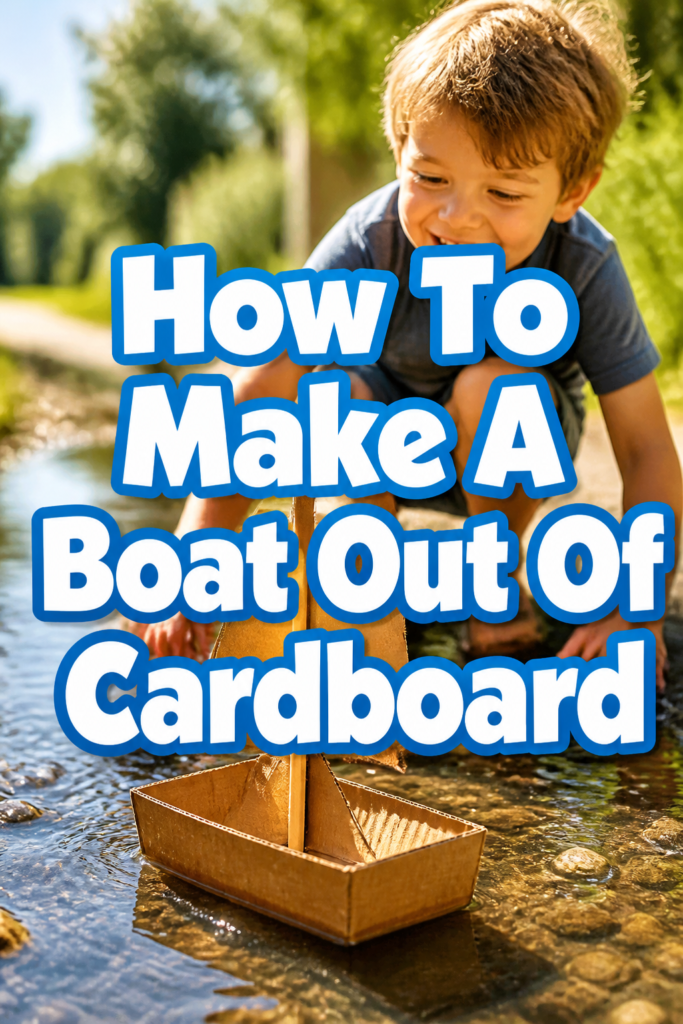
Quick Overview
This guide will walk you through the entire process of designing, constructing, and waterproofing a functional cardboard boat. You’ll learn essential techniques for creating a sturdy frame and ensuring it stays afloat.
Expect to gain practical skills in measurement, cutting, assembly, and sealing. By the end, you’ll have a boat ready for its maiden voyage.
- Time needed: 15-25 hours (spread over several days for drying)
- Difficulty: Intermediate
- What you’ll need: Large cardboard sheets, utility knife, ruler, hot glue gun, construction adhesive, waterproof sealant, measuring tape, pencil, safety gear.
Step-by-Step Instructions
Step 1: Plan Your Design
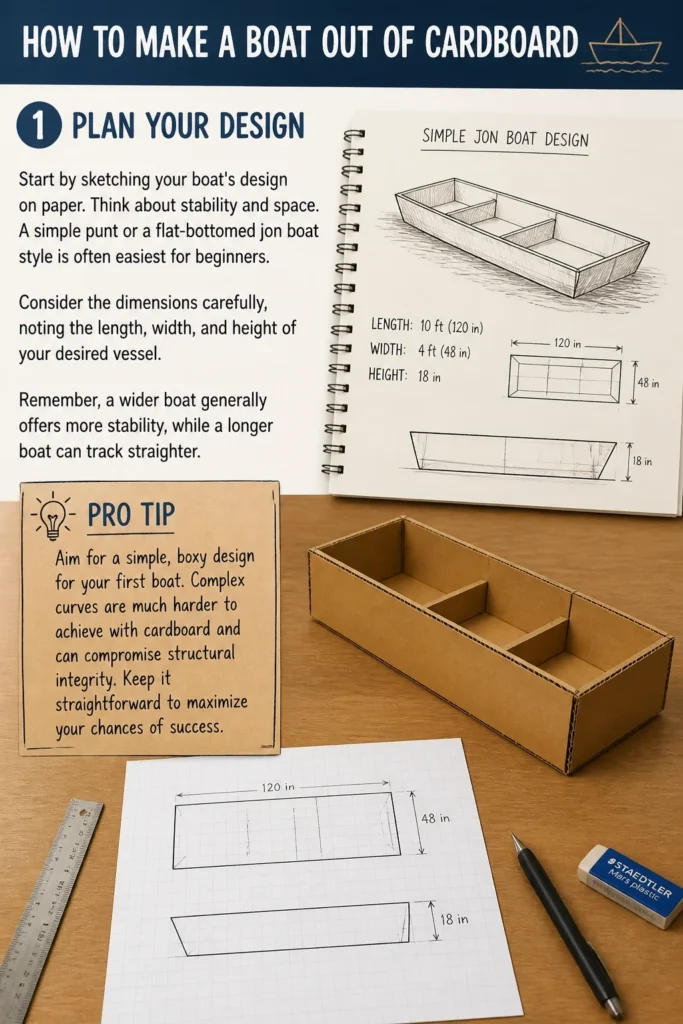
Start by sketching your boat’s design on paper. Think about stability and space. A simple punt or a flat-bottomed jon boat style is often easiest for beginners.
Consider the dimensions carefully, noting the length, width, and height of your desired vessel. Remember, a wider boat generally offers more stability, while a longer boat can track straighter.
Pro Tip: Aim for a simple, boxy design for your first boat. Complex curves are much harder to achieve with cardboard and can compromise structural integrity. Keep it straightforward to maximize your chances of success.
Step 2: Gather Your Materials
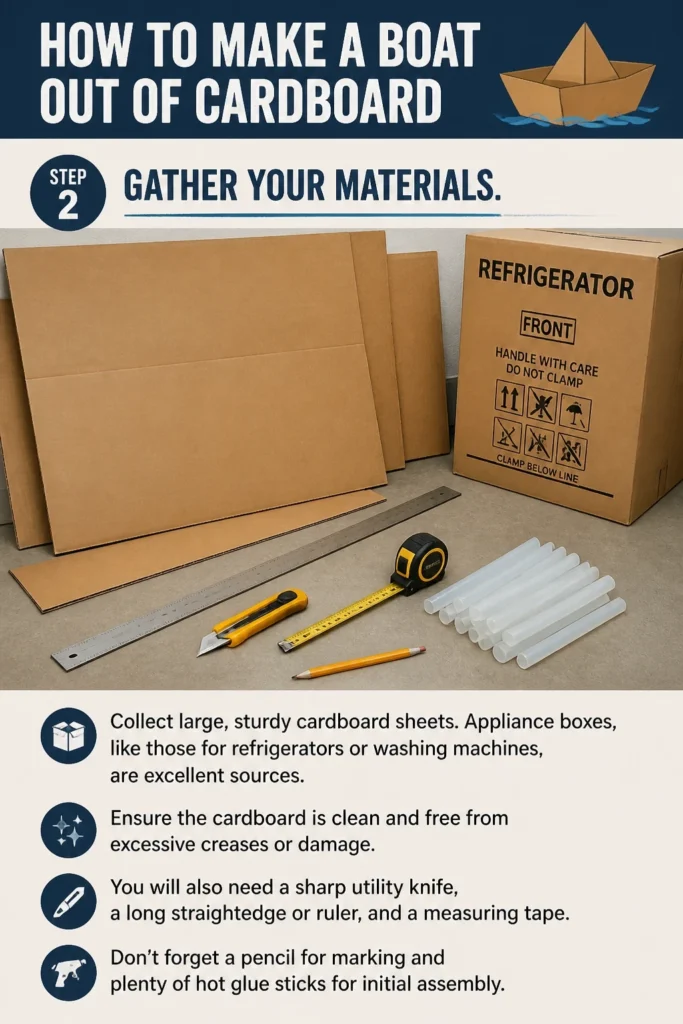
Collect large, sturdy cardboard sheets. Appliance boxes, like those for refrigerators or washing machines, are excellent sources. Ensure the cardboard is clean and free from excessive creases or damage.
You will also need a sharp utility knife, a long straightedge or ruler, and a measuring tape. Don’t forget a pencil for marking and plenty of hot glue sticks for initial assembly.
Step 3: Cut the Base and Sides
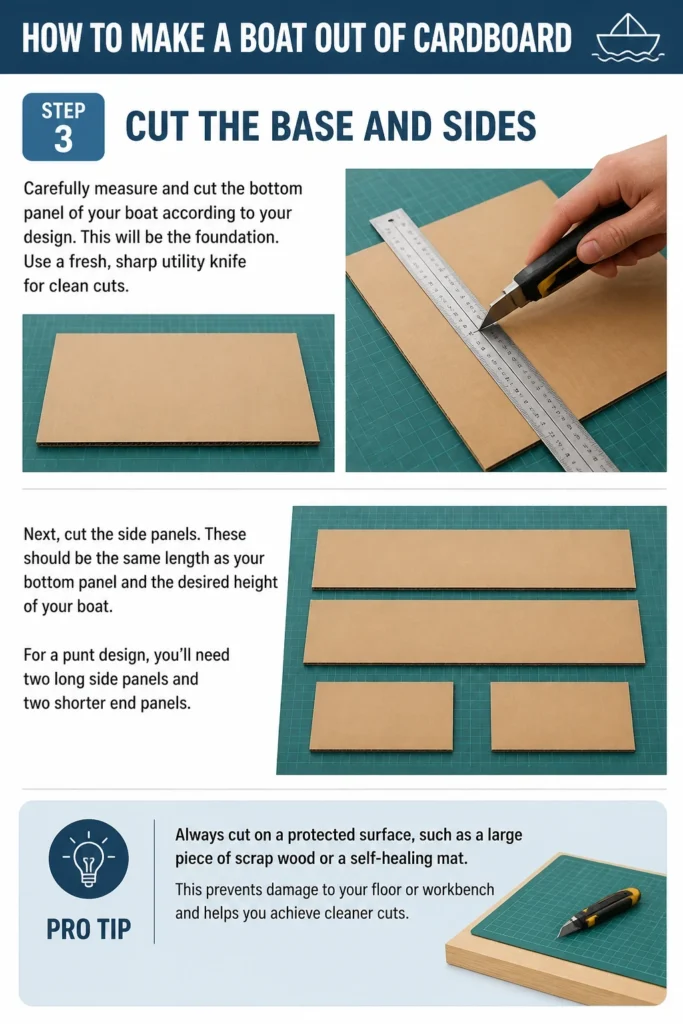
Carefully measure and cut the bottom panel of your boat according to your design. This will be the foundation. Use a fresh, sharp utility knife for clean cuts.
Next, cut the side panels. These should be the same length as your bottom panel and the desired height of your boat. For a punt design, you’ll need two long side panels and two shorter end panels.
Pro Tip: Always cut on a protected surface, such as a large piece of scrap wood or a self-healing mat. This prevents damage to your floor or workbench and helps you achieve cleaner cuts.
Step 4: Assemble the Basic Frame
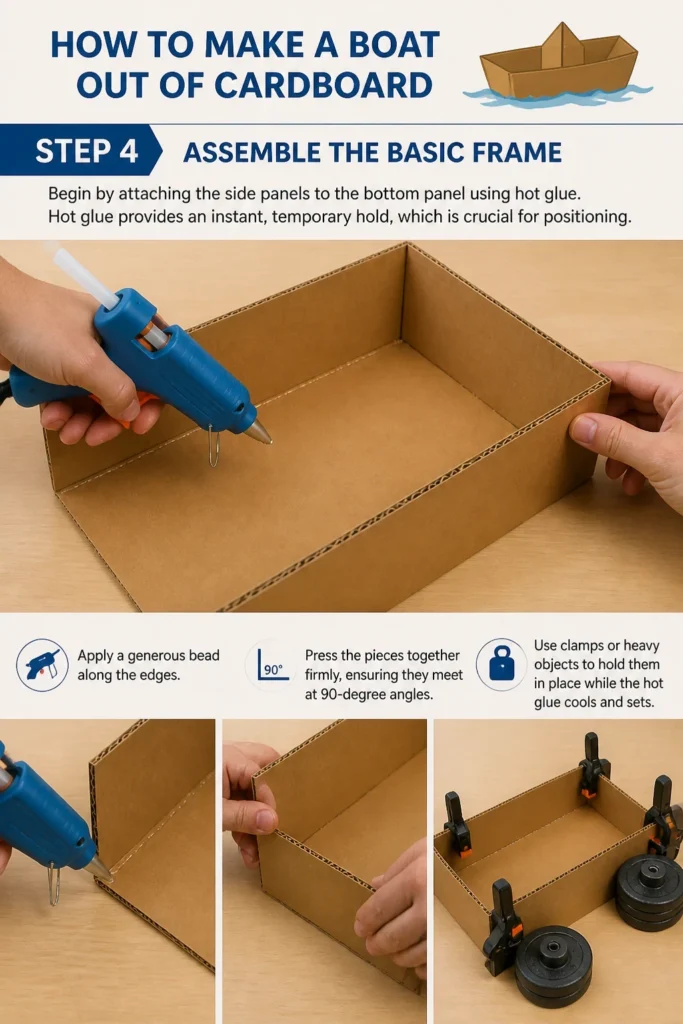
Begin by attaching the side panels to the bottom panel using hot glue. Hot glue provides an instant, temporary hold, which is crucial for positioning. Apply a generous bead along the edges.
Press the pieces together firmly, ensuring they meet at 90-degree angles. Use clamps or heavy objects to hold them in place while the hot glue cools and sets.
Step 5: Reinforce the Joints
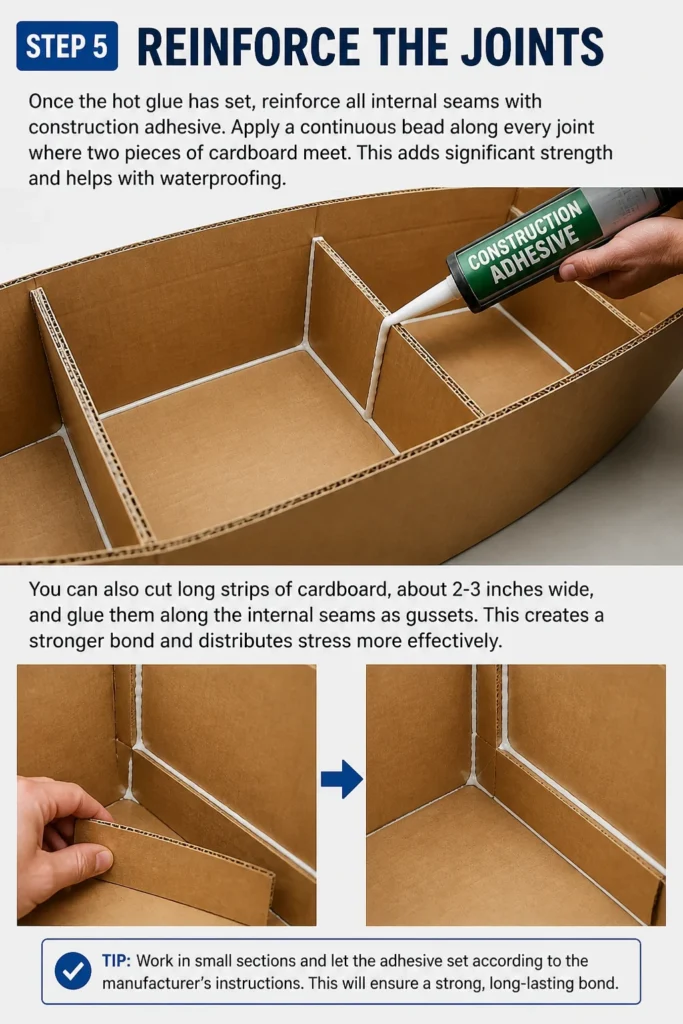
Once the hot glue has set, reinforce all internal seams with construction adhesive. Apply a continuous bead along every joint where two pieces of cardboard meet. This adds significant strength and helps with waterproofing.
You can also cut long strips of cardboard, about 2-3 inches wide, and glue them along the internal seams as gussets. This creates a stronger bond and distributes stress more effectively.
Step 6: Add Internal Supports and Seats
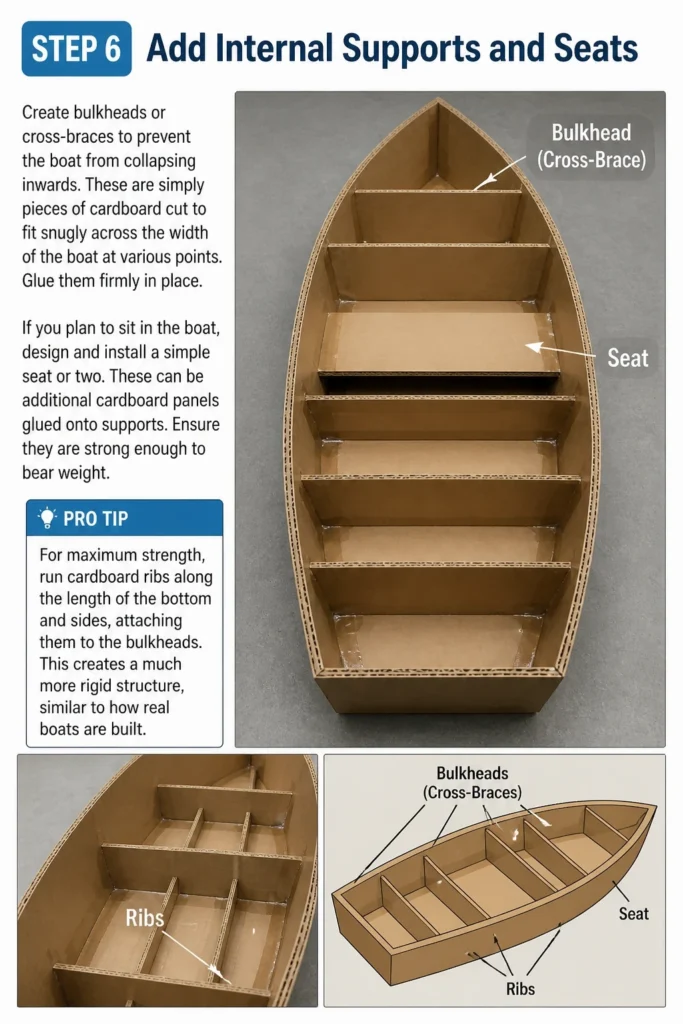
Create bulkheads or cross-braces to prevent the boat from collapsing inwards. These are simply pieces of cardboard cut to fit snugly across the width of the boat at various points. Glue them firmly in place.
If you plan to sit in the boat, design and install a simple seat or two. These can be additional cardboard panels glued onto supports. Ensure they are strong enough to bear weight.
Pro Tip: For maximum strength, run cardboard “ribs” along the length of the bottom and sides, attaching them to the bulkheads. This creates a much more rigid structure, similar to how real boats are built.
Step 7: Prepare for Waterproofing
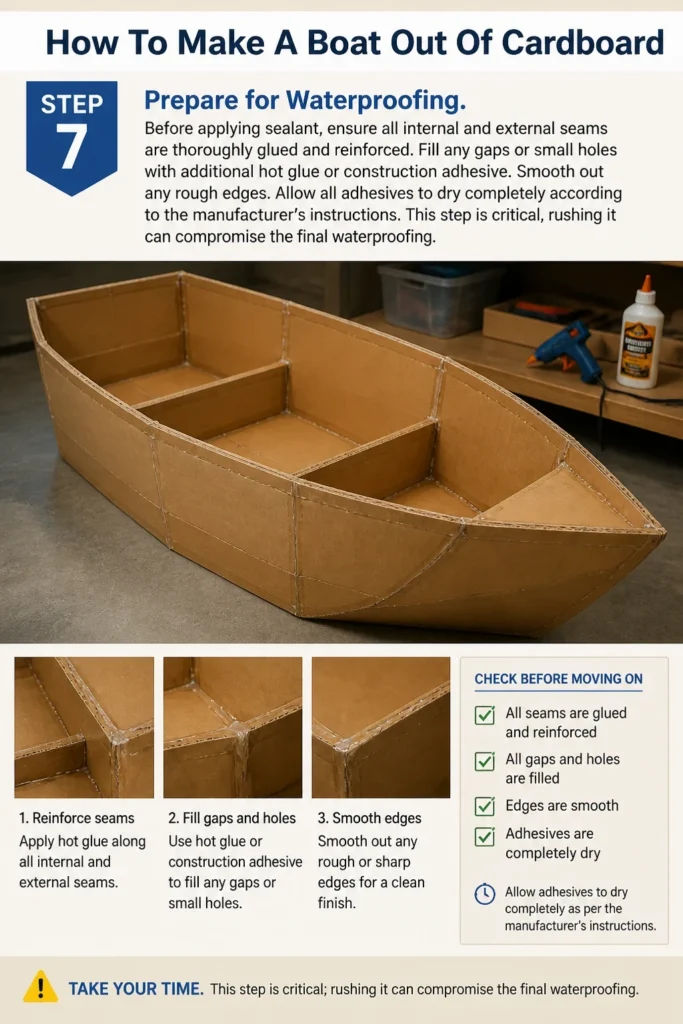
Before applying sealant, ensure all internal and external seams are thoroughly glued and reinforced. Fill any gaps or small holes with additional hot glue or construction adhesive. Smooth out any rough edges.
Allow all adhesives to dry completely according to the manufacturer’s instructions. This step is critical; rushing it can compromise the final waterproofing.
Step 8: Apply the Waterproof Sealant
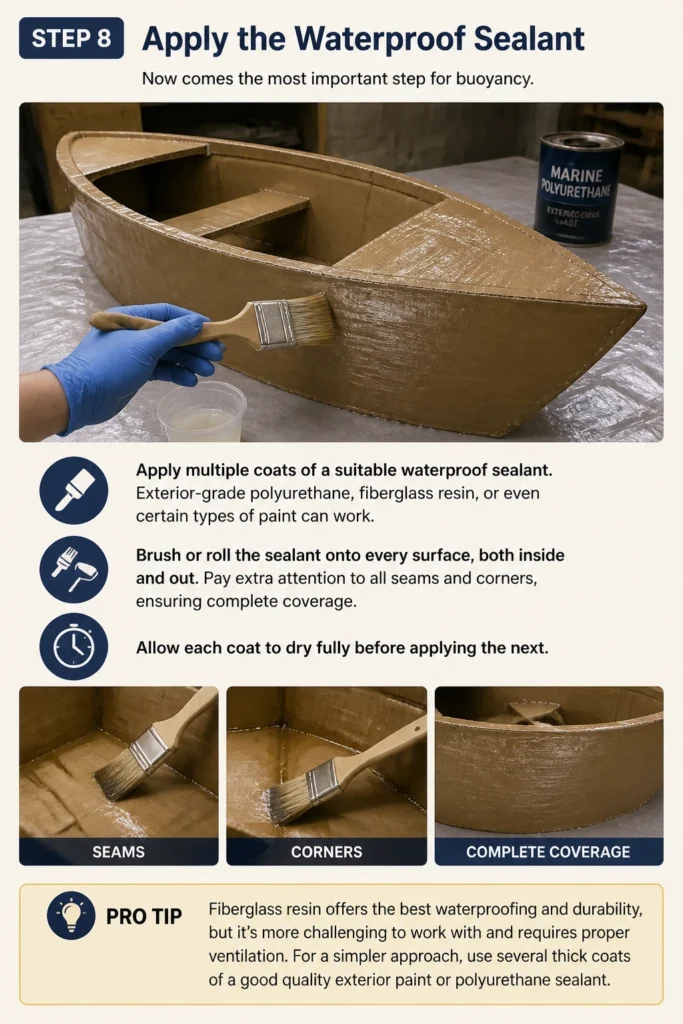
Now comes the most important step for buoyancy. Apply multiple coats of a suitable waterproof sealant. Exterior-grade polyurethane, fiberglass resin, or even certain types of paint can work.
Brush or roll the sealant onto every surface, both inside and out. Pay extra attention to all seams and corners, ensuring complete coverage. Allow each coat to dry fully before applying the next.
Pro Tip: Fiberglass resin offers the best waterproofing and durability, but it’s more challenging to work with and requires proper ventilation. For a simpler approach, use several thick coats of a good quality exterior paint or polyurethane sealant.
Step 9: Conduct a Leak Test (Optional but Recommended)
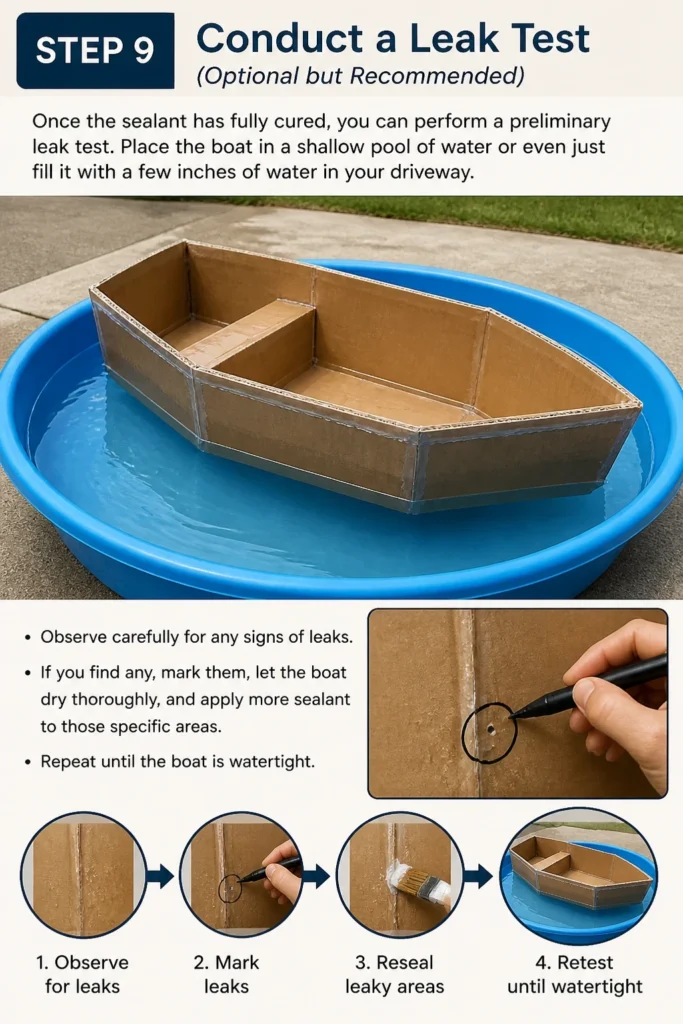
Once the sealant has fully cured, you can perform a preliminary leak test. Place the boat in a shallow pool of water or even just fill it with a few inches of water in your driveway.
Observe carefully for any signs of leaks. If you find any, mark them, let the boat dry thoroughly, and apply more sealant to those specific areas. Repeat until the boat is watertight.
Step 10: Launch Your Cardboard Boat!
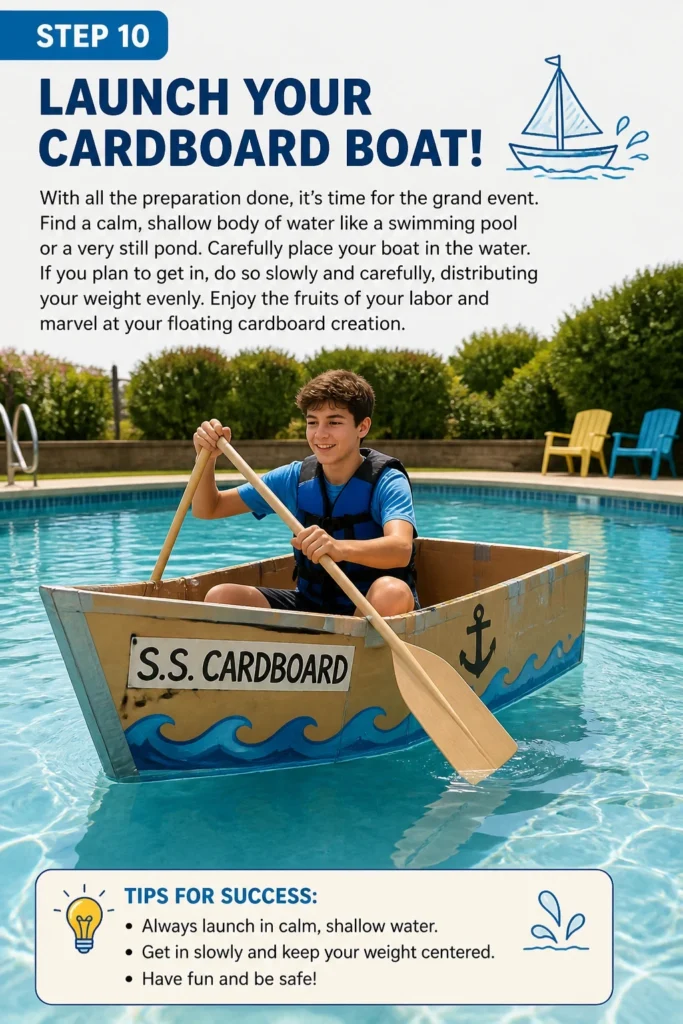
With all the preparation done, it’s time for the grand event. Find a calm, shallow body of water like a swimming pool or a very still pond. Carefully place your boat in the water.
If you plan to get in, do so slowly and carefully, distributing your weight evenly. Enjoy the fruits of your labor and marvel at your floating cardboard creation.
Common Mistakes to Avoid
Using Weak Cardboard
Many beginners grab any cardboard they can find, not realizing the quality makes a huge difference. Thin, flimsy, or previously wet cardboard will quickly fail under stress and moisture. Always seek out thick, corrugated cardboard, ideally double-walled, for maximum strength and water resistance.
Skimping on Adhesive
It’s tempting to use just enough glue to hold pieces together, but this is a critical error. Cardboard boats need robust structural integrity. Apply generous amounts of hot glue for initial holds, then follow up with continuous, thick beads of construction adhesive on all internal seams. Don’t be afraid to use extra glue.
Inadequate Waterproofing
This is the most common reason cardboard boats sink. A single coat of paint or a thin layer of sealant is rarely enough. You need multiple, thick, even coats of a high-quality waterproof sealant, covering every inch of the cardboard. Pay particular attention to edges, corners, and any areas that might flex.
Overly Complex Designs
While an intricate design might look appealing on paper, it’s a nightmare to execute with cardboard. Complex curves, sharp angles, and numerous small pieces introduce weak points and make waterproofing incredibly difficult. Stick to simple, boxy shapes for your first boat to ensure success and learn the basics.
Troubleshooting
Boat Sinks Immediately
If your boat goes straight to the bottom, the primary issue is almost always a failure in waterproofing or structural integrity. Thoroughly inspect every seam and surface for unsealed areas or cracks in the sealant. Pay close attention to the bottom and lower sides, as these experience the most water pressure.
Reapply generous amounts of sealant to any compromised areas, ensuring complete coverage. Allow ample drying time between coats. Also, check if any major structural joints have failed, requiring re-gluing and reinforcement.
Boat Flexes or Collapses Inwards
Excessive flexing or collapsing indicates insufficient internal support. Your boat lacks the necessary bulkheads or ribs to maintain its shape under load. The cardboard itself isn’t strong enough on its own.
Add more cross-braces (bulkheads) strategically placed along the length of the boat. Consider adding longitudinal “ribs” along the bottom and sides, connecting them to the bulkheads. These reinforcements will significantly stiffen the structure.
Water Seeps In Slowly
Slow seepage suggests small, unnoticed pinholes or thin spots in your waterproofing. The sealant might not have been applied evenly, or tiny air bubbles were trapped during application.
Dry the boat completely and perform a detailed inspection. Look for small, dark spots where water has soaked in, indicating a breach. Apply an additional, thick coat of sealant over the entire boat, focusing on ensuring every pore and crevice is filled.
Key Takeaways
- Planning a simple, boxy design significantly increases your chances of success for a first-time build.
- Use high-quality, sturdy corrugated cardboard, ideally from large appliance boxes, for the best foundation.
- Reinforce all joints with generous amounts of construction adhesive after initial hot glue assembly.
- Apply multiple, thick, and even coats of a strong waterproof sealant to every surface, inside and out.
- Internal supports like bulkheads and ribs are crucial for preventing the boat from collapsing under weight or water pressure.
- Always allow adhesives and sealants to dry completely between applications for maximum effectiveness.
Frequently Asked Questions
How long will a cardboard boat last?
The lifespan of a cardboard boat depends heavily on the quality of its construction and waterproofing. A well-built and thoroughly sealed boat can last for several hours in the water, sometimes even for multiple short voyages. Poorly sealed boats might only last minutes.
What kind of cardboard is best for boat building?
The best cardboard is thick, double-walled corrugated cardboard, often found in large appliance boxes. It offers superior rigidity and resistance to moisture compared to single-ply or thinner packaging cardboard. Ensure it’s clean and dry.
Can I use regular paint to waterproof my boat?
While some exterior paints offer a degree of water resistance, they are generally not sufficient for full waterproofing. For best results, use dedicated waterproof sealants like polyurethane, epoxy resin, or fiberglass resin. If using paint, apply many thick coats of a high-quality exterior-grade enamel, but consider a dedicated sealant underneath.
Is it safe to get into a cardboard boat?
It can be safe if the boat is properly designed, constructed, and waterproofed. Always test the boat in shallow, calm water first, and wear a life jacket. Ensure the boat’s internal supports are robust enough to handle your weight. Never attempt to use a cardboard boat in deep or turbulent water.
Our Top Recommended Finds
- Heavy-Duty Utility Knife: A good quality knife with easily replaceable blades ensures clean, precise cuts through thick cardboard without tearing.
- Construction Adhesive (e.g., Liquid Nails): This provides superior bonding and gap-filling capabilities compared to hot glue alone, creating strong, water-resistant seams.
- Exterior-Grade Polyurethane Sealant: An effective and relatively easy-to-apply option for waterproofing, offering excellent protection against water ingress.
Embark on Your Next Cardboard Adventure
You now have a complete roadmap for constructing your very own cardboard boat. This project is more than just building; it’s about learning, problem-solving, and celebrating a unique accomplishment. The satisfaction of seeing your creation float is truly unmatched.
Don’t let the details overwhelm you; break it down into manageable steps. Gather your materials, clear some space, and start bringing your cardboard boat to life today. Who knows what other incredible cardboard creations you might build next?
Beginner-friendly templates, step-by-step guides,
and weekly project ideas in your inbox.