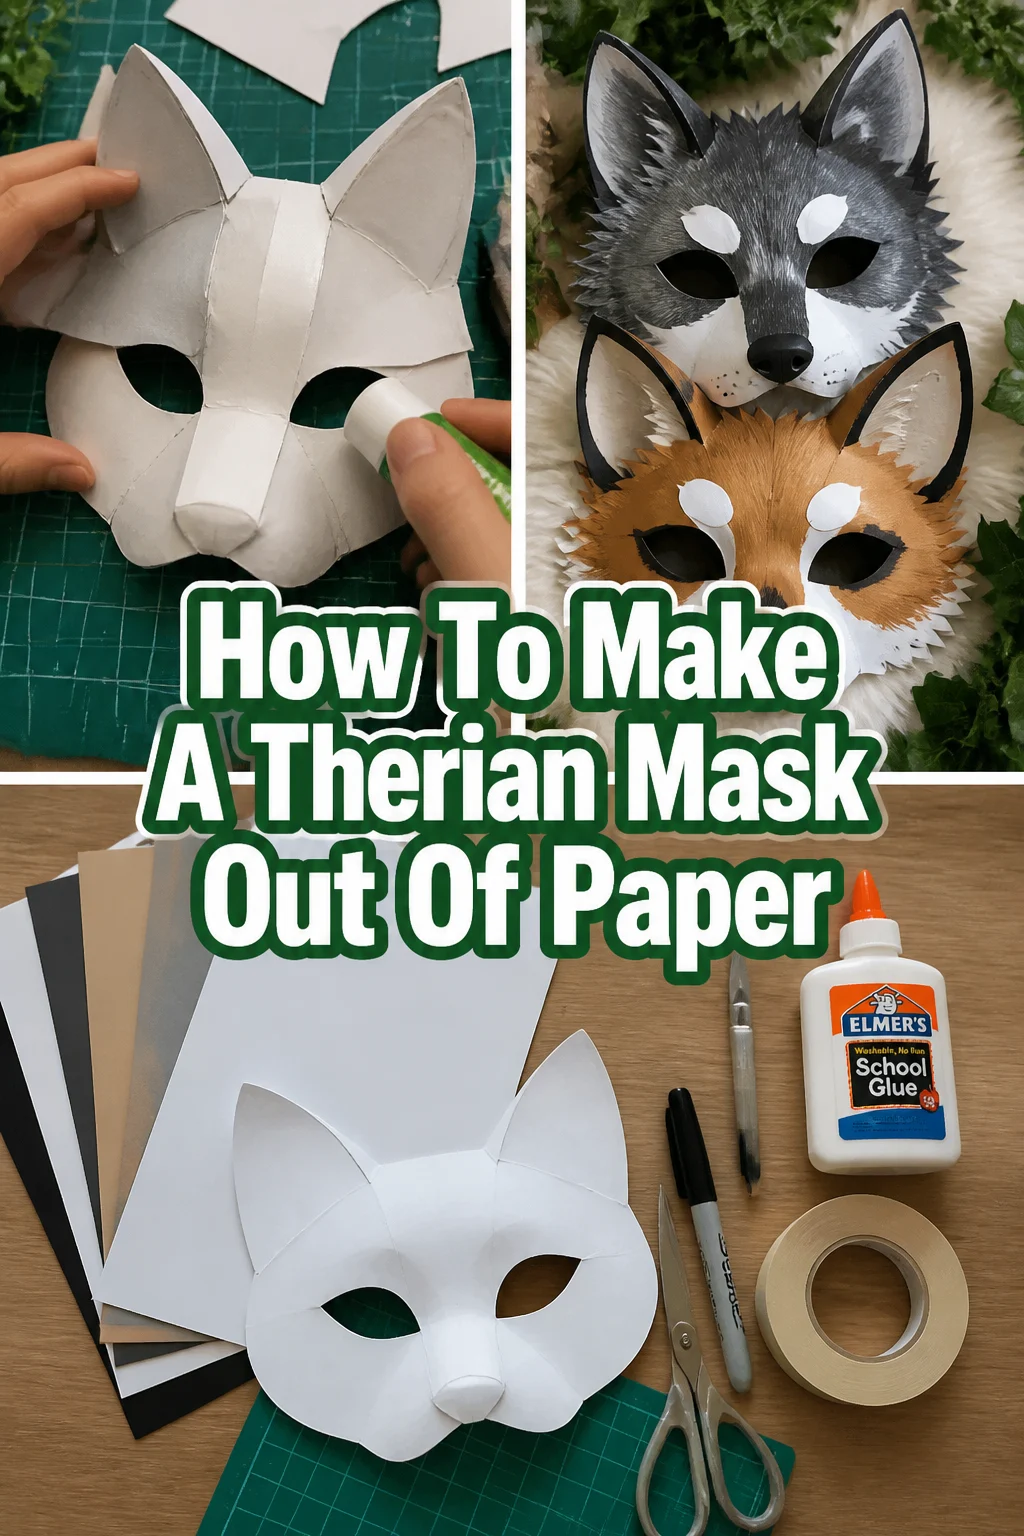
How To Make A Therian Mask Out Of Paper

Beginner-friendly templates, step-by-step guides,
and weekly project ideas in your inbox.
Creating a mask is a powerful way to express your internal identity and connect with your theriotype.
I have spent years refining paper-crafting techniques to ensure these masks are both durable and comfortable for long-term wear.
This guide provides a professional approach to building a high-quality paper mask that looks as realistic as a resin base.

Quick Overview
Before you start cutting and gluing, take a look at the project requirements to ensure you have enough time and space.
- Time needed: 4 to 6 hours (including drying time)
- Difficulty: Intermediate
- What you’ll need: Heavy cardstock (250gsm+), scissors, non-toxic glue, acrylic paint, elastic cord, and a craft knife.
Step-by-Step Instructions
Step 1: Select Your Base Material
Choose a heavy-duty cardstock or watercolor paper rather than standard printer paper.
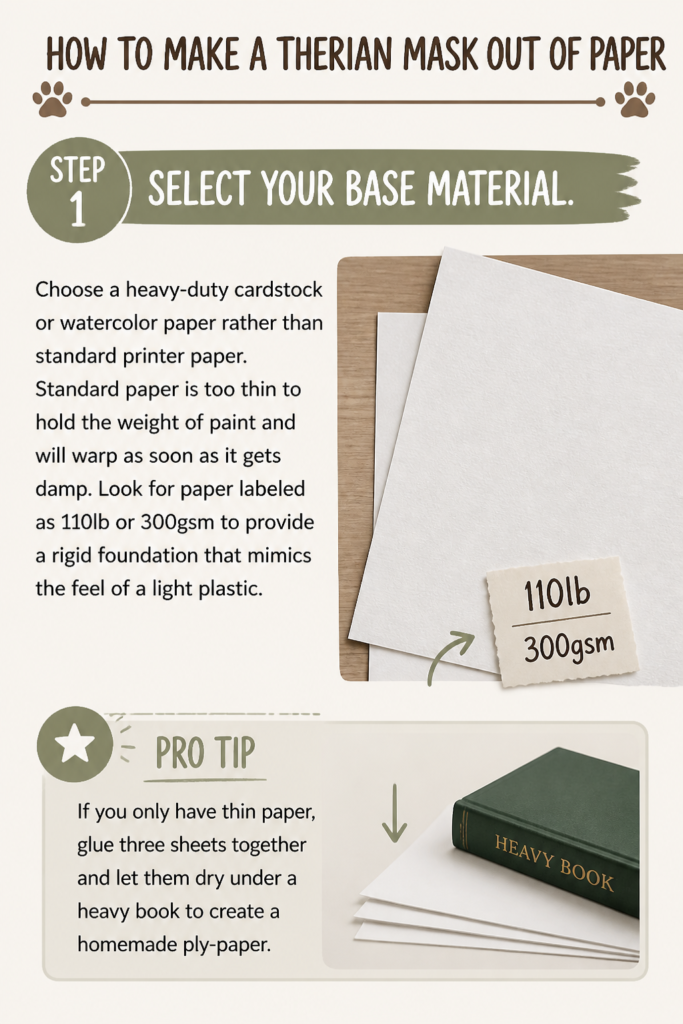
Standard paper is too thin to hold the weight of paint and will warp as soon as it gets damp.
Look for paper labeled as 110lb or 300gsm to provide a rigid foundation that mimics the feel of a light plastic.
Pro Tip: If you only have thin paper, glue three sheets together and let them dry under a heavy book to create a homemade “ply-paper.”
Step 2: Measure Your Face Dimensions
Measure the distance between your pupils using a soft measuring tape or a piece of string.
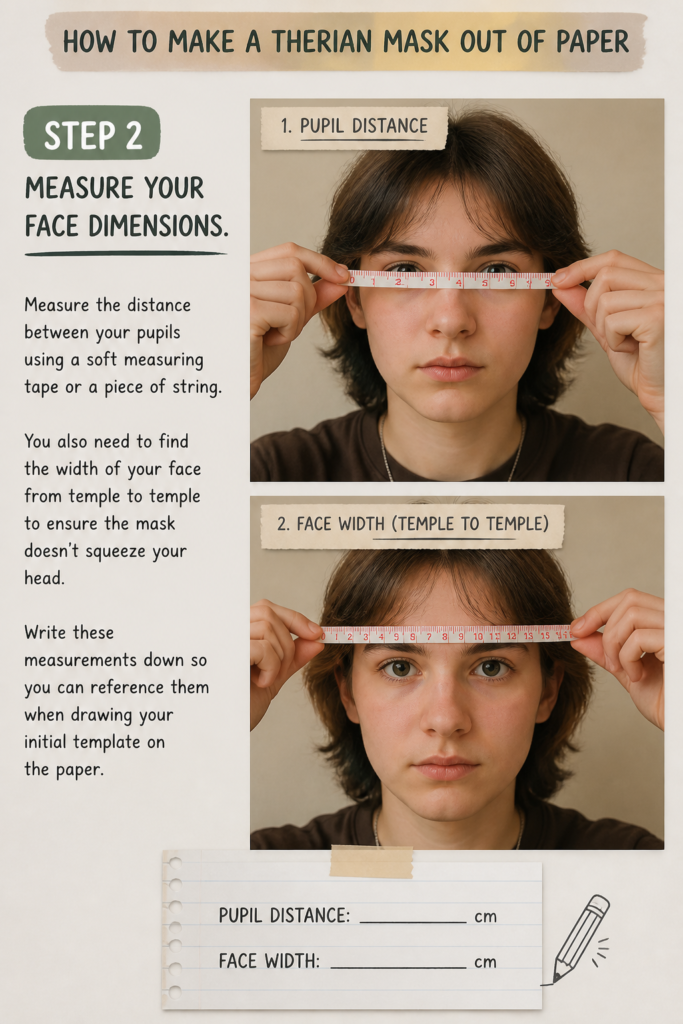
You also need to find the width of your face from temple to temple to ensure the mask doesn’t squeeze your head.
Write these measurements down so you can reference them when drawing your initial template on the paper.
Step 3: Sketch Your Animal Template
Draw the outline of your theriotype, focusing on the specific ear shape and jawline of the animal.
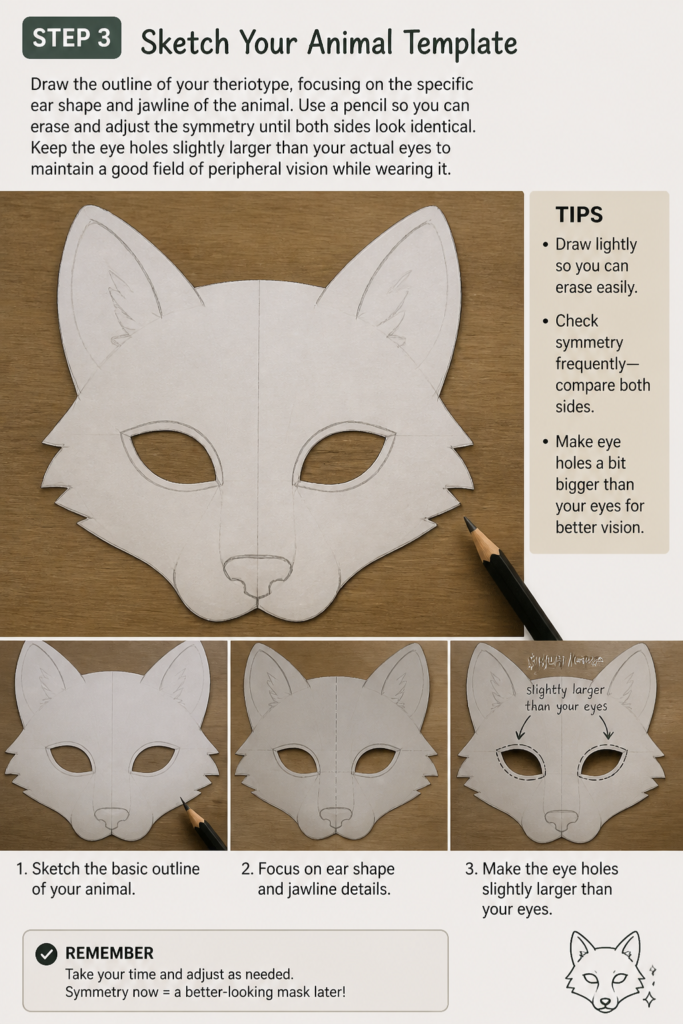
Use a pencil so you can erase and adjust the symmetry until both sides look identical.
Keep the eye holes slightly larger than your actual eyes to maintain a good field of peripheral vision while wearing it.
Step 4: Cut The Primary Base
Cut out the main silhouette of the mask using sharp scissors for the edges and a craft knife for the eye holes.
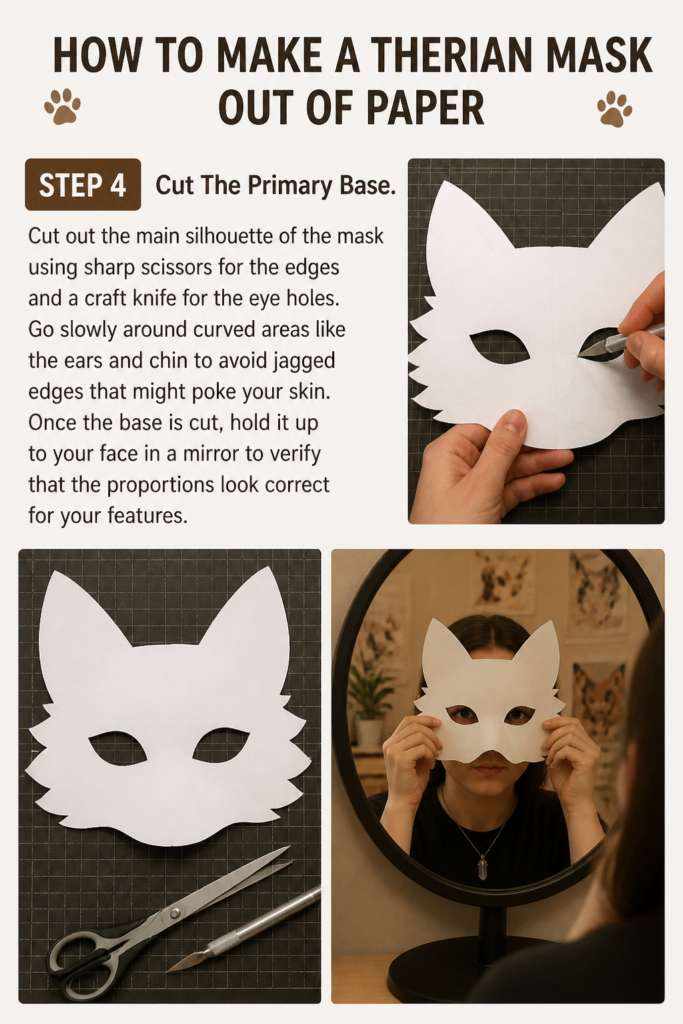
Go slowly around curved areas like the ears and chin to avoid jagged edges that might poke your skin.
Once the base is cut, hold it up to your face in a mirror to verify that the proportions look correct for your features.
Step 5: Create 3D Depth With Scoring
Score lines down the center of the nose and along the brow bone using the back of a craft knife.
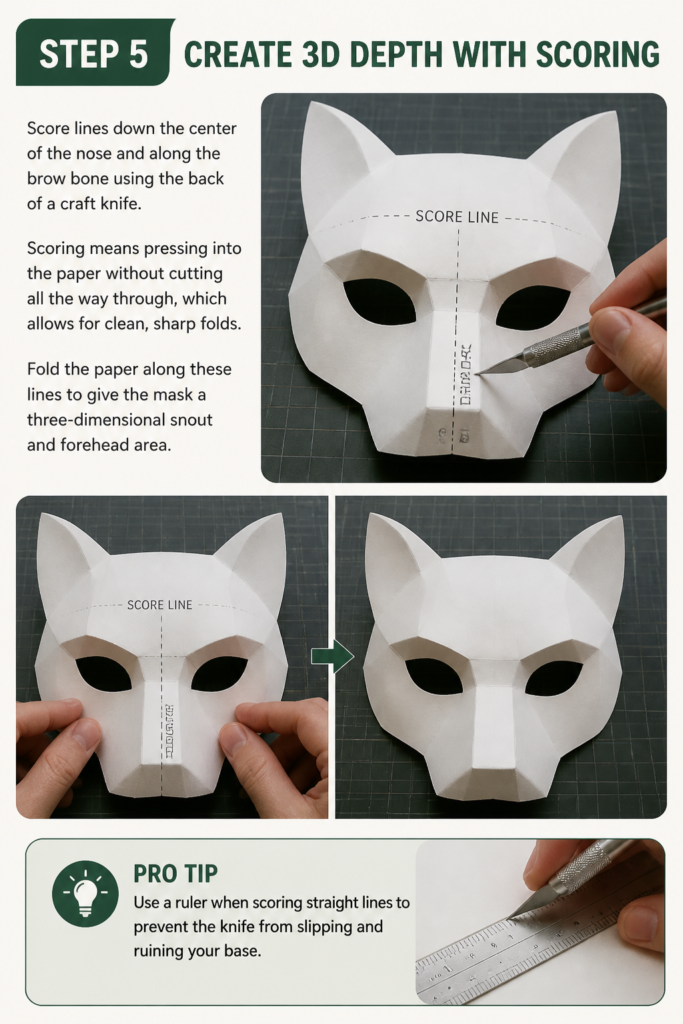
Scoring means pressing into the paper without cutting all the way through, which allows for clean, sharp folds.
Fold the paper along these lines to give the mask a three-dimensional snout and forehead area.
Pro Tip: Use a ruler when scoring straight lines to prevent the knife from slipping and ruining your base.
Step 6: Build The Muzzle Structure
Cut a separate triangular piece of cardstock to act as the bridge of the nose and the muzzle.
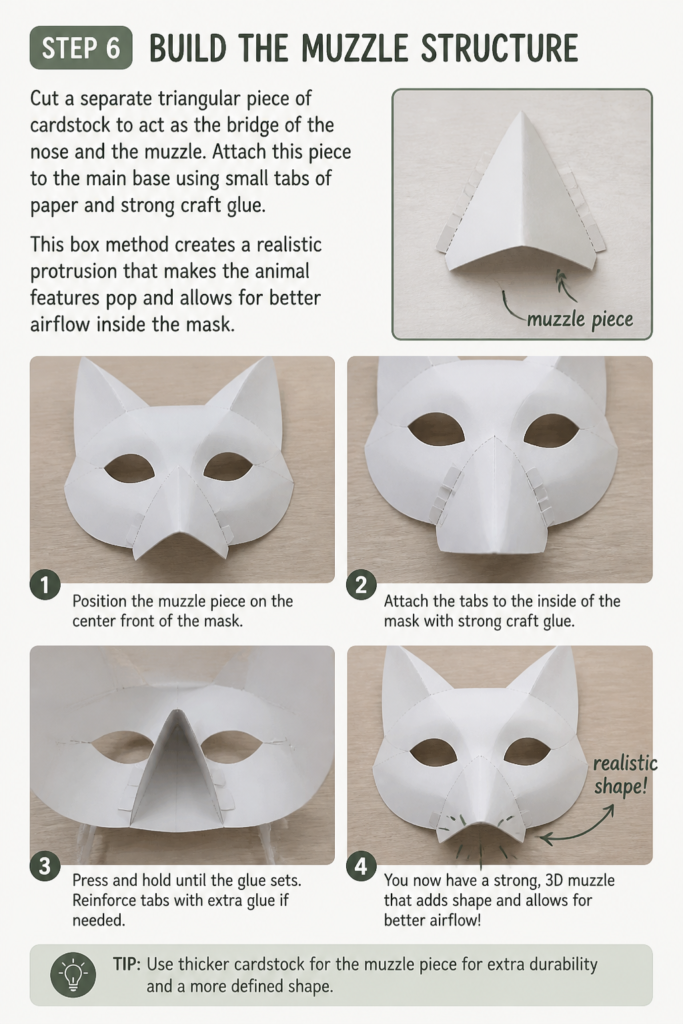
Attach this piece to the main base using small tabs of paper and strong craft glue.
This “box” method creates a realistic protrusion that makes the animal features pop and allows for better airflow inside the mask.
Step 7: Reinforce The Stress Points
Apply extra layers of paper strips to the back of the mask, specifically where the elastic straps will be attached.
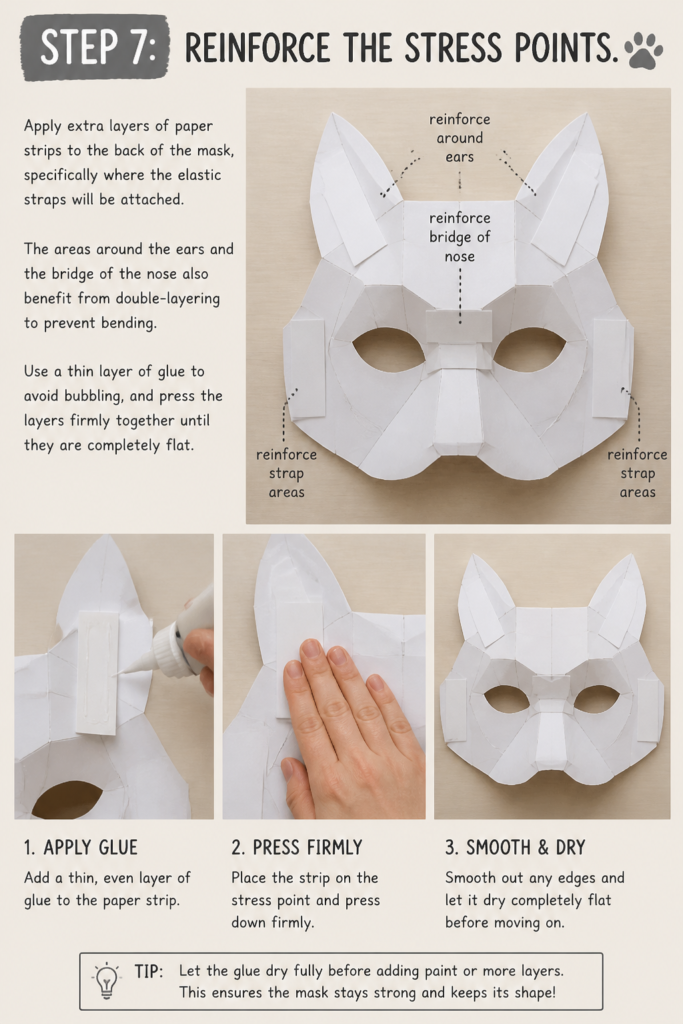
The areas around the ears and the bridge of the nose also benefit from double-layering to prevent bending.
Use a thin layer of glue to avoid bubbling, and press the layers firmly together until they are completely flat.
Step 8: Prime The Surface For Paint
Coat the entire mask in a layer of white gesso or a mixture of white glue and water.
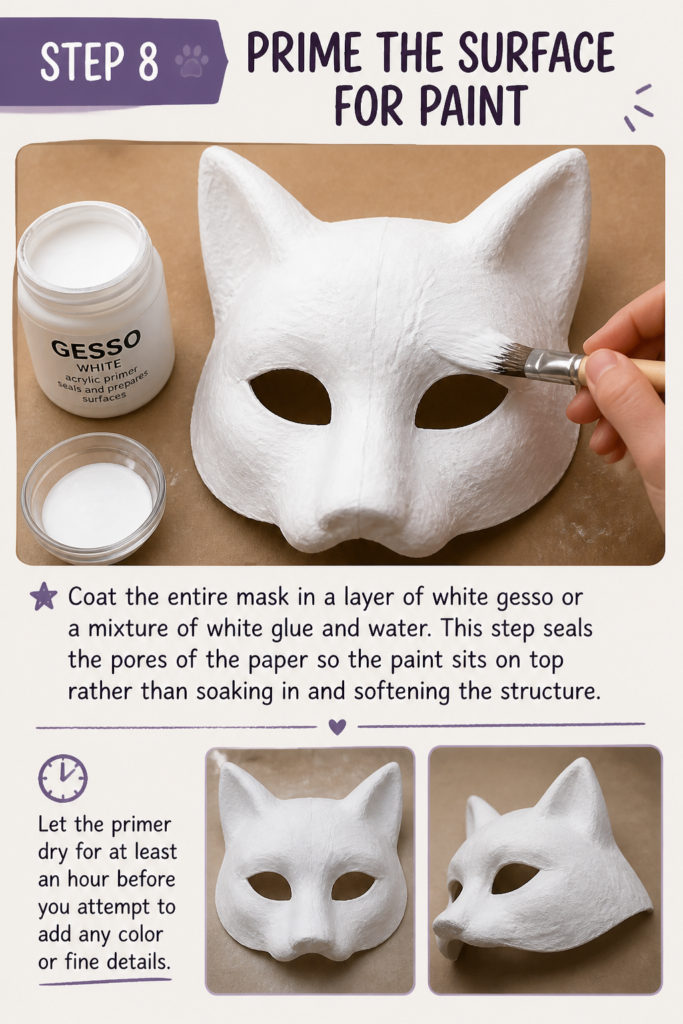
This step seals the pores of the paper so the paint sits on top rather than soaking in and softening the structure.
Let the primer dry for at least an hour before you attempt to add any color or fine details.
Step 9: Apply Base Colors And Texture
Paint the largest areas of color first, such as the main fur tone of your fox, wolf, or cat.
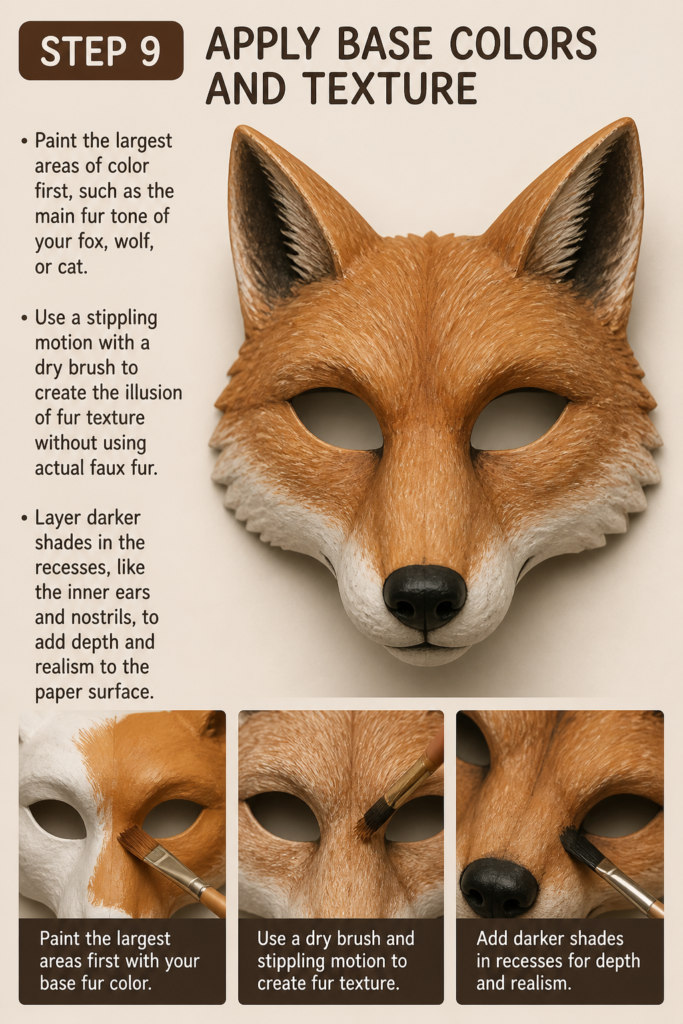
Use a “stippling” motion with a dry brush to create the illusion of fur texture without using actual faux fur.
Layer darker shades in the recesses, like the inner ears and nostrils, to add depth and realism to the paper surface.
Step 10: Install Vision Mesh And Straps
Glue a small piece of black mesh or buckram over the eye holes from the inside of the mask.
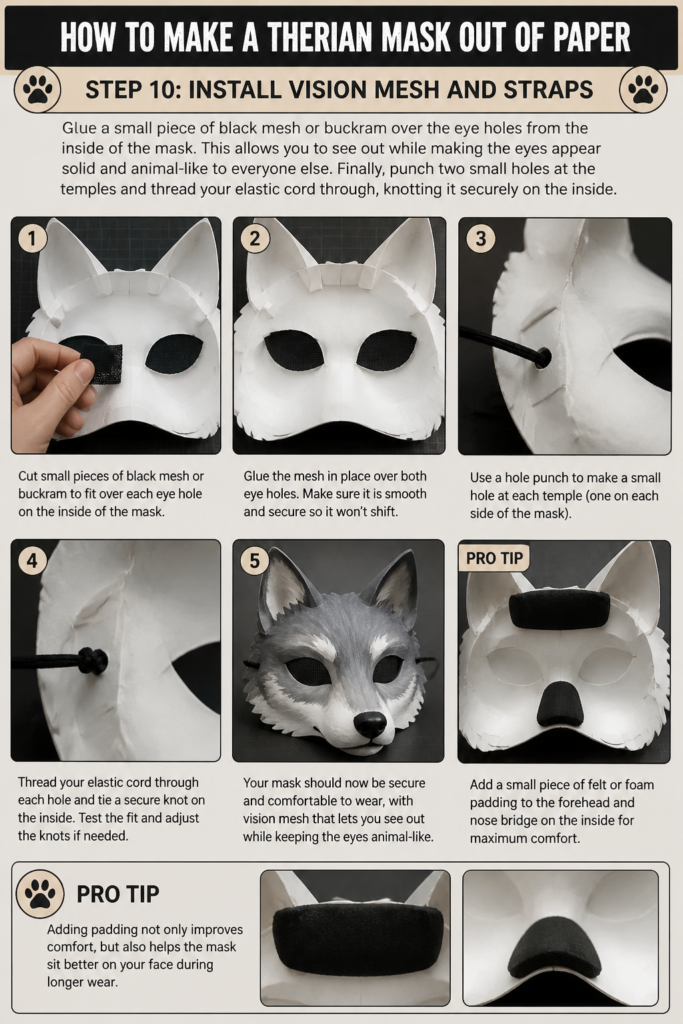
This allows you to see out while making the eyes appear solid and animal-like to everyone else.
Finally, punch two small holes at the temples and thread your elastic cord through, knotting it securely on the inside.
Pro Tip: Add a small piece of felt or foam padding to the forehead and nose bridge on the inside for maximum comfort.
Common Mistakes to Avoid
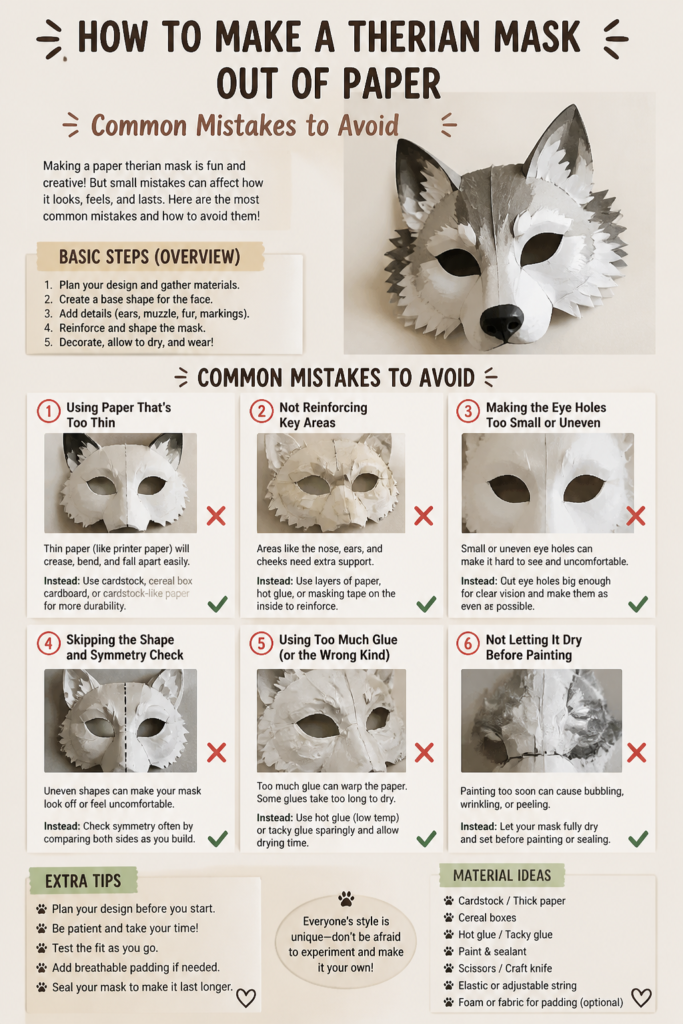
Using Hot Glue On Single Layers
Hot glue is very heavy and can cause thin paper to sag or warp under the heat and weight.
It also creates thick, lumpy seams that are difficult to hide with paint later on.
Stick to white craft glue or a glue stick for the main construction, and only use hot glue for attaching heavy accessories.
Ignoring The Grain Of The Paper
Paper has a grain, similar to wood, which makes it easier to fold in one direction than the other.
If you force a fold against the grain, the paper will crack and create a messy, jagged line.
Test a small scrap of your paper first to see which way it bends most naturally before you start your final mask.
Cutting Eye Holes Too Small
Many beginners make the eyes look “cute” by keeping the holes small, but this is dangerous for your vision.
Small holes limit your ability to see obstacles or people around you, especially in low light.
Always prioritize safety and visibility by making the openings large enough to see your entire surroundings.
Troubleshooting
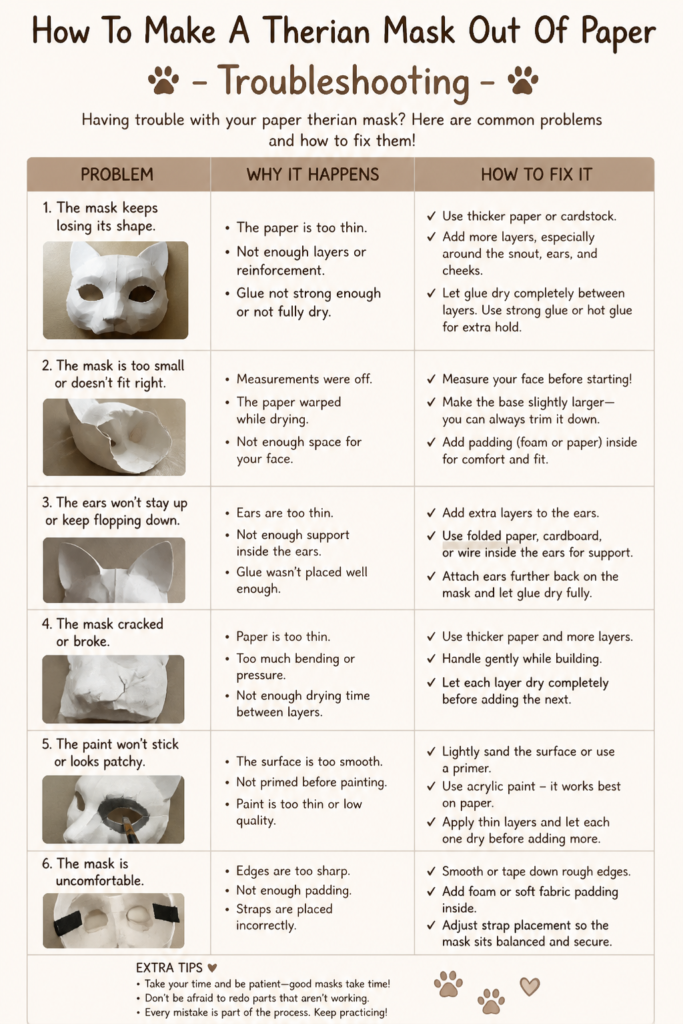
The Mask Is Too Floppy
If your mask feels weak after painting, it usually means the paper absorbed too much moisture.
You can fix this by gluing a “skeleton” of thin cardboard strips to the inside of the mask for support.
Alternatively, apply a final coat of clear acrylic sealer to the outside to stiffen the entire structure.
Paint Is Peeling Off The Paper
Peeling usually happens if the paper was too glossy or if you didn’t use a primer before painting.
Lightly sand the area with fine-grit sandpaper to create “teeth” for the paint to grab onto.
Re-apply your primer and then layer your paint in thin coats rather than one thick, heavy layer.
Key Takeaways
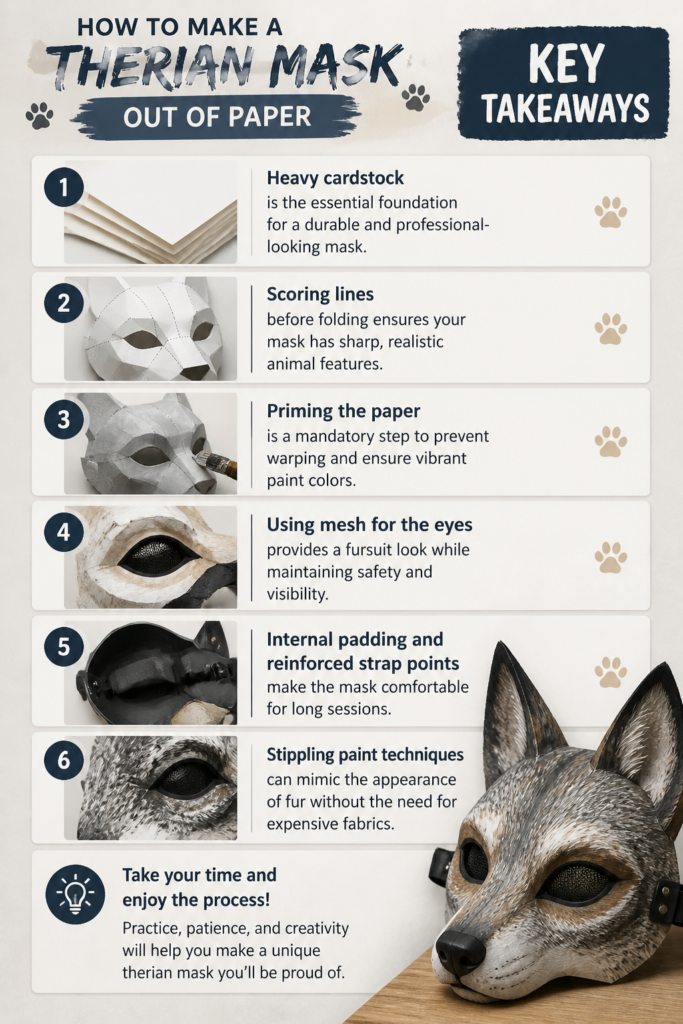
- Heavy cardstock is the essential foundation for a durable and professional-looking mask.
- Scoring lines before folding ensures your mask has sharp, realistic animal features.
- Priming the paper is a mandatory step to prevent warping and ensure vibrant paint colors.
- Using mesh for the eyes provides a “fursuit” look while maintaining safety and visibility.
- Internal padding and reinforced strap points make the mask comfortable for long sessions.
- Stippling paint techniques can mimic the appearance of fur without the need for expensive fabrics.
Frequently Asked Questions
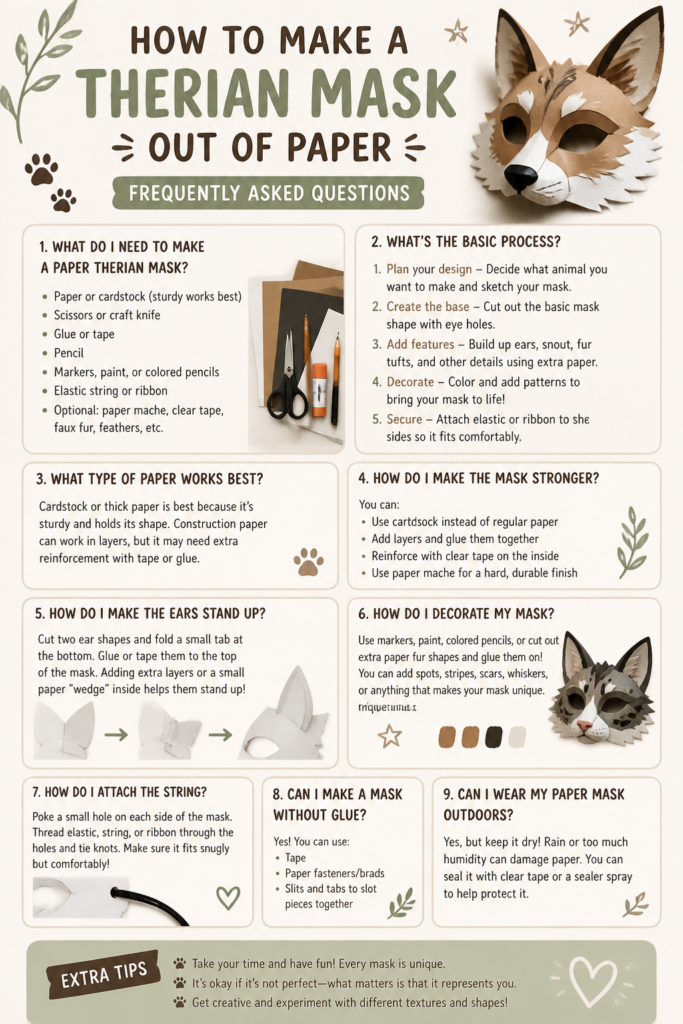
Can I use cardboard instead of cardstock?
Yes, you can use thin cardboard like cereal boxes, but it is much harder to get clean folds.
Cardboard also tends to show “corrugation” lines if you press too hard, which can ruin the smooth look of the animal’s face.
How do I make the mask waterproof?
You can make the mask water-resistant by applying several coats of clear spray sealant or Mod Podge.
However, since the base is paper, you should still avoid wearing it in heavy rain or submerging it in water.
What if I don’t have a craft knife?
You can use a pair of small embroidery scissors to cut the fine details like eye holes and nostrils.
Just be sure to poke a small hole in the center of the area first so you don’t crease the paper while trying to start the cut.
How do I make the ears stand up straight?
If the ears are drooping, glue a toothpick or a small piece of wire to the back of the ear as a “spine.”
Cover the wire with another layer of paper so it is hidden and doesn’t scratch your head.
Our Top Recommended Finds
- 300GSM Mixed Media Paper: This is the perfect weight for holding paint and maintaining a 3D shape without being too difficult to cut.
- Precision Craft Knife Set: Having various blade shapes allows you to cut intricate fur patterns and clean eye holes with ease.
- Matte Acrylic Varnish: A good sealer protects your paint job from sweat and handling while giving the mask a professional, non-plastic finish.
Taking Your Mask To The Next Level
Once you have mastered the basic paper structure, you can start experimenting with advanced textures.
Try adding individual paper “scales” for a dragon theriotype or using a sponge to create the mottled fur of a calico cat.
You might also consider looking into “quadrobics” to see how your mask holds up during movement.
The most important part of this process is that the mask feels right to you and reflects your unique identity.
Grab your scissors and start sketching your first template today.
Beginner-friendly templates, step-by-step guides,
and weekly project ideas in your inbox.